
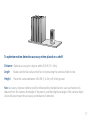
Lorex Smart Home
Security Center (LSHSC) &
Wire-Free Camera System
Quick Start Guide
HC64A Series
lorex.com
En
Start
here!

• Read this guide carefully and keep it for future reference.
• Follow all instructions for safe use and handling of the product.
• Use the camera within given temperature, humidity and voltage levels noted in the camera’s
specications.
• Do not disassemble the camera.
• Do not point the camera directly at the sun or a source of intense light.
• Do not place the camera near air conditioners and other air outlets.
• Periodic cleaning may be required. Use a damp cloth only. Do not use any harsh, chemical-based
cleaners.
• Refer to the battery safety rules insert.
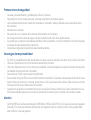
Safety precautions
• The LSHSC and extender are rated for indoor use only. Do not use outdoors.
• Only use the devices with the included power supply.
• Only use the devices with compatible memory. See the product support page for details on compatible
memory.
• The LSHSC is required to operate the extender.
• This camera includes an Auto Mechanical IR Cut Filter. When the camera changes between Day/Night
viewing modes, an audible clicking noise may be heard from the camera. This clicking is normal, and
indicates that the camera lter is working.
• Audio recording without consent is illegal in certain jurisdictions. Lorex Corporation assumes no liability
for use of its products that does not conform with local laws.
Disclaimers
Attention
A REGULATED UL / CSA APPROVED power supply is REQUIRED for use with this bundle (included).
Use of a non-regulated, non-conforming power supply can damage this product and voids the warranty.

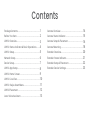
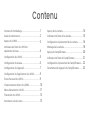
Contents
Package Contents..................................................1
Before You Start.................................................... 2
LSHSC Overview....................................................3
LSHSC Status Indicator & Basic Operations........4
LSHSC Setup..........................................................5
Network Setup.......................................................6
Device Setup..........................................................7
LSHSC App Setup..................................................8
LSHSC Home Screen.............................................9
LSHSC Live View....................................................10
LSHSC Swipe-down Menu....................................11
LSHSC Placement..................................................12
Lorex Voice Assistant............................................13
Camera Overview...................................................14
Camera Status Indicator....................................... 15
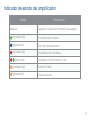
Extender Status Indicator......................................21
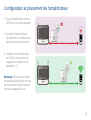
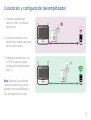
Extender Setup & Placement.................................22
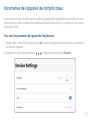
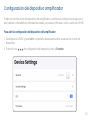
Extender Device Settings......................................23
Camera Setup & Placement..................................16
Camera Mounting..................................................18
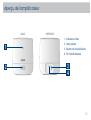
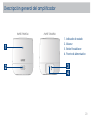
Extender Overview.................................................20

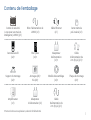
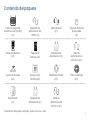
Power Adapter
(x1)
6.6ft (2m) Power
Cable (x1)
Extender
(x1)
*May include one or more, depending on the package purchased.
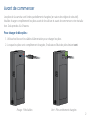
Package Contents
1
Lorex Smart Home
Security Center (LSHSC)
(x1)
LSHSC Power Adapter
(x1)
Ethernet Cable
(x1)
Pre-inserted
Memory Card
(x1)
Wire-Free Camera
(x2)* Battery Pack
(x2)*
Mounting Bracket
(x2)*
Anchors (x6)*
Screws (x6)*
6.6ft (2m) Power
Cable (x1)*
Power Adapter
(x1)*
Mounting Plate
(x2)*
Mounting Template
(x2)*

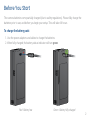
2
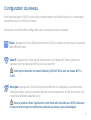
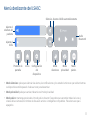
Before You Start
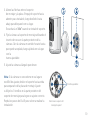
1. Use the power adapters and cables to charge the batteries.
2. When fully charged, the battery status indicator will turn green.
To charge the battery pack:
Green - Battery fully chargedRed - Battery low
The camera batteries come partially charged (due to safety regulations). Please fully charge the
batteries prior to use, and before you begin your setup. This will take 4-6 hours.

3
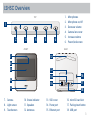
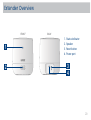
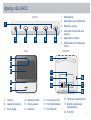
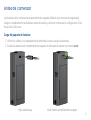
LSHSC Overview
FRONT BACK
TOP
1
1. Microphones
2. Microphone on/off
3. Decrease volume
4. Camera lens cover
5. Increase volume
6. Power/lock screen
7. Camera
8. Light sensor
9. Touchscreen
10. Status indicator
11. Speakers
12. Antennas
13. SSD cover
14. Power port
15. Ethernet port
16. microSD card slot
17. Pairing/reset button
18. USB port
23456
7
8
9
10
11
14
15
12
13
16
17
18

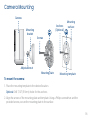
Touchscreen Gestures
From the left edge, swipe right
for the previous screen
From the bottom edge,
swipe up for the home screen
From the top edge, swipe
down for the drop-down menu
4
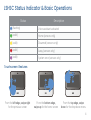
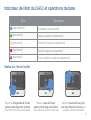
LSHSC Status Indicator & Basic Operations
Status Description
(flashing) Voice assistant activated
(solid) Home (sensors only)
(solid) Disarmed (sensors only)
(solid) Away (sensors only)
(solid) System error (sensors only)

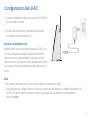
1. Using the provided LSHSC power adapter, connect to
a power outlet.
2. Follow the on-screen instructions to complete
the device setup.
Optional: Face Unlock
Enable this feature to unlock the LSHSC with your face.
Make sure the built-in camera's lens cover is opened
and that nothing is covering your face. Position your
face directly in front of the camera with a reasonable
amount of light on your face.
5
LSHSC Setup
Note:
• Three faces can be stored for the Face Unlock feature.
• If you forget both your passcode and device password, you will need to reset the LSHSC.
Press down on the reset button until a warning pop-up appears. Select Yes.

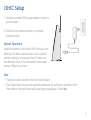
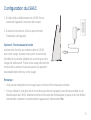
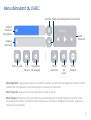
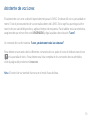
Central placement of the LSHSC is important for the Lorex devices to communicate directly with the
LSHSC and the router.
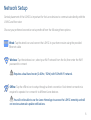
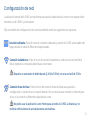
Choose your preferred connection set up method from the following three options:
Wired: Tap the wired icon and connect the LSHSC to your home router using the provided
Ethernet cable.
Wireless: Tap the wireless icon, select your Wi-Fi network from the list, then enter the Wi-Fi
password to connect.
Requires a dual-band router (2.4GHz / 5GHz) with 5GHz Wi-Fi network.
6
Network Setup
Oine: Tap the offline icon to setup through a direct connection. No Internet connection is
required to operate it or connect it to different Lorex devices.
You will not be able to use the Lorex Home App to access the LSHSC remotely and will
not receive automatic update notications.

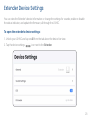
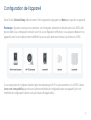
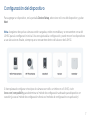
To add a device, at the Device Setup screen, select the device icon and tap Next.
Note: Ensure your cameras are charged, powered on and located near the LSHSC for initial setup.
Once set up, you can move your devices to their nal locations as long as they are within range of the
LSHSC.
7
Device Setup
If you plan to set up other types of Wi-Fi cameras and/or a doorbell on the LSHSC, visit
lorex.com/compatibility to determine the right setup method for that device (either direct setup method
or app setup method).

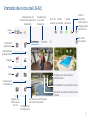
Playback
recordings
8
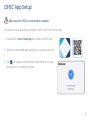
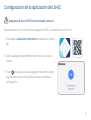
LSHSC App Setup
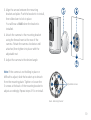
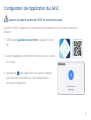
1. Download the Lorex Home app by scanning the QR code.
2. Open the Lorex Home app, and sign in or create an account.
3. Tap + in the app to add the device, then follow the in-app
instructions to complete the setup.
For remote access and viewing, add the LSHSC to the Lorex Home App.
Make sure the LSHSC is connected to a network.

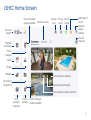
Time and
weather
Device rmware
update available
LSHSC rmware
update available
Playback
recordings
Device
manager
Events
Photos
Device
settings
Recordings
/snapshots
Weather
Voice
prompts
examples
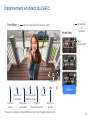
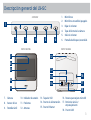
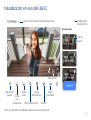
Camera/device settings
Camera battery status indicator
Camera signal strength
Device live view Network
signal/
settings
View all
channels
Notications
on/off
System
error
Sensor
status
Privacy
mode
9
LSHSC Home Screen
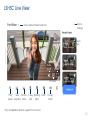
8

Device
settings
Event
type
Play/
pause
Take
snapshot
Device name/channel selection
Record
video
2-way
talk
Warning
light*
Audio
on/off
Full
screen
Siren* Privacy
mode
HD video
*Only compatible cameras support this function.
10
LSHSC Live View

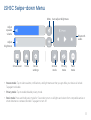
LSHSC Swipe-down Menu
Adjust
speaker
volume
• Snooze mode: Tap to silence alerts, notications, and light statuses that you get while your device is locked.
Tap again to disable.
• Privacy mode: Tap to enable/disable privacy mode.
• Panic mode: Press and hold panic mode for 5 seconds to turn on all lights and sirens from compatible active or
smart deterrence cameras/doorbell. Tap again to turn off.
Adjust
brightness
Home
Screensaver Device
settings
Mute
Snooze
mode
Privacy
mode
Panic
mode
Bluetooth
audio
Auto adjust brightness
1110

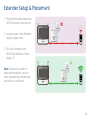
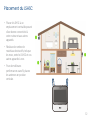
• Place the LSHSC in a central
location with good connectivity
to your router and other
devices.
• Reduce the number of
obstructive materials, such as
walls, between the LSHSC and
your other Lorex devices.
• For better wireless performance
move the antennas in the
upright position.
12
LSHSC Placement

12
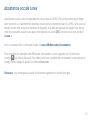
Lorex Voice Assistant
The Lorex voice assistant is a specially designed voice assistant for the LSHSC. It was developed
with your privacy in mind. All voice processing is done inside the LSHSC. This means that no voice
information leaves the device and makes response time quick. To enable this feature make sure that
the microphone is turned ON and say the wake up word “Lorex”.
A sample voice command: “Lorex, show me all cameras!”
For a sampling of the different voice commands, tap on the Voice Prompts icon on the home
screen. For a full list of supported voice commands, visit the product page at lorex.com.
Note: Voice control also works in offline mode.
13

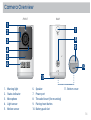
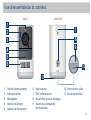
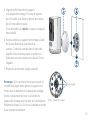
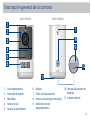
1. Warning light
2. Status indicator
3. Microphone
4. Light sensor
5. Motion sensor
1
2
3
4
6
5
FRONT BACK
9
8
7
6. Speaker
7. Power port
8. Threaded insert (for mounting)
9. Pairing/reset button
10. Battery pack slot
11. Bottom cover
14
Camera Overview
10
11

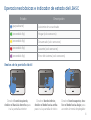
15
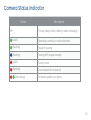
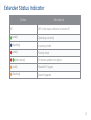
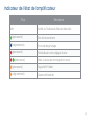
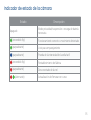
Camera Status Indicator
Status Description
Off Privacy/sleep mode or battery needs recharging
(solid) Operating correctly or motion detected
(flashing) Ready for pairing
(flashing) Testing Wi-Fi signal strength
(solid) Factory reset
(flashing) Disconnected from network
(alternating) Firmware update in progress
11. Bottom cover
14

16
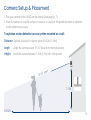
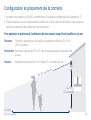
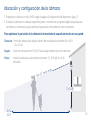
1. Pair your camera to the LSHSC per the Device Setup page (p. 7).
2. Place the camera on any flat surface or mount it to a wall per the guidelines below to optimize
motion detection accuracy.
Distance Optimal accuracy for objects within 6.5-32ft (2~10m).
Angle Angle the camera around 15°-30° down from the level position.
Height Install the camera between 7-10ft (2~3m) off of the ground.
To optimize motion detection accuracy when mounted on a wall:
Camera Setup & Placement
7-10ft
15-30° down
6.5-32ft

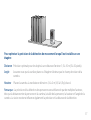
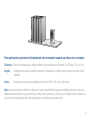
Distance Optimal accuracy for objects within 5-32ft (1.5~10m).
Angle Make sure the flat surface/shelf is not obstructing the camera’s eld of view.
Height Place the camera between 4.5-6.5ft (1.4~2m) off of the ground.
Note: Accuracy of person detection will be influenced by multiple factors, such as the person’s
distance from the camera, the height of the person, and the height and angle of the camera. Night
vision will also impact the accuracy and distance of detection.
To optimize motion detection accuracy when placed on a shelf:
1716
La page est en cours de chargement...
La page est en cours de chargement...
La page est en cours de chargement...
La page est en cours de chargement...
La page est en cours de chargement...
La page est en cours de chargement...
La page est en cours de chargement...
La page est en cours de chargement...
La page est en cours de chargement...
La page est en cours de chargement...
La page est en cours de chargement...
La page est en cours de chargement...
La page est en cours de chargement...
La page est en cours de chargement...
La page est en cours de chargement...
La page est en cours de chargement...
La page est en cours de chargement...
La page est en cours de chargement...
La page est en cours de chargement...
La page est en cours de chargement...
La page est en cours de chargement...
La page est en cours de chargement...
La page est en cours de chargement...
La page est en cours de chargement...
La page est en cours de chargement...
La page est en cours de chargement...
La page est en cours de chargement...
La page est en cours de chargement...
La page est en cours de chargement...
La page est en cours de chargement...
La page est en cours de chargement...
La page est en cours de chargement...
La page est en cours de chargement...
La page est en cours de chargement...
La page est en cours de chargement...
La page est en cours de chargement...
La page est en cours de chargement...
La page est en cours de chargement...
La page est en cours de chargement...
La page est en cours de chargement...
La page est en cours de chargement...
La page est en cours de chargement...
La page est en cours de chargement...
La page est en cours de chargement...
La page est en cours de chargement...
La page est en cours de chargement...
La page est en cours de chargement...
La page est en cours de chargement...
La page est en cours de chargement...
La page est en cours de chargement...
La page est en cours de chargement...
La page est en cours de chargement...
La page est en cours de chargement...
La page est en cours de chargement...
La page est en cours de chargement...
La page est en cours de chargement...
La page est en cours de chargement...
La page est en cours de chargement...
La page est en cours de chargement...
La page est en cours de chargement...
La page est en cours de chargement...
La page est en cours de chargement...
-
 1
1
-
 2
2
-
 3
3
-
 4
4
-
 5
5
-
 6
6
-
 7
7
-
 8
8
-
 9
9
-
 10
10
-
 11
11
-
 12
12
-
 13
13
-
 14
14
-
 15
15
-
 16
16
-
 17
17
-
 18
18
-
 19
19
-
 20
20
-
 21
21
-
 22
22
-
 23
23
-
 24
24
-
 25
25
-
 26
26
-
 27
27
-
 28
28
-
 29
29
-
 30
30
-
 31
31
-
 32
32
-
 33
33
-
 34
34
-
 35
35
-
 36
36
-
 37
37
-
 38
38
-
 39
39
-
 40
40
-
 41
41
-
 42
42
-
 43
43
-
 44
44
-
 45
45
-
 46
46
-
 47
47
-
 48
48
-
 49
49
-
 50
50
-
 51
51
-
 52
52
-
 53
53
-
 54
54
-
 55
55
-
 56
56
-
 57
57
-
 58
58
-
 59
59
-
 60
60
-
 61
61
-
 62
62
-
 63
63
-
 64
64
-
 65
65
-
 66
66
-
 67
67
-
 68
68
-
 69
69
-
 70
70
-
 71
71
-
 72
72
-
 73
73
-
 74
74
-
 75
75
-
 76
76
-
 77
77
-
 78
78
-
 79
79
-
 80
80
-
 81
81
-
 82
82


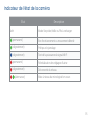
dans d''autres langues
- English: Lorex HC64A User guide
- español: Lorex HC64A Guía del usuario
Documents connexes
-
Lorex F461AQ Manuel utilisateur
-
Lorex H32A3TU Mode d'emploi
-
Lorex U424AA Series Mode d'emploi
-
Lorex B463AJ Manuel utilisateur
-
Lorex N4K2-84WB-DSC Mode d'emploi
-
Lorex N4K2-84WB-DSC Manuel utilisateur
-
Lorex F462AQ Series Manuel utilisateur
-
Lorex ACCHM2 Series Manuel utilisateur
-
Lorex E910AB Mode d'emploi
-
Lorex LRXH871T6A2E Mode d'emploi