Pleasant Hearth 25-720-15 Mode d'emploi
- Catégorie
- Cheminées
- Taper
- Mode d'emploi

1
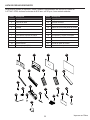
MODEL # 25-720-15 / 25-720-204
ATTACH YOUR RECEIPT HERE
Serial Number ________________________________ Purchase Date _________________________________
180717
Questions, problems, missing parts?
Before returning to your retailer, call our customer service department at 1-877-447-4768,
8:30 a.m. – 4:30 p.m. CST, Monday – Friday.
Español p. 17
COMPACT MOBILE FIREPLACE
C US
INSTALLER: Leave this manual with the appliance.
CONSUMER: Retain this manual for future reference.
WARNING!
IF THE INFORMATION IN THIS MANUAL IS NOT FOLLOWED EXACTLY,
AN ELECTRICAL SHOCK OR FIRE MAY RESULT
CAUSING PROPERTY DAMAGE, PERSONAL INJURY OR LOSS OF LIFE.
IMPORTANT INSTRUCTIONS
PLEASE READ THIS MANUAL BEFORE INSTALLING AND USING APPLIANCE
Français p. 33

2
IMPORTANT: Read all instructions and warnings carefully before starting installation.
Failure to follow these instructions may result in a possible electric shock, injury to
persons, re hazard and will void the warranty.
Please read the Installation & Operating Instructions before using this appliance.
TABLE OF CONTENTS
Safety Information ............................................................................................................................ 3
Package Contents ............................................................................................................................ 5
Hardware Contents .......................................................................................................................... 5
Fireplace Dimensions ...................................................................................................................... 6
Safety Information ........................................................................................................................... 7
Preparation ...................................................................................................................................... 7
Assembly Instructions ...................................................................................................................... 7
Operating Instructions ...................................................................................................................... 9
Care and Maintenance ................................................................................................................... 11
Electric Wiring Diagram .................................................................................................................. 12
Troubleshooting .............................................................................................................................. 13
Warranty ......................................................................................................................................... 14
Replacement Parts ......................................................................................................................... 15
PRODUCT DAMAGE MAY OCCUR.
Never attempt to disassemble or alter the product in any way not instructed by this manual.
This Product can expose you to chemicals including Formaldehyde which is known to the State
of California to cause cancer and Benzene which is known to the State of California to cause
developmental harm.
For more information go to www.p65Warnings.ca.gov
CAUTION
WARNING

3
Please read and understand this entire manual before attempting to assemble, operate or install the product.
1. Read all instructions before using this appliance.
2. This appliance is hot when in use. To avoid burns, do not let bare skin touch hot surfaces.
If provided, use handles when moving this appliance. Keep combustible materials, such as
furniture, pillows, bedding, papers, clothes and curtains at least 3 ft. (914 mm) from the front
of this appliance and keep them away from the sides and rear.
3. CAUTION: Extreme caution is necessary when any heater is used by or near
children or invalids and whenever the heater is left operating unattended.
4. If possible always unplug this appliance when not in use.
5. Do not operate any heater with a damaged cord or plug or after the appliance malfunctions,
has been dropped or damaged in any manner.
6. Anyrepairstothisapplianceshouldbecarriedoutbyaqualiedserviceperson.
7. Undernocircumstancesshouldthisappliancebemodied.Partshavingtoberemovedfor
servicing must be replaced prior to operating this appliance again.
8. Do not use outdoors.
9. This heater is not intended for use in bathrooms, laundry areas and similar indoor locations.
Never place this appliance where it may fall into a bathtub or other water container.
10. Do not use this heater in elevated locations, such as on shelves, raised platforms, etc.
11. Do not run cord under carpeting. Do not cover cord with throw rugs, runners or the like.
Arrangecordawayfromtrafcareasandwhereitwillnotbetrippedover.
12. To disconnect this appliance, turn controls to the off position, then remove plug from outlet.
13. Connect to properly grounded outlets only.
14. This appliance, when installed, must be electrically grounded in accordance with local codes,
with the current CSA C22.1 Canadian Electrical codes or for USA installations, follow local
codes and the National Electric Code, ANSI/NFPA No. 70.
15. Do not insert or allow foreign objects to enter any ventilation or exhaust opening as this may
causeanelectricshock,reordamagetotheappliance.
16. Topreventpossiblere,donotblockairintakesorexhaustinanymanner.Donotuseonsoft
surfaces, like a bed, where openings may become blocked.
17. This appliance has hot and arcing or sparking parts inside. Do not use it in areas where
gasoline,paintorammableliquidsareusedorstored.Thisapplianceshouldnotbeusedas
a drying rack for clothing, nor should Christmas stockings or decorations be hung on or near it.
18. Use this appliance only as described in this manual. Any other use not recommended by the
manufacturermaycausere,electricshockorinjurytopersons.
19. Always plug heaters directly into a wall outlet/receptacle. Never use with an extension cord or
relocatable power tap (outlet/power strip) because of the risk of overheating the cord and the
riskofre.Extensioncordsarefortemporaryuseonly.Ifanextensioncordmustbeused,it
mustbeUL/CSAcertied,ratedat15A(1,875W),125Vmaximumwith14AWGminimumand
constructed of two current carrying conductors with ground. A heavy duty extension cord with
the shortest length possible for the connection is recommended and must not be longer than 50
ft. (15.2 m). Do not coil or cover the extension cord.
20. Do not use this heater with missing, damaged, or broken wheels.
21."SAVETHESEINSTRUCTIONS"
SAFETY INFORMATION SAVE THESE INSTRUCTIONS

4
SAFETY INFORMATION
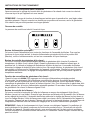
Electrical Connection
Grounding Instructions
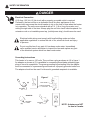
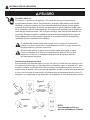
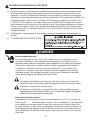
Thisheaterisforuseon120volts.Thecordhasaplugasshownat(A)ingure1.
An adapter as shown at (C) is available for connecting three-blade grounding-type
plugs to two-slot receptacles. The green grounding lug extending from the adapter
must be connected to a permanent ground such as a properly grounded outlet box.
The adapter should not be used if a three-slot grounded receptacle is available.
NOTE: Adapters are NOT
for use in Canada.
DANGER
A15Amp,120Volt,60Hzcircuitwithaproperlygroundedoutletisrequired.
Preferably, the item will be on a dedicated circuit as other appliances on the
same circuit may cause the circuit breaker to trip or the fuse to blow when the heater
is in operation. The unit comes standard with a 6 ft. (1.8 m) long, three-wire cord,
exiting the right side of the item. Always plug the unit into a wall outlet/receptacle. An
extension cord or re-locatable power tap, (outlet/power strip), should never be used.
Electrical outlet wiring must comply with local building codes and other
applicableregulationstoreducetheriskofre,electricalshockandinjury
to persons.
Do not use this item if any part of it has been under water. Immediately
callaqualiedservicetechniciantoinspecttheitemandreplaceanypart
of the electrical system which has been under water.
Figure 1
GROUNDING
PIN
METAL SCREW
GROUNDING
MEANS
COVER OF GROUNDED
OUTLET BOX
ADAPTER
GROUNDING
PIN
(A)
(B)
(D)
(C)
1

5
SAFETY INFORMATION
REMOTE CONTROL
This Class (B) device complies with Part 15 of the FCC Rules and Canadian ICES-003.
Operation is subject to the following two conditions:
(1) This device may not cause harmful interference, and (2) this device must accept any
interference received, including interference that may cause undesired operation. There
is no guarantee that interference will not occur in a particular installation. If this equipment
does cause harmful interference to radio or television reception, which can be determined by
turning the equipment o and on, the user is encouraged to try to correct the interference by
one or more of the following measures:
• Reorient or relocate the receiving antenna.
• Increase the separation between the equipment and receiver.
• Connect the equipment into an outlet on a circuit different from that to which the receiver is
connected.
•Consultthedealeroranexperiencedradio/TVtechnicianforhelp.
This remote control requires 1 Lithium Coin Cell Battery (size CR2025), which is included.
CAUTION:Changesormodicationtothisunitnotexpresslyapprovedbytheparty
responsibleforcompliancecouldvoidtheuser’sauthoritytooperatetheequipment.
WARNING
DO NOT mix old and new batteries.
DO NOT use rechargeable silver oxide cell batteries with remote control unit.
DO NOT mix alkaline, standard (Carbon-Zinc), or rechargeable (Nickel-Cadmium) batteries.
DONOTdisposeofbatteriesinre.Improperdisposalmaycausebatteriestoleakorexplode.

6
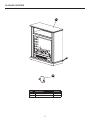
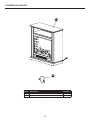
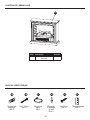
PACKAGE CONTENTS
A
AA
Part Description Quantity
A Mantel (with replace insert) 1
AA Anti-Tip Device 1

7
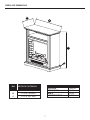
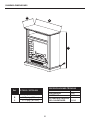
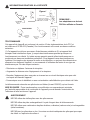
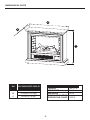
FIREPLACE DIMENSIONS
TECHNICAL SPECIFICATIONS
VOLTAGE 120V AC
FREQUENCY 60HZ
AMPS 12.5A
HEATER RATING 1350W
Ref. 25-720-15 / 25-720-204
A 30 in. (762 mm)
B 11.75 in. (300 mm)
C 31.75 in. (807 mm)
A
B
C

8
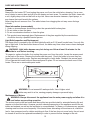
CLEARANCE TO COMBUSTIBLES
Sides 2 27/64 (61.5 mm)
Floor 0 in. (0 mm)
Top 20 in. (51 mm)
Front 36 in. (914 mm)
Rear 0 in. (0 mm)
Warning: Do not install unit on shelves, raised platforms, beds, blankets, pillows etc.
Keep combustible materials such as furniture, bedding, papers, clothes and curtains at least
3 feet (914 mm) from the stove.
Please read and understand this entire manual before attempting to assemble, operate or install the
product. If you have any questions regarding the product, please call customer service at
1-877-447-4768, 8:30 a.m. - 4:30 p.m., CST, Monday - Friday.
Before beginning assembly of product, make sure all parts are present. Compare parts with package
contents list and hardware contents above. If any part is missing or damaged, do not attempt to as-
semble the product. Contact customer service for replacement parts.
Estimated Assembly Time: 20 minutes
Tools Required for Assembly (not included): Phillips screwdriver
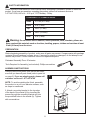
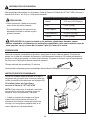
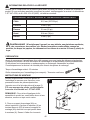
PREPARATION
ASSEMBLY INSTRUCTIONS
Carefully remove all pieces from carton and make
sure that you have all parts listed (refer to parts list
on page 6). If you are missing parts, please call
customer service at 1-877-447-4768
NOTE: To avoid scratching the nish, assemble
the product on a soft, non-abrasive surface, such
as carpet or cardboard.
SAFETY INFORMATION
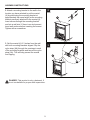
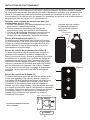
1. Attach a mounting bracket to the top edge
of the back of the mantel (A) by inserting two
screws through the mounting bracket and into
the pre-drilled holes in the mantel (A). Tighten
with a screwdriver.
1
1
A

9
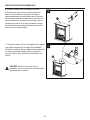
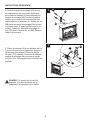
2. Attach a mounting bracket to the wall in the
location you have selected to put the mantel
(A) by positioning the mounting bracket at
approximately the same height as the mounting
bracket previously attached to the mantel (A).
Insert screws through the mounting bracket
and into a wall stud. If there is no stud present,
insert wall anchors before inserting the screws.
Tighten with a screwdriver.
3. Set the mantel (A) 2-3 inches from the wall
with both mounting brackets aligned. Slip the
nylon strap (AA) through the openings in each
of the mounting brackets and secure the nylon
strap (AA). This will help prevent the mantel
from tipping.
ASSEMBLY INSTRUCTIONS
DANGER: This product is only a deterrent. It
is not a substitute for proper adult supervision.
2
A
3
AA
A

10
OPERATING INSTRUCTIONS
Read All Instructions Before Use
Check that the heater outlet grill is not covered or obstructed in anyway, and make sure the power to
the unit is switched on.
NOTE:Whentheheatfunctionisusedforthersttime,aslightodormaybepresent.Thisisnormal
and should not occur again unless the heater is not used for an extended period of time.
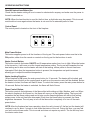
Control Panel
Thecontrolpanelislocatedonthefrontofthereplace.
Main Power Button:
This button supplies power to all the functions of the log set. The main power button must be in the
ON position, either from the remote or controls on the log set for the functions to work.
Heater Control Button:
This button controls the heater ON/OFF and 5 temperature modes from Low to High. When the heater
isrstturnedon,itwillcomeonatthelowesttemperaturesetting.Thelogsetwillrememberthelast
heat setting and in later use the heater will start at that setting, unless power to the unit has been
interrupted. Each time the temperature button is pressed, the temperature set point increases,
allowing you to adjust the ambient temperature.
Heater Locking Function:
WhenreplaceisON, press the main power button for 10 seconds. The heater will be locked, and
the heater control button on the control panel as well as on the remote control will be disabled. Before
theheaterislocked,theamewillash6times.Tounlocktheheater,pressthemainpowerbuttonfor
10seconds.Beforetheheaterisunlocked,theamewillash6times.
Flame Control Button:
ThisbuttoncontrolsthebrightnessoftheameeffectwithsettingsatHigh,Medium,andLow.When
theelectricreplaceisrstturnedon,theamewillcomeonatthehighestsetting.Thelogsetwill
rememberthelastamesettingusedandinlaterusetheamebrightnesswillstartatthatsetting,
unlesspowertotheunithasbeeninterrupted.Eachtimetheamebuttonispressed,theame
brightnessdecreases.Theonlywaytoturnofftheameeffectcompletelyistoturnoffthemain
power button.
NOTE: After the replace has been operating, when the unit is turned off, the fan (not the heater) will
continue to run for about 1 minute to cool down the interior of the unit. During this time, you may feel
cool air from the blower outlet. This is normal and does not require any action. The fan will stop once
the interior cools down.

11
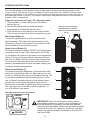
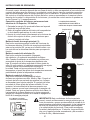
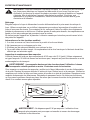
OPERATING INSTRUCTIONS
The infrared remote control relies on a line of sight and must be pointed at the controls of the
log set to work. The remote control unit has the controls required to turn ON/OFF both the main
power and the heater. If you prefer to use the control buttons on the log set unit itself, they are on
the lower right corner of the unit. The layout of the buttons and remote control unit can be seen in
Figures 2 and 3, respectively.
The plastic tab inside the battery
compartment MUST be removed
before the remote control will operate.
(Pull tab)
Battery replacement instruction
CR2025
OPEN
PUSH
RELEASE
Figure 3
1
2
3
IMPORTANT: Under normal operation, when power is
interrupted from either an outage or from unplugging unit
from wall while still in operation, the heat level indicator
lights may blink repeatedly and the unit will cease operation.
In order to reset the unit, unplug for 10 minutes, then plug
back in and operate normally in accordance with the Use
and Care Guide.
Plug your log set into a 15-amp, 120-volt power outlet.
1. Turn the power on. Flame will show on the wall be
hind the log set.
2. Remove the plastic tab from inside the battery
compartment to activate the remote control.
3. Point the remote control directly at the control buttons
of the log set and use the buttons to operate the log set.
Main Power Button (1):
This button supplies power to all the functions of the
electric replace. The main power button must be in the
ON position, either from the remote or the controls on the
electric replace for the functions to work.
Heater Control Button (2):
This button controls the heater ON/OFF and 5 temperature
modes from Low to High. When the heater is rst turned
on, the heater will come on at the lowest room temperature
setting. The log set will remember the last heat setting. In
later use, the heater will start at that setting, unless power
to the unit has been interrupted. Each time this button is
pressed, the temperature set point increases, allowing you
to adjust the ambient temperature.
Flame Control Button (3):
This button controls the brightness of the ame effect with
settings at High, Medium and Low. When the log set is rst
turned on, the ame will come on at the highest setting. The
log set will remember the last ame setting used. In later
use, the ame brightness will start at that setting, unless
power to the unit has been interrupted. Each time the
Flame button is pressed, the ame brightness decreases.
The only way to turn off the ame effect completely is to
turn off the Main Power button.
Battery Replacement Procedure:
(Size CR2025)

12
Toinspectorreplacethebulbs,rstunplugthepowercordfromtheoutlet.Locatetheaccesspanel
on the back of the stove. Remove the screws and the panel. Check the bulbs to be sure they are
ngertightandinworkingorder.Replaceanydamagedorfaultybulbs.Reattachtheaccesspanel.
Do not operate this heater without the access panel in place. Do not remove the back cover of this
heater. There are no serviceable parts inside.
CARE AND MAINTENANCE
Cleaning
Always turn the heater OFF and unplug the power cord from the outlet before cleaning. Use a vacu-
umordustertoremovedustanddirtfromtheheaterandventareas.Tomaintainthenish,cleanwith
a soft, slightly damp cloth and buff with a dry cloth. Never use abrasive cleansers, liquid sprays, or
any cleaner that could scratch the surface.
Neverdragtheunitacrossaoor.Theaddedstressfromdraggingtheunitmaycausethelegs
to break.
Glass Information (some models)
1. Under no circumstances should this product be operated with broken glass.
2. Do not strike or slam the glass.
3. Do not use abrasive cleaners to clean the glass.
4. This product uses tempered glass. Replacement of the glass supplied by the manufacturer
shouldbedonebyaqualiedserviceperson.
Light Bulb Inspection and Replacement
Theameeffectiscreatedbytwo40-WattlightbulbswithanE-12(small)socketbase.Useonlythis
typeoflightbulb.Iftheameeffectdoesnotwork,thebulbsmayhavecomelooseorbeendamaged
during shipping.
WARNING: Light bulbs become very hot during use. Allow at least 10 minutes for the
bulbs to cool before touching.
WARNING: Do not exceed 40 watts per bulb. Use of higher rated
bulbsmayresultinare,causingpropertydamageorpersonalinjury.
Maintenance of Motors
WARNING: Always disconnect the appliance from the main power supply and allow it to
cool before any servicing operation.
Themotorsusedonthefanheaterandameeffectarepre-lubricatedforextendedbearinglifeand
require no further lubrication. However, periodic cleaning/vacuuming of the appliance around the air
intake and exhaust, as well as the fan heater is recommended. For heavy or continuous use, periodic
cleaning must be done more frequently. If the heater blows alternating cold and warm air, check the
fanforfreemovementandfordebrisrestrictingairow.Ifthefandoesnotmovefreely,theunitmust
be turned off and the fan replaced immediately in order to prevent further damage to the unit.

13
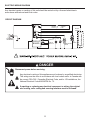
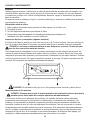
Disconnect power before servicing.
Anyelectricalre-wiringofthisappliancemustbedonebyaqualiedelectrician.
This wiring must be done in accordance with local codes and/or in Canada with
the current CSA C22.1 Canadian Electrical Code, and for US installations, the
National Electrical Code ANSI/NFPA No. 70.
If repairing or replacing any electrical component or wiring, the original
wire routing, color coding and securing locations must be followed.
DANGER
Any electrical repairs or rewiring of this unit should be carried out by a licensed electrician in
accordance with national and local codes.
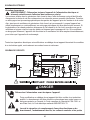
ELECTRIC WIRING DIAGRAM
CIRCUIT DIAGRAM
CIRCUIT
BOARD
THERMAL
CUTOFF
POWER I/O
FLAME I/O
HEATER I/O
THERMAL
FUSE
HEATER
ELEMENT
FAN
HEATER
FLAME EFFECT
MOTOR
BULB 2
40W
BULB 1
40W

14
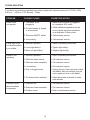
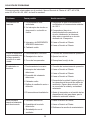
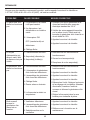
TROUBLESHOOTING
If you have any questions regarding the product, please call customer service at 1-877-447-4768,
8:30 a.m. – 4:30 p.m. CST, Monday – Friday.
PROBLEM POSSIBLE CAUSE CORRECTIVE ACTION
Heater does
not operate.
Power light is ON
buttheameeffect
is not visible.
Excessive noise
when the heater
is operating.
Heater is not
operating.
1. The heater is not
plugged in.
2. A circuit breaker is tripped
or a fuse blown.
3. Defective ON/OFF switch.
4. Loose wiring.
1. Incorrect operation.
2. Loose light bulb(s).
3. Burnt out light bulb(s).
1. Defective fan.
2. Defective heater assembly.
3. Dirt/dust on fan.
1. Incorrect operation.
2. Defective heater switch.
3. Defective heater assembly.
4. Loose wiring.
5. Dirty or clogged vents.
6.Thethermostatissatised.
1. Make sure the heater is plugged in
toastandard120Voutlet.
2. Check additional appliances on the
circuit; ideally the heater should be
on a dedicated 15 Amp circuit.
3. Call customer service.
4. Call customer service.
1. Refer to operating instructions.
2. Tighten light bulb(s).
3. Replace light bulb(s).
1. Call customer service.
2. Call customer service.
3. Refer to maintenance section.
1. Refer to operating instructions.
2. Call customer service.
3. Call customer service.
4. Call customer service.
5. Unplug the unit. Clear vent area of dust
and debris. Wait ten minutes, plug the
unit in again and turn on the heater.
6. Adjust thermostat clockwise to make
room warmer.

15
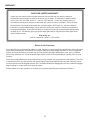
GHP Group, Inc.
6440 W. Howard St. • Niles, IL • 60714-3302
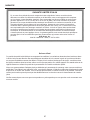
ONE YEAR LIMITED WARRANTY
If within one year from the date of original purchase, this item fails due to a defect in material or
workmanship, we will replace or repair at our option, free of charge. To order parts or obtain warranty
service, call 1-877-477-4768, 8:30 a.m. – 4:30 p.m. CST, Monday – Friday. This warranty does not
cover defects resulting from improper or abnormal use, misuse, accident, or alteration. Failure to follow
all instructions in the owner’s manual will also void this warranty. GHP Group, Inc. will not be liable for
incidental or consequential damages. Some states do not allow the exclsion or limitation of incidental or
consequential damages, so the above limitation or exclusion of incidental or consequential damages may
not apply to you. This warranty gives you specic legal rights and you may also have other rights which
vary from state to state.
Notice to the Customer
Our quality furniture is built keeping tradition in mind. Variations in actual wood color and nishes which may result
from natural characteristics of the wood, such as grain patterns, mineral streaks and the like, are not considered
defects. As wood continues to move and age you may notice these slight differences in color, even on different
parts of any individual unit. Sound knots and slight surface cracks are true personality of a quality piece of wood
furniture.
There are several practices we reccomend so that you may maintain your new furniture in top condition. First of all,
to maintain the nish, you should clean with a soft, slightly damp cloth and buff with a dry cloth. Secondly, wood
furniture should never be dragged across a oor. The added stress from dragging the unit may cause the dragged
edge to splinter or it may cause some joints to loosen.
Please contact us for any questions or concerns you may have regarding your new piece of furniture.
WARRANTY

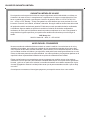
16
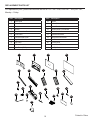
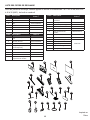
REPLACEMENT PARTS LIST
For replacement parts, please call customer service at 1-877-447-4768, 8:30 a.m. – 4:30 p.m. CST,
Monday – Friday.
Printed in China
1
1
2
2
3
3
4
4
9
9
8
8
7
7
6
6
5
5
10
10
11
11
12
12
18
18
13
13
19
19
14
14
20
20
15
15
21
21
22
22
16
16
17
17
Part Description
1 Back Panel
2 Flame Panel
3 Glass
4 Screen
5 Front Decorative Panel
6 Front Panel
7 Left Brick Side Panel
8 Right Brick Side Panel
9 Top Panel
10 Remote Control
11 Main Board (PCB)
Part Description
12 Logset
13 Flame Reector
14 Control Panel
15 Control Panel Circuit Board
16 Power Cord & Connector
17 Synchronous Motor
18 Lamp Socket & Bracket
19 Fan Heater
20 Access Panel
21 Control Panel Door
22 Anti-Tip Device

17
ADJUNTE SU RECIBO AQUÍ
Número de serie ________________________________ Fecha de compra _________________________________
¿Preguntas, problemas, piezas faltantes?
Antes de volver a la tienda, llame a nuestro departamento de servicio al cliente al
1-877-447-4768
,
de lunes a viernes de
8:30 a.m. – 4:30 p.m.
C US
INSTALADOR: Deje este manual con el dispositivo.
CONSUMIDOR: Conserve este manual para uso futuro.
¡ADVERTENCIA!
SI LA INFORMACIÓN EN ESTE MANUAL NO SE SIGUE CON EXACTITUD,
PUEDE RESULTAR UN CHOQUE ELÉCTRICO O INCENDIO
OCASIONANDO DAÑOS A LA PROPIEDAD, LESIONES PERSONALES O LA MUERTE.
INSTRUCCIONES IMPORTANTES
POR FAVOR, LEA ESTE MANUAL ANTES DE LA INSTALACIÓN Y USO DEL DISPOSITIVO
MODELO #25-720-15 / 25-720-204
COMPACTO MÓVIL CHIMENEA
180717

18
IMPORTANTE: lea con atención todas las instrucciones y advertencias antes de
comenzar la instalación. Si no se siguen las instrucciones, se puede provocar una
descarga eléctrica, lesiones a personas, riesgo de incendio, lo que anulará la garantía.
ÍNDICE
Información de seguridad ............................................................................................................... 18
Contenido del paquete
..................................................................................................................... 20
Aditamentos
.................................................................................................................................... 20
Dimensiones de la chimenea ......................................................................................................... 21
Información de seguridad ............................................................................................................... 22
Preparación .................................................................................................................................... 22
Instrucciones de ensemblaje .......................................................................................................... 22
Instrucciones de operación............................................................................................................. 24
Cuidado y mantenimiento ............................................................................................................... 26
Diagrama del cableado eléctrico .................................................................................................... 27
Solución de problemas ................................................................................................................... 28
Garantía.......................................................................................................................................... 29
Lista de piezas de repuesto............................................................................................................ 30
Lea estas instrucciones de instalación y funcionamiento
antes de utilizar el electrodoméstico.
EL DAÑO DEL PRODUCTO PUEDE OCURRIR.
Nunca trate de desarmar o alterar este producto sin seguir las instrucciones de este manual.
PRECAUCIÓN
Esteproductopuedeexponerloaustedaagentesquímicosincluyendoformaldehído,reconocido
porelestadodeCaliforniacomocausantedecáncer,asícomobenceno,reconocidoporelestado
de California como causantes de problemas de crecimiento.
Para obtener más información, visite www.p65Warnings.ca.gov
ADVERTENCIA

19
Lea y comprenda completamente este manual antes de intentar ensamblar, usar o instalar el producto.
1. Lea todas las instrucciones antes de usar este electrodoméstico.
2. Este electrodoméstico se calienta cuando está en funcionamiento. Para evitar quemaduras, no
toquesuperciescalientesconlapieldesnuda.Siseincluyen,utilicelasmanijasparatrasladarel
electrodoméstico.Mantengamaterialesinamables,comomuebles,almohadas,ropadecama,
papeles, ropa y cortinas al menos a 914,4 mm (3 pies) de la parte delantera de este electrodoméstico
y mantenerlos alejados de los costados y parte trasera..
3. PRECAUCIÓN: Se debe tener extrema precaución cuando niños o personas
discapacitadas usen un calentador o cuando se use cerca de ellos, y siempre
que el calentador se deje funcionando sin vigilancia.
4. Si es posible, siempre desenchufe este electrodoméstico cuando no lo use.
5. No opere ningún calentador con un cable o enchufe dañados, o después de fallas del mismo,
de que se haya dejado caer o dañado de cualquier forma.
6. Todareparacióndeesteelectrodomésticodeberealizarlauntécnicocalicado.
7. Bajoningunacircunstanciasedebemodicaresteelectrodoméstico.Laspiezasquesedebenretirar
para reparación se deben reemplazar antes de volver a hacer funcionar este electrodoméstico.
8. No lo use en exteriores.
9. Este calentador no se debe usar en el baño, lavadero y en espacios húmedos similares interiores.
Nunca coloque este calentador donde se pueda caer dentro de una bañera u otro contenedor de agua.
10. No utilice este calentador en lugares elevados como por ejemplo sobre repisas, plataformas elevadas,
etc.
11. No coloque el cable debajo de una alfombra. No cubra el cable con alfombras, tapetes o
similares. Coloque el cable lejos de zonas de tránsito en donde nadie se pueda tropezar y caer.
12. Para desconectar este electrodoméstico, gire los controles a la posición de apagado y luego retire el
enchufe del tomacorriente.
13. Conecte únicamente a un tomacorriente con la debida puesta a tierra.
14. Cuando está instalado, este electrodoméstico se debe poner a tierra según los códigos locales, según
los Códigos de Electricidad de Canadá CSA C22.1 o, para instalaciones en EE.UU., siga los códigos
locales y el código nacional de electricidad, ANSI/NFPA No. 70.
15. No introduzca objetos extraños ni permita que entren en las aberturas de escape o ventilación, ya que
pueden provocar descargas eléctricas, incendios o daños en el electrodoméstico.
16. Para evitar incendios, no bloquee las entradas ni salidas de aire de ninguna manera. No use sobre
superciesblandas,comounacama,dondelasaberturassepuedanbloquear.
17. Este electrodoméstico tiene en su interior piezas calientes y piezas que forman arcos eléctricos o que
echanchispas.Nolouseenáreasdondeseuseoalmacenegasolina,pinturaolíquidosinamables.
Este electrodoméstico no se debe usar como una rejilla para secar ropa, ni tampoco se deben colgar
calcetas navideñas o decoraciones en el electrodoméstico o cerca de éste.
18. Utilice este electrodoméstico sólo como se describe en este manual. Cualquier otro uso no
recomendado por el fabricante puede causar incendios, descargas eléctricas o lesiones personales.
19. Conecte siempre los calefactores directamente en un tomacorriente/receptáculo de pared. Nunca
use un cable de extensión o tomacorriente móvil (tomacorriente/enchufe múltiple) debido al riesgo
de sobrecalentamiento del cable y el riesgo de incendio. Los cables de extensión son solo para
usotemporal.Sisedebeusaruncabledeextensión,debeserUL/CSAcerticado,concapacidad
nominalde15A(1,875W),125Vmáximocon14AWGmínimoyconstruidodedosconductoresde
corriente con tierra. Se recomienda un cable de extensión resistente con la longitud más corta posible
para la conexión y no debe ser más largo que 50 pies (15.2 m). No enrolle ni cubra el cable de
extensión.
20. No utilice este calentador cuando le falten patas o estén dañadas o rotas.
21.GUARDEESTASINSTRUCCIONES.
INFORMACIÓN DE SEGURIDAD GUARDE ESTAS INSTRUCCIONES

20
INFORMACIÓN DE SEGURIDAD
Conexión eléctrica
Instrucciones de puesta a tierra
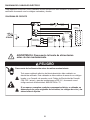
Este calentador fue diseñado para su uso en 120 voltios. El cable tiene un enchufe, como
semuestraenAdelagura1.Haydisponibleunadaptador,comosemuestraenC,para
conectar enchufes con puesta a tierra de tres clavijas a receptáculos de dos ranuras. La
orejeta verde de puesta a tierra que sale del adaptador se debe conectar permanentemente
a tierra, como a través de una caja de un tomacorriente correctamente puesto a tierra. El
adaptador no se debe usar si hay disponible un receptáculo de tres ranuras puesto a tierra.
PELIGRO
NOTA:
Los adaptadores NO son
para ser utilizados en Canadá
Se requiere un circuito de 15 amperios, 120 voltios, 60 Hz con un tomacorriente
correctamentepuestoatierra.Depreferencia,laartículodebeestarenuncircuito
dedicado, ya que la conexión de otros electrodomésticos al mismo circuito puede
provocar que el interruptor de circuito se desconecte o que el fusible se funda cuan-
do el calentador esté en funcionamiento. Se incluye como estándar con la unidad un
cable de tres conductores de 1,83 m (6 pies) de largo, que sale del lado derecho de
laartículo.Siempre enchufe la unidad en untomacorriente/receptáculo de la pared.
Nunca deben usarse una extensión eléctrica ni un tomacorriente de alimentación
reubicable (tomacorriente/enchufe múltiple).
El cableado del tomacorriente debe cumplir con los códigos de construcción
locales y con otras normas que correspondan para reducir el riesgo de incendio,
descarga eléctrica y lesiones a personas.
Noutiliceestaartículosialgunadesuspiezasestuvosumergidaenagua.
Llamedeinmediatoauntécnicoenmantenimientocalicadoandeque
inspeccionelaartículoyreemplacecualquierpiezadelsistemaeléctrico
que haya estado bajo agua.
CLAVIJA CON
PUESTA A
TIERRA
PUESTA A
TIERRA
TORNILLO DE
METAL
CLAVIJA CON
PUESTA A
TIERRA
ADAPTADOR
(A)
(C)
(D)
TAPA DE LA CAJA
DEL TOMACORRIENTE
PUESTO A TIERRA
Figura 1
(B)
La page est en cours de chargement...
La page est en cours de chargement...
La page est en cours de chargement...
La page est en cours de chargement...
La page est en cours de chargement...
La page est en cours de chargement...
La page est en cours de chargement...
La page est en cours de chargement...
La page est en cours de chargement...
La page est en cours de chargement...
La page est en cours de chargement...
La page est en cours de chargement...
La page est en cours de chargement...
La page est en cours de chargement...
La page est en cours de chargement...
La page est en cours de chargement...
La page est en cours de chargement...
La page est en cours de chargement...
La page est en cours de chargement...
La page est en cours de chargement...
La page est en cours de chargement...
La page est en cours de chargement...
La page est en cours de chargement...
La page est en cours de chargement...
La page est en cours de chargement...
La page est en cours de chargement...
La page est en cours de chargement...
La page est en cours de chargement...
-
 1
1
-
 2
2
-
 3
3
-
 4
4
-
 5
5
-
 6
6
-
 7
7
-
 8
8
-
 9
9
-
 10
10
-
 11
11
-
 12
12
-
 13
13
-
 14
14
-
 15
15
-
 16
16
-
 17
17
-
 18
18
-
 19
19
-
 20
20
-
 21
21
-
 22
22
-
 23
23
-
 24
24
-
 25
25
-
 26
26
-
 27
27
-
 28
28
-
 29
29
-
 30
30
-
 31
31
-
 32
32
-
 33
33
-
 34
34
-
 35
35
-
 36
36
-
 37
37
-
 38
38
-
 39
39
-
 40
40
-
 41
41
-
 42
42
-
 43
43
-
 44
44
-
 45
45
-
 46
46
-
 47
47
-
 48
48


Pleasant Hearth 25-720-15 Mode d'emploi
- Catégorie
- Cheminées
- Taper
- Mode d'emploi
dans d''autres langues
Documents connexes
-
Pleasant Hearth 23-700-712 Important Instructions Manual
-
-
-
-
-
-
-
-
-