
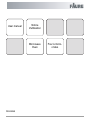
User manual
Microwave
Oven
Notice
d'utilisation
Four à micro-
ondes
FSG25249

Contents
Safety information _ _ _ _ _ _ _ _ _ _ _ _ _ _ _ _ _ _ 2
Safety instructions _ _ _ _ _ _ _ _ _ _ _ _ _ _ _ _ _ 4
Product description _ _ _ _ _ _ _ _ _ _ _ _ _ _ _ _ _ 5
Before first use _ _ _ _ _ _ _ _ _ _ _ _ _ _ _ _ _ _ _ 6
Control panel _ _ _ _ _ _ _ _ _ _ _ _ _ _ _ _ _ _ _ _ 7
Daily use _ _ _ _ _ _ _ _ _ _ _ _ _ _ _ _ _ _ _ _ _ _ 8
Automatic programmes _ _ _ _ _ _ _ _ _ _ _ _ _ _ 10
Using the accessories _ _ _ _ _ _ _ _ _ _ _ _ _ _ _ 11
Additional functions _ _ _ _ _ _ _ _ _ _ _ _ _ _ _ _ 12
Helpful hints and tips _ _ _ _ _ _ _ _ _ _ _ _ _ _ _ 12
Care and cleaning _ _ _ _ _ _ _ _ _ _ _ _ _ _ _ _ _ 13
Troubleshooting _ _ _ _ _ _ _ _ _ _ _ _ _ _ _ _ _ _ 13
Installation _ _ _ _ _ _ _ _ _ _ _ _ _ _ _ _ _ _ _ _ _ 14
Environment concerns _ _ _ _ _ _ _ _ _ _ _ _ _ _ _ 16
Subject to change without notice.
Safety information
Before the installation and use of the appliance, carefully read the supplied
instructions. The manufacturer is not responsible if an incorrect installation
and use causes injuries and damages. Always keep the instructions with the
appliance for future reference.
Children and vulnerable people safety
Warning! Risk of suffocation, injury or permanent disability.
• This appliance can be used by children aged from 8 years and above and
persons with reduced physical, sensory or mental capabilities or lack of ex-
perience and knowledge if they are supervised by an adult or a person who
is responsible for their safety.
• Do not let children play with the appliance. Children under 3 years must not
be left unsupervised in the vicinity of the appliance.
• Keep all packaging away from children.
• Keep children and pets away from the appliance when it operates or when
it cools down. Accessible parts are hot.
• If the appliance has a child safety device, we recommend that you activate
it.
• Cleaning and user maintenance shall not be made by children without su-
pervision.
• Keep the appliance and its cord out of reach of children less than 8 years.
General Safety
• This appliance is intended to be used in household and similar applications
such as:
2

– staff kitchen areas in shops, offices and other working environments;
– farm houses;
– by clients in hotels, motels and other residential environments;
– bed and breakfast type environments.
• Internally the appliance becomes hot when in operation. Do not touch the
heating elements that are in the appliance. Always use oven gloves to re-
move or put in accessories or ovenware.
• Do not use a steam cleaner to clean the appliance.
• Before maintenance cut the power supply.
• If the door or door seals are damaged, the appliance must not be operated
until it has been repaired by a competent person.
• The appliances are not intended to be operated by means of an external
timer or separate remote-control system.
• Only a competent person can carry out any service or repair operation that
involves the removal of a cover which gives protection against exposure to
microwave energy.
• Do not heat liquids and other foods in sealed containers. They are liable to
explode.
• Only use utensils that are suitable for use in microwave ovens.
• When heating food in plastic or paper containers, keep an eye on the appli-
ance due to the possibility of ignition.
• The appliance is intended for heating food and beverages. Drying of food or
clothing and heating of warming pads, slippers, sponges, damp cloth and
similar may lead to risk of injury, ignition or fire.
• If smoke is emitted, switch off or unplug the appliance and keep the door
closed in order to stifle any flames.
• Microwave heating of beverages can result in delayed eruptive boiling.
Care must be taken when handling the container.
• The contents of feeding bottles and baby food jars shall be stirred or shak-
en and the temperature checked before consumption, in order to avoid
burns.
3

• Eggs in their shell and whole hard-boiled eggs should not be heated in the
appliance since they may explode, even after microwave heating has
ended.
• The appliance should be cleaned regularly and any food deposits removed.
• Failure to maintain the appliance in a clean condition could lead to deterio-
ration of the surface that could adversely affect the life of the appliance and
possibly result in a hazardous situation.
• The temperature of accessible surfaces may be high when the appliance is
operating.
• The microwave oven shall not be placed in a cabinet unless it has been
tested in a Cabinet.
• The rear surface of appliances shall be placed against a wall.
• Pay attention to the minimum dimensions of the cabinet (if applicable). Re-
fer to the installation chapter.
• The appliance must be operated with the decorative door open (if applica-
ble).
• Do not use harsh abrasive cleaners or sharp metal scrapers to clean the
glass door since they can scratch the surface, which may result in shatter-
ing of the glass.
• If the supply cord is damaged, it must be replaced by the manufacturer, an
authorized Service or similarly qualified persons in order to avoid a hazard.
Safety instructions
Installation
Warning! Only a qualified person must install
this appliance.
• Remove all the packaging.
• Do not install or use a damaged appliance.
• Obey the installation instruction supplied with the
appliance.
• Always be careful when you move the appliance
because it is heavy. Always wear safety gloves.
• Do not pull the appliance by the handle.
• Keep the minimum distance from the other applian-
ces and units.
• Make sure that the appliance is installed below and
adjacent safe structures.
• The sides of the appliance must stay adjacent to
appliances or to units with the same height.
Electrical connection
Warning! Risk of fire and electrical shock.
• All electrical connections should be made by a
qualified electrician.
• The appliance must be earthed.
• Make sure that the electrical information on the rat-
ing plate agrees with the power supply. If not, con-
tact an electrician.
4

• If the appliance is connected to the socket via an
extension cord, make sure the cord is earthed.
• Connect the mains plug to the mains socket only at
the end of the installation. Make sure that there is
access to the mains plug after the installation.
• Make sure not to cause damage to the mains plug
and to the mains cable. Contact the Service or an
electrician to change a damaged mains cable.
• Do not pull the mains cable to disconnect the appli-
ance. Always pull the mains plug.
Use
Warning! Risk of injury, burns or electric shock
or explosion.
• Use this appliance in a household environment.
• Do not change the specification of this appliance.
• Make sure that the ventilation openings are not
blocked.
• Do not let the appliance stay unattended during op-
eration.
• Do not apply pressure on the open door.
• Do not use the appliance as a work surface and do
not use the cavity for storage purposes.
Care and Cleaning
Warning! Risk of injury, fire or damage to the
appliance.
• Before maintenance, deactivate the appliance and
disconnect the mains plug from the mains socket.
• Clean regularly the appliance to prevent the deteri-
oration of the surface material.
• Do not allow food spills or cleaner residue to accu-
mulate on door sealing surfaces.
• Remaining fat or food in the appliance can cause
fire.
• Clean the appliance with a moist soft cloth. Only
use neutral detergents. Do not use abrasive prod-
ucts, abrasive cleaning pads, solvents or metal ob-
jects.
• If you use an oven spray, obey the safety instruc-
tions on the packaging.
Disposal
Warning! Risk of injury or suffocation.
• Disconnect the appliance from the mains supply.
• Cut off the mains cable and discard it.
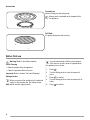
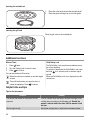
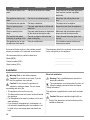
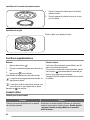
Product description
1 2
8 67
3 4
5
1
Lamp
2
Safety interlock system
3
Display
4
Control panel
5
Door opener
6
Waveguide cover
7
Grill
8
Turntable shaft
5

Accessories
Turntable set
Glass cooking tray and roller guide.
Always use the turntable set to prepare food in
the appliance.
Grill Rack
For grilling food and combi cooking.
Before first use
Warning! Refer to the Safety chapters.
Initial Cleaning
• Remove all parts from the appliance.
• Clean the appliance before first use.
Important! Refer to chapter "Care and Cleaning".
Setting the time
When you connect the appliance to the electrical
supply or after a power cut, the display shows
0:00 and an acoustic signal sounds.
You can set the time in 24 hour clock system.
If the clock is not set it does not operate when
the appliance is not in use.
1.
Press
.
2. Turn the Setting knob to enter the amount of
hours.
3.
Press
to confirm.
4. Turn the Setting knob to enter the amount of mi-
nutes.
5.
Press
to confirm.
6

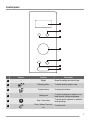
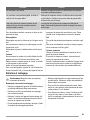
Control panel
2
3
5
6
7
4
1
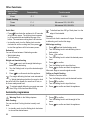
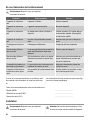
Symbol Function Description
1
— Display Shows the settings and current time.
2
Defrosting button To defrost food by weight or time.
3
Function button To choose the function.
4
— Setting knob
To set the cooking time, weight or to ac-
tivate the auto cooking programmes.
5
Stop / Clear button
To deactivate the appliance or delete the
cooking settings.
6
Clock / Kitchen Timer but-
ton
To set the clock.
7

Symbol Function Description
7
Start / +30 sec button
To start the appliance or increase the
cooking time for 30 seconds at full pow-
er.
Daily use
Warning! Refer to the Safety chapters.
Activating and deactivating the appliance
1. Press the button with the function you want to ac-
tivate.
2. Repeatedly press the button or turn the Setting
knob to set the desired function.
3.
Press
to confirm.
4. Turn the Setting knob to set the desired time.
5.
Press
to confirm and activate the appliance.
6. To deactivate the appliance you can:
– wait until the appliance deactivates automati-
cally when the time comes to an end.
– open the door. The appliance stops automati-
cally. Close the door to continue cooking. Use
this option to inspect the food.
–
press
.
Caution! Do not let the appliance operate when
there is no food in it.
General information about using the appliance
General:
• After you deactivate the appliance, let the food
stand for some minutes.
• Remove the aluminium foil packaging, metal con-
tainers, etc. before you prepare the food.
Cooking:
• If possible, cook food covered with material suitable
for use in the microwave. Only cook food without a
cover if you want to keep it crusty
• Do not overcook the dishes by setting the power
and time too high. The food can dry out, burn or
catch fire in some places.
• Do not use the appliance to cook eggs or snails in
their shells, because they can explode. With fried
eggs, pierce the yolks first.
• Prick food with "skin" or "peel", such as potatoes,
tomatoes, sausages, with a fork several times be-
fore cooking so that the food does not explode.
• For chilled or frozen food, set a longer cooking
time.
• Dishes which contain sauce must be stirred from
time to time.
• Vegetables that have a firm structure, such as car-
rots, peas or cauliflower, must be cooked in water.
• Turn larger pieces after half of the cooking time.
• If possible, cut vegetables into similar-sized pieces.
• Use flat, wide dishes.
• Do not use cookware made of porcelain, ceramic or
earthenware with small holes, e. g. on handles or
unglazed bottoms. Moisture going into the holes
can cause the cookware to crack when it is heated.
• The glass cooking tray is a work space for heating
food or liquids. It is necessary for the operation of
the microwave.
Defrosting meat, poultry, fish:
• Put the frozen, unwrapped food on a small up-
turned plate with a container below it so that the de-
frosting liquid collects in the container.
• Turn the food after half of the defrosting time. If
possible, divide and then remove the pieces that
started to defrost.
Defrosting butter, portions of gateau, quark:
• Do not fully defrost the food in the appliance, but let
it defrost at room temperature. This gives a more
even result. Fully remove all metal or aluminium
packaging before defrosting.
Defrosting fruit, vegetables:
• Do not fully defrost fruit and vegetables, which are
to be further prepared while raw, in the appliance.
Let them defrost at room temperature.
• You can use a higher microwave power to cook fruit
and vegetables without defrosting them first.
8

Ready meals:
• You can prepare ready meals in the appliance only
if their packaging is suitable for microwave use.
• You must follow the manufacturer's instructions
printed on the packaging (e.g. remove the metal
cover and pierce the plastic film).
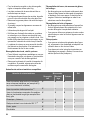
Suitable cookware and materials
Cookware / Material Microwave Grilling
Defrosting Heating Cooking
Ovenproof glass and porcelain (with no metal
components, e. g. Pyrex, heat-proof glass)
X X X X
Non-ovenproof glass and porcelain
1)
X -- -- --
Glass and glass ceramic made of ovenproof /
frost-proof material (e. g. Arcoflam), grill shelf
X X X X
Ceramic
2)
, earthenware
2)
X X X --
Heat-resistant plastic up to 200 °C
3)
X X X --
Cardboard, paper X -- -- --
Clingfilm X -- -- --
Roasting film with microwave safe closure
3)
X X X --
Roasting dishes made of metal, e. g. enamel,
cast iron
-- -- -- X
Baking tins, black lacquer or silicon-coated
3)
-- -- -- X
Baking tray -- -- -- X
Browning cookware, e. g. Crisp pan or Crunch
plate
-- X X --
Ready meals in packaging
3)
X X X X
1) With no silver, gold, platinum or metal plating / decorations
2) Without quartz or metal components, or glazes which contain metals
3) You must follow the manufacturer’s instructions about the maximum temperatures.
X suitable -- not suitable
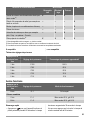
Power setting table
Press the Func-
tion button
Power setting Approximate Percentage of Power
1 time P100 100 %
2 times P 80 80 %
3 times P 50 50 %
4 times P 30 30 %
5 times P 10 10 %
9

Other functions
Press the Func-
tion button
Power setting Function mode
6 times G - 1 Full Grill
Combi Cooking
7 times C – 1 Microwaves 55%, Grill 45%
8 times C – 2 Microwaves 36%, Grill 64%
Quick Start
•
Press
to activate the appliance for 30 seconds
at full function power. The cooking time increases
by 30 seconds with each additional press of the
button. The maximum cooking time is 95 minutes.
• In standby mode, turn the Setting knob counter-
clockwise to set the cooking time, then press
to start the appliance at full microwave power.
Defrosting
You can choose between 2 defrosting modes:
• Weight defrosting
• Time defrosting
Weight and time defrosting
1.
Press
once to set the weight defrosting or
twice for time defrosting.
2. Turn the Setting knob to input the desired weight
or time.
3.
Press
to confirm and start the appliance.
For weight defrosting the time is set automatical-
ly. Weight defrosting should not be used on food
that is left out of the freezer for more than 20 min, or
for frozen ready-made food.
To activate weight defrosting you must use more
than 100 g of food and less than 2000 g.
To defrost less than 200 g of food place it on the
edge of the turntable.
Cooking
You can cook food in maximum 2 stages. If one stage
is defrosting, set it as the first stage.
Multi-stage cooking:
1.
Press
and set the defrosting mode.
2. Turn the Setting knob to set defrosting time or
food weights.
3.
Press
to confirm.
4. Turn the Setting knob to select the desired power
level.
5.
Press
to confirm.
6. Turn the Setting knob to input the time.
7.
Press
to confirm and start the appliance.
After each stage an acoustic signal sounds.
Grilling or Combi Cooking
1. Press the Function button.
2. Turn the Setting knob to set the desired function.
3.
Press
to confirm.
4. Turn the Setting knob to input the time.
5.
Press
to confirm and start the appliance.
Automatic programmes
Warning! Refer to the Safety chapters.
Auto Cooking
You can use Auto Cooking function to easily cook
food.
1. In standby mode, turn the Setting knob clockwise
to choose the desired menu.
2.
Press
to confirm.
3. Turn the Setting knob to set the weight of the
menu.
4.
Press
to confirm and start the appliance.
10

Menu Weight
A - 1
Pizza
200 g
400 g
A - 2
Potato
200 g
400 g
600 g
A - 3
Meat
250 g
350 g
450 g
A - 4
Fish
250 g
350 g
450 g
A - 5
Vegetable
200 g
300 g
400 g
A - 6
Beverage
1 cup (120 ml)
2 cups (240 ml)
3 cups (360 ml)
A - 7
Pasta
50 g (add 450 ml of water)
100 g (add 800 ml of water)
A - 8
Popcorn
50 g
100 g
A - 9
Chicken
400 g
800 g
1200 g
A - 10
Reheat
200 g
400 g
600 g
Using the accessories
Warning! Refer to the Safety chapters.
Caution! Do not cook food without the turntable
set. Use only the turntable set provided with the
appliance.
Never cook food directly on the glass cooking
tray.
11

Inserting the turntable set
1. Place the roller guide around the turntable shaft.
2. Place the glass cooking tray on the roller guide
Inserting the grill rack
Place the grill rack on the turntable set.
Additional functions
Kitchen Timer
1.
Press
twice.
2. Turn the Setting knob to enter the time.
3.
Press
to confirm.
You can set maximum 95 minutes.
When the set time is reached, an acoustic signal
sounds.
Timer still works when you open the door or
pause the appliance. Press
to cancel.
Child Safety Lock
The Child Safety Lock prevents an accidental opera-
tion of the appliance.
To activate or deactivate the Child Safety Lock press
and hold
for 3 seconds, until an acoustic signal
sounds.
When the Child Safety Lock is on, display shows the
current time.
Helpful hints and tips
Tips for the microwave
Problem Remedy
You cannot find details for the amount of food
prepared.
Look for a similar food. Increase or shorten the length of the
cooking times according to the following rule: Double the
amount = almost double the time, Half the amount = half
the time
The food got too dry. Set shorter cooking time or select lower microwave power.
12

Problem Remedy
The food is not defrosted, hot or cooked after
the time came to an end.
Set longer cooking time or set higher power. Note that large
dishes need longer time.
After the cooking time comes to an end, the
food is overheated at the edge but is still not
ready in the middle.
Next time set a lower power and a longer time. Stir liquids
halfway through, e.g. soup.
To get better results for rice use a flat, wide dish.
Defrosting
Always defrost roast with the fat side down.
Do not defrost covered meat because this may cause
cooking instead of defrosting.
Always defrost whole poultry breast side down.
Cooking
Always remove chilled meat and poultry from the re-
frigerator at least 30 minutes before cooking.
Let the meat, poultry, fish and vegetables stay cov-
ered after cooking.
Brush a little oil or melted butter over the fish.
Add 30 - 45 ml of cold water for every 250 g of vegeta-
bles. Cut the fresh vegetables into even size pieces
before cooking. Cook all vegetables with a cover on
the container.
Grilling
Grill flat food items in the middle of the grill rack.
Turn the food over halfway through the set time and
continue grilling.
Combi Cooking
Use the Combi Cooking to keep the crispness of cer-
tain foods.
At the half of the cooking time, turn over the foods
then continue.
There are 2 modes for Combi Cooking. Each mode
combines the microwave and the grill functions at dif-
ferent time periods and power levels.
Care and cleaning
Warning! Refer to the Safety chapters.
Notes on cleaning:
• Clean the front of the appliance with a soft cloth
with warm water and a cleaning agent.
• To clean metal surfaces, use a usual cleaning
agent.
• Clean the appliance interior after each use. Then
you can remove dirt more easily and it does not
burn on.
• Clean stubborn dirt with a special cleaner.
• Clean all accessories regularly and let them dry.
Use a soft cloth with warm water and a cleaning
agent.
• To soften the hard to remove remains, boil a glass
of water at full microwave power for 2 to 3 minutes.
• To remove odours, mix a glass of water with 2 tsp
of lemon juice and boil at full microwave power for 5
minutes.
Troubleshooting
Warning! Refer to the Safety chapters.
Problem Possible cause Remedy
The appliance does not op-
erate.
The appliance is deactivated. Activate the appliance.
The appliance does not op-
erate.
The appliance is not plugged in. Plug in the appliance.
13

Problem Possible cause Remedy
The appliance does not op-
erate.
The fuse in the fuse box is blown. Check the fuse. If the fuse blows more
than one time, contact a qualified
electrician.
The appliance does not op-
erate.
The door is not closed properly. Make sure that nothing blocks the
door.
The lamp does not operate. The lamp is defective. The lamp has to be replace.
There is sparking in the
cavity.
There are metal dishes or dishes with
metal trim.
Remove the dish from the appliance.
There is sparking in the
cavity.
There are metal skewers or aluminium
foil that touches the interior walls.
Make sure that the skewers and foil
does not touch the interior walls.
The turntable set makes
scratching or grinding noise.
There is an object or dirt below the
glass cooking tray.
Clean the area below the glass cook-
ing tray.
The appliance stop to oper-
ate without a clear reason.
There is a malfunction. If this situation repeats call the cus-
tomer service center.
If you cannot find a solution to the problem yourself,
contact your dealer or the customer service centre.
The necessary data for the customer service center is
on the rating plate on the appliance.
We recommend that you write the data here:
Model (MOD.) .........................................
Product number (PNC) .........................................
Serial number (S.N.) .........................................
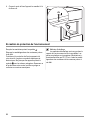
Installation
Warning! Refer to the Safety chapters.
Caution! Do not block the air vents. If you do
that, the appliance can overheat.
Caution! Do not connect the appliance to
adapters or extension leads. This can cause
overloading and risk of fire.
• The appliance is for built-in use only.
• The fitted cabinet must not have a back wall behind
the appliance.
• Put the appliance far away from steam, hot air and
water splashes.
• If you transport the appliance in cold weather, do
not activate it immediately after the installation. Let
is stand in the room temperature and absorb the
heat.
Electrical installation
Warning! Only a qualified person must do the
electrical installation.
The manufacturer is not responsible if you do not
follow the safety precautions from the chapter
"Safety Information".
This appliance is supplied with a main cable and main
plug.
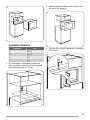
Caution! Minimum installation height is 85 cm.
1. Check if the dimensions of the furniture meet the
installation distances.
14

D
B
A
C
Installation distances
Dimension mm
A 450 + 2
B 560 + 8
C 500
D 45
2. Put the template on the bottom of cabinet and
mark the spots for screws. Remove the template
and fix the bracket with the screws.
=
=
3. Install the appliance. Make sure the bracket locks
the back of the appliance.
4. Open the door and fix the appliance to the cabinet
with a screw.
15

Environment concerns
Recycle the materials with the symbol . Put the
packaging in applicable containers to recycle it.
Help protect the environment and human health and to
recycle waste of electrical and electronic appliances.
Do not dispose appliances marked with the symbol
with the household waste. Return the product to your
local recycling facility or contact your municipal office.
Packaging material
The packaging material is environmentally-
friendly and recyclable. Plastic parts are marked with
international abbreviations such as PE, PS, etc. Dis-
pose of the packaging material in the containers provi-
ded for this purpose at your local waste management
facility.
16

Sommaire
Consignes de sécurité _ _ _ _ _ _ _ _ _ _ _ _ _ _ _ 17
Instructions de sécurité _ _ _ _ _ _ _ _ _ _ _ _ _ _ 20
Description de l'appareil _ _ _ _ _ _ _ _ _ _ _ _ _ _ 21
Avant la première utilisation _ _ _ _ _ _ _ _ _ _ _ _ 21
Bandeau de commande _ _ _ _ _ _ _ _ _ _ _ _ _ _ 22
Utilisation quotidienne _ _ _ _ _ _ _ _ _ _ _ _ _ _ _ 23
Programmes automatiques _ _ _ _ _ _ _ _ _ _ _ _ 26
Utilisation des accessoires _ _ _ _ _ _ _ _ _ _ _ _ 27
Fonctions supplémentaires _ _ _ _ _ _ _ _ _ _ _ _ 28
Conseils utiles _ _ _ _ _ _ _ _ _ _ _ _ _ _ _ _ _ _ _ 28
Entretien et nettoyage _ _ _ _ _ _ _ _ _ _ _ _ _ _ _ 29
En cas d'anomalie de fonctionnement _ _ _ _ _ _ _ 30
Installation _ _ _ _ _ _ _ _ _ _ _ _ _ _ _ _ _ _ _ _ _ 30
En matière de protection de l'environnement _ _ _ 32
Sous réserve de modifications.
Consignes de sécurité
Avant d'installer et d'utiliser cet appareil, lisez soigneusement les instructions
fournies. Le fabricant ne peut être tenu pour responsable des dommages et
blessures liés à une mauvaise installation ou utilisation. Conservez toujours
cette notice avec votre appareil pour vous y référer ultérieurement.
Sécurité des enfants et des personnes vulnérables
Avertissement Risque d'asphyxie, de blessure ou d'invalidité
permanente.
• Cet appareil peut être utilisé par des enfants de plus de 8 ans, ainsi que
des personnes dont les capacités physiques, sensorielles et mentales sont
réduites ou dont les connaissances et l'expérience sont insuffisantes, à
condition d'être surveillés par une personne responsable de leur sécurité.
• Ne laissez pas les enfants jouer avec l'appareil. Les enfants de moins de
3 ans ne doivent pas être laissés sans surveillance à proximité de l'appa-
reil.
• Ne laissez pas les emballages à la portée des enfants.
• Tenez les enfants et les animaux éloignés de l'appareil lorsqu'il est en
cours de fonctionnement ou lorsqu'il refroidit. Les parties accessibles sont
chaudes.
• Si l'appareil est équipé d'un dispositif de sécurité enfants, nous vous re-
commandons de l'activer.
• Les enfants ne doivent pas nettoyer ni entreprendre une opération de main-
tenance sur l'appareil sans surveillance.
17

• L'appareil et son cordon d'alimentation doivent être conservés hors de por-
tée des enfants âgés de moins de 8 ans.
Sécurité générale
• Cet appareil est conçu uniquement pour un usage domestique et des situ-
ations telles que :
– dans des cuisines réservées aux employés dans des magasins, bureaux
et autres lieux de travail ;
– dans des bâtiments de ferme ;
– par les clients, dans des hôtels et autres lieux de séjour ;
– en chambre d'hôtes.
• L'intérieur de l'appareil devient chaud lorsqu'il est en fonctionnement. Ne
touchez pas les éléments chauffants se trouvant dans l'appareil. Utilisez
toujours des gants de cuisine pour retirer ou enfourner des accessoires ou
des plats allant au four.
• N'utilisez pas de nettoyeur vapeur pour nettoyer l'appareil.
• Avant toute opération de maintenance, déconnectez l'alimentation électri-
que.
• Si la porte ou les joints de la porte sont endommagés, vous ne devez pas
utiliser l'appareil tant qu'il n'a pas été réparé par un professionnel qualifié.
• Les appareils ne doivent pas être utilisés avec une minuterie ni un système
de commande à distance indépendant.
• Toute opération de maintenance ou de réparation nécessitant le retrait de
l'un des caches assurant la protection contre les micro-ondes ne doit être
confiée qu'à un professionnel qualifié.
• Ne faites pas chauffer de liquides ni d'autres aliments dans des récipients
hermétiquement fermés. Ils pourraient exploser.
• N'utilisez que des ustensiles adaptés à une utilisation dans un four à micro-
ondes.
• Lorsque vous faites chauffer des aliments dans des récipients en plastique
ou en papier, surveillez toujours l'appareil car ces matières peuvent s'en-
flammer.
18

• Cet appareil est uniquement destiné à chauffer des aliments et des bois-
sons. L'utiliser pour sécher des aliments ou des vêtements, ou pour faire
chauffer des compresses chauffantes, des chaussons, des éponges, des
tissus humides ou autres pourrait provoquer des blessures ou un incendie.
• En présence de fumée, éteignez ou débranchez l’appareil et laissez la por-
te fermée pour étouffer les flammes.
• Si vous chauffez des boissons au micro-ondes, celles-ci peuvent entrer en
ébullition après être sorties de l'appareil. Soyez prudent lorsque vous mani-
pulez le récipient.
• Mélangez ou remuez le contenu des biberons et des petits pots pour bé-
bés, puis vérifiez la température avant de nourrir votre enfant afin d'éviter
les brûlures.
• Les œufs dans leur coquille et les œufs durs entiers ne doivent pas être
chauffés dans l'appareil car ils pourraient exploser, même après la fin de la
cuisson.
• Nettoyez régulièrement l'appareil et retirez-en les résidus alimentaires.
• Si vous ne nettoyez pas régulièrement l'appareil, sa surface peut se dété-
riorer, ce qui pourrait réduire sa durée de vie et provoquer des situations
dangereuses.
• La température des surfaces accessibles peut être élevée pendant le fonc-
tionnement de l'appareil.
• Le four à micro-ondes ne doit pas être encastré, à moins qu'il n'ait été spé-
cifiquement testé à cet effet.
• La surface arrière de l'appareil doit être positionnée contre un mur.
• Faites attention aux dimensions minimales du meuble (le cas échéant). Re-
portez-vous au chapitre « Installation ».
• L'appareil doit être mis en marche avec la porte décorative du meuble ou-
verte (si présente).
• N'utilisez pas de produits abrasifs ni de racloirs pointus en métal pour net-
toyer la porte en verre car ils peuvent rayer sa surface, ce qui peut briser le
verre.
19

• Si le câble d'alimentation est endommagé, il ne doit être remplacé que par
un professionnel qualifié afin d'éviter tout danger.
Instructions de sécurité
Installation
Avertissement L'appareil doit être installé
uniquement par un professionnel qualifié.
• Retirez l'intégralité de l'emballage.
• N'installez pas et ne branchez pas un appareil en-
dommagé.
• Suivez scrupuleusement les instructions d'installa-
tion fournies avec l'appareil.
• L'appareil est lourd, prenez toujours des précau-
tions lorsque vous le déplacez. Portez toujours des
gants de sécurité.
• Ne tirez jamais l'appareil par la poignée.
• Respectez l'espacement minimal requis par rapport
aux autres appareils.
• Vérifiez que l'appareil est installé sous et à proximi-
té de structures sûres.
• Les côtés de l'appareil doivent rester à côté d'appa-
reils ou d'éléments ayant la même hauteur.
Branchement électrique
Avertissement Risque d'incendie ou
d'électrocution.
• L'ensemble des branchements électriques doit être
effectué par un technicien qualifié.
• L'appareil doit être relié à la terre.
• Vérifiez que les données électriques figurant sur la
plaque signalétique correspondent à celles de votre
réseau. Si ce n'est pas le cas, contactez un électri-
cien.
• Si l'appareil est branché à la prise murale en utili-
sant une rallonge électrique, assurez-vous qu'elle
est reliée à la terre.
• Ne branchez la fiche d'alimentation à la prise de
courant qu'à la fin de l'installation. Assurez-vous
que la prise de courant est accessible une fois l'ap-
pareil installé.
• Veillez à ne pas endommager la fiche secteur ni le
câble d'alimentation. Contactez le service après-
vente ou un électricien pour remplacer le câble
d'alimentation s'il est endommagé.
• Ne tirez jamais sur le câble d'alimentation pour dé-
brancher l'appareil. Tirez toujours sur la fiche.
Utilisation
Avertissement Risque de blessures, de
brûlures, d'électrocution ou d'explosion.
• Utilisez cet appareil dans un environnement do-
mestique.
• Ne modifiez pas les caractéristiques de cet appa-
reil.
• Assurez-vous que les orifices de ventilation ne sont
pas bouchés.
• Ne laissez jamais l'appareil sans surveillance pen-
dant son fonctionnement.
• N'exercez jamais de pression sur la porte ouverte.
• N'utilisez jamais l'appareil comme plan de travail, ni
la cavité comme un espace de rangement.
Entretien et nettoyage
Avertissement Risque de blessure corporelle,
d'incendie ou de dommage matériel à l'appareil.
• Avant toute opération d'entretien, éteignez l'appa-
reil et débranchez la fiche de la prise secteur.
• Nettoyez régulièrement l'appareil afin de maintenir
le revêtement en bon état.
• Ne laissez pas les résidus alimentaires ou de pro-
duits nettoyants s'accumuler sur les joints de la por-
te.
• Des graisses ou de la nourriture restant dans l'ap-
pareil peuvent provoquer un incendie.
• Nettoyez l'appareil avec un chiffon doux humide.
Utilisez uniquement des produits de lavage neutres.
N'utilisez pas de produits abrasifs, de tampons à ré-
curer, de solvants ni d'objets métalliques.
• Si vous utilisez un spray pour four, suivez les consi-
gnes de sécurité figurant sur l'emballage.
20
La page est en cours de chargement...
La page est en cours de chargement...
La page est en cours de chargement...
La page est en cours de chargement...
La page est en cours de chargement...
La page est en cours de chargement...
La page est en cours de chargement...
La page est en cours de chargement...
La page est en cours de chargement...
La page est en cours de chargement...
La page est en cours de chargement...
La page est en cours de chargement...
La page est en cours de chargement...
La page est en cours de chargement...
La page est en cours de chargement...
La page est en cours de chargement...
-
 1
1
-
 2
2
-
 3
3
-
 4
4
-
 5
5
-
 6
6
-
 7
7
-
 8
8
-
 9
9
-
 10
10
-
 11
11
-
 12
12
-
 13
13
-
 14
14
-
 15
15
-
 16
16
-
 17
17
-
 18
18
-
 19
19
-
 20
20
-
 21
21
-
 22
22
-
 23
23
-
 24
24
-
 25
25
-
 26
26
-
 27
27
-
 28
28
-
 29
29
-
 30
30
-
 31
31
-
 32
32
-
 33
33
-
 34
34
-
 35
35
-
 36
36


Faure FSG25249XA Manuel utilisateur
- Taper
- Manuel utilisateur
- Ce manuel convient également à
dans d''autres langues
- English: Faure FSG25249XA User manual
Documents connexes
Autres documents
-
Electrolux EMS20300OX Le manuel du propriétaire
-
-
-
Electrolux MO317GXE Manuel utilisateur
-
-
Electrolux EMM20007OX Manuel utilisateur
-
-
Electrolux EMS30400OX Manuel utilisateur
-
Juno JM60200211 Manuel utilisateur
-
ZANKER KAM2800X Manuel utilisateur