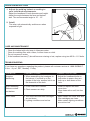
Kobalt SGY-A13 Manuel utilisateur
- Catégorie
- Accessoires de vélo
- Taper
- Manuel utilisateur

Fr
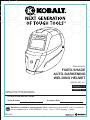
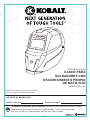
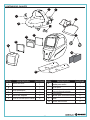
ITEM #0033326
MODEL SGY-A13
FIXED-SHADE
AUTO-DARKENING
WELDING HELMET
ATTACH YOUR RECEIPT HERE
Purchase DateSerial Number
Questions, problems, missing parts? Before returning to your retailer, call our custormer
service department at 1-888-3KOBALT, 8 a.m. - 8 p. m., EST, Monday - Friday.
AB13903
KOBALT
®
and the K Design
®
are registered
trademarks of LF, LLC. All Rights Reserved.
Français p. 12
Español p. 23
1

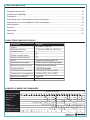
TABLE OF CONTENTS
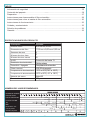
PRODUCT SPECIFICATIONS
Safety Information ....................................................................................................................
Package Contents ....................................................................................................................
Preparation ..............................................................................................................................
Care and Maintenance ............................................................................................................
Troubleshooting .................................................................................................................................
Warranty .................................................................................................................................
3
4
5
Disassembly Instructions for the Automatic Filter....................................................................
6
Reinstallation Instructions for the Automatic Filter................................................................... 8
Operating Instructions.............................................................................................................. 10
10
11
11
RECOMMENDED SHADE NUMBERS
WELDING PROCESS
Covered Electrode
MIG Plate Welding
MIG Sheet Metal
TIG
MAG
Arc Gouging
Plasma Cutting
Plasma Welding
3.80 in. × 1.66 in.
4.33 in. × 3.54 in. × 0.21 in.
3
01
Protection up to 13
Solar cells
citamotua ylluF
-10°C
t
o 65
°
C
(14°F to 149°F)
-20°C to 85°C (-4°F to 185°F)
Nylon
801
515g
1/20,000 of
a second
Viewing Area
Filter Dimension
Light Shade Number
Dark Shade Number
UV/IR
Power Supply
Power On/Off
Light to Dark
Operation Temperature
Storage Temperature
Helmet Material
Total Weight
Arc Sensors 2
2
Description Specification

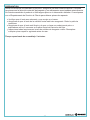
• Wear impact-resistant, primary eye protection, spectacles or goggles that meet current ANSI
• Avoid work positions that would expose unprotected areas of the body to sparks, spatter,
• The KOBALT welding filter should always be used with original KOBALT inner and outer
• Never place the helmet on or near hot surfaces.
• Keep helmet and all of its components out of the reach of children.
• Never open or tamper with the filter cartridge.
• The manufacturer is not responsible for modifications to the welding filter or the use of the filter
in any other manufacturer’s helmet.
• Failure to follow these warnings and operating instructions could result in severe personal
• The welding helmet is not suitable for overhead welding applications, laser welding or laser
• The recommended operating temperature range for the welding lens is -10°C - 65°C (14°F -
149°F). Do not use this device beyond these temperature limits.
cover lenses. Protection could be compromised if unapproved modifications are made.
specifications at all times when using this welding helmet.
direct and/or reflection radiation. Use adequate protection if exposure cannot be avoided.
injury.
cutting applications.
SAFETY INFORMATION
Please read and understand this entire manual before attempting to assemble, operate or install
the product. If you have any questions regarding the product, please call customer service at
1-888-3KOBALT, 8 a.m. - 8 p.m., EST, Monday - Friday.
3
R
R

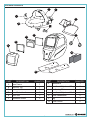
QUANTITYDESCRIPTIONPART
A 1Lens Frame
B 1
Resilient Trip
C 1
Automatic Filter
E 2Block Nut
D 1Inner Protection Lens
F 2Headband Screw
G
H
I
J
1
1
Sweatband
Headband Adjustment Strap
1Positioning Plate
1Headband Adjustment Knob
2
1
Extra Sweatbands K
2
Extra Lenses M
L
Bag
QUANTITYDESCRIPTIONPART QUANTITYDESCRIPTIONPART
A
L
K
D
C
PACKAGE CONTENTS
B
E
4
G
I
H
J
F
M

PREPARATION
Before beginning assembly of product, make sure all parts are present. Compare parts with
package contents list and hardware contents above. If any part is missing or damaged, do not
attempt to assemble the product.
Estimated Assembly Time: 2 minutes
5
Check for proper lens and helmet fit.
Make certain the front cover lens is properly attached. Remove protective film.
Make certain the lens is clean and there is no dirt or spatter covering the 2 sensors at the
front of the filter cartridge.
Inspect all parts for signs of wear or damage. Replace any scratched or cracked parts
prior to use.

2
3
PRESS
1
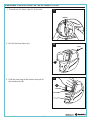
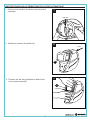
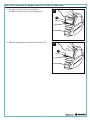
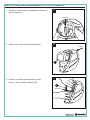
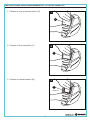
DISASSEMBLY INSTRUCTIONS FOR THE AUTOMATIC FILTER
6
1. Press down the frame clips for 2 seconds.
2. Pull off the lens frame (A).
PULL
A
3. Push the two clips at the bottom and pull off
the resilient trip (B).
PRESS
B

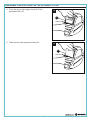
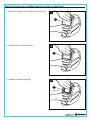
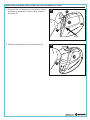
DISASSEMBLY INSTRUCTIONS FOR THE AUTOMATIC FILTER
4
5
7
5. Take out the inner protection lens (D).
4. Push the same clips again and pull off the
automatic filter (C).
PRESS
C
D
PRESS

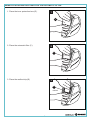
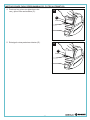
REINSTALLATION INSTRUCTIONS FOR THE AUTOMATIC FILTER
1. Place the inner protection lens (D).
2. Place the automatic filter (C).
3. Place the resilient trip (B).
8
1
D
2
C
3
PRESS
B

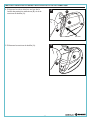
REINSTALLATION INSTRUCTIONS FOR THE AUTOMATIC FILTER
9
4. Push the two clips at the bottom of the outer
5. Press down the lens frame (A).
4
5
protections lens (B) and lens frame (A).
PUSH
PRESS
A
A
B

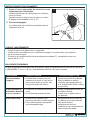
OPERATION INSTRUCTIONS
CARE AND MAINTENANCE
2. On/off.
The solar unit automatically switches on when
exposed to light.
your individual requirements.
1. Adjust the welding helmet according to
Adjust the headband in both diameter and height.
Adjust the angle between the face and helmet
also. The recommended angle is 10° - 12°.
10° - 12°
1
10
Clean the helmet with mild soap in lukewarm water.
Clean the welding filter with a clean, lint-free tissue or cloth.
Do not immerse in water.
Poor vision.
1. The cover lens and filter cartridges
are not clean.
2. Lighting conditions are too low.
1. Make certain the cover lens and
filter cartridges are clean.
2. Make certain lighting conditions
are not too low.
TROUBLESHOOTING
PROBLEM POSSIBLE CAUSE CORRECTIVE ACTION
Irregular
darkening.
1. When assembling the headgear to
the helmet, if one bolt is on the
upside of the hole, another bolt is on
the downside of the hole.
Auto-darkening
flickers or does
not darken.
1. Front cover lens is soiled.
2. Photo sensors are dirty.
1. Adjust the headband bolts on
both sides to assure they are
both up or both down on the
hole.
1. Clean or replace the front
cover lens.
2. Wipe clean with a soft, lint-free
cloth.
If you have any questions regarding the product, please call cu
stomer service at 1-888-3KOBALT,
8 a.m. - 8 p.m., EST, Monday - Friday.
If the headband screws (F) should become missing or lost, replace using two M5.6 x 11.5 bolts.

If you are not completely happy with your purchase, simply return it along with your original sales
Three (3) year warranty:
receipt to the place of purchase. We’ll repair it, replace it or refund your money. See store for
details.This warranty does not cover product malfunctions or damages, which result from the
product being tampered with, misused or abused. The operating instructions must be followed;
failure to do so will void the warranty.
The manufacturer is not responsible for any indirect damage,
which arises out of the use of the product.
WARRANTY
11
Printed in China
This warranty does not cover batteries.
KOBALT
®
and the K Design
®
are registered
trademarks of LF, LLC. All Rights Reserved.

Fr
12
ARTICLE #0033326
MODÈLE SGY-A13
MASQUE DE SOUDEUR
À OBSCURCISSEMENT
AUTOMATIQUE AVEC
TEINTE FIXE
KOBALT et le motif de K sont des marques de
commerce déposées de LF, LLC. Tous droits réservés.
® ®
JOIGNEZ VOTRE REÇU ICI
Numéro de série Date d'achat
Des questions, des problèmes, des pièces manquantes? Avant de retourner l'article
au détaillant, communiquez avec notre service à la clientèle au 1 888 3KOBALT, entre
8 h et 20 h (HNE), du lundi au vendredi.

14
15
16
17
19
21
21
22
22
NUMÉROS D'OMBRE RECOMMANDÉS
9,60 cm × 4,20 cm
11,00 cm × 9,00 cm × 0,53 cm
3
01
-10°C
t
o 65
°
C
(14°F to 149°F)
-20°C to 85°C (-4°F to 185°F)
Nylon
801
515g
UV/IR
Poids total
2
13
Description
................................................................................................................................
Consignes de sécurité ..............................................................................................................
Contenu de l’emballage ............................................................................................................
Préparation
Entretien ...................................................................................................................................
Dépannage ...............................................................................................................................
Garantie ....................................................................................................................................
Instructions pour le démontage du filtre automatique ...............................................................
Instructions pour la réinstallation du filtre automatique .............................................................
Mode d’emploi...........................................................................................................................
TABLE DES MATIÈRES
CARACTÉRISTIQUES DU PRODUIT
Matériau du masque
Température de fonctionnement
Température de rangement
1/20 000 de seconde
De clair à foncé
Cellule solaire et pile remplaçable
Entièrement automatique
Alimentation électrique
Mise sous tension/hors tension
Protection allant jusqu’à 13
Numéro (teinte claire)
Numéro (teinte foncée)
Capteurs d’arc
Dimension du filtre
Visière
TIG
MAG
MÉTHODE DE SOUDAGE
Électrode enrobée
MIG (plaques)
MIG (tôle)
Gougeage à l’arc
Coupage à l’arc plasma
Soudage à l’arc plasma
INTENSITÉ DE COURANT
Teinte 9 Teinte Teinte Teinte Teinte
Teinte Teinte
Teinte
Teinte Teinte Teinte Teinte
Teinte Teinte Teinte
Teinte Teinte
Teinte
Teinte Teinte Teinte Teinte
Teinte
Teinte Teinte Teinte
Teinte
Teinte Teinte Teinte
Réglable

14
•
R
R
• Ce masque n’est pas prévu pour le soudage effectué au-dessus de la tête, ni pour le soudage
ou le découpage au laser.
• Les températures recommandées pour le fonctionnement du hublot de soudage sont de -10°C
- 65°C (14°F - 149°F). N’utilisez pas cet appareil si les températures dépassent ces limites.
CONSIGNES DE SÉCURITÉ
Assurez-vous de lire et de comprendre l’intégralité de ce manuel avant de tenter d’assembler,
d’utiliser ou d’installer le produit. Si vous avez des questions, veuillez communiquer avec notre
service à la clientèle au 1 888 3KOBALT, Entre 8 h et 20 h (HNE), du lundi au vendredi.
• Ne portez pas ce masque sans porter également en tout temps une première protection des
yeux résistante aux chocs sous forme de lunettes ou de lunettes-masque de sécurité
satisfaisant aux normes ANSI.
• Évitez les positions de travail exposant les zones non protégées du corps à des étincelles, à
des projections ou à un rayonnement direct ou réfléchi. Utilisez un équipement de protection
adéquat si ce genre d’exposition ne peut être évité.
• Le filtre KOBALT pour le so udage devrait toujours être utilisé avec les lentilles extérieures
et intérieures KOBALT d’ori gine. Les modifications non autorisées pourraient compromettre
votre protection.
• Ne placez jamais ce masque sur une surface chaude ou à proximité d’une surface chaude.
• Gardez ce masque et ses composants hors de la portée des enfants.
• N’ouvrez ni ne manipulez jamais la cartouche du filtre.
• Le fabricant n’est pas responsable des modifications au filtre pour soudage ni de l’utilisation
de ce filtre dans un autre casque du fabricant.
• Ne pas tenir compte de ces avertissements et ne pas respecter le mode d’emploi peut
entraîner des blessures graves.

QUANTITYDESCRIPTIONPART
A 1
Monture de lentille
B 1
Resilient Trip
C 1
E 2
D 1
F 2
G
H
I
J
1
1
1
1
2
1
K
2
M
L
QUANTITÉDESCRIPTIONPIÈCE
QUANTITÉDESCRIPTIONPIÈCE
A
L
K
D
C
B
E
15
G
I
H
J
F
M
Bouton de réglage de la teinte
Lentille de protection intérieure
Écrou de verrouillage
Vis du tour de tête
Bandeau
Courroie de réglage du tour de tête
Plaque de positionnement
Bouton de réglage du tour de tête
Bandeau supplémentaire
Sac
Lentille supplémentaire
CONTENU DE L’EMBALLAGE

16
PRÉPARATION
Avant de commencer l’assemblage du produit, assurez-vous d’avoir toutes les pièces.
Comparez les pièces avec la liste du contenu de l’emballage et celle de la quincaillerie
ci-dessus. S’il y a des pièces manquantes ou endommagées, ne tentez pas d’assembler le
produit. Communiquez avec le service à la clientèle pour obtenir des pièces de rechange.
Assurez-vous que le casque et les lentilles sont bien ajustés.
Assurez-vous que la lentille extérieure est solidement fixée. Retirez la pellicule protectrice.
Assurez-vous que la lentille est propre et qu’il n’y a pas de saleté ou de projections sur les
deux capteurs situés à l’avant de la cartouche du filtre.
Inspectez toutes les pièces pour repérer les signes d’usure ou de dommage. Remplacez
toute pièce égratignée ou fissurée avant l’utilisation.
Temps d’assemblage approximatif : 2 minutes

2
3
Appuyez
Appuyez
1
17
Tirez
A
3. Poussez sur les deux fixations du bas et tirez
sur le cadre souple (B).
B
INSTRUCTIONS POUR LE DÉMONTAGE DU FILTRE AUTOMATIQUE
1. Enfoncez les attaches d’armature pendant deux
secondes.
2. Retirez la monture de lentille (A).

4
5
18
5. Retirez les lentilles de protection intérieure (D).
4. Poussez de nouveau sur les mêmes
fixations et retirez le filtre automatique (c).
Appuyez
C
D
Appuyez
INSTRUCTIONS POUR LE DÉMONTAGE DU FILTRE AUTOMATIQUE

1. Placez les lentilles de protection intérieure (D).
2. Placez le filtre automatique (C).
3. Installez le cadre souple (B).
19
1
D
2
C
3
Appuyez
B
INSTRUCTIONS POUR LE DÉMONTAGE DU FILTRE AUTOMATIQUE

20
4
5
Pousser
Appuyez
A
A
B
4. Enfoncez les deux attaches au bas de la
lentille de protection extérieure (B) et de la
monture de lentille (A).
5. Enfoncez la monture de lentille (A).
INSTRUCTIONS POUR LA RÉINSTALLATION DU FILTRE AUTOMATIQUE
La page est en cours de chargement...
La page est en cours de chargement...
La page est en cours de chargement...
La page est en cours de chargement...
La page est en cours de chargement...
La page est en cours de chargement...
La page est en cours de chargement...
La page est en cours de chargement...
La page est en cours de chargement...
La page est en cours de chargement...
La page est en cours de chargement...
La page est en cours de chargement...
La page est en cours de chargement...
-
 1
1
-
 2
2
-
 3
3
-
 4
4
-
 5
5
-
 6
6
-
 7
7
-
 8
8
-
 9
9
-
 10
10
-
 11
11
-
 12
12
-
 13
13
-
 14
14
-
 15
15
-
 16
16
-
 17
17
-
 18
18
-
 19
19
-
 20
20
-
 21
21
-
 22
22
-
 23
23
-
 24
24
-
 25
25
-
 26
26
-
 27
27
-
 28
28
-
 29
29
-
 30
30
-
 31
31
-
 32
32
-
 33
33


Kobalt SGY-A13 Manuel utilisateur
- Catégorie
- Accessoires de vélo
- Taper
- Manuel utilisateur
dans d''autres langues
- español: Kobalt SGY-A13 Manual de usuario
Documents connexes
Autres documents
-
Powerfist 9099706 Le manuel du propriétaire
-
Power Fist 8700254 Le manuel du propriétaire
-
 A.C.E. International Company ArcOne Singles Series Manuel utilisateur
-
 JBM 53415 Mode d'emploi
-
3M Speedglas™ Heavy-Duty Welding Helmet G5-01 w ADF G5-01VC and Adflo™ High-Altitude PAPR Assembly, 46-1101-30iVC, 1 EA/Case Mode d'emploi
-
-
-
-
-
3M Speedglas™ 100 Series Front Frame 07-0212-01BL, Black, 1 EA/Case Mode d'emploi

