Canvas Vernon Kitchen Island Le manuel du propriétaire
- Taper
- Le manuel du propriétaire

ASSEMBLY INSTRUCTIONS
HAVING TROUBLE?
TOLL-FREE:
1-888-670-6684
IMPORTANT: Please read this manual carefully
before beginning assembly of this product.
Keep this manual for future reference.
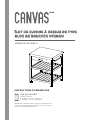
VERNON
VERNON
KITCHEN ISLAND WITH BUTCHER
KITCHEN ISLAND WITH BUTCHER
BLOCK TOP
BLOCK TOP
PRODUCT NO. 168-0144-0

We believe in the power of décor and its
ability to make up the fabric of your home.
That’s why CANVAS®
CANVAS®
collections draw
inspiration from Canadians and the way
inspiration from Canadians and the way
they live.
they live.
From on-trend furniture pieces to holiday
décor and all your outdoor living essentials,
CANVAS®
CANVAS®
makes it easy to refresh your space
to refl ect your unique style and the way you
your unique style and the way you
live every day.
live every day.
We would love to hear from you and welcome
your thoughtful feedback. Visit our website
at canadiantire.ca
canadiantire.ca
to tell us about your
experience, and share your photos with us
using #myCANVASstyle
#myCANVASstyle
.
Show us how you bring CANVAS®
CANVAS®
products
to life. We can’t wait to see!

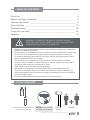
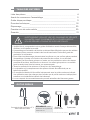
Parts List 4
Before You Begin Assembly 9
Step-by-step Guide 11
Technical Data 18
Troubleshooting 20
Caring for Your Item 20
Warranty 21
TABLE OF CONTENTS
TOOLS REQUIRED
No. 2 Cross-head Screwdriver
Tip Shown Actual Size Rubber
Mallet
NOTE: Do not over-drill/
be aware of over-drilling
VERNON KITCHEN ISLAND WITH BUTCHER BLOCK TOP 3
• Please read and understand this entire manual before attempting to assemble,
operate, or install the product.
• Any assembly or maintenance of the product must be carried out by adults only.
• Some parts may contain sharp edges. Wear protective gloves if necessary.
• To prevent damage, place all parts on a level surface during assembly. Add a
layer of protective surface if needed.
• Do not allow your children to climb or jump on furniture due to possible
accident, injury or death. A child climbing on a piece of furniture can make it
top-heavy and cause the furniture to tip over.
• Keep children and pets away during assembly.
• Repairing and replacing parts should be done by a qualifi ed technician.
• This unit is intended for use only within the maximum weight indicated. Use
with loads heavier than the maximum weight indicated may result in instability
causing possible injury.
• Failure to follow these warnings could result in serious injury.
WARNING! TO REDUCE THE RISK OF SERIOUS INJURY,
READ THE FOLLOWING SAFETY INSTRUCTIONS BEFORE
ASSEMBLING AND USING THE PRODUCT.
2 People

VERNON KITCHEN ISLAND WITH BUTCHER BLOCK TOP
4
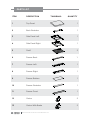
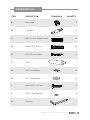
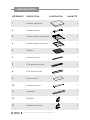
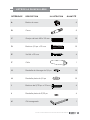
PARTS LIST
ITEM DESCRIPTION THUMBNAIL QUANTITY
7 Drawer Left 1
8 Drawer Right 1
9 Drawer Bottom 1
10 Drawer Stretcher 1
11 Drawer Front 1
12 Castor 2
13 Castor With Brake 2
1 Top Panel 1
2 Back Stretcher 1
3 Side Panel Left 1
4 Side Panel Right 1
5 Shelf 2
6 Drawer Back 1

VERNON KITCHEN ISLAND WITH BUTCHER BLOCK TOP 5
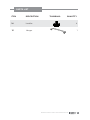
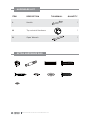
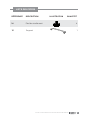
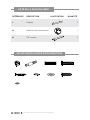
14 Leveller 4
PARTS LIST
ITEM DESCRIPTION THUMBNAIL QUANTITY
15 Hanger 1

VERNON KITCHEN ISLAND WITH BUTCHER BLOCK TOP
6
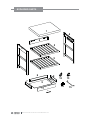
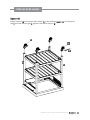
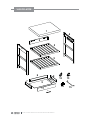
EXPLODED PARTS
1
2
3
4
5
5
6
7
8
9
10
11 15
14
12 13
L

VERNON KITCHEN ISLAND WITH BUTCHER BLOCK TOP 7
HARDWARE LIST
ITEM DESCRIPTION THUMBNAIL QUANTITY
A Cam Lock 8
B Cam Bolt 8
G 1/4’’ Lock Washer 18
H 1/4’’ Flat Washer 18
C M8 x 30 mm Wood Dowel 18
D Bolts 1/4’’ x 32 mm 18
E M4 x 32 mm Screw 4
F Glue 1
I Bolts 5/32’’ x 23 mm 4
J 5/32’’ Flat Washer 4
K Hex Key 1

VERNON KITCHEN ISLAND WITH BUTCHER BLOCK TOP
8
HARDWARE LIST
EXTRA HARDWARE BAG
ITEM DESCRIPTION THUMBNAIL QUANTITY
L Handle 1
N Open Wrench 1
M Tip-restraint Hardware 1

VERNON KITCHEN ISLAND WITH BUTCHER BLOCK TOP 9
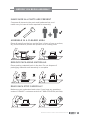
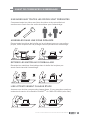
BEFORE YOU BEGIN ASSEMBLY
MAKE SURE ALL PARTS ARE PRESENT
Compare all pieces to the parts and hardware lists, and
make sure you have all tools required for assembly.
REMOVE PACKAGING MATERIALS
Place packing materials back in the box. Do not dispose of
packaging materials until assembly is complete.
READ EACH STEP CAREFULLY
Make sure you understand each step. If you have any questions,
contact CANVAS® customer service at 1-888-670-6684 (toll free).
ASSEMBLE IN A CLEARED AREA
Place all parts from the box on the fl oor in front of you on a clean,
dry, level surface to protect the product as it is being built.
?

VERNON KITCHEN ISLAND WITH BUTCHER BLOCK TOP
10
BEFORE YOU BEGIN ASSEMBLY
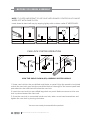
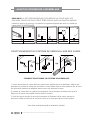
CAM LOCK SYSTEM OPERATION
NOTE: IT IS VERY IMPORTANT TO USE GLUE WITH DOWELS. EXCESS GLUE CAN BE
WIPED OFF WITH DAMP CLOTH.
Insert dowel at least half way by tapping lightly with a rubber mallet IF NECESSARY.
GLUE
XX
1 4
3
2
HOW THE KNOCK DOWN (KD) ASSEMBLY SYSTEM WORKS
1. Screw cam bolt into the pre-drilled small holes on panel. Align the panels to be joined
so that the cam bolt goes into the pre-drilled hole on the edge of the second panel and
protrudes into the hole that will house the cam lock.
2. Insert the cam lock into pre-drilled large hole on panel. Make sure arrow on the cam
lock is pointed toward the cam bolt.
3. Once the cam bolt is connected inside cam lock, take a cross-head screwdriver and
tighten the cam lock by turning clockwise.
You are now ready to assemble the product.

VERNON KITCHEN ISLAND WITH BUTCHER BLOCK TOP 11
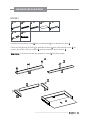
STEP-BY-STEP GUIDE
7X19X111 X1
6X18X1
11
7
8
6
6
9
E
BX8EX4
B
B
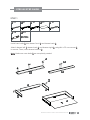
Install cam bolts
B
B into drawer front
11
11 and drawer back
6
6.
Attach drawer left
7
7, drawer back
6
6, and drawer right
8
8, using M4 x 32 mm screws
E
E
to secure. Then, insert drawer bottom
9
9.
Note
Note: Make sure cam bolts
B
B are completely seated.
STEP 1

VERNON KITCHEN ISLAND WITH BUTCHER BLOCK TOP
12
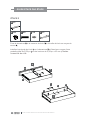
Attach drawer front
11
11 and drawer stretcher
10
10 to drawer box, using cam locks
A
A.
Install drawer handle
L
L to drawer front
11
11 and secure with 5/32” fl at washer
J
J and
bolts 5/32” x 23 mm
I
I. Set aside
STEP-BY-STEP GUIDE
10 X1
11
11
7
8
A
I
L
STEP 2
AX8IX2JX2LX1
10
JA

VERNON KITCHEN ISLAND WITH BUTCHER BLOCK TOP 13
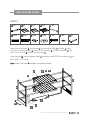
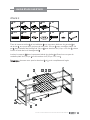
Attach back stretcher
2
2 and shelves
5
5, to side panels left
3
3 and right
4
4, using
M8 x 30 mm wood dowels
C
C with 1/4’’ fl at washers
H
H, 1/4’’ lock washers
G
G with
bolts 1/4’’ x 32 mm
D
D; tighten with hex key
K
K.
Insert hanger
15
15 into side panel right
4
4 and secure with 5/32” fl at washers
J
J and
bolts 5/32” x 23 mm
I
I.
Note
Note: Make sure bolts
D
D and
I
I are completely seated.
STEP-BY-STEP GUIDE
5X2
2X1
DX10
CX12
STEP 3
GX10 HX10 IX2JX2
15 X1
KX1
4X1
3X1
4
3
5
2
5
15
D
C
I
J
G H
K

VERNON KITCHEN ISLAND WITH BUTCHER BLOCK TOP
14
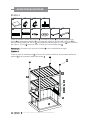
STEP-BY-STEP GUIDE
2
4
3
1
D
K
14
G
H
KX1NX1
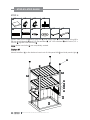
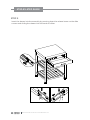
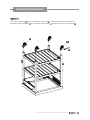
Attach side panel left
3
3, back stretcher
2
2, side panel right
4
4 to top panel
1
1 using M8 x
30 mm wood dowels
C
C and 1/4’’ fl at washers
H
H, 1/4’’ lock washers
G
G with bolts 1/4’’ x
32 mm
D
D; tighten with hex key
K
K.
Option #1
Option #1
Attach levellers
14
14 to the bottom insert nut of side panel left
3
3 and side panel right
4
4.
Note
Note: Make sure bolts
D
D are completely seated.
14 X4
13 X2
12 X2
STEP 4
DX8
CX6GX8H
1X1
X8
C

VERNON KITCHEN ISLAND WITH BUTCHER BLOCK TOP 15
N
12
13
Option #2
Option #2
Attach castors
12
12 and castors with brake
13
13 to the bottom
insert nut
insert nut of side panel
left
3
3 and side panel right
4
4; tighten with open wrench
N
N.
STEP-BY-STEP GUIDE
4
3

VERNON KITCHEN ISLAND WITH BUTCHER BLOCK TOP
16
Insert the drawer into the assembly by pressing down the release levers on the slide
runners and sliding the drawer into the tracks of slides.
STEP-BY-STEP GUIDE
STEP 5

VERNON KITCHEN ISLAND WITH BUTCHER BLOCK TOP 17
STEP-BY-STEP GUIDE
MX1
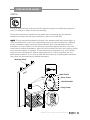
STEP 6
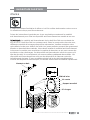
This is an optional step to be used if this island is going to be stationary against a
wall. This design is meant to be free standing.
Follow the instructions printed on the plastic bag containing the tip-restraint
hardware to attach the tip-over restraints to the unit and the wall.
NOTE
NOTE: The tip-restraint hardware included is for wooden stud wall construction. It
must be attached to a wall stud. Depending upon your wall construction, diff erent
anchor hardware maybe required. Please contact your local hardware store for
assistance. Young children can be seriously injured by tipping furniture. You must
install the tip-restraint hardware with the unit to prevent the unit from tipping, which
may cause accidents or damage. The tip restraints are intended only as a backup,
they are not a substitute for proper adult supervision. The tip restraints are not
earthquake restraints. If you wish to add the extra security of earthquake restraints,
they must be purchased and installed separately.
Steel Cable
Wall
Wall
Wooden Stud
Short Screw
Metal Bracket
Long Screw

VERNON KITCHEN ISLAND WITH BUTCHER BLOCK TOP
18
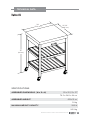
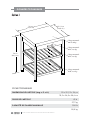
Maximum load
110 lb (50 kg)
Maximum load
30 lb (13.6 kg)
Maximum load
30 lb (13.6 kg)
Maximum load
30 lb (13.6 kg)
TECHNICAL DATA
SPECIFICATIONS
ASSEMBLED DIMENSIONS (W x D x H) 30 x 25 1/2 x 34”
76.2 x 64.8 x 86.4 cm
ASSEMBLED WEIGHT 61 lb
2 7 . 7 k g
MAXIMUM WEIGHT CAPACITY 200 lb
9 0 . 9 k g
Option #1
Option #1
30”
(76.2 cm) 25 1/2”
(64.8 cm)
34”
(86.4 cm)

VERNON KITCHEN ISLAND WITH BUTCHER BLOCK TOP 19
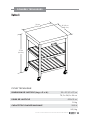
TECHNICAL DATA
SPECIFICATIONS
ASSEMBLED DIMENSIONS (W x D x H) 30 x 25 1/2 x 37”
76.2 x 64.8 x 94 cm
ASSEMBLED WEIGHT 63 lb 15 oz
2 9 k g
MAXIMUM WEIGHT CAPACITY 200 lb
9 0 . 9 k g
Option #2
Option #2
30”
(76.2 cm)
37”
(94 cm)
25 1/2”
(64.8 cm)

VERNON KITCHEN ISLAND WITH BUTCHER BLOCK TOP
20
CARING FOR YOUR ITEM
ASSEMBLY TROUBLESHOOTING
PRODUCT TROUBLESHOOTING
CALL US;
WE CAN HELP
BEFORE RETURNING
YOUR PRODUCT If you have questions regarding your product or require
warranty assistance, please call our customer service helpline.
TOLL-FREE:
1-888-670-6684
HAVING TROUBLE?
LET US HELP YOU!
1Use a soft, clean cloth that will not scratch the surface when dusting.
2Wipe clean using a damp cloth and a mild cleaner. Wipe dry with a clean cloth.
4Check all nuts and bolts periodically for tightness. When required, tighten them again.
3Regular application of food-grade oil to the surface will help prevent and treat light
scratches. This treatment does not apply to deep scratches.
PROBLEM POSSIBLE CAUSES SOLUTION
Drawer slides do not go
smoothly.
Drawer gaps are not
even.
Take out and repeat
drawer installation.
Use the pilot holes on
the support rail as a
guide to level the slide
runners.
The slide runners do not align
with the slide tracks properly.
Slide runners are not
level with each other.
La page est en cours de chargement...
La page est en cours de chargement...
La page est en cours de chargement...
La page est en cours de chargement...
La page est en cours de chargement...
La page est en cours de chargement...
La page est en cours de chargement...
La page est en cours de chargement...
La page est en cours de chargement...
La page est en cours de chargement...
La page est en cours de chargement...
La page est en cours de chargement...
La page est en cours de chargement...
La page est en cours de chargement...
La page est en cours de chargement...
La page est en cours de chargement...
La page est en cours de chargement...
La page est en cours de chargement...
La page est en cours de chargement...
La page est en cours de chargement...
La page est en cours de chargement...
La page est en cours de chargement...
La page est en cours de chargement...
La page est en cours de chargement...
-
 1
1
-
 2
2
-
 3
3
-
 4
4
-
 5
5
-
 6
6
-
 7
7
-
 8
8
-
 9
9
-
 10
10
-
 11
11
-
 12
12
-
 13
13
-
 14
14
-
 15
15
-
 16
16
-
 17
17
-
 18
18
-
 19
19
-
 20
20
-
 21
21
-
 22
22
-
 23
23
-
 24
24
-
 25
25
-
 26
26
-
 27
27
-
 28
28
-
 29
29
-
 30
30
-
 31
31
-
 32
32
-
 33
33
-
 34
34
-
 35
35
-
 36
36
-
 37
37
-
 38
38
-
 39
39
-
 40
40
-
 41
41
-
 42
42
-
 43
43
-
 44
44


Canvas Vernon Kitchen Island Le manuel du propriétaire
- Taper
- Le manuel du propriétaire
dans d''autres langues
Documents connexes
-
Canvas Hexagon Metal Frame Sofa End/Side Accent Table Le manuel du propriétaire
-
-
-
-
-
-
Autres documents
-
YOTRIO Canterbury Coffee Table Assembly Instructions
-
-
-
-
ROOMS TO GO 21556230 Assembly Instructions
-
-
for Living 3-Shelf Bookcase Le manuel du propriétaire
-
Dorel Living DA7867B Manuel utilisateur
-
-
 Quadrafire Mt. Vernon AE Pellet Insert Manuel utilisateur
