Baldwin 6403.150.B Le manuel du propriétaire
- Taper
- Le manuel du propriétaire

OWNER’S MANUAL
Manual del propietario
Manuel du propriétaire
PK.1187


ENGLISH
3
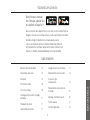
TABLE OF CONTENTS
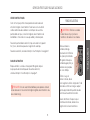
DOWNLOAD THE KEVO APP
Baldwin Evolved is powered by Kevo.
Download the Kevo app from the
App Store
®
or Google Play™.
Follow the instructions inside the app to create an account, enroll your
rst smartphone and send eKeys to family and friends.
A Kevo-compatible smartphone (or other mobile internet-connected device or tablet) must have
Bluetooth Smart Ready/ Bluetooth 4.0 and an app specic to the device must be installed.
Find out if your device is compatible at www.baldwinhardware.com/evolved/compatibility.
Important Safeguards 4
Lock Features 5
Switches 5
Normal Use 6
Fob Accessory 6
Triple Touch Lock & Auto-Lock 7
System Reset 7
System Lights 8
Fob Pairing 9
Lock Battery Replacement 10
Access to Battery Pack
and Back Panel 10
Fob Battery Replacement 11
Troubleshooting: Door Handing 12
Advanced Features 13
Regulatory Compliance 14

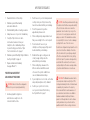
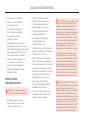
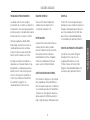
IMPORTANT SAFEGUARDS
1. Read all instructions in their entirety.
2. Familiarize yourself with all warning
and caution statements.
3. Remind all family members of safety precautions.
4. Always have access to your lock’s standard key.
5. If using the Triple Touch Lock or Auto-
Lock features, make sure to have your
smartphone, fob or standard key with you
to prevent locking yourself out. See “Triple
Touch Lock & Auto-Lock” on page 7.
6. Familiarize yourself with all light string notications.
See “System Lights” on page 8.
7. Replace low batteries immediately.
See pages 10 and 11.
PREVENTING INADVERTENT
UNLOCKING OF YOUR DOOR
WARNING: Failure to follow these safeguards
could result in your lock opening inadvertently.
1. Avoid keeping and storing phones
and fobs unnecessarily close to the
lock when inside the home.
2. Restrict access to your lock’s back panel and
routinely check your settings to ensure they
have not been altered without your knowledge.
3. Protect the password to your Kevo
app and web portal accounts.
4. When sending an eKey, always double-check
that you are sending it to the correct recipient.
5. Protect and restrict access to your
smartphone so that your app settings cannot
be altered without your knowledge.
6. Enable the Kevo app’s security passcode
so that your app settings cannot be
altered without your knowledge.
7. When sending eKeys, be aware of the
difference between an Admin user and
other users in the system: an Admin user
can send, disable and delete eKeys.
8. If your smartphone is lost or stolen, use the Kevo
web portal (www.mykevo.com) to disable it.
9. If a fob in your system is lost or stolen,
reset your lock to delete it from memory.
See “System Reset” on page 7.
CAUTION: As with any radio-based technology,
it should be noted that the accuracy and reliability
of the lock’s inside-outside sensor cannot be
guaranteed. Users should not rely solely on the
lock’s sensor for security purposes and should
always use caution. This manufacturer assumes
no responsibility for incorrect results or damages
resulting from the use of the lock’s sensor.
Certain home congurations may impede the lock’s
sensor more than others. Example: Your home
ofce is located next to your entryway, and part
of the ofce extends past the front door, jutting
into the front yard. If your device is being actively
used in that ofce extension, the lock’s sensor
could possibly detect the device as being outside
of your home while that device is in active use.
WARNING: This Manufacturer advises that no
lock can provide complete security by itself. This
lock may be defeated by forcible or technical means,
or evaded by entry elsewhere on the property.
No lock can substitute for caution, awareness of
your environment, and common sense. Builder’s
hardware is available in multiple performance
grades to suit the application. In order to enhance
security and reduce risk, you should consult a
qualied locksmith or other security professional.

ENGLISH
5
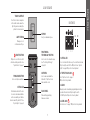
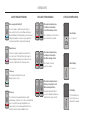
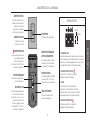
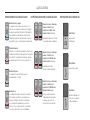
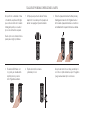
LOCK FEATURES
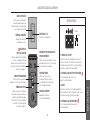
SWITCHES
TOUCH SURFACE
Touch the lock exterior anywhere
on the metallic surface above the
light string and surrounding the
cylinder to lock and unlock.
LIGHT STRING
Changes color to
communicate with you.
KEYWAY
Insert your standard key here.
BACK PANEL
Where all the programming
features are located.
PROGRAM BUTTON
Use to enroll phones and fobs.
POSITIONING
TECHNOLOGY BUTTON
Use to reset lock’s activation range.
See “Positioning Technology”
on page 13.
1. STATUS LED
Door lock status LED blinks every 6 seconds. Can be turned
off by moving the switch to the Off position. See “System
Lights” on page 8. On position is factory default.
2. TRIPLE TOUCH LOCK
See “Triple Touch Lock” on page 7.
Off position is factory default.
3. AUDIO
Beeping sound is heard during programming and normal
operation. Can be turned off by moving the switch
to the Off position. On position is factory default.
4. AUTO-LOCK
See “Auto-Lock” on page 7. Off position is factory default.
SWITCHES
Use to enable and disable the
Status LED, Triple Touch Lock,
Audio, and Auto-Lock.
STATUS LED
Communicates whether the door
is locked or unlocked and ashes
red for a low battery alert. Can be
turned on and off by Switch #1. See
“System Lights” on page 8.
RESET BUTTON
Only use to reset the lock, which
will delete all eKeys and fobs. See
“System Reset” on page 7.
A B
1 2 3 4
On Off

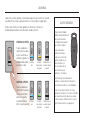
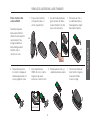
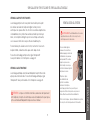
The Baldwin fob accessory
(8380) is a Bluetooth device
that provides the same
touch-to-open convenience
as a smartphone.
Up to eight fobs can be
enrolled in a single lock, and
a single fob can be enrolled
in up to 25 different locks.
Note: You may choose
to use only fobs, only
smartphones, or a
mix of both in your Baldwin system.
When using a fob to lock and unlock the
door, you may hold it in your hand, pocket,
bag or purse as long as there is a clear line
of sight between the lock and the fob.
For fob pairing instructions, see page 9.
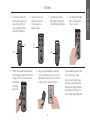
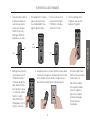
LOCKING THE DOOR
Touch the lock exterior
on the touch surface. The
light string will display
the following animations,
the lock will beep once,
and the door will lock.
UNLOCKING THE DOOR
Touch the lock exterior
on the touch surface. The
light string will display the
following animations, the
lock will beep twice, and
the door will unlock.
NORMAL USE
When using your phone to lock and unlock the door, make sure the phone is on,
Bluetooth is enabled, and the Kevo app is running in the background.
You may hold the phone in your hand, pocket, bag or purse as long as
there is a clear line of sight between the lock and the phone.
FOB ACCESSORY
blue sweep amber sweep,
moving towards
door edge
last 2 LEDs
remain on for
2 seconds
blue sweep green sweep,
moving away
from door edge
last 2 LEDs
remain on for
2 seconds

ENGLISH
7
TRIPLE TOUCH LOCK & AUTO-LOCK
TRIPLE TOUCH LOCK
Triple Touch Lock allows you to lock the door from the outside without the use of a
smartphone or fob. You might use Triple Touch Lock if you are using only a standard key
in your system but wish to lock the door by touch, if your smartphone or fob is disabled,
or if you have a visitor in your home that will leave and lock the door behind them.
To lock the door with this feature, touch the lock three (3)
times, pausing briey between each touch.
To enable Triple Touch Lock, set Switch #2 to the On
position. See “Switches” on page 5.
AUTO-LOCK
Auto-Lock will automatically re-lock the door 30 seconds after unlocking. To enable
Auto-Lock, set Switch #4 to the On position. See “Switches” on page 5.
CAUTION: With these feature enabled, it is possible to lock yourself outside if
you don’t have an enrolled smartphone, fob or standard key with you.
SYSTEM RESET
CAUTION: Resetting your Baldwin Bluetooth
system will restore your lock to factory settings
and delete all smartphones and fobs from the
lock’s memory.
If you wish to perform a
system reset, press and
hold the Reset button
on the back panel for
10 seconds until the
lock beeps and the light
string ashes a boot up
pattern of multiple colors.
Phones: After a
system reset, you
will need to re-enroll
your Owner phone. You will still be able to send
eKeys at no charge to anyone who previously
had an active eKey at the time of reset.
Fobs: After a system reset, all fobs
will need to be re-enrolled.
A B

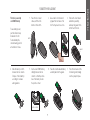
LIGHT STRING NOTIFICATIONS
SYSTEM LIGHTS
After normal locking/unlocking,
5 red ashes followed by the
center LEDs remaining solid red
The four AA batteries in the lock interior
are low and need to be replaced.
After normal locking/unlocking,
5 red ashes followed by the
side LEDs remaining solid red
The fob battery is low and
needs to be replaced.
After normal locking/unlocking, 5
red ashes followed by the side
LEDs alternating red ashes
The deadbolt has jammed. Check
your door for alignment and make sure
the latch bolt can operate smoothly.
Blue sweeping and shutting off
The lock is unable to establish a connection with your
device, and it will not lock or unlock. Make sure that your
Bluetooth and Bluetooth Sharing (inside your phone’s privacy
settings) are enabled. Also, make sure you are signed in to
your Kevo app and that it is running in the background.
Magenta sweep
Your device is outside of activation range, and it will not
lock or unlock. See “Positioning Technology” on page 13.
When locking and unlocking your door, make sure there is
a clear line of sight between the lock and your device.
Teal sweep
The lock was touched while the door was
already opening or closing.
Red sweep
The lock has detected an unauthorized device within
activation range, and it will not lock or unlock. An unauthorized
phone is one with the Kevo app installed that does not
have an eKey to your lock, and an unauthorized fob is one
that has not been enrolled in your Baldwin system.
Red ashing
The four AA batteries in
the lock interior are low
and need to be replaced.
Amber ashing
Door is locked.
Green ashing
Door is unlocked.
RED LIGHT STRING WARNINGS STATUS LED NOTIFICATIONS

ENGLISH
9
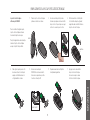
FOB PAIRING
1. To activate the fob for the rst
time after unboxing, press and
release the fob’s button (do
not press and hold). The fob’s
internal LED will ash green.
2. Remove the interior cover
or window to gain access
to the back panel. See
page 10 for details.
3. Press and release the fob’s
button again to intiate pairing.
The LED will begin to blink green.
4. Press and hold the Program
button on the back panel
for two (2) seconds.
5. Hold the fob close against the back panel. The
fob’s LED will begin to blink faster. When it turns
solid green, the fob is successfully enrolled. If
A B
button button
LED
A B
back
panel
A B
the LED ashes
red, pairing is
unsuccessful.
6. Bring your fob and standard key outside and
close the door. Make sure there is a clear line of
sight between the fob and the lock. Test the fob
to make sure it locks and unlocks the door.
If you are unable to pair the fob, reboot
the lock and try steps 2-6 again.
To reboot, remove the battery pack,
wait a few seconds, then reinsert the
battery pack. See page 10 for battery
removal instructions. When the lock
reboots, the light string will ash amber.

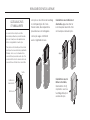
The battery pack is located inside the
interior assembly, and it holds four (4) AA
batteries. For best results, use new, non-
rechargeable Alkaline batteries only.
Dispose of the old batteries according
to local laws and regulations.
If the window on the interior cover is unlocked,
gently squeeze the top sides of the window and
pull up when you need to access the battery pack.
squeeze
If the window on the
interior cover is locked,
remove the three (3)
screws that secure the
interior cover to the interior
assembly when you need to
access the battery pack.
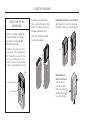
LOCK BATTERY REPLACEMENT
The interior cover features a window that
is unlocked by default so you may slide
it up for quick access to programming
buttons and the battery pack.
For added security, you may lock the window
to prevent access to the programming buttons.
Note: This will require the removal of the interior
cover to access the battery pack. To lock the
window, remove the two screws from the back of
the interior cover and install them in the window.
window
ACCESS TO BATTERY PACK
AND BACK PANEL
Remove screws.
Install screws in window.

ENGLISH
11
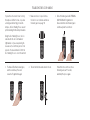
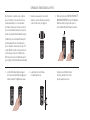
FOB BATTERY REPLACEMENT
The fob is powered by
one CR2025 battery.
1. Place the fob on a at
surface, with the fob’s
button on the bottom.
2. Use a small coin to twist and
pry apart the two halves of the
fob. You may need to use force.
3. Remove the circuit board
and battery assembly,
and keep the gasket in the
bottom half of the fob.
4. Slide the battery out from
between the two contacts.
Dispose of the old battery
according to local laws
and regulations.
5. Insert a new CR2025 battery,
sliding it between the two
contacts so that the positive
face of the battery touches
the positive contact.
6. Place the circuit board and battery
assembly back into the gasket.
7. Press the two halves of the
fob back together, making
sure they snap into place.
gasket
positive contact
button
To save battery power,
your fob will enter sleep
mode when it is still.
To extend battery life,
consider leaving your fob
at rest when not in use.

TROUBLESHOOTING: DOOR HANDING
If your latch won’t extend or retract correctly,
the turnpiece is difcult to rotate, or you hear
a clicking sound when trying to rotate the
turnpiece, the Door Handing Process was not
performed during rst-time battery installation.
During the Door Handing Process, the lock
learns whether the door is left-handed or
right-handed, so if you are experiencing the
issues above, the lock thinks your door is the
opposite of its actual orientation. Perform the
Door Handing Process to correct the latch bolt.
1. Make sure the door is open. Remove
the interior cover or window and remove
the battery pack. See page 10.
2. Reinsert the battery pack while PRESSING
AND HOLDING the Program button.
Release the button when the battery pack
is all the way inside the lock interior.
3. The Status LED will ash red and green,
and the lock will beep. Press and
release the Program button again.
If the latch bolt does not move, remove
the battery pack, wait 15 seconds,
and attempt the process again.
A B A B A B
A B A B
A B
4. The latch bolt will retract and extend on its own.

ENGLISH
13
ADVANCED FEATURES
POSITIONING TECHNOLOGY
Your Baldwin lock features a unique positioning
technology that can tell if your device is inside
or outside your home to help prevent your
door from being unlocked by unauthorized
users while your device is inside.
For additional security, the lock will also limit the
activation range on the outside. The lock will learn
about your entryway and the typical positions where
you might keep your phone or fob during normal use.
If you nd that the lock’s activation range is not ideal
for your use, you can reset what the lock learned,
and it will learn your environment again. Quickly
press and release the Positioning Technology button
on the lock interior (See “Lock Features” on page
5). The lock will learn your environment again.
HISTORY LOG
A history of the lock’s activity may be viewed
through the Kevo app or by logging into
the web portal: www.mykevo.com.
NOTIFICATIONS
The Kevo app can send notications when the door
is locked and unlocked by eKey holders. You can
choose to receive the system’s default notications or
set up custom notications to monitor a specic user
or time frame. In the Kevo app, tap the gear icon and
select “Notications” to view and edit notications.
DUAL FACTOR AUTHENTICATION
The Kevo app features an optional, added-
security passcode that you can use in addition to
the app’s password. Enabling the passcode will
require you to enter a 4-digit PIN whenever you
access the app. You can also choose to require
the PIN upon each lock and unlock attempt.
KEVO PLUS
With Kevo Plus, you will be able to lock and unlock
your home and check whether your door is locked
or unlocked when you are away from home. You can
upgrade to Kevo Plus inside the Kevo app.
Visit www.baldwinhardware.com/
evolved#kevo-plus for more information.
CONNECT SMART PRODUCTS
Connect your Baldwin lock to select smart
products. In the Kevo app, tap the gear icon
to connect to smart products (iOS only: select
“Preferences”). Visit www.baldwinhardware.com/
evolved/kevo/support for more information.

REGULATORY COMPLIANCE
This product complies with standards established by the following regulatory bodies:
• Federal Communications Commission (FCC)
• Industry Canada
FCC
This device complies with Part 15 of the FCC Rules. Operation is subject to the following two conditions: ( 1 ) this device may not cause harmful
interference, and ( 2 ) this device must accept any interference received, including interference that may cause undesired operation.
This equipment has been tested and found to comply with the limits for a Class B digital device, pursuant to Part 15 of the FCC Rules. These limits are designed
to provide reasonable protection against harmful interference in a residential installation. This equipment generates, uses, and can radiate radio frequency
energy and, if not installed and used in accordance with the instructions, may cause harmful interference to radio communications. However, there is no
guarantee that interference will not occur in a particular installation. If this equipment does cause harmful interference to radio or television reception, which can
be determined by turning the equipment off and on, the user is encouraged to try to correct the interference by one or more of the following measures:
• Reorient or relocate the receiving antenna.
• Increase the separation between the equipment and receiver.
• Connect the equipment into an outlet on a circuit different from that to which the receiver is connected.
• Consult the dealer or an experienced radio/TV technician for help.
IMPORTANT! Changes or modications not expressly approved by the manufacturer could void the user’s authority to operate the equipment.
Industry Canada
This device complies with Industry Canada licence-exempt RSS standard(s). Operation is subject to the following two conditions:
( 1 ) this device may not cause interference, and ( 2 ) this device must accept any interference, including interference that may cause undesired operation of the device.

ESPAÑOL
15
DESCARGUE LA APLICACIÓN MÓVIL KEVO
Baldwin Evolved es alimentado por
Kevo. Descargue la aplicación móvil
Kevo del App Store
®
o Google Play™.
Siga las instrucciones de la aplicación para crear una cuenta, registrar su primer
teléfono inteligente y enviar las llaves electrónicas (eKeys) a su familia y amigos.
Un teléfono inteligente (una tableta o un dispositivo móvile conectado a Internet)
compatible con Kevo debe tener Bluetooth Smart Ready/ Bluetooth 4.0, y se debe
instalar la aplicación Kevo especíca del dispositivo. Averigüe si su dispositivo
es compatible en www.baldwinhardware.com/evolved/compatibility.
TABLA DE CONTENIDO
Medidas de protección importantes 16
Características de la cerradura 17
Interruptores 17
Uso normal 18
Llavero transmisor 18
Cierre con tres toques y bloqueo automático 19
Reiniciar su sistema 19
Luces del sistema 20
El registro del llavero transmisor 21
Reemplazo de las baterías en la cerradura 22
Acceso al paquete de baterías
y el panel posterior 22
Reemplazo de la batería en el llavero transmisor 23
Solución de problemas: Orientación de la puerta 24
Funciones avanzadas 25
Cumplimiento Normativo 26

MEDIDAS DE PROTECCIÓN IMPORTANTES
1. Lea las instrucciones en su totalidad.
2. Familiarícese con todas las deniciones
de advertencia y precaución.
3. Recuerde a todos los integrantes de su
familia las precauciones de seguridad.
4. Siempre tenga acceso a la llave
estándar de su cerradura.
5. Si utiliza la función de cierre con tres toques o
bloqueo automático, verique que lleve consigo el
teléfono inteligente, llavero transmisor o llave estándar
para evitar quedarse afuera. Vea “Cierre con tres
toques y bloqueo automático” en la página 19.
6. Familiarícese con todas las noticaciones de
error que aparecen con la cadena de luces.
Vea “Luces del sistema” en la página 20.
7. Cambie las baterías gastadas de inmediato.
Vea la página 22 and 23.
IMPEDIR LA APERTURA
INVOLUNTARIA DE LA PUERTA
WARNING: Si no se cumplen estas medidas de
protección, la cerradura podría abrirse involuntariamente.
1. Evite mantener y guardar los teléfonos y
llaveros transmisores cerca de la cerradura
cuando esté en el interior de la casa.
2. Limite el acceso al panel posterior de la
cerradura y verique en forma rutinaria las
conguraciones para comprobar que no
hayan sido alteradas sin su conocimiento.
3. Proteja las contraseñas de las cuentas
del portal web y aplicación Kevo.
4. Al enviar una llave electrónica, siempre
vuelva a comprobar que la está
enviando al destinatario correcto.
5. Proteja y limite el acceso a su teléfono inteligente
para que no se puedan alterar las conguraciones
de la aplicación sin su conocimiento.
6. Habilite el código de acceso de seguridad de la
aplicación Kevo para que no se puedan alterar las
conguraciones de la aplicación sin su conocimiento.
7. Al enviar llaves electrónicas, tenga en cuenta la
diferencia entre un usuario Admin y otros usuarios
del sistema: el usuario Admin puede enviar,
deshabilitar y eliminar llaves electrónicas.
8. Si pierde o roban su teléfono inteligente,
utilice el portal web (www.mykevo.com) para
deshabilitar el dispositivo inteligente.
9. Si pierde o roban su llavero transmisor, reinicie
la cerradura para eliminarla de la memoria. Vea
“Reiniciar su sistema” en la página 19.
PRECAUCIÓN: Al igual que con cualquier tecnología
de radio, se debe tener en cuenta que la precisión, la
conabilidad o la utilidad del posicionamiento de su
dispositivo no se pueden garantizar con ubicaciones
derivadas del sensor correspondiente a la cerradura; esta
función se brinda solo por propósitos de comodidad.
Los usuarios no deben conar únicamente en el sensor
de la cerradura para propósitos de seguridad y siempre
deben tener precaución. Este Fabricante no asume
responsabilidad alguna por resultados incorrectos o
daños producidos por el uso del sensor de la cerradura.
Ciertas conguraciones domésticas pueden impedir
el funcionamiento del sensor de la cerradura más que
otras. Ejemplo: Su ocina está ubicada junto al recibidor,
y parte de la ocina se extiende más allá de la puerta
principal, proyectándose hacia el patio principal. Si su
dispositivo se utiliza en forma activa en dicha extensión
de la ocina, es posible que el sensor de la cerradura
detecte el dispositivo en una ubicación externa al hogar
mientras dicho dispositivo se encuentra en uso activo.
ADVERTENCIA: Este Fabricante hace saber que no
hay cerrojos que puedan proporcionar completa seguridad
por sí mismos. Puede hacerse que falle este cerrojo
forzándolo o utilizando medios técnicos, o puede evadirse
entrando por otra parte de la propiedad. No hay cerrojos
que puedan hacer de sustitutos para la precaución, el estar
al tanto del entorno, y el sentido común. Pueden obtenerse
piezas de ferretería de constructor con diversos grados
de rendimiento para ajustarse a la aplicación. Para realzar
la seguridad y reducir los riesgos, debe consultar con un
cerrajero capacitado o otro profesional de seguridad.

ESPAÑOL
17
CARACTERÍSTICAS DE LA CERRADURA
INTERRUPTORES
SUPERFICIE TÁCTIL
Toque la cerradura exterior en
cualquier parte de la supercie
metálica por encima de la
cadena de luces y alrededor
del cilindro para cerrar y abrir.
CADENA DE LUCES
Cambia de color para
comunicarse con usted.
CHAVETERO
Introduzca la llave estándar aquí.
PANEL POSTERIOR
Donde se encuentran todas las
funciones de programación.
BOTÓN PROGRAMA
Se utiliza para registrar teléfonos
y llaveros transmisores.
BOTÓN DE TECNOLOGÍA
DE POSICIONAMIENTO
Se utiliza para restablecer el rango
de activación. Vea “Tecnología de
posicionamiento” en la página 25.
1. ESTADO DEL LED
La luz LED parpadea cada 6 segundos para indicar el estado
de la cerradura de la puerta. Para desactivar el LED, mueva el
interruptor a la posición de apagada. Vea “Luces del sistema”
en la página 20. Encendido en forma predeterminada.
2. CIERRE CON TRES TOQUES
Vea “Cierre con tres toques” en la página 19.
Apagada en forma predeterminada.
3. AUDIO
El sonido tipo pitido se escucha durante la
programación y el funcionamiento normal. Para
desactivar el audio, mueva el interruptor a la posición
de apagada. Encendido en forma predeterminada.
4. BLOQUEO AUTOMÁTICO
Vea “Bloqueo automático” en la página 19.
Apagada en forma predeterminada.
INTERRUPTORES
Se utiliza para habilitar y deshabilitar
el estado del LED, cierre con tres
toques, audio y bloqueo automático.
ESTADO DEL LED
Se comunica independientemente
de si la puerta está cerrada o
abierta y titila en color rojo como
señal de poca batería. Puede
prenderse y apagarse a través
del interruptor N° 1. Vea “Luces
del sistema” en la página 20.
BOTÓN REINICIAR
Se utiliza solamente para reiniciar
la cerradura para eliminar
todos las eKeys y llaveros
transmisores. Consulte “Reiniciar
su sistema” en la página 19.
A B
1 2 3 4
Encenido
Apagada

El llavero transmisor Baldwin
(8380) es un dispositivo Bluetooth
que proporciona la misma
comodidad de tocar para abrir
que un teléfono inteligente.
Puede comprar llaveros
transmisores adicionales
según sea necesario. Puede
registrar un máximo de ocho
llaveros transmisores en
una sola cerradura. Un solo
llavero transmisor puede
registrarse en 25 cerraduras.
Nota: Puede elegir usar solamente llaveros
transmisores, solamente dispositivos inteligentes o
una combinación de ambos en su sistema Baldwin.
Puede sostener el llavero transmisor en su mano,
guardarlo en el bolsillo, bolso o monedero en la medida
que haya una línea de visión clara entre la cerradura
y el llavero transmisor. Para obtener instrucciones de
registro del llavero transmisor, vea la página 21.
CERRANDO LA PUERTA
Toque la cerradura de la
supercie táctil. La cadena
de luces va a mostrar las
animaciones siguientes, la
cerradura emitirá un pitido,
y la puerta se cerrará.
ABRIENDO LA PUERTA
Toque la cerradura de la
supercie táctil. La cadena
de luces va a mostrar las
animaciones siguientes,
la cerradura emitirá dos
pitidos, y la puerta se abrirá.
USO NORMAL
Cuando utilice su teléfono para abrir y cerrar la puerta, asegúrese de que el teléfono esté encendido,
que el Bluetooth esté activado y que la aplicación Kevo se esté ejecutando en segundo plano.
Puede sostener el teléfono en su mano, guardarlo en el bolsillo, bolso o monedero en
la medida que haya una línea de visión clara entre la cerradura y el teléfono.
LLAVERO TRANSMISOR
movimiento
azul
movimiento
ámbar al borde
de la puerta
2 LED permanecen
encendidos durante
2 segundos
movimiento
azul
movimiento
verde del borde
de la puerta
2 LED permanecen
encendidos durante
2 segundos

ESPAÑOL
19
CIERRE CON TRES TOQUES Y BLOQUEO AUTOMÁTICO
CIERRE CON TRES TOQUES
Cierre con tres toques permite cerrar la puerta desde el lado de afuera sin
un teléfono inteligente o llavero transmisor. Puede hacer uso de esta función
si utiliza solamente una llave estándar en su sistema pero desea cerrar la
puerta mediante un toque, si su teléfono inteligente o llavero transmisor está
deshabilitado o si tiene visitas en su casa que saldrán y cerrarán la puerta.
Para cerrar la puerta mediante esta función, toque la roseta del cerrojo pasador
tres (3) veces, haciendo una pausa de un segundo entre cada toque.
Para activar esta función, encienda el interruptor 2. Vea “Interruptores” en la página 17.
BLOQUEO AUTOMÁTICO
Bloqueo automático se volverá a cerrar la puerta 330 segundos después
de que la puerta ha sido desbloqueada.. Para activar esta función,
encienda el interruptor 4. Vea “Interruptores” en la página 17.
PRECAUCIÓN: Con estas características habilitadas, puede quedarse encerrado
del lado de afuera si no tiene un teléfono inteligente registrado, llavero transmisor o una
llave estándar consigo.
REINICIAR SU SISTEMA
ADVERTENCIA: Reiniciar su cerradura
borrará todas las eKeys y los llaveros
transmisores vinculadas con la cerradura.
Si desea restaurar su
cerradura, mantenga
presionado el botón Reiniciar
en el panel posterior durante
10 segundos hasta que la
cerradura haga un pitido y la
cadena de luces parpadea
en colores múltiples.
Teléfonos: Luego de
reiniciar el sistema, deberá
volver a registrar su teléfono de propietario. Podrá
enviar llaves electrónicas sin cargo a cualquier
persona que previamente haya tenido una llave
electrónica activa al momento del reinicio.
Llaveros transmisores: Despues de que el
sistema ha sido reiniciado, deberá volver a
registrar todos los llaveros transmisores.
A B

NOTIFICACIONES DE LA CADENA DE LUCES
LUCES DEL SISTEMA
Después de bloqueo / desbloqueo
normales, 5 destellos rojos
seguidos por los LEDs centros
restantes sólido de color rojo
Las baterías AA bajas en el interior del
cerrojo pasador y debe reemplazarse.
Después de bloqueo / desbloqueo
normales, 5 destellos rojos
seguidos por los LEDs laterales
restantes sólido de color rojo
La batería baja en el llavero
transmisor y deven reemplazarse.
Después de bloqueo / desbloqueo
normales, 5 destellos rojos
seguidos por los LEDs laterales
alternando destellos rojos
El cerrojo pasador está atorado.
Verique la alineación de la puerta
y compruebe que el perno de
retención funcione sin problemas.
Movimiento azul y se apaga:
La cerradura no pudo establecer una conexión con el
dispositivo, y la cerradura no va a bloquear o desbloquear.
Asegúrese de que el Bluetooth y Bluetooth Sharing (dentro
de la conguración de privacidad de su teléfono) están
habilitados, y asegúrese de que haya iniciado sesión en la
aplicación Kevo y que se está ejecutando en segundo plano.
Movimiento magenta
El dispositivo se encuentra fuera del rango de activación, y la
cerradura no va a bloquear o desbloquear. Vea “Tecnología de
posicionamiento” en la página 25. Asegúrese de que haya
una clara línea de visión entre el cerrojo y su dispositivo.
Movimiento turqueso
La cerradura fue tocado mientras que la puerta
ya estaba abriendo o cerrando.
Movimiento rojo
La cerradura ha detectado un dispositivo no autorizado
dentro del rango de activación, y la cerradura no va a
bloquear o desbloquear. Un teléfono no autorizada es
uno con la aplicación instalada Kevo que no tiene un
eKey a su cerrojo, y un llavero transmisor no autorizada
es uno que no ha sido inscrito en el sistema Baldwin.
Roja titilando
Las baterías AA bajas en el
interior del cerrojo pasador
y debe reemplazarse.
Ámbar titilando
La puerta está cerrada.
Verde titilando
La puerta está
desbloqueada.
ADVERTENCIAS EN ROJO DE LA CADENA DE LUCES NOTIFICACIONES DEL ESTADO DE LED
La page est en cours de chargement...
La page est en cours de chargement...
La page est en cours de chargement...
La page est en cours de chargement...
La page est en cours de chargement...
La page est en cours de chargement...
La page est en cours de chargement...
La page est en cours de chargement...
La page est en cours de chargement...
La page est en cours de chargement...
La page est en cours de chargement...
La page est en cours de chargement...
La page est en cours de chargement...
La page est en cours de chargement...
La page est en cours de chargement...
La page est en cours de chargement...
La page est en cours de chargement...
La page est en cours de chargement...
La page est en cours de chargement...
La page est en cours de chargement...
-
 1
1
-
 2
2
-
 3
3
-
 4
4
-
 5
5
-
 6
6
-
 7
7
-
 8
8
-
 9
9
-
 10
10
-
 11
11
-
 12
12
-
 13
13
-
 14
14
-
 15
15
-
 16
16
-
 17
17
-
 18
18
-
 19
19
-
 20
20
-
 21
21
-
 22
22
-
 23
23
-
 24
24
-
 25
25
-
 26
26
-
 27
27
-
 28
28
-
 29
29
-
 30
30
-
 31
31
-
 32
32
-
 33
33
-
 34
34
-
 35
35
-
 36
36
-
 37
37
-
 38
38
-
 39
39
-
 40
40


Baldwin 6403.150.B Le manuel du propriétaire
- Taper
- Le manuel du propriétaire
dans d''autres langues
Documents connexes
-
Baldwin 6403.150.B Mode d'emploi
-
-
-
-
-
-
-
-
Autres documents
-
Kwikset 926 KEVO FOB Guide d'installation
-
Denso FN01060 Manuel utilisateur
-
KIA XR-4978 Mode d'emploi
-
 eKey TOCAhome Mode d'emploi
-
Denso FN01230 Mode d'emploi
-
Dometic ACC3100D Performance Booster Mode d'emploi
-
Master Lock 3681 Mode d'emploi
-
Spectrum Brands 910 TRL ZW L03 SMTCP Manuel utilisateur
-
-
