Olimpia Splendid Limpia 2 Manuel utilisateur
- Catégorie
- Humidificateurs
- Taper
- Manuel utilisateur
Ce manuel convient également à

LIMPIA 2
ISTRUZIONI PER USO E MANUTENZIONE IT
INSTRUCTION FOR USE AND MAINTENANCE EN
MODE D'EMPLOI ET D'ENTRETIEN FR
HINWEISE FÜR DIE VERWENDUNG UND PFLEGE DE
INSTRUCCIONES PARA EL USO Y EL MANTENIMIENTO ES

2
ITALIANO
QUANDO SI UTILIZZANO APPARECCHIATURE ELETTRICHE,
È SEMPRE NECESSARIO SEGUIRE PRECAUZIONI DI SICUREZZA DI
BASE PER RIDURRE RISCHI DI INCENDIO, SCOSSE ELETTRICHE E
INFORTUNI A PERSONE, INCLUSO QUANTO SEGUE:
Questo prodotto deve essere utilizzato unicamente secondo le spe-
ciche indicate nel presente manuale. L’utilizzo diverso da quanto
specicato potrebbe comportare gravi infortuni.
1 - ATTENZIONE Questa è un’apparecchiatura elettrica e richiede attenzione
durante l’utilizzo.
2 - ATTENZIONE per ridurre il rischio di gravi ustioni, tenere il prodotto fuori
dalla portata di bambini e animali domestici.
3 - ATTENZIONE Non consentire ai bambini di giocare con alcun imballo del
prodotto come buste di plastica.
4 - Lo smontaggio, riparazione o riconversione da parte di una persona non
autorizzata potrebbe comportare gravi danni e annullerà la garanzia del
fabbricante.
5 - Non azionare l’apparecchiatura in caso di cavo o spina danneggiati, dopo
malfunzionamenti dell’apparecchiatura o se è stata fatta cadere o è dan-
neggiata in qualsiasi modo. Restituire l’apparecchiatura al fabbricante per
l’esame, la regolazione meccanica o la riparazione.
6 - Collocare sempre l’umidicatore su una supercie stabile, piana e livellata
almeno a 60 cm dal pavimento. Questo umidicatore potrebbe non funzionare
correttamente su una supercie irregolare.
7 - Non bloccare l’ingresso o l’uscita dell’aria.
8 - Non collocare questo prodotto su una supercie in stoffa, tappeto o assor-
bente.
Questo potrebbe ostruire l’ingresso dell’aria.
9 - Non collocare l’umidicatore vicino a fonti di calore come stufe, radiatori e
caloriferi.
10 -Non collocare l’umidicatore vicino a una presa elettrica.
11 - Questo prodotto rilascia nebbia. Non collocare questo umidicatore diretta-
mente sopra mobilio in legno, pavimenti o qualsiasi supercie che potrebbe
essere danneggiata dall’acqua. Il produttore non si assume alcuna respon-
sabilità per danni nel caso in cui l’unità sia collocata in modo non corretto.
12 -Prima di riempire o pulire l’unità, accertarsi che sia scollegata dalla presa di
corrente.
13 -Una volta che l’umidicatore è stato collegato alla presa di corrente, non
inclinare né muovere l’unità.
14 -Non rimuovere la tanica dell’acqua dall’unità mentre è accesa.

3
ITALIANO
LIMPIA 2
15 -Non maneggiare la spina con le mani bagnate.
16 -Non piegare eccessivamente, attorcigliare, tirare o danneggiare il cavo di
alimentazione.
17 -Evitare di collocare il prodotto laddove la bocchetta dell’umidità sia puntata
direttamente su un oggetto o persona.
18 -Non inalare la nebbia/vapore espulso dal prodotto né bere l’acqua dalla tanica.
19 -Non riempire la tanica dell’acqua con acqua calda o bollente.
20 -Non utilizzare questo prodotto sotto la luce diretta del sole o vicino a fonti di
calore come una stufa, calorifero o radiatore.
21 -Se la tanica dell’acqua diventa fessurata o danneggiata, non utilizzare.
22 -Non tenere il prodotto in funzione per un periodo di tempo prolungato.
23 -Scollegare il cavo quando l’unità non è in uso per un periodo di tempo pro-
lungato e/o quando nessuno si trova in casa.
24 -Non tenere l’acqua nella tanica se non in uso per un periodo di tempo pro-
lungato.
25 -Non pulire l’unità, la tanica o serbatoio dell’acqua con detergenti o sostanze
chimiche di alcun tipo.
26 -L’uso di additivi per l’acqua tra cui oli eterici/essenziali, fragranze, eucalipto,
depuratori d’acqua, ecc. danneggerà i materiali dell’apparecchiatura e di
conseguenza l’intera unità.
Qualsiasi utilizzo di tali additivi annullerà la garanzia del fabbricante.
27 -Non utilizzare il prodotto vicino ad alcun altro dispositivo elettronico.
28 -Non coprire mai la bocchetta di spruzzo durante l’uso. Non collocare nulla
sopra o all’interno della tanica.
29 -Mentre si scollega dalla presa, tenere saldamente l’umidicatore.
30 -Non collocare il cavo sopra degli oggetti.
31 -Non bagnare il cavo esternamente o internamente o dove si collega al prodotto.
32 -Non utilizzare vicino a un lavabo.
33 -Non toccare la tanica d’acqua durante il funzionamento.
34 -Non immergere l’unità in acqua né versare acqua sull’unità o nella bocchetta
dell’umidità.
35 -Quando si svuota l’acqua dalla tanica dell’acqua, versare o scaricare late-
ralmente.
36 -Non coprire la bocchetta con un panno o la mano e non utilizzare senza la
bocchetta.
37 -Utilizzare acqua potabile o distillata nella tanica. Le aree con acque dure
richiederanno la pulizia più frequente.
38 -Se si forma umidità sulle pareti o nestre della stanza, spegnere l’umidicatore.
La stanza presenta molta umidità e una maggiore umidicazione potrebbe
causare danni.

4
ITALIANO
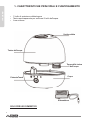
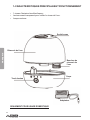
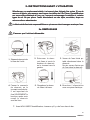
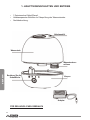
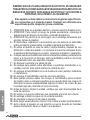
1- CARATTERISTICHE PRINCIPALI E FUNZIONAMENTO
• 1 livello di emissione nebbia/vapore
• Tanica semitrasparente per vericare il livello dell’acqua.
• Luce notturna.
SOLO PER USO DOMESTICO
Tanica dell’acqua
Tappo della tanica
dell’acqua
Corpo
Uscita nebbia
Alimentatore
PulsanteTouch

5
ITALIANO
LIMPIA 2
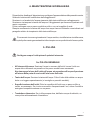
2- ISTRUZIONI PRIMA DELL’USO
Selezionare un’ubicazione stabile, livellata, e piana distante almeno 15 cm da pareti o og-
getti per un corretto usso dell’aria. Collocare l’umidicatore su una supercie resistente
all’acqua, poiché l’acqua può danneggiare il mobilio e alcuni tipi di pavimenti. Non collocare
l’unità direttamente su tappeti, asciugamani, lenzuola o altre superci assorbenti.
Non si accettano responsabilità per danni causati da versamenti d’acqua.
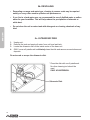
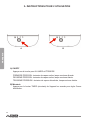
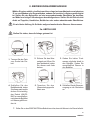
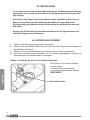
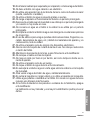
2a- RIEMPIMENTO
Accertarsi che l’unità sia scollegata.
1. Separare la tanica
dalla base dell’unità.
2. Capovolgere la tanica
dell’acqua e aprire il
tappo della tanica, gi-
randolo a sinistra.
3. Versare acqua fredda pota-
bile direttamente nella tani-
ca. Non versare nient’altro
che acqua nella tanica.
4. Chiudere il coperchio
della tanica, girandolo
a destra. È importante
ssare SALDAMEN-
TE il tappo dopo avere
riempito la tanica con
acqua.
7. Prima di ACCENDERE l’umidicatore accertarsi che vi sia acqua nella vasca.
5. Ricollocare il serbatoio
sul corpo.
6. Collegare l’alimentazione
alla presa elettrica..

6
ITALIANO
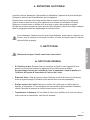
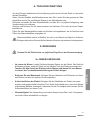
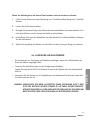
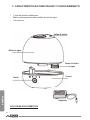
3- ISTRUZIONI PER L’USO
A) ON/OFF
Premere il pulsante per ACCENDERE e SPEGNERE.
PRIMA PRESSIONE: emissione di vapore attiva, luce notturna accesa
SECONDA PRESSIONE: emissione di vapore attiva, luce notturna spenta
TERZA PRESSIONE: emissione di vapore disattiva, luce notturna spenta
B) Timer
Premere il pulsante TIMER, da apparecchio in funzione, per impostare il tempo (ore) allo
spegnimento.
A B

7
ITALIANO
LIMPIA 2
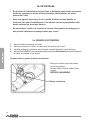
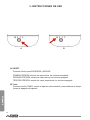
4- MANUTENZIONE GIORNALIERA
Prima di pulire, disattivare l’alimentazione e scollegare l’apparecchiatura dalla presa di corrente.
Sollevare la tanica dell’umidicatore dall’alloggiamento.
Scaricare in un lavabo tutta l’acqua rimanente dalla tanica dell’acqua e alloggiamento.
Scaricare e risciacquare la tanica dell’acqua e l’alloggiamento per rimuovere qualsiasi sedi-
mento o sporcizia.
Pulire e asciugare con un panno morbido e pulito o con un tovagliolo di carta.
Riempire nuovamente la tanica dell’acqua con acqua fresca di rubinetto come indicato nel
paragrafo relativo al riempimento della tanica dell’acqua.
È necessario rimuovere giornalmente l’acqua residua, sia dalla tanica sia dalla vasca,
quindi pulire e asciugare entrambi e inne riempire con acqua di rubinetto fresca e pulita.
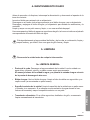
5- PULIZIA
Scollegare sempre l’unità prima di qualsiasi intervento.
5a- PULIZIA GENERALE
• All’interno della vasca. Scaricare l’acqua in eccesso dall’unità. Lavare l’unità con
acqua dolce utilizzando un pennello ed un panno morbidi come necessario.
Non immergere la base dell’unità nell’acqua, né permettere all’acqua di penetrare
all’interno della porta di scarico dell’aria secca dell’unità.
• Tanica dell’acqua. Svuotare la tanica dell’acqua. Pulire il tubo della nebbia con acqua
dolce e un leggero spazzolamento (si consiglia un pennello morbido).
• Supercie esterna dell’unità. Pulire la supercie dell’unità con un panno sofce e
umido, se necessario. Se si nota un accumulo d’acqua durante l’uso, ridurre l’umidità e
asciugare la supercie esterna con un panno.
• Trasduttore ultrasonico. Se si utilizza acqua dura, distillata o acqua di rubinetto, oc-
corre pulire settimanalmente il trasduttore.

8
ITALIANO
5b- DECALCIFICAZIONE
• In base all’utilizzo e al tipo di acqua, potrebbe essere richiesta la pulizia settima-
nale o in ogni altra settimana per ottimizzare le prestazioni dell’unità.
• Se si vive in un’area con acque dure, si consiglia di utilizzare acqua distillata o di
ammorbidire l’acqua per l’umidicatore. Ciò aiuterà a ridurre la precipitazione di
minerali o polvere bianca.
• Non pulire l’unità o la tanica dell’acqua con detergenti o sostanze chimiche di
alcun tipo.
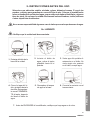
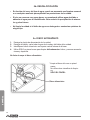
5c- DISCO ULTRASONICO
1. Togliere la spina di alimentazione dell’unità.
2. Rimuovere la tanica e svuotare tutta l’acqua dalla vasca e tanica dell’unità.
3. Individuare il disco ultrasonico nella parte centrale interna dell’unità di base.
4. Usare SOLO un pennello morbido per pulire delicatamente il disco e rimuovere accumuli
e depositi.
Non stronare o grattare il disco ultrasonico.
* Pulire il disco solo con un pennello
morbido.
Non devono essere utilizzati altri
utensili di pulizia.
SOLO PENNELLO.
Disco ultrasonico

9
ITALIANO
LIMPIA 2
Se il calcare diventa difcile da rimuovere con un pennello:
1. Riempire la vasca con la miscela di 1 cucchiaino di aceto bianco e 1 cucchiaino d’acqua
2. Lasciare agire per 5 minuti.
3. Con l’aceto nella vasca, pulire tutte le superci interne con un panno morbido o spazzola
per aiutare a rimuovere il calcare.
4. Controllare anche l’ugello della nebbia e il tubo della nebbia nella tanica dell’acqua.
Pulire come necessario.
5. Risciacquare accuratamente con acqua per rimuovere il calcare e la soluzione con aceto.
5d- STOCCAGGIO A FINE STAGIONE
• Seguire le istruzioni per la pulizia e la decalcicazione quando l’umidicatore viene
stoccato al termine della stagione.
• Asciugare completamente l’umidicatore prima dello stoccaggio. NON riporre con ac-
qua all’interno della vasca o tanica dell’acqua.
• Imballare l’unità nel suo cartone originale e conservare in luogo fresco e asciutto.
NOTA: SE SI RISCONTRA UN PROBLEMA NON TENTARE DI APRIRE DA SOLI
L’ALLOGGIAMENTO DEL MOTORE. QUESTA OPERAZIONE POTREBBE
ANNULLARE LA GARANZIA E CAUSARE DANNI ALL’UMIDIFICATORE O
LESIONI PERSONALI.

10
ITALIANO
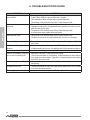
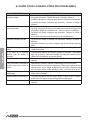
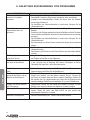
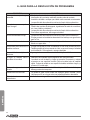
PROBLEMA SOLUZIONE
Vapore d'acqua e umidità non
vengono prodotti.
• Spina di alimentazione: Scollegare e quindi riprovare.
• Interruzione di corrente: Quando la corrente torna, riprovare.
• Installazione della tanica: Accertarsi che la tanica sia collegata correttamente.
• Lasuperciedeldiscoultrasonicoèsporca:Pulireildiscoultrasonico.
L'ariasofamailvapored'acqua
non viene prodotto.
• Acqua eccessiva: Rimuovere una certa quantità d'acqua dalla tanica.
• Potrebberoesserepresentinellatanicaresiduididetergentee/oingredienti
d'olio da cosmetici, ecc.; lavare la tanica e riprovare.
• Lasuperciedeldiscoultrasonicoèsporca:Pulireildiscoultrasonico.
• Sesiutilizzanoacquedure,sostituireconacquapiùmorbida.
Illivellodiumiditàèbasso. • Lasuperciedeldiscoultrasonicoèsporca:Pulireildiscoultrasonico.
• L'acqua nell'unità è troppo fredda: Sostituire con acqua fresca, ma non
fredda.
L'umidità ha un cattivo odore. • Scarsamanutenzioneoacquasporca:Pulireaccuratamenteilprodottoe
riempirlo d'acqua dolce.
Si forma polvere bianca vicino
sulmobilionellevicinanze.
• L'acqua dura può depositare una certa quantità di polvere. Anche la polvere
nell'aria si posa a causa della maggiore umidità nella stanza. Usare acqua
distillata se ciò diventa fastidioso.
L'unità ha smesso di funzionare. • Acquaesauritaoscarsa.Scollegarel'unitàerabboccarelatanica.
L'acqua si accumula all'esterno
dell'unità o area circostante
l'unità.
• Saturazionedell'umidità.Abbassarel'impostazionedelcontrollonebbia.
• Unitànonlivellatael'acquasiaccumula.Scollegareecollocaresusupercie
livellata. Puntare lo spruzzo lontano da oggetti. Sollevare l'unità su una
supercielivellataresistenteall'acquaadalmeno60cmdalpavimento.
Gocciolamento d'acqua durante
il riempimento.
• Acqua rimanente sul fondo della tanica. Pulire la tanica o inclinarla per
scaricare prima di trasportare.
Aumento del livello di rumorosità. • L'unità deve essere collocata su una supercie piana, livellata e dura.
AccertarsicheNONsiacollocatasuunasuperciemorbidaoassorbente.
Simboliluminosilampeggianti. • Indicascarsitàd'acqua.Scollegareerabboccarelatanica.
6- GUIDA PER LA RISOLUZIONE DEI PROBLEMI

11
ITALIANO
LIMPIA 2
SMALTIMENTO
Il simbolo sul prodotto o sulla confezione indica che il prodotto
non deve essere considerato come un normale riuto domestico,
ma deve essere portato nel punto di raccolta appropriato per il
riciclaggio di apparecchiature elettriche ed elettroniche.
Provvedendo a smaltire questo prodotto in modo appropriato,
si contribuisce a evitare potenziali conseguenze negative per
l’ambiente e per la salute, che potrebbero derivare da uno smal-
timento inadeguato del prodotto.
Per informazioni più dettagliate sul riciclaggio di questo prodotto,
contattare l’ufcio comunale, il servizio locale di smaltimento
riuti o il negozio in cui è stato acquistato il prodotto.
Questa disposizione è valida solamente negli Stati membri
dell’UE.

ENGLISH
12
WHEN USING ELECTRICAL APPLIANCES, BASIC SAFETY PRECAU-
TIONS SHOULD ALWAYS BE FOLLOWED TO REDUCE THE RISK OF
FIRE, ELECTRIC SHOCK, AND INJURY TO PERSONS, INCLUDING THE
FOLLOWING:
This product should be used only in accordance with the specications
outlined in this manual. Usage other than what has been specied
here may result in serious injury.
1 - CAUTION This is an electrical appliance and requires attention when in use.
2 - CAUTION To reduce the risk of severe burns, keep this product out of the
reach of children and pets.
3 - CAUTION Do not allow children to play with any product packaging such as
plastic bag
4 - Disassembly, repair or remodelling by an unauthorized person may result in
serious harm and will void the manufactures warranty.
5 - Do not operate the appliance in case of damaged cord or plug, after the ap-
pliance malfunctions, or if it has been dropped or damaged in any manner.
Return appliance to manufacturer for examination, electrical or mechanical
adjustment or repairing.
6 - Always place this humidier on a rm, at and level surface at least 60cm
from the oor. This humidier may not work properly on an uneven surface.
7 - Do not block air inlet or outlet.
8 - Do not place this product on cloth, carpet or an absorbent surface.
This may block air inlet.
9 - Do not place humidier near heat sources such as stoves, radiators and
heaters
10 -Do not place humidier near electrical outlet
11 - This product releases mist. Do not place this humidier directly on wood furni-
ture, ooring or any surfaces that could be damaged by water. Manufacturer
does not accept any liability for damage in the case of the unit being placed
incorrectly.
12 -Before lling or cleaning the unit, make sure it is unplugged.
13 -Once the humidier has been plugged in, do not tilt or move the unit.
14 -Do not remove the water tank from the unit while it is on.
15 -Do not handle the plug with wet hands.
16 -Do not excessively bend, twist, pull or damage the power cord.
17 -Avoid placing this product where the humidity spout is pointed directly at an
object or person.
18 -Do not inhale the mist/vapor expelled from the product or drink water from
the tank.

ENGLISH
13
LIMPIA 2
19 -Do not ll the water tank with hot or boiling water.
20 -Do not use this product in direct sunlight or near a heat source such as a
stove, heater or radiator.
21 -If the water tank becomes cracked or damaged, do not use.
22 -Do not keep this product running for an extended period of time.
23 -Unplug the cord when unit is not in use for an extended period of time and/
or when no one is home.
24 -Do not keep water in the tank when not in use for an extended period of time.
25 -Do not clean the unit, water tank or water reservoir with detergents or chem-
icals of any kind.
26 -The use of water additives including ethereal/essential oils, fragrances, eu-
calyptus, water conditioners, etc. will damage the appliance materials and
as a consequence the whole unit. Any use of such additives will void the
manufactures warranty.
27 -Do not use this product near any other electronic device.
28 -Do not cover the spray spout at any time during use. Do not put anything on
or in the tank.
29 -When unplugging from outlet hold humidier securely.
30 -Do not place cord over objects.
31 -Do not get water in or on the power cord or where it connects to the product.
32 -Do not use near a sink.
33 -Do not touch the water tank during operation.
34 -Do not submerse the unit in water or pour water on the unit or in the humidity
spout.
35 -When emptying water from water tank, pour on drain side.
36 -Do not cover the spout with cloth or hand and do not use without the spout.
37 -Use clean or distilled water in tank. Hard water areas will require more fre-
quent cleaning.
38 -If moisture forms on the walls or windows of the room, turn off the humidier.
The room already has plenty of humidity and additional moisture may cause
damage.

ENGLISH
14
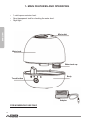
Mist outlet
Water tank cap
Body
1- MAIN FEATURES AND OPERATING
• 1 mist/vapour emission level.
• Semi-transparent tank for checking the water level.
• Night light.
FOR HOUSEHOLD USE ONLY
Adapter
Water tank
Touch button

ENGLISH
15
LIMPIA 2
2- PRE-OPERATING INSTRUCTION
Select a rm, level, at location at least 15cm from any wall or object for proper air
ow. Place the humidier on a water-resistant surface, as water can damage furniture
and some ooring. Do not place unit directly on carpet, towels, blankets or other ab-
sorbent surfaces.
We will not accept responsibility for damage caused by water spillage.
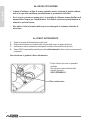
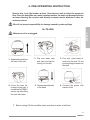
2a- FILLING
Make sure unit is unplugged.
7. Before turning ON the humidier make sure there is water in the Bowl.
1. Separate the tank from
the base of the unit.
2. Flip over water tank
and open the tank lid,
turning it to the left.
3. Pour cool, clean water di-
rectly into the tank. Do not
pour anything but water into
the tank.
4. Close the tank lid,
turning it to the right. It
is important to FIRMLY
secure cap after ling
the tank with water.
5. Replace the water tank
to the base.
6. Connect the power with
electric outlet

ENGLISH
16
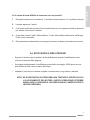
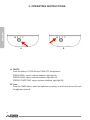
3- OPERATING INSTRUCTIONS
A) ON/OFF
Press the button to TURN ON and TURN OFF the appliance.
PRESS ONCE: vapour emission enabled, night light On.
PRESS AGAIN: vapour emission enabled, night light Off.
PRESS A THIRD TIME: vapour emission disabled, night light Off.
B) Timer
Press the TIMER button, when the appliance is working, to set the time (hours) left until
the appliance turns off.
A B

ENGLISH
17
LIMPIA 2
4- DAILY MAINTENANCE
Before clearing, turn off the power and unplug the appliance from the electrical outlet.
Lift off the tank of the humidier from the housing.
Carry the water tank and the housing to a sink, drain all the remaining water.
Drain and rinse water tank and housing to remove any sediment and dirt.
Wipe clean and dry with clean soft cloth or paper towel.
Rell the water tank with cool tap water as instructed in lling water tank paragraph.
It is necessary to remove daily any residual water, from both the tank and the tank
and the bowl, then clean and dry both and nally rell with new and clean tap water.
5- CLEANING
Always unplug the unit before servicing in any way.
5a- GENERAL CLEANING
• Inside the bowl. Pour excess water out of the unit. Wash the unit with fresh water,
using a soft paintbrush and a soft cloth as necessary.
Do not submerse the base of the unit into water, or allow water to enter inside
the dry air exhaust port of the unit.
• Water tank. Empty water tank. Clean the mist tube with fresh water and a light brush (a
soft paintbrush is advised).
• Outer surface of the unit. Wipe the surface of the unit with a soft, damp cloth if need-
ed. If you notice an accumulation of water during usage, reduce humidity and dry outer
surface with a cloth.
• Ultrasonic Transducer. If you use the hard water, distilled or tap water, you should
clean the transducer weekly.

ENGLISH
18
5b- DESCALING
• Depending on usage and water type, cleaning to remove scale may be required
weekly or every other week to optimize unit performance.
• If you live in a hard water area, we recommend the use of distilled water or soften
water for your humidier. This will help reduce the precipitation of minerals or
white dust.
• Do not clean the unit or water tank with detergents or cleaning chemicals of any
kind.
5c- ULTRASONIC DISK
1. Unplug unit.
2. Remove the tank and empty all water from unit bowl and tank.
3. Locate the ultrasonic disk on the inside centre of the base unit.
4. ONLY use a soft paintbrush to delicately clean the disk and remove accumulations and
deposits.
Do not scrub or scrape the ultrasonic disk.
* Clean the disk with a soft paintbrush.
No other cleaning tool should be
used.
ONLY A PAINTBRUSH.
Ultrasonic Disk

ENGLISH
19
LIMPIA 2
If calcium becomes difcult to remove with a paintbrush:
1. Fill the bowl with mixture of 1 tea spoon of white vinegar and 1 tea spoon of water
2. Let solution stand for 5 minutes.
3. With the vinegar in the bowl, clean all interior surfaces with a soft cloth or brush to help
remove scale.
4. Also check mist nozzle and mist tube in water tank. Clean as needed.
5. Rinse the Base thoroughly with water to remove scale and vinegar solution.
5d- END OF SEASON STORAGE
• Follow the Cleaning and Descaling instructions when the humidier will be stored at the
end of the season.
• Dry the humidier completely before storing.
DO NOT store with water inside the bowl or Water Tank.
• Pack the unit in its original carton and store in a cool, dry location.
NOTE: IF YOU EXPERIENCE A PROBLEM DO NOT ATTEMPT TO OPEN THE MO-
TOR HOUSING YOURSELF. DOING SO MAY VOID YOUR WARRANTY AND
CAUSE DAMAGE TO THE HUMIDIFIER OR PERSONAL INJURY.

ENGLISH
20
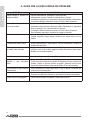
PROBLEM SOLUTION
Water vapor and humidity are
not produced.
• Powerplug:Unplugandthentryagain.
• PowerFailure:Whenthepowerisreturned,tryagain.
• Tank Installation: Make sure the tank is correctly attached.
• The surface of the ultrasonic disk is dirty: Clean ultrasonic disk.
Airblowsbutwatervaporisnot
produced.
• ExcessiveWater:Removeacertainamountofwaterfromthetank.
• Detergentresidueand/oroilingredientsfromcosmetics,etcmaybeintank;
washouttankandtryagain.
• The surface of the ultrasonic disk is dirty: Clean ultrasonic disk.
• Ifyouusehardwater,replacewithsofterwater.
Humiditylevelislow.
• The surface of the ultrasonic disk is dirty: Clean ultrasonic disk.
• Thewaterintheunitistoocold:Replacewithcool,butnotcoldwater.
Thehumidityhasabadsmell.
• Poormaintenanceordirtywater:Cleantheproductthoroughly,andllitwith
freshwater.
Whitedustisformingonnearby
furniture.
• Hardwatermaydepositacertainofdust.Dustintheairalsosettlesbecause
ofaddedhumidityintheroom.Usedistilledwaterifthisbecomesanuisance.
Unithasstoppedworking.
• Noorlowwater.Unplugunitandrelltank.
Water is accumulating outside of
unit or area surrounding unit.
• Saturationofhumidity.Lowermistcontrolsetting.
• Unitnotlevelandwaterisaccumulating.Unplugandplaceonlevelsurface.
Pointsprayawayfromobjects.Raiseunitonawater-resistantlevelsurface
atleast60cmfromtheoor.
Waterdrippingwhenrelling.
• Water remaining on bottom of tank. Wipe tank or tilt to drain before
transporting.
Increased noise level.
• Unitmustbeplacedonaat,level,hardsurface.MakesureitisNOTplaced
onasoftorabsorbentsurface.
Flashinglightsymbols.
• Indicateslowwater.Unplugandrelltank.
6- TROUBLESHOOTING GUIDE
La page est en cours de chargement...
La page est en cours de chargement...
La page est en cours de chargement...
La page est en cours de chargement...
La page est en cours de chargement...
La page est en cours de chargement...
La page est en cours de chargement...
La page est en cours de chargement...
La page est en cours de chargement...
La page est en cours de chargement...
La page est en cours de chargement...
La page est en cours de chargement...
La page est en cours de chargement...
La page est en cours de chargement...
La page est en cours de chargement...
La page est en cours de chargement...
La page est en cours de chargement...
La page est en cours de chargement...
La page est en cours de chargement...
La page est en cours de chargement...
La page est en cours de chargement...
La page est en cours de chargement...
La page est en cours de chargement...
La page est en cours de chargement...
La page est en cours de chargement...
La page est en cours de chargement...
La page est en cours de chargement...
La page est en cours de chargement...
La page est en cours de chargement...
La page est en cours de chargement...
La page est en cours de chargement...
La page est en cours de chargement...
-
 1
1
-
 2
2
-
 3
3
-
 4
4
-
 5
5
-
 6
6
-
 7
7
-
 8
8
-
 9
9
-
 10
10
-
 11
11
-
 12
12
-
 13
13
-
 14
14
-
 15
15
-
 16
16
-
 17
17
-
 18
18
-
 19
19
-
 20
20
-
 21
21
-
 22
22
-
 23
23
-
 24
24
-
 25
25
-
 26
26
-
 27
27
-
 28
28
-
 29
29
-
 30
30
-
 31
31
-
 32
32
-
 33
33
-
 34
34
-
 35
35
-
 36
36
-
 37
37
-
 38
38
-
 39
39
-
 40
40
-
 41
41
-
 42
42
-
 43
43
-
 44
44
-
 45
45
-
 46
46
-
 47
47
-
 48
48
-
 49
49
-
 50
50
-
 51
51
-
 52
52


Olimpia Splendid Limpia 2 Manuel utilisateur
- Catégorie
- Humidificateurs
- Taper
- Manuel utilisateur
- Ce manuel convient également à
dans d''autres langues
Documents connexes
-
Olimpia Splendid Limpia 4 Mode d'emploi
-
-
Olimpia Splendid Limpia 6 Manuel utilisateur
-
Olimpia Splendid Limpia Pure Manuel utilisateur
-
Olimpia Splendid Aqua Pure Manuel utilisateur
-
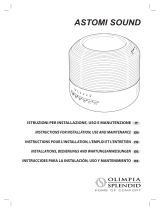 Olimpia Splendid Astomi Sound Manuel utilisateur
-
 Olimpia Splendid Astomi 200 Manuel utilisateur


