Blomberg BCHS30100SS Manuel utilisateur
- Catégorie
- Hottes
- Taper
- Manuel utilisateur

www.blomberginternational.com
Range Hood
User manual
Hotte
Manuel d’utilisation
Campana
Manual del usuario
BCHS30100SS
Document number : 01M-8851223200-0316-04

Ths product has been manufactured n envronmental frendly modern plants wthout gvng any harm to the nature.
Please read this manual first!
Dear Customers!
Thank you for preferring a Blomberg product. We hope that you get the best results
from your product which has been manufactured with high quality and state-of-the-art
technology. Therefore, please read this entire user manual and all other accompanying
documents carefully before using the product and keep it as a reference for future use.
If you handover the product to someone else, give the user manual as well. Follow all
warnings and information in the user manual.
Remember that this user manual is also applicable for several other models. Differences
between the models are explicitly described in the manual.
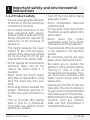
Meanings of the Symbols
Following symbols are used in the various section of this manual:
C
Important nformaton and useful hnts about
usage.
A
WARNING:
Warnngs for dangerous
stuatons concernng the safety of lfe and
property.
B
Warnng for electrc shock.
Warnng for hot surfaces.

Range Hood / User Manual
3 / 56 EN
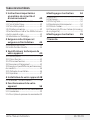
CONTENTS
1 Important safety and
envronmental nstructons 4
1.1 General safety . . . . . . . . . . . . . . . . . . . . . . . . . . . . . . 4
1.1.1 Electrcal safety. . . . . . . . . . . . . . . . . . . . . . . . . . . 4
1.1.2 Product safety. . . . . . . . . . . . . . . . . . . . . . . . . . . . 5
1.1.3 Chldren's safety . . . . . . . . . . . . . . . . . . . . . . . . . . 6
1.2 Intended use . . . . . . . . . . . . . . . . . . . . . . . . . . . . . . . 6
1.3 Complance wth WEEE Drectve and dspo-
sng of the waste product. . . . . . . . . . . . . . . . . . . . . . .7
Complance wth RoHS Drectve: . . . . . . . . . . . . . . .7
1.4 Package nformaton . . . . . . . . . . . . . . . . . . . . . . . .7
2 Electrcal & Installaton
requrements 8
2.1 Electrcal requrements. . . . . . . . . . . . . . . . . . . . . 8
2.2 Before nstallng the hood . . . . . . . . . . . . . . . . . 8
3 Techncal specfıcatons of your
applance 9
3.1 Lst of Materals . . . . . . . . . . . . . . . . . . . . . . . . . . . . 9
3.1.1 Parts suppled . . . . . . . . . . . . . . . . . . . . . . . . . . . . 9
3.1.2 Parts not suppled . . . . . . . . . . . . . . . . . . . . . . . . 9
3.2 Dmensons and Clearances . . . . . . . . . . . . . . . . 9
3.3 Ductng Optons and Examples. . . . . . . . . . . . 10
3.3.1 Ventng methods. . . . . . . . . . . . . . . . . . . . . . . . 10
3.4 Preparaton . . . . . . . . . . . . . . . . . . . . . . . . . . . . . . . 11
4 Installng your applance 12
4.1 Installaton - Ductng verson. . . . . . . . . . . . . . 12
5 Operatng your applance 16
5.1 Descrpton of the hood & Controls . . . . . . . 16
5.1.1 Controls. . . . . . . . . . . . . . . . . . . . . . . . . . . . . . . . . . 16
5.1.2 Descrpton of control panel. . . . . . . . . . . . . 16
6 Cleanng and mantenance 17
6.1 Mantenance . . . . . . . . . . . . . . . . . . . . . . . . . . . . . . 17
6.2 Cleanng. . . . . . . . . . . . . . . . . . . . . . . . . . . . . . . . . . . 17
6.3 Grease Flter . . . . . . . . . . . . . . . . . . . . . . . . . . . . . . 17
6.4 Replacng the lght bulb. . . . . . . . . . . . . . . . . . . 17
6.5 Charcoal Flter. . . . . . . . . . . . . . . . . . . . . . . . . . . . . 18
6.6 Charcoal flter placement (Recrculatng
accessores). . . . . . . . . . . . . . . . . . . . . . . . . . . . . . . . . . . 18
7 Warranty 19

4 / 56 EN
Range Hood / User Manual
1
Important safety and envronmental
nstructons
Ths secton contans safety
nstructons that wll help protect
from rsk of personal njury or
property damage. Falure to follow
these nstructons nvaldates the
granted warranty.
1.1 General safety
•Always have the nstallaton and
reparng procedures carred out
by the Authorzed Servce Agent.
Manufacturng frm shall not be
held responsble for damages that
may be caused by unauthorzed
persons.
•Ths applance s not ntended
for use by persons (ncludng
chldren) wth reduced physcal,
sensory or mental capabltes, or
lack of experence and knowledge.
Chldren should be supervsed to
ensure that they do not play wth
the applance.
1.1.1 Electrcal safety
•Always unplug the applance
from the mans supply durng
nstallaton, mantenance,
cleanng and repar operatons.
•If the power cable s faulty,
t should be replaced by a
qualfed person certfed by
the manufacturer, after-sales
servce or smlar (preferably an
electrcan) or a person descrbed
by the mporter.
•Operatng voltage s 220 to 240
volts.
•If the applance has a falure, t
should not be operated unless
t s repared by the Authorzed
Servce Agent. There s the rsk of
electrc shock!
•Do not route power cable close to
hobs. Otherwse power cable may
cause fre snce t melts down
easly.
•Never plug the hood before
nstallaton s completed.
•In order to obtan the best
performance, external conductor
must not be longer than 4 m. It
must not contan more than 2
perpendcular (90°) angles and ts
dameter must be mn. ø120 mm.
•Dsconnect the applance from
mans before any nterventon to
the nternal parts of the applance.
•Use the applance wth a grounded
outlet only.

Range Hood / User Manual
5 / 56 EN
1
Important safety and envronmental
nstructons
1.1.2 Product safety
•You can use a ppe wth a dameter
of 120 mm or 150 mm on the flue
connecton of the hood.
•Do not make connectons to the
flues connected wth stoves,
exhaust shafts or flues wth rsng
flames. Observe the rules set by
authortes on the dscharge of
exhaust ar.
•The heght between the lower
surface of the hood and upper
surface of the stove/oven should
not be less than 50 cm for gas
hobs and 45 cm for electrc hobs.
•Do not operate the hood wthout
alumnum flters and do not
remove the flters whle t s
operated.
•Never touch the hood's lamps
after they are operated for a long
tme. Hot lamps may burn your
hand.
•Avod large flames beneath the
product. Otherwse, partcles on
ol flter may gnte and lead to a
fre.
•Turn on the hobs after placng
pans or pots on t. Otherwse,
rsng heat may deform certan
parts of your product.
•Turn off the hobs before takng
away pans or pots.
•Avod nflammable materals
under the hood.
•Ol may gnte whle fryng foods.
Therefore, be careful about cloths
and curtans.
•Never leave the cooker
unattended when fryng foods;
otherwse hot ol may cause fre.
•There s the rsk of fre f your hood
s not cleaned n the specfed
perods.
•Be extremely careful and wear
gloves when cleanng the hood.
•We advse you to operate the
applance a few mnutes before
startng to cook n order to
ncrease the sucton power. Thus,
you shall have a contnuous and
stable sucton power when the
vapors arse.
•Operate your hood for 15 mnutes
more after the end of cookng or
fryng n order to remove the smell
and cookng vapor n the ktchen.
•When the hood s n use, especally
together wth gas cookers,
make sure that envronment s
ventlated wth clean ar.

6 / 56 EN
Range Hood / User Manual
•Pay attenton not to connect
the applance to the flues used
by non-electrcal devces. (E.g.:
Heater flue).
•Smultaneous and smooth
operaton of the hood and
another devce that requre ar s
only possble when a low pressure
of 4 Pa (0.04 mbar) s reached,
and thus the reabsorpton of the
gas s avoded. Ths can only be
acheved by means of ar comng
from uncovered openngs (door,
wndow, ventlaton openngs
or other techncal measures).
Pay utmost attenton to provde
suffcent ar flow. A flue that
provdes ar ngress/egress s not
enough for ths purpose.
1.1.3 Chldren's safety
•Packagng materals are
dangerous to chldren. Keep
packagng materals n a safe place
out of reach of chldren.
•Electrcal applances are
dangerous to chldren. Keep
chldren away from the product.
Do not allow chldren play wth the
applance.
•Ths applance can be used by the
chldren who are at the age of 8 or
over and by the people who have
lmted physcal, sensory or mental
capacty or who do not have
knowledge and experence, as
long as they are supervsed wth
regard to safe use of the product
or they are nstructed accordngly
and understand the rsks of usng
the product. Chldren should not
play wth the applance.
•
CAUTION:
Accessble parts
may heat up when used wth a
cookng devce.
1.2 Intended use
•Ths applance s ntended for
domestc use. It s not sutable for
commercal use and t must not be
used out of ts ntended use.
•The manufacturer shall not be
lable for any damage caused by
mproper use or handlng.
•Servce lfe of your applance s 10
years. Ths s the perod requred
for avalablty of spare parts for
proper functonng of the product.
1
Important safety and envronmental
nstructons

Range Hood / User Manual
7 / 56 EN
•
WARNING:
Falure to fx the
screws n concordance wth
the nstructons provded n the
manual may lead to electrcal
hazards.
1.3 Complance wth WEEE
Drectve and dsposng of the
waste product
Ths product comples wth EU WEEE
Drectve (2012/19/EU). Ths product
bears a classfcaton symbol for waste
electrcal and electronc equpment
(WEEE).
Ths product has been manufactured wth hgh
qualty parts and materals whch can be reused
and are sutable for recyclng. Do not dspose
of the waste product wth normal domestc
and other wastes at the end of ts servce lfe.
Take t to the collecton center for the recyclng
of electrcal and electronc equpment. Please
consult your local authortes to learn about these
collecton centers.
Complance wth RoHS
Drectve:
The product you have purchased comples wth EU
RoHS Drectve (2011/65/EU). It does not contan
harmful and prohbted materals specfed n the
Drectve.
1.4 Package nformaton
Package of the product s made of
recyclable materals n accordance wth
our Natonal Legslaton. Do not dspose
of the packagng materals together wth the
domestc or other wastes. Take them to the
packagng materal collecton ponts desgnated
by the local authortes.
1
Important safety and envronmental
nstructons

8 / 56 EN
Range Hood / User Manual
2 Electrcal & Installaton requrements
2.1 Electrcal requrements
C
Observe all governng codes and
ordnances.
It s the customer’s responsblty:
To contact a qualfed electrcal nstaller. To
assure that the electrcal nstallaton s adequate
and n conformance wth Natonal Electrcal Code,
ANSI/NFPA 70 — latest edton*, or CSA Standards
C22.1-94, Canadan Electrcal Code, Part 1 and
C22.2 No.0-M91 - latest edton** and all local
codes and ordnances.
• If codes permt and a separate ground wre
s used, t s recommended that a qualfed
electrcan determne that the ground path s
adequate.
• Do not ground to a gas ppe.
• Check wth a qualfed electrcan f you are not
sure range hood s properly grounded.
• Do not have a fuse n the neutral or ground
crcut.
C
Save Installaton Instructons for
electrcal nspector’s use.
C
The range hood must be connected
wth copper wre only.
C
The range hood should be
connected drectly to the fused
dsconnect (Or crcut breaker) box
through metal electrcal condut.
Wre szes must conform to the requrements of
the Natonal Electrcal Code ANSI/NFPA 70 — latest
edton*, or CSA Standards C22.1-94, Canadan
Electrcal Code Part 1 and C22.2 No. 0-M91 - latest
edton** and all local codes and ordnances.
A U.L.- or C.S.A.-lsted condut connector must be
provded at each end of the power supply condut
(at the range hood and at the juncton box).
Copes of the standards lsted may be obtaned
from:
* Natonal Fre Protecton Assocaton
Batterymarch Park Quncy, Massachusetts 02269
** CSA Internatonal 8501 East Pleasant Valley
Road Cleveland, Oho 44131-5575
2.2 Before nstallng the hood
1. For the most effcent ar flow exhaust, use a
straght run or as few elbows as possble.
A
WARNING:
Vent unt to outsde
of buldng, only.
2. At least two people are necessary for
nstallaton.
3. The hood s ftted wth Screws and Drywall
Anchorssutable for most surfaces, consult a
Qualfed Installer,check f they perfectly ft
wth your cabnet/wall.
4. Do not use flex ductng.
5. COLD WEATHER nstallatons should
have an addtonalbackdraft damper
nstalled to mnmze backward cold
arflow and a nonmetallc thermal break to
mnmzeconducton of outsde temperatures
as part of theductwork. The damper should be
on the cold ar sde ofthe thermal break.The
break should be as close as possble to where
theductng enters the heated porton of the
house.
6. Make up ar: Local buldng codes may requre
the use of Make-Up Ar Systems when usng
Ducted Ventlaton Systems greater than
specfed CFM of ar movement. The specfed
CFM vares from locale to locale. Consult your
HVAC professonal for specfc requrements n
your area.

Range Hood / User Manual
9 / 56 EN
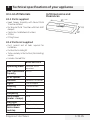
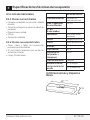
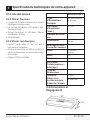
3 Techncal specfıcatons of your applance
3.1 Lst of Materals
3.1.1 Parts suppled
• Hood Canopy Assembly wth Round Metal
Transton nstalled
• Rectangular Metal Transton wth Back draft
dampers
• Care & Use / Installaton Instructons
• 2 Flters
• Fttng Screws
3.1.2 Parts not suppled
• Duct, condut and all tools requred for
nstallaton.
• Ductless Recrculatng Kt
• To be used only n the Ductless (Recrculatng)
verson
• ncludes: charcoal flter
BCHS30100SS
Operatng mode
convertble : ducted/
recrculated
Max. Ventlaton
Capacty
240 CFM
Nr.of Speeds
3
Controls
Electroncal Tact Swtches
Lghts
2 x 50 W Halogene
Flterng
2 x Alumnum Mesh
Volts
120 V
Frequency
60 Hz
Total Power
(motor + lamps)
260 W
Plug type
Hard Wre
Requred ds-
tance above
cooktop
30” (gas cooktop)
24” (electrcal cooktop)
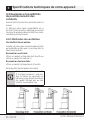
3.2 Dmensons and
Clearances

10 / 56 EN
Range Hood / User Manual
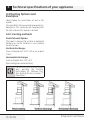
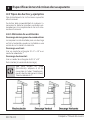
3.3 Ductng Optons and
Examples
Closely follow the nstructons set out n ths
manual.
All responsblty, for any eventual nconvenences,
damages or fres caused by not complyng wth
the nstructons n ths manual, s declned.
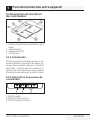
3.3.1 Ventng methods
Vent Exhaust Opton
The hood s desgned for vertcal or horzontal
dscharge or can be nstalled n a recrculatng
ductless verson:
Vertcal dscharge:
Use a rectangular duct 3 1/4” x 10” or use a round
7” duct.
Horzontal dscharge:
Use a rectangular duct 3 1/4” x 10”
Recrculatng (non vented ductless)
C
For ductless (Recrculatng) verson
only: purchase the Ductless
Recrculatng Kt. Mnmum Duct
Sze (Ductng/Ductless verson): 7”
Round Ppe.
3 Techncal specfıcatons of your applance

Range Hood / User Manual
11 / 56 EN
3 Techncal specfıcatons of your applance
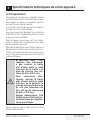
3.4 Preparaton
Do not cut a jost or stud unless absolutely
necessary. If a jost or stud must be cut, then a
supportng frame must be constructed.
Fttngs materal s provded to secure the hood to
most types of walls/celngs.
However, a qualfed techncan must verfy
sutablty of the materals n accordance wth the
type of wall/celng.
Before makng cutouts, make sure there s proper
clearance wthn the celng or wall for exhaust
vent.
Hood nstallaton heght above cooktop s the
users preference. The lower the hood s above
the cooktop, the more effcent the capturng of
cookng odors, grease and smoke.
A
WARNING: For gas ranges
ınstallatıon: mount thıs
hood so that the bottom
edge ıs at 30” (76,2 cm)
above the cookıng surfa-
ce.
For electrıc ranges ınstal-
latıon: mount thıs hood so
that the bottom ıs not less
than 24” (61 cm) and not
more that 30” (76,2 cm)
above the cookıng surfa-
ce.
Household use. Please,
read ınstallatıon manual
for specıfıc applıcatıon.
Check your celng heght and the hood heght
maxmum before you select your hood.

12 / 56 EN
Range Hood / User Manual
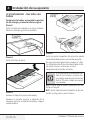
4 Installng your applance
4.1 Installaton - Ductng
verson
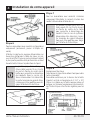
After havng choosen the vent
opton, proceed as follows:
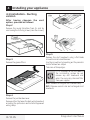
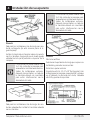
Step 2
Remove the round transton from ts seat by
unscrewng the ts fxng screws (save the screws).
Step 3
Remove the grease flters.
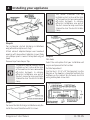
Step 4
Remove the juncton box cover.
Remove ether the top or the back wrng knockout
accordng the preference and nstall an approved
wrng clamp
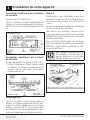
Step 5
Remove the duct knockouts usng a flat blade
screwdrver and a small hammer.
Use the screwdrver by knockng out the pannel n
smlar fashon to a scalpel.
Take care of sharp edges.
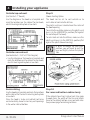
C
If t s ntended to use the hood n
the recrculatng verson do not
remove any duct knockouts and
order the necessary charcoal flter
from your suppler.
R1 =
Remove rectangular duct knockout only.
R2 =
Remove semcrcular and rectangular duct
knockouts

Range Hood / User Manual
13 / 56 EN
4 Installng your applance
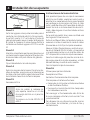
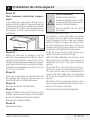
Step 6
For rectangular ducted dscharge nstallatons
only (otherwse skp to next step)
Attach exhaust adaptor/damper over knockout
openng wth two exhaust adaptor screws. Make
sure damper pvot s nearest to top/back edge of
hood.
Remove tape from damper flap.
C
The exhaust adaptor/damper can be
nstalled up to 1 nch on ether sde
of the hood center to accommodate
off-center ductwork. In extreme
offcenter nstallatons, one end of
the duct connector may need to be
trmmed to clear the electrcal cable
clamp.
Step 7
For round ducted dscharge nstallatons only Re-
nstall the round transton wth ts screws.
C
The round transton can be
nstalled up to 1 nch on ether sde
of the hood center to accommodate
off-center ductwork. In extreme
offcenter nstallatons, one end of
the duct connector may need to be
trmmed to clear the electrcal cable
clamp.
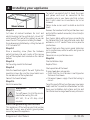
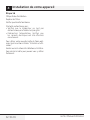
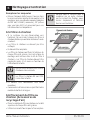
Step 8
Mark holes
Select the vent opton that your nstallaton wll
requre and proceed to that secton:
Outsde top exhaust
(Vertcal duct– 3 1/4”x 10” Rectangular) Use the
dagram or the hood as a template and mark the
locatons on the cabnet for ductwork, electrcal
wrng and keyhole screw slots.

14 / 56 EN
Range Hood / User Manual
4 Installng your applance
Outsde top exhaust
(Vertcal duct–7” Round)
Use the dagram or the hood as a template and
mark the locatons on the cabnet for ductwork,
electrcal wrng and keyhole screw slots.
Outsde rear exhaust
(Horzontal duct– 3 1/4”x 10” Rectangular)
• Use the dagram or the hood as a template and
mark the locatons on the cabnet for ductwork,
electrcal wrng and keyhole screw slots.
Recrculatng
Use the hood as a template and mark the locatons
on the cabnet for the electrcal wrng and keyhole
screw slots.
Snce the hood s to be recrculated (not to be
vented outsde), do not cut out any vent openngs
n the wall or cabnet bottom.
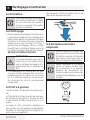
Step 9
Choose Ventng Opton
The hood can be set to vent outsde or to
recrculate ar back nto the ktchen.
The plastc vent lever s located near the center of
the hood openng.
To vent to the outsde, make sure the plastc vent
lever s n the HORIZONTAL poston (flat aganst
the metal top of the hood).
To recrculate ar nto the ktchen, make sure the
plastc vent lever s n the VERTICAL poston (flat
aganst the plastc blower housng).
C
In order to change the vent lever
poston, you wll need to pull the
lever out slghtly to clear the plastc
tabs.
Step 10
For recessed bottom cabnet only
If the cabnets have front, sde or back trm, make
2 wood shms the wdth of the trm and attach
them to the cabnet bottom recess on both sdes.
See prevous page for markng locatons.

Range Hood / User Manual
15 / 56 EN
4 Installng your applance
Step 11
Cut holes at marked locatons for duct and
electrcal wrng. For the vertcal duct, cut out 3/4”
extra toward the front of the cabnet so you can
move the duct freely when nstallng the hood.
It may also ease nstallaton by cuttng the hole 10
1/ 2” nstead of 10”.
Step 12
Drve a mountng screw (from the hardware
packet) partway nto each center of the narrow
neck of the keyhole slots marked on the cabnet
bottom.
Step 13
Fx the wrng condut to the hood.
Step 14
Slde the hood back aganst the wall. Tghten the
mountng screws. Be sure the screw heads are n
the narrow neck of the keyhole slot.
Connect Ductwork to hood.
Step 15.
Electrcal connecton
A
WARNING:
Electrcal Shock
Hazard
Turn off power crcut at the servce
panel before wrng ths unt.
120 VAC, 15 or 20 Amp crcut
requred.
Electrcal groundng nstructons
Ths applance s ftted wth an electrcal juncton
box wth 3 wres, one of whch (green/yellow)
serves to ground the applance.
To protect you aganst electrc shock, the green
and yellow wre must be connected to the
groundng wre n your home electrcal system,
and t must under no crcumstances be cut or
removed.
Falure to do so can result n death or electrcal
shock.
Remove the knockout and the Juncton box cover
and nstall the condut connector (cULus lsted) n
juncton box.
Run 3 wres; black, whte and green ,accordng to
the Natonal Electrcal Code and local codes and
ordnances, n 1/2” condut from servce panel to
juncton box.
Connect black wre from servce panel to black or
red n juncton box, whte to whte and green to
green-yellow.
Close and secure juncton box cover.
Step 16
Fnal nstallaton steps
Replace flters.
Check operaton of the hood.
If range hood does not operate:
• Check that the crcut breaker s not trpped or
the house fuse blown.
• Dsconnect power supply. Check that wrng s
correct.
To get the most effcent use from your new range
hood, read the “Use and Care Informaton” secton.
Keep your Installaton Instructons and Use and
Care Gude close to range hood for easy reference.

16 / 56 EN
Range Hood / User Manual
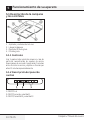
5 Operatng your applance
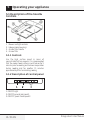
5.1 Descrpton of the hood &
Controls
1. Blower and lght controls
2. Halogen lamp housngs
3. Grease flter Handle
4. Grease flter
5.1.1 Controls
Use the hgh sucton speed n cases of
concentrated ktchen vapours. It s recommended
that the cooker hood sucton s swtched on for 5
mnutes pror to cookng and to leave n operaton
durng cookng and for another 15 mnutes
approxmately after termnatng cookng.
5.1.2 Descrpton of control panel
1. ON/OFF Lght
2. ON/OFF general and speed1.
3. ON/OFF, speed 2 and speed 3.

Range Hood / User Manual
17 / 56 EN
6 Cleanng and mantenance
6.1 Mantenance
C
Before performng any mantenance
operaton, solate the hood from the
electrcal supply by swtchng off
at the connector and removng the
connector fuse.
Or f the applance has been
connected through a plug and
socket, then the plug must be
removed from the socket.
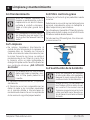
6.2 Cleanng
• Do not spray cleaners drectly to the control
whle cleanng the Hood.The cooker hood
should be cleaned regularly (at least wth the
same frequency wth whch you carry out
mantenance of the fat flters) nternally and
externally. Clean usng the cloth dampened wth
neutral lqud detergent. Do not use abrasve
products.
DO NOT USE ALCOHOL!
A
WARNING:
Falure to carry out
the basc cleanng recommendat-
ons of the cooker hood and repla-
cement of the flters may cause fre
rsks.
• Therefore, we recommend oservng these
nstructons.
• The manufacturer declnes all responsblty for
any damage to the motor or any fre damage
lnked to napproprate mantenance or falure
to observe the above safety recommendatons.
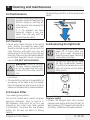
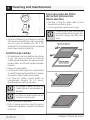
6.3 Grease Flter
Traps cookng grease partcles.
Ths must be cleaned once a month usng non
aggressve detergents, ether by hand or n
the dshwasher, whch must be set to a low
temperature and a short cycle. When washed
n a dshwasher, the grease flter may dscolour
slghtly, but ths does not affect ts flterng
capacty.
To remove the grease flter, pull the sprng release
handle.
6.4 Replacng the lght bulb
C
Before replacng the lamps, swtch
power off at servce panel and
lock servce panel dsconnectng
means to prevent power from beng
swtched on accdentally.
C
Turn off the lghts and fan. Allow
the lghts to cool before handlng.
If new lghts do not operate be sure
lghts are nserted correctly before
callng servce.
Replace Lghts
• Remove the damaged lght (twst counter
clockwse) and replace wth a new 120 Volt, 50
Watt (maxmum) 50° halogen lght made for a
GU10 base, sutable for use n open lumnare.

18 / 56 EN
Range Hood / User Manual
6 Cleanng and mantenance
6.5 Charcoal Flter
• If the model s not vented to the outsde, the ar
wll be recrculated through dsposable charcoal
flters that help remove smoke and odors.
• The charcoal flters cannot be cleaned.
• They must be replaced.
• The charcoal flters are clpped nsde of each
metal grease flter (mountng nstructons
ncluded wth charcoal flters kt). The charcoal
flters should be replaced every 4-6 months
(dependng on hood usage).
C
DO NOT rnse, or put charcoal flters
n an automatc dshwasher.
C
Charcoal flters are not ncluded
wth the hood.
• They must be ordered from your suppler.
• Order the needed kt specfyng your hood
model and wdth sze.
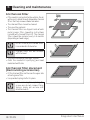
6.6 Charcoal flter placement
(Recrculatng accessores)
• Ft the charcoal flter mattress on the upper sde
of each grease flter.
• Use provded sprngs to fx t n place.
C
When removng for replacng for
a new one do not remove Fxng
Sprngs, smply pull out one and
rotate outwards.

Range Hood / User Manual
19 / 56 EN
7 Warranty
Warranty Statement For Blomberg Range Hoods
1 800 459 9848
otherwise

Este producto se ha fabrcado utlzando la últma tecnología y en condcones de fabrcacón
respetuosas con el medo ambente.
Lea el manual del usuario antes de utilizar el aparato
Estimado cliente:
Gracias por elegir un producto Blomberg. Esperamos que obtenga los mejores resultados
de nuestro producto ya que ha sido fabricado con gran calidad y con tecnología de
última generación. Por tanto, le aconsejamos que lea con atención este manual del
usuario y todos los demás documentos adjuntos antes de utilizar el producto; guárdelo
para futuras consultas. Si va a entregar este producto a otra persona, proporciónele el
manual del usuario también. Siga todas las advertencias e instrucciones incluidas en
este manual.
Recuerde que este manual del usuario también es válido para otros modelos. Las
diferencias entre los modelos se señalan dentro del manual.
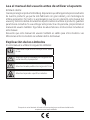
Explicación de los símbolos
En este manual se utilizan los siguientes símbolos:
C
Información importante o consejos útiles sobre
el uso.
A
Advertencia para situaciones de riesgo con res-
pecto a la vida y la propiedad.
B
Advertencia sobre posibles descargas eléctricas.
Advertencia para las superficies calientes.
La page est en cours de chargement...
La page est en cours de chargement...
La page est en cours de chargement...
La page est en cours de chargement...
La page est en cours de chargement...
La page est en cours de chargement...
La page est en cours de chargement...
La page est en cours de chargement...
La page est en cours de chargement...
La page est en cours de chargement...
La page est en cours de chargement...
La page est en cours de chargement...
La page est en cours de chargement...
La page est en cours de chargement...
La page est en cours de chargement...
La page est en cours de chargement...
La page est en cours de chargement...
La page est en cours de chargement...
La page est en cours de chargement...
La page est en cours de chargement...
La page est en cours de chargement...
La page est en cours de chargement...
La page est en cours de chargement...
La page est en cours de chargement...
La page est en cours de chargement...
La page est en cours de chargement...
La page est en cours de chargement...
La page est en cours de chargement...
La page est en cours de chargement...
La page est en cours de chargement...
La page est en cours de chargement...
La page est en cours de chargement...
La page est en cours de chargement...
La page est en cours de chargement...
La page est en cours de chargement...
La page est en cours de chargement...
La page est en cours de chargement...
La page est en cours de chargement...
La page est en cours de chargement...
La page est en cours de chargement...
-
 1
1
-
 2
2
-
 3
3
-
 4
4
-
 5
5
-
 6
6
-
 7
7
-
 8
8
-
 9
9
-
 10
10
-
 11
11
-
 12
12
-
 13
13
-
 14
14
-
 15
15
-
 16
16
-
 17
17
-
 18
18
-
 19
19
-
 20
20
-
 21
21
-
 22
22
-
 23
23
-
 24
24
-
 25
25
-
 26
26
-
 27
27
-
 28
28
-
 29
29
-
 30
30
-
 31
31
-
 32
32
-
 33
33
-
 34
34
-
 35
35
-
 36
36
-
 37
37
-
 38
38
-
 39
39
-
 40
40
-
 41
41
-
 42
42
-
 43
43
-
 44
44
-
 45
45
-
 46
46
-
 47
47
-
 48
48
-
 49
49
-
 50
50
-
 51
51
-
 52
52
-
 53
53
-
 54
54
-
 55
55
-
 56
56
-
 57
57
-
 58
58
-
 59
59
-
 60
60


Blomberg BCHS30100SS Manuel utilisateur
- Catégorie
- Hottes
- Taper
- Manuel utilisateur
dans d''autres langues
- English: Blomberg BCHS30100SS User manual
- español: Blomberg BCHS30100SS Manual de usuario