
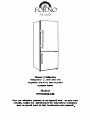
FFFFD1948-24S

Customer Care
Thank you for purchasing a FORNO product. Please read the en�re instruc�on manual before
opera�ng your new appliance for the first �me. Whether you are an occasional user or an expert,
it will be beneficial to familiarize yourself with the safety prac�ces, features, opera�on and care
recommenda�ons of your appliance.
Both the model and serial number are listed on the product. For warranty purposes, you will also
need the date of purchase. Record this informa�on below for future reference.
SERVICE INFORMATION
Model Number
:
Use these numbers in any correspondence
or service calls concerning your appliance.
Serial Number:
If you received a damaged appliance,
immediately contact the dealer (or builder)
that sold you the appliance
Date of Purchase
:
Purchase Address & Phone: Save �me and money. Before you call for
service, check the Troubleshoo�ng Guide. It
lists the causes of minor opera�ng problems
that you can correct yourself.
SERVICE IN CANADA:
Keep the instruc�on manual handy to answer your ques�ons. If you don’t understand something
or you need more assistance, please call our Customer Service: 1-800-561-7265
Or email: service@dis�nc�ve-online.com
SERVICE IN THE UNITED STATES:
Keep the instruc�on manual handy to answer your ques�ons. If you don’t understand something
or you need more assistance, please call our Customer Service: 1-866-231-8893
Or email: info@forno.ca
Digital instruc�on manual can be downloaded from www.forno.ca
If your appliance ever requires servicing, be sure to use a FORNO Factory Cer�fied Service
provider recommended by our customer care center. All Factory Cer�fied Service providers are
carefully selected and thoroughly trained by us.

Sabbath control mode steps
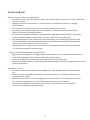
Warranty

This product is for household use only!
Please read these instructions carefully before the first use of this product
and save this manual for your future reference.
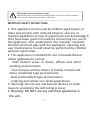
IMPORTANT SAFETY INSTRUCTIONS
1. This appliance can be used by children aged 8
years or
older and persons with reduced physical,
sensory or
mental capabilities or lack of experience and knowledge if
they have been given instructions concerning the use of
the appliance
and understand the hazards involved.
Children shall not play with the appliance. Cleaning
and
user maintenance should never be performed by children
without supervision.
2. This appliance is intended for use in household
and
similar applications such as:
-Staff kitchen areas in shops, offices and other
working environments
- Farm houses and by clients in hotels, motels and
other residential type environments
-Bed and breakfast type environments
-Catering and similar non-retail applications
3. Warning: Do not use mechanical devices or other
mean to accelerate the defrosting process
4. Warning: DO NOT use any electrical appliances in
the unit.
-1-

12. Do not pour water directly onto the freezer,
openings,
ventilation
Keep
WARNING:
7.
6. Warning: If the supply cord is damaged, or if the
appliance malfunctions or has been damaged
in any
manner, please return the unit to the
5. Warning: Never try to use this appliance for
applications or in a way which is not described in
service
authorized
its
manufacturer,
the
instructions,
occur.
otherwise
severe
hazards may
center
for
examination, repair or
adjustment in order to avoid a
hazard.
(
in the
appliance enclosure or in the built-in structure),
clear of obstruction.
8. WARNING: Do not damage the refrigerant circuit.
9. WARNING: Do not use electrical appliances inside
the
food storage compartments of the appliance.
10. Do not use the appliance in a dusty environment or in
an explosive and inflammable atmosphere
(inflammable gases, vapors, vapors from organic
solvents, etc.)
11. Do not store explosive substances such as aerosol
cans with a flammable propellant in this appliance.
12. Do not pour water directly in the freezer, as this
may cause the corrosion or deterioration of the
insulation.
13. Insert the plug into a single grounded socket.
Make sure to place the plug all the way into the
socket
when connecting your appliance.
2

14. To prevent possible harm to the environment or
human health from uncontrolled waste disposal,
recycle this appliance responsibly to promote the
sustainable
reuse of material resources. Disposal should
only be done at public collection points.
15. The appliance should be placed on a horizontal floor
kept freely ventilated. Do not try to replace
or repair any
components by yourself, ask the repair service for help if
necessary.
16. Always handle the appliance to avoid any damage.
17. Caution: Do not connect the grounding wire to a water
or gas pipe.
18. Absolutely never store strong bases, strong acids,
organic
solvents and corrosive goods together with food.
19. Please refer to the “Troubleshooting” section
when
having problems with the unit. Do not
attempt to solve
the problem on your own, please
refer to certified
technicians only.
20. For information on installation,
operation,
maintenance and disposal of the appliance,
refer to the
following parts of the manual.
21.Do not look directly into the LED light located in the
refrigerator compartment with optical instruments
to avoid eye injuries.
-3-

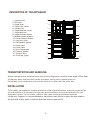
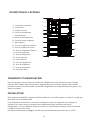
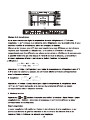
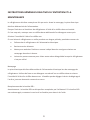
DESCRIPTION OF THE APPLIANCE
1. Control panel
2. LED light
3. Glass shelf
4. Chiller box cover
5. Chiller box
6. Vegetable box cover
7. Vegetable box
8. Upper freezer drawer
9. Middle freezer drawer
10. Lower freezer drawer
11. Leg front (left)
12. Refrigerator gasket
13. Upper rack
14. Lower rack
15. Door refrigerator
16. Freezer gasket
17. Freezer door
18. Front leg (right)
TRANSPORTATION AND HANDLING
When transportation, hold the base and lift the refrigerator carefully
at an angle of less than
45 degrees. Never hold the door handle as support. Never place it upside down
nor
horizontally. Push refrigerator onto its back and put it in place with the roller feet.
INSTALLATION
To fix stably, the appliance must be placed on a flat and solid surface. It should not be
laid on
any soft material.
It is necessary to maintain good ventilation around the appliance for the
dissipation of
heat. For this reason, sufficient clear space should be available around the
refrigerator. Suggest: It is recommended to maintain at least 15mm of space for both sides
to
the wall and a clear
space in front to allow the doors to open at 135
°.
-5-
4
1
2
3
4
5
6
7
8
9
10
11
12
13
14
15
16
17
18

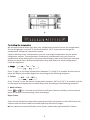
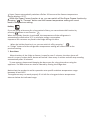
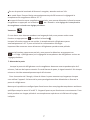
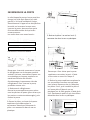
Sabbath control mode steps:
hold the Freezer and Fridge keys
1. When powering on for the first time, after running the refrigerator for 10 minutes, press and hold the freezer and fridge keys at the same
time for 5 seconds to enter Sabbath mode.
2. At any other time, press and hold the freezer and fridge keys at the same time for 5 seconds to enter Sabbath mode.
3. After entering Sabbath control mode, press and hold the freezer and fridge key at the same time for 5 seconds to exit an return to
normal control mode.

We recommend that when you start your refrigerator for the first time, the temperature
for the refrigerator is set to 4
°
C and the freezer to -18
°
C.If you want to change the
temperature, follow the instructions below.
Caution! When you set a temperature, you set an average temperature for the whole
refrigerator cabinet. The temperature inside each compartment may vary from the
temperature values displayed on the panel, depending on how much food you store and
where you place them. Ambient temperature may also affect the actual temperature
inside the appliance.
3 4
Press “Fridge” to set fridge temperature between 2
°
C and 8
°
C as needed, and the control
panel will display corresponding values according to the following sequence.
2. Freezer
-22
Press “Freezer” to set the freezer temperature between -16
°
C and -24
°
C as needed, and the
control panel will display the corresponding value according to the following sequence.
3. Mode selection
Press or for 3 seconds to set function of Super Freeze or Holiday, and the control
panel will display corresponding value accordingly.
Super Freeze
Super Freeze will quickly lower the temperature within the freezer so food will freeze the
vitamins and nutrients inside fresh foods and keep food fresh longer.
If the maximum amount of food is to be frozen, please wait approximately 24 hours.
-7-
6

Super Freeze automatically switches off after 26 hours and the freezer temperature
setting displays -25
°C.
When the Super Freeze function is on, you can switch off the Super Freeze function by
pressing “ ”or “Freezer” button and the freezer temperature setting will revert
back to the previous setting.
Holiday
If you are going to be away for a long period of time, you can activate this function by
pressing button to set function .
When the holiday function is activated, the temperature of the refrigerator is
automatically switched to 15
°
C to minimize energy consumption.
Important! Do not store any food in the fridge during this time.
When the holiday function is on, you can switch it off by pressing “ ” "
or “Fridge” button and the refrigerator temperature setting will revert back to the
previous setting.
7. Door Alarm
When the door of the fridge or freezer is open for over 2 minutes, the door alarm will
sound. In case of a door alarm, buzzer will sound 1 time every 1 minute and will stop sounding
automatically after 10 minutes.
To save energy, please avoid keeping the door open for a long time when using the
appliance. The door alarm can also be cleared by closing the fridge door.
Notice that the product is set for operation at a specific ambient temperature range
between 16 and
43°C.
The appliance may not work properly if it is left for a long period at a temperature
above or below the indicated range.
-8-
7

FOOD STORAGE
How to Use the Freezer Compartment?
l
Put fresh food, such like fish or meat, into the freezer to preserve their taste and
nutrient content.
l
Wrapped food has to be frozen in an aluminum or cellophane sheet or in airtight
plastic boxes.
l
Do not put fresh food directly in contact with already-frozen food.
l
If you buy frozen food, bring it home and place it in freezer as quickly as possible.
l
Never re-freeze a defrosted product.
l
Do not store liquids in bottles or cans (besides high-percentage spirits), especially
carbonated beverages in the freezer, as these will burst during freezing
l
The storage time for the respective food (especially for commercially frozen food)
recommended by the food manufacturer should not be exceeded. Only take the
required amount of food out of the freezer.
l
During defrost or maintenance and care, the temperature of frozen food could
rise and the storage life could reduce
How to Use the Refrigerator Compartment?
l
Eggs have to be placed in the egg compartment, bottles in the bottle compartment, etc.
l
Fruits and vegetables have to be placed in the salad crisper.
l
Jars have to be placed in the tubs inside the door of the refrigerator.
l
Other perishable foods, or foods that can release odours into the refrigerator, must be
packed separately.
Placement of Food
l
Do not store too much food in the refrigerator, this would result in a loss of cold
air
.
l
Food has to be wrapped separately in aluminum sheets, in cellophane sheets or in
airtight plastic boxes.
l
Hot food cannot be put in the refrigerator or in the freezer until they have reached
the ambient temperature, or this will increase electrical consumption.
l
Never place vegetables and fruits into freezer compartments as they will be
unfit for consumption once defrosted.
-9-
8

GENERAL INSTRUCTIONS FOR CARE AND MAINTENANCE
The refrigerator should be cleaned once a month. Before cleaning, the electrical plug must
be removed from the power supply.
Wipe the inside and the outside of the refrigerator with a wet soft cloth.
If it's too dirty, clean with a soft cloth with neutral detergent and then remove the
moisture with a dry cloth.
If you leave the refrigerator idle for a long time, proceed as follows:
l
Disconnect the refrigerator from the electrical power supply.
l
Remove all food.
l
Clean and dry the inside as instructed in the directions given above for cleaning.
l
Leave the doors open to prevent any unpleasant smells while the refrigerator is not
being used.
Cleaning
When cleaning the refrigerator, the electrical plug must be removed from the power supply.
Use water or a non-abrasive detergent on a soft cloth and remove the moisture with a
dry soft cloth. Remember to clear the defrost drain at the back just above the glass
cover.
Replacing the LED light:
Warning: The
LED
light
must
not
be
replaced
by
the
user!
If
the
LED
light
is
damaged, contact the customer helpline for assistance.
-10-
9

plastic bag.
take down part and put it back into the
and then disconnect electrical connector.
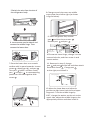
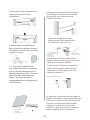
2.Open part on top of the upper door
left
ref
door stop,
left
ref
cover
left upper hinge door stop,
Parts you will need
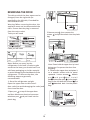
REVERSING THE DOOR
2
1
3
2
1
3
2
1
bag.
part detached back into the plastic
bag) to the left side with screws . Put
part and another part (in the plastic
p a r t a n d p a r t t h e n i n s t a l l
upwards. Loose screws , detach
on a smooth surface with its panel
4. Remove the upper door and place it
during step 2 to prevent the door from
dropping.
Note: Please hold the upper door by hand
screws and put them back into the plastic
bag.
3.Remove part , then remove the
2
1
The side on which the door opens can be
changed, from the right side (as
supplied) to the left side, if needed for
the installation site.
Warning! When reversing the door, the
appliance must not be connected to the
main. Ensure that the plug is removed
from the main socket.
Tools you will need
Note: Before you start, lay the
refrigerator on its back in order to gain
access to the base, you should rest it on
soft foam packaging or similar material
to avoid damaging the backboard of the
refrigerator. To reverse the door, the
following steps are generally
recommended:
1. Stand the refrigerator upright.
Open the upper door to take out all
door racks (to avoid damaging the racks) and
then close the door.
-11-
10

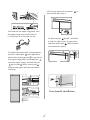
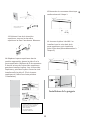
-12-
remove the lower door.
and remove the middle hinge. Then
6. Loose screws used to attach the
slot of refrigerator body.
5.Switch the wire from the right to left
screws
1
1
4
2
3
4
1
3
2
1
1
3
2
8.Change screw hole covers on middle
cover plate from left to right (as shown
in figure below).
9. Place refrigerator flat, remove
part and then loose screws
.
Remove part and part .
Lower hinge part (right)
Leg front
(
right
)
Leg front
(
left
)
Self-tapping-screws
10.Screw out lower hinge, change it to the
nearest hole site, and then screw in and
mount washer.
7.Place the lower door on a smooth
11. Remount in step 9, change
surface with its panel upwards. Loosen
part and part to the left and then attach
3
,detach part and part
them with screws .Change part
Turn part by180
°
and then install
to the right, and install it.
part and part to corresponding
position on left side together with
Lower hinge part (left)
screws .
12.Move the lower door and adjust its
position to align lower hole site and upper
hinge axis. Turn the middle hinge by
180
°
, change the washer on the axis to the
1
2
3
upper side, adjust the middle hinge to the
appropriate position and then install it.
5.Switch the wire from the slot of
the refrigerator body.
6. Loose screws used to attach and
remove the middle hinge. Then
remove the lower door.
11

4
. Lastly, mount part .
2
1
3
2
15.Connect electrical connector in
accordance with step 1.
13.Screw out the upper hinge axis, turn
the upper hinge over and fix axis on
it. Then place it on the side for use.
16. Reverse part by 180
°
and install
it onto the right corner of upper door,
and then mount part
(both of which
are removed in step 1)
14. Move the upper door to appropriate
position, adjust part
and upper door,
Move the connecting wire in the slot of
the upper hinge (left), and install part
onto the upper hinge, and then fix part
with screws
5
(Please hold upper door by hand when
installing)
5
left upper hinge cover (whic h is in the plastic bag)
upper hinge part
connecting wire
Self-tapping-screws
5
top cover B
-13-
12
Door handle installation

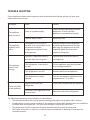
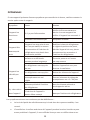
TROUBLE SHOOTING
If your appliance shows other symptoms than those described below, please call your local
authorized service center.
Symptom
Cause
Solution
Check the plug connecting it to other
The appliance
does not work
There is no power supply
appliances, or verify that the
appliance is connected to the plug
The fuse doesn’t work
Replace the fuse
The appliance is too close to
Stabilize the base of the refrigerator
The appliance
the wall, or it is not stable, or the
by adjusting the position of the feet,
makes a lot of
accessories inside the
take away the appliance of the wall,
noise
refrigerator are placed in the
correctly place
the accessories
wrong position
inside the refrigerator
The door is opened to often or
Close the door and do not open it
was left open for a long time
too frequently
The appliance
doesn’t cool
The refrigerator is too close to
the wall
Pull the appliance away from the wall
to encourage
ventilation
enough
The refrigerator is too full
Remove food from the appliance
The temperature is badly
Turn the temperature regulation knob
adjusted
temperature to "3" or more
Expired food inside the
Throw away expired food and wrap
ping
There are smells
refrigerator
in the appliance
The inside of the appliance needs
to be cleaned
Clean the inside of the refrigerator
The following symptoms are not indicative of a breakdown:
l
The noise produced by the cooling liquid circulating inside pipes can be heard, this is normal.
l
Condensation on the outside surface of the appliance during wet seasons does not indicate a
problem with the appliance ; you just need to wipe it with a dry soft cloth.
l
The compressor and the condenser can warm more during the periods of strong heat.
l
The frame of the door is a bit hot; it means that the condenser is working to evacuate the
humidity in the air.
-14-
13

In the event of a power outage, food should remain safely cold for about 16 hours. Follow these
tips during a prolonged power interruption, especially in summer:
l
Open the door/drawer as few times as possible.
l
Do not put additional food into the appliance during a power interruption.
l
If prior notice of a power interruption is given and the interruption duration is longer
than 16 hours, make some ice and put it in a container in the top of the refrigerator
compartment.
l
An inspection of the food is required immediately after the interruption.
l
As temperature in the refrigerator will rise during a power interruption or other failure,
the storage period and edible quality of food will be reduced. Any food that defrosts
should be either consumed, or cooked and refrozen (where suitable) soon afterwards in
order to prevent health risks.
-15-
14

We decline liability for any damage or accident derived from any use of this product
which is not compliant with the instructions contained in this booklet.
DISPOSAL
H e l p
p ro te c t
t h e
e nv i ro n m e nt
a n d
h u m a n
h e a l t h .
P u t
t h e
packaging in applicable containers to recycle it. Help to recycle
waste from electrical and electronic appliances. Do not dispose of
appliances marked with this symbol with the household waste.
Return the product to your local recycling facility or contact your
municipal office.
WARNING!
Risk of injury or suffocation!
Refrigerants and gases must be disposed of professionally. Ensure that the tubing of the
refrigerant circuit is not damaged before being properly disposed of. Disconnect the
appliance from the main supply. Cut off the main cable and dispose of it. Remove the
trays and drawers as well as the door catch and seals, to prevent children and pets from
getting trapped inside
the appliance.
-16-
15

-16
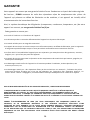
WARANTY INFORMATION
Yourapplianceiscoveredbyaoneyearlimitedwarranty.Foroneyearfromyouroriginaldate
ofdelivery,FORNOwillrepairorreplaceanypartsofthisappliancethatprovetobedefectivein
materialsorworkmanshipwhensuchapplianceisinstalled,used,andmaintainedinaccordance
withtheprovidedinstructions.Furthermore,thesealedrefrigerationsystem
(compressor,condenser,etc.)ofyourapplianceiscoveredbya(2)oneyearlimitedwarranty.
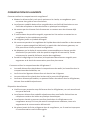
EXCLUSIONS
Thiswarrantydoesnotcoverthefollowing:
•Productwithoriginalserialnumbersthathavebeenremovedalteredorcannotbereadilydetermined.
•Rustontheinteriororexterioroftheunit.
•Foodlossduetoapowerfailureand/orfreezerfailure.
•Productsusedcommercially.
•ServiceCallswhichdonotinvolvemalfunctionordefectsinmaterialsorworkmanship,orforappliances
notinordinary householduseorusedotherthaninaccordancewiththeprovidedinstructions.
•Expensesformakingtheapplianceaccessibleforservicing,suchasremovaloftrim,cupboards,shelves,
etc.,whichare notapartoftheappliance.
•ServiceCallstorepairorreplaceapplianceconsumables,orknobs,handles,orothercosmeticparts.
•Pickupanddeliverycosts;yourappliancewillberepairedathome.
•Damagestothefinishofapplianceorhomeincurredduringtransportationorinstallation,includingbut
notlimitedto floors,cabinets,walls,etc.
•Damagescausedby:servicesperformedbyunauthorizedServiceCenters;useofpartsotherthangenuine
partsorparts obtainedfrompersonsotherthanauthorizedServiceCenters;orexternalcausessuchas
abuse,misuse,inadequate powersupply,accidents,fires,oractsofGod.
DISCLAIMEROFIMPLIEDWARRANTIES;LIMITATIONOFREMEDIES
THE CUSTOMER’S SOLE AND EXCLUSIVE REMEDY UNDER THIS LIMITED WARRANTY SHALL BE REPAIR
OR REPLACEMENTSASPROVIDEDHERE.CLAIMS BASED ON IMPLIED WARRANTIES, INCLUDING WARRANTIES
OFMERCHANTABILITYORFITNESSFORAPARTICULARPURPOSE,ARELIMITEDTOONEYEARORTHE
SHORTESTPERIODALLOWEDBYLAW,EXCEPTTHOSELESSTHANONEYEAR.
CORBEIL APPLIANCES SHALL NOT BE LIABLE FOR CONSEQUENTIAL OR INCIDENTAL DAMAGES SUCH
AS PROPERTY DAMAGE AND INCIDENTAL EXPENSES RESULTING FROM ANY BREACH OF THIS WRITTEN
LIMITEDWARRANTYORANYIMPLIEDWARRANTY.SOMEPROVINCESDONOTALLOWTHEEXCLUSIONOR
LIMITATIONOFINCIDENTALORCONSEQUENTIALDAMAGES,ORLIMITATIONSONTHEDURATIONOFIMPLIED
WARRANTIES,SOTHESELIMITATIONSOREXCLUSIONSMAYNOTAPPLYTOYOU.THISWRITTENWARRANTY
GIVESYOUSPECIFICLEGALRIGHTS.YOUMAYALSOHAVEOTHERRIGHTSTHATVARYFROMPROVINCETO
PROVINCE.

La page charge ...
La page charge ...
La page charge ...
La page charge ...
La page charge ...
La page charge ...
La page charge ...
La page charge ...
La page charge ...
La page charge ...
La page charge ...
La page charge ...
La page charge ...
La page charge ...
La page charge ...
La page charge ...
La page charge ...
La page charge ...
La page charge ...
-
 1
1
-
 2
2
-
 3
3
-
 4
4
-
 5
5
-
 6
6
-
 7
7
-
 8
8
-
 9
9
-
 10
10
-
 11
11
-
 12
12
-
 13
13
-
 14
14
-
 15
15
-
 16
16
-
 17
17
-
 18
18
-
 19
19
-
 20
20
-
 21
21
-
 22
22
-
 23
23
-
 24
24
-
 25
25
-
 26
26
-
 27
27
-
 28
28
-
 29
29
-
 30
30
-
 31
31
-
 32
32
-
 33
33
-
 34
34
-
 35
35
-
 36
36
-
 37
37
-
 38
38
-
 39
39


