Good Earth Lighting AC1213-BKG-07LF2 Mode d'emploi
- Taper
- Mode d'emploi

RG
OFF
W
ON
B
FLASH
STROBE
FADE
SMOOTH
2
CONEXIÓN DEL CABLE USB
2
Una vez que las luces LED con cinta autoadhesiva estén firmemente en la posición deseada, enchufe el conector USB en un televisor, una computadora
personal o un adaptador USB.
1. Retire la lengüeta de plástico de la batería que se encuentra en el control remoto jalándola
directamente hacia fuera de dicho control.
2. La máxima distancia de utilización del control remoto con baterías nuevas es aproximadamente 20
pies (7 m) con una línea de visión directa entre el control remoto y el receptor IR.
3. La batería que se utiliza en el control remoto es de tipo botón CR2025 y será necesario
reemplazarla al final de su ciclo de vida útil.
UTILIZACIÓN DEL CONTROL REMOTO
NOTA: Al encender la luz por primera vez, esta ciclará a través de rojo, verde y azul hasta que se
seleccione un color.
NOTA: La utilización del controlador remoto requiere una línea de visión directa
entre el control remoto y el receptor IR.
Los botones ubicados en el fondo negro que se encuentra en la parte superior del control remoto
ajustan la intensidad y las variaciones multicolor de las luces LED de color.
Los botones ubicados en la parte inferior del control remoto aplican luz festiva y
cambiante ciclando a través del color con grados variables de pérdida de
intensidad y cambios de luz a saltos.
Utilice los botones de ENCENDIDO (“ON”) o APAGADO (“OFF”) de esta sección
para encender las luces LED de color .
Para atenuar o intensificar las luces LED de color, presione y mantenga
presionados los botones de atenuación o intensificación hasta que se alcance
la intensidad luminosa deseada.
Al presionar cualquiera de los otros botones de color se cambiará la luz con cinta autoadhesiva al
color del botón que se presione.
FLASH
STROBE
FADE
SMOOTH
OFF ON
PROBLEMA CAUSA POSIBLE MEDIDA CORRECTIVA
GUÍA DE SOLUCIÓN DE PROBLEMAS
1. La franja LED no se enciende. 1. El interruptor de alimentación/luz está en la posición de apagado.
2. El receptor IR está bloqueado respecto a la señal del control remoto.
1. La unidad está montada en superficies de madera o panel de
aglomerado que no están acabadas.
2. La superficie no se ha limpiado con un paño.
1. La conexión está floja
1. Móntela con soportes y tornillos (no incluidos)
2. limpie la superficie y reaplique una nueva capa de cinta adhesiva de doble cara,
tal como la 3M VHB (no incluida).
1. Compruebe el cable preconectado y empuje hacia dentro
1. Verifique si la TV, el monitor y la fuente de alimentación están encendidos.
2. Posicione el receptor IR orientado en dirección hacia el control remoto.
1. El control remoto no funciona correctamente.
2. El receptor IR no está recibiendo luz del control remoto.
1. Limpie el lente IR del control remoto.
2. Jale la lengüeta de plástico para separarla del compartimiento de la batería o
reemplace la batería (CR2025).
ANTES DE HACER CUALQUIER TRABAJO EN EL ACCESORIO PARA ILUMINACIÓN, ¡DESENCHUFE EL CABLE DE ALIMENTACIÓN DEL TOMACORRIENTE!
2. La luz no cambia los colores al
utilizar el control remoto.
3. El adhesivo de la franja LED está
perdiendo adhesión.
4. La franja LED tiene secciones que
no se encienden.
Good Earth Lighting® - GARANTÍA LIMITADA DE 10 AÑOS: El fabricante garantiza que esta lámpara no presentará defectos en los materiales ni en la mano de obra por un período de (10) años a partir de la
fecha de compra original. La lámpara no está cubierta por esta garantía si se la utiliza en aplicaciones comerciales o minoristas. La garantía se limita al uso en entornos residenciales. Repararemos o
reemplazaremos sin costo alguno (según nuestro criterio) la unidad en el color y el estilo originales si están disponibles, o en un estilo y un color similares si el artículo original se ha discontinuado. Las
unidades defectuosas se deben empaquetar correctamente y devolver al fabricante con una carta explicativa y el recibo de compra original con la fecha de compra. Llame al 1-800-291-8838 para obtener
un número de autorización de devolución y una dirección donde enviar el producto defectuoso. NOTA: NO se aceptarán envíos contrarreembolso (C.O.D., por sus siglas en inglés). La responsabilidad del
fabricante se limita, en todos los casos, al reemplazo de la lámpara defectuosa. El fabricante no será responsable por ninguna pérdida, daños, costos de mano de obra o lesiones causadas por el producto.
Esta limitación de la responsabilidad del fabricante incluye toda pérdida, daño, costos de mano de obra o lesión (I) que involucre a una persona o propiedad u otros casos; (II) que sea de naturaleza
accidental o resultante; (III) que se base en teorías de la garantía, contrato, negligencia, responsabilidad estricta, agravio o de otro tipo; o (IV) que se relacione de manera directa o indirecta con la venta,
uso o reparación del producto. Esta garantía le otorga derechos específicos, pero podría tener también otros derechos que varían según el estado.
DECLARACIÓN DE LA FCC: Cet appareil est conforme à l’alinéa 15 du règlement de la FCC. Son fonctionnement est soumis aux deux conditions suivantes: (1) Cet appareil ne doit pas causer d’interférences nuisibles et (2) cet appareil doit accepter toutes les interférences reçues, y compris les interférences pouvant causer un
fonctionnement non souhaité. Avertissement : Les modifications non autorisées expressément par la partie responsable de la conformité peuvent annuler le droit de l’utilisateur de se servir de cet appareil. L’utilisateur est avisé que les modifications non autorisées expressément par la partie responsable de la conformité
peuvent annuler le droit de l’utilisateur de se servir de cet appareil. Remarque: Cet appareil a été testé et déclaré conforme aux limites imposées aux appareils numériques de classe B, conformément à l’alinéa 15 du règlement de la FCC. Ces limites sont destinées à assurer une protection raisonnable contre les interférences
nuisibles dans un environnement résidentiel. Cet appareil génère, utilise et peut émettre de l’énergie radiofréquence et, s’il n’est pas installé et utilisé conformément aux instructions, risque de provoquer des interférences nuisibles aux communications radio. Cependant, tout risque d’interférence ne peut être totalement exclu.
S’il constate des interférences nuisibles à la réception des signaux de radio ou de télévision (il suffit, pour le vérifier, d’allumer et d’éteindre successivement l’appareil), l’utilisateur devra prendre les mesures nécessaires pour les éliminer. À cette fin, il devra : 1) réorienter ou déplacer l’antenne de réception; 2) augmenter la
distance entre l’équipement et le récepteur; 3) brancher l’appareil sur une prise de courant appartenant à un circuit différent de celui du récepteur; 4) consultez le détaillant ou un technicien en radio ou en télévision expérimenté afin d’obtenir de l’aide.
Good Earth Lighting
®
son marcas registradas de Good Earth Lighting, Inc.© 2019 Good Earth Lighting, Inc.
¿Necesita ayuda?
Sírvase visitar nuestro sitio web en: www.goodearthlighting.com/support o llame al Centro de Asistencia
al Cliente al 1-800-291-8838, 8:30 a.m.-5 p.m., Hora Central Estándar (CST), de lunes a viernes
Impreso en China
Good Earth Lighting® 1400 East Business Center Drive, Ste. 108 Mount Prospect, IL 60056
REEMPLACE LA BATERÍA
Cuando la batería se agote, siga las instrucciones que se encuentran en la parte trasera del
control remoto para retirar la batería y reemplazarla por una batería CR2025 nueva.
CUIDADO Y MANTENIMIENTO: Limpie la lámpara y el difusor periódicamente con un paño suave y un limpiador suave y no abrasivo. Cuando limpie la
lámpara, asegúrese de desconectar la fuente de alimentación. No use limpiador directamente en ninguna parte de la lámpara de luces LED.
Es posible que tragarse las baterías cause lesiones graves o la muerte. Si se tragan, vaya directamente a una sala de emergencias médicas. Es posible que las baterías dejen escapar líquidos nocivos o materiales inflamables, o que exploten y causen lesiones
y daños al producto. No mezcle baterías viejas y nuevas, ni de distintos tipos. Reemplace todas las baterías al mismo tiempo. Retire las baterías del producto si no se han utilizado durante un período de tiempo prolongado. Las baterías reemplazadas se
deberán desechar apropiadamente. Mantenga las baterías fuera del alcance de los niños
1923INAC1213REV1
4
RG
OFF
W
ON
B
FLASH
STROBE
FADE
SMOOTH
INSTALACIÓN: ATTACHING TAPE LIGHT TO SURFACE
1
Seleccione una ubicación para la luz LED con cinta autoadhesiva y márquela. Verifique que el cable USB llegue hasta el tomacorriente más cercano y que llegará hasta la
luz LED con cinta autoadhesiva. Limpie minuciosamente la superficie de montaje con alcohol desinfectante y deje que se seque. NO ENCHUFE EL PUERTO USB EN LA
FUENTE ALIMENTACIÓN HASTA SE HAYA COMPLETADO LA INSTALACIÓN. Retire cuidadosamente el recubrimiento de soporte posterior, de manera que no desprenda
accidentalmente el adhesivo de montaje de la luz LED con cinta autoadhesiva. Coloque la luz LED con cinta autoadhesiva en la posición deseada. Aplique presión
cuidadosamente a toda la longitud de la luz LED con cinta autoadhesiva para asegurar una adhesión adecuada.
1
1. Retirez la languette en plastique pour les piles sur la
télécommande en tirant tout droit dessus pour la détacher de la
télécommande.
2. La distance maximale de fonctionnement de la télécommande
avec des piles neuves est d'environ 7m / 20 pi, avec une ligne de
visée directe entre la télécommande et le récepteur IR.
3. La pile utilisée dans la télécommande est une pile bouton
CR2025, et elle devra être remplacée à la fin de son cycle de vie.
UTILISATION AVEC LA TÉLÉCOMMANDE
REMARQUE : La première fois qu’il sera allumé, le luminaire
aura successivement une couleur rouge, puis verte, puis
bleue, et le cycle continuera jusqu’à ce que vous ayez
sélectionné une couleur.
REMARQUE : Le fonctionnement de la télécommande
nécessite une ligne de visée directe entre la télécommande
et le récepteur IR.
Les boutons situés sur le fond gris en haut de la télécommande
permettent de régler l'intensité et les variations multicolores de la
sortie des DEL de couleur.
Les boutons situés en bas de la télécommande
permettent d'appliquer une lumière festive et changeante
en faisant défiler les couleurs avec différents degrés de
nuances et des changements soudains de lumière.
Utilisez les boutons « ON » (Allumer) ou « OFF »
(Éteindre) dans cette section pour activer ou désactiver
les DEL de couleur.
Pour faire varier la luminosité ou éclaircir les DEL de
couleur, appuyez et maintenez enfoncées les touches
de variation ou d'éclaircissement jusqu'à ce que vous
atteigniez l’intensité lumineuse désirée.
En appuyant sur l'un quelconque des autres boutons de couleur, la
lumière du ruban passera à la couleur du bouton enfoncé.
FLASH
STROBE
FADE
SMOOTH
OFF ON
Printed in ChinaGood Earth Lighting® 1400 East Business Center Drive, Ste. 108 Mount Prospect, IL 60056
Good Earth Lighting® is a registered trademark of Good Earth Lighting, Inc. © 2019 Good Earth Lighting, Inc.
Need Help? Please visit our website at: www.goodearthlighting.com/support or call the Customer Care Center
1-800-291-8838, 8:30 a.m.-5 p.m., CST, Monday-Friday.
Good Earth Lighting® - 6 YEAR LIMITED WARRANTY: The manufacturer warrants this lighting fixture to be free from defects in materials and workmanship for a period of (6) years from the date of original
purchase by the consumer. The fixture is not warrantied for use in a commercial or retail application. The warranty is limited to use in a residential environment. We will repair or replace (at our option) the
unit in the original color and style if available, or in a similar color and style if the original item has been discontinued, without charge. Defective units must be properly packed and returned to the
manufacturer with a letter of explanation and your original purchase receipt showing date of purchase. Call 1-800-291-8838 to obtain a return authorization number and an address where to ship your
defective product. Note: C.O.D. shipments will NOT be accepted. The liability of the manufacturer is in any case limited to replacement of the defective light fixture product. The manufacturer will not be
liable for any other loss, damage, labor costs or injury which is caused by the product. This limitation upon the liability of the manufacturer includes any loss, damage, labor costs or injury which is (I) to
person or property or otherwise; (II) incidental or consequential in nature; (III) based upon theories of warranty, contract, negligence, strict liability, tort, or otherwise; or (IV) directly, or indirectly related to
the sale, use, or repair of the product. This warranty gives you specific rights, and you may also have other rights which vary from state to state.
FCC Statement This device complies with Part 15 of the FCC rules. Operation is subject to the following two conditions: (1) This device may not cause harmful interference, and (2) this device must accept any interference received, including interference that may cause undesired operation. Warning: Changes
or modifications to this unit not expressly approved by the party responsible for compliance could void the user’s authority to operate the equipment. Note: This equipment has been tested and found to comply with the limits for a Class B digital device, pursuant to Part 15 of the FCC rules. These limits are
designed to provide reasonable protection against harmful interference in a residential installation. This equipment generates, uses and can radiate radio frequency energy and, if not installed and used in accordance with the instructions, may cause harmful interference to radio communications. However,
there is no guarantee that the interference will not occur in a particular installation. If this equipment does cause harmful interference to radio or television reception, which can be determined by turning the equipment off and on, the user is encouraged to try to correct the interference by one or more of the
following measures: 1) Reorient or relocate the receiving antenna. 2) Increase the separation between the equipment and receiver. 3) Connect the equipment into an outlet on a circuit different from that of the receiver. 4) Consult the dealer or an experienced radio/TV technician for help.
AVANT D’EFFECTUER UN QUELCONQUE TRAVAIL SUR LE LUMINAIRE, DÉBRANCHEZ LE CORDON D’ALIMENTATION DE LA PRISE DE COURANT !
PROBLÈME CAUSE POSSIBLE ACTION CORRECTIVE
1. La bande à DEL ne s’allume pas. 1. L’interrupteur d’alimentation/d’éclairage est hors tension.
2. Le récepteur IR ne reçoit pas le signal de la télécommande.
1. Montage sur une surface en bois non fini ou sur un
panneau de particules agglomérées.
2. la surface n’est pas propre
1. La connexion n’est pas suffisamment serrée.
1. Montez avec des attaches de fixation et des vis (non incluses).
2. Nettoyez la surface et réappliquez une nouvelle couche de ruban adhésif double tel que
3M VHB (non inclus)
1. Inspectez le fil pré-connecté et enfoncez-le.
1. Vérifiez que le téléviseur, le moniteur, la source d’alimentation sont allumés/sous tension.
2. Positionnez le récepteur IR de façon qu’il soit en face de la télécommande.
1. La télécommande ne fonctionne pas correctement.
2. Le récepteur IR ne reçoit pas le signal lumineux de la
télécommande.
1. Nettoyez la lentille IR sur la télécommande.
2. Retirez le couvercle en plastique du compartiment de la pile ou remplacez la pile (CR2025).
2. La couleur de la lumière ne peut
pas être modifiée au moyen de
la télécommande.
GUIDE DE DÉPANNAGE
ADVERTENCIAS Y PRECAUCIONES
Este producto tiene un conector USB que permite realizar una conexión rápida y fácil a televisores y computadoras portátiles. Las luces LED con cinta autoadhesiva también se pueden enchufar en un tomacorriente con un adaptador de alimentación USB (no
incluido). NO ALTERE LUZ. LEA TODO EL MANUAL ANTES DE LA INSTALACIÓN. Verificar el contenido del paquete y del hardware. Guarda estas instrucciones.
1. No hay piezas que se puedan reparar ni ajustar en este producto. NO corte las luces LED con cinta autoadhesiva.
Estas luces LED con cinta autoadhesiva están precontectadas y no se pueden cortar.
2. NO instale la unidad mientras esté enchufada. NO enchufe el Cable USB en la fuente de alimentación hasta que se
haya completado la instalación.
3. Para conocer los requisitos eléctricos, consulte el dorso de la etiqueta del controlador.
4. Para lugares INTERIORES solamente.
5. NO toque, utilice ni instale el accesorio para iluminación mientras esté en contacto con agua. No está diseñado para
iluminación de acuarios.
6. NO monte la unidad sobre lavamanos, fregaderos o estufas de cocinar.
7. NO se ha diseñado para instalación embutida en techos o sofitos. NO tienda NINGÚN
cable detrás de paredes, techos, sofitos, gabinetes o una estructura permanente similar donde es posible que los
cables sean inaccesibles para examinarlos.
8. La luz con cinta autoadhesiva debe estar totalmente desenrollada para funcionar correctamente, así como para
prevenir su sobrecalentamiento.
9. Esta luz con cinta autoadhesiva NO es expansible. NO SE PUEDEN añadir tramos de luz LED con cinta autoadhesiva adicionales.
10. NO mire directamente a las luces LED encendidas ni tan siquiera por unos instantes.
11. Utilice únicamente grapas con aislamiento o amarres de plástico (no incluidos) para fijar los cables.
12. NO utilice la unidad con un cable de extensión. Utilice una regleta de enchufes con protección integral contra sobrecorriente para
suministrar alimentación eléctrica al accesorio para iluminación. No utilice nunca una regleta de enchufes a menos que el enchufe se
pueda insertar por completo.
13. NO UTILICE ESTE ACCESORIO PARA ILUMINACIÓN CON UN CIRCUITO REGULADOR DE LA INTENSIDAD DE LA LUZ. Si hay presentes
controles reguladores de la intensidad de la luz, retírelos y reemplácelos.
14. Si no está familiarizado con las instalaciones eléctricas, contacte a un electricista calificado para que realice la instalación.
15. Las luces LED emiten gradualmente menos luz a lo largo de su tiempo de vida útil.
16. NO cortar las luces de la tira de LED. Estas tiras de luces LED ya están conectadas y no se pueden cortar.
ESPAÑOL
ESTA LUZ NO SE PUEDE CORTAR NI ENLAZAR
No reposicione la luz con cinta autoadhesiva una vez que esté
montada. Al hacerlo se reducirá la adhesividad del soporte
posterior de la cinta autoadhesiva.
Una vez que se haya colocado en la posición deseada, deje que
el adhesivo de la cinta se seque durante 24 horas antes de
utilizar la luz.
LA LUZ USB CON CINTA
AUTOADHESIVA ES
COMPATIBLE CON TAMAÑOS
DE PANTALLA QUE VAN DE 76
CM A 165 CM
REMPLACEZ LA PILE
Lorsque la pile est déchargée, suivez les instructions à l'arrière de la
télécommande pour retirer la pile et la remplacer par une nouvelle pile
CR2025.
Utilice los clips para cables incluidos para sujetar
el cable entre las luces con cinta autoadhesiva.
L’ingestion des piles pourrait causer des blessures graves ou même la mort. En cas d’ingestion, rendez-vous immédiatement aux urgences. Les piles peuvent avoir des fuites de liquides toxiques ou des matériaux inflammables, ou elles peuvent exploser,
risquant ainsi de causer des blessures et des dommages matériels. Ne mélangez pas des piles neuves avec des piles usagées, ou des types de piles différents. Remplacez toutes les piles en même temps. Retirez les piles du produit si vous pensez que vous
n’allez pas vous en servir pendant une durée prolongée. Les piles remplacées doivent être mises au rebut de façon appropriée. Gardez les piles hors de portée des enfants.
3. L’adhésif de la bande à DEL
adhère insuffisamment.
4. La bande à DEL a des sections qui
ne s’allument pas
3
INSTALLATION
2
RACCORDEMENT DU CORDON USB
2
Une fois que les rubans lumineux à DEL sont fermement en place, branchez le connecteur USB dans un
téléviseur, un ordinateur portable ou un adaptateur USB.
Printed in ChinaGood Earth Lighting® 1400 East Business Center Drive, Ste. 108 Mount Prospect, IL 60056
Good Earth Lighting® is a registered trademark of Good Earth Lighting, Inc. © 2019 Good Earth Lighting, Inc.
Need Help? Please visit our website at: www.goodearthlighting.com/support or call the Customer Care Center
1-800-291-8838, 8:30 a.m.-5 p.m., CST, Monday-Friday.
Good Earth Lighting® - 6 YEAR LIMITED WARRANTY: The manufacturer warrants this lighting fixture to be free from defects in materials and workmanship for a period of (6) years from the date of original
purchase by the consumer. The fixture is not warrantied for use in a commercial or retail application. The warranty is limited to use in a residential environment. We will repair or replace (at our option) the
unit in the original color and style if available, or in a similar color and style if the original item has been discontinued, without charge. Defective units must be properly packed and returned to the
manufacturer with a letter of explanation and your original purchase receipt showing date of purchase. Call 1-800-291-8838 to obtain a return authorization number and an address where to ship your
defective product. Note: C.O.D. shipments will NOT be accepted. The liability of the manufacturer is in any case limited to replacement of the defective light fixture product. The manufacturer will not be
liable for any other loss, damage, labor costs or injury which is caused by the product. This limitation upon the liability of the manufacturer includes any loss, damage, labor costs or injury which is (I) to
person or property or otherwise; (II) incidental or consequential in nature; (III) based upon theories of warranty, contract, negligence, strict liability, tort, or otherwise; or (IV) directly, or indirectly related to
the sale, use, or repair of the product. This warranty gives you specific rights, and you may also have other rights which vary from state to state.
FCC Statement This device complies with Part 15 of the FCC rules. Operation is subject to the following two conditions: (1) This device may not cause harmful interference, and (2) this device must accept any interference received, including interference that may cause undesired operation. Warning: Changes or modifications to this unit not
expressly approved by the party responsible for compliance could void the user’s authority to operate the equipment. Note: This equipment has been tested and found to comply with the limits for a Class B digital device, pursuant to Part 15 of the FCC rules. These limits are designed to provide reasonable protection against harmful interference in
a residential installation. This equipment generates, uses and can radiate radio frequency energy and, if not installed and used in accordance with the instructions, may cause harmful interference to radio communications. However, there is no guarantee that the interference will not occur in a particular installation. If this equipment does cause
harmful interference to radio or television reception, which can be determined by turning the equipment off and on, the user is encouraged to try to correct the interference by one or more of the following measures: 1) Reorient or relocate the receiving antenna. 2) Increase the separation between the equipment and receiver. 3) Connect the
equipment into an outlet on a circuit different from that of the receiver. 4) Consult the dealer or an experienced radio/TV technician for help.
BEFORE DOING ANY WORK ON THE FIXTURE, UNPLUG THE POWER CORD FROM THE ELECTRICAL OUTLET!
Ce produit a un connecteur USB qui permet une connexion rapide et facile à des téléviseurs et des ordinateurs portables. Les rubans lumineux à DEL peuvent également être branchés à une prise de
courant au moyen d’un adaptateur de courant USB (non inclus).NE MODIFIEZ PAS LA FICHE. LISEZ TOUT LE MANUEL AVANT L’INSTALLATION. Vérifiez le contenu du paquet et du matériel.
Conservez ces instructions.
AVERTISSEMENTS ET MISES EN GARDE
FRANÇAIS
Ne repositionnez pas le ruban lumineux
une fois qu’il a été monté. Ceci réduirait
la force d’adhérence du support du ruban.
ATTACHEMENT DU RUBAN LUMINEUX À LA SURFACE
Une fois en place, laissez l'adhésif du
ruban sécher pendant 24 heures avant
de vous en servir.
1
Sélectionnez un emplacement pour le ruban lumineux à DEL et marquez-le.
Assurez-vous que le cordon USB est assez long pour atteindre la prise de courant
la plus proche et le ruban lumineux à DEL. Nettoyez soigneusement la surface de
montage avec de l’alcool à friction et laissez-la sécher. NE PAS BRANCHER LE
CORDON USB DANS LA PRISE DE COURANT AVANT QUE L’INSTALLATION NE
SOIT TERMINÉE. Retirez le revêtement de support en prenant les précautions
nécessaires de façon à ne pas peler accidentellement la colle de montage du
ruban lumineux à DEL. Placez le ruban lumineux à DEL dans la position désirée.
Faites pression délicatement sur toute la longueur du ruban lumineux à DEL pour
assurer une adhérence correcte.
1
ENTRETIEN: Nettoyez périodiquement le luminaire et le diffuseur à l’aide d’un nettoyant pour vitres doux et non
abrasif et d’un linge doux. Assurez-vous que le luminaire est éteint avant de le nettoyer. Ne vaporisez pas de produit
nettoyant directement sur les pièces du luminaire ou sur les ampoules à DEL.
MESURE DE SÉCURITÉ IMPORTANTE
1. Aucune partie de ce produit n'est réparable. NE COUPEZ PAS les rubans lumineux à DEL. Ces
rubans lumineux à DEL sont pré-connectés et ne peuvent pas être coupés.
2. NE PAS installer pendant que le ruban lumineux est branché. NE PAS brancher le Cordon USB
avant que l’installation nesoit terminée.
3. Voir le verso de l’étiquette du luminaire pour connaître les spécifications électriques.
4. Pour utilisation À L'INTÉRIEUR exclusivement.
5. NE PAS toucher, utiliser ou installer un luminaire en contact avec de l’eau. Non conçu pour
illuminer des aquariums.
6. NE PAS monter au-dessus d’éviers ou de poêles.
7. Ce luminaire n’est PAS conçu pour une installation encastrée dans un faux-plafond ou un
soffite. NE PAS faire passer de cordons derrière les murs, les plafonds, les soffites, les
armoires ou une structure permanente similaire où ils pourraient être inaccessibles pour un
examen.
8. Le ruban lumineux doit être complètement déroulé pour permettre un fonctionnement correct
et pour prévenir toute surchauffe.
9. Ce ruban lumineux n’est PAS extensible. Il n’est PAS POSSIBLE d’ajouter des longueurs de
ruban lumineux à DEL additionnels.
10. NE PAS regarder directement une DEL allumée pendant une durée prolongée.
11. Utilisez seulement des agrafes ou des attaches en plastique isolées (non incluses) pour
sécuriser les cordons.
12. NE PAS utiliser avec un cordon de rallonge. Utilisez une barrette d'alimentation avec
protection intégrée contre les surintensités pour alimenter le luminaire. N’utilisez jamais de
barrette d’alimentation électrique, sauf si la fiche peut être insérée complètement.
13. N’UTILISEZ PAS CE LUMINAIRE AVEC UN CIRCUIT GRADATEUR. Si des commandes de
gradateurs sont présentes, retirez-les et remplacez-les.
14. Si vous ne savez pas comment effectuer des installations électriques, contactez un
électricien professionnel pour réaliser l'installation.
15. Les DEL émettent progressivement moins de lumière au fil du temps.
16. NE PAS couper les lumières de la bande de LED. Ces bandes lumineuses à LED sont déjà
connectées et ne peuvent pas être coupées.
PROBLEM POSSIBLE CAUSE CORRECTIVE ACTION
TROUBLESHOOTING GUIDE
1. LED Strip does not light up. 1. Power/Light switch is off.
2. IR Receiver blocked from remote control signal.
1. Mounted on unfinished wood or particle board surfaces.
2. Surface is not wiped down.
1. Connection is lose.
1. Mount with brackets and screws (not included).
2. Clean surface and reapply new layer of double- sided tape such as 3M VHB (not included).
1. Check pre-connected wire and push in.
1. Verify TV, Monitor, power source is on.
2. Position IR Receiver facing the direction of the remote
3. LED strip adhesive is losing adhesion.
1. Remote not functioning correctly.
2. IR Receiver not receiving remote light.
1. Clean IR lens on remote
2. Pull plastic tab from battery compartment or replace battery (CR2025)
2. Light will not switch colors
when remote is used.
CE LUMINAIRE NE PEUT PAS ÊTRE COUPÉ ET IL NE PEUT PAS ÊTRE
RACCORDÉ À D’AUTRES LUMINAIRES.
LE RUBAN LUMINEUX USB EST
COMPATIBLE AVEC DES ÉCRANS DE
TAILLES COMPRISES ENTRE 76 CM ET
165 CM
Utilisez les pinces de fixation du
cordon pour maintenir le cordon
entre les rubans lumineux.
4. LED Strip has sections that do not
light up.
2
RG
OFF
W
ON
B
FLASH
STROBE
FADE
SMOOTH
Do not reposition tape light once it is
mounted. Doing so will reduce the
adhesiveness of the tape backing.
Model / Modèle / Modelo #: AC1213-BKG-07LF2-G
7 ft LED USB Tape Light RGB w/ IR Remote (Page 1)
Ruban lumineux RGB USB TV à DEL de 213,4 cm avec télécommande IR (Page 2)
Luz LED con cinta autoadhesiva USB de 213,4 cm RVA con control remoto IR (Página 3)
Required/ Nécessaire
Se necesita
Hardware kit* / Trousse de quincaillerie*/ Kit de aditamentos*
* Actual hardware may differ from illustration.
* La quincaillerie incluse peut être différente de l’illustration.
* Los aditamentos reales pueden diferir de los que se muestran en la ilustración.
USB Cord
Cordon USB
Cable USB
IR (Infrared) receiver
Récepteur IR (infrarouge)
Receptor IR (Infrarrojo)
THIS LIGHT IS NON-CUTTABLE AND NON-LINKABLE
ENGLISH
WARNINGS AND CAUTIONS
This product has a USB connector allowing quick and easy connection to televisions and laptop computers. The LED tape lights can also be plugged into an electrical outlet with a USB power
adapter (not included). DO NOT ALTER THE TAPE LIGHT. READ THE ENTIRE MANUAL PRIOR TO INSTALLATION. Verify package and hardware contents. Save these instructions.
INSTALLATION
ATTACHING TAPE LIGHT TO SURFACE
Once in place, allow the tape adhesive
to cure for 24 hours before use.
1
Select a location for the LED tape light and mark it. Verify that the USB cord reaches the
nearest USB port. Thoroughly clean the mounting surface with rubbing alcohol and
allow it to dry. DO NOT PLUG THE USB CORD INTO THE POWER SOURCE UNTIL
INSTALLATION IS COMPLETE. Remove the backing liner carefully so as to not
accidentally peel away the mounting glue of the LED tape light. Place the LED tape light
in the desired position. Carefully apply pressure to the entire length of the LED tape light
to ensure proper adhesion.
1
CARE AND MAINTENANCE: Periodically clean the fixture and diffuser using a mild, non-abrasive cleaner and
soft cloth. When cleaning the fixture, make sure the power is turned off. Do not spray cleaner directly onto any part of the
fixture or LEDs.
2
CONNECTING USB CORD
2
Once the LED tape lights are firmly in place, plug the USB connector into a television, computer laptop, or USB adaptor.
1. Remove the plastic battery tab on the remote control by pulling it
straight out of the remote.
2. The maximum operating distance of the remote control with new
batteries is approximately 20 ft. (7 m) with a direct line of sight between
the remote control and the IR receiver.
3. The battery used in the remote control is a CR2025 button cell, and will
need to be replaced at the end of its life cycle.
REMOTE CONTROL OPERATION
NOTE: When first turned on, the light will cycle through red, green and blue until a color is selected.
NOTE: Remote controller operation requires direct line of sight between
the remote control and the IR receiver.
The buttons located on the black background at the top of the remote
control, adjust the intensity and multi-color variations of the color
LED’s output.
The buttons at the bottom of the remote control, apply
festive, and changing light by cycling through color with
varying degrees of fades and jumping light changes.
Use the “ON” or “OFF” buttons in this section to turn on
the color LED’s.
To dim, or brighten the color LED’s, press, and hold down the dimming
or brighten buttons until reaching the desired light output.
Pressing any of the other color buttons will switch the
tape light to the color of the button pressed.
FLASH
STROBE
FADE
SMOOTH
OFF ON
RG
OFF
W
ON
B
FLASH
STROBE
FADE
SMOOTH
IMPORTANT SAFETY INFORMATION
1. No parts are serviceable on this product. DO NOT cut the LED tape lights. These LED tape
lights are pre-connected and are not cuttable.
2. DO NOT INSTALL WHILE UNIT IS PLUGGED IN. DO NOT plug the USB cord into the power
source until installation is complete.
3. For electrical requirements, see back of driver label.
4. For INDOOR locations only.
5. DO NOT touch, operate, or install fixture while in contact with water. Not intended for
illumination of aquariums.
6. DO NOT mount over sinks or stoves.
7. NOT intended for recessed installation in ceilings or soffits. DO NOT run ANY cords behind
walls, ceilings, soffits, cabinets or a similar permanent structure where it may be
inaccessible for examination.
8. Tape light must be fully uncoiled for proper operation, and to prevent overheating.
9. This tape light is NOT expandable. Additional LED tape light lengths CANNOT be added.
10. DO NOT look directly at lighted LEDs for any length of time.
11. Use only insulated staples or plastic ties (not included) to secure the cords.
12. DO NOT use with an extension cord. Use a power strip with integral over current protection to
supply power to the fixture. NEVER use power strip unless the plug can be fully inserted.
14. DO NOT USE THIS FIXTURE WITH A DIMMING CIRCUIT. If dimmer controls are present, remove
and replace.
15. If unfamiliar with electrical installations, contact a qualified electrician to install.
16. LEDs gradually emit less light over their lifetime.
Remote control
Télécommande
Control remoto
LED tape light (x2) 18in/ (x2) 24in
Ruban lumineux à DEL (x2) 18in/ (x2) 24in
Luz LED con cinta autoadhesiva (x2) 18in/ (x2) 24in
FITS SCREEN SIZES
RANGING FROM 30IN.
TO 65 IN.
Cord clips (X5)
Clips de cordon (X5)
Clips de cordón (X5)
BATTERY REPLACEMENT
When the battery is exhausted, use the instructions on the back of the remote
control to remove the battery and replace it with a new CR2025 battery.
Use included cord clips to hold cords
in between tape lights
Swallowing the batteries may lead to serious injury or death. If swallowed, go straight to a medical emergency room. Batteries may leak harmful liquids or ignitable materials or explode causing injury and product damage. Do not mix old and
new, or different types of batteries. Replace all batteries at the same time. Remove batteries from product if unused for extended amount of time. Replaced batteries should be disposed of properly. Keep batteries out of children’s reach
Model#: AC1213-BKG-07LF2-G
File Name:
IN_AC1213-BKG-07LF2-G_1921INAC1213REV1_ALL.ai
Date: 2019.05.06
Insert size : 297 mm x 420 mm
Cuts
Folds
Product & CVP area
Dimension w/ unit or call outs
Color:
BLACK
420 mm
297 mm297 mm

RG
OFF
W
ON
B
FLASH
STROBE
FADE
SMOOTH
2
CONEXIÓN DEL CABLE USB
2
Una vez que las luces LED con cinta autoadhesiva estén firmemente en la posición deseada, enchufe el conector USB en un televisor, una computadora
personal o un adaptador USB.
1. Retire la lengüeta de plástico de la batería que se encuentra en el control remoto jalándola
directamente hacia fuera de dicho control.
2. La máxima distancia de utilización del control remoto con baterías nuevas es aproximadamente 20
pies (7 m) con una línea de visión directa entre el control remoto y el receptor IR.
3. La batería que se utiliza en el control remoto es de tipo botón CR2025 y será necesario
reemplazarla al final de su ciclo de vida útil.
UTILIZACIÓN DEL CONTROL REMOTO
NOTA: Al encender la luz por primera vez, esta ciclará a través de rojo, verde y azul hasta que se
seleccione un color.
NOTA: La utilización del controlador remoto requiere una línea de visión directa
entre el control remoto y el receptor IR.
Los botones ubicados en el fondo negro que se encuentra en la parte superior del control remoto
ajustan la intensidad y las variaciones multicolor de las luces LED de color.
Los botones ubicados en la parte inferior del control remoto aplican luz festiva y
cambiante ciclando a través del color con grados variables de pérdida de
intensidad y cambios de luz a saltos.
Utilice los botones de ENCENDIDO (“ON”) o APAGADO (“OFF”) de esta sección
para encender las luces LED de color .
Para atenuar o intensificar las luces LED de color, presione y mantenga
presionados los botones de atenuación o intensificación hasta que se alcance
la intensidad luminosa deseada.
Al presionar cualquiera de los otros botones de color se cambiará la luz con cinta autoadhesiva al
color del botón que se presione.
FLASH
STROBE
FADE
SMOOTH
OFF ON
PROBLEMA CAUSA POSIBLE MEDIDA CORRECTIVA
GUÍA DE SOLUCIÓN DE PROBLEMAS
1. La franja LED no se enciende. 1. El interruptor de alimentación/luz está en la posición de apagado.
2. El receptor IR está bloqueado respecto a la señal del control remoto.
1. La unidad está montada en superficies de madera o panel de
aglomerado que no están acabadas.
2. La superficie no se ha limpiado con un paño.
1. La conexión está floja
1. Móntela con soportes y tornillos (no incluidos)
2. limpie la superficie y reaplique una nueva capa de cinta adhesiva de doble cara,
tal como la 3M VHB (no incluida).
1. Compruebe el cable preconectado y empuje hacia dentro
1. Verifique si la TV, el monitor y la fuente de alimentación están encendidos.
2. Posicione el receptor IR orientado en dirección hacia el control remoto.
1. El control remoto no funciona correctamente.
2. El receptor IR no está recibiendo luz del control remoto.
1. Limpie el lente IR del control remoto.
2. Jale la lengüeta de plástico para separarla del compartimiento de la batería o
reemplace la batería (CR2025).
ANTES DE HACER CUALQUIER TRABAJO EN EL ACCESORIO PARA ILUMINACIÓN, ¡DESENCHUFE EL CABLE DE ALIMENTACIÓN DEL TOMACORRIENTE!
2. La luz no cambia los colores al
utilizar el control remoto.
3. El adhesivo de la franja LED está
perdiendo adhesión.
4. La franja LED tiene secciones que
no se encienden.
Good Earth Lighting® - GARANTÍA LIMITADA DE 10 AÑOS: El fabricante garantiza que esta lámpara no presentará defectos en los materiales ni en la mano de obra por un período de (10) años a partir de la
fecha de compra original. La lámpara no está cubierta por esta garantía si se la utiliza en aplicaciones comerciales o minoristas. La garantía se limita al uso en entornos residenciales. Repararemos o
reemplazaremos sin costo alguno (según nuestro criterio) la unidad en el color y el estilo originales si están disponibles, o en un estilo y un color similares si el artículo original se ha discontinuado. Las
unidades defectuosas se deben empaquetar correctamente y devolver al fabricante con una carta explicativa y el recibo de compra original con la fecha de compra. Llame al 1-800-291-8838 para obtener
un número de autorización de devolución y una dirección donde enviar el producto defectuoso. NOTA: NO se aceptarán envíos contrarreembolso (C.O.D., por sus siglas en inglés). La responsabilidad del
fabricante se limita, en todos los casos, al reemplazo de la lámpara defectuosa. El fabricante no será responsable por ninguna pérdida, daños, costos de mano de obra o lesiones causadas por el producto.
Esta limitación de la responsabilidad del fabricante incluye toda pérdida, daño, costos de mano de obra o lesión (I) que involucre a una persona o propiedad u otros casos; (II) que sea de naturaleza
accidental o resultante; (III) que se base en teorías de la garantía, contrato, negligencia, responsabilidad estricta, agravio o de otro tipo; o (IV) que se relacione de manera directa o indirecta con la venta,
uso o reparación del producto. Esta garantía le otorga derechos específicos, pero podría tener también otros derechos que varían según el estado.
DECLARACIÓN DE LA FCC: Cet appareil est conforme à l’alinéa 15 du règlement de la FCC. Son fonctionnement est soumis aux deux conditions suivantes: (1) Cet appareil ne doit pas causer d’interférences nuisibles et (2) cet appareil doit accepter toutes les interférences reçues, y compris les interférences pouvant causer un
fonctionnement non souhaité. Avertissement : Les modifications non autorisées expressément par la partie responsable de la conformité peuvent annuler le droit de l’utilisateur de se servir de cet appareil. L’utilisateur est avisé que les modifications non autorisées expressément par la partie responsable de la conformité
peuvent annuler le droit de l’utilisateur de se servir de cet appareil. Remarque: Cet appareil a été testé et déclaré conforme aux limites imposées aux appareils numériques de classe B, conformément à l’alinéa 15 du règlement de la FCC. Ces limites sont destinées à assurer une protection raisonnable contre les interférences
nuisibles dans un environnement résidentiel. Cet appareil génère, utilise et peut émettre de l’énergie radiofréquence et, s’il n’est pas installé et utilisé conformément aux instructions, risque de provoquer des interférences nuisibles aux communications radio. Cependant, tout risque d’interférence ne peut être totalement exclu.
S’il constate des interférences nuisibles à la réception des signaux de radio ou de télévision (il suffit, pour le vérifier, d’allumer et d’éteindre successivement l’appareil), l’utilisateur devra prendre les mesures nécessaires pour les éliminer. À cette fin, il devra : 1) réorienter ou déplacer l’antenne de réception; 2) augmenter la
distance entre l’équipement et le récepteur; 3) brancher l’appareil sur une prise de courant appartenant à un circuit différent de celui du récepteur; 4) consultez le détaillant ou un technicien en radio ou en télévision expérimenté afin d’obtenir de l’aide.
Good Earth Lighting
®
son marcas registradas de Good Earth Lighting, Inc.© 2019 Good Earth Lighting, Inc.
¿Necesita ayuda?
Sírvase visitar nuestro sitio web en: www.goodearthlighting.com/support o llame al Centro de Asistencia
al Cliente al 1-800-291-8838, 8:30 a.m.-5 p.m., Hora Central Estándar (CST), de lunes a viernes
Impreso en China
Good Earth Lighting® 1400 East Business Center Drive, Ste. 108 Mount Prospect, IL 60056
REEMPLACE LA BATERÍA
Cuando la batería se agote, siga las instrucciones que se encuentran en la parte trasera del
control remoto para retirar la batería y reemplazarla por una batería CR2025 nueva.
CUIDADO Y MANTENIMIENTO: Limpie la lámpara y el difusor periódicamente con un paño suave y un limpiador suave y no abrasivo. Cuando limpie la
lámpara, asegúrese de desconectar la fuente de alimentación. No use limpiador directamente en ninguna parte de la lámpara de luces LED.
Es posible que tragarse las baterías cause lesiones graves o la muerte. Si se tragan, vaya directamente a una sala de emergencias médicas. Es posible que las baterías dejen escapar líquidos nocivos o materiales inflamables, o que exploten y causen lesiones
y daños al producto. No mezcle baterías viejas y nuevas, ni de distintos tipos. Reemplace todas las baterías al mismo tiempo. Retire las baterías del producto si no se han utilizado durante un período de tiempo prolongado. Las baterías reemplazadas se
deberán desechar apropiadamente. Mantenga las baterías fuera del alcance de los niños
1923INAC1213REV1
4
RG
OFF
W
ON
B
FLASH
STROBE
FADE
SMOOTH
INSTALACIÓN: ATTACHING TAPE LIGHT TO SURFACE
1
Seleccione una ubicación para la luz LED con cinta autoadhesiva y márquela. Verifique que el cable USB llegue hasta el tomacorriente más cercano y que llegará hasta la
luz LED con cinta autoadhesiva. Limpie minuciosamente la superficie de montaje con alcohol desinfectante y deje que se seque. NO ENCHUFE EL PUERTO USB EN LA
FUENTE ALIMENTACIÓN HASTA SE HAYA COMPLETADO LA INSTALACIÓN. Retire cuidadosamente el recubrimiento de soporte posterior, de manera que no desprenda
accidentalmente el adhesivo de montaje de la luz LED con cinta autoadhesiva. Coloque la luz LED con cinta autoadhesiva en la posición deseada. Aplique presión
cuidadosamente a toda la longitud de la luz LED con cinta autoadhesiva para asegurar una adhesión adecuada.
1
1. Retirez la languette en plastique pour les piles sur la
télécommande en tirant tout droit dessus pour la détacher de la
télécommande.
2. La distance maximale de fonctionnement de la télécommande
avec des piles neuves est d'environ 7m / 20 pi, avec une ligne de
visée directe entre la télécommande et le récepteur IR.
3. La pile utilisée dans la télécommande est une pile bouton
CR2025, et elle devra être remplacée à la fin de son cycle de vie.
UTILISATION AVEC LA TÉLÉCOMMANDE
REMARQUE : La première fois qu’il sera allumé, le luminaire
aura successivement une couleur rouge, puis verte, puis
bleue, et le cycle continuera jusqu’à ce que vous ayez
sélectionné une couleur.
REMARQUE : Le fonctionnement de la télécommande
nécessite une ligne de visée directe entre la télécommande
et le récepteur IR.
Les boutons situés sur le fond gris en haut de la télécommande
permettent de régler l'intensité et les variations multicolores de la
sortie des DEL de couleur.
Les boutons situés en bas de la télécommande
permettent d'appliquer une lumière festive et changeante
en faisant défiler les couleurs avec différents degrés de
nuances et des changements soudains de lumière.
Utilisez les boutons « ON » (Allumer) ou « OFF »
(Éteindre) dans cette section pour activer ou désactiver
les DEL de couleur.
Pour faire varier la luminosité ou éclaircir les DEL de
couleur, appuyez et maintenez enfoncées les touches
de variation ou d'éclaircissement jusqu'à ce que vous
atteigniez l’intensité lumineuse désirée.
En appuyant sur l'un quelconque des autres boutons de couleur, la
lumière du ruban passera à la couleur du bouton enfoncé.
FLASH
STROBE
FADE
SMOOTH
OFF ON
Printed in ChinaGood Earth Lighting® 1400 East Business Center Drive, Ste. 108 Mount Prospect, IL 60056
Good Earth Lighting® is a registered trademark of Good Earth Lighting, Inc. © 2019 Good Earth Lighting, Inc.
Need Help? Please visit our website at: www.goodearthlighting.com/support or call the Customer Care Center
1-800-291-8838, 8:30 a.m.-5 p.m., CST, Monday-Friday.
Good Earth Lighting® - 6 YEAR LIMITED WARRANTY: The manufacturer warrants this lighting fixture to be free from defects in materials and workmanship for a period of (6) years from the date of original
purchase by the consumer. The fixture is not warrantied for use in a commercial or retail application. The warranty is limited to use in a residential environment. We will repair or replace (at our option) the
unit in the original color and style if available, or in a similar color and style if the original item has been discontinued, without charge. Defective units must be properly packed and returned to the
manufacturer with a letter of explanation and your original purchase receipt showing date of purchase. Call 1-800-291-8838 to obtain a return authorization number and an address where to ship your
defective product. Note: C.O.D. shipments will NOT be accepted. The liability of the manufacturer is in any case limited to replacement of the defective light fixture product. The manufacturer will not be
liable for any other loss, damage, labor costs or injury which is caused by the product. This limitation upon the liability of the manufacturer includes any loss, damage, labor costs or injury which is (I) to
person or property or otherwise; (II) incidental or consequential in nature; (III) based upon theories of warranty, contract, negligence, strict liability, tort, or otherwise; or (IV) directly, or indirectly related to
the sale, use, or repair of the product. This warranty gives you specific rights, and you may also have other rights which vary from state to state.
FCC Statement This device complies with Part 15 of the FCC rules. Operation is subject to the following two conditions: (1) This device may not cause harmful interference, and (2) this device must accept any interference received, including interference that may cause undesired operation. Warning: Changes
or modifications to this unit not expressly approved by the party responsible for compliance could void the user’s authority to operate the equipment. Note: This equipment has been tested and found to comply with the limits for a Class B digital device, pursuant to Part 15 of the FCC rules. These limits are
designed to provide reasonable protection against harmful interference in a residential installation. This equipment generates, uses and can radiate radio frequency energy and, if not installed and used in accordance with the instructions, may cause harmful interference to radio communications. However,
there is no guarantee that the interference will not occur in a particular installation. If this equipment does cause harmful interference to radio or television reception, which can be determined by turning the equipment off and on, the user is encouraged to try to correct the interference by one or more of the
following measures: 1) Reorient or relocate the receiving antenna. 2) Increase the separation between the equipment and receiver. 3) Connect the equipment into an outlet on a circuit different from that of the receiver. 4) Consult the dealer or an experienced radio/TV technician for help.
AVANT D’EFFECTUER UN QUELCONQUE TRAVAIL SUR LE LUMINAIRE, DÉBRANCHEZ LE CORDON D’ALIMENTATION DE LA PRISE DE COURANT !
PROBLÈME CAUSE POSSIBLE ACTION CORRECTIVE
1. La bande à DEL ne s’allume pas. 1. L’interrupteur d’alimentation/d’éclairage est hors tension.
2. Le récepteur IR ne reçoit pas le signal de la télécommande.
1. Montage sur une surface en bois non fini ou sur un
panneau de particules agglomérées.
2. la surface n’est pas propre
1. La connexion n’est pas suffisamment serrée.
1. Montez avec des attaches de fixation et des vis (non incluses).
2. Nettoyez la surface et réappliquez une nouvelle couche de ruban adhésif double tel que
3M VHB (non inclus)
1. Inspectez le fil pré-connecté et enfoncez-le.
1. Vérifiez que le téléviseur, le moniteur, la source d’alimentation sont allumés/sous tension.
2. Positionnez le récepteur IR de façon qu’il soit en face de la télécommande.
1. La télécommande ne fonctionne pas correctement.
2. Le récepteur IR ne reçoit pas le signal lumineux de la
télécommande.
1. Nettoyez la lentille IR sur la télécommande.
2. Retirez le couvercle en plastique du compartiment de la pile ou remplacez la pile (CR2025).
2. La couleur de la lumière ne peut
pas être modifiée au moyen de
la télécommande.
GUIDE DE DÉPANNAGE
ADVERTENCIAS Y PRECAUCIONES
Este producto tiene un conector USB que permite realizar una conexión rápida y fácil a televisores y computadoras portátiles. Las luces LED con cinta autoadhesiva también se pueden enchufar en un tomacorriente con un adaptador de alimentación USB (no
incluido). NO ALTERE LUZ. LEA TODO EL MANUAL ANTES DE LA INSTALACIÓN. Verificar el contenido del paquete y del hardware. Guarda estas instrucciones.
1. No hay piezas que se puedan reparar ni ajustar en este producto. NO corte las luces LED con cinta autoadhesiva.
Estas luces LED con cinta autoadhesiva están precontectadas y no se pueden cortar.
2. NO instale la unidad mientras esté enchufada. NO enchufe el Cable USB en la fuente de alimentación hasta que se
haya completado la instalación.
3. Para conocer los requisitos eléctricos, consulte el dorso de la etiqueta del controlador.
4. Para lugares INTERIORES solamente.
5. NO toque, utilice ni instale el accesorio para iluminación mientras esté en contacto con agua. No está diseñado para
iluminación de acuarios.
6. NO monte la unidad sobre lavamanos, fregaderos o estufas de cocinar.
7. NO se ha diseñado para instalación embutida en techos o sofitos. NO tienda NINGÚN
cable detrás de paredes, techos, sofitos, gabinetes o una estructura permanente similar donde es posible que los
cables sean inaccesibles para examinarlos.
8. La luz con cinta autoadhesiva debe estar totalmente desenrollada para funcionar correctamente, así como para
prevenir su sobrecalentamiento.
9. Esta luz con cinta autoadhesiva NO es expansible. NO SE PUEDEN añadir tramos de luz LED con cinta autoadhesiva adicionales.
10. NO mire directamente a las luces LED encendidas ni tan siquiera por unos instantes.
11. Utilice únicamente grapas con aislamiento o amarres de plástico (no incluidos) para fijar los cables.
12. NO utilice la unidad con un cable de extensión. Utilice una regleta de enchufes con protección integral contra sobrecorriente para
suministrar alimentación eléctrica al accesorio para iluminación. No utilice nunca una regleta de enchufes a menos que el enchufe se
pueda insertar por completo.
13. NO UTILICE ESTE ACCESORIO PARA ILUMINACIÓN CON UN CIRCUITO REGULADOR DE LA INTENSIDAD DE LA LUZ. Si hay presentes
controles reguladores de la intensidad de la luz, retírelos y reemplácelos.
14. Si no está familiarizado con las instalaciones eléctricas, contacte a un electricista calificado para que realice la instalación.
15. Las luces LED emiten gradualmente menos luz a lo largo de su tiempo de vida útil.
16. NO cortar las luces de la tira de LED. Estas tiras de luces LED ya están conectadas y no se pueden cortar.
ESPAÑOL
ESTA LUZ NO SE PUEDE CORTAR NI ENLAZAR
No reposicione la luz con cinta autoadhesiva una vez que esté
montada. Al hacerlo se reducirá la adhesividad del soporte
posterior de la cinta autoadhesiva.
Una vez que se haya colocado en la posición deseada, deje que
el adhesivo de la cinta se seque durante 24 horas antes de
utilizar la luz.
LA LUZ USB CON CINTA
AUTOADHESIVA ES
COMPATIBLE CON TAMAÑOS
DE PANTALLA QUE VAN DE 76
CM A 165 CM
REMPLACEZ LA PILE
Lorsque la pile est déchargée, suivez les instructions à l'arrière de la
télécommande pour retirer la pile et la remplacer par une nouvelle pile
CR2025.
Utilice los clips para cables incluidos para sujetar
el cable entre las luces con cinta autoadhesiva.
L’ingestion des piles pourrait causer des blessures graves ou même la mort. En cas d’ingestion, rendez-vous immédiatement aux urgences. Les piles peuvent avoir des fuites de liquides toxiques ou des matériaux inflammables, ou elles peuvent exploser,
risquant ainsi de causer des blessures et des dommages matériels. Ne mélangez pas des piles neuves avec des piles usagées, ou des types de piles différents. Remplacez toutes les piles en même temps. Retirez les piles du produit si vous pensez que vous
n’allez pas vous en servir pendant une durée prolongée. Les piles remplacées doivent être mises au rebut de façon appropriée. Gardez les piles hors de portée des enfants.
3. L’adhésif de la bande à DEL
adhère insuffisamment.
4. La bande à DEL a des sections qui
ne s’allument pas
3
INSTALLATION
2
RACCORDEMENT DU CORDON USB
2
Une fois que les rubans lumineux à DEL sont fermement en place, branchez le connecteur USB dans un
téléviseur, un ordinateur portable ou un adaptateur USB.
Printed in ChinaGood Earth Lighting® 1400 East Business Center Drive, Ste. 108 Mount Prospect, IL 60056
Good Earth Lighting® is a registered trademark of Good Earth Lighting, Inc. © 2019 Good Earth Lighting, Inc.
Need Help? Please visit our website at: www.goodearthlighting.com/support or call the Customer Care Center
1-800-291-8838, 8:30 a.m.-5 p.m., CST, Monday-Friday.
Good Earth Lighting® - 6 YEAR LIMITED WARRANTY: The manufacturer warrants this lighting fixture to be free from defects in materials and workmanship for a period of (6) years from the date of original
purchase by the consumer. The fixture is not warrantied for use in a commercial or retail application. The warranty is limited to use in a residential environment. We will repair or replace (at our option) the
unit in the original color and style if available, or in a similar color and style if the original item has been discontinued, without charge. Defective units must be properly packed and returned to the
manufacturer with a letter of explanation and your original purchase receipt showing date of purchase. Call 1-800-291-8838 to obtain a return authorization number and an address where to ship your
defective product. Note: C.O.D. shipments will NOT be accepted. The liability of the manufacturer is in any case limited to replacement of the defective light fixture product. The manufacturer will not be
liable for any other loss, damage, labor costs or injury which is caused by the product. This limitation upon the liability of the manufacturer includes any loss, damage, labor costs or injury which is (I) to
person or property or otherwise; (II) incidental or consequential in nature; (III) based upon theories of warranty, contract, negligence, strict liability, tort, or otherwise; or (IV) directly, or indirectly related to
the sale, use, or repair of the product. This warranty gives you specific rights, and you may also have other rights which vary from state to state.
FCC Statement This device complies with Part 15 of the FCC rules. Operation is subject to the following two conditions: (1) This device may not cause harmful interference, and (2) this device must accept any interference received, including interference that may cause undesired operation. Warning: Changes or modifications to this unit not
expressly approved by the party responsible for compliance could void the user’s authority to operate the equipment. Note: This equipment has been tested and found to comply with the limits for a Class B digital device, pursuant to Part 15 of the FCC rules. These limits are designed to provide reasonable protection against harmful interference in
a residential installation. This equipment generates, uses and can radiate radio frequency energy and, if not installed and used in accordance with the instructions, may cause harmful interference to radio communications. However, there is no guarantee that the interference will not occur in a particular installation. If this equipment does cause
harmful interference to radio or television reception, which can be determined by turning the equipment off and on, the user is encouraged to try to correct the interference by one or more of the following measures: 1) Reorient or relocate the receiving antenna. 2) Increase the separation between the equipment and receiver. 3) Connect the
equipment into an outlet on a circuit different from that of the receiver. 4) Consult the dealer or an experienced radio/TV technician for help.
BEFORE DOING ANY WORK ON THE FIXTURE, UNPLUG THE POWER CORD FROM THE ELECTRICAL OUTLET!
Ce produit a un connecteur USB qui permet une connexion rapide et facile à des téléviseurs et des ordinateurs portables. Les rubans lumineux à DEL peuvent également être branchés à une prise de
courant au moyen d’un adaptateur de courant USB (non inclus).NE MODIFIEZ PAS LA FICHE. LISEZ TOUT LE MANUEL AVANT L’INSTALLATION. Vérifiez le contenu du paquet et du matériel.
Conservez ces instructions.
AVERTISSEMENTS ET MISES EN GARDE
FRANÇAIS
Ne repositionnez pas le ruban lumineux
une fois qu’il a été monté. Ceci réduirait
la force d’adhérence du support du ruban.
ATTACHEMENT DU RUBAN LUMINEUX À LA SURFACE
Une fois en place, laissez l'adhésif du
ruban sécher pendant 24 heures avant
de vous en servir.
1
Sélectionnez un emplacement pour le ruban lumineux à DEL et marquez-le.
Assurez-vous que le cordon USB est assez long pour atteindre la prise de courant
la plus proche et le ruban lumineux à DEL. Nettoyez soigneusement la surface de
montage avec de l’alcool à friction et laissez-la sécher. NE PAS BRANCHER LE
CORDON USB DANS LA PRISE DE COURANT AVANT QUE L’INSTALLATION NE
SOIT TERMINÉE. Retirez le revêtement de support en prenant les précautions
nécessaires de façon à ne pas peler accidentellement la colle de montage du
ruban lumineux à DEL. Placez le ruban lumineux à DEL dans la position désirée.
Faites pression délicatement sur toute la longueur du ruban lumineux à DEL pour
assurer une adhérence correcte.
1
ENTRETIEN: Nettoyez périodiquement le luminaire et le diffuseur à l’aide d’un nettoyant pour vitres doux et non
abrasif et d’un linge doux. Assurez-vous que le luminaire est éteint avant de le nettoyer. Ne vaporisez pas de produit
nettoyant directement sur les pièces du luminaire ou sur les ampoules à DEL.
MESURE DE SÉCURITÉ IMPORTANTE
1. Aucune partie de ce produit n'est réparable. NE COUPEZ PAS les rubans lumineux à DEL. Ces
rubans lumineux à DEL sont pré-connectés et ne peuvent pas être coupés.
2. NE PAS installer pendant que le ruban lumineux est branché. NE PAS brancher le Cordon USB
avant que l’installation nesoit terminée.
3. Voir le verso de l’étiquette du luminaire pour connaître les spécifications électriques.
4. Pour utilisation À L'INTÉRIEUR exclusivement.
5. NE PAS toucher, utiliser ou installer un luminaire en contact avec de l’eau. Non conçu pour
illuminer des aquariums.
6. NE PAS monter au-dessus d’éviers ou de poêles.
7. Ce luminaire n’est PAS conçu pour une installation encastrée dans un faux-plafond ou un
soffite. NE PAS faire passer de cordons derrière les murs, les plafonds, les soffites, les
armoires ou une structure permanente similaire où ils pourraient être inaccessibles pour un
examen.
8. Le ruban lumineux doit être complètement déroulé pour permettre un fonctionnement correct
et pour prévenir toute surchauffe.
9. Ce ruban lumineux n’est PAS extensible. Il n’est PAS POSSIBLE d’ajouter des longueurs de
ruban lumineux à DEL additionnels.
10. NE PAS regarder directement une DEL allumée pendant une durée prolongée.
11. Utilisez seulement des agrafes ou des attaches en plastique isolées (non incluses) pour
sécuriser les cordons.
12. NE PAS utiliser avec un cordon de rallonge. Utilisez une barrette d'alimentation avec
protection intégrée contre les surintensités pour alimenter le luminaire. N’utilisez jamais de
barrette d’alimentation électrique, sauf si la fiche peut être insérée complètement.
13. N’UTILISEZ PAS CE LUMINAIRE AVEC UN CIRCUIT GRADATEUR. Si des commandes de
gradateurs sont présentes, retirez-les et remplacez-les.
14. Si vous ne savez pas comment effectuer des installations électriques, contactez un
électricien professionnel pour réaliser l'installation.
15. Les DEL émettent progressivement moins de lumière au fil du temps.
16. NE PAS couper les lumières de la bande de LED. Ces bandes lumineuses à LED sont déjà
connectées et ne peuvent pas être coupées.
PROBLEM POSSIBLE CAUSE CORRECTIVE ACTION
TROUBLESHOOTING GUIDE
1. LED Strip does not light up. 1. Power/Light switch is off.
2. IR Receiver blocked from remote control signal.
1. Mounted on unfinished wood or particle board surfaces.
2. Surface is not wiped down.
1. Connection is lose.
1. Mount with brackets and screws (not included).
2. Clean surface and reapply new layer of double- sided tape such as 3M VHB (not included).
1. Check pre-connected wire and push in.
1. Verify TV, Monitor, power source is on.
2. Position IR Receiver facing the direction of the remote
3. LED strip adhesive is losing adhesion.
1. Remote not functioning correctly.
2. IR Receiver not receiving remote light.
1. Clean IR lens on remote
2. Pull plastic tab from battery compartment or replace battery (CR2025)
2. Light will not switch colors
when remote is used.
CE LUMINAIRE NE PEUT PAS ÊTRE COUPÉ ET IL NE PEUT PAS ÊTRE
RACCORDÉ À D’AUTRES LUMINAIRES.
LE RUBAN LUMINEUX USB EST
COMPATIBLE AVEC DES ÉCRANS DE
TAILLES COMPRISES ENTRE 76 CM ET
165 CM
Utilisez les pinces de fixation du
cordon pour maintenir le cordon
entre les rubans lumineux.
4. LED Strip has sections that do not
light up.
2
RG
OFF
W
ON
B
FLASH
STROBE
FADE
SMOOTH
Do not reposition tape light once it is
mounted. Doing so will reduce the
adhesiveness of the tape backing.
Model / Modèle / Modelo #: AC1213-BKG-07LF2-G
7 ft LED USB Tape Light RGB w/ IR Remote (Page 1)
Ruban lumineux RGB USB TV à DEL de 213,4 cm avec télécommande IR (Page 2)
Luz LED con cinta autoadhesiva USB de 213,4 cm RVA con control remoto IR (Página 3)
Required/ Nécessaire
Se necesita
Hardware kit* / Trousse de quincaillerie*/ Kit de aditamentos*
* Actual hardware may differ from illustration.
* La quincaillerie incluse peut être différente de l’illustration.
* Los aditamentos reales pueden diferir de los que se muestran en la ilustración.
USB Cord
Cordon USB
Cable USB
IR (Infrared) receiver
Récepteur IR (infrarouge)
Receptor IR (Infrarrojo)
THIS LIGHT IS NON-CUTTABLE AND NON-LINKABLE
ENGLISH
WARNINGS AND CAUTIONS
This product has a USB connector allowing quick and easy connection to televisions and laptop computers. The LED tape lights can also be plugged into an electrical outlet with a USB power
adapter (not included). DO NOT ALTER THE TAPE LIGHT. READ THE ENTIRE MANUAL PRIOR TO INSTALLATION. Verify package and hardware contents. Save these instructions.
INSTALLATION
ATTACHING TAPE LIGHT TO SURFACE
Once in place, allow the tape adhesive
to cure for 24 hours before use.
1
Select a location for the LED tape light and mark it. Verify that the USB cord reaches the
nearest USB port. Thoroughly clean the mounting surface with rubbing alcohol and
allow it to dry. DO NOT PLUG THE USB CORD INTO THE POWER SOURCE UNTIL
INSTALLATION IS COMPLETE. Remove the backing liner carefully so as to not
accidentally peel away the mounting glue of the LED tape light. Place the LED tape light
in the desired position. Carefully apply pressure to the entire length of the LED tape light
to ensure proper adhesion.
1
CARE AND MAINTENANCE: Periodically clean the fixture and diffuser using a mild, non-abrasive cleaner and
soft cloth. When cleaning the fixture, make sure the power is turned off. Do not spray cleaner directly onto any part of the
fixture or LEDs.
2
CONNECTING USB CORD
2
Once the LED tape lights are firmly in place, plug the USB connector into a television, computer laptop, or USB adaptor.
1. Remove the plastic battery tab on the remote control by pulling it
straight out of the remote.
2. The maximum operating distance of the remote control with new
batteries is approximately 20 ft. (7 m) with a direct line of sight between
the remote control and the IR receiver.
3. The battery used in the remote control is a CR2025 button cell, and will
need to be replaced at the end of its life cycle.
REMOTE CONTROL OPERATION
NOTE: When first turned on, the light will cycle through red, green and blue until a color is selected.
NOTE: Remote controller operation requires direct line of sight between
the remote control and the IR receiver.
The buttons located on the black background at the top of the remote
control, adjust the intensity and multi-color variations of the color
LED’s output.
The buttons at the bottom of the remote control, apply
festive, and changing light by cycling through color with
varying degrees of fades and jumping light changes.
Use the “ON” or “OFF” buttons in this section to turn on
the color LED’s.
To dim, or brighten the color LED’s, press, and hold down the dimming
or brighten buttons until reaching the desired light output.
Pressing any of the other color buttons will switch the
tape light to the color of the button pressed.
FLASH
STROBE
FADE
SMOOTH
OFF ON
RG
OFF
W
ON
B
FLASH
STROBE
FADE
SMOOTH
IMPORTANT SAFETY INFORMATION
1. No parts are serviceable on this product. DO NOT cut the LED tape lights. These LED tape
lights are pre-connected and are not cuttable.
2. DO NOT INSTALL WHILE UNIT IS PLUGGED IN. DO NOT plug the USB cord into the power
source until installation is complete.
3. For electrical requirements, see back of driver label.
4. For INDOOR locations only.
5. DO NOT touch, operate, or install fixture while in contact with water. Not intended for
illumination of aquariums.
6. DO NOT mount over sinks or stoves.
7. NOT intended for recessed installation in ceilings or soffits. DO NOT run ANY cords behind
walls, ceilings, soffits, cabinets or a similar permanent structure where it may be
inaccessible for examination.
8. Tape light must be fully uncoiled for proper operation, and to prevent overheating.
9. This tape light is NOT expandable. Additional LED tape light lengths CANNOT be added.
10. DO NOT look directly at lighted LEDs for any length of time.
11. Use only insulated staples or plastic ties (not included) to secure the cords.
12. DO NOT use with an extension cord. Use a power strip with integral over current protection to
supply power to the fixture. NEVER use power strip unless the plug can be fully inserted.
14. DO NOT USE THIS FIXTURE WITH A DIMMING CIRCUIT. If dimmer controls are present, remove
and replace.
15. If unfamiliar with electrical installations, contact a qualified electrician to install.
16. LEDs gradually emit less light over their lifetime.
Remote control
Télécommande
Control remoto
LED tape light (x2) 18in/ (x2) 24in
Ruban lumineux à DEL (x2) 18in/ (x2) 24in
Luz LED con cinta autoadhesiva (x2) 18in/ (x2) 24in
FITS SCREEN SIZES
RANGING FROM 30IN.
TO 65 IN.
Cord clips (X5)
Clips de cordon (X5)
Clips de cordón (X5)
BATTERY REPLACEMENT
When the battery is exhausted, use the instructions on the back of the remote
control to remove the battery and replace it with a new CR2025 battery.
Use included cord clips to hold cords
in between tape lights
Swallowing the batteries may lead to serious injury or death. If swallowed, go straight to a medical emergency room. Batteries may leak harmful liquids or ignitable materials or explode causing injury and product damage. Do not mix old and
new, or different types of batteries. Replace all batteries at the same time. Remove batteries from product if unused for extended amount of time. Replaced batteries should be disposed of properly. Keep batteries out of children’s reach
Model#: AC1213-BKG-07LF2-G
File Name:
IN_AC1213-BKG-07LF2-G_1921INAC1213REV1_ALL.ai
Date: 2019.05.06
Insert size : 297 mm x 420 mm
Cuts
Folds
Product & CVP area
Dimension w/ unit or call outs
Color:
BLACK
420 mm
297 mm297 mm
-
 1
1
-
 2
2
-
 3
3
-
 4
4


Good Earth Lighting AC1213-BKG-07LF2 Mode d'emploi
- Taper
- Mode d'emploi
dans d''autres langues
Documents connexes
-
Good Earth Lighting AC1347-CCT-07LF0 Mode d'emploi
-
-
-
-
-
-
-
-
-
Autres documents
-
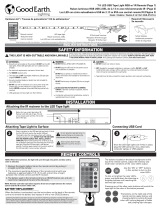 Good Earth AC1347-RGB-07LF0-G 7 ft LED USB Tape Light RGB Manuel utilisateur
-
Monster MLB7-1027-WW Manuel utilisateur
-
Festive Lights BL037 Manuel utilisateur
-
Festive Lights BL110 Mode d'emploi
-
Festive Lights BL142 Manuel utilisateur
-
Festive Lights SL166 Manuel utilisateur
-
Festive Lights SL165 Manuel utilisateur
-
Festive Lights SL170 Manuel utilisateur
