
-20℃~+85℃
WIFI-01
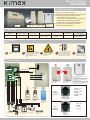
2. Spécification
≤300W
Manuel d'utilisation
040-2003W
1. Caractéristiques
!
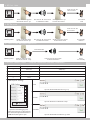
3.Connexions
AC112-04
MGF-YK-01
Télécommande IR
RF 433.92MHz
IR 38KHz
WIFI 2.4GHz
AC112-04
Attention
Veuillez éteindre avant de
câbler
N'utilisez pas votre main pour
toucher directement le tableau
de commande afin d'éviter tout
endommagement
électrostatique de la carte
mère.
Veuillez garder le fil de
terre correctement
connecté.
Modèle Tension d'entrée Température de
fonctionnement Fréquence radio Puissance de sortie Mode de
fonctionnement
Interrupteur manuel
●Convient à tous les écrans électriques
●Assemblage automatisé SMT, procédé résistant à l'humidité
●Prend en charge plusieurs méthodes de contrôle :
· Télécommande RF, Télécommande IR
· Commutateur manuel, déclencheur 12V, contrôle RS-485
·Contrôle intelligent du téléphone portable WIFI,
compatible avec une variété d'audio intelligent tiers,
●Convient pour les écrans électriques, les auvents
électriques, les volets roulants, etc.
COMMUTATEUR
MANUEL
Nombre de
connexions RF
20pcs
WIFI / COMMUTATEUR
MANUEL / TRIGGER RF /
IR / DV12V / RS-485
Instructions d'opération manuelle
de commutateur :
1. Appuyez sur le bouton de direction pour
libérer en 1 seconde, l’écran s’allumera
dans la direction souhaitée jusqu’à la
prochaine commande.
2. Appuyez sur le bouton directionnel et
maintenez-le enfoncé pendant plus d'une
seconde. L’écran s’arrête immédiatement
après le relâchement du bouton.
Ne touchez pas le
métal pour éviter les
interférences de signal
Métal
Haut
STOP
Bas
WIFI-01
Récepteur
AC 110V -230V
Lorsque la tension d'entrée est
de 110V, veuillez utiliser un
moteur de 110V. Si la tension
d'entrée est de 220V, veuillez
utiliser un moteur de 220V.
Moteur
Alimentation
N: Neutre (Bleu)
E: Terre (jaune / vert)
L: Live (marron)
N: Neutre (Bleu)
E: Terre (jaune / vert)
D: HAUT / BAS (noir)
U: bas / haut (marron)
Clé 1
bas/haut
Clé 2
STOP
Clé 3
haut/bas
Récepteur IR
AC112-04
Trigger 12V
Interrupteur manuel Contrôle central
RS-485
TÉLÉCOMMANDE RF
MGF-YK-05
TÉLÉCOMMANDE IR
MGF-YK-01 contrôle de
l'application
mobile
Interrupteur moteur avant / arrière
Modèle WIFI intelligent
Relais
Fusible
Transformateur
Relais
Récepteur IR
JP-1
JP-2
1 2 3 4 5 6
1 2 3 4
JP-01
Définition
d'interface
1.VDD + 5V
2.TR_data
3.BAS / HAUT
4.STOP
5.HAUT / BAS
6.GND
1.485_A
2.GND
3.+12V
4.485_B
MGF-YK-05
JP-02
TÉLÉCOMMANDE IR
MGF-YK-01
TÉLÉCOMMANDE RF
MGF-YK-05
Définition
d'interface
Télécommande RF

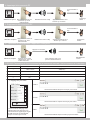
4.Appairage télécommande RF
5.Suppression télécommande RF
Allumez le récepteur Appuyez lentement sur le
bouton "up" trois fois
Appairage
réussi
Appuyez 20 secondes sur
le bouton "up" de la
télécommande
Relâchez le bouton au bip
6.Opération de réinitialisation d'application intelligente
7.RS-485 Paramètres de fonctionnement de la commande centrale / de la connexion à l'ordinateur
Vous entendrez 3
bip
Allumez le récepteur Appuyez lentement sur le
bouton "up" trois fois
Suppression
réussie
Appuyez 20 secondes sur
le bouton "up" de la
télécommande
Relâchez le bouton au bip
Vous entendrez 5
bip
Allumez le récepteur Réinitialisation
réussie
Appuyez 20 secondes
sur le bouton "stop" de
la télécommande
Vous entendrez 5 bip, vous
pourrez relâcher le bouton
Appuyez 10 secondes
Numéro Fonctionnement Instruction opérationnelle
1
Débit en bauds
2400,n,8,2
2
Haut
FF AA EE EE DD
3
Stop
FF AA EE EE CC
4
Bas
FF AA EE EE EE
Ouvrez l'outil de débogage série,
sélectionnez le port série que vous
avez branché sur l'appareil, puis réglez
le débit en bauds sur 2400 bandes,
cliquez à nouveau pour l'ouvrir.
1. Réglage du port série
Entrée FF AA EE EE DD Cliquez sur Envoyer pour monter
Entrée FF AA EE EE CC Cliquez sur Envoyer pour arrêter
2.HAUT
3.STOP
4.BAS
Entrée FF AA EE EE EE Cliquez sur Envoyer pour descendre
COM Configs
Canal
Débit en bauds
Bits de parité
Bits de données
Bits d'arrêt
COM7#S
2400
NONE
8
2
Ouvrir

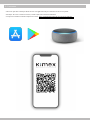
8. Connexion
Votre écran peut être contrôlé par Wi-Fi soit avec une application soit par commande vocale via un système
domotique. Pour vous connecter à l'écran, scannez le QR code et suivez les indications.
Vous pouvez consulter le tutoriel en cliquant sur ce lien : https://www.kimexinternational.com/cms/smart-wifi.aspx

-20℃~+85℃
WIFI-01
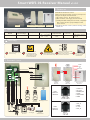
2.Specification
≤300W
Smart WIFI-01 Receiver Manual v1.0.0
1.Features
!
3. C o n n e c tio n s
AC112-04
MGF-YK-01
IR REMOTE CONTROL
RF 433.92MHz
IR 38KHz
WIFI 2.4GHz
AC112-04
Warning
Please turn off the power
before wiring
Do not use the hand
to directly touch the
control board to avoid
electrostatic damage
to the motherboard
Please keep the ground
wire connected correctly.
Model Input Voltage Operating Temperature Radio frequency Output Power Operation Mode
Manual switch
● Suitable for all electric screens
● SMT automated assembly, moisture-proof process
● Support multiple control methods:
① RF remote control、 IR remote control
② Manual switch, 12V trigger, RS-485 control
③ Intelligent WIFI mobile phone control, compatible
with a variety of third-party intelligent audio,
voice control
● Suitable for electric screens, electric awnings, roller
blinds, etc.
MANUAL SWITCH
Number of RF
connections
20pcs
WIFI/MANUAL SWITCH/
RF/IR/DV12V TRIGGER
/RS-485
Do not touch metal
to avoid signal
interference
Metal
UP
STOP
DOWN
WIFI-01
RECEIVER
AC 110V -230V
When the input voltage is 110V,
please use a 110V motor
When the input voltage is 220V,
please use a 220V motor
Motor
Power input
N:Neutral(Blue)
E:Earth(Yellow/Green)
L:Live(brown)
N:Neutral(Blue)
E:Earth(Yellow/Green)
D:UP/Down(Black)
U:Down/UP(Brown)
KEY-1
DOWN/UP
KEY-2
STOP
KEY-3
UP/DOWN
IR Receiver
AC112-04
12V Trigger
Manual switc RS-485
Central control
RF
CONTROL
MGF-YK-05
REMOTE
IR REMOTE
CONTROL
MGF-YK-01
Mobile App Control
Motor forward/reverse switch
Smart WIFI template
Relay
Fuse
Transformer
Relay
IR Receiver
RF REMOTE
CONTROL
MGF-YK-05
JP-1
JP-2
1 2 3 4 5 6
1 2 3 4
JP-01
Interface
definition
1.VDD+5V
2.TR_data
3.DOWN/UP
4.STOP
5.UP/DOWN
6.GND
1.485_A
2.GND
3.+12V
4.485_B
MGF-YK-05
RF REMOTE CONTROL
IR REMOTE
CONTROL
MGF-YK-01
JP-02
Interface
definition
UP
STOP
DOWN
IR Receiver

4.RF Pair Code
5.RF Deleted
Receiver power Slowly press the "up"
button three times
Successful
code
Power on 20S long press
the remote control “up”
Hear the "Di~Di" two sounds
to release the button
6. Intelligent App Reset Operation
7.RS-485 Central Control / Computer Connection Operation Parameters
Hear the "Di~Di"
three sounds
Receiver power Slowly press the "down"
button three times
Successfully
deleted
Power on 20S long press
the remote control “up”
Hear the "Di~Di" two sounds
to release the button
Hear the "Di~Di"
five sounds
Receiver power Reset
successfully
Power on 20S long press
the remote control “stop”
Hear the "Di~Di" five sounds
to release the button
Press about 10S
Number
Operating
Operational Instruction
1
Baud rate
2400,n,8,2
2
Up
FF AA EE EE DD
3
Stop
FF AA EE EE CC
4
Down
FF AA EE EE EE
Open the serial debugging tool,
Select the serial port you plugged into
the device,And adjust the baud rate to
2400 bands,Click again to open
1.Serial port setting
Input FF AA EE EE DD Click Send to go up
Input FF AA EE EE CC Click Send to stop
2.UP
3.STOP
4.DOWN
Input FF AA EE EE EE Click Send to go down
COM Configs
Channel
Baud rate
Parity bits
Data bits
Stop bits
COM7#S
2400
NONE
8
2
Open

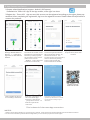
8.App Connection/Control
1.Prepare related Applications (support Android / IOS system)
Download the "Smart Life" App in the App market, as the right icon show
2.Register the “Smart Life” App account (this account can be registered according to the region, please pay
attention). After completing the registration, log in to the registered account. Please follow the steps below to
connect our products:
Open the interface after Smart
Life App, click Add Device or
click the “+” in the upper
right corner to enter the next
interface.
Clic k to ente r this i nt er f a ce ,
then c l ick on th e l e f t sm a ll
Appl i ance to d rop do w n to
find t h e [ c ur t ai n] op t ion,
clic k o n the arr ow to en ter
(Not e: non- c ur t a in
“Zig B ee”, select t h is ite m
can no t b e conne c ted)
A f te r add i n g the dev i ce
succ e ssful l y , click D o ne.
Pre ss and hol d t he re m ote
cont rol sto p butto n withi n
10 sec o nds a f te r pow er-on,
when h e di are f i ve “Di”
soun d s on the sc reen product ,
re s et to ent er the pairing
stat e, ente r the pa i ring
stat e and cli c k to con f i rm.
After t h e comple t ion of
the "s m ar t l i fe" A p p
inte r f a ce, cli c k ae the
“projecti o n scre en” to
ente r the ope r ation
inte r f a ce
Th is i s the end of the smar t A pp c on ne ct ion
In-p u t your WI F I accou n t
and passwo rd,th e n click
conf i rm
En te r the proj ect io n sc re en
op erati on , in te r fa c e to c ontrol
th e scre en acco rdin g to your
de mands
NO T ES:
1. Wh en co n nec tin g a nd pa iri n g, t r y to ke ep ou r p rod uct s , ro u ter s a nd c o nne cte d m obi le ph o ne s c los e w it h e ach o the r
2. If t he co n nec tio n f ai l s, pl e as e r ese t the Ap p an d t ry to c onn e ct th e pro j ec t ion s cre e n aga in
Download Smart
projection screen App
Please scan QR code

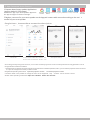
9.App Connected Voice Control
1.Prepare related smart speaker Applications
(support Android / IOS system)
Download the App of your Smart speaker in Apps store .
The Apps we support are shown on the right:
2.Register a account for your smart speaker on the App,and connect with net work according to the user’s
manual of your smart speaker
Goog l e
Home
Amaz o n
Alex a
IFTT T Rokid Bai d u
Due r OS
Ten c e nt c lo u d
mi c r oe nt e rp ri se T m all
Ji n g do ng
Di n g D on g
Cl i ck on t h e more s er v ic e i nt e r fa c e
G o o g l e H o m e con nec t t he “Ar r ow 1 ” ico n
A m a z o n A l e x a con nec t t he “Ar r ow 2 ” ico n
Go o gle H o me Pa iri n g
de s cri p tio n in t e r fa c e
Am a zon A l ex a Pai ri ng
de s cri p tio n in t e r fa c e
Go og le Home 、Amazon Alexa con nec tio n descript ion
Op e n “sm ar t l i fe”
Cl i ck to "M e "
1
2
Acco rding t o the pa iring in s truct i ons, vo i ce cont rol of the pro jecti o n scre e n can be pe r f or m ed us i ng spea kers su c h as
Goog l e Home an d A mazon Al e xa.
1.Google Home can change the name of the device to perform the command operation, that is, you can use the projection screen to control
it, or you can change it to the name you like to control.
Google Home operating instructions: Open the projector screen Close the projector screen
2. Amazon Alexa is not possible to change the name of the equipment. Only " curtains" can be used for control.
Amazon Alexa operating instructions:Open the curtains Close the curtains
-
 1
1
-
 2
2
-
 3
3
-
 4
4
-
 5
5
-
 6
6
-
 7
7


dans d''autres langues
- English: Kimex 040-2003W User manual
Documents connexes
Autres documents
-
EXPERT4HOUSE MS-104B Manuel utilisateur
-
Samsung HW-Q70R Manuel utilisateur
-
Samsung HW-Q80R Manuel utilisateur
-
Samsung HW-N850 Manuel utilisateur
-
Samsung HW-Q90R Manuel utilisateur
-
Samsung HW-NW700 Manuel utilisateur
-
KALORIK RVC 47730 BK Manuel utilisateur
-
BAZZ CAMFXWFW1 Guide d'installation
-
BAZZ WFKIT300 Guide d'installation
-
AYA A32HD0123BSmart Mode d'emploi