Danby DWC032A2BDB Mode d'emploi
- Catégorie
- Boissons glacées
- Taper
- Mode d'emploi

OWNER’S USE AND CARE GUIDE
GUIDE D’UTILISATION ET D'ENTRETIEN
GUÍA DE UTILIZACIÓN Y CUIDADO PARA EL PROPIETARIO
MODEL • MODÈLE • MODELO
DANBY PRODUCTS LIMITED, ONTARIO, CANADA N1H 6Z9
DANBY PRODUCTS INC., FINDLAY, OHIO, USA 45840
2015.09.14
WINE COOLER
REFROIDISSEUR À VIN
REFRIGERADOR PARA VINOS
DWC032A2BDB

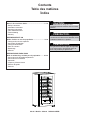
WINE COOLER
Owner’s Use and Care Guide...........................................
• Safety Instructions
• Installation Instructions
• Operating Instructions
• Care and Maintenance
• Troubleshooting
• Warranty
REFROIDISSEUR À VIN
Guide d’utiliser et soin de propriètaire...........................
• Consignes de sécurité important
• Instructions d’installation
• Consignes d’utilisation
• Soins et entretien
• Dépannage
• Garantie
Contents
2- 10
11-19
REFRIGERADOR PARA VINOS
Guía de utilización y cuidado para el propietario.........
• Instrucciones de Seguridad Importantes
• Instrucciones D’Instalacion
• Operación
• Limpieza y Mantenimiento
• Solución Sugerida
• Garantia
20-28
CAUTION:
PRECAUTION :
PRECAUCION:
Read and follow all safety rules and
operating instructions before first use of this
product.
Veuillez lire attentivement les consignes de
sécurité et les instructions d’utilisation avant
l’utilisation initiale de ce produit.
Lea y observe todas las reglas de seguridad
y las instrucciones de operación antes de
usar este producto por primera vez.
Model • Modèle • Modelo DWC032A2BDB
Índice
Table des matières

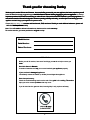
Thank you for choosing Danby
We know you’re excited. We are too! However, the more familiar you are with your new appliance, the better experience you will
have. We therefore strongly suggest that you read this Owner’s Manual before plugging in your new appliance. It contains
important operational information that will help you make full use of the technical features available in your Danby appliance. The
manual also contains information designed to enhance operating reliability and safety, as well as tips to maintaining your new
appliance so that it brings you happiness for years to come.
Please visit www.danby.com to access self-service tools, FAQs and more. Should you need additional assistance, please call
1-800-26-DANBY (1-800-263-2629).
Note: You will need the below information to obtain service under warranty.
To receive service, you must provide the original receipt.
Model Number:
Serial Number:
Date of Purchase:
NEED HELP?
Before you call for service, here are a few things you can do to help us serve you
better:
Read this Owner’s Manual:
It contains instructions to help you use and maintain your appliance properly.
If you received a damaged appliance:
Immediately contact the retailer (or builder) that sold you the appliance.
Save time and money:
Check the Troubleshooting section at the end of the guide before calling. This section
helps you solve common problems that may occur.
If you do need service, you can relax, knowing help is only a phone call away.
Tel: 1-800-26-
(1-800-263-2629)
Thank you for choosing Danby
Thank you for choosing Danby
Thank you for choosing Danby
www.dan
Please visit
appliance so that it brings you happiness for years to come.
manual also contains information designed to enhance operating reliability and safety, as well as tips to maintaining your new
important operational information that will help you make full use of the technical features available in your Danby appliance.
have. We therefore strongly suggest that you
We know you’re excited. We are too! However, the more familiar you are with your new appliance, the better experience you will
1-800-26-DANBY (1-800-263-2629).
to access self-service tools, FAQs and more. Should you need additional assistance, please call
nby.com
appliance so that it brings you happiness for years to come.
manual also contains information designed to enhance operating reliability and safety, as well as tips to maintaining your new
important operational information that will help you make full use of the technical features available in your Danby appliance.
read this Owner’s Manual before plugging in your new appliancehave. We therefore strongly suggest that you
We know you’re excited. We are too! However, the more familiar you are with your new appliance, the better experience you will
1-800-26-DANBY (1-800-263-2629).
to access self-service tools, FAQs and more. Should you need additional assistance, please call
appliance so that it brings you happiness for years to come.
manual also contains information designed to enhance operating reliability and safety, as well as tips to maintaining your new
important operational information that will help you make full use of the technical features available in your Danby appliance.
read this Owner’s Manual before plugging in your new appliance
We know you’re excited. We are too! However, the more familiar you are with your new appliance, the better experience you will
to access self-service tools, FAQs and more. Should you need additional assistance, please call
manual also contains information designed to enhance operating reliability and safety, as well as tips to maintaining your new
Theimportant operational information that will help you make full use of the technical features available in your Danby appliance.
. It contains read this Owner’s Manual before plugging in your new appliance
We know you’re excited. We are too! However, the more familiar you are with your new appliance, the better experience you will
Serial
Model
service,receiveoT
needwillou: YNote
Number:Serial
Number: Model
originaltheprovidemustyou
toinformationthe belowneed
receipt.original
warrantunderserviceaintob
. ywarrant
Date
Purchase:ofDate
better:
service,forcallyouBefore
canyouthingsfewaarehere
HELP?NEED
youservehelp ustodocan
roubleshootingTtheCheck
money:andtimeSave
retheacttconImmediately
damagedareceivedyouIf
helptoinstructionsainstconIt
Manual:s’rOwnethisRead
better:
guidetheofendtheatsection
yousoldthatbuilder)(orailert
appliance:damaged
your applianceaintmainanduseyouhelp
Manual:
calling. This sectionbeforeguide
the appliance. you
.yproperlyour appliance
calling. This section
youservice,needdoyouIf
problemscommonsolveyousphel
ishelpknowingrelax,canyou
.roccumaythatproblems
phone call away.aonly
(1-800-263-2629)
1-800-26-
2

Important Safety Information
READ AND FOLLOW ALL SAFETY INSTRUCTIONS
ELECTRICAL
REQUIREMENTS
This appliance must be grounded. In the event of an electrical short circuit, grounding reduces the risk of
electrical shock by providing an escape wire for the electrical current.
This appliance is equipped with a cord having a grounding wire with a
grounding plug. The plug must be plugged into an outlet that is properly
installed and grounded.
An empty wine cooler is a very dangerous attraction to children.
Remove either the gasket or lid from unused appliances, or take
some other action that will guarantee it harmless.
IMPORTANT WARNING
WARNING
Improper use of the grounding plug can result in a risk of electric
shock. Consult a qualified electrician or service person if the
grounding instructions are not completely understood, or if doubt
exists as to whether the appliance is properly grounded.
DANGER: Risk off child entrapment. Before you throw away your old
wine cooler / refrigerator / freezer etc:
• Take off the doors.
• Leave the shelves in place so that children may not easily climb in.
DON’T WAIT DO IT NOW!
SAVE THESE INSTRUCTIONS
DO NOT USE AN EXTENSION CORD
Use an exclusive wall outlet. Do not connect your wine cooler to extension
cords or together with any other appliance in the same wall outlet.
SAFETY
PRECAUTIONS
• Do not operate this appliance if it has a damaged power cord or plug, if it
is not working properly, or if the appliance has been damaged or dropped.
• Do not splice the power cord that is equipped with this appliance.
• Keep power cord away from heated surfaces.
• Do not immerse power cord, plug or the appliance itself in water.
• Do not use this product near water, for example, in a wet basement,
near a swimming pool or near a sink.
• Do not use corrosive chemicals or vapors in this appliance.
• Use this appliance only for its intended use, as described in this manual.
• Do not store perishable food items such as (but not limited to) meats and dairy
products in your Wine Cooler.
• Store wine in sealed containers only.
• See door surface cleaning instructions in the “Care and Cleaning” sec-
tion(s) of this manual.
• Do not cover or block any openings on the appliance.
• This unit is not designed for outside installation, including installation any-
where that is not temperature controlled (garages, porches, carports, etc.).
• This appliance should be serviced only by qualified service personnel.
Contact nearest authorized service facility for examination, repair or
adjustment.
• Before connecting the appliance to an electrical power supply, let it stand
6 hours. This will reduce the possibility of malfunctions in the cooling sys-
tem due to transport handling.
3

Installation Instructions
LEVELING
INSTRUCTIONS
It is important that your Wine Cooler is level. To level the Wine
Cooler:
1) Move the Wine Cooler to its final location.
2) Have someone gently lean on the front of the Wine Cooler to
take some of the weight off of the leveling leg.
3) Turn the leveling leg clockwise to raise, and counter-clockwise to lower
the Wine Cooler. Continue in this manner until the Wine Cooler is level.
DO...
• Select a location with a strong, level floor.
• Allow for 12.7 cm / 5 inches of space between the back of the appliance
and any adjacent wall.
• Avoid direct sunlight and heat. Direct sunlight may affect the acrylic
coating; heat sources nearby will cause higher electricity consumption.
DO NOT...
• Use this appliance outdoors: This appliance is intended for house-
hold use only. Do not attempt to operate or store this appliance outdoors.
• Build this appliance into an enclosure: This appliance is designed for a
Free-Standing application only and is not intended to be “Built-In.”
Extreme Weight Hazard! Use 2 or more people when moving the
Wine Cooler.
WARNING
LOCATION
5 In. / 12.7 cm
5 In. / 12.7 cm
4

Operating Instructions
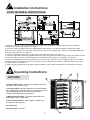
FEATURES
1) Tempered Glass Door: Tinted for UV protection while still
allowing for easy interior viewing.
2) Thermostat Dial: (Externally mounted rear wall thermostat)
For controlling the temperature inside the wine cooler. Turns the
motor (compressor) on /off as soon as the temperature
rises/falls above/below the set cooling level.
3) Magnetic Door Gaskets: Tight fitting seals retain all the
cooling power and humidity levels.
4) Plastic Coated Shelves: Odor resistant, rustproof, and
removable for easy cleaning.
5) Leveling Leg.
6) Interior Light (not shown)
Installation Instructions
DOOR REVERSAL INSTRUCTIONS
5
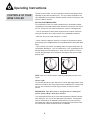
1. Remove the two (2) screws from the back of the worktop, lift the back of the worktop slightly and pull the worktop
forward, this will remove the worktop. See Figure 1.
2. Remove the left or right door strip cover (depending on which side you are moving the door to) and the left or right
hinge cover, then remove the two (2) upper hinge screws and remove the upper hinge. Loosen the upper door spindle and
remove the door assembly. See Figure 2.
3. Remove the hinge pin from the door, move it to the other side of the door. See Figure 3.
4. Install the upper door spindle to the opposite side of the upper hinge, place the upper hinge onto the other side of the cab-
inet, install the door strip cover and the hinge cover to the opposite side of where you removed it. See Figure 4.
5. Loosen the adjustable foot and remove the two (2) screws around it. Remove the two (2) bottom hinge screws, remove
the bottom hinge. Reinstall the foot and two (2) screws where the bottom hinge used to be. Install the bottom hinge where
the foot used to be. See Figure 5.
6. Make necessary adjustments to the upper hinge and bottom hinge, reinstall the worktop in reverse order of removing
it.
1
2
3
4
5
6

Operating Instructions
CONTROLS OF YOUR
WINE COOLER
To start the wine cooler, turn the temperature control to the position corre-
sponding to your desired cooling level. The wine cooler temperature will
vary depending on the quantity of bottles stored, and on the frequency with
which the door is opened.
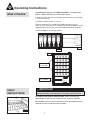
SETTING THE TEMPERATURE:
The temperature of the wine cooler compartment is controlled by adjust-
ing/setting the thermostat control knob, located on the exterior rear wall of
the unit. To start the wine cooler and achieve maximum cooling quickly;
• Turn the temperature control knob clockwise to the furthest (maximum)
setting on the darker blue (wide) section of the graduated control dial.
• Allow the unit to run at this setting for 3-4 hours.
• When maximum cooling is achieved, turn back the temperature control
knob setting to the middle position on the graduated blue control dial. See
Fig.1.
• To turn off the wine cooler, (no cooling) rotate the control knob to the “0”
(off) position. See Fig. 2. Turn the control to the “OFF” (0) position to tem-
porarily disconnect the cooling cycle. When the wine cooler is not to be
used for long periods of time, disconnect from power and leave the door
partially open.
NOTE: Wait 3 to 5 minutes before restarting if operation has been inter-
rupted.
Interior Light:
To manually operate the light, depress the interior light toggle switch situat-
ed on the left side of the interior light housing, located on the ceiling inside
the unit; this will allow the interior light to remain on while the door is
closed.
DEFROSTING: Your wine cooler is designed with an “Auto-Cycle”
defrost system. What is Auto Cycle defrost?
The refrigerated surfaces of the fresh food compartment defrost automati-
cally during the “off” cycle of the cold control (thermostat). Defrost water
from the compartment is disposed of automatically, by means of being
channeled onto a drip tray located on the compressor. Heat transfer from
the compressor causes the defrost water to evaporate.
Fig. 2
Fig. 1
6
MAX
MIN
MAX
MIN

Operating Instructions
WINE STORAGE
The Maximum Capacity* of the DWC032A2BDB is 36 (750mL) wine
bottles. * When stocked as per instructions below.
In order to achieve the maximum storage capacity of thirty six (36) bottles,
it will be necessary to:
1) Position 5 bottles across, as in Fig. A.
2) Finally, position three (3) bottles per staggered bottom shelf, as
shown in Fig. B, for a total of six (6) bottles per tier on the bottom 2 tiered,
staggered shelf. This will give you a total loading capacity of 36 bottles.
3) Refer to Fig.C for full storage capacity.
Fig. A
Fig. B
To remove a rack from its locked position, lift the rear of the rack
upward and then slide the rack out from the unit, as shown in Fig. D.
To re-install, ensure the rack is resting securely on the support brackets,
and push the rack inward until it locks into place.
Do not cover any part of the rack with aluminum foil or any other
material that will prevent adequate air circulation within the unit.
IMPORTANT
Fig. D
SHELF
INSTRUCTIONS
7
Total - 30 Bottles
refer to Fig A.
Total - 6 bottles
refer to Fig B.
Fig. C

Care and Maintenance
HELPFUL HINTS
Allow the Wine Cooler door to remain open for a few minutes after manual
cleaning to air out and dry the inside of the Wine Cooler.
NOTE: Be certain the power is off before cleaning any part of this
appliance.
Never use any commercial or abrasive cleaners or sharp objects on
any part of the Wine Cooler.
Walls, Floor, Inside Window, and Shelves:
Some water deposits and dust can be removed with a dry paper towel,
others may require a damp cloth.
Do not use cleaners containing ammonia or alcohol on the Wine
Cooler. Ammonia or alcohol can damage the appearance of the
appliance.
Outer Case:
It’s important to keep the area clean where the door seals against the unit.
Clean this area with a sudsy cloth. Rinse and then dry.
Control Panel and Glass Door:
Wipe with a damp cloth and dry thoroughly. Do not use cleaning sprays,
large amounts of soap and water, abrasive or sharp objects on the
panel they can damage it. Some paper towels may also scratch the control
panel and door glass.
HOW TO CLEAN
THE INSIDE
HOW TO CLEAN
THE OUTSIDE
8

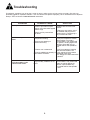
Troubleshooting
Occasionally, a problem may arise that is minor in nature, and a service call may not be necessary. Use this trou-
bleshooting guide for a possible solution. If the unit continues to operate improperly, call an authorized service depot or
Danby’s Toll Free Number 1-800-263-2629 for assistance.
PROBLEM POSSIBLE CAUSE SOLUTION
1) No power.
• A fuse in your home may be
blown or a circuit breaker tripped
• Power surge
• Plug is not fully inserted into
wall outlet.
• Replace fuse or reset circuit
breaker.
• Unplug the wine cooler, wait a
few seconds and plug back in.
• Make sure the 3-prong plug is
fully inserted into outlet.
2) Cabinet temperature too
warm.
• Temperature Setting.
• Door not shut properly or
opened excessively.
• Exhaust vent is obstructed.
• Recently added large quantity of
warm bottles to cabinet.
• Verify the temperature control
setting; adjust if necessary.
• Ensure door is fully closed and
the gasket is sealing against the
cabinets. Open door only as
needed and for short periods of
time.
• Verify that nothing is blocking
front-mounted exhaust vent.
• Limit quantity of warm bottles
introduced at the same
time. Stagger the load introduction
if possible.
3) Condensation on the
cabinet and/or doors.
• High humidity conditions in the
home.
• Ensure door is fully closed and
gasket is sealing against the
cabinet. Open the door only
as needed and for short periods
of time.
9

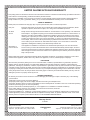
LIMITED IN-HOME APPLIANCE WARRANTY
This quality product is warranted to be free from manufacturer’s defects in material and workmanship, provided that the unit is used under the normal operating
conditions intended by the manufacturer.
This warranty is available only to the person to whom the unit was originally sold by Danby Products Limited (Canada) or Danby Products Inc. (U.S.A.) (hereafter
“Danby”) or by an authorized distributor of Danby, and is non-transferable.
TERMS OF WARRANTY
Plastic parts, are warranted for thirty (30) days only from purchase date, with no extensions provided.
First Year
During the rst twelve (12) months, any functional parts of this product found to be defective, will be repaired or replaced, at warrantor’s
option, at no charge to the ORIGINAL purchaser.
To obtain
Danby reserves the right to limit the boundaries of “In Home Service” to the proximity of an Authorized Service Depot. Any app liance
Service
requiring service outside the limited boundaries of “In Home Service” , it will be the consumer’s responsibility to transport the appliance (at
their own expense) to the original retailer (point of purchase) or a service depot for repair. See “Boundaries of In Home Serv ice” below.
Contact your dealer from whom your unit was purchased, or contact your nearest authorized Danby service depot, where service
must be performed by a qualied service technician.
If service is performed on the units by anyone other than an authorized service depot, or the unit is used for commercial appli cation, all
obligations of Danby under this warranty shall be void.
Boundaries of
If the appliance is installed in a location that is 100 kilometers (62 miles) or more from the nearest service center your unit must be
In Home Service
delivered to the nearest authorized Danby Service Depot, as service must only be performed by a technician qualied and certif ied for
warranty service by Danby. Transportation charges to and from the service location are not protected by this warranty and are t he
responsibility of the purchaser.
Nothing within this warranty shall imply that Danby will be responsible or liable for any spoilage or damage to food or other c ontents of this appliance, whether due
to any defect of the appliance, or its use, whether proper or improper.
EXCLUSIONS
Save as herein provided, Danby, there are no other warranties, conditions, representations or guarantees, express or implied, m ade or intended by Danby or its
authorized distributors and all other warranties, conditions, representations or guarantees, including any warranties, conditio ns, representations or guarantees
under any Sale of Goods Act or like legislation or statue is hereby expressly excluded. Save as herein provided, Danby shall no t be responsible for any damages
to persons or property, including the unit itself, howsoever caused or any consequential damages arising from the malfunction o f the unit and by the purchase of
the unit, the purchaser does hereby agree to indemnify and hold harmless Danby from any claim for damages to persons or propert y caused by the unit.
GENERAL PROVISIONS
No warranty or insurance herein contained or set out shall apply when damage or repair is caused by any of the following:
1) Power failure.
2) Damage in transit or when moving the appliance.
3) Improper power supply such as low voltage, defective house wiring or inadequate fuses.
4) Accident, alteration, abuse or misuse of the appliance such as inadequate air circulation in the room or abnormal operating con ditions
(extremely high or low room temperature).
5) Use for commercial or industrial purposes (ie. If the appliance is not installed in a domestic residence).
6) Fire, water damage, theft, war, riot, hostility, acts of God such as hurricanes, oods etc.
7) Service calls resulting in customer education.
8) Improper Installation (ie. Building-in of a free standing appliance or using an appliance outdoors that is not approved for out door application).
Proof of purchase date will be required for warranty claims; so, please retain bills of sale. In the event warranty service is required, present this document to our
AUTHORIZED SERVICE DEPOT.
Danby Products Limited
PO Box 1778, Guelph, Ontario, Canada N1H 6Z9
Telephone: (519) 837-0920 FAX: (519) 837-0449
Danby Products Inc.
PO Box 669, Findlay, Ohio, U.S.A. 45840
Telephone: (419) 425-8627 FAX: (419) 425-8629
04/09
1-800-263-2629
Warranty Service
In-home
If the appliance is installed in a location that is 100 kilometres (62 miles) or more from the nearest
service centre your unit must be delivered to the nearest authorized Danby Service Depot, as service
must only be performed by a technician qualified and certified for warranty service by Danby. Transpor-
tation charges to and from the service location are not protected by this warranty and are the responsi-
bility of the purchaser.
During the first twelve (12) months, any functional parts of this product found to be defective, will be
repaired or replaced, at warrantor’s option, at no charge to the ORIGINAL purchaser.
Danby reserves the right to limit the boundaries of “In Home Service” to the proximity of an Authorized
Service Depot. Any appliance requiring service outside the limited boundaries of “In Home Service” ,it
will be the consumer’s responsibility to transport the appliance (at their own expense) to the original
retailer (point of purchase) or a service depot for repair. See “Boundaries of In Home Service” below.
Contact your dealer from whom your unit was purchased, or contact your nearest authorized Danby
service depot, where service must be performed by a qualified service technician. If service is performed
on the units by anyone other than an authorized service depot, or the unit is used for commercial
application, all obligations of Danby under this warranty shall be void.
First year
To obtain
service
Boundaries of
in-home service
LIMITED IN-HOME APPLIANCE WARRANTY
This quality product is warranted to be free from manufacturer’s defects in material and workmanship, provided that the unit is
used under the normal operating conditions intended by the manufacturer.
This warranty is available only to the person to whom the unit was originally sold by Danby Products Limited (Canada) or
Danby Products Inc. (U.S.A.) (hereafter “Danby”) or by an authorized distributor of Danby, and is non-transferable.
TERMS OF WARRANTY
Plastic parts, are warranted for thirty (30) days only from purchase date, with no extensions provided.
Nothing within this warranty shall imply that Danby will be responsible or liable for any spoilage or damage to food or other
contents of this appliance, whether due to any defect of the appliance, or its use, whether proper or improper.
EXCLUSIONS
Save as herein provided, by Danby, there are no other warranties, conditions, representations or guarantees, express or
implied, made or intended by Danby or its authorized distributors and all other warranties, conditions, representations or
guarantees, including any warranties, conditions, representations or guarantees under any Sale of Goods Act or like legislation
or statute is hereby expressly excluded. Save as herein provided, Danby shall not be responsible for any damages to persons
or property, including the unit itself, howsoever caused or any consequential damages arising from the malfunction of the unit
and by the purchase of the unit, the purchaser does hereby agree to indemnify and hold harmless Danby from any claim for
damages to persons or property caused by the unit.
GENERAL PROVISIONS
No warranty or insurance herein contained or set out shall apply when damage or repair is caused by any of the following:
1) Power failure.
2) Damage in transit or when moving the appliance.
3) Improper power supply such as low voltage, defective house wiring or inadequate fuses.
4) Accident, alteration, abuse or misuse of the appliance such as inadequate air circulation in the room or abnormal operating
conditions (extremely high or low room temperature).
5) Use for commercial or industrial purposes (i.e., If the appliance is not installed in a domestic residence).
6) Fire, water damage, theft, war, riot, hostility, acts of God such as hurricanes, floods etc.
7) Service calls resulting in customer education.
8) Improper Installation (i.e., building-in of a free standing appliance or using an appliance outdoors that is not approved for
outdoor application). Proof of purchase date will be required for warranty claims; so, please retain bills of sale. In the event
warranty service is required, present this document to our AUTHORIZED SERVICE DEPOT.
Warranty Service
In-home
Danby Products Limited
PO Box 1778, Guelph, Ontario, Canada N1H 6Z9
Telephone: (519) 837-0920 FAX: (519) 837-0449
Danby Products Inc.
PO Box 669, Findlay, Ohio, U.S.A. 45840
Telephone: (419) 425-8627 FAX: (419) 425-8629
1-800-263-2629
07/14

Merci d’avoir choisi Danby
Nous savons que vous êtes excité. Nous sommes aussi! Cependant, le plus que vous vous familiarisez avec votre
nouvel appareil, le mieux va être votre expérience. Nous suggérons donc de lire ces instructions avant connecter votre
nouvel appareil. Ce manuel contient des informations opérationnel important qui vous aidera à faire un usage pleine de les
caractéristiques techniques disponibles dans votre appareil Danby. Le manuel contient également des informations conçu
pour améliorer la fiabilité et la sécurité de votre appareil ainsi que des conseils pour le maintien, pour vous assurez des annees
de bonheur.
Se il vous plaît visitez www.danby.com pour accéder les outils libre-service, FAQ et plus encore. Si jamais vous avez besoin
d'aide supplémentaire, s’il vous plaît appelez 1-800-26-Danby (1-800-263-2629). S’il vous plaît ayez votre facture d’achat, le
numéro de modèle, et le numéro de série près durant l'appel.
Remarque : Ces renseignements seront nécessaires si votre appareil a besoin d’entretien ou pour les demandes de
renseignements généraux. Pour bénéficier d’une opération de maintenance ou de dépannage, le reçu
original sera exigé.
Numéro de modèle :
Numéro de serie :
Date d’achat :
BESOIN D’ASSISTANCE ?
Veuillez trouver quelques conseils avant de faire appel à nos services, cela
nous aidera à mieux vous servir :
Lisez ce guide :
Il comprend des instructions pour l’utilisation et l’entretien adapté de votre
appareil.
Si votre nouvel appareil est endommagé :
Contactez immédiatement le revendeur (ou le fabricant).
Gagnez du temps et de l’argent :
Avant de faire appel à nos services, consultez à nouveau la section
« Dépannage ». Cette section vous aidera à résoudre des problèmes courants.
Si une réparation est nécessaire, ne vous inquiétez pas, la solution est au
bout du fil.
Tel: 1-800-26-
(1-800-263-2629)
11

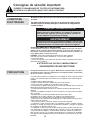
Consignes de sécurité important
PRENDRE CONNAISSANCE DE TOUTES LES INFORMATIONS
RELATIVES À LA SÉCURITÉ AVANT D'UTILISER LE PRODUIT
LISEZ TOUTES LES INFORMATIONS DE SÉCURITÉ AVANT DE FAIRE FONCTIONNER L’APPAREIL
CONDITIONS
ÉLECTRIQUES
Branchez la fiche dans une prise de courant correctement installée et mise
à la terre.
Cet appareil doit être mise à la terre. En cas de courtcircuit, la mise à la terre
réduit les risques de décharge électrique en fournissant un échappatoire au
courant électrique.
Un refroidisseur à vin vide est une attraction dangereuse aux
enfants. Enlever les joints étanches, les loquets, les couvercles
oules portes des appareils qui ne sont pas utiliser, ou faites de
soit que l’appareil ne présente aucun danger.
PRÉCAUTION IMPORTANTE
AVERTISSEMENT
Consultez un electricien ou un technicien qualifie si vous ne com-
prenez pas bien les instructions de mise à la terre ou si vous avez
un doute quelconque sur la bonne mise à la terre de l’appareil.
DANGER : Risque des enfants deviennent coincer dans l’appareil.
Avant de jeter votre ancien refroidisseur à vin ou autres appareils :
• Enlevez les portes
• Laissez les clayette a ses places afin que des enfants ne puissent pas monter
facilement dans l’appareil.
N’ATTENDEZ PAS! FAITES-LE IMMÉDIATEMENT!
SAUVEGARDE CES INSTRUCTIONS!
N’UTILISER JAMAIS DE FIL DE RALLONGE
S’il est poissible, branchez le refrigerateur à son propre circuit. Ainsi, les autres
appareils ou la surcharge des lampes du domicile ne puevent pas surcharger et
interrompre le courant electrique. Une connexion desserrée peut se doubler a un
autre appareil dans la meme prisemurale.
PRÉCAUTIONS
Cet appareil doit être mise à la terre. Branchez le seulement dans une prise
correctement mise à la terre. Référez-vous au chapitre intitulé “Instructions
de mise à la terre” ci-dessous.
• Ne faites pas fonctionner cet appareil s’il a un cordon ou fiche électrique endom-
magé, s’il ne fonctionne pas correctement, ou si l’appareil a été endommagé ou
échappé.
• N'épissez pas le cordon électrique.
• Gardez le cordon électrique éloigné des sources de chaleur.
• N’immersez pas le cordon ou sa fiche dans aucun liquide.
• N’utilisez pas cet appareil près de bassins d’eau, par exemple dans un sous-sol
détrempé, près d’une piscine ou d’un évier.
• N’utilisez pas de produits chimiques ou vapeurs corrosives dans/près de cet
appareil.
• N’utilisez cet appareil que pour les fins aux quelles il est conçu comme indiqué
dans ce guide.
• Ne placez pas les articles périssables de nourriture dans votre
réfrigérateur de vin (pour example, les viandes et les produits laitiers).
• Entreposez les breuvages dans des bouteilles scellées seullement.
• Référez-vous aux instructions de nettoyage du fini de la porte se trouvant au(x)
chapitre Soins et Entretien.
• Ne recouvrez pas ou n’obstruez aucune ouverture de l’appareil.
• Cet appareil n’a pas été conçu pour une installation extérieur, incluant l’installa-
tion dans un endroit qui n’a pas une température contrôlée (y compris les garages,
les vérandas, les abris de voitures, etc.).
• Cet appareil ne devrait être réparé que par du personnel qualifié. Pour tout exa-
men, réparation ou réglage, contactez votre centre de service le plus rapproché.
• Avant de brancher l’appareil à l’alimentation électrique, laissez-le reposer pen-
dant environ 6 heures. Ce qui réduira la possibilité que le système de refroidisse-
ment présente des dysfonctionnements en raison de la manutention au cous du
transport.
12

Instructions d’installation
INSTRUCTIONS DE
MISE À NIVEAU
Danger de poids excessif! Il faut deux personnes ou plus pour
déplacer le refroidisseur de vin.
AVERTISSEMENT
Il est important que votre refroidisseur de vin soit à niveau. Pour
mettre le refroidisseur de vin à niveau :
1) Installez le refroidisseur de vin à sa position finale.
2) Demandez à une autre personne d’appliquer une légère pression sur la
partie avant supérieure du refroidisseur de vin pour l’incliner et alléger la
pesanteur sur les pattes de réglage de mise à niveau.
3) Pivotez les pattes de mise à niveau dans le sens des aiguilles d’une
montre pour lever le refroidisseur à vin oudans le sens contraire pour
l’abaisser.
Pour
lever
Pour abaisser
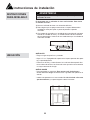
EMPLACEMENT
À FAIRE...
• Choisir un endroit avec un plancher solide et au niveau.
• Laisser un espace de 12,7 cm (5 po) entre l'arrière de l'appareil et tout
mur adjacent.
• Éviter l'exposition au soleil direct et à la chaleur. Le soleil direct peut
affecter la couche d'acrylique. Les sources de chaleur à proximité peuvent
causer une plus grande consommation d'électricité.
À NE PAS FAIRE...
• Utiliser cet appareil à l'extérieur : Cet appareil a été conçu pour usage
domestique seulement. Ne pas faire fonctionner ou entreposer cet
appareil à l'extérieur.
• Incorporer cet appareil dans une armoire : Cet appareil est conçu pour
une utilisation autonome seulement et n'est pas prévu pour être encas-
tré.
12,7 cm / 5 po.
12,7 cm / 5
po.
13

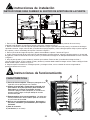
INSTRUCTIONS DE L’INVERSION DE PORTE
Instructions d’installation
Consignes d’utilisation
1) Portes En Verre Trempé : Teinté pour protéger contre
les rayons UV tout en permettant de voir facilement le contenu
du cabinet.
2) Contôles Électroniques de la Température : (contrôles
installés à l’avant, à l’extérieur du cabinet)Ces commandes
contrôlent la température à l’intérieur du cabinet à vins.
Ils mettent le moteur en marche ou l’arrêtent dès que la
température dépasse en plus ou en moins le niveau de
refroidissement demandé.
3) Joint Étanche Magnétique : Le joint étanche permet de
conserver le niveau de température et d’humidité à l’intérieur
du cabinet.
4) Étageres Plastifiées : Résistent auxodeurs et à la rouille.
Amovibles pour faciliter l'entretien.
5) Pied Ajustable.
6) Lumière Intérieures (non illustré)
CARACTÉRISTIQUES
14
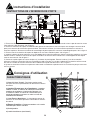
1. Enlevez les deux (2) vis du dos du plan de travail, levez légèrement le dos du plan de travail et tirez le plan de travai en avant.
Cela enlèvera le plan de travail. Voir la figure 1.
2. Enlevez le couvercle de la porte en bande du côté gauche ou droit (selon le côté vers lequel vous changez l’ouverture de la
porte) et le couvercle de la charnière gauche ou droit. Puis enlevez les deux (2) vis de charnière supérieures et enlevez la
charnière supérieure. Desserrez la broche de l’assemblage de porte supérieure et enlevez l’assemblage de porte. Voir la figure 2.
3. Enlevez l’axe de la charnière de la porte et déplacez-le vers l’autre côté de la porte. Voir la figure 3.
4. Installez la broche de porte supérieure sur le côté opposé de la charnière supérieure, placez la charnière supérieure sur l’autre
côté de l’armoire. Installez le couvercle de la porte en bande et le couvercle de la charnière sur le côté opposé du côté duquel
vous les avez enlevés. Voir la figure 4.
5. Desserrez le pied réglable et enlevez les deux (2) vis autour du pied réglable. Enlevez les deux (2) vis de la charnière
inférieure et enlevez la charnière inférieure. Réinstallez le pied et les deux (2) vis dans l’endroit d’où la charnière inférieure avait
été enlevée. Installez la charnière inférieure dans l’endroit d’où le pied avait été enlevé. Voir la fi gure 5.
6. Ajustez les charnières inférieure et supérieure selon besoin et réinstallez le plan de travail en reversant les pas que vous avez
suivi en l’enlever.
1
2
3
4
5
6

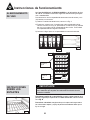
Consignes d’utilisation
COMMANDES DE
VOTRE
REFROIDISSEUR
DE VIN
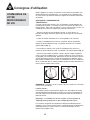
Mettre l'appareil en marche en tournant la commande du thermostat à la
position désirée de refroidissement. La température du refroidisseur de
vin varie selon la quantité de bouteilles rangées et du nombre d'ouverture
de la porte.
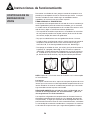
RÉGLAGE DE LA COMMANDE DE
TEMPÉRATURE :
La temp. intérieure du cabinet à vins est contrôlée à l’aide dubouton de
contrôle du thermostat. Ce bouton se trouve à l’extérieur du cabinet, sur
la paroi arrière. Pour mettre le cabinet à vins en marche et pour en tirer un
refroidissement maximum rapidement, procédez comme suit :
• Tournez le bouton de commande de la temp. en sens horaire, en
direction du réglage maximum (partie bleu foncé large) de la commande
graduée.
• Laissez le cabinet fonctionner à ce niveau pendant 3 ou 4 heures.
• Lorsque le refroidissement maximum est atteint, placez l’aiguille du
bouton de commande de la temp. à la position de milieu sur le cadran
gradué (voir la Fig. 1).
• Pour arrêter le cabinet à vins (arrêt du refroidissement), tournez le
bouton de commande de la temp. à la position «0» (éteint) (voir la Fig. 2).
• Tournez la commande en position «éteint» (0) pour couper temporaire-
ment le cycle de refroidissement. Lorsque le cabinet à vins n’est pas util-
isé pendant une longue période, débranchez la prise de courant et laissez
la porte partiellement ouverte. Régler la commande à la position “éteint”
pour arrêter temporairement le cycle de refroidissement. Si le refroidisseur
de vin ne doit pas être en marche pendant quelques temps, débrancher la
prise et laisser la porte entre ouverte.
REMARQUE : Retarder la mise en marche de 3 à 5 minutes si le fonction-
nement a été interrompu.
Lumière intérior :
Pour opérer la lumière manuellement; appuyer sur l’interrupteur de lumière
situé du côté gauche de boîtier de la lumière qui se trouve au plafond á l’in-
térieur du cabinet. Ceci permettra á la lumière de rester allumée lorsque la
porte est fermée.
Dégivrage : Le refroidisseur de vin est pour vu d'un système de
dégivrage auto-cycle.Qu'est ce que le dégivrage auto-cycle?
Les surfaces réfrigérées du compartiment dégivrent automatiquement
pendant le cycle "éteint" du thermostat. L'eau de dégivrage se débarrasse
automatiquement en entrant un bac. Le transfert de chaleur du com-
presseur fait évaporer l'eau.
15
Fig. 2
Fig. 1
MAX
MIN
MAX
MIN

Consignes d’utilisation
ENTREPOSAGE
DES VINS
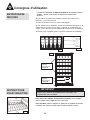
La capacité *maximum du DWC032A2BDB est 36 bouteilles du vin
(750ml). * Quand il est stocké en utilisant les instructions
fournies.
Afin de réaliser la capacité de stockage maximum de trente-six (36)
bouteilles, il sera nécessaire de :
1) Placez 5 bouteilles à travers, comme dans Fig. A
2) Puis, placez trois (3) bouteilles, suivant les indications de Fig. B, sur le
étagère à deux niveaux inférieur, pour un total de six (6) bouteilles par
rangée. Ceci te donnera un total capacité de chargement de 36 bouteilles.
3) Référez-vous à la figure C pour la capacité maximale d’entreposage.
Fig. A
Fig. B
INSTRUCTIONS
POUR TABLETTES
Ne couvrez toute partie des étagères de papier d'aluminium ou
d'aucun autre matériel qui empêcheront à circulation d'air
proportionnée dans le coffret.
IMPORTANT
Pour enlever une tablette de la position verrouillée, incline l'étagère
comme montré dans la figue D et tire à l'extérieur.
Pour réinstaller, assurez l'étagère se repose sur les supports et poussée
la tablette vers l'intérieur jusqu'à cequ'elle soit verrouillée en place.
Fig. D
16
Total : Pour 30
bouteilles,
référez-vous à
la figure A.
Total : Pour 6
bouteilles,
référez-vous à
la figure B.
Fig. C

Soins et entretien
CONSEILS UTILS
Après nettoyage, laissez la porte de la machine ouverte durant quelques
minutes pour aérer et assécher l’intérieur de l’armoire. REMARQUE :
Avant de nettoyer cet appareil, assurez-vous que l’alimentation est
coupée.
COMMENT
NETTOYER
L’INTÉRIEUR
N’utilisez jamais de nettoyant industriels sur aucune partie de votre
refroidisseur de vin.
Parois, plancher, intérieur de la visière et tablettes :
Certaines éclaboussures d’eau et poussières peuvent être essuyées avec
des essuie-tout. D’autres taches peuvent nécessiter un linge humide.
COMMENT
NETTOYER
L’EXTÉRIEURE
N’utilisez pas de produits nettoyants comprenant de l’ammoni-
aque ou de l’alcool sur l’appareil. L’ammoniaque ou l’alcool peu-
vent altérer le fini de l’appareil.
Il est important de garder la région de scellement de la porte sur l’armoire
propre. Nettoyez avec un tissu savonneux, rincez le régionr et puis séchez
Panneau de commande et porte verre :
Essuyez avec un chiffon humide. Asséchez bien avec un chiffon sec.
N’utilisez pas de nettoyants en aérosol, de grandes quantités d’eau et de
savon, d’abrasifs ou d’objets acérés sur le panneau, ceci pourrait
l’endommager. Certains essuie-tout peuvent aussi égratigner le panneau
de commande et verre de la porte.
17

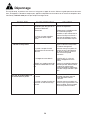
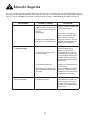
Dépannage
En temp de temp, le probleme est mineur et n’exige pas un appel de service. Utilisez ce guide pour trouver des solu-
tions. Si l’appareil ne fonctionne toujours pas, appelez un depot de service autorise ou le numero de telephone sans
frais Danby 1-800-263-2629 pour de plus amples renseignements.
PROBLÈME CAUSE PROBABLE SOLUTION
1) L’appareil n’es pas alimenté.
• Un fusible de votre panneau de
distribution peut être grillé ou le
disjoncteur déclenché.
• Surtension.
• La fiche n’est pas complète-
ment insérée dans la prise
murale.
• Remplacez le fusible ou
réarmez le disjoncteur.
• Débranchez la refroidisseur de
vin et attendez quelques
secondes, et puis rebranchez la.
• Assurez-vous que la fiche à 3
branches de l’appareil est com-
plètement insérée dans la prise.
2) La température dans la
cabinet est trop chaud.
• Réglage du température.
• Le porte n’est pas fermées
correctement ou ouverte trop
souvent.
• L'échappement est obstrué.
• Stocké une grande quantité de
bouteilles chaudes dans le cabi-
net.
• Vérifiez que la commande est
réglée le cabinet est trop haute.
à la bonne arrangement.
• Assurez-vous que la porte est
fermées et que le joint étanche
est contre le coffret. Ouvrez la
porte seulement quand
nécessaire.
• Vérifiez qu'il n'y a rien qui
bloque l’échappement sur le
devant.
• Limitez la quantité de bouteilles
chaudes qui sont stockées dans
le cabinet en même temps.
Essayez d'introduire progressive-
ment des charge chaudes si pos-
sible.
3) L’eau de condensation sur
le coffret et/ou les portes.
• Niveau de humidité élevé dans
la maison.
• La porte n’est pas fermées cor-
rectement ou son ouverte trop
souvent.
• La formation de l'eau de con-
densation s'arrêtera quand le
niveau d'humidité retours
à normale.
• Assurez-vous que la porte est
fermée et que le joint étanche est
contre le coffret. Ouvrez la porte
seulement quand nécessaire.
18

LIMITED IN-HOME APPLIANCE WARRANTY
This quality product is warranted to be free from manufacturer’s defects in material and workmanship, provided that the unit is used under the normal operating
conditions intended by the manufacturer.
This warranty is available only to the person to whom the unit was originally sold by Danby Products Limited (Canada) or Danby Products Inc. (U.S.A.) (hereafter
“Danby”) or by an authorized distributor of Danby, and is non-transferable.
TERMS OF WARRANTY
Plastic parts, are warranted for thirty (30) days only from purchase date, with no extensions provided.
First Year
During the rst twelve (12) months, any functional parts of this product found to be defective, will be repaired or replaced, at warrantor’s
option, at no charge to the ORIGINAL purchaser.
To obtain
Danby reserves the right to limit the boundaries of “In Home Service” to the proximity of an Authorized Service Depot. Any app liance
Service
requiring service outside the limited boundaries of “In Home Service” , it will be the consumer’s responsibility to transport the appliance (at
their own expense) to the original retailer (point of purchase) or a service depot for repair. See “Boundaries of In Home Serv ice” below.
Contact your dealer from whom your unit was purchased, or contact your nearest authorized Danby service depot, where service
must be performed by a qualied service technician.
If service is performed on the units by anyone other than an authorized service depot, or the unit is used for commercial appli cation, all
obligations of Danby under this warranty shall be void.
Boundaries of
If the appliance is installed in a location that is 100 kilometers (62 miles) or more from the nearest service center your unit must be
In Home Service
delivered to the nearest authorized Danby Service Depot, as service must only be performed by a technician qualied and certif ied for
warranty service by Danby. Transportation charges to and from the service location are not protected by this warranty and are t he
responsibility of the purchaser.
Nothing within this warranty shall imply that Danby will be responsible or liable for any spoilage or damage to food or other c ontents of this appliance, whether due
to any defect of the appliance, or its use, whether proper or improper.
EXCLUSIONS
Save as herein provided, Danby, there are no other warranties, conditions, representations or guarantees, express or implied, m ade or intended by Danby or its
authorized distributors and all other warranties, conditions, representations or guarantees, including any warranties, conditio ns, representations or guarantees
under any Sale of Goods Act or like legislation or statue is hereby expressly excluded. Save as herein provided, Danby shall no t be responsible for any damages
to persons or property, including the unit itself, howsoever caused or any consequential damages arising from the malfunction o f the unit and by the purchase of
the unit, the purchaser does hereby agree to indemnify and hold harmless Danby from any claim for damages to persons or propert y caused by the unit.
GENERAL PROVISIONS
No warranty or insurance herein contained or set out shall apply when damage or repair is caused by any of the following:
1) Power failure.
2) Damage in transit or when moving the appliance.
3) Improper power supply such as low voltage, defective house wiring or inadequate fuses.
4) Accident, alteration, abuse or misuse of the appliance such as inadequate air circulation in the room or abnormal operating con ditions
(extremely high or low room temperature).
5) Use for commercial or industrial purposes (ie. If the appliance is not installed in a domestic residence).
6) Fire, water damage, theft, war, riot, hostility, acts of God such as hurricanes, oods etc.
7) Service calls resulting in customer education.
8) Improper Installation (ie. Building-in of a free standing appliance or using an appliance outdoors that is not approved for out door application).
Proof of purchase date will be required for warranty claims; so, please retain bills of sale. In the event warranty service is required, present this document to our
AUTHORIZED SERVICE DEPOT.
Danby Products Limited
PO Box 1778, Guelph, Ontario, Canada N1H 6Z9
Telephone: (519) 837-0920 FAX: (519) 837-0449
Danby Products Inc.
PO Box 669, Findlay, Ohio, U.S.A. 45840
Telephone: (419) 425-8627 FAX: (419) 425-8629
04/09
1-800-263-2629
Warranty Service
In-home
Si l'appareil est installé à plus de 100 kilomètres (62 milles) du centre de service le plus proche, il doit
être livré à l'atelier de réparation autorisé par Danby le plus proche, car l'entretien doit uniquement être
réalisé par un technicien qualifié et certifié pour effectuer un entretien couvert par la garantie de Danby.
Les frais de transport entre votre domicile et le lieu de l'entretien ne sont pas couverts par la présente
garantie et doivent être acquittés par l'acheteur.
Pendant les premiers douze (12) mois, toutes les pièces fonctionnelles de ce produit qui s’avèrent
défectueuses seront réparées ou remplacées, selon le choix du garant, sans frais à l’acheteur INITIAL.
Le client sera responsable pour le transport et tous les frais d’expédition de tout appareil exigeant le
service au dépot de service autorisé le plus proche. S’adresser au détaillant qui a vendu l’appareil, ou à
la station technique agréée de service la plus proche, où les réparations doivent être effectuées par un
technicien qualifié. Si les réparations sont effectuées par quiconque autre que la station de service
agréée où à des fins commerciales, toutes les obligations de Danby en vertu de cette garantie seront
annulées.
Premiers 12 mois
Pour bénéficier
du service
Limites de
l’entretien à
domicile
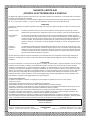
GARANTIE LIMITÉE SUR
APPAREIL ÉLECTROMÉNAGER À DOMICILE
Cet appareil de qualité est garanti exempt de tout vice de matière première et de fabrication, s’il est utilisé dans les conditions
normales recommandées par le fabricant.
Cette garantie n’est offerte qu’à l’acheteur initial de l’appareil vendu par Danby Products Limited (Canada) ou Danby Products
Inc. (E.- U.A.) (ci-après « Danby ») ou par l’un des ses distributeurs agréés et elle ne peut être transférée.
CONDITIONS
Les pièces en plastique sont garanties pendant trente (30) jours seulement à partir de la date de l’achat, sans aucune prolon-
gation prévue.
Aucune partie de la garantie ne prévoit implicitement que le fabricant sera tenu responsable des dommages subis par les
aliments ou d’autres types de contenu, qu’ils soient causés par la défectuosité de l’appareil ou par son usage adéquat ou
inadéquat.
EXCLUSIONS
En vertu de la présente, il n’existe aucune autre garantie, condition ou représentation, qu’elle soit exprimée ou tacite, de façon
manifeste ou intentionnelle, par Danby ou ses distributeurs agréés. De même, sont exclues toutes les autres garanties,
conditions ou représentations, y compris les garanties, conditions ou représentations en vertu de toute loi régissant la vente
de produits ou de toute autre législation ou règlement semblables. En vertu de la présente, Danby ne peut être tenue respon-
sable en cas de blessures corporelles ou des dégâts matériels, y compris à l’appareil, quelle qu’en soit les causes. Danby ne
peut pas être tenue responsable des dommages indirects dus au fonctionnement défectueux de l’appareil. En achetant
l’appareil, l’acheteur accepte de mettre à couvert et de dégager Danby de toute responsabilité en cas de réclamation pour
toute blessure corporelle ou tout dégât matériel causé par cet appareil.
CONDITIONS GÉNÉRALES
La garantie ou assurance ci-dessus ne s’applique pas si les dégâts ou réparations sont dus aux cas suivants :
1) Panne de courant.
2) Dommage subis pendant le transport ou le déplacement de l’appareil.
3) Alimentation électrique incorrecte (tension faible, câblage défectueux, fusibles incorrects).
4) Accident, modification, emploi abusif ou incorrect de l’appareil tel qu'une circulation d'air inadéquate dans la pièce ou des
conditions de fonctionnement anormales (température extrêmement élevée ou basse).
5) Utilisation dans un but commercial ou industriel (à savoir, si l'appareil n'est pas installé dans un domicile résidentiel).
6) Incendie, dommages causés par l’eau, vol, guerre, émeute, hostilités, cas de force majeure (ouragan, inondation, etc.).
7) Visites d’un technicien pour expliquer le fonctionnement de l’appareil au propriétaire.
8) Installation inappropriée (par exemple, encastrement d'un appareil autoportant, ou utilisation extérieure d'un appareil non
conçu à cet effet). Une preuve d’achat doit être présentée pour toute demande de réparation sous garantie. Prière de garder
le reçu. Pour faire honorer la garantie, présenter ce document à la station technique agréée ou s’adresser à :
Service sous garantie
Service au domicile
Danby Products Limited
PO Box 1778, Guelph, Ontario, Canada N1H 6Z9
Téléphone : (519) 837-0920 Télécopieur: (519) 837-0449
Danby Products Inc.
PO Box 669, Findlay, Ohio, U.S.A. 45840
Téléphone: (419) 425-8627 Télécopieur: (419) 425-8629
1-800-263-2629
03/14
La page charge ...
La page charge ...
La page charge ...
La page charge ...
La page charge ...
La page charge ...
La page charge ...
La page charge ...
La page charge ...
La page charge ...
La page charge ...
La page charge ...
-
 1
1
-
 2
2
-
 3
3
-
 4
4
-
 5
5
-
 6
6
-
 7
7
-
 8
8
-
 9
9
-
 10
10
-
 11
11
-
 12
12
-
 13
13
-
 14
14
-
 15
15
-
 16
16
-
 17
17
-
 18
18
-
 19
19
-
 20
20
-
 21
21
-
 22
22
-
 23
23
-
 24
24
-
 25
25
-
 26
26
-
 27
27
-
 28
28
-
 29
29
-
 30
30
-
 31
31
-
 32
32


Danby DWC032A2BDB Mode d'emploi
- Catégorie
- Boissons glacées
- Taper
- Mode d'emploi
dans d''autres langues
- English: Danby DWC032A2BDB User guide
- español: Danby DWC032A2BDB Guía del usuario
Documents connexes
-
Danby DWC036A2BDB6 Le manuel du propriétaire
-
Danby DWC93BLSDBR1 Manuel utilisateur
-
Danby DWC93BLSDB Owners Manual (PDF)
-
-
-
-
-
-
Danby DWC114BLSDD Manuel utilisateur
-