La page est en cours de chargement...

5771219COM
Nightstand
‐Unitcantipovercausingsevereinjuryordeath.
‐Anchorunittostudinwall(ifinstructedto).
‐DoNotallowchildrentoclimbonunit.
‐Putheavyitemsonlowershelvesordrawers.
B345771219COM0
THISINSTRUCTIONBO OKLETCONTAINS
IMPORTANT
SAFETYINFORMATION.PLEASEREADANDKEEPFORFUTUREREFERENCE.
WARNING
FollowAmeriwoodHome
Tube
You
DateofPurchase___/___/___
LotNumber:
DoNotReturnThisProduct!
Contactourcustomerserviceteamforhelpfirst.
Call:1‐800‐489‐3351(tollfree)
Monday‐Friday9am‐5pmCST
Visit:www.ameriwoodhome.com
AssemblyDifficultyMeter
Easy
Tough

ContactUs!
HelpfulHints
2
ameriwoodhome.com
DoNOTreturnthisproduct!
Contactourfriendlycustomerserviceteamfirstforhelp.
Callus!
1‐800‐489‐3351
Monday‐Friday
9am‐5pmCST
Visitameriwoodhome.comtoviewthe
limitedwarrantyvalidintheU.S.andCanada.
AssemblyTips
‐Openyouritemintheareayouplantokeepittoavoidexcessiveheav ylifting.
‐Identify,sortandcountthe partsbeforeattemptingassembly.
‐Compressiondowelsarelightlytappedinwithahammer.
‐Slidesarelabeledwitha
R
(right)and
L
(left)forproperplacement.
‐MakesuretoalwaysfacethepointonthetopoftheCamLock towar d sthe
outeredge.
‐Useallthenailsprovidedforthebackpanelandspreadthemou tequally.
‐Backpanelmustbeusedtomakesureyourunitissturdy.
‐Do
NOTuseharshchemicalsorabrasivecleanersonthisitem.
‐Neverpush,pull,ordragyourfurniture.
Tube
You
Tube
You
PEOPLENEEDEDFORASSEMBLY:1‐2
ESTIMATEDASSEMBLYTIME:1HOUR

3
ameriwoodhome.com
BeforeYouStart
Q
u
i
c
k
T
i
p
A
s
s
e
m
b
l
y
CamLockFasteningSystem
ThisCamLockFasteningSystem willbeusedthroughouttheassemblyprocess.
1
3
2
4
Tube
You
Readthrougheachstepcarefullyandfollowtheproperorder
Separateandcountallyourpartsandhardware
Giveyourselfenoughroomfortheassemblyprocess
Havethefollowingtools:FlatHeadScrewdriver,#2PhillipsHead
ScrewdriverandHammer
Caution:Ifusingapowerdrillorpowerscrewdriverforscr ewing,
pleasebeawaretoslowdownandstopwhenscrewistight.
Failuretodosomayresultinstrippingthescrew.

4
ameriwoodhome.com
BoardIdentification
Notactualsize
Tube
You
LeftPanel
35771015010
RightPanel
35771015020
Top
35771015030
Bottom
35771015040
Apron
35771015050
Kick
35771015060
LeftFrontLeg
35771015070
RightFrontLeg
35771015080
RightRearLeg
35771015100
LeftRearLeg
35771015090
DrawerFront
35771219110
DrawerBack
35771331120
DrawerBottom
35771331130
LeftDrawerSide
36858331220
RightDrawerSide
36858331230
BackPanel
K577101500
Thispieceispaperboardconstruction.
Itisnotmadefromwood,butis
requiredfortheassemblyof
yourunit.
A
B
C
D
E
F
G
H
I
J
K
L
M
X
V
W

5
ameriwoodhome.com
BoardIdentification
Notactualsize
Tube
You
A
B
C
D
E
F
G
H
I
J
K
L
M
V
W
X
Thispieceispaperboardconstruction.
Itisnotmadefromwood,butis
requiredfortheassemblyofyourunit.

6
ameriwoodhome.com
PartList
ActualSize
Tube
You
NotActualSize
(x8)
#A22570
cam lock
(x8)
#A22510
cam bolt
(x12)
#A22900
connector
(x12)
#A22910
connector bolt
(x4)
#A21660
wood dowel
(x10)
#A12120
7/16" pan head
(x4)
#A11600
1-1/4" flat head
(x10)
#A11080
7/16" flat head
(x8)
#A21110
nail
(x2)
#A54213
drawer bracket
(x1)
#A56770
drawer slide kit
leftcabinet
member
leftdrawer
member
rightdrawer
member
rightcabinet
member
1
2
3
4
5
6
7
8
9
10
11
11a
11b
11c
11d

7
ameriwoodhome.com
STEP
1
Tube
You
*rawedgesareshaded
B
Youwillneedtotapthe
connectorwithahammerto
fullyinsert.Besurethe
connectorispositionedas
shownbeforetappinginto
holes.
A
(x8)
#A22900
3
3
3
3
3
3
3
3
3

8
ameriwoodhome.com
STEP2
Tube
You
(x8)
#A22910
*rawedgesareshaded
J
I
H
G
Youwillusethelargerholesinthe rearlegs(I)(J)fortheconnectorbolts.
4
4
4
4
4
4
4
4
4

9
ameriwoodhome.com
STEP3
Tube
You
Turnscrewclockwise
tolockinplace
A
G
I
endview

10
ameriwoodhome.com
STEP
4
Tube
You
J
B
H
Turnscrewclockwise
tolockinplace
endview

11
ameriwoodhome.com
STEP
5
Proper orientation of CAM LOCK
Tip
Assembly
Quick
Tube
You
(x2)
#A22570
(x2)
#A22510
(x1)
#A21660
(x1)
#A56770
A
I
G
8
(x3)
#A11080
1
2
5
11a
8
2
2
1
1
8
8
Markedwith
a"L"
11a
5

12
ameriwoodhome.com
STEP
6
Proper orientation of CAM LOCK
Tip
Assembly
Quick
Tube
You
(x2)
#A22570
(x2)
#A22510
(x1)
#A21660
(x1)
#A56770
J
B
H
8
(x3)
#A11080
1
2
5
11d
8
2
2
5
8
8
1
1
11d
Markedwith
a"R"

13
ameriwoodhome.com
STEP
7
Tube
You
(x2)
#A22900
(x2)
#A22910
Youwillneedtotapthe
connectorwithahammerto
fullyinsert.Besurethe
connectorispositionedas
shownbeforetappinginto
holes.
E
F
4
3
4
3

14
ameriwoodhome.com
STEP8
Proper orientation of CAM LOCK
Tip
Assembly
Quick
Tube
You
D
F
(x4)
#A22570
(x2)
#A21660
Turnscrewclockwise
tolockinplace
1
5
1
1
1
1
5
5
endview

15
ameriwoodhome.com
STEP9
Tube
You
U
N
L
O
C
K
L
O
C
K
D
F
A
B
B
D

16
ameriwoodhome.com
STEP10
Tube
You
E
C
2
4
(x4)
#A22510
(x2)
#A22910
4
4
2
2
2
2

17
ameriwoodhome.com
STEP
11
Tube
You
U
N
LO
C
K
L
O
C
K
E
C
A
B

18
ameriwoodhome.com
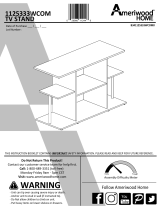
STEP12
Tube
You
(x8)
#A21110
IMPORTANT!
THEBACKPANELISASTRUCTURALPARTOFTHISUNIT
ANDMUSTBEINSTALLEDPROPE RLY.
*rawedgesareshaded
Withthehelpofanother person,
carefullyturntheunitover.
Attachthebackpanelasshownnailing
straightintotherawedges.
Attachthebackpanelsothat
thebottomedgeisevenwith
thebottomandalignedside
toside.
Note that screws holes
should line up with holes in rear
legs. Use nails along the top
and bottom edge. Use screws
only along the sides.
Assurethattheunitissquare.
Distancefromcornertocorner
mustbeequalasshown.
(x6)
#A12120
X
J
I
D
6
6
9
9

19
ameriwoodhome.com
STEP13
Tube
You
V
W
(x2)
#A54213
10
10
10
bracketorientation
bracketorientation

20
ameriwoodhome.com
STEP
14
Tube
You
K
V
W
(x4)
#A12120
6
6
6
6
6
/