
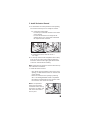
Mortar
Glass Block
Installation System
assembly
instructions
www.sevesglassblock.com
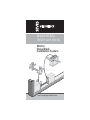
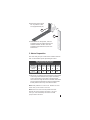
GLASSBLOCK

Seves Glass Block
Mortar Glass Block Installation System
Assembly Instructions
Introduction:
The Mortar I System utilizes Seves Glass Block perimeter
channels on all four sides. You will also use Universal
Mortar Spacers and glass block mortar to produce clean,
consistent 1/4" joints and a traditional grid look.
The Mortar II System does not use the Seves Glass Block
perimeter channels but instead utilizes expansion strips,
panel reinforcing and panel anchors. You will also use
Universal Mortar Spacers and glass block mortar to produce
clean, consistent 1/4" joints and a traditional
grid look.
Here is additional information about each method.
Mortar I: (page 3)
• This method is designed for use with
Seves Glass
Block
4-in (4" thick) and 3-in (3" thick) Series Glass
Block.
• The installation recommendations are for small
residential panels of 25 sq. ft. or less.
• Not for use in constructing curved glass block walls.
• Interior and exterior panels must be framed on all
four sides.
Note: This method is not to be used in constructing
curved glass block applications. All glass block panels
are non-load bearing, so adequate provisions must be
made for support of construction around the panel.
Mortar II: (page 14)
• This method is designed for use with
Seves Glass Block
4-in (4” thick) and 3-in (3” thick) Series Glass Block.
• The installation recommendations may be used for
interior or exterior residential panels larger than 25
sq. ft.
• This method may be used to install projects framed
on two, three, or four sides.
• 4-in Series - Panel size limitations - Interior (250 sq.
ft. max) and *Exterior (144 sq. ft. max.).
• 3-in Series - Panel size limitations - Interior (150 sq.
ft. max.) and *Exterior (85 sq. ft. max.).
* Exterior panel size limitations are based on a 20
PSF (pounds per square foot). For higher windloads
consult local building codes or call Seves Glass Block at
1-877-SEVES11 (738-3711).
1

Note: All glass block panels are non-load bearing,
so adequate provisions must be made for support of
construction around the panel.
The joints of the Mortar I and Mortar II Systems utilize
DWUDGLWLRQDOLQVWDOODWLRQPHWKRGXVLQJDPRUWDUÀQLVK
for the classic “grid” look. Glass block sealant should
be used to seal the perimeter on both sides of the
panel.
Before you begin installing your glass blocks, decide
which installation method is right for your project.
The materials required for Mortar System glass block
installation are:
1. Seves Glass Block 3-in or 4-in Series Glass Block
2. Universal Mortar Spacers
3. Perimeter Channels - 4-in (4") or 3in (3")
(Mortar I System)
4. Expansion Strips
[]LQFSODWHGÁDWKHDGVFUHZVDSSUR[
three per lineal foot of perimeter channel)
(Mortar I System)
6. Panel reinforcing (Mortar II System)
7. Panel anchors (Mortar II System)
8. #12 x 1" zinc-plated pan head screws
(Mortar II System)
9. Glass Block white premixed mortar
10. Glass Block Sealant
11. White touch up paint (Mortar I System)
12. Latex paint, Weldbond
®
adhesive, or asphalt
emulsion depending upon application.
(Mortar II System)
2

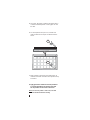
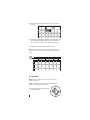
C. Measure the opening
diagonally from corner to
corner in both directions, and
compare the dimensions to
check for squareness. These
dimensions should be equal to
within 1/8".
Note: If there are any problems with
the opening, make adjustments before
proceeding.
Mortar I System
The tools required for the Mortar I glass block
installation system are a margin trowel, mortar pan,
polyfoam brush, sponge, tin snips, screwdriver or power
GULOOÀQHWRRWKVDZRUPLWHUVDZFDXONLQJJXQXWLOLW\
NQLIHPHWDOÀOHWDSHPHDVXUH
"
to 1/2" striking tool
and 2' level.
sure the opening is level
and plumb.
1B
1C
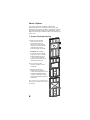
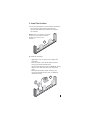
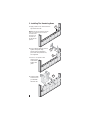
1. Prepare The Rough Opening
A. Make sure the opening
is the correct size. To
determine the correct
size of the rough opening,
add 1/4" to the sum of the
nominal block sizes for
both the height and width.
Example: Panel (using
8" x 8" block) is four block
wide (8 x 4 + 1/4" = 32-1/4")
DQGÀYHEORFNKLJK[
+ 1/4" = 40-1/4"). Rough
opening needs to be 32-1/4"
wide and 40-1/4" high.
B. Use a level to make
1A
3

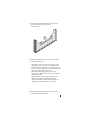
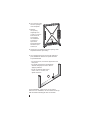
C. Install the bottom channel:
• The channel may be installed in the center of the
RSHQLQJRUÁXVKZLWKWKHLQWHULRURUH[WHULRUVLGH
of the opening.
• Attach the channel to the opening by inserting
[ÁDWKHDGJDOYDQL]HGVFUHZVRUHTXLYDOHQW
through the predrilled holes in the channel. Insert
two screws in each end of the channel.
Note: If the predrilled
holes at the ends were
trimmed off when cutting
the channel to length, drill
new ones at the ends of
the cut piece.
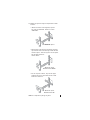
2. Install Perimeter Channel
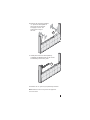
$&XWWKHFKDQQHOWRÀWWKHSHULPHWHURIWKHRSHQLQJ
The channel ends may be cut straight or mitered.
a. If cutting the ends straight:
• Cut the top and bottom channels to the width
of the opening.
• Cut the side channels to the height of the
RSHQLQJPLQXVVRWKH\ZLOOÀWEHWZHHQ
the top and bottom channels.
b. If mitering the ends, make all cuts at a
45° angle.
45°
2C
B. Cut the top channel in half lengthwise with a utility
knife. Score the center groove with the knife and
break the channel in half. Apply glass block sealant
to back of channel before installing.
Note: Cutting the top channel in half will allow the top
row of blocks to be installed.
4

5
F. Paint all of the screw heads white to reduce
their visibility.
D. Install the side channels in the same manner
making sure they are plumb before attaching with
screws.
Note: You may want to slide a glass block into the
bottom channel at both corners to make sure the side
channels are aligned with the bottom channel.
3.
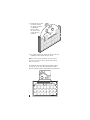
Preparation of Universal Mortar Spacers
A. Assemble the spacers for the series of block you
are installing. The spacers come in
two halves, snap the spacers
WRJHWKHUWRÀWWKHZLGWKRI
the block.
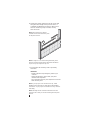
E. Install the half top channel:
• Place the half channel in the
top of the opening making
sure it is aligned with the
side channels.
• Attach the channel to the
opening by inserting #6 x 1"
ÁDWKHDGJDOYDQL]HGVFUHZV
through the predrilled holes
in the channel. Insert a
screw at each end of the
channel.
•On exterior windows, the
screwed in half channel
should always be the exterior side.
Note: If the predrilled hole at the end was trimmed
off when cutting the channel to length, drill a new
one at the end of the cut piece.
2E
3A

6
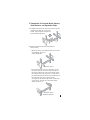
Note: ,WLVLPSRUWDQWWRÀOHRIIDQ\EXUUV
B. Modify the spacers using tin snips based on their
location:
• Where four block come together, spacers
are used as assembled. These are called
“REGULAR”.
“REGULAR” Spacer
•Where block meet the side perimeter channel,
clip off both sets of smooth legs. Twist-off tabs
remain in place. File off any burrs so the spacer
ZLOOOD\ÁDW7KHVHDUH
called “FLAT”.
“REGULAR” Spacer
0RGLÀHG&DOOHG“FLAT”
•For the top row of block, clip off one upper
toothed leg and cut the twist off tab in half.
These are called “H”.
“REGULAR” Spacer
0RGLÀHG&DOOHG“H”

7
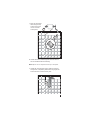
This is a reference guide for where “REGULAR” and
PRGLÀHGVSDFHUVDUHXVHG
= “REGULAR” Spacer
= “FLAT” Spacer
= “H” Spacer
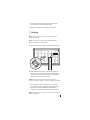
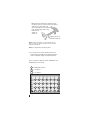
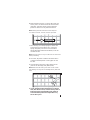
4. Mortar Preparation
The following gives an idea of the number of blocks
that can be installed per 50 pound bag of mortar.
A. Mix mortar according to the instructions on the
premix mortar bag. When mixed to the proper
consistency, mortar should stick to the edge of the
glass block when turned on edge. Be sure to read
and understand all precautions outlined by the
mortar manufacturer. Freshly mixed mortar may
cause skin irritation.
Note: Slowly add water to mortar mix. DO NOT mix
more mortar than you can install in one hour.
Note: Avoid direct contact when possible and wash exposed
skin areas promptly with water. If any gets into eyes, rinse
immediately with water and seek prompt medical attention.
White Premixed Glass Block Mortar
Block Sizes
(Nominal)
4" x 8" 6" x 6" 6" x 8" 8" x 8" 12" x 12"
No.of 4-inSeries
(4"thick)
Based on 1/4" mortar joints
34 34 30 26 18
No.of 3-inSeries
(3"thick)
42 42 36 32 N/A
Number of blocks per 50 lb. bag of mortar

8
5. Install The First Row
A. Place two glass blocks in the sill channel, sliding one
block into the right jamb and one block into
the left jamb. Make sure the blocks are seated in
the channels.
Note: No mortar is applied to the edges
of the blocks that meet the channel.
DO NOT apply mortar to the
channels.
5A
B. Install the next block:
•Apply 3/8" to 1/2" of mortar to the edge of the
next block.
•Place the block in the channel with the mortar
facing a previously installed block.
•As you install the block, insert a “REGULAR” spacer
with the cross arm down where the two blocks
meet.
3XVKWKHEORFNÀUPO\LQSODFHIRUPLQJD
mortar joint. Make sure the joint is completely
ÀOOHGZLWKPRUWDU
5B

9
&,QVWDOOWKHUHPDLQLQJEORFNVLQWKHÀUVWURZLQWKH
same manner.
•Apply 3/8" to 1/2" of mortar to both edges of the
last block installed in the row.
•Be sure to insert “REGULAR” spacers with the cross
arm down, where two blocks meet.
3XVKWKHEORFNVÀUPO\
in place, forming
1/4" mortar joints.
Make sure
the joints are
FRPSOHWHO\ÀOOHG
with mortar.
5C
5D
D. Remove excess mortar with a polyfoam brush,
DQGÀOODQ\YRLGVRQERWKVLGHVRIWKHSDQHO
%3ODFHD´)/$7µVSDFHURQWRSRIWKHÀUVWDQGODVW
block of the previous row where they meet the side
channels.
6. Install The Remaining Rows
$$SSO\DWRPRUWDUEHGRQWRSRIWKHÀUVW
row.
Note: Be careful to keep
the smooth legs of the
spacers free of mortar
to ensure that the
next row of block
ZLOOVLWÁDWRQWKH
spacers.
6B
6A

10
&6HWWKHÀUVWEORFNDQGODVWEORFNRIWKHQH[WURZ
into the side channels on top of the
“FLAT” spacers.
D. Install the remaining blocks in the row in the same
PDQQHUDVWKHÀUVWURZ
•Apply 3/8" to 1/2" of mortar to the edge of each
block that meets a previous block. Apply mortar
to both edges of the last block installed in the row.
•Be sure to insert “REGULAR” spacers with the cross
arm down, where two blocks meet.
3XVKWKHEORFNVÀUPO\LQSODFHIRUPLQJ
mortar joints. Make sure the joints are completely
ÀOOHGZLWKPRUWDU
•Remove excess mortar with a polyfoam brush,
DQGÀOODQ\YRLGVRQERWKVLGHVRIWKHSDQHO
•Check periodically to ensure that the blocks are
straight, level and plumb. Adjust as needed.
E. Repeat Steps 6A - 6D to install each row of block,
except for the next to last row.
6C

11
F. Install the next to last
row of block using
“H” spacers in place
of “REGULAR”
spacers. Insert
“H” spacers and
“FLAT” spacers
as shown.
6F
G. Lay a bed of mortar on top of the next to last row,
installing “FLAT” spacers at each corner.
Note: For ease of block placement, you may want to
snap off the tab of the “FLAT” spacer before placing
both corner blocks.
H. Install the last row of block starting with a block
in each top corner, then work toward the middle.
Be sure to apply mortar to both sides of the last block.
6G
6H

12
I. Press any mortar that has been forced out back
into the joints using a polyfoam brush.
J. Remove all mortar from the glass block faces.
7. Finishing
Note: Allow the mortar to set up for about one hour
before proceeding.
Note: To prevent scratching of the glass DO NOT use
abrasive materials for this cleanup.
A. Twist off the spacer tabs on both sides of the panel.
B. With moderate pressure, run the striking tool over
all the joints. It is best to strike all the horizontal
MRLQWVÀUVWWKHQWKHYHUWLFDOMRLQWVVRWKHSDWWHUQLV
uniform. Fill any voids with mortar.
Note: Striking removes excess mortar and compacts
the joint to create a smooth, concave, moisture-proof seal.
C. Use a damp sponge to remove the excess mortar
from the block face, rinsing the sponge frequently.
'RQRWEHFRQFHUQHGDERXWWKHGU\ÀOPWKDW
remains on the blocks, it will be cleaned off later.
Note: Allow the mortar to dry for about two to three hours
before proceeding.
7A
7B

13
'8VHDVRIWGU\FORWKWRUHPRYHWKHH[FHVVÀOP$
common household plastic scouring pad can also
be used.
E. Cut the expansion strip to a 1-1/2" width and
insert it between the top of the blocks and the
frame.
F. Apply sealant to the back of the half-section of
channel and install it between the expansion strip
and frame.
G. Apply glass block sealant around the perimeter
to seal the glass block and channel. Also seal
the top channel to the frame at the head.
Note: For exterior panels or wet areas, also seal
where the channels meet the framing.
7E
7F
7G

14
1.Prepare The Rough Opening
Note: For those glass block applications that begin at
ÁRRUOHYHOZHUHFRPPHQGWKDW\RXPDNHDFXUEEDVH
as wide as the glass block being used. This will help
protect the bottom row of glass block from damage
(vacuum cleaners, mops, etc.).
Mortar II System
The tools required for the Mortar II glass block
installation system are a margin trowel, mortar pan,
2 polyfoam brushes, sponge, tin snips, screwdriver
RUSRZHUGULOOFDXONLQJJXQXWLOLW\NQLIHPHWDOÀOH
tape measure, 3/8" to 1/2" striking tool, 2' level and
rubber mallet.
A. Make sure the opening is the correct size. To
determine the correct size of the rough opening,
add 1/2" to the sum of the nominal block sizes for
both the height and width.
Example: Panel (using 8" x 8" block) is fourteen block
wide (8 x 14 + 1/2" = 112-1/2") and ten block high (8 x
10 + 1/2" = 80-1/2"). Rough opening needs to be
112-1/2" wide and 80-1/2" high.
1A

15
B. Use a level to make
sure the opening is
level and plumb.
C. Measure
the opening
diagonally from
corner to corner in
both directions,
and compare
the dimensions
to check for
squareness.
These dimensions
should be equal
within 1/8".
D. If there are any problems with the opening, make
adjustments before proceeding.
If using Weldbond
®
, apply mortar to the surface
before it cures. Otherwise, let the treated area set up
DQGFXUHEHIRUHLQVWDOOLQJWKHÀUVWURZRIEORFN
1C
1B
E. Use a polyfoam brush to treat the sill with latex
paint, Weldbond
®
adhesive or asphalt emulsion
DVVSHFLÀHGEHORZ
•For wood interior, non-shower applications use
latex paint.
•For shower applications use Weldbond
®
adhesive. Rough up the surfce before
applying adhesive.
•For all commercial applications,
metal, brick or concrete, use
asphalt emulsion.
1E

16
•For the two bottom corners of the panel, orient
the spacer with the cross arm down and clip off
the upper toothed legs. Clip off the upper half of
the twist-off tabs. Cut off the left or right side of
the remaining twist-off tab and the smooth legs on
the same side. Only two of these spacers
are required. Clip off the right set of smooth legs
of one spacer, the left set of the other spacer.
These are called “L”.
2.
Preparation of Universal Mortar Spacers,
Panel Anchors, and Expansion Strips
A. Assemble the spacers for the series of block you are
installing. The spacers come in two
halves, snap the spacers together to
ÀWWKHZLGWKRIWKHEORFN
2A
B. Modify the spacers using tin snips based on
their location:
•Where four block come together spacers are used
as assembled. These are
called “REGULAR”.
“REGULAR” Spacer
“REGULAR” Spacer
0RGLÀHG&DOOHG“L”

17
Note: Prepare a supply of “T” spacers before you
start, so that your panel construction can continue
without interruption.
Note:,WLVLPSRUWDQWWRÀOHRIIDQ\EXUUV
C. Dry construct your panel (without mortar) to
HQVXUHWKDW\RXUEORFNÀWVWKHRSHQLQJDQG\RX
have an adequate supply of prepared spacers.
This is a reference guide for where “REGULAR” and
PRGLÀHGVSDFHUVDUHXVHG
•Where glass block meet the jambs and curb,
(except for the four corners) orient the spacer
with the cross arm down and
clip off the upper set of toothed
legs, and the upper half of the
twist-off tab.
These are
called “T”.
“REGULAR” Spacer
0RGLÀHG&DOOHG“T”
= “REGULAR” Spacer
= “L” Spacer
= “T” Spacer

18
3. Mortar Preparation
This chart will give you an idea of the number of blocks
that can be installed per 50 pound bag of mortar.
A. Mix mortar according to the instructions on the premix
mortar bag. When mixed to the proper consistency,
mortar should stick to the edge of the glass block
when turned on edge. Be sure to read and understand
all precautions outlined by the mortar manufacturer.
Freshly mixed mortar may cause skin irritation.
Note: Slowly add water to mortar mix. DO NOT mix more
mortar than you can install in one hour.
Note: Avoid direct contact when possible and wash
exposed skin areas promptly with water. If any gets
into eyes, rinse immediately with water and seek
prompt medical attention.
4
°
2D
E
X
P
A
N
S
I
O
N
S
T
R
I
P
2E
White Premixed Glass Block Mortar
Block Sizes
(Nominal)
4" x 8" 6" x 6" 6" x 8" 8" x 8" 12" x 12"
No.of 4-inSeries
(4"thick)
Based on 1/4" mortar joints
34 34 30 26 18
No.of 3-inSeries
(3"thick)
42 42 36 32 N/A
Number of blocks per 50 lb. bag of mortar
D. Bend each panel anchor
90° to produce a short
arm (approximately 4").
E. With scissors or utility knife, trim the
expansion strip for length based on the
distance between anchors. Trim the
expansion strip width to 2-1/8" for 3-in
Series block.

19
4. Install The First Row
Note: If your project is framed on 3 or 4 sides, complete
Steps A thru K. If your project is framed on 2 sides, skip
to Step L.
A. Using a trowel apply
approximately a 1/2"
mortar bed to
the treated
curb or
ÁRRU
%:LWKRXWDSSO\LQJDQ\PRUWDUWRWKHÀUVWEORFNSODFH
an “L” spacer at the lower outside corner of the
block so that the spacer cross arm will be at the
bottom, between the glass block and the curb.
C. Place a “T” spacer at the other lower corner of the
block with the spacer cross arm up.
D. Slip a 16" long piece of trimmed expansion
strip between the block and jamb, and push
WKHEORFNÀUPO\LQWRSODFH
E. Slip a “T” spacer between
the block and jamb so that
the cross arm is on top of
the block.
4A
4B
4C
4D
4E
La page est en cours de chargement...
La page est en cours de chargement...
La page est en cours de chargement...
La page est en cours de chargement...
La page est en cours de chargement...
La page est en cours de chargement...
La page est en cours de chargement...
La page est en cours de chargement...
La page est en cours de chargement...
La page est en cours de chargement...
La page est en cours de chargement...
La page est en cours de chargement...
-
 1
1
-
 2
2
-
 3
3
-
 4
4
-
 5
5
-
 6
6
-
 7
7
-
 8
8
-
 9
9
-
 10
10
-
 11
11
-
 12
12
-
 13
13
-
 14
14
-
 15
15
-
 16
16
-
 17
17
-
 18
18
-
 19
19
-
 20
20
-
 21
21
-
 22
22
-
 23
23
-
 24
24
-
 25
25
-
 26
26
-
 27
27
-
 28
28
-
 29
29
-
 30
30
-
 31
31
-
 32
32


dans d''autres langues
- English: Design It 111960C Installation guide
Autres documents
-
Clearly Secure PVHALF4 Manuel utilisateur
-
LAMONA WOH9804 Mode d'emploi
-
 American Olean GS7126BJMSCC1U Guide d'installation
-
daltile 0000HDCHIPML63 Guide d'installation
-
Unbranded RE15416WAVHD1P2 Guide d'installation
-
York Water Source Heat Pump and Heat Recovery Outdoor Units 208-460V Guide d'installation
-
Braun Mobility Aid 32899 Rev A Manuel utilisateur
