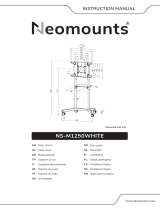
Neomounts NS-FS100BLACK Manuel utilisateur
- Taper
- Manuel utilisateur

NS-FS100BLACK
IT
EN
NL
DE
FR
ES
PT
DK
Floor stand
Vloersteun
Bodenständer
Support au sol
Supporto da pavimento
Soporte de suelo
Suporte de chão
Gulvstander
NO
SE
FI
PL
CS
SK
RO
Gulv stativ
Golvstativ
Lattiateline
Stojak podłogowy
Podlahový stojan
Podlahový stojan
Stativ pentru podea
WWW.NEOMOUNTS.COM
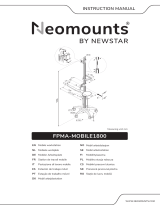
INSTRUCTION MANUAL
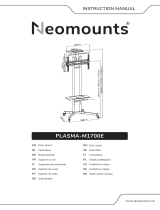
30°
0°
100mm
75mm
300mm
400mm
200mm
100mm
75mm
200mm
300mm
400mm
502mm
454mm
min750mm-max1240mm
Ø32mm
Ø38mm
428mm
428mm

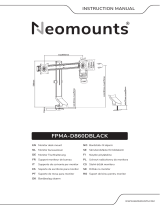
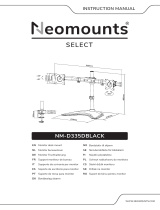
PARTS
NS-FS100BLACK
Tool
Assemble the base
Monteer de voet
Montieren Sie die Basis
Assemblez la base
Montare la base
Montar la base
Montar a base
Złóż podstawę
EN
NL
DE
FR
IT
ES
PT
PL
75x75 -
400x400 mm
75-124 cm
0-20 kg
A. (x1)
D. (x1)
N. (x1) O. (x1)
E. (x2) F. (x2) G. (x1) H. (x8) I. (x5) J. (x5) K. (x5)
M-E. (x4) M-F. (x4) M-G. (x8)
L. (x1) M. (x4)
B. (x2) C. (x1)
M-A. (x4)
M4x14mm
M-B. (x4)
M5x14mm
M-C (x4)
M6x14mm
M-D (x4)
M8x20mm
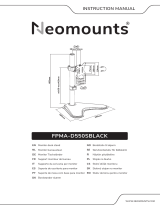
STEP 1
A
I
J
K
O
B

Place the decorative cover and place the inner pole
back again
Plaats de decoratieve afdekkap en plaats de binnen-
stang terug
Bringen Sie die dekorative Abdeckung an und legen
Sie den innere Stange wieder zurück
Placez le couvercle décoratif et remettez le poteau
intérieur en place
Posizionare il coperchio decorativo e ricollocare l'asta
interna
Coloca la cubierta decorativa y vuelve a colocar el
poste interior
Colocar a tampa decorativa e voltar a colocar o pólo
interior
Załóż pokrywę dekoracyjną i ponownie umieść słupek
wewnętrzny
EN
NL
DE
FR
IT
ES
PT
PL
Remove the screws and pull out the inner pole
Draai de schroeven los en trek de binnenstang
uit de buitenstang
Entfernen Sie die Schrauben und ziehen Sie
die innere Stange heraus
Retirez les vis du tube inférieur et enlevez le
tube supérieur
Rimuovere le viti ed estrarre il palo interno
Quite los tornillos y saque el poste interior
Remova os parafusos e puxe o tubo interno
Wykręć śruby i wyciągnij wewnętrzną słupek
EN
NL
DE
FR
IT
ES
PT
PL
STEP 2
STEP 3
O
O
N
N
G

Attach the pole to the base
Bevestig de stang aan de voet
Befestigen Sie die Stange an der Basis
Fixez le tube sur la base
Attaccare il palo alla base
Adjunte el poste a la base
Anexe o tubo à base
Przymocuj słupek do podstawy
EN
NL
DE
FR
IT
ES
PT
PL
Attach the VESA plate to the screen
Bevestig de VESA plaat aan het scherm
Befestigen Sie die VESA-Platte am Bildschirm
Fixez la plaque VESA sur l'écran
Collegamento del piatto VESA al monitor
Coloque la placa VESA en la pantalla
Colocar a placa VESA no monitor
Montaż płytki VESA do monitora
EN
NL
DE
FR
IT
ES
PT
PL
STEP 4
N
I
M
OKJ
A
STEP 5
* Not Included
VESA 75x75/200x200 mm
M-A
M-B
M-E

Install the adapter brackets and attach the combination
to the screen
Bevestig de adaptersteunen en bevestig de combinatie
aan het scherm
Montieren Sie die Adapterhalterungen und befestigen
Sie die Kombination an den Bildschirm
Installez les supports d'adaptation et fixez la combinai-
son à l'écran
Installare le staffe di adattamento e fissare la combina-
zione allo schermo
Instale los soportes adaptadores y fije la combinación a
la pantalla
Instale os suportes do adaptador e fixe a combinação ao
ecrã
Zainstaluj wsporniki adaptera i przymocuj kombinację
do ekranu
EN
NL
DE
FR
IT
ES
PT
PL
E
F
H
E
F
* Not Included
400mm
400mm
VESA 300x300/400x400 mm
M-A
M-B
M-C
M-D
M-E M-F
M-D M-D
M-F M-F
M-G M-G
B
STEP 5

L
Attach the screen to the bracket and secure it
Bevestig het scherm op de beugel en zet vast
Befestigen Sie den Bildschirm an der Halterung
und sichern Sie ihn
Attachez l'écran au support et fixez-le
Fissare lo schermo alla staffa e fissarlo
Coloque la pantalla en el soporte y fíjela
Fixar o ecrã ao suporte e fixá-lo
Przymocuj ekran do uchwytu i zabezpiecz go
EN
NL
DE
FR
IT
ES
PT
PL
Adjust the mount to the desired position
Stel de steun in op de gewenste positie
Stellen Sie die Stütze in die gewünschte Position
Réglez le support dans la position souhaitée
Regolare il supporto nella posizione desiderata
Ajuste el soporte a la posición deseada
Ajustar o suporte à posição desejada
Ustawić podporę w żądanej pozycji
EN
NL
DE
FR
IT
ES
PT
PL
STEP 6
STEP 7
L
O
O
-3° +3°
0°
30°


-
 1
1
-
 2
2
-
 3
3
-
 4
4
-
 5
5
-
 6
6
-
 7
7
-
 8
8


Neomounts NS-FS100BLACK Manuel utilisateur
- Taper
- Manuel utilisateur
dans d''autres langues
- español: Neomounts NS-FS100BLACK Manual de usuario
- português: Neomounts NS-FS100BLACK Manual do usuário
Documents connexes
-
 Neomounts NS-M1250WHITE Manuel utilisateur
-
 Neomounts PLASMA-M1700E Manuel utilisateur
-
 Neomounts FPMA-D860DBLACK Manuel utilisateur
-
 Neomounts FPMA-MOBILE1700 Manuel utilisateur
-
 Neomounts FPMA-D550SBLACK Manuel utilisateur
-
Neomounts FPMA-HAW050 Manuel utilisateur
-
 Neomounts FPMA-MOBILE1800 Manuel utilisateur
-
Neomounts WL70-550BL14 Manuel utilisateur
-
 Neomounts NM-D335DBLACK Manuel utilisateur
-


