


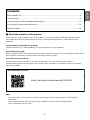
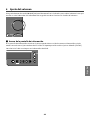
■ About the manuals of this product
Three manuals are provided for users of this product, including the Safety Guide, Quick Guide and the
User Guide. Be sure to read each of these manuals, and keep them together in a safe place for future
reference.
Safety Guide (included with this product)
Explains the necessary “PRECAUTIONS” you must take when using this product.
Quick Guide (this guide)
Explains about the basic connections and operations required aer you purchase this product. Refer to the
User Guide for connections and operations not explained in this guide.
User Guide (Yamaha website)
Explains about all of this product’s functions and features. This also includes information on
troubleshooting and firmware updates. User Guide is only available via our website. Access this content
from the link below.
User Guide Online version
https://manual.yamaha.com/av/22/hal7a/
Note
• The explanations in this Guide are written according to the latest specifications as of the date of
publication.
• You can download the latest version of each guide (PDF) from the website shown below.
https://download.yamaha.com/
Contents
Please Read First .......................................................................................................................... 4
Getting ready ............................................................................................................................... 5
Listening to music (basic playback operations) ...................................................................... 11
Listening with your preferred sound ........................................................................................ 14
Other functions .......................................................................................................................... 16
3
EnglishРусский

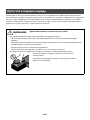
Please Read First
Thank you for purchasing this Yamaha product. The HA-L7A is a standalone headphone amplifier that lets
you listen to the audio from devices that are connected to this unit via digital/analog connection, and can
play back high-definition audio from a computer that’s connected to this unit via USB. You can play back
audio through headphones and through an external amp.
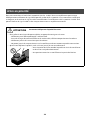
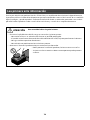
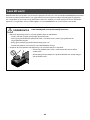
CAUTION This content indicates risk of injury.
• To prevent hearing loss, observe the following points.
• Do not listen at high volumes for an extended period of time.
• When switching between audio input sources or output destinations, temporarily turn down the
volume.
• Do not make sudden changes in volume.
• Do not turn this product on while you are wearing headphones.
• Do not move around or pick up the product while holding the transformer unit.
• You might drop the product, injuring yourself or causing a
malfunction.
• Applying excessive force to this part may cause it to break.
4

Getting ready
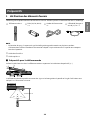
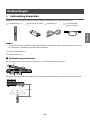
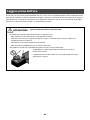
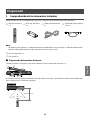
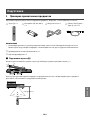
1 Checking the included items
The following items are included with this product. Make sure that everything is present.
Remote control × 1
Batteries (AA, R6, UM-3)
× 2
Power cord × 1
USB cable (Type-A to
Type-B), 1.5 m × 1
NOTE
• There may be more than one power cord included with this product in certain regions. Use the cord
that’s appropriate for the power outlet where you will use it.
Safety Guide × 1
Quick Guide × 1
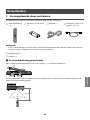
■ Getting the remote control ready
Insert the included batteries into the remote control in the correct orientation (+/−).
The remote control for this product transmits infrared signals, which operate within the range shown in the
following illustration.
30° 30°
Within 6 m
5
EnglishРусский

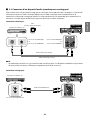
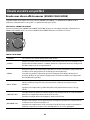
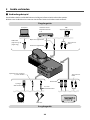
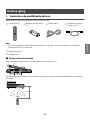
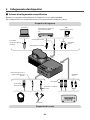
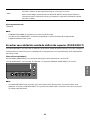
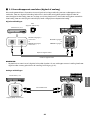
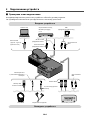
2 Connecting your devices
■ Sample connection diagram
This is an example of how to connect various devices and cables to this product.
Refer to the User Guide when connecting to an external amp.
Input devices
Output devices
Computer Satellite tuner,
BD/DVD recorder,
etc.
DAP
(Digital Audio Player)
USB cable
(Type-A to Type-B)
(included)
Optical digital cable
Coaxial digital cable
Stereo RCA
cable
Stereo RCA
cable
XLR3 cable
6.3 mm standard
plug
Balanced 4.4 mm
five-conductor plugs
XLR 4-pin plug
Headphones Earphones External amp
6

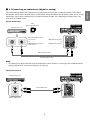
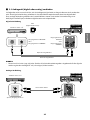
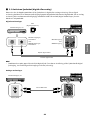
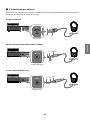
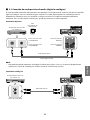
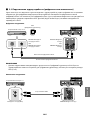
■ 2-1 Connecting an audio device (digital or analog)
This shows how to connect this product to an audio device via digital or analog connection. For a digital
connection, you’ll need a commercially available optical digital cable or coaxial digital cable. For an analog
connection, you’ll need a commercially available stereo RCA cable. For a DAP (Digital Audio Player), you
may need an adaptor cable.
Digital connections
COAXIALOPTICAL
Satellite tuner, etc.
DAP
(Digital Audio Player)
OPTICAL Output jacks/
connectors
or
COAXIAL Output jacks/
connectors
Optical digital cable
Coaxial digital cable
OPTICAL Input jacks
or
COAXIAL Input jacks
NOTE
• This product can play back two-channel PCM digital audio. If there is a setting on your audio device for
digital audio output, use the PCM output (2 ch) setting.
Analog connections
Satellite tuner, etc.
Output (RCA) jacks ANALOG Input jacks
Stereo RCA cable
7
EnglishРусский

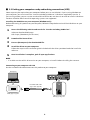
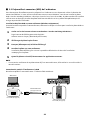
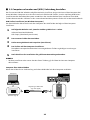
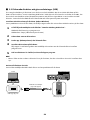
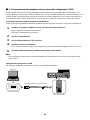
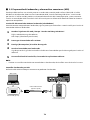
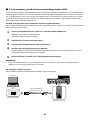
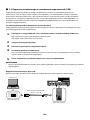
■ 2-2 Getting your computer ready and making connections (USB)
Some steps may be required on your computer before you can use USB DAC. If you’re using Windows on
your computer, you must install the “Yamaha Steinberg USB Driver” USB driver supplied by Yamaha. If
you’re using macOS, you can use the standard driver for the OS, and there is no need to install a USB driver.
See User Guide for details on which operating systems are supported.
Installing the USB driver on your computer (Windows only)
Before connecting this product to your computer, follow the steps below to install the USB driver on your
computer.
1 Access the following website and search for “Yamaha Steinberg USB Driver”.
Soware download Web page:
URL: https://download.yamaha.com/
2 Download the latest driver.
3 Extract (decompress) the downloaded file.
4 Install the driver on your computer.
Follow the steps in the installation guide included with the driver you downloaded to install the
soware.
5 Once installation is complete, quit all open applications.
NOTE
• If an older version of this driver exists on your computer, uninstall it before installing the new one.
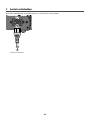
Connecting to your computer via USB
Use the included USB cable to connect this product to your computer.
USB
Computer
USB (Type-A) port
USB (Type-B) port
Included USB cable
(Type-A to Type-B)
8

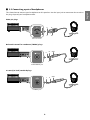
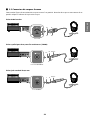
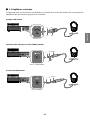
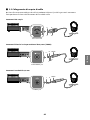
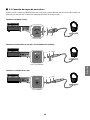
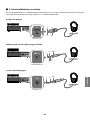
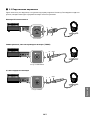
■ 2-3 Connecting a pair of headphones
This shows how to connect your headphones to this product. Use the input jack or connector that matches
the plug shape of your headphone cable.
XLR 4-pin plugs
R− R−
L+ L+
R+ R+
L− L−
XLR connector
Balanced 4.4 mm five-conductor (TRRRS) plugs
R−
L+ R+
L−
GND
4.4 BALANCED jack
6.3 mm (1/4-inch) standard plugs
PHONES jack
LRGND
9
EnglishРусский

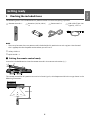
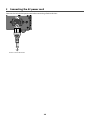
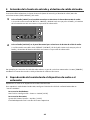
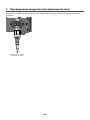
3 Connecting the AC power cord
Connect the included AC power cord aer connecting all other devices.
Connect to the AC outlet
10

Listening to music (basic playback operations)
This explains the basic operations for listening to audio (such as music) from your audio device or
computer on this product. The following steps show you how to do this from the operating panel on top of
this product. See User Guide for details on how to use the remote control.
1 Turning on the audio device or computer
Turn on the power of the audio device or computer that’s connected to this product.
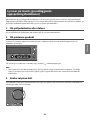
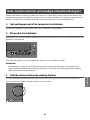
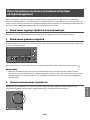
2 Turning on this product
Press the [z] power button on the operating panel. The indicator to the le of the power button lights up
when the power is on.
To turn o the power (standby), press the [z] power button again.
NOTE
• The auto power standby feature on this product automatically turns o the power (standby) when the
unit is not operated and nothing is played back for 20 minutes. See User Guide for details.
3 Turning the volume all the way down
Turn the [VOLUME] knob on the operating panel all the way down (counterclockwise) to minimize the
volume (the indicators encircling the knob should be unlit).
11
EnglishРусский

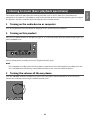
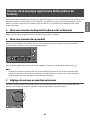
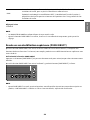
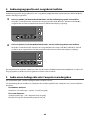
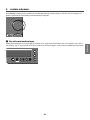
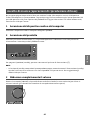
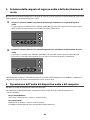
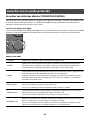
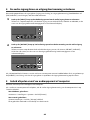
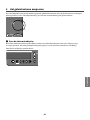
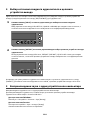
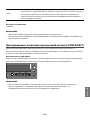
4 Selecting the audio input source and output destination
This shows how to select the input source (input jack) and output destination (headphones jack or
[PRE/LINE OUT] jacks) for the audio.
1 Press the [INPUT] button on the operating panel to select the audio input source.
The input switches between USB, OPTICAL, COAXIAL and ANALOG each time you press the button,
and the input source name is shown in the information display.
2 Press the [OUTPUT] button on the operating panel to select the audio output destination.
The output switches between, HP 6.3mm, PRE OUT (LINE OUT), HP XLR and HP 4.4mm each time
you press the button, and the output destination name is shown in the information display.
For example, to listen to your computer’s audio in a pair of headphones plugged into the [PHONES] jack,
set the input source to USB and the output destination to HP 6.3mm.
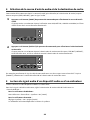
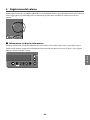
5 Playing back sound from your audio device or computer
Play back the audio on your audio device or computer.
To play back audio from your computer, set the computer’s audio output destination to “Yamaha USB DAC”.
For Windows users:
Start menu > Settings > System > Sound [Output]
For macOS users:
System Settings > Sound > [Output] tab
The method to use depends on the OS version.
12

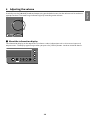
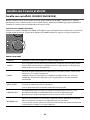
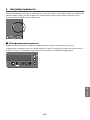
6 Adjusting the volume
Gradually turn the [VOLUME] knob on the operating panel clockwise to raise the volume until it reaches an
appropriate level. The knob range indicators light up according to the volume.
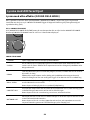
■ About the information display
The information display on the top of this unit shows various information such as the current input and
output names. The display type changes when you press the [STATUS] button. See User Guide for details.
13
EnglishРусский

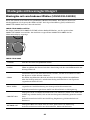
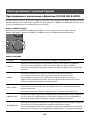
Listening with your preferred sound
Listening with various eects (SOUND FIELD MODE)
This product includes dierent sound field eects (SOUND FIELD MODE). Select the desired mode
according to the contents you are listening to. The SOUND FIELD MODE add depth and reverberation to the
sound through signal processing (DSP).
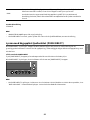
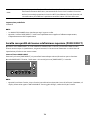
Selecting the SOUND FIELD MODE
Turn the [SOUND FIELD MODE SELECTOR] knob on the operating panel to select the desired
SOUND FIELD MODE. The name of the SOUND FIELD MODE you selected appears in the information display.
SOUND FIELD MODE
STRAIGHT Plays the sound without applying the sound field eect.
CINEMA
Gives a greater sense of immersion and presence to movies with action scenes, such
as action and SF movies. The eect increases the separation between dialogue and
sound eects or background music.
DRAMA
Lets you comfortably enjoy animated shows, dramas, variety shows and other
content where voice is important.
The eect increases the separation between dialogue and sound eects or
background music, making the dialogue sound more real and adding a comfortable
sense of reverberation.
MUSIC VIDEO
Simulates a comfortable spatial placement of vocals and musical instruments, for
enjoying music videos and other content.
This creates a pleasant sense of space and sonic placement.
CONCERT HALL
A setting that creates the echoes and space of a live concert in a hall, letting you
enjoy the performance as if you were part of the venue.
This creates a sense of envelopment, enthusiasm, unity and realism.
OUTDOOR LIVE
Recreates the open-air feeling of an outdoor setting, letting you enjoy the sense of
watching a live performance outdoors.
This creates a sense of unity, openness and realism, reproducing a unique outdoor
space by keeping the reverberations to an appropriate level.
14

BGM
This setting is suitable for listening to background music where the sound is
localized outside the head, letting you relax and listen to music.
Uses Yamaha’s proprietary high-definition HRTF (Head Related Transfer Function)
technology to process the stereo position of the sound outside your head.
Default setting
STRAIGHT
NOTE
• The SOUND FIELD MODE is remembered for each audio input.
• When using PURE DIRECT, the sound is played without applying the sound field eect, regardless of the
setting.
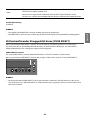
Listening with higher-definition sound quality (PURE DIRECT)
When PURE DIRECT is turned on, the various processing modes and circuits except for the basic functions
necessary for playback, are stopped, which allows for higher playback definition with less noise.
How to use PURE DIRECT
Press the [PURE DIRECT] button on the operating panel to toggle this function on/o.
When PURE DIRECT is on, the indicator to the le of the [PURE DIRECT] button lights up.
NOTE
• When PURE DIRECT is on, some functions are disabled. When you try to operate this product,
“NOT AVAILABLE” appears in the information display. See User Guide for details.
15
EnglishРусский

Other functions
Refer to the User Guide for the content listed below, which is not explained in this guide.
Names of parts on this product and on the remote control
Using the remote control
Content shown in the information display
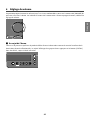
Connecting to an external amp
Connect an external amp (a preamp or power amp), an active speaker or similar equipment to the
[PRE/LINE OUT] output jacks to output audio from this product.
Various functions and settings accessible from the setting menu
• Setting the DAC filter
Changes the type of DAC digital filter used.
• Setting the DAC lock range
This function is used to reduce jitter and improve sound quality.
• Setting the output gain for the headphones and the PRE/LINE OUT
output
• Setting an upper limit for the volume
• Setting the default volume used when the power is turned on
• Adjusting the le/right balance
• Setting the auto power standby function
• Checking the firmware version and initializing this product
Other topics not listed above
Firmware update function
Troubleshooting
Specifications
User Guide
Setting menu list
16

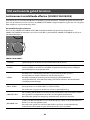
■ À propos des manuels de ce produit
Les trois manuels suivants sont fournis aux utilisateurs de ce produit : le Guide de sécurité, le Guide rapide et
le Guide d’utilisation. Veillez à lire attentivement chacun de ces manuels et à les conserver en lieu sûr pour
toute référence ultérieure.
Guide de sécurité (fourni avec ce produit)
Énonce les «PRÉCAUTIONS D'USAGE» indispensables à respecter lors de l’utilisation de ce produit.
Guide rapide (le présent guide)
Décrit les connexions et opérations élémentaires à eectuer lors de l’utilisation initiale de votre nouveau
produit. Le Guide d’utilisation décrit plus en détail les connexions et l’utilisation du produit.
Guide d’utilisation (site internet de Yamaha)
Décrit toutes les fonctions et caractéristiques du produit. Ce document fournit aussi des informations de
dépannage et sur la mise à jour du firmware. Guide d’utilisation est uniquement accessible via notre site
internet. Le lien ci-dessous vous permet d’accéder à ce contenu.
Guide d’utilisation Version en ligne
https://manual.yamaha.com/av/22/hal7a/
Note
• Les descriptions fournies dans ce guide ont été rédigées sur base des dernières spécifications en date au
moment de la publication.
• Vous pouvez télécharger la dernière version de chacun des guides (PDF) sur le site internet ci-dessous.
https://download.yamaha.com/
Table des matières
À lire en priorité.......................................................................................................................... 18
Préparatifs .................................................................................................................................. 19
Écouter de la musique (opérations élémentaires de lecture) ................................................ 25
Écoute via votre son préféré ..................................................................................................... 28
Autres fonctions ......................................................................................................................... 30
17
FrançaisРусский

À lire en priorité
Nous vous remercions d’avoir choisi ce produit Yamaha. Le HA-L7A est un amplificateur pour casque
dédié permettant d’écouter le signal de dispositifs audio reliés au produit via une connexion numérique/
analogique, et de restituer le signal audio haute définition d’un ordinateur relié au produit via USB. Vous
pouvez restituer le signal audio via des casques Arceaux ou un amplificateur externe.
ATTENTION Ce contenu indique un risque de blessures.
• Pour prévenir tout risque de perte auditive, respectez les consignes suivantes.
• N’eectuez pas d’écoute prolongée à volume élevé.
• Avant de changer de source d’entrée ou de sortie audio, réduisez temporairement le volume.
• N’eectuez jamais de hausses brusques de volume.
• Ne portez jamais de casques Arceaux sur les oreilles quand vous mettez ce produit sous tension.
• Quand vous déplacez le produit, ne le saisissez jamais par son transformateur.
• Vous risqueriez de laisser tomber le produit et ainsi de vous blesser
ou de causer un dysfonctionnement.
• Une pression excessive sur cet élément risquerait de le briser.
18

Préparatifs
1 Vérification des éléments fournis
L’emballage de ce produit contient les éléments suivants. Vérifiez que tous se trouvent bien dans l’emballage.
Télécommande × 1
Piles (AA, R6, UM-3)
× 2
Cordon d’alimentation
× 1
Câble USB (de type A
vers B), 1,5 m × 1
NOTE
• En fonction du pays, il se pourrait que l’emballage de ce produit contienne plusieurs cordons
d’alimentation. Utilisez le cordon d’alimentation adapté à la prise de courant à laquelle vous comptez
brancher le produit.
Guide de sécurité × 1
Guide rapide × 1
■ Préparatifs pour la télécommande
Insérez les piles fournies dans la télécommande en respectant les indications de polarité (+/−).
La télécommande de ce produit transmet des signaux infrarouge dont la portée et l’angle d’utilisation sont
indiqués sur l’illustration suivante.
30° 30°
Portée de 6m
19
FrançaisРусский

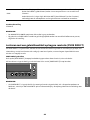
2 Connexions de vos dispositifs
■ Exemple de connexion
Cet exemple illustre divers types de connexions de dispositifs à ce produit.
Pour la connexion d’un ampli externe, voyez le Guide d’utilisation.
Dispositifs d’entrée
Dispositifs de sortie
Ordinateur Syntoniseur satellite,
enregistreur BD/DVD,
etc.
DAP
(lecteur audio numérique)
Câble USB
(de type A vers B)
(fourni)
Câble numérique
optique
Câble numérique coaxial
Câble stéréo
RCA/Cinch
Câble stéréo
RCA/Cinch
Câble XLR3
Fiche jack standard
de 6,3 mm
Fiches symétriques de
4,4mm
à 5 conducteurs
Fiche XLR 4
broches
Casques Arceaux Écouteurs Ampli externe
20
La page est en cours de chargement...
La page est en cours de chargement...
La page est en cours de chargement...
La page est en cours de chargement...
La page est en cours de chargement...
La page est en cours de chargement...
La page est en cours de chargement...
La page est en cours de chargement...
La page est en cours de chargement...
La page est en cours de chargement...
La page est en cours de chargement...
La page est en cours de chargement...
La page est en cours de chargement...
La page est en cours de chargement...
La page est en cours de chargement...
La page est en cours de chargement...
La page est en cours de chargement...
La page est en cours de chargement...
La page est en cours de chargement...
La page est en cours de chargement...
La page est en cours de chargement...
La page est en cours de chargement...
La page est en cours de chargement...
La page est en cours de chargement...
La page est en cours de chargement...
La page est en cours de chargement...
La page est en cours de chargement...
La page est en cours de chargement...
La page est en cours de chargement...
La page est en cours de chargement...
La page est en cours de chargement...
La page est en cours de chargement...
La page est en cours de chargement...
La page est en cours de chargement...
La page est en cours de chargement...
La page est en cours de chargement...
La page est en cours de chargement...
La page est en cours de chargement...
La page est en cours de chargement...
La page est en cours de chargement...
La page est en cours de chargement...
La page est en cours de chargement...
La page est en cours de chargement...
La page est en cours de chargement...
La page est en cours de chargement...
La page est en cours de chargement...
La page est en cours de chargement...
La page est en cours de chargement...
La page est en cours de chargement...
La page est en cours de chargement...
La page est en cours de chargement...
La page est en cours de chargement...
La page est en cours de chargement...
La page est en cours de chargement...
La page est en cours de chargement...
La page est en cours de chargement...
La page est en cours de chargement...
La page est en cours de chargement...
La page est en cours de chargement...
La page est en cours de chargement...
La page est en cours de chargement...
La page est en cours de chargement...
La page est en cours de chargement...
La page est en cours de chargement...
La page est en cours de chargement...
La page est en cours de chargement...
La page est en cours de chargement...
La page est en cours de chargement...
La page est en cours de chargement...
La page est en cours de chargement...
La page est en cours de chargement...
La page est en cours de chargement...
La page est en cours de chargement...
La page est en cours de chargement...
La page est en cours de chargement...
La page est en cours de chargement...
La page est en cours de chargement...
La page est en cours de chargement...
La page est en cours de chargement...
La page est en cours de chargement...
La page est en cours de chargement...
La page est en cours de chargement...
La page est en cours de chargement...
La page est en cours de chargement...
La page est en cours de chargement...
La page est en cours de chargement...
La page est en cours de chargement...
La page est en cours de chargement...
La page est en cours de chargement...
La page est en cours de chargement...
La page est en cours de chargement...
La page est en cours de chargement...
La page est en cours de chargement...
La page est en cours de chargement...
La page est en cours de chargement...
La page est en cours de chargement...
-
 1
1
-
 2
2
-
 3
3
-
 4
4
-
 5
5
-
 6
6
-
 7
7
-
 8
8
-
 9
9
-
 10
10
-
 11
11
-
 12
12
-
 13
13
-
 14
14
-
 15
15
-
 16
16
-
 17
17
-
 18
18
-
 19
19
-
 20
20
-
 21
21
-
 22
22
-
 23
23
-
 24
24
-
 25
25
-
 26
26
-
 27
27
-
 28
28
-
 29
29
-
 30
30
-
 31
31
-
 32
32
-
 33
33
-
 34
34
-
 35
35
-
 36
36
-
 37
37
-
 38
38
-
 39
39
-
 40
40
-
 41
41
-
 42
42
-
 43
43
-
 44
44
-
 45
45
-
 46
46
-
 47
47
-
 48
48
-
 49
49
-
 50
50
-
 51
51
-
 52
52
-
 53
53
-
 54
54
-
 55
55
-
 56
56
-
 57
57
-
 58
58
-
 59
59
-
 60
60
-
 61
61
-
 62
62
-
 63
63
-
 64
64
-
 65
65
-
 66
66
-
 67
67
-
 68
68
-
 69
69
-
 70
70
-
 71
71
-
 72
72
-
 73
73
-
 74
74
-
 75
75
-
 76
76
-
 77
77
-
 78
78
-
 79
79
-
 80
80
-
 81
81
-
 82
82
-
 83
83
-
 84
84
-
 85
85
-
 86
86
-
 87
87
-
 88
88
-
 89
89
-
 90
90
-
 91
91
-
 92
92
-
 93
93
-
 94
94
-
 95
95
-
 96
96
-
 97
97
-
 98
98
-
 99
99
-
 100
100
-
 101
101
-
 102
102
-
 103
103
-
 104
104
-
 105
105
-
 106
106
-
 107
107
-
 108
108
-
 109
109
-
 110
110
-
 111
111
-
 112
112
-
 113
113
-
 114
114
-
 115
115
-
 116
116


dans d''autres langues
- italiano: Yamaha HA-L7A Guida Rapida
- English: Yamaha HA-L7A Quick start guide
- español: Yamaha HA-L7A Guía de inicio rápido
- Deutsch: Yamaha HA-L7A Schnellstartanleitung
- Nederlands: Yamaha HA-L7A Snelstartgids
- dansk: Yamaha HA-L7A Hurtig start guide
- suomi: Yamaha HA-L7A Pikaopas
Documents connexes
-
Yamaha HA-L7A Mode d'emploi
-
Yamaha CD-S2100BL Le manuel du propriétaire
-
Yamaha CD-S3000 Le manuel du propriétaire
-
-
-
Yamaha A-S801 Le manuel du propriétaire
-
-
-
Yamaha RX-V3900 Le manuel du propriétaire
-
Yamaha CX-A5100 Le manuel du propriétaire