
CPV
CENTER CONSOLE REFRIGERATOR
WARNING
Cancer and Reproductive Harm
www.P65Warnings.ca.gov Revision A Form No. 3318069.000 04/22 | ©2022 Dometic Corporation
GM CCF-T
EN CCF-T Refrigerator
Installation and Operation Manual ........2
FR Réfrigérateur CCF-T
Manuel d’installation et de fonctionnement
..
16
ES Refrigerador CCF-T
Manual de instalación y funcionamiento ...31

2EN
Contents CCF-T Refrigerator
Contents .................................. 2
1 Explanation of Symbols and Safety
Instructions ............................ 2
1.1 Recognize Safety Information .............2
1.2 Understand Signal Words ................3
1.3 Supplemental Directives .................3
1.4 General Safety Messages ................3
2 Intended Use ........................... 4
3 General Information ..................... 4
3.1 Tools and Materials .....................4
3.2 Data Plate .............................5
3.3 Component Locations. . . . . . . . . . . . . . . . . . .5
3.4 External Dimensions ....................6
4 Specifications .......................... 6
5 Wiring Diagram ......................... 7
6 Preinstallation .......................... 7
6.1 Assessing the Installation Location .........8
6.2 Removing the Cupholders ...............8
6.3 Removing the Console Back Panel .........8
6.4 Testing the Refrigerator ..................9
6.5 Replacing the Side Brackets ..............9
6.6 Preparing the Front Fan Location .........10
6.7 Preparing the Rear Power Connector Location 10
7 Installation .............................11
7.1 Installing the Front Fan ................. 11
7.2 Connecting Power to the Fan ............12
7.3 Securing the Refrigerator ...............12
7.4 Reinstalling the Console Back Panel .......12
7.5 Reinstalling the Cupholders .............13
8 Operation ............................. 13
8.1 Turning the Refrigerator ON .............13
8.2 Turning the Refrigerator OFF .............13
8.3 Adjusting the Refrigerator ...............13
8.4 Opening and Closing the Refrigerator .....14
8.5 Storing Refrigerated Goods .............14
9 Maintenance .......................... 14
9.1 Cleaning the Refrigerator ...............14
9.2 Maintaining the Refrigerator When Not in Use 14
10 Troubleshooting ....................... 15
11 Disposal .............................. 15
12 Warranty Information ................... 15
12.1 United States and Canada ..............15
12.2 All Other Regions .....................15
Sommaire ................................ 16
Service Center & Dealer Locations
Visit: www.dometic.com
Please read these instructions carefully and follow all instructions,
guidelines, and warnings included in this product manual in order to
ensure that you install, use, and maintain the product properly at all
times. These instructions MUST stay with this product.
By using the product, you hereby confirm that you have read
all instructions, guidelines, and warnings carefully and that you
understand and agree to abide by the terms and conditions as set
forth herein. You agree to use this product only for the intended
purpose and application and in accordance with the instructions,
guidelines, and warnings as set forth in this product manual as well
as in accordance with all applicable laws and regulations. A failure
to read and follow the instructions and warnings set forth herein may
result in an injury to yourself and others, damage to your product,
or damage to other property in the vicinity. This product manual,
including the instructions, guidelines, and warnings, and related
documentation, may be subject to changes and updates. For up-to-
date product information, please visit www.dometic.com.
Contents
1 Explanation of Symbols and
Safety Instructions
This manual has safety information and instructions to
help you eliminate or reduce the risk of accidents and
injuries.
1.1 Recognize Safety Information
This is the safety alert symbol. It is used to alert
you to potential physical injury hazards. Obey all
safety messages that follow this symbol to avoid
possible injury or death.

3
EN
CCF-T Refrigerator Explanation of Symbols and Safety Instructions
1.2 Understand Signal Words
A signal word will identify safety messages and property
damage messages, and also will indicate the degree or
level of hazard seriousness.
DANGER!
Indicates a hazardous situation that, if not avoided,
will result in death or serious injury.
WARNING
Indicates a hazardous situation that, if not avoided,
could result in death or serious injury.
CAUTION
Indicates a hazardous situation that, if not avoided,
could result in minor or moderate injury.
NOTICE: Used to address practices not related to
physical injury.
IIndicates additional information that is not related
to physical injury.
1.3 Supplemental Directives
To reduce the risk of accidents and injuries, please
observe the following directives before proceeding to
install and operate this appliance:
• Read and follow all safety information and
instructions.
• Read and understand these instructions before
installing and operating this product.
• The installation must comply with all applicable local
or national codes.
1.4 General Safety Messages
WARNING: ELECTRICAL SHOCK, FIRE, AND/
OR EXPLOSION HAZARD. Failure to obey the
following warnings could result in death or
serious injury:
• Use only Dometic replacement parts and
components that are specifically approved for use
with the appliance.
• Avoid improper installation, adjustment, alterations,
service, or maintenance of the appliance. Service and
maintenance must be done by a qualified service
person only.
• Do not modify this product in any way. Modification
can be extremely hazardous.
• Do not immerse this product in water.
• Do not use this product for any purpose other than as
a mobile cooling device.
• Use care when diagnosing and/or adjusting the
components on a powered unit.
• Turn off the vehicle’s engine during installation.
• Dispose of properly in accordance with the
applicable federal or local regulations.
• Do not drill or puncture the refrigerator assembly
or refrigerant tubing. Follow handling instructions
carefully.
WARNING: CARBON MONOXIDE AND/
OR VEHICLE SAFETY. Failure to obey the
following warnings could result in death or
serious injury:
• Park the vehicle in a well-ventilated area during the
installation process.
• Ensure the vehicle is in Park with the emergency
brake engaged at all times during the installation
process.
• Follow all vehicle manufacturer safety procedures.
CAUTION
Avoid touching the compressor or front fan blades
during installation. Failure to obey this caution
could result in minor or moderate injury.
NOTICE: Failure to obey the following notices could
result in property damage:
• Do not use a power strip or two-way splitter.
• Do not use power cord adapters other than those
provided by the manufacturer.
• Do not fill this product with ice cubes or water. If frost
or condensation accumulates inside this product,
wipe dry with a so sponge or microfiber cloth.

4EN
Intended Use CCF-T Refrigerator
2 Intended Use
The center console refrigerator (or “refrigerator”)
provides vehicle passengers with easy access to
refrigerated items from within the comfort of the
vehicle cabin. The refrigerator is designed to fit
within the existing console footprint and to provide
an automatically controlled cooling environment for
packaged items. This refrigerator is only suitable for the
intended purpose and application in accordance with
these instructions.
This manual provides information that is necessary for
proper installation and operation of the refrigerator. Poor
installation and/or improper operating or maintenance
will result in unsatisfactory performance and a possible
failure. The manufacturer accepts no liability for any injury
or damage to the product resulting from:
• Incorrect assembly or connection, including excess
voltage
• Incorrect maintenance or use of spare parts other
than the original spare parts provided by the
manufacturer
• Alterations to the product without express permission
from the manufacturer
• Use for purposes other than those described in this
manual
Dometic reserves the right to change the product
appearance and the product specifications.
3 General Information
This section provides information on the included parts,
installation tools and materials, component locations,
and the refrigerator.
IThe images used in this document are for reference
purposes only. Components and component
locations may vary according to specific product
models. Measurements may vary ±0.38 in. (10 mm).
3.1 Tools and Materials
Dometic recommends that the following tools and
materials be used while installing the appliance.
Included Parts Quantity
Refrigerator Unit 1
Rubber Mat 2
Front Fan with Housing 1
Front Fan - Template 1
Attachment Bracket 2
Bracket Fastener 4
Recommended Tools
Drill Phillips Screwdriver
3.5 in. Hole Saw Drill Bit Removable Tape
1-1/8 in. Hole Saw Drill Bit T15, T20 Torx Screwdrivers
Marker Vacuum or Shop Vac
Multimeter

5
EN
CCF-T Refrigerator General Information
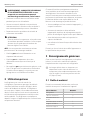
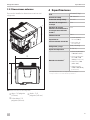
3.2 Data Plate
This section provides the location of the refrigerator data
plate. Have this information readily available if you have
to call the Dometic Customer Support Center.
0 0 0 0 0 0 0 0 0 0 0 0 0 0
Dometic.com
www.dometic.com
Made in China
Range:
To tal Gross Volume:
Climatic class:
Refrigerant:
Insulation Blowing Gas:
CoolFreeze
~7L
N or T
Max. Pressure:
Input Voltage:
Rated Current:
ND 11 bar/HD 25 bar
DC 13.5 V
5.6 A
GWP=1430 / tCO2-eq=0.037
R 134a / 0.026kg
C5H10
Model
SKU
CCF-T GM_T1XX
9600049539
PNC
Serial
XXXXXXXXX
XXXXXXX
Contains fluorinated greenhouse gases covered by
the Kyoto Protocol. Type and amount of refrigerant
see product label. Hermetically sealed.
1 Data Plate Location
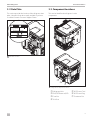
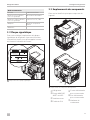
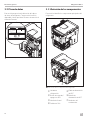
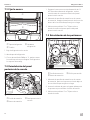
3.3 Component Locations
This section identifies the refrigerator’s main
components.
q
w
e
t
y
u
r
2 Refrigerator Component Locations
q Refrigerator Unit t VDC Power Cord
w ON/OFF Button w/LED y VDC Power Plug
e Front Fan u Condenser Fan
r 10 A Fuse

6EN
Specifications CCF-T Refrigerator
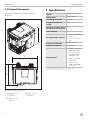
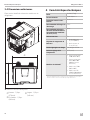
3.4 External Dimensions
This section identifies the refrigerator’s external
dimensions.
w
q
e
3 Refrigerator Exterior Dimensions
q Height: 11.0 in.
(279 mm)
e Width: 13.5 in.
(343 mm)
w Depth: 11.5 in.
(292 mm)
4 Specifications
Weight 12.5lbs (5.7kg)
Voltage Input 12.0–16.0VDC
Low Voltage Protection 12.3VDC
Energy Consumption at
Startup
5.6A
Energy Consumption during
Operation at 90°F Ambient
4.2A
Internal Volume 7 L
Beverage Storage Capacity
• Six 16.9oz (500mL)
Bottles
• Nine 12oz (355mL)
Cans
Refrigerant and Charge R134a 1 oz (26 g)
Temperature Setpoint 37°F (3°C)
Vehicle Models1, 2
• Chevrolet Silverado
1500 (2019–2021)
• Chevrolet Silverado
HD 2500/3500
(2020 and newer)
• GMC Sierra 1500
(2019–2021)
• GMC Sierra HD
2500/3500 (2020
and newer)
1 Only available for models with a floor console configuration.
2 Excludes models with BoseⒸ Premium Sound System.

7
EN
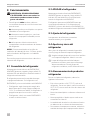
CCF-T Refrigerator Wiring Diagram
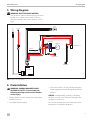
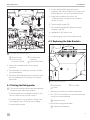
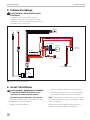
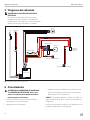
5 Wiring Diagram
WARNING: ELECTRIC SHOCK HAZARD.
Turn the power off before performing any electrical
installation or maintenance activities. Failure to
obey this warning could result in death or serious
injury.
43640
NTC
RED
BLK
1
2
5
6
4(NA)
3(NA)
molex
1
Inner LED
Control board
GROUND
-
+
F+
F-
LIN
CONTROL UNIT
SWITCH
POWER INPUT DC12
V
CONDENSER FAN
AIR DUCT FAN
COMPRESSOR
43640
Auto-Fuse 10A
4 Refrigerator Wiring Diagram
6 Preinstallation
WARNING: CARBON MONOXIDE AND/
OR VEHICLE SAFETY. Failure to obey the
following warnings could result in death or
serious injury:
• Park the vehicle in a well-ventilated area during the
installation process.
• Turn off the vehicle’s engine.
• Ensure the vehicle is in Park with the emergency
brake engaged at all times during the installation
process.
NOTICE: Avoid pinching, crushing, or breaking
the wires or power cord. Otherwise damage to the
refrigerator could occur.
This section describes the assessment and location
preparations to install the refrigerator.

8EN
Preinstallation CCF-T Refrigerator
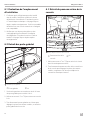
6.1 Assessing the Installation
Location
1. Confirm your vehicle is the correct model, model
year, and trim level to accept the refrigerator. See
“Specifications” on page6 for more information.
Only trim packages with an integrated center floor
console are eligible.
2. Verify you have the correct parts and tools to perform
the refrigerator installation. See “Tools and Materials”
on page4 for more information.
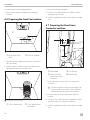
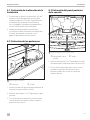
6.2 Removing the Cupholders
q
w
5 Removing the Cupholders
q Cupholders w Screw
1. Li up the rubber trim at the front of the cupholders
to access the screw.
2. Use a T15 Torx screwdriver to loosen and remove the
screw.
3. Firmly pull up the cupholders to release the hidden
retainer clips, and remove the cupholders from the
console.
6.3 Removing the Console Back
Panel
q
w
6 Removing the Console Back Panel
q Console Back Panel w Screw
1. Use a T15 Torx screwdriver to remove the screw from
the top of the console back panel.
2. Firmly pull the console back panel away from the
console to release the hidden retainer clips, taking
care not to strain the internal electrical connections.

9
EN
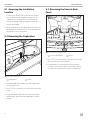
CCF-T Refrigerator Preinstallation
q
r
we
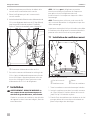
7 Removing the Electrical Connections
q Center Console e 12 V Rear Power
Connector
w 12 V Rear Power
Connector Red Tab r Console Back Panel
3. Remove the red tab from the 12 V rear power
connector.
4. Disconnect the 12 V rear power connector from the
console back panel.
5. Disconnect all remaining electrical connections from
the console back panel, and set the console back
panel aside.
6.4 Testing the Refrigerator
IThe console lid should remain open during the pre-
installation and installation procedures.
1. Place the refrigerator unit upright on the floor, near
the rear of the console (second row area).
2. Insert the vehicle’s 12 V rear power connector into
the refrigerator unit’s 12 VDC power cord plug.
3. Start the vehicle engine.
4. Confirm the blue LED is illuminated on the
refrigerator unit’s ON/OFF button. If not, press and
hold the button for one second, and then release.
5. Listen for the condenser fan to start. See
“Troubleshooting” on page15 if the condenser
fan does not start.
6. Turn the vehicle engine OFF.
7. Press and hold the ON/OFF button to turn the
refrigerator unit OFF.
8. Unplug the 12 VDC power cord.
9. Set the refrigerator unit away from the console.
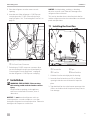
6.5 Replacing the Side Brackets
q
w
e
8 Replacing the Side Brackets
q Side Bracket e Console Bin
w Screws
1. Open the console bin to locate the side brackets.
2. Use a T20 Torx screwdriver to loosen and remove the
screws from each side bracket.
IRetain the screws.
3. Remove the existing side brackets.
IRetain the side brackets.

10 EN
Preinstallation CCF-T Refrigerator
4. Insert the provided mounting brackets.
5. Reverse these steps to install the new mounting
brackets.
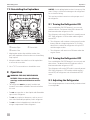
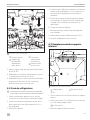
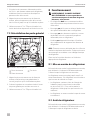
6.6 Preparing the Front Fan Location
w
q
9 Using the Front Fan Template
q Console Bin Front
Wall
w Front Fan Template
1. Tape the front fan template to the inside, front wall of
the console bin.
2. Using a marker, trace the center point opening from
the template onto the console bin wall.
q
w
10 Drilling the Front Fan Opening
q 3.5 in. (89 mm) Hole w 3.5 in. (89 mm) Hole
Saw Drill Bit
3. Remove the front fan template.
4. Use the 3.5 in. (89 mm) hole saw drill bit to drill an
opening for the front fan.
5. Vacuum any debris from the console and console bin
area.
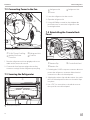
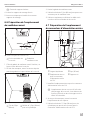
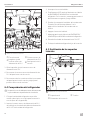
6.7 Preparing the Rear Power
Connector Location
w
e
r
q q
11 Drilling the Rear Power Connector Opening
q Equal Width e 2 in. (50 mm)
w Hole Location for
the 12 V Rear Power
Connector
r Black Bracket
1. Identify the hole location for the 12 V rear power
connector.
IThe hole location is on the rear passenger side
of the console, measured 2 in. (50 mm) above
the black bracket and centered horizontally.
2. Using a marker, trace the center of the drill hole
location.
3. Use the 1 1/8 in. (29 mm) hole saw drill bit to drill an
opening for the 12 V rear power connector.
4. Vacuum any debris from the console and console bin
area.

11
EN
CCF-T Refrigerator Installation
5. Place the refrigerator near the center console
opening.
6. Insert the end of the refrigerator’s 12 VDC power
cord plug into the 1 1/8 in. (29 mm) hole until it
snaps into place. See “Connecting the Front Fan” on
page12.
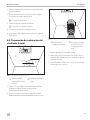
q
12 Installing the 12 V Rear Power Connector
q 12 V Rear Power Connector
7. Push the gray 12 VDC rear power connector (that
was disconnected from the console back panel in
“Removing the Console Back Panel” on page8)
into the refrigerator’s 12 VDC power cord plug.
7 Installation
WARNING: FIRE HAZARD. Failure to obey
this warning could result in death or serious
injury.
Keep ventilation openings, in the appliance
enclosure or in the built-in structure, clear of
obstruction.
NOTICE: Do not leave the refrigerator unit in an
inverted position or run the compressor soon aer
having the refrigerator in an inverted position. Otherwise
damage to the compressor could occur.
NOTICE: Avoid pinching, crushing, or breaking
the wires or power cord. Otherwise damage to the
refrigerator unit could occur.
This section describes how to install and wire the fan
and the refrigerator unit and to reinstall the console back
panel and cupholders.
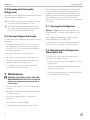
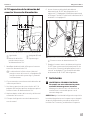
7.1 Installing the Front Fan
e
q
r
w
13 Installing the Front Fan
q Console Bin e Tape
w Front Fan r Black Fan Wire
1. Hold the front fan vertically by the fan housing.
2. Insert the front fan into the new 3.5 in. (89 mm)
opening inside the console bin until it snaps into
place.
3. Tape the black fan wire to the bottom passenger side
of the console bin to hold it in place and to protect it
from damage.

12 EN
Installation CCF-T Refrigerator
7.2 Connecting Power to the Fan
q
w
e
r
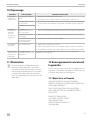
14 Connecting the Front Fan
q 12 VDC Power Cord Plug e Refrigerator Unit
w Auxiliary Fan Power
Connector
r Front Fan
1. Place the refrigerator unit in an upright position on a
stable surface next to the console.
2. Connect the front fan power plug to the auxiliary
connector coming from the refrigerator power plug.
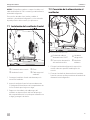
7.3 Securing the Refrigerator
w
e
q
15 Securing the Refrigerator
q Refrigerator Lid e Refrigerator Unit
w Screws
1. Lower the refrigerator into the console.
2. Open the refrigerator lid.
3. Using a #2 Phillips screwdriver, hand tighten the
provided screws to secure the refrigerator to the
mounting brackets.
7.4 Reinstalling the Console Back
Panel
q
w
e
16 Reinstalling the Console Back Panel
q Retainer Clip e Console Back Panel
w Retainer Slot
1. Excluding the 12 VDC rear power connector that now
powers the refrigerator, reconnect all the electrical
connections to the console back panel.
2. Aligning the retainer clips with the retainer slots, push
the console back panel into the console until it snaps
into place.
3. Use a T15 Torx screwdriver to reinstall the screw at
the top of the console back panel.

13
EN
CCF-T Refrigerator Operation
7.5 Reinstalling the Cupholders
qq
ww
e
17 Reinstalling the Cupholders
q Retainer Clips e Screw Hole
w Retainer Slots
1. Aligning the retainer clips with the retainer slots,
press the cupholders down into the console until they
snap in place.
2. Li up the rubber trim at the front of the cupholders
to access the screw hole.
3. Use a T15 Torx screwdriver to reinstall the screw.
8 Operation
WARNING: FIRE AND/OR EXPLOSION
HAZARD. Failure to obey the following
warnings could result in death or serious
injury:
• This refrigerator must be properly installed and
located in accordance with these instructions before
it is used.
• Do not store gasoline or other liquids with flammable
vapors in this refrigerator.
• Do not store explosive substances, such as aerosol
cans with a flammable propellant, in this refrigerator.
• Do not use electrical appliances inside the food
storage compartments of the refrigerator.
NOTICE: Avoid spilling liquid into the closeout tray’s fan
vents. Doing so could cause damage to the refrigerator’s
fan or electrical wiring.
This section provides instructions on the proper use of
the refrigerator.
8.1 Turning the Refrigerator ON
Press and hold the ON/OFF button for one second,
and then release. The button’s blue LED indicator will
illuminate when the refrigerator is ON.
The refrigerator will remain ON until it is manually turned
OFF. If the refrigerator is ON and the vehicle engine is
turned OFF:
• The refrigerator will continue to draw power from the
battery until the voltage drops below 12.3V. If this
threshold is reached, the refrigerator will cycle OFF
until the engine restarts.
• The refrigerator will return to an ON status when the
engine restarts.
8.2 Turning the Refrigerator OFF
Press and hold the ON/OFF button for one second, and
then release. The button’s blue LED indicator will not
illuminate when the refrigerator is OFF.
The refrigerator will remain OFF until it is manually turned
ON. If the refrigerator is OFF and the vehicle engine is
turned OFF, the refrigerator unit will maintain the OFF
status.
8.3 Adjusting the Refrigerator
The cooling temperature is automatically maintained and
is not adjustable.

14 EN
Maintenance CCF-T Refrigerator
8.4 Opening and Closing the
Refrigerator
Open and close the refrigerator by liing the console lid
and then liing the refrigerator lid.
IBe sure the console lid does not interfere with the
refrigerator’s lid when opening or closing.
IThe refrigerator lid is designed to remain closed
unless held open manually. When the refrigerator
lid is open, an LED illuminates the interior.
8.5 Storing Refrigerated Goods
For optimal use of the refrigerator, observe the following
instructions:
• Avoid placing materials 75°F (24°C) or warmer in
the refrigerator. For optimal use, allow materials to
cool to 50°F (10 °C) or cooler before placing them
inside the refrigerator.
• Never put hot liquids or food in the interior.
• Never put ice or uncontained liquids in the interior.
• The total amount of goods placed into the interior
should not exceed its storage volume.
• To maintain constant temperature, minimize the
amount of time the lid stays open.
9 Maintenance
WARNING: ELECTRICAL SHOCK, FIRE, AND/
OR EXPLOSION HAZARD. Failure to obey the
following warnings could result in death or
serious injury:
• Always turn the refrigerator OFF before cleaning or
servicing.
• Maintenance and repair must be done by a qualified
service person only.
• Do not use mechanical devices to defrost the
refrigerator.
• Do not puncture refrigerant tubing.
• To be repaired only by trained service personnel.
The maintenance and cleaning instructions provided
in this section should be performed at the intervals
indicated, or as needed, depending on the use of the
appliance. Failure to properly maintain the appliance
may void the warranty and could result in unsafe
operation. Preventive maintenance is not covered under
the warranty.
9.1 Cleaning the Refrigerator
NOTICE: Do not use abrasive cleaning materials or
harsh chemicals, or damage to the refrigerator could
occur.
If the refrigerator becomes dirty, wipe clean with a
damp, so sponge or microfiber cloth.
If condensation or liquid accumulates in the interior,
remove it with a so sponge or microfiber cloth.
9.2 Maintaining the Refrigerator
When Not in Use
For optimal care of the refrigerator when not in use,
observe the following instructions:
• Clean and dry the interior of the refrigerator to avoid
lingering odor.
• Avoid storing refrigerated goods in the refrigerator
when it is not turned ON.
• Avoid storing any sharp items or items not intended
for refrigeration in the refrigerator.

15
EN
CCF-T Refrigerator Troubleshooting
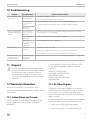
10 Troubleshooting
Problem Possible Cause Recommended Solution
The refrigerated goods
are not cold. The refrigerator is
not turned ON. • Confirm the refrigerator is ON.
• See “Turning the Refrigerator ON” on page13.
The refrigerator
is not receiving
power.
• Locate and inspect the vehicle fuse. If the fuse is blown, replace it.
• Locate and inspect the refrigerator fuse. If the fuse is blown, replace it.
The fan is not
operating.
There is condensation
around the refrigerator
unit lid.
The refrigerator
lid is not closing
properly.
• Remove any obstructions from around the refrigerator lid and console lid to
allow both lids to close completely.
The lid gasket is
damaged. • Inspect and replace the lid if the gasket is damaged.
There is an
electronic control
unit (ECU)
malfunction.
• Contact a qualified service technician.
The fan is noisy. There is an
obstruction. 1. Confirm the refrigerator is OFF.
2. Remove the refrigerator, inspect the fan, and remove all obstructions.
3. If the problem is not resolved, contact a qualified service technician.
There is an odor
coming from the
refrigerator interior.
Residue has built
up inside the
refrigerator.
Clean the interior of the refrigerator. See “Cleaning the Refrigerator” on page14.
11 Disposal
MPlace the packaging material in the appropriate
recycling waste bins, whenever possible. Consult
a local recycling center or specialist dealer for
details about how to dispose of the product in
accordance with all applicable national and local
regulations.
12 Warranty Information
Refer to the sections below for information about
warranty and warranty support in the US, Canada, and all
other regions.
12.1 United States and Canada
LIMITED WARRANTY AVAILABLE AT DOMETIC.COM/
EN-US/TERMS-AND-CONDITIONS-CONSUMER/
WARRANTY.
IF YOU HAVE QUESTIONS, OR TO OBTAIN A COPY
OF THE LIMITED WARRANTY FREE OF CHARGE,
CONTACT:
DOMETIC CORPORATION
CUSTOMER SUPPORT CENTER
5155 VERDANT DRIVE
ELKHART, INDIANA, USA 46516
1-800-544-4881
12.2 All Other Regions
The statutory warranty period applies. If the product
is defective, please contact the manufacturer’s branch
in your region or your retailer (see the back of this
instruction manual for the web addresses to locate your
region or retailer).
For repair and guarantee processing, please include the
following documents when you send in the device:
• A copy of the receipt with purchasing date
• A reason for the claim or description of the fault

16 FR
Sommaire Réfrigérateur CCF-T
1 Explication des symboles
et consignes de sécurité ................. 17
1.1 Reconnaître les consignes de sécurité .....17
1.2 Comprendre les mots-indicateurs ........17
1.3 Directives supplémentaires ..............17
1.4 Messages de sécurité d’ordre général .....17
2 Utilisation prévue ...................... 18
3 Renseignements généraux .............. 18
3.1 Outils et matériel ......................18
3.2 Plaque signalétique ....................19
3.3 Emplacements des composants ..........19
3.4 Dimensions extérieures .................20
4 Caractéristiques techniques .............20
5 Schéma de câblage ..................... 21
6 Avant l’installation ..................... 21
6.1 Évaluation de l’emplacement
d’installation .........................22
6.2 Retrait des porte-gobelet ...............22
6.3 Retrait du panneau arrière de la console ...22
6.4 Essai du réfrigérateur ...................23
6.5 Remplacement des supports latéraux .....23
6.6 Préparation de l’emplacement
du ventilateur avant ....................24
6.7 Préparation de l’emplacement
du connecteur d’alimentation arrière ......24
7 Installation ............................ 25
7.1 Installation du ventilateur avant ...........25
7.2 Connexion de l’alimentation électrique au
ventilateur ...........................26
7.3 Fixation du réfrigérateur ................26
7.4 Réinstallation du panneau arrière
de la console .........................26
7.5 Réinstallation des porte-gobelet. . . . . . . . . .27
8 Fonctionnement ....................... 27
8.1 Mise en marche du réfrigérateur ..........27
8.2 Arrêt du réfrigérateur ...................27
8.3 Ajustement de la température
du réfrigérateur .......................28
8.4 Ouverture et fermeture du réfrigérateur ....28
8.5 Rangement des produits réfrigérés .......28
9 Entretien ..............................28
9.1 Nettoyage du réfrigérateur ..............28
9.2 Entretien du réfrigérateur lorsqu’il
n’est pas utilisé .............................28
10 Dépannage ...........................29
11 Élimination ............................29
12 Renseignements concernant la garantie ...29
12.1 États-Unis et Canada ...................29
12.2 Toutes les autres régions ................30
Liste des centres de service et des revendeurs
Consultez: www.dometic.com
Veuillez lire attentivement ces instructions et suivre tous les
avertissements, instructions et directives inclus dans ce manuel du
produit afin de vous assurer que vous installez, utilisez et entretenez
le produit correctement à tout moment. Les présentes consignes
DOIVENT être conservées avec ce produit.
En utilisant le produit, vous confirmez par la présente que vous avez
lu attentivement tous les avertissements, consignes et directives
et que vous comprenez et acceptez de respecter les conditions
générales énoncées dans le présent document. Vous acceptez
d’utiliser ce produit uniquement pour l’usage et l’application prévus
et conformément aux instructions, directives et avertissements
figurant dans ce manuel du produit ainsi qu’en accord avec toutes
les lois et réglementations applicables. Le fait de ne pas lire et de
ne pas suivre les instructions et les avertissements énoncés dans le
présent document peut entraîner des blessures pour vous-même
et pour d’autres personnes, des dommages à votre produit ou des
dommages à d’autres biens situés à proximité. Ce manuel du produit,
y compris les instructions, les directives et les avertissements, ainsi
que la documentation connexe, peut faire l’objet de modifications et
de mises à jour. Pour obtenir des informations à jour sur les produits,
veuillez consulter www.dometic.com.
Sommaire

17
FR
Réfrigérateur CCF-T Explication des symboles et consignes de sécurité
1 Explication des symboles
et consignes de sécurité
Ce manuel contient des renseignements et des
consignes de sécurité pour vous aider à éliminer ou
réduire le risque d’accidents et de blessures.
1.1 Reconnaître les consignes de
sécurité
C’est le symbole d’alerte à la sécurité.
Il signale des risques de blessures. Respectez tous
les messages de sécurité qui suivent ce symbole
pour éviter les risques de blessures ou de mort.
1.2 Comprendre les mots-
indicateurs
Un mot-indicateur identifie les messages de sécurité et
les messages liés aux dégâts matériels, et signale aussi le
degré ou niveau de gravité du danger.
DANGER!
Indique une situation dangereuse qui, si elle n’est
pas évitée, causera la mort ou des blessures
graves.
AVERTISSEMENT
Indique une situation dangereuse qui, si elle n’est
pas évitée, peut causer la mort ou des blessures
graves.
ATTENTION
Indique une situation dangereuse qui, si elle n’est
pas évitée, peut causer des blessures légères ou
modérées.
AVIS : Utilisé pour signaler des pratiques non liées à
une blessure physique.
IFournit des renseignements supplémentaires qui
ne concernent pas les risques de blessures.
1.3 Directives supplémentaires
Pour réduire le risque d’accidents et de blessures,
veuillez respecter les directives suivantes avant de
continuer à installer ou utiliser cet appareil:
• Lisez et suivez tous les renseignements et toutes les
consignes de sécurité.
• Lisez et comprenez les présentes directives avant
d’installer ou d’utiliser ce produit.
• L’installation doit être conforme à tous les codes
locaux et nationaux applicables.
1.4 Messages de sécurité d’ordre
général
AVERTISSEMENT: RISQUE DE DÉCHARGE
ÉLECTRIQUE, DE DÉPART DE FEU ET/OU
D’EXPLOSION. Le non-respect de ces
avertissements pourrait entraîner de graves
blessures, voire la mort:
• Utilisez uniquement des pièces et des composants
de rechange Dometic spécifiquement approuvés
pour une utilisation avec l’appareil.
• Évitez l’installation, le réglage, les altérations, les
réparations ou l’entretien inappropriés de l’appareil.
Les réparations et la maintenance doivent être
confiées à un agent technique qualifié.
• Ne modifiez pas ce produit d’une quelconque
manière. Une modification peut être extrêmement
dangereuse.
• Ne plongez pas ce produit dans l’eau.
• N’utilisez pas ce produit à des fins autres que celles
d’un dispositif de refroidissement mobile.
• Faites attention lors du diagnostic ou de l’ajustement
des composants d’un appareil sous tension.
• Coupez le moteur du véhicule durant l’installation.
• Éliminez correctement conformément aux règlements
locaux ou fédéraux en vigueur.
• Ne percez pas et ne perforez pas l’assemblage du
réfrigérateur ou la tubulure du fluide frigorigène.
Suivez les directives de manipulation attentivement.

18 FR
Utilisation prévue Réfrigérateur CCF-T
AVERTISSEMENT: MONOXYDE DE CARBONE
ET/OU SÉCURITÉ DES VÉHICULES. Le non-
respect de ces avertissements pourrait
entraîner de graves blessures, voire la mort:
• Stationnez le véhicule dans un endroit bien ventilé
pendant le processus d’installation.
• Assurez-vous que le véhicule est en position de
stationnement avec le frein de secours enclenché à
tout moment pendant le processus d’installation.
• Respectez toutes les procédures de sécurité du
constructeur automobile.
ATTENTION
Évitez de toucher le compresseur ou les pales avant
du ventilateur pendant l’installation. Le non-respect
de cette mise en garde pourrait entraîner des
blessures légères ou modérées.
AVIS : Le non-respect des avertissements suivants
pourrait mener à des dommages matériels:
• N’utilisez pas une barre d’alimentation ou un
séparateur bidirectionnel.
• N’utilisez pas des adaptateurs de cordon
d’alimentation autres que ceux fournis par le
fabricant.
• Ne remplissez pas ce produit avec des glaçons ou de
l’eau. Si du gel ou de la condensation s’accumulent
à l’intérieur de cet appareil, essuyez-les avec une
éponge douce ou un chiffon en microfibre.
2 Utilisation prévue
Le réfrigérateur pour console centrale (ou
«réfrigérateur») permet aux passagers du véhicule
d’accéder facilement aux articles réfrigérés dans le
confort de l’habitacle du véhicule. Le réfrigérateur
est conçu pour s’adapter à l’encombrement existant
dans la console et pour fournir un environnement de
refroidissement automatiquement contrôlé pour des
articles emballés. Ce réfrigérateur est uniquement
adapté à l’usage et à l’application prévus conformément
aux présentes directives.
Ce manuel fournit les renseignements nécessaires
à une installation et un fonctionnement appropriés
du réfrigérateur. Une mauvaise installation ou un
mauvais fonctionnement ou entretien entraîneront une
performance insatisfaisante et possiblement, une panne.
Le fabricant décline toute responsabilité en cas de
blessure ou de dommage au produit résultant:
• d’un assemblage ou d’une connexion inappropriés, y
compris la surtension
• d’un mauvais entretien ou d’une utilisation
inappropriée de pièces de rechange autres que les
pièces de rechange d’origine fournies par le fabricant
• d’une altération du produit sans la permission
expresse du fabricant
• une utilisation à d’autres fins que celles décrites dans
ce manuel
Dometic se réserve le droit de modifier l’apparence et
les spécifications des produits.
3 Renseignements généraux
Cette section fournit des renseignements sur les pièces
incluses, les outils et les matériaux d’installation,
l’emplacement des composants et le réfrigérateur.
ILes images utilisées dans ce document sont
uniquement fournies à titre de référence. Les
composants et leur emplacement peuvent varier
selon le modèle. Les mesures peuvent varier de
±0,38 po (10mm).
3.1 Outils et matériel
Dometic recommande l’utilisation des outils et du
matériel suivants pour l’installation de l’appareil.
Pièces fournies Quantité
Réfrigérateur 1
Tapis en caoutchouc 2
Ventilateur avant avec
boîtier 1
Ventilateur avant – modèle 1
Support de fixation 2
Attache de support 4

19
FR
Réfrigérateur CCF-T Renseignements généraux
Outils recommandés
Perceuse Tournevis cruciforme
Mèche de 3,5po (89mm)
pour scie cylindrique Ruban adhésif détachable
Mèche de 11/8po (28mm)
pour scie cylindrique Tournevis Torx T15, T20
Marqueur Aspirateur ou aspirateur
d’atelier
Multimètre
3.2 Plaque signalétique
Cette section indique l’emplacement de la plaque
signalétique du réfrigérateur. Ayez cette information
à la portée de la main si vous devez appeler le centre
d’assistance à la clientèle de Dometic.
0 0 0 0 0 0 0 0 0 0 0 0 0 0
Dometic.com
www.dometic.com
Made in China
Range:
To tal Gross Volume:
Climatic class:
Refrigerant:
Insulation Blowing Gas:
CoolFreeze
~7L
N or T
Max. Pressure:
Input Voltage:
Rated Current:
ND 11 bar/HD 25 bar
DC 13.5 V
5.6 A
GWP=1430 / tCO2-eq=0.037
R 134a / 0.026kg
C5H10
Model
SKU
CCF-T GM_T1XX
9600049539
PNC
Serial
XXXXXXXXX
XXXXXXX
Contains fluorinated greenhouse gases covered by
the Kyoto Protocol. Type and amount of refrigerant
see product label. Hermetically sealed.
1 Emplacement de la plaque signalétique
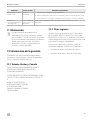
3.3 Emplacements des composants
Cette section identifie les principaux composants de
l’appareil.
q
w
e
t
y
u
r
2 Emplacement des composants du réfrigérateur
q Réfrigérateur t Cordon d’alimentation
pour courant continu
w Bouton MARCHE/
ARRÊT avec DEL y Prise d’alimentation
pour courant continu
e Ventilateur avant
u Ventilateur du
condensateur
r Fusible de 10A

20 FR
Caractéristiques techniques Réfrigérateur CCF-T
3.4 Dimensions extérieures
Cette section identifie les dimensions extérieures du
réfrigérateur.
w
q
e
3 Dimensions extérieures du réfrigérateur
q Hauteur: 11,0po
(279mm)
e Largeur: 13,5po
(343mm)
w Profondeur: 11,5po
(292mm)
4 Caractéristiques techniques
Poids 12,5lb (5,7kg)
Tension d’entrée 12,0 à 16,0Vc.c.
Protection contre la sous-
tension
12,3Vc.c.
Consommation d’énergie au
démarrage
5,6A
Consommation d’énergie
durant le fonctionnement à
une température ambiante
de 90°F (32°C)
4,2A
Volume intérieur 7l
Capacité de rangement de
boissons
• Six bouteilles de
16,9oz (500ml)
• Neuf canettes de
12oz (355ml)
Fluide frigorigène et charge 1 oz (26 g) de R134a
Point de réglage de la
température
37°F (3°C)
Modèles de véhicules1, 2
• Chevrolet Silverado
1500 (2019–2021)
• Chevrolet Silverado
HD 2500/3500
(2020 et versions
ultérieures)
• GMC Sierra 1500
(2019–2021)
• GMC Sierra HD
2500/3500 (2020 et
versions ultérieures)
1 Disponible uniquement pour les modèles avec une configuration de console au sol.
2 Exclut les modèles avec la chaîne audiophonique de luxe Bose.
La page est en cours de chargement...
La page est en cours de chargement...
La page est en cours de chargement...
La page est en cours de chargement...
La page est en cours de chargement...
La page est en cours de chargement...
La page est en cours de chargement...
La page est en cours de chargement...
La page est en cours de chargement...
La page est en cours de chargement...
La page est en cours de chargement...
La page est en cours de chargement...
La page est en cours de chargement...
La page est en cours de chargement...
La page est en cours de chargement...
La page est en cours de chargement...
La page est en cours de chargement...
La page est en cours de chargement...
La page est en cours de chargement...
La page est en cours de chargement...
La page est en cours de chargement...
La page est en cours de chargement...
La page est en cours de chargement...
La page est en cours de chargement...
La page est en cours de chargement...
La page est en cours de chargement...
La page est en cours de chargement...
La page est en cours de chargement...
-
 1
1
-
 2
2
-
 3
3
-
 4
4
-
 5
5
-
 6
6
-
 7
7
-
 8
8
-
 9
9
-
 10
10
-
 11
11
-
 12
12
-
 13
13
-
 14
14
-
 15
15
-
 16
16
-
 17
17
-
 18
18
-
 19
19
-
 20
20
-
 21
21
-
 22
22
-
 23
23
-
 24
24
-
 25
25
-
 26
26
-
 27
27
-
 28
28
-
 29
29
-
 30
30
-
 31
31
-
 32
32
-
 33
33
-
 34
34
-
 35
35
-
 36
36
-
 37
37
-
 38
38
-
 39
39
-
 40
40
-
 41
41
-
 42
42
-
 43
43
-
 44
44
-
 45
45
-
 46
46
-
 47
47
-
 48
48


Dometic FRID176 Guide d'installation
- Taper
- Guide d'installation
- Ce manuel convient également à
dans d''autres langues
- English: Dometic FRID176 Installation guide
- español: Dometic FRID176 Guía de instalación