
Aspen
®
OTS
ASPEN OTS TLSO 457
ENGLISH ESPAÑOL DEUTSCH ITALIANO FRANÇAIS
中文
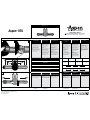
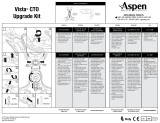
SIZE ADJUSTMENT AJUSTAR LA TALLA GRÖSSENANPASSUNG
REGOLAZIONE DELLA
TAGLIA
RÉGLAGE DE LA TAILLE
尺寸调节
A. To adjust the size of the brace,
peel up the inside end of each
side panel.
B. Adjust as necessary to achieve
a proper t and reattach.
C. Brace sizes follow closely to
standard pants sizes. Size
ranges are only guidelines.
NOTE: Once the brace is applied,
the sides of the brace may require
further adjustment to achieve a
snug t without too much overlap
at the front of the brace.
A. Para ajustar el tamaño de la
faja, desprenda el extremo
interior de cada panel lateral.
B. Ajuste según sea necesario
para lograr que se adapte
correctamente y vuelva a
acomodar.
C. Las tallas del corset
corresponden aproximadamente
a las tallas estándar de los
pantalones. Los rangos de las
tallas son solo orientativos.
NOTA: Una vez que se ha colocado
el corset, los lados del corset
pueden requerir un mayor ajuste
a n de lograr un calce ceñido
sin exceso de superposición en el
frente del corset.
A. Um die Größe der Orthese
anzupassen, lösen Sie das
innere Ende der Seitenplatten
auf beiden Seiten.
B. Passen Sie die Orthese an,
so dass sie gut sitzt, und
befestigen Sie diese wieder.
C. Die Stützengrößen
orientieren sich eng an den
normalen Hosengrößen. Die
Größenangaben dienen lediglich
als Richtwerte.
HINWEIS: Nachdem die Stütze
angelegt ist, können die Seiten
der Stütze eine weitere Einstellung
erfordern, um einen guten Sitz
ohne zu große Überlappung an der
Vorderseite zu erreichen.
A. Per regolare la dimensione del
tutore, staccare l’estremità
interna di ogni pannello
laterale.
B. Regolare come necessario per
adattare adeguatamente, poi
riattaccare.
C. Le dimensioni del tutore
corrispondono alle taglie
standard dei pantaloni.
Le dimensioni sono solo
esemplicative.
NOTA: Una volta applicato il
tutore, i suoi lati potrebbero
richiedere un’ulteriore regolazione
per ottenere un buon adattamento
senza una sovrapposizione
eccessiva sulla parte anteriore.
A. Pour ajuster la taille de
l’orthèse, ôtez les languettes
sur l’extrémité intérieure de
chaque panneau latéral.
B. Réglez le dispositif au besoin
pour qu’il soit bien ajusté puis
attachez-le à nouveau.
C. Les ceintures orthopédiques
reprennent exactement les
tailles de pantalon standard.
Les différentes tailles gurent
uniquement à titre de
référence.
REMARQUE: Une fois l’orthèse
installée, les côtés peuvent
demander un ajustement
supplémentaire pour atteindre
une xation confortable sans trop
de chevauchement à l’avant de
l’orthèse.
A.如果要改变腰带的尺寸,
请向上剥离两边侧板的
内端。
B.根据需要调节至合身的状
态,然后重新连接。
C.腰带尺寸应与标准裤子
尺寸一致。尺寸范围仅
供参考。
注意: 使用支架后,可能需要
进一步调整支架侧面,使其
在前端无过多重叠的情况下
紧贴身体。
SIZING 1 2 3 4
CIRCUMFERENCE
28 in
71 cm
37 in
94 cm
45 in
114 cm
54 in
137 cm
U.S. MEN’S PANT SIZE RANGES 28 38 46 54
U.S. WOMEN’S PANT SIZE RANGES 2 14 20 26
2"
PREPARATION PREPARACIÓN VORBEREITUNG PREPARAZIONE PRÉPARATION
准备
Place the pull tabs 2 inches (5 cm)
from the plastic in the back of the
brace. Pull the ends of the brace
away from each other ensuring that
the brace is fully extended.
Coloque las pestañas de ajuste a
2 pulgadas (5 cm) del plástico en
la parte posterior de la faja. Jale
de los extremos de la faja alejando
uno del otro y asegúrese de que la
faja esté completamente extendida.
Die Zugleinen 5 cm vom
Kunststoffteil im Rückenteil der
Orthese herausziehen. Die Orthese
an den Enden auseinanderziehen,
bis sie vollständig gedehnt ist.
Posizionare le linguette a 5 cm (2
pollici) di distanza dalla plastica
sul retro del tutore. Tenere lontane
le due estremità del tutore per
garantire che questo raggiunga la
completa estensione.
Placez les languettes à une
distance de 2 pouces (5 cm) de la
matière plastique située à l’arrière
de l’orthèse. Écartez les extrémités
de l’orthèse en vous assurant que
l’orthèse est étirée.
将拉环放在距离腰带背面塑
料板2英寸(5厘米)的位置。
将腰带的两端向相反的方向
拉动,务必将腰带完全拉开。
Not made with natural
rubber latex.
No está hecho con látex
de goma natural.
Ohne Naturkautschuklatex.
Non realizzato con lattice
di gomma naturale.
Pas fabriqué avec du latex
de caoutchouc naturel.
并非采用天然胶乳制造。
© 2017 Aspen Medical Products. All Rights Reserved.
Pat. aspenmp.com/patents.
OS0004B revised 03/18
1
2
B
C
A
ASPEN MEDICAL PRODUCTS
6481 OAK CANYON, IRVINE, CA 92618-5202, USA
800-295-2776 ∙ 949-681-0200 ∙ aspenmp.com

ENGLISH ESPAÑOL DEUTSCH ITALIANO FRANÇAIS
中文
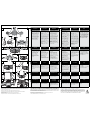
APPLICATION COLOCACIÓN ANWENDUNG APPLICAZIONE UTILISATION
使用
A. Apply the fully extended brace
making sure the back panel is
centered and low on the back.
B. Apply the brace tightly, with the
right side overlapping the left.
When applied properly, both
the upper and lower edge of
the brace should be snug. If
they are not, reapply the brace.
If needed, angle the ends to
insure a snug t at both the
upper and lower edges.
NOTE: For certain patients, the
ends must be steeply angled.
A. Coloque el soporte
completamente extendido y
asegúrese de que el panel
trasero esté centrado y ubicado
en la parte inferior de la
espalda.
B. Coloque el soporte de modo que
quede ceñido y el lado derecho
se superponga al lado izquierdo.
Si se coloca correctamente,
el borde superior y el borde
inferior del soporte deben estar
ceñidos. Si no lo están, vuelva
a colocar el soporte. Si es
necesario, doble los extremos
para garantizar un calce ceñido
en ambos bordes.
NOTA: Para ciertos pacientes, el
ángulo de los extremos debe ser
pronunciado.
A. Legen Sie den ganz
ausgebreiteten Gurt an und
stellen Sie sicher, dass die
Rückenplatte in der Mitte und
am unteren Rücken sitzt.
B. Ziehen Sie den Gurt fest an,
so dass die rechte Seite die
linke überlappt. Wenn er richtig
angelegt ist, sollten sowohl die
Ober- als auch die Unterkante
des Gurts angenehm sitzen.
Wenn sie das nicht tun, legen
Sie den Gurt erneut an. Wenn
nötig, stellen Sie die Enden so
ein, dass sowohl die Ober- als
auch die Unterkante gut sitzen.
HINWEIS: Bei einigen Patienten
müssen die Enden eventuell starker
abgewinkelt warden.
A. Applicare il tutore
completamente esteso,
assicurandosi che il pannello
posteriore sia centrato e
posizionato sulla parte bassa
della schiena.
B. Applicare il tutore stringendo,
con il lato destro a sovrapporsi
al sinistro. Quando è
applicato correttamente, sia
il bordo inferiore, che quello
superiore del tutore devono
essere ben stretti. Se non
lo sono, riapplicare il tutore.
Se necessario, angolare le
estremità per assicurare
una certa aderenza sia nel
bordo superiore, che in quello
inferiore.
NOTA: Per determinati pazienti,
l’angolatura delle estremità deve
essere molto pronunciata.
A. Enlez la ceinture orthopédique
bien ouverte en vous assurant
que le panneau arrière soit
centré et correctement placé au
bas du dos.
B. Serrez bien la ceinture
orthopédique, le côté droit
chevauchant le côté gauche.
Lorsque la ceinture est bien
placée, les bords supérieur
et inférieur doivent être bien
ajustés. Dans le cas contraire,
répétez l’opération an de bien
placer la ceinture orthopédique.
Si nécessaire, pliez légèrement
les extrémités an de vous
assurer que les bords supérieur
et inférieur soient bien ajustés.
REMARQUE: Pour certains
patients,les bouts doivent être
fortement inclinés.
A.使用完全伸展的支架,确
保背面板处于背部中间下
面的位置。
B.扣紧支架,右侧与左侧重
叠。正确扣紧后的支架上沿
和下沿应贴紧身体。如果未
扣紧,重新扣紧支架。如果
需要,调整两端的角度,确
保上沿和下沿贴紧身体。
注意: 对于某些患者,腰带两
端必须调整成较大的角度。
TIGHTENING AJUSTE STRAFFEN CHIUSURA SERRAGE
佩戴
A. Slip your thumbs through the
holes in the pull tabs. Pull away
from your body.
B. The left pull tab controls lower
compression and the right
pull tab controls the upper
compression. Adjust the
compression as needed.
C. When tightened, secure the
pull tabs to the loop in front of
the brace.
A. Pase los pulgares por los
oricios de las pestañas de
ajuste. Hale en dirección
opuesta a su cuerpo.
B. La pestaña izquierda controla
la compresión inferior, y la
derecha, la superior. Ajuste
la compresión según sea
necesario.
C. Una vez ajustada la faja,
asegure las pestañas
sujetándolas al gancho y felpa
de la parte delantera de la faja.
A. Die Daumen durch die Ösen
der Zugleinen stecken und
diese nach außen vom Körper
wegziehen.
B. Mit der linken Zugleine wird
die untere Kompression und
mit der rechten Zugleine die
obere Kompression reguliert.
Die Kompression je nach Bedarf
anpassen.
C. Nach dem Straffen die
Zugleinen am Klettverschluss
an der Vorderseite der
Kreuzstützbandage befestigen.
A. Inlare i pollici attraverso i
fori presenti nelle linguette di
estensione. Tirare in direzione
opposta al corpo.
B. La linguetta di estensione
sinistra controlla la
compressione inferiore, mentre
la linguetta di estensione destra
controlla la compressione
superiore. Regolare la
compressione secondo la
necessità.
C. Una volta stretto il supporto,
ssare le linguette di estensione
al materiale a uncini e asole
sulla sua parte frontale.
A. Glisser les pouces dans les
tirants. Tirer en écartant du
corps.
B. Le tirant de droite sert à régler
la compression supérieure et
celui de gauche la compression
inférieure. Régler la
compression selon les besoins.
C. Une fois serré, sécuriser les
tirants au Velcro situé devant
la ceinture.
A.将双手大拇指插入拉环的
孔。朝身体外的方向拉动。
B.左面的拉环控制下半部的
松紧,右面的拉环控制上
半部的松紧。按照需要调
整松紧度。
C.拉紧后,将拉环粘附在腰带
前方的钩环布上。
ADJUSTMENT AJUSTE JUSTIEREN REGOLAZIONE AJUSTEMENT
调整
A. Adjust the upper and/or lower
compression by loosening
or tightening the pull tabs as
needed.
B. When patient is seated, slightly
loosening the upper portion may
be benecial.
A. Ajuste la compresión superior
y/o inferior aojando o
apretando las pestañas según
sea necesario.
B. Aojar levemente la sección
superior cuando el paciente está
sentado puede ser benecioso.
A. Zum Justieren der oberen und/
oder unteren Kompression
einfach die Zugleinen lockern
oder straffen.
B. Für mehr Komfort kann der
obere Teil der Stützbandage
beim Sitzen des Patienten etwas
gelockert werden.
A. Regolare la compressione
superiore e/o inferiore
allentando o stringendo le
linguette di estensione secondo
la necessità.
B. Un leggero allentamento della
porzione superiore potrebbe
rendere il supporto più comodo
per il paziente quando sta
seduto.
A. Régler la compression
supérieure ou inférieure en
desserrant ou en resserrant les
tirants selon les besoins.
B. Lorsque le patient est assis,
il peut être bénéque de
desserrer légèrement la partie
supérieure.
A.按照需要松开或拉紧拉环,
调整上半部和/或下半部
的松紧度。
B.如果患者坐下,将上半部略
微松开可能会更舒适。
STRAP ADJUSTMENT AJUSTAR LAS TIRAS RIEMENANPASSUNG REGOLAZIONE CINGHIE RÉGLAGE DE LA SANGLE
皮带调节
A. Properly t shoulder straps.
B. Pull and tighten the shoulder
straps.
A. Ajuste adecuadamente las
correas del hombro.
B. Hale de las correas del hombro
y ajústelas.
A. Die Schulterriemen richtig
anlegen.
B. Die Riemen straff ziehen.
A. Adattare correttamente le
spalline.
B. Tirare e stringere le spalline.
A. Ajustez correctement les
bretelles.
B. Tirez sur les bretelles et
serrez-les.
A.适当调整肩带。
B.拉紧肩带。
PANEL REMOVAL RETIRAR EL PANEL
ENTFERNUNG
DER PLATTEN
RIMOZIONE DEL PANNELLO RETRAIT DU PANNEAU
移除板
If necessary, remove back panel
after disengaging hook and loop
attachment between back panel
and belt.
Si es necesario, retire el panel
trasero después de haber soltado
el gancho y la trabilla que une el
panel trasero con el cinturón.
Wenn notwendig, entfernen Sie
die Rückenplatte nachdem Sie den
aus Haken und Öse bestehenden
Mechanismus zwischen der
Rückenplatte und dem Gurt gelöst
haben.
Se necessario, rimuovere il
pannello posteriore dopo aver
sganciato la chiusura tra il pannello
e la fascia.
En cas de besoin, retirez le
panneau arrière après avoir
décroché la xation à crochet et le
boucle placées entre le panneau
arrière et la ceinture.
如果需要,拆除背面板和皮
带之间的挂钩和环扣,拆除
背面板。
READ INSTRUCTIONS BEFORE USE. Proper training in the use of this device should take place before it is applied.
These directions are guidelines only and are not offered as medical recommendations.
THIS PRODUCT IS INTENDED FOR APPLICATION BY LICENSED HEALTH CARE PRACTITIONERS AS DIRECTED BY
A PHYSICIAN OR OTHER QUALIFIED MEDICAL AUTHORITY. PERMANENT INJURY MAY RESULT FROM USE OTHER
THAN AS DIRECTED BY A PHYSICIAN OR OTHER MEDICAL AUTHORITY. ASPEN MEDICAL PRODUCTS SPECIFICALLY
DISCLAIMS ANY OBLIGATION OR LIABILITY FOR INJURY OR DAMAGE BY REASON OF ANY APPLICATION OF THIS
PRODUCT. PLEASE SEE THE LIMITED WARRANTY FOR FURTHER INFORMATION IN THIS REGARD.
LIMITED WARRANTY
Aspen Medical Products, Irvine, CA 92618, warrants to the user who originally purchases this product that it is free from defects
in material and workmanship. The sole obligation of Aspen Medical Products in the event of breach of warranty shall be to repair
or replace the defective product or part(s).
Aspen Medical Products shall have no obligation under this limited warranty in the event:
(a) The product was not purchased from Aspen Medical Products or through its authorized channels of distribution;
(b) The product is altered;
(c) Any parts not supplied by Aspen Medical Products are inserted into the product; or
(d) The product is not used in accordance with the Aspen Medical Products Instructions for Use.
THE FOREGOING IS THE SOLE AND EXCLUSIVE REMEDY FOR FAILURE IN SERVICE OF, OR DEFECT IN, THE PRODUCT. ASPEN
MEDICAL PRODUCTS SHALL NOT BE LIABLE UNDER THIS OR ANY IMPLIED WARRANTY FOR ANY DIRECT, SPECIAL, INCIDENTAL, OR
CONSEQUENTIAL DAMAGES. THIS WARRANTY IS IN LIEU OF ALL OTHER WARRANTIES, EXPRESSED OR IMPLIED, INCLUDING THE
WARRANTY OF MERCHANTABILITY OR FITNESS FOR A PARTICULAR PURPOSE OR USE, AND ALL OBLIGATIONS OR LIABILITIES ON THE
PART OF ASPEN MEDICAL PRODUCTS FOR DAMAGES ARISING OUT OF OR IN CONNECTION WITH THE USE OF THE PRODUCTS, WHICH
ARE HEREBY DISCLAIMED AND EXCLUDED BY ASPEN MEDICAL PRODUCTS.
This warranty gives you specific legal rights and you may have other rights which vary from state to state.
Warning: To ensure proper use, please review all material.
A listing of authorized distributors in your area is available upon request.
3
4
5
6
7
A
A
B
B
A
A
C
B
B
-
 1
1
-
 2
2


dans d''autres langues
- italiano: Aspen OTS Manuale utente
- English: Aspen OTS User manual
- español: Aspen OTS Manual de usuario
- Deutsch: Aspen OTS Benutzerhandbuch
Documents connexes
Autres documents
-
 Aspen Medical Products SIERRA LSO ADJUSTABLE Manuel utilisateur
-
Össur Miami Lumbar Posteo Instructions For Use Manual
-
 Aspen Medical Products TLSO Guide de démarrage rapide
-
bort medical DorsoFX Instructions For Use Manual
-
-
-
 Allard 35306 SELECTION OPEN WRIST CHILDREN Instructions For Use Manual
-
Ottobock 8359 Genu Direxa Stable Instructions For Use Manual
-
Otto Bock 28U90 Series Instructions For Use Manual
-
 Aspen Medical Products Vista CTO Guide de démarrage rapide


