
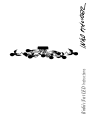
Birdie’s Nest LED Instructions

32
Montageanleitung
Bitte vor der Montage aufmerksam lesen und aufbe-
wahren!
Instructions for assembly
Please read these instructions carefully before going
any further, and keep them in a safe place for future
reference!
Instructions de montage
A lire attentivement avant le montage et à conserver
soigneusement!
Istruzioni di montaggio
Prima del montaggio leggere attentamente le pre-
senti istruzioni e conservarle!
Deutsch Seite 4
English Page 7
Français Page 10
Italiano Pagina 14
Zeichnungen Seite 18
Drawings Page 18
Dessins Page 18
Disegni Pagina 18
Birdie‘s Nest
Ingo Maurer 2005/2017

54
Montage und Elektroanschluss müssen von einer Elektro-
fachkraft ausgeführt werden.
Wichtig: Bitte nehmen Sie die Leuchte vorsichtig aus der
Verpackung und entfernen Sie die Verpackungsmaterialien
vollständig. Bei allen Arbeiten am Lüster bitte die beilie-
genden Stoffhandschuhe tragen. Die verzinnten Metallteile
sowie die Federn sind sehr empfindlich.
Wir empfehlen, die Montage mit zwei Personen durchzu-
führen.
Achtung: Birdie’s Nest ist nicht geeignet für die Montage
in Räumen mit hoher Luftfeuchtigkeit oder im Freien.
Montagevorbereitung
Wichtig: Schalten Sie die Sicherung des Decken- oder
Wandauslasses vor der Montage aus. Achten Sie unbe-
dingt auf den Verlauf von Elektroleitungen, damit auf kei-
nen Fall ein Kabel angebohrt wird. Montieren Sie nicht auf
feuchtem und leitendem Untergrund!
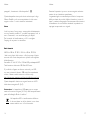
Öffnen Sie das Trafogehäuse (1) der Leuchte, indem Sie
die drei seitlichen Schrauben (2) so weit in den Kunst-
stoffbaldachin (3) zurückschrauben, dass der Baldachin
nach oben vom Trafogehäuse (1) abgezogen werden
kann. ①
Benutzen Sie den Kunststoffbaldachin als Bohrschablone.
Platzieren Sie den Baldachin so, dass die Zuleitungen des
Decken- oder Wandauslasses durch die große Öffnung
ins Innere der Dose ragen.
Montage
Bohren Sie vier Dübellöcher Ø 6 mm, setzen Sie die Dübel
S6 ein und schrauben Sie den Kunststoffbaldachin (3)
gut fest. Lassen Sie die Zuleitungen des Decken- oder
Wandauslasses ca. 8 cm herausragen und isolieren Sie
nur die Enden von Leiter und Neutralleiter um jeweils
5 mm ab. Schließen Sie Leiter und Neutralleiter an die
Lüsterklemmenbuchse (4) an.
Achtung: Birdie’s Nest darf nicht geerdet werden!
Deutsch
Eine Person sollte den Lüster unter den an der Decke
festgeschraubten Baldachin halten. Stecken Sie den an der
Lampe angeklemmten Lüsterklemmenstecker (5) in die am
Deckenauslass angeschlossene Lüsterklemmenbuchse (4).
Achten Sie auf festen Sitz.
Schieben Sie das Trafogehäuse (1) des Lüsters so weit auf
den Baldachin (3), dass Sie die drei seitlichen Schrauben
(2) wieder bis zum Anschlag nach aussen durch die Lang-
löcher des Trafogehäuses herausdrehen können, so dass
der Lüster sicher daran hängt. ①
Einsetzen der LED-Leuchtmittel
Schrauben Sie die LED-Leuchtmittel (6) in die Fassungs-
ringe (7) ein und stecken Sie die Anschlussdrähte (8)
bis zum Anschlag in die Buchsen (9) der LED-Lampen.
Überzeugen Sie sich vom festen Sitz der Drähte. ②
Achtung: Alle zehn Anschlussdrähte müssen sich vor
dem Einschalten des Stroms in den Buchsen befinden,
sonst besteht Kurzschlussgefahr!
Stecken Sie die zehn Flügelpaare mit dem Messing-clip
(10) auf den Fassungsring (7). ②
Gestalten Sie Birdie’s Nest selbst durch vorsichtiges Biegen
der silbernen Arme und die Stellung der Flügel.
Wechsel der LED-Leuchtmittel
Achtung: Schalten Sie die Sicherung des Deckenauslasses
aus und lassen Sie die Leuchtmittel vollständig abkühlen.
Ziehen Sie den Anschlussdraht (8) aus der Buchse (9)
des zu ersetzenden Leuchtmittels und drehen Sie es aus
dem Fassungsring (7). Setzen Sie das neue Leuchtmittel
ein, wie unter „Einsetzen der Leuchtmittel“ beschrieben.
②
Die Leuchtmittel werden exklusiv für die Ingo Maurer
GmbH hergestellt und können nur über unseren Webshop
oder unsere Händler bezogen werden.
Deutsch

76
Pflege
Die Flügel aus Gänsefedern können vorsichtig mit einem
weichen Pinsel gesäubert werden. Gegebenfalls können
die Flügel mit handelsüblichem Haarlack bzw. -spray
imprägniert werden. Für das Trafogehäuse und die Drähte
benutzen Sie am besten ein Mikrofasertuch.
Technische Daten
230 Volt~50 Hz, PF 0,99; 125 Volt~60 Hz., PF 0,98;
Die für Ihre Leuchte zutreffende Spannung und Frequenz ent-
nehmen Sie bitte dem Typenschild.
Sekundär 12 Volt AC, 10x 1,5 Watt LED, Fassungen E27.
Elektronischer Transformator max. 20 Watt LED.
Es ist möglich, einen Universaldimmer für LED, mit
mindestens 100 Watt Leistung anzuschließen (siehe
Dimmerempfehlung auf unserer Website).
https://www.ingo-maurer.com/de/produkte/birdies-nest-led/
Diese Leuchte enthält LED Lichtquellen der Energieklasse
G (A-G).
Achtung: Die LED-Leuchtmittel können in keiner
Halogenversion (24 Volt) der Birds- und Lucellino-Familie
verwendet werden!
Eine defekte Leuchte oder LED Leuchtmittel
müssen als Elektroschrott entsorgt werden und
dürfen nicht in den Hausmüll gelangen.
Eventuell notwendige Reparaturen dürfen nur von einer
Elektrofachkraft durchgeführt werden.
Bei Schäden, die durch Nichtbeachten dieser Bedienungs-
anleitung, unsachgemäßer Inbetriebnahme und/oder bau-
licher Veränderung z.B. durch Fremdbauteile, Handhabung
oder Fremdeingriff verursacht werden, erlischt der Garantie-
anspruch.
Deutsch English
The lamp assembly and all electrical work must be carried
out by a qualified electrician.
Important: Please take the lamp carefully out of the packa-
ging and remove all packing materials. The cotton gloves
supplied must be worn during work on the chandelier, as
the galvanized metal parts and the feathers are very deli-
cate.
A second person should preferably be present to assist with
the assembly.
Caution: Birdie’s Nest is not suitable for use in damp areas
or outdoor areas.
Preparations for assembly
Important: Switch off or remove the fuse for the ceiling
outlet before beginning the assembly. Take care to ascer-
tain the exact position of all electrical wiring in the ceiling,
so as to avoid accidentally drilling into a cable. Do not
attach the lamp to a damp and/or conductive surface!
Open the transformer housing (1) by driving the three
screws at the side (2) into the plastic canopy (3) to the
point where the canopy can be lifted away from the
transformer housing (1). ①
Mark the drill holes, using the canopy as a template.
Position the canopy so that the wires from the ceiling
outlet can be fed through the large aperture into the box.
Assembly
Drill the four 6 mm-diameter holes, insert the S6 plugs
and screw the canopy (3) firmly into place. Remove an
8 cm section of the outer covering from the mains cable
and strip about 5 mm from the ends of the phase and
neutral wires only. Attach the phase and neutral wires to
the contacts in the ceiling terminal (4).
Caution: Birdie’s Nest must not be grounded!

98
For the next part of the operation one person should
hold the chandelier under the canopy fixed to the cei-
ling. Plug the lamp connector (5) into the ceiling terminal
socket (4). Ensure that the connector is firmly inserted in
the socket.
Push the transformer housing (1) onto the canopy (3) to
the point where the three screws at the side (2) can be
driven out through the slots on the transformer housing,
so that the chandelier is securely suspended. ①
Inserting the LED light bulbs
Screw the LED bulbs (6) into the holder rings (7) and
push the connecting wires (8) firmly into the contact slee-
ves (9) on the bulbs. Ensure that the wires are securely in
position. ②
Caution: All ten connecting wires must be inserted in
the sleeves before the lamp is switched on; otherwise
there is a danger of short-circuiting!
Fit the ten pairs of wings with the brass clips (10) on the
holder rings (7). ②
Birdie’s Nest can be modified to suit the user‘s wishes by
carefully bending the silver arms and altering the position
of the wings.
Changing the LED bulbs
Caution: Switch off or remove the fuse for the power
outlet and allow the bulbs to cool down completely.
Remove the connecting wire (8) from the contact sleeve
(9) on the spent bulb, unscrew the bulb from the holder
ring (7) and insert the replacement as described under
„Inserting the LED light bulbs“ above. ②
The bulbs are manufactured exclusively for Ingo Maurer
GmbH. Replacements are only available from our web-
shop or authorized retailers.
English English
Cleaning
The goose-feather wings can be cleaned carefully with a
soft paintbrush. If necessary, the wings can be impregna-
ted with ordinary hairspray or hair lacquer.
A microfibre cloth should be used for the transformer
housing and the wires.
Technical specification
230 Volt~50 Hz, PF 0,99; 125 Volt~60 Hz., PF 0,98;
The correct voltage and frequency for your lamp are indicated
on the type label.
Secondary 12 Volt AC, 10 x 1,5 Watt LED, socket E27.
Electronic transformer, max. 20 Watt LED.
A universal dimmer (suitable LED), with a minimum output
of 100 watt may be fitted. For current recommendations
on compatible dimmers please see our website:
https://www.ingo-maurer.com/en/products/birdies-nest-led/
The lamp is supplied with LED lightsources of the energy
class G (A-G).
Caution: The LED light bulbs must not be used in any
24 volts halogen version of Birdie or Lucellino!
A defective lamp or LED bulb must be disposed
as electronic scrap. It must not get into domestic
waste.
Any repairs that may become necessary must be carried
out by a professional electrician.
The legal and contractual warranty for defects and product
liability will be void, should the installation instructions not
be duly followed or non-original components be employed.

1110
Français
Le montage et le branchement électrique sont à effectuer
par un électricien.
Important: Veuillez sortir la lampe soigneusement de son
emballage. Retirez tous les matériaux d‘emballage. Il est
indispensable de porter des gants en tissu pour effectuer
tous travaux sur le lustre: les parties en métal étamé ainsi
que les plumes sont très fragiles! Nous recommandons
d’effectuer le montage à deux personnes.
Attention: Birdie‘s Nest n‘est pas approprié pour un
montage dans des pièces humides, ou en plein air!
Préparation au montage
Important: déconnecter le fusible contrôlant l‘arrivée du
courant au plafond avant le montage! Il est indispensable
de respecter le positionnement des conduites électriques
au plafond pour éviter de percer un câble électrique! Ne
pas installer sur une surface humide et/ou conductrice!
Ouvrir le coffre du transformateur (1) de la lampe en
vissant les trois vis latérales (2) dans le baldaquin en
plastique (3) de telle manière que le baldaquin puisse être
enlevé du coffre (1) par le haut. ①
Utiliser le baldaquin en plastique comme gabarit de per-
çage. Placer le baldaquin de telle sorte que les câbles de
la sortie du plafond dépassent de la grande ouverture
dans l‘intérieur du boîtier.
Montage
Percer quatre trous de cheville Ø 6 mm, insérer les che-
villes S6 et visser fermement le baldaquin en plastique (3).
Laisser dépasser les conduites isolées de la sortie de pla-
fond d‘environ 8 cm et dénuder les extrémités du fil de
phase et du fil neutre de 5 mm. Connecter le fil de phase
et le fil neutre à la douille du domino (4).
Français
Attention: Birdie‘s Nest ne doit en aucun cas être relié
à la terre!
Nous conseillons qu‘une personne tienne le lustre au-
dessous du baldaquin vissé au plafond. Insérer la fiche (5)
du domino connectée à la lampe dans la douille (4) du
domino connectée à la sortie du plafond. Assurez-vous
du bon positionnement.
Positionner le coffre (1) du transformateur du lustre sur
le baldaquin (3) de sorte que les trois vis latérales (2)
puissent être dévissées jusqu‘à la butée vers l‘extérieur
par les trous oblongs du coffre, de telle manière que le
lustre soit suspendu d‘une manière sûre. ①
Insertion des ampoules LED
Visser les ampoules LED (6) dans les porte-anneaux (7)
et amener les fils de connexion (8) jusqu’à la butée dans
les alvéoles (9) des ampoules. Assurez-vous de la position
ferme des fils de connexion! ②
Attention: les dix fils de connexion doivent se trouver
fixés dans les alvéoles avant la mise en circuit, sinon il y a
danger de court-circuit!
Attacher les dix paires d‘ailes avec le clip en laiton (10)
sur les porte-anneaux (7). ②
Formez Birdie’s Nest vous-même en pliant les bras argen-
tés et en plaçant les ailes avec précaution.
Remplacement des ampoules LED
Attention: déconnecter le fusible contrôlant l‘arrivée du
courant au plafond et laisser refroidir les ampoules com-
plètement.
Retirer le fil de connexion (8) de l‘alvéole (9) de l‘ampoule
à remplacer, dévisser l‘ampoule du porte-anneau (7)
et insérer l‘ampoule de rechange (voir „Insertion des
ampoules“).②

1312
Français
Cette ampoule est produite exclusivement pour la société
Ingo Maurer GmbH. Ampoules de rechange sont à com-
mander auprès de nos revendeurs et notre webshop.
Entretien
Les ailes en plumes d’oie doivent être nettoyées avec pré-
caution au pinceau. Eventuellement, imprégner les ailes
avec une laque à cheveux. Utilisez un chiffon à microfibre
pour nettoyer le boîtier du trafo et les fils.
Données techniques
230 Volt~50 Hz, PF 0,99; 125Volt~60 Hz., PF 0,98;
Vous trouverez la tension et la fréquence adaptées à votre
lampe sur la plaque signalétique.
Secondaire 12 Volt AC, 10 x 1,5 Watt LED, douille E27.
Transformateur électronique 20 Watt LED max.
Il est possible de connecter un variateur universel pour LED,
avec une puissance d‘au moins 100 watts (voir les recom-
mandations de variateur sur notre site internet).
https://www.ingo-maurer.com/fr/produits/birdies-nest-led/
Cette lampe est équipée avec les sources lumineuses LED
de la classe énergétique G (A-G).
Attention: Les ampoules LED ne peuvent être utilisées
dans aucune version halogène (24 volts) de la famille des
Birds et Lucellino!
Un lampe ou ampoule LED défectueux devra
être jeté avec des déchets électroniques, ne pas
les jeter avec vos ordures ménagères.
Des réparations éventuellement nécessaires ne sont à
effectuer que par un spécialiste.
La garantie légale et contractuelle pour les défauts et la
responsabilité pour les dommages causés par des produits
Français
défectueux, expireront en cas de dommages ou de réclama-
tions résultant du non-respect des instructions d‘installation
et/ou des modifications structurelles, en particulier si des
composants non originaux sont utilisés.

1514
Italiano
Il montaggio e il collegamento alla rete devono essere
effettuati da un elettricista.
Importante: Estrarre cautamente la lampada
dell’imballaggio e rimuovere tutti i materiali di imballaggio.
Per tutti i lavori sul lampadario indossare sempre i guanti
in stoffa in dotazione: le parti in metallo zincato e le piume
sono molto delicate. Raccomandiamo di effettuare il mon-
taggio in due persone.
Attenzione: Birdie’s Nest non è adatta per il montaggio
in ambienti ad alta umidità oppure all’aperto.
Preparazione del montaggio
Importante: Prima del montaggio staccare la corrente
dell’uscita della corrente sul soffitto! Fare attenzione al
percorso delle linee di alimentazione, per evitare di dan-
neggiare un cavo. Non montare su superfici umide e/o
conduttrici di corrente!
Aprire la scatola del trasformatore (1) della lampada,
avvitando le tre viti laterali (2) nel rosone in materiale
sintetico (3) fino a che il rosone possa essere rimosso
verso l’alto dalla scatola del trasformatore (1). ①
Impiegare il rosone in materiale sintetico come dima di
foratura. Disporre il rosone in modo da consentire che
i cavi di alimentazione dell’uscita della corrente sul sof-
fitto possano passare all’interno della scatola attraverso
l’apertura maggiore.
Montaggio
Effettuare i quattro fori di Ø 6 mm, inserire i tasselli S6
e avvitare saldamente il rosone in materiale sintetico (3).
Lasciare spuntare i cavi di alimentazione dell’uscita della
corrente sul soffitto di ca. 8 cm e spelare esclusivamente
le estremità di fase e neutro di 5 mm circa. Collegare fase
e neutro al serrafilo (4).
Italiano
Attenzione: Birdie’s Nest non deve essere collegata a
terra!
Una persona tiene il lampadario posizionandolo sotto il
rosone avvitato al soffitto. Inserire il serrafilo a spina (5)
stretto alla lampada nel serrafilo (4) fissato all’uscita della
corrente sul soffitto. Assicurarsi che sia saldamente e cor-
rettamente inserito.
Spingere la scatola del trasformatore (1) del lampadario
sul rosone (3), fino a che le tre viti laterali (2) possano
essere svitate verso l’esterno attraverso le asole della
scatola del trasformatore, in modo che il lampadario vi sia
agganciato solidamente. ①
Inserimento delle lampadine a LED
Avvitare le lampadine a LED (6) negli anelli dei portalam-
pada (7) e inserire i fili di collegamento (8) fino all’arresto
negli spinotti (9) delle lampadine. Assicurarsi che i fili
siano saldamente inseriti. ②
Attenzione: Prima di attaccare la corrente, i dieci fili di
collegamento devono essere inseriti negli spinotti. In caso
contrario sussiste il rischio di corto circuito!
Applicare le dieci paia d’ali con i clip in ottone (10) sui
rispettivi anelli dei portalampada (7). ②
Date a Birdie la forma che desiderate, torcendo cauta-
mente le braccia in argento nonché le ali.
Sostituzione delle lampadine a LED
Attenzione: Staccare la corrente e attendere che le lam-
padine siano completamente fredde!
Staccare il filo di collegamento (8) dallo spinotto (9) della
lampadina da sostituire, svitarla ed estrarla dall’anello del
portalampada (7), quindi inserire la nuova lampadina; vedi

1716
Italiano
paragrafo „Inserimento delle lampadine”. ②
Questa lampadina viene prodotta in esclusiva per la Ingo
Maurer GmbH e può essere acquistata solo dal nostro
negozio online o i nostri rivenditori autorizzati.
Cura
Le ali in piume d’oca possono essere pulite delicatamente
con un pennello morbido. E’ possibile impregnare le ali, in
caso di necessità, con una lacca/spray per capelli.
Per la scatola del trasformatore e i fili è consigliato
l’impiego di un panno in microfibra.
Dati tecnici
230 Volt~50 Hz, PF 0,99; 125Volt~60 Hz., PF 0,98;
I dati tecnici relativi alla tensione e alla frequenza di funzio-
namento della Vostra lampada sono riportati sulla targhetta
d’identificazione.
Secondario 12 Volt AC, 10 x 1,5 Watt LED, portalampada E27.
Trasformatore elettronico 20 Watt LED max. .
E‘ possibile collegare un dimmer universale per LED,
con una potenza di almeno 100 watt (raccomandazioni
relative a dimmer adatti contenute sul nostro sito).
https://www.ingo-maurer.com/it/prodotti/birdies-nest-led/
Questa lampada è dotata con sorgenti luminose a LED
della classe energetica G (A-G).
Attenzione: Le lampadine a LED non possono essere
usate nelle versioni alogene (24 Volt) delle lampade facenti
parte della famiglia Birds e Lucellino!
Un lampadine LED o transformatore difettoso
è da considerarsi un rifiuto elettrici e non deve
essere smaltito con i rifi uti domestici.
Italiano
Eventuali riparazioni possono essere eseguite esclusiva-
mente da un elettricista specializzato.
La garanzia legale e contrattuale per difetti e la responsa-
bilità per danni da prodotti difettosi, decadono in caso di
danni o reclami conseguenti all’inosservanza delle istruzioni
d’installazione e/o a modifiche strutturali, soprattutto se
impiegati componenti non originali.

1918
1
S6
Ø 6 mm
3
4
5
2
①
6
9
7
8
10
②

Ingo Maurer GmbH
Kaiserstrasse 47
80801 München
Germany
T. +49. 89. 381606-0
F. +49. 89. 381606 20
www.ingo-maurer.com
September 2021 Made in Germany
-
 1
1
-
 2
2
-
 3
3
-
 4
4
-
 5
5
-
 6
6
-
 7
7
-
 8
8
-
 9
9
-
 10
10
-
 11
11


dans d''autres langues
Documents connexes
-
Ingo Maurer Bulb Limited Mode d'emploi
-
-
-
-
-
-
-
-
-

