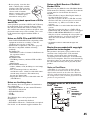
Sony MEX-DV900 Le manuel du propriétaire
- Catégorie
- Lecteurs DVD
- Taper
- Le manuel du propriétaire

GB
DE
FR
IT
NL
©
2008 Sony Corporation
MEX-DV900
3-283-926-11 (1)
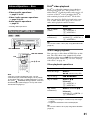
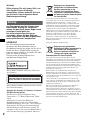
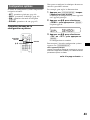
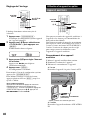
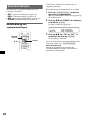
Multi Disc Player
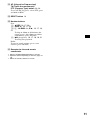
SOURCE
MODE
Operating Instructions
Bedienungsanleitung
Mode d’emploi
Istruzioni per l’uso
Gebruiksaanwijzing
Multi Disc Player

2
Warning
To prevent fire or shock hazard, do not
expose the unit to rain or moisture.
To avoid electrical shock, do not open the
cabinet. Refer servicing to qualified
personnel only.
CAUTION
The use of optical instruments with this product
will increase eye hazard. As the laser beam used
in this CD/DVD player is harmful to eyes, do not
attempt to disassemble the cabinet.
Refer servicing to qualified personnel only.
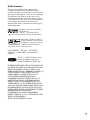
CAUTION
RADIATION WHEN OPEN AND INTERLOCKS DEFEATED.
DO NOT VIEW DIRECTLY WITH OPTICAL INSTRUMENTS.
:
CLASS 1M VISIBLE/INVISIBLE LASER
This label is located on the bottom of the
chassis.
This label is located on the drive unit’s internal
chassis.
Notice for the customer in the countries
applying EU Directives
The manufacturer of this product is Sony
Corporation, 1-7-1 Konan, Minato-ku, Tokyo,
Japan.
The Authorized Representative for EMC and
product safety is Sony Deutschland GmbH,
Hedelfinger Strasse 61, 70327 Stuttgart,
Germany. For any service or guarantee matters
please refer to the addresses given in separate
service or guarantee documents.
Disposal of Old Electrical &
Electronic Equipment (Applicable in
the European Union and other
European countries with separate
collection systems)
This symbol on the product or on its
packaging indicates that this product shall not be treated
as household waste. Instead it shall be handed over to the
applicable collection point for the recycling of electrical
and electronic equipment. By ensuring this product is
disposed of correctly, you will help prevent potential
negative consequences for the environment and human
health, which could otherwise be caused by inappropriate
waste handling of this product. The recycling of materials
will help to conserve natural resources. For more detailed
information about recycling of this product, please contact
your local Civic Office, your household waste disposal
service or the shop where you purchased the product.
Applicable accessory: Remote commander
Disposal of waste batteries
(applicable in the European Union
and other European countries with
separate collection systems)
This symbol on the battery or on the packaging indicates
that the battery provided with this product shall not be
treated as household waste. By ensuring these batteries are
disposed of correctly, you will help prevent potentially
negative consequences for the environment and human
health which could otherwise be caused by inappropriate
waste handling of the battery. The recycling of the
materials will help to conserve natural resources. In case
of products that for safety, performance or data integrity
reasons require a permanent connection with an
incorporated battery, this battery should be replaced by
qualified service staff only. To ensure that the battery will
be treated properly, hand over the product at end-of-life to
the applicable collection point for the recycling of
electrical and electronic equipment. For all other batteries,
please view the section on how to remove the battery from
the product safely. Hand the battery over to the applicable
collection point for the recycling of waste batteries. For
more detailed information about recycling of this product
or battery, please contact your local Civic Office, your
household waste disposal service or the shop where you
purchased the product.

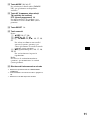
3
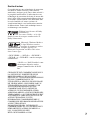
On safety
• Comply with the traffic laws in your country.
• For your safety, the monitor connected to the
VIDEO OUT turns off automatically when the
parking brake is not applied.
Warning if your car’s ignition has no
ACC position
Be sure to set the Auto Off function
(page 41).
The unit will shut off completely and
automatically in the set time after the unit is
turned off, which prevents battery drain.
If you do not set the Auto Off function, press
and hold (OFF) until the display disappears
each time you turn the ignition off.
To cancel the demonstration (DEMO) display,
see page 41.
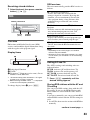
Preventing an accident
Pictures appear only after you park the car
and set the parking brake.
If the car starts moving during video
playback, pictures from the VIDEO OUT
automatically disappear after displaying the
following caution.
The pictures on the screen are turned off, but
audio source can be heard.
Do not operate the unit or watch the monitor
while driving.
Video blocked for your
safety.

4
Table of Contents
Welcome ! . . . . . . . . . . . . . . . . . . . . . . . . . . . . .6
Copyrights . . . . . . . . . . . . . . . . . . . . . . . . . . .7
Playable discs and symbols used in this
manual . . . . . . . . . . . . . . . . . . . . . . . . . . . . . . . .8
Location and function of controls . . . . . . . . . .10
Main unit . . . . . . . . . . . . . . . . . . . . . . . . . . .10
Card remote commander RM-X168 . . . . . .12
Getting Started
Installing the unit and the optional
monitor . . . . . . . . . . . . . . . . . . . . . . . . . . 14
Resetting the unit. . . . . . . . . . . . . . . . . . 14
Preparing the card remote
commander. . . . . . . . . . . . . . . . . . . . . . . 14
Detaching the front panel . . . . . . . . . . . 15
Attaching the front panel. . . . . . . . . . 15
Basic Operations
Playing video discs . . . . . . . . . . . . . . . . 16
Playing audio discs . . . . . . . . . . . . . . . . 18
Listening to the radio. . . . . . . . . . . . . . . 20
Advanced Operations — Discs
Playing DivX
®
/JPEG files . . . . . . . . . . . . . . . .21
DivX
®
video playback. . . . . . . . . . . . . . . . .21
JPEG image playback . . . . . . . . . . . . . . . . .21
Using PBC functions — Playback control. . . .22
Using play mode menu. . . . . . . . . . . . . . . . . . .22
Viewing time/text information of the disc . . . .24
Configuring audio settings . . . . . . . . . . . . . . . .24
Changing the audio language/format. . . . . .25
Checking the program format . . . . . . . . . . .25
Adjusting the audio output level
— DVD level. . . . . . . . . . . . . . . . . . . . . . . .26
Magnifying pictures . . . . . . . . . . . . . . . . . . . . .26
Adjusting the picture quality
— Picture EQ . . . . . . . . . . . . . . . . . . . . . . . . . .27
Customizing the picture quality. . . . . . . . . .27
Locking discs — Parental control . . . . . . . . . .28
Activating parental control . . . . . . . . . . . . .28
Changing the area and its movie rating
level . . . . . . . . . . . . . . . . . . . . . . . . . . . . . . .28
Repeat and shuffle play . . . . . . . . . . . . . . . . . . 29
Direct search play . . . . . . . . . . . . . . . . . . . . . . 30
Listing up tracks/images/video files
— Quick-BrowZer. . . . . . . . . . . . . . . . . . . . . . 31
Selecting a track/image/video file. . . . . . . . 31
Selecting a file type. . . . . . . . . . . . . . . . . . . 31
Viewing audio disc information . . . . . . . . . . . 32
Advanced Operations — Radio
Storing and receiving stations . . . . . . . . . . . . . 32
Storing automatically — BTM . . . . . . . . . . 32
Storing manually. . . . . . . . . . . . . . . . . . . . . 32
Receiving stored stations . . . . . . . . . . . . . . 33
RDS . . . . . . . . . . . . . . . . . . . . . . . . . . . . . . . . . 33
Overview. . . . . . . . . . . . . . . . . . . . . . . . . . . 33
Setting AF and TA . . . . . . . . . . . . . . . . . . . 33
Selecting PTY . . . . . . . . . . . . . . . . . . . . . . . 34
Setting CT. . . . . . . . . . . . . . . . . . . . . . . . . . 34
Sound Adjustment
Adjusting the sound characteristics. . . . . . . . . 35
Customizing the equalizer curve
— EQ3 . . . . . . . . . . . . . . . . . . . . . . . . . . . . 35
Settings
Visual setup . . . . . . . . . . . . . . . . . . . . . . . . . . . 36
Basic operation of visual setup . . . . . . . . . . 36
Language setup for display or
soundtrack. . . . . . . . . . . . . . . . . . . . . . . . . . 37
Display setup. . . . . . . . . . . . . . . . . . . . . . . . 37
Custom setup. . . . . . . . . . . . . . . . . . . . . . . . 38
Audio setup. . . . . . . . . . . . . . . . . . . . . . . . . 39
Resetting all settings. . . . . . . . . . . . . . . . . . 39
System setup . . . . . . . . . . . . . . . . . . . . . . . . . . 40
Basic operation of system setup . . . . . . . . . 40
Setting the clock . . . . . . . . . . . . . . . . . . . . . 43
Using Optional Equipment
Auxiliary equipment . . . . . . . . . . . . . . . . . . . . 43

For installation and connections, see the
supplied installation/connections manual.
5
Additional Information
Precautions . . . . . . . . . . . . . . . . . . . . . . . . . . . 44
Notes on discs . . . . . . . . . . . . . . . . . . . . . . . 44
Playback order of MP3/WMA/JPEG/DivX
®
files . . . . . . . . . . . . . . . . . . . . . . . . . . . . . . . 45
About MP3 files . . . . . . . . . . . . . . . . . . . . . 46
About WMA files . . . . . . . . . . . . . . . . . . . . 46
About JPEG files . . . . . . . . . . . . . . . . . . . . 46
About DivX
®
files . . . . . . . . . . . . . . . . . . . 46
Maintenance . . . . . . . . . . . . . . . . . . . . . . . . . . 46
Removing the unit . . . . . . . . . . . . . . . . . . . . . . 47
Specifications . . . . . . . . . . . . . . . . . . . . . . . . . 48
Troubleshooting. . . . . . . . . . . . . . . . . . . . . . . . 49
Error displays/Messages . . . . . . . . . . . . . . . 51
Glossary. . . . . . . . . . . . . . . . . . . . . . . . . . . . . . 52
Language code/area code list. . . . . . . . . . . . . . 53
Index . . . . . . . . . . . . . . . . . . . . . . . . . . . . . . . . 54

6
Welcome !
Thank you for purchasing this Sony Multi Disc
Player. Before operating this unit, read this
manual thoroughly and retain it for future
reference.
Features
Follow the page reference for details.
* Depending on track length and recorded sampling
rate.
DVD, VCD, CD playback
t page 8
Compatible with various disc formats.
2000MP3, 2000WMA
Can play up to 2,000 tracks* recorded on DVD-
R DL in MP3/WMA format.
Multi-disc resume playback
t page 38
Stores the point where playback is stopped for
up to 5 discs and can resume DVD VIDEO/
VCD playback even after the disc is ejected.
t page 35
7 preset equalizer curves, which can be further
customized by tuning 3 different bands.
t page 27
Picture tone selectable from preset settings
according to the car’s interior/ambient light.
t page 43
Allows connection of a portable audio device
(analog connection).
t page 43
The AUX AUDIO IN terminals on the rear
allow connection and audio output of an
auxiliary device, such as portable audio device
(analog connection), hideaway navigation
device, TV tuner box, etc.

7
Copyrights
This product incorporates copyright protection
technology that is protected by U.S. patents and
other intellectual property rights. Use of this
copyright protection technology must be
authorized by Macrovision, and is intended for
home and other limited viewing uses only unless
otherwise authorized by Macrovision. Reverse
engineering or disassembly is prohibited.
“DVD VIDEO,” “DVD-R,” “DVD-RW,”
“DVD+R,” and “DVD+RW” are trademarks.
“DivX” and “DivX Certified” are
registered trademarks or trademarks
of DivX, Inc.
THIS PRODUCT IS LICENSED UNDER THE
MPEG-4 VISUAL PATENT PORTFOLIO
LICENSE FOR THE PERSONAL AND NON-
COMMERCIAL USE OF A CONSUMER FOR
DECODING MPEG-4 VIDEO THAT WAS
ENCODED BY A CONSUMER ENGAGED IN
A PERSONAL AND NON-COMMERCIAL
ACTIVITY AND/OR WAS OBTAINED FROM
A VIDEO PROVIDER LICENSED BY MPEG
LA TO PROVIDE MPEG-4 VIDEO. NO
LICENSE IS GRANTED OR SHALL BE
IMPLIED FOR ANY OTHER USE.
ADDITIONAL INFORMATION INCLUDING
THAT RELATING TO PROMOTIONAL,
INTERNAL AND COMMERCIAL USES AND
LICENSING MAY BE OBTAINED FROM
MPEG LA, LLC. SEE
HTTP://WWW.MPEGLA.COM
Manufactured under license
from Dolby Laboratories.
“Dolby” and the double-D
symbol are trademarks of Dolby Laboratories.
Microsoft, Windows Media,
and the Windows logo are
trademarks or registered
trademarks of Microsoft
Corporation in the United States and/or other
countries.

8
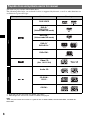
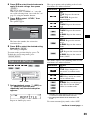
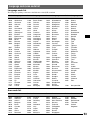
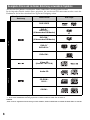
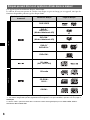
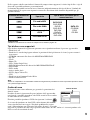
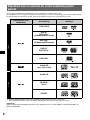
Playable discs and symbols used in this manual
This unit can play various video/audio discs.
The following chart helps you to check if a disc is supported by this unit, as well as what functions are
available for a given disc type.
*1 Audio files can also be stored. For details, see page 9.
*2 Video/image files can also be stored. For details, see page 9.
Note
“DVD” may be used in this manual as a general term for DVD VIDEOs, DVD-Rs/DVD-RWs, and DVD+Rs/
DVD+RWs.
Disc symbol in manual Disc format Disc logo
VIDEO
DVD VIDEO
DVD-R*
1
DVD-R DL*
1
(Video mode/VR mode)
DVD-RW*
1
(Video mode/VR mode)
DVD+R*
1
DVD+R DL*
1
DVD+RW*
1
Video CD
(Ver. 1.0/1.1/2.0)
AUDIO
Audio CD
CD-ROM*
2
CD-R*
2
CD-RW*
2

9
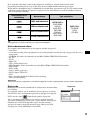
The following chart shows the supported compression formats, their file types, and the disc types on
which those files can be stored.
Available functions differ depending on the format, regardless of disc type. The format symbols below
appear next to the description of functions available for that format.
Tip
For details on compression formats, see page 46.
Unsupported discs
The following discs cannot be played on this unit.
•8 cm (3
1
/4 in) discs
• 12 cm (4
3
/4 in) discs utilizing only the inner 8 cm (3
1
/4 in) data portion (the rest is transparent)
• CD-ROM containing files other than MP3/WMA/JPEG/DivX
•SA-CD
•CD-G
•Photo-CD
• VSD (Video Single Disc)
• DVD-ROM containing files other than MP3/WMA/JPEG/DivX
•DVD-RAM
•DVD-Audio
• Active-Audio (Data)
• SVCD (Super Video CD)
•CDV
• Discs created in Packet Write format
• Discs in DTS format
Note
Even compatible discs may not be playable on this unit, depending on their recorded condition.
Region code
The region system is used to protect software copyrights.
The region code is located on the bottom of the unit, and only DVDs
labeled with an identical region code can be played on this unit.
DVDs labeled can also be played.
If you try to play any other DVD, the message “Playback prohibited
by region code.” will appear on the monitor screen. Depending on
the DVD, no region code may be labeled even though playing the
DVD is prohibited by area restrictions.
Format symbol in manual File type Storable disc type
MP3 audio file
DATA DVDs
DVD-ROM
DVD-R
DVD-R DL
DVD-RW
DVD+R
DVD+R DL
DVD+RW
DATA CDs
CD-ROM
CD-R
CD-RW
WMA audio file
JPEG image file
DivX
®
video file
Region code
ALL

10
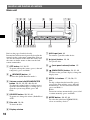
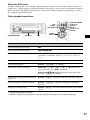
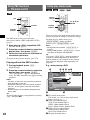
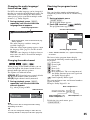
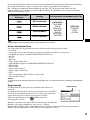
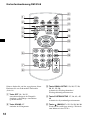
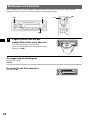
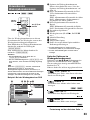
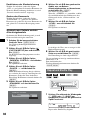
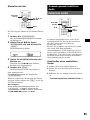
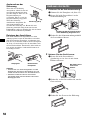
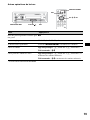
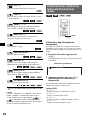
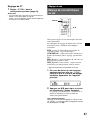
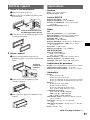
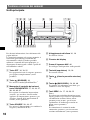
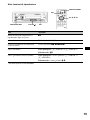
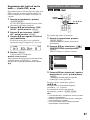
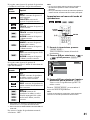
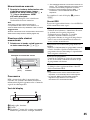
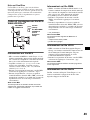
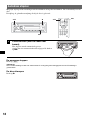
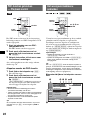
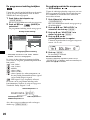
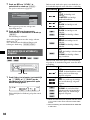
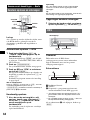
Location and function of controls
Main unit
Refer to the pages listed for details.
Instructions in this manual generally describe the
controls on the card remote commander. You can
also use the controls on the main unit if they have
the same or similar names to those on the card
remote commander.
A OFF button 16, 18, 22
To power off/stop the source (press); shut off
completely (press and hold).
B (BROWSE) button 31
To enter the Quick-BrowZer mode.*
1
C Volume control dial/SOUND/ENTER
button 26, 31, 32, 35, 40, 43, 44
To adjust the volume/adjust a setting (rotate);
open the sound menu/apply a setting (press);
open the system setup menu (press and
hold).
D SOURCE button 20, 32, 44
To power on; change the source (Radio/Disc/
AUX).
E Disc slot 16, 18
To insert the disc.
F Display window
G AUX input jack 43
To connect a portable audio device.
H Z (eject) button 16, 18
To eject the disc.
I (front panel release) button 15
J (BACK/DSPL) button 24, 31, 43
To return to the previous display; change the
display item.
K SEEK –/+ buttons 17, 19, 20, 21
Disc:
To skip a chapter/track/scene/file (press);
reverse/fast-forward disc (press and hold
momentarily); reverse/fast-forward track
(press and hold).*
2
Radio:
To tune in stations automatically (press); find
a station manually (press and hold).
L MODE button 20, 32, 44
To select the radio band (FM/MW/LW);
select an auxiliary device*
3
.
SEEK
BACK
DSPL
BROWSE
SOURCE
MODE
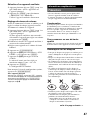
AF/TA
OFF
SEEK
REP
PTY
ALBUM
AUX
PUSH SOUND/ENTER
1 2
SHUF
3 4 56
1
90 q
a
q
s
q
d
q
f
q
g
q
h
5 6 7 82 43

11
M AF (Alternative Frequencies)/
TA (Traffic Announcement)/
PTY (Program Type) button 33, 34
To set AF and TA (press); select PTY (press
and hold) in RDS.
N RESET button 14
O Number buttons
Disc:
(1): b REP 16, 17, 29
(2): SHUF B 16, 17, 29
(3)/(4): ALBUM –/+ (V/v) 16, 17, 19,
21
To skip an album or folder/move the
cursor (press); skip albums or folders
continuously (press and hold).
(6): u (play/pause) 16, 17, 18, 19, 21
To start/pause playback.
Radio:
To receive stored stations (press); store
stations (press and hold).
P Receptor for the card remote
commander
*1 When a CD/MP3/WMA/JPEG/DivX is played.
*2 Operation differs depending on the disc (page 17,
19).
*3 When two auxiliary devices are used.

12
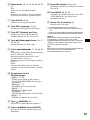
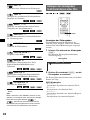
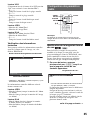
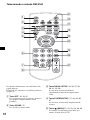
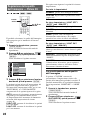
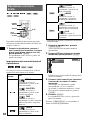
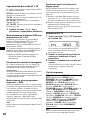
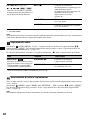
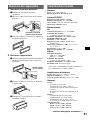
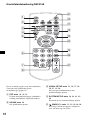
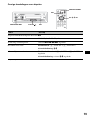
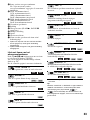
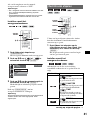
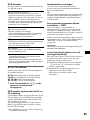
Card remote commander RM-X168
Refer to the pages listed for details.
Remove the insulation film before use (page 14).
A OFF button 16, 18, 22
To power off/stop the source (press); shut off
completely (press and hold).
B SOUND button 35
To open the sound menu.
C VISUAL SETUP button 22, 25, 26, 27,
28, 30, 31, 36
To open the play mode/visual setup menu.
D SYSTEM SETUP button 26, 32, 40, 43,
44
To open the system setup menu.
E (BACK)/O button 22, 23, 28, 29,
36
To return to the previous display; return to
the menu on a VCD*
1
.
qs
1
2
3
4
5
6
7
8
qd
qf
qg
qj
qh
9
0
qa

13
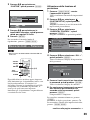
F Number buttons 16, 17, 22, 23, 28, 29,
30, 31, 32
Disc:
To locate a title/chapter/track.
Radio:
To receive stored stations (press); store
stations (press and hold).
G CLEAR button 28, 31
To delete an entered number.
H DSPL (Display) button 24, 43
To change display items.
I ATT (Attenuate) button
To attenuate the sound (to cancel, press
again).
J u (Play/Pause) button 16, 17, 18, 19,
21
To start/pause playback.
K .m/M> buttons 17, 19, 20,
21
Disc:
To skip a chapter/track/scene/file (press);
reverse/fast-forward disc (press and hold
momentarily); reverse/fast-forward track
(press and hold).*
2
Radio:
To tune in stations automatically (press); find
a station manually (press and hold).
L DVD playback setting buttons
(AUDIO): 17, 25
To change the audio language/format.
(For VCD/CD/MP3/WMA, to change the
audio channel.)
(SUBTITLE): 17
To change the subtitle language.
(ANGLE): 17
To change the viewing angle.
(TOP MENU): 17
To open the top menu on a DVD.
(MENU): 17
To open the menu on a disc.
M (BROWSE) button 31
To enter the Quick-BrowZer mode.*
3
N </M/m/, (Cursor)/ENTER buttons
To move the cursor and apply a setting.
O SRC (Source) button 20, 32, 44
To power on; change the source (Radio/Disc/
AUX).
P MODE button 20, 32, 44
To select the radio band (FM/MW/LW);
select an auxiliary device*
4
.
Q VOL (Volume) +/– buttons
To adjust the volume.
*1 When playing with PBC function.
*2 Operation differs depending on the disc (page 17,
19).
*3 When a CD/MP3/WMA/JPEG/DivX is played.
*4 When two auxiliary devices are used.
Note
If the unit is turned off and the display disappears, it
cannot be operated with the card remote commander
unless (SOURCE) on the main unit is pressed, or a
disc is inserted to activate the unit first.
Tip
For details on how to replace the battery, see
“Replacing the lithium battery of the card remote
commander” on page 46.

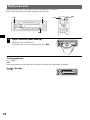
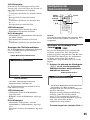
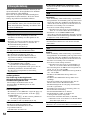
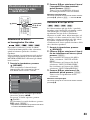
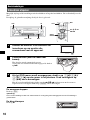
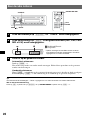
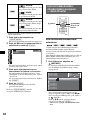
14
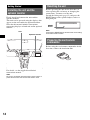
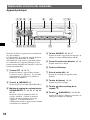
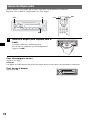
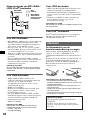
Getting Started
Installing the unit and the
optional monitor
Firstly, install and connect the unit and the
optional monitor.
This unit can be operated using the displays that
appear on the unit and/or the optional monitor.
Note that this manual includes instructions
concerning displays on both unit and/or optional
monitor.
For details, see the supplied installation/
connections manual.
Note
Be sure to install the optional monitor safely, and in a
place where it does not obstruct the driver’s view.
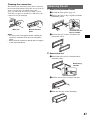
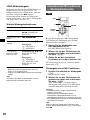
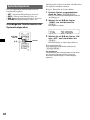
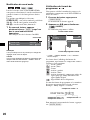
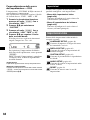
Resetting the unit
Before operating the unit for the first time, or
after replacing the car battery or changing the
connections, you must reset the unit.
Detach the front panel (page 15) and press the
RESET button with a pointed object, such as a
ball-point pen.
Note
Pressing the RESET button will erase the clock setting
and some stored contents.
Preparing the card remote
commander
Before using the card remote commander for the
first time, remove the insulation film.
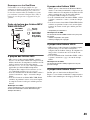
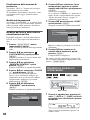
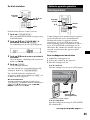
Unit
Optional monitor
RESET
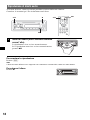
button

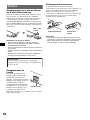
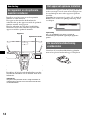
15
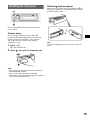
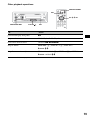
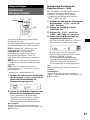
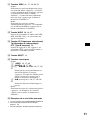
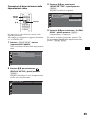
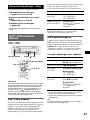
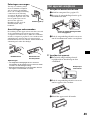
Detaching the front panel
You can detach the front panel of this unit to
prevent theft.
Caution alarm
If you turn the ignition switch to the OFF
position without detaching the front panel, the
caution alarm will sound for a few seconds.
The alarm will only sound if the built-in
amplifier is used.
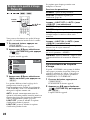
1 Press (OFF).
The unit is turned off.
2 Press , then pull it off towards you.
Notes
• Do not drop or put excessive pressure on the front
panel and display window.
• Do not subject the front panel to heat/high
temperature or moisture. Avoid leaving it in a parked
car or on a dashboard/rear tray.
Attaching the front panel
Engage part A of the front panel with part B of
the unit, as illustrated, and push the left side into
position until it clicks.
Note
Do not put anything on the inner surface of the front
panel.
OFF
B
A

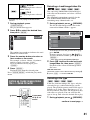
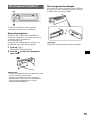
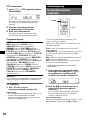
16
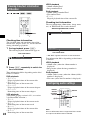
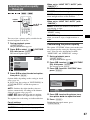
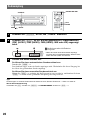
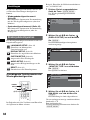
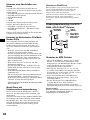
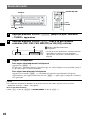
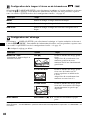
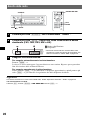
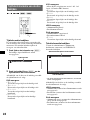
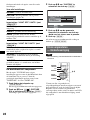
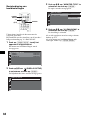
Basic Operations
Playing video discs
Depending on the disc, some operations may be different or restricted.
Refer to the operating instructions supplied with your disc.
To stop playback
Press (OFF).
Note
Discs in DTS format are not supported. The sound is not output if the DTS format is selected.
1
Turn on your monitor, then select the
input source on your monitor
corresponding to this unit.
2
Insert the disc (label side up).
Playback starts automatically.
If playback does not start automatically, press u.
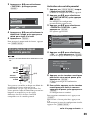
3
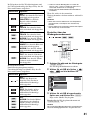
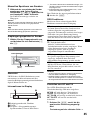
If the DVD menu appears, press (1)(b)/(2)(B)/(3)(V)/(4)(v) to move
the cursor, then press (6) (u) to confirm.
With the card remote commander, press the </M/m/,/number buttons to move the cursor,
then press (ENTER) to confirm.
To eject the disc
Press Z.
</M/m/,
ENTER
u
OFF
b/B/V/v u
OFF
Z
Number
buttons

17
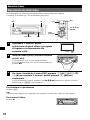
About the DVD menu
A DVD is divided into several sections, which make up a picture or music feature. These sections are
called “titles.” When you play a DVD that contains several titles, you can select a desired title using the
DVD’s top menu. For DVDs that allow you to select items such as subtitle/sound language(s), select
these items using the DVD menu.
Other playback operations
*1 Unavailable depending on the disc.
*2 When the 4-digit input prompt appears, input the language code (page 53) for the desired language.
To Press
pause/resume play after pause u
skip a chapter/track/scene/file .m/M>
reverse/fast-forward disc and hold .m/M> momentarily; and then
repeatedly to switch the speed (× 2 t × 12 t × 120 t
× 2…)
cancel reverse/fast-forward u
show the DVD menu*
1
Remote: (TOP MENU) or (MENU)
select items in the DVD menu*
1
Main unit: (1)(b)/(2)(B)/(3)(V)/(4)(v) to move the
cursor, then press (6) (u) to confirm
Remote: </M/m/,/number buttons to move the cursor,
then press (ENTER) to confirm
change audio language/format/channel
(page 25)*
1
Remote: (AUDIO) repeatedly until the desired item appears
turn off/change the subtitle language*
1
Remote: (SUBTITLE) repeatedly until the desired item
appears*
2
change the viewing angle*
1
Remote: (ANGLE) repeatedly until the desired angle number
appears
.m/M>
u
SUBTITLE
ANGLE
MENU
</M/m/,
ENTER
AUDIO
TOP MENU
b/B/V/v.m/M> u
Number
buttons

18
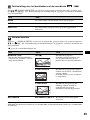
Playing audio discs
Depending on the disc, some operations may be different or restricted.
Refer to the operating instructions supplied with your disc.
To stop playback
Press (OFF).
Note
Discs in DTS format are not supported. The sound is not output if the DTS format is selected.
1
Insert the disc (label side up).
Playback starts automatically.
If playback does not start automatically, press u.
To eject the disc
Press Z.
u
OFF
u
OFF
Z

19
Other playback operations
* When an MP3/WMA is played.
To Press
pause/resume play after pause u
skip a track .m (<)/M> (,)
reverse/fast-forward track and hold .m/M>
skip an album* Main unit: (3) (ALBUM –)/(4) (ALBUM +)
Remote: M/m
skip albums continuously* Main unit: and hold (3) (ALBUM –)/(4) (ALBUM +)
Remote: and hold M/m
</M/m/,
.m/M>
u
.m/M>
u
ALBUM

20
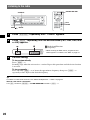
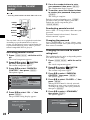
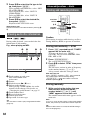
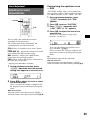
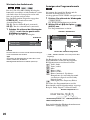
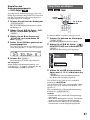
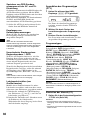
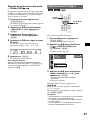
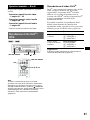
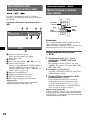
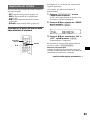
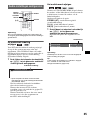
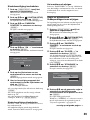
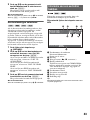
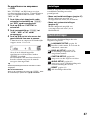
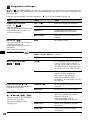
Listening to the radio
Tip
For details on other radio functions, see “Advanced Operations — Radio” on page 32.
With the card remote commander
Use (SRC) instead of (SOURCE), and .m/M> instead of (SEEK) –/+.
1
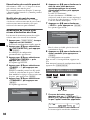
Press (SOURCE) repeatedly until “TUNER” appears.
2
Press (MODE) repeatedly until the desired band (FM1, FM2, FM3, MW
or LW) appears.
3
Perform tuning.
To tune automatically
Press (SEEK)
–/+.
Scanning stops when the unit receives a station. Repeat this procedure until the desired station
is received.
To tune manually
Press and hold (SEEK)
–/+ to locate the approximate frequency, then press (SEEK) –/+
repeatedly to fine adjust to the desired frequency.
.m/M>
MODE
SRC
SEEK MODE
SOURCE
B
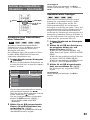
A
A Radio band/Function
B Frequency*
* While receiving an RDS station, program service
name appears. For details, see “RDS” on page 33.
La page est en cours de chargement...
La page est en cours de chargement...
La page est en cours de chargement...
La page est en cours de chargement...
La page est en cours de chargement...
La page est en cours de chargement...
La page est en cours de chargement...
La page est en cours de chargement...
La page est en cours de chargement...
La page est en cours de chargement...
La page est en cours de chargement...
La page est en cours de chargement...
La page est en cours de chargement...
La page est en cours de chargement...
La page est en cours de chargement...
La page est en cours de chargement...
La page est en cours de chargement...
La page est en cours de chargement...
La page est en cours de chargement...
La page est en cours de chargement...
La page est en cours de chargement...
La page est en cours de chargement...
La page est en cours de chargement...
La page est en cours de chargement...
La page est en cours de chargement...
La page est en cours de chargement...
La page est en cours de chargement...
La page est en cours de chargement...
La page est en cours de chargement...
La page est en cours de chargement...
La page est en cours de chargement...
La page est en cours de chargement...
La page est en cours de chargement...
La page est en cours de chargement...
La page est en cours de chargement...
La page est en cours de chargement...
La page est en cours de chargement...
La page est en cours de chargement...
La page est en cours de chargement...
La page est en cours de chargement...
La page est en cours de chargement...
La page est en cours de chargement...
La page est en cours de chargement...
La page est en cours de chargement...
La page est en cours de chargement...
La page est en cours de chargement...
La page est en cours de chargement...
La page est en cours de chargement...
La page est en cours de chargement...
La page est en cours de chargement...
La page est en cours de chargement...
La page est en cours de chargement...
La page est en cours de chargement...
La page est en cours de chargement...
La page est en cours de chargement...
La page est en cours de chargement...
La page est en cours de chargement...
La page est en cours de chargement...
La page est en cours de chargement...
La page est en cours de chargement...
La page est en cours de chargement...
La page est en cours de chargement...
La page est en cours de chargement...
La page est en cours de chargement...
La page est en cours de chargement...
La page est en cours de chargement...
La page est en cours de chargement...
La page est en cours de chargement...
La page est en cours de chargement...
La page est en cours de chargement...
La page est en cours de chargement...
La page est en cours de chargement...
La page est en cours de chargement...
La page est en cours de chargement...
La page est en cours de chargement...
La page est en cours de chargement...
La page est en cours de chargement...
La page est en cours de chargement...
La page est en cours de chargement...
La page est en cours de chargement...
La page est en cours de chargement...
La page est en cours de chargement...
La page est en cours de chargement...
La page est en cours de chargement...
La page est en cours de chargement...
La page est en cours de chargement...
La page est en cours de chargement...
La page est en cours de chargement...
La page est en cours de chargement...
La page est en cours de chargement...
La page est en cours de chargement...
La page est en cours de chargement...
La page est en cours de chargement...
La page est en cours de chargement...
La page est en cours de chargement...
La page est en cours de chargement...
La page est en cours de chargement...
La page est en cours de chargement...
La page est en cours de chargement...
La page est en cours de chargement...
La page est en cours de chargement...
La page est en cours de chargement...
La page est en cours de chargement...
La page est en cours de chargement...
La page est en cours de chargement...
La page est en cours de chargement...
La page est en cours de chargement...
La page est en cours de chargement...
La page est en cours de chargement...
La page est en cours de chargement...
La page est en cours de chargement...
La page est en cours de chargement...
La page est en cours de chargement...
La page est en cours de chargement...
La page est en cours de chargement...
La page est en cours de chargement...
La page est en cours de chargement...
La page est en cours de chargement...
La page est en cours de chargement...
La page est en cours de chargement...
La page est en cours de chargement...
La page est en cours de chargement...
La page est en cours de chargement...
La page est en cours de chargement...
La page est en cours de chargement...
La page est en cours de chargement...
La page est en cours de chargement...
La page est en cours de chargement...
La page est en cours de chargement...
La page est en cours de chargement...
La page est en cours de chargement...
La page est en cours de chargement...
La page est en cours de chargement...
La page est en cours de chargement...
La page est en cours de chargement...
La page est en cours de chargement...
La page est en cours de chargement...
La page est en cours de chargement...
La page est en cours de chargement...
La page est en cours de chargement...
La page est en cours de chargement...
La page est en cours de chargement...
La page est en cours de chargement...
La page est en cours de chargement...
La page est en cours de chargement...
La page est en cours de chargement...
La page est en cours de chargement...
La page est en cours de chargement...
La page est en cours de chargement...
La page est en cours de chargement...
La page est en cours de chargement...
La page est en cours de chargement...
La page est en cours de chargement...
La page est en cours de chargement...
La page est en cours de chargement...
La page est en cours de chargement...
La page est en cours de chargement...
La page est en cours de chargement...
La page est en cours de chargement...
La page est en cours de chargement...
La page est en cours de chargement...
La page est en cours de chargement...
La page est en cours de chargement...
La page est en cours de chargement...
La page est en cours de chargement...
La page est en cours de chargement...
La page est en cours de chargement...
La page est en cours de chargement...
La page est en cours de chargement...
La page est en cours de chargement...
La page est en cours de chargement...
La page est en cours de chargement...
La page est en cours de chargement...
La page est en cours de chargement...
La page est en cours de chargement...
La page est en cours de chargement...
La page est en cours de chargement...
La page est en cours de chargement...
La page est en cours de chargement...
La page est en cours de chargement...
La page est en cours de chargement...
La page est en cours de chargement...
La page est en cours de chargement...
La page est en cours de chargement...
La page est en cours de chargement...
La page est en cours de chargement...
La page est en cours de chargement...
La page est en cours de chargement...
La page est en cours de chargement...
La page est en cours de chargement...
La page est en cours de chargement...
La page est en cours de chargement...
La page est en cours de chargement...
La page est en cours de chargement...
La page est en cours de chargement...
La page est en cours de chargement...
La page est en cours de chargement...
La page est en cours de chargement...
La page est en cours de chargement...
La page est en cours de chargement...
La page est en cours de chargement...
La page est en cours de chargement...
La page est en cours de chargement...
La page est en cours de chargement...
La page est en cours de chargement...
La page est en cours de chargement...
La page est en cours de chargement...
La page est en cours de chargement...
La page est en cours de chargement...
La page est en cours de chargement...
La page est en cours de chargement...
La page est en cours de chargement...
La page est en cours de chargement...
La page est en cours de chargement...
La page est en cours de chargement...
La page est en cours de chargement...
La page est en cours de chargement...
La page est en cours de chargement...
La page est en cours de chargement...
La page est en cours de chargement...
La page est en cours de chargement...
La page est en cours de chargement...
La page est en cours de chargement...
La page est en cours de chargement...
La page est en cours de chargement...
La page est en cours de chargement...
La page est en cours de chargement...
La page est en cours de chargement...
La page est en cours de chargement...
La page est en cours de chargement...
La page est en cours de chargement...
La page est en cours de chargement...
La page est en cours de chargement...
La page est en cours de chargement...
La page est en cours de chargement...
La page est en cours de chargement...
La page est en cours de chargement...
La page est en cours de chargement...
La page est en cours de chargement...
La page est en cours de chargement...
La page est en cours de chargement...
La page est en cours de chargement...
La page est en cours de chargement...
La page est en cours de chargement...
La page est en cours de chargement...
La page est en cours de chargement...
La page est en cours de chargement...
La page est en cours de chargement...
La page est en cours de chargement...
La page est en cours de chargement...
La page est en cours de chargement...
La page est en cours de chargement...
La page est en cours de chargement...
La page est en cours de chargement...
La page est en cours de chargement...
La page est en cours de chargement...
La page est en cours de chargement...
La page est en cours de chargement...
La page est en cours de chargement...
La page est en cours de chargement...
La page est en cours de chargement...
La page est en cours de chargement...
La page est en cours de chargement...
La page est en cours de chargement...
La page est en cours de chargement...
La page est en cours de chargement...
La page est en cours de chargement...
La page est en cours de chargement...
-
 1
1
-
 2
2
-
 3
3
-
 4
4
-
 5
5
-
 6
6
-
 7
7
-
 8
8
-
 9
9
-
 10
10
-
 11
11
-
 12
12
-
 13
13
-
 14
14
-
 15
15
-
 16
16
-
 17
17
-
 18
18
-
 19
19
-
 20
20
-
 21
21
-
 22
22
-
 23
23
-
 24
24
-
 25
25
-
 26
26
-
 27
27
-
 28
28
-
 29
29
-
 30
30
-
 31
31
-
 32
32
-
 33
33
-
 34
34
-
 35
35
-
 36
36
-
 37
37
-
 38
38
-
 39
39
-
 40
40
-
 41
41
-
 42
42
-
 43
43
-
 44
44
-
 45
45
-
 46
46
-
 47
47
-
 48
48
-
 49
49
-
 50
50
-
 51
51
-
 52
52
-
 53
53
-
 54
54
-
 55
55
-
 56
56
-
 57
57
-
 58
58
-
 59
59
-
 60
60
-
 61
61
-
 62
62
-
 63
63
-
 64
64
-
 65
65
-
 66
66
-
 67
67
-
 68
68
-
 69
69
-
 70
70
-
 71
71
-
 72
72
-
 73
73
-
 74
74
-
 75
75
-
 76
76
-
 77
77
-
 78
78
-
 79
79
-
 80
80
-
 81
81
-
 82
82
-
 83
83
-
 84
84
-
 85
85
-
 86
86
-
 87
87
-
 88
88
-
 89
89
-
 90
90
-
 91
91
-
 92
92
-
 93
93
-
 94
94
-
 95
95
-
 96
96
-
 97
97
-
 98
98
-
 99
99
-
 100
100
-
 101
101
-
 102
102
-
 103
103
-
 104
104
-
 105
105
-
 106
106
-
 107
107
-
 108
108
-
 109
109
-
 110
110
-
 111
111
-
 112
112
-
 113
113
-
 114
114
-
 115
115
-
 116
116
-
 117
117
-
 118
118
-
 119
119
-
 120
120
-
 121
121
-
 122
122
-
 123
123
-
 124
124
-
 125
125
-
 126
126
-
 127
127
-
 128
128
-
 129
129
-
 130
130
-
 131
131
-
 132
132
-
 133
133
-
 134
134
-
 135
135
-
 136
136
-
 137
137
-
 138
138
-
 139
139
-
 140
140
-
 141
141
-
 142
142
-
 143
143
-
 144
144
-
 145
145
-
 146
146
-
 147
147
-
 148
148
-
 149
149
-
 150
150
-
 151
151
-
 152
152
-
 153
153
-
 154
154
-
 155
155
-
 156
156
-
 157
157
-
 158
158
-
 159
159
-
 160
160
-
 161
161
-
 162
162
-
 163
163
-
 164
164
-
 165
165
-
 166
166
-
 167
167
-
 168
168
-
 169
169
-
 170
170
-
 171
171
-
 172
172
-
 173
173
-
 174
174
-
 175
175
-
 176
176
-
 177
177
-
 178
178
-
 179
179
-
 180
180
-
 181
181
-
 182
182
-
 183
183
-
 184
184
-
 185
185
-
 186
186
-
 187
187
-
 188
188
-
 189
189
-
 190
190
-
 191
191
-
 192
192
-
 193
193
-
 194
194
-
 195
195
-
 196
196
-
 197
197
-
 198
198
-
 199
199
-
 200
200
-
 201
201
-
 202
202
-
 203
203
-
 204
204
-
 205
205
-
 206
206
-
 207
207
-
 208
208
-
 209
209
-
 210
210
-
 211
211
-
 212
212
-
 213
213
-
 214
214
-
 215
215
-
 216
216
-
 217
217
-
 218
218
-
 219
219
-
 220
220
-
 221
221
-
 222
222
-
 223
223
-
 224
224
-
 225
225
-
 226
226
-
 227
227
-
 228
228
-
 229
229
-
 230
230
-
 231
231
-
 232
232
-
 233
233
-
 234
234
-
 235
235
-
 236
236
-
 237
237
-
 238
238
-
 239
239
-
 240
240
-
 241
241
-
 242
242
-
 243
243
-
 244
244
-
 245
245
-
 246
246
-
 247
247
-
 248
248
-
 249
249
-
 250
250
-
 251
251
-
 252
252
-
 253
253
-
 254
254
-
 255
255
-
 256
256
-
 257
257
-
 258
258
-
 259
259
-
 260
260
-
 261
261
-
 262
262
-
 263
263
-
 264
264
-
 265
265
-
 266
266
-
 267
267
-
 268
268
-
 269
269
-
 270
270
-
 271
271
-
 272
272
-
 273
273
-
 274
274
-
 275
275
-
 276
276
-
 277
277
-
 278
278
-
 279
279
-
 280
280
-
 281
281
-
 282
282
-
 283
283
-
 284
284
-
 285
285
-
 286
286
-
 287
287
-
 288
288


Sony MEX-DV900 Le manuel du propriétaire
- Catégorie
- Lecteurs DVD
- Taper
- Le manuel du propriétaire
dans d''autres langues
- italiano: Sony MEX-DV900 Manuale del proprietario
- English: Sony MEX-DV900 Owner's manual
- Deutsch: Sony MEX-DV900 Bedienungsanleitung
- Nederlands: Sony MEX-DV900 de handleiding