
SRL3 Manual

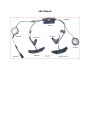
This product is used by installed on helmet as below.
Charging
Red LED: Charging
Blue LED: Fully charged
Power On/Off
Press and hold the (+) Button and Center Button for 1 second
Tap the (+) Button and Center Button.
Volume Adjustment
(+) Button - Increase the volume
(-) Button - Decrease the volume

Battery Check
Phone, Music Pairing
Initially Pairing the Impulse
The headset will automatically enter the phone pairing mode
when you initially turn on the headset or in the following
situation:
• Rebooting after executing Factory Reset
1. Press and hold the Center Button and (+) Button for 1 second.
2. Search for Bluetooth devices on your mobile phone. Select the SRL-Mesh in the list of the devices
detected on the mobile phone.
3. Enter 0000 for the PIN. Some mobile phones may not ask for the PIN.
Music Operation
Play or pause music: Press the Center Button for 1 second.
Track back: Press the (-) Button for 1 second.
Track forward: Press the (+) Button for 1 second.
Mobile Phone Call Making and Answering
Answering a call: Tap the Center Button
Ending a call: Press the Center Button for 2 seconds.
Voice dial: Press the Center Button for 3 seconds.
Speed dial: Press the (+) Button for 3 seconds.
Rejecting a call: Press the (+) Button for 2 seconds.

Intercom
Intercom Pairing
1. Press and hold the Center Button of two headsets for 5 seconds until red LEDs of both units start
to flash rapidly.
2. The two headsets will be automatically paired.
Intercom Start/End : Tap the Center Button
Mesh Intercom
Mesh Intercom On/Off : Tap the Mesh Button
Radio On/Off
Turn on the FM radio: Press the (-) Button for 1 second.
Turn off the FM radio: Press the (-) Button for 1 second.
Radio Scan Up FM Band
Start scanning: Press (+) Button for 1 second.
Stop scanning: Press (+) Button for 1 second.
Save presets while scanning
Save presets: Tap the Center Button
Radio Move to Preset Station
Move to next preset: Press the Center Button for 1 second (1 → 2 → … → 10)
Radio Seek Stations
Seek up stations: Double tap the (+) Button.
Seek down stations: Double tap the (-) Button.
Setting

Configuration Menu: Press the Center Button for 10 seconds.
Using the Sena Device Manager
Connect the headset to your computer via a USB cable. Launch the Sena Device Manager and click
DEVICE SETTING to configure the headset settings.
For details about downloading the Sena Device Manager, please refer to the leaflet included in the package.
Troubleshooting
Factory Reset
If you want to restore the headset to factory default settings, use the Factory Reset The headset
automatically restores the default settings and turns off.
1. Press the Center Button for 10 second.
2. Tap the (-) Button twice.
3. Tap the Center Button.
Certification and Safety Approvals FCC Compliance Statement
This device complies with part 15 of the FCC rules. Operation is subject to the following two conditions:
(1) This device may not cause harmful interference, and
(2) This device must accept any interference received, including interference that may cause undesired
operation.
This equipment has been tested and found to comply with the limits for a Class B digital device pursuant to
part 15 of the FCC rules. These limits are designed to provide reasonable protection against harmful
interference in a residential installation. This equipment generates, uses and can radiate radio frequency
energy and, if not installed and used in accordance with the instructions, may cause harmful interference
to radio communications. However, there is no guarantee that interference will not occur in a particular
installation. If this equipment does cause harmful interference to radio or television reception, which can be
determined by turning the equipment on and off, the user is encouraged to try to correct the interference by
one or more of the following measures:

-Reorient or relocate the receiving antennae
-Increase the separation between the equipment and the receiver
-Connect the equipment into an outlet on a circuit different from that to which the receiver is connected.
-Consult the dealer or an experienced radio/TV technician for help.
FCC RF Exposure Statement
This equipment complies with FCC radiation exposure limits set forth for an uncontrolled environment. End
users must follow the specific operating instructions for satisfying RF exposure compliance. The antenna
used for this transmitter must not transmit simultaneously with any other antenna or transmitter, except in
accordance with FCC multi-transmitter product procedures.
When equipped, the distance between antenna and one’s head surface is 42.6mm.
FCC Caution
Any changes or modifications to the equipment not expressly approved by the party responsible for
compliance could void user’s authority to operate the equipment.
Industry Canada(IC) Statement
This device complies with Industry Canada license-exempt RSS standard(s). Operation is subject to the
following two conditions:
(1)this device may not cause interference, and
(2)this device must accept any interference, including interference that may cause undesired operation of
the device.
Le present appareil est conforme aux CNR d’Industrie Canada applicables aux appareils radio exempts de
licence. L’exploitation est autorisee aux deux conditions suivantes :
(1) l’appareil ne doit pas produire de brouillage, et
(2) l’utilisateur de l’appareil doit accepter tout brouillage radioelectrique subi, meme si le brouillage est
susceptible d’en compromettre le fonctionnement.
IC RF Exposure Statement
Cet équipement est conforme aux limites d'exposition aux radiations de la FCC définies pour un
environnement non contrôlé. Les utilisateurs finaux doivent suivre les instructions d'utilisation spécifiques
pour satisfaire à la conformité d'exposition RF. L'antenne utilisée pour cet émetteur ne doit pas émettre
simultanément avec d'autres antennes ou émetteurs, sauf en conformité avec les procédures FCC relatives
aux produits multi-émetteurs.
Lorsque équipé, la distance entre l’antenne et la surface de la tête est de 42.6mm.
-
 1
1
-
 2
2
-
 3
3
-
 4
4
-
 5
5
-
 6
6


dans d''autres langues
- English: Sena SRL3 User manual
Documents connexes
-
Sena Spider RT1 Bluetooth Headset Manuel utilisateur
-
Sena Spider ST1 Bluetooth Headset Manuel utilisateur
-
Sena SC2 Manuel utilisateur
-
Sena M1 Manuel utilisateur
-
Sena 10S Motorcycle Bluetooth Communication System Manuel utilisateur
-
Sena SP107 Manuel utilisateur
-
Sena SP92 Manuel utilisateur
-
Sena SP87 Manuel utilisateur
