Whirlpool WZF56R16DW Mode d'emploi
- Catégorie
- Congélateurs
- Taper
- Mode d'emploi
Ce manuel convient également à

W10668404A
SAFETY.................................................................................................1
INSTALLING YOUR FREEZER ...........................................................2
Unpacking..........................................................................................2
Location Requirements .....................................................................3
Electrical Requirements.....................................................................3
Water Supply Requirements .............................................................4
Connect the Water Supply ................................................................4
Remove and Replace the Handle......................................................5
Freezer Door ......................................................................................5
Freezer Leveling and Door Closing ...................................................6
OPERATING YOUR FREEZER............................................................7
Ensuring Proper Air Circulation .........................................................7
Using the Control...............................................................................7
Key Eject Lock...................................................................................8
Ice Maker ...........................................................................................8
Freezer Features................................................................................9
CARING FOR YOUR FREEZER..........................................................9
Cleaning Your Frost-Free Freezer.....................................................9
Changing the Light Bulb..................................................................10
Power Interruptions.........................................................................10
Moving Care ....................................................................................10
PROBLEM SOLVER...........................................................................11
Freezer Operation............................................................................11
Ice Production .................................................................................12
Ice Quality........................................................................................12
WARRANTY .......................................................................................13
THANK YOU for purchasing this high-quality product. Register your freezer at www.whirlpool.com. In Canada, register your freezer at
www.whirlpool.ca.
For future reference, please make a note of your product model and serial numbers. These numbers can be found inside your freezer.
Model Number . . . . . . . . . . . . . . . . . . . . . . . . . . . . . . . . . . . . . . . . . .
Serial Number . . . . . . . . . . . . . . . . . . . . . . . . . . . . . . . . . . . . . . . . . .
User Guide
Upright Freezer
TABLE OF CONTENTS
SAFETY
You can be killed or seriously injured if you don’t immediately
You
can be killed or seriously injured if you don’t follow instructions.
All safety messages will tell you what the potential hazard is, tell you how to reduce the chance of injury, and tell you what can happen if the
instructions are not followed.
Your safety and the safety of others are very important.
We have provided many important safety messages in this manual and on your appliance. Always read and obey all safety messages.
This is the safety alert symbol.
This symbol alerts you to potential hazards that can kill or hurt you and others.
All safety messages will follow the safety alert symbol and either the word “DANGER” or “WARNING.”
These words mean:
follow instructions.
DANGER
WARNING

2
PROPER DISPOSAL OF YOUR OLD
FREEZER OR REFRIGERATOR
IMPORTANT: Child entrapment and suffocation are not problems of the
past. Junked or abandoned freezers or refrigerators are still
dangerous... even if they will sit for “just a few days.” If you are getting
rid of your old refrigerator or freezer, please follow these instructions to
help prevent accidents.
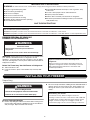
Before You Throw Away Your Old Freezer or Refrigerator:
■ Take off the doors or lid.
■ Leave the shelves in place so that children may not easily climb
inside.
Unpacking
Remove Packaging Materials
■ Remove tape and glue residue from surfaces before turning on the
freezer. Rub a small amount of liquid dish soap over the adhesive
with your fingers. Wipe with warm water and dry.
■ Do not use sharp instruments, rubbing alcohol, flammable fluids, or
abrasive cleaners to remove tape or glue. These products can
damage the surface of your freezer. For more information, see
“Safety.”
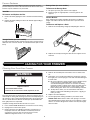
IMPORTANT SAFETY INSTRUCTIONS
To reduce the risk of fire, electric shock, or injury when using your freezer, follow these basic precautions:WARNING:
SAVE THESE INSTRUCTIONS
■
Plug into a grounded 3 prong outlet.
■
Do not remove ground prong.
■
Do not use an adapter.
■
Do not use an extension cord.
■
Disconnect power before servicing.
■
Replace all parts and panels before operating.
■
Use nonflammable cleaner.
■
Keep flammable materials and vapors, such as gasoline, away
from freezer.
■
Use two or more people to move and install freezer.
■
Keep key away from children.
■
Remove doors or lid from your old freezer or refrigerator.
■
Disconnect power before installing ice maker (on ice maker kit
ready models only).
State of California Proposition 65 Warnings:
WARNING: This product contains one or more chemicals known to the State of California to cause cancer.
WARNING: This product contains one or more chemicals known to the State of California to cause birth defects or other reproductive harm.
WARNING
Suffocation Hazard
Remove doors or lid from your old freezer or
refrigerator.
Failure to do so can result in death or brain damage.
Important information to know about disposal of
refrigerants:
Dispose of freezer in accordance with Federal and Local
regulations. Refrigerants must be evacuated by a licensed,
EPA certified refrigerant technician in accordance with
established procedures.
INSTALLING YOUR FREEZER
WARNING
Excessive Weight Hazard
Use two or more people to move and install freezer.
Failure to do so can result in back or other injury.
When Moving Your Freezer:
Your freezer is heavy. When moving the freezer for
cleaning or service, be sure to cover the floor with cardboard
or hardboard to avoid floor damage. Always pull the freezer
straight out when moving it. Do not wiggle or “walk” the
freezer when trying to move it, as floor damage could occur.

3
Clean Before Using
After you remove all of the packaging materials, clean the inside of your
freezer before using it. See the cleaning instructions in “Caring for Your
Freezer.”
Location Requirements
Ventilation and Clearance
■ Keep flammable materials and vapors, such as gasoline, away from
freezer.
■ Do not cover the freezer with items such as blankets, sheets,
tablecloths, etc. This reduces air circulation.
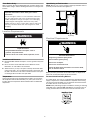
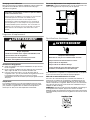
■ Allow at least 3" (7.5 cm) of air space at the top and on both sides
of the freezer and 1" (2.5 cm) between the back of the freezer and
the wall. If the freezer is to be next to a fixed wall, leave extra space
on the hinge side so the door can open wider.
Temperature
Your freezer operates most efficiently when located in an area where
the temperature will not fall below 40°F (5°C). Place your freezer in a
location where the temperature will not fall below this recommended
temperature.
Upon Moving to Final Location
NOTE: Allow for a 3" (7.5 cm) clearance at the top and sides and a ¹⁄₄"
(6.4 mm) clearance between the appliances.
Electrical Requirements
Before you move your freezer into its final location, it is important to
make sure you have the proper electrical connection.
Recommended Grounding Method
A 115 Volt, 60 Hz., AC only, 15- or 20-amp fused, grounded electrical
supply is required. It is recommended that a separate circuit serving
only your freezer be provided. Use an outlet that cannot be turned off
by a switch. Do not use an extension cord.
NOTE: Before performing any type of installation, cleaning, or removing
a light bulb, press and hold TEMP SETTING for 3 seconds to turn off
cooling, and then disconnect the freezer from the electrical source.
Important information to know about glass shelves
and covers:
Do not clean glass shelves or covers with warm water when
they are cold. Shelves and covers may break if exposed to
sudden temperature changes or impact, such as bumping.
Tempered glass is designed to shatter into many small,
pebble-size pieces. This is normal. Glass shelves and covers
are heavy. Use both hands when removing them to avoid
dropping.
WARNING
Explosion Hazard
Keep flammable materials and vapors, such as
gasoline, away from freezer.
Failure to do so can result in death, explosion, or fire.
3" (7.5 cm)
3" (7.5 cm)
Electrical Shock Hazard
Plug into a grounded 3 prong outlet.
Do not remove ground prong.
Do not use an adapter.
Do not use an extension cord.
Failure to follow these instructions can result in death,
fire, or electrical shock.
WARNING

4
Water Supply Requirements (on some models)
Gather the required tools and parts before starting installation. Read
and follow the instructions provided with any tools listed here.
Tools Needed
NOTE: Your freezer dealer has a kit available with a ¹⁄₄" (6.35 mm)
saddle-type shutoff valve, a union, and plastic tubing. Before
purchasing, make sure a saddle-type valve complies with your local
plumbing codes. Do not use a piercing-type or ³⁄₁₆" (4.76 mm) saddle
valve which reduces water flow and clogs more easily.
IMPORTANT:
■ If you turn the freezer on before the water line is connected, turn the
ice maker OFF.
■ All installations must meet local plumbing code requirements.
■ Use plastic tubing and check for leaks. Install plastic tubing only in
areas where temperatures will remain above freezing.
Water Pressure
A cold water supply with water pressure of between 30 and 120 psi
(207 to 827 kPa) is required to operate the water dispenser and ice
maker. If you have questions about your water pressure, see “Problem
Solver” or call a licensed, qualified plumber.
Reverse Osmosis Water Supply
If a reverse osmosis water filtration system is connected to your cold
water supply, the water pressure to the system needs to be a minimum
of 40 to 60 psi (276 to 414 kPa).
If the water pressure to the reverse osmosis system is less than 40 to
60 psi (276 to 414 kPa), a booster pump can be inserted into the small
tubing that goes from the cold water line to the reverse osmosis system.
If the water dispenser is still not dispensing water properly:
■ Check to see whether the sediment filter in the reverse osmosis
system is blocked. Replace the filter if necessary.
■ Allow the storage tank on the reverse osmosis system to refill after
heavy usage.
■ If your refrigerator has a water filter, it may further reduce the water
pressure when used in conjunction with a reverse osmosis system.
Remove the water filter.
If you have questions about your water pressure, refer to “Problem
Solver” or call a licensed, qualified plumber.
Connect the Water Supply (on some models)
Connect to Water Line
1. Unplug freezer or disconnect power.
2. Turn OFF main water supply. Turn ON nearest faucet long enough
to clear line of water.
3. Locate a ½" to 1¹⁄₄" (12.7 mm to 3.18 cm) vertical cold water pipe
near the freezer.
IMPORTANT:
■ Make sure it is a cold water pipe.
■ Horizontal pipe will work, but drill on the top side of the pipe, not
the bottom. This will help keep water away from the drill and
normal sediment from collecting in the valve.
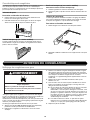
4. Determine the length of plastic tubing you need. Measure from the
connection on the lower left rear of freezer to the water pipe. Add
7 ft (2.1 m) to allow for cleaning. Use ¹⁄₄" (6.35 mm) O.D. (outside
diameter) plastic tubing. Be sure both ends of plastic tubing are cut
square.
5. Using a cordless drill, drill a ¹⁄₄" (6.35 mm) hole in the cold water
pipe you have selected.
6. Fasten the shutoff valve to the cold water pipe with the pipe clamp.
Be sure the outlet end is solidly in the ¹⁄₄" (6.35 mm) drilled hole in
the water pipe and that the washer is under the pipe clamp.
Tighten the packing nut. Tighten the pipe clamp screws slowly and
evenly so washer makes a watertight seal. Do not overtighten or
you may crush the plastic tubing.
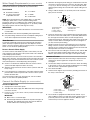
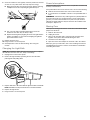
7. Slip the compression sleeve and compression nut on the plastic
tubing as shown. Insert the end of the tubing into the outlet end
squarely as far as it will go. Screw compression nut onto outlet end
with adjustable wrench. Do not overtighten.
8. Place the free end of the tubing in a container or sink, and turn ON
the main water supply. Flush the tubing until water is clear. Turn
OFF the shutoff valve on the water pipe. Coil the plastic tubing.
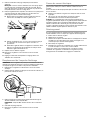
Connect to Freezer
1. Attach the plastic tube to the valve inlet using a compression nut
and sleeve as shown. Tighten the compression nut. Do not
overtighten.
2. Use the tube clamp on the back of the freezer to fasten the tubing
to the freezer as shown. This will help avoid damage to the tubing
when the freezer is pushed back against the wall.
3. Turn shutoff valve ON.
4. Check for leaks. Tighten any connections (including connections at
the valve) or nuts that leak.
5. The ice maker is equipped with a built-in water strainer. If your
water conditions require a second water strainer, install it in the ¹⁄₄"
(6.35 mm) water line at either tube connection. Obtain a water
strainer from your nearest appliance dealer.
■ Flat-blade screwdriver
■ ⁷⁄₁₆" and ¹⁄₂" open-end or
2 adjustable wrenches
■ ¹⁄₄" nut driver
■ ¹⁄₄" drill bit
■ Cordless drill
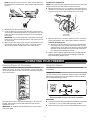
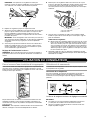
A. Cold water pipe
B. Pipe clamp
C. Plastic tubing
D. Compression nut
E. Compression sleeve
F. Sh utoff v alve
G. Packing nut
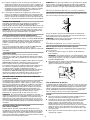
A. Tube clamp
B. Tube clamp screw
C. Plastic tubing
D. Compression nut
E. Valve inlet
A
B
C
DEF
G
A
C
B
D
E

5
6. Plug into a grounded 3 prong outlet.
Remove and Replace the Handle
To Remove the Handle:
1. Loosen the setscrews located on the side of handle at each end.
See “Door Swing Reversal and Handle Removal” graphic.
2. Remove the handle from the grommets.
To Replace the Handle:
1. Place the handle onto the grommets making sure the grommets
are fitted into the handle holes.
2. Tighten the upper and lower setscrews with the hex key provided.
See “Door Swing Reversal and Handle Removal” graphic. Do not
overtighten the setscrews.
Freezer Door
Tools Needed: ⁵⁄₁₆" hex-head socket wrench, ³⁄₈" hex-head socket
wrench, flat 2" putty knife.
IMPORTANT:
■ All graphics referenced in the following instructions are included
later in this section after “Final Steps.” The graphics shown are for a
right-hand swing door (hinges factory installed on the right).
■ If you only want to remove and replace the door, see the “Remove
Door and Hinges” and “Replace Door and Hinges.”
■ Before you begin, turn the control OFF, and remove food and
adjustable door or utility bins from door.
Remove Door and Hinges
1. Unplug freezer or disconnect power.
2. Keep the freezer door closed until you are ready to lift it free from
the cabinet.
NOTE: Provide additional support for the door while the hinges are
being moved. Do not depend on the door magnets to hold the door
in place while you are working.
3. Remove the parts for the top hinge as shown in Top Hinge graphic.
4. Lift the freezer door free from the lower hinge and cabinet and set
aside.
5. Remove the 4 hex-head hinge screws and bottom hinge assembly.
See Bottom Hinge graphic.
Reverse Door (optional on some models)
IMPORTANT: If you want to reverse your door so that it opens in the
opposite direction, continue with “Reverse Door (optional on some
models)” instructions. If you are not reversing the door, see “Replace
Door and Hinges.”
Cabinet
1. Remove the cabinet hinge hole plugs from the cabinet top and
move them to the opposite side hinge holes as shown in
Graphic 2.
2. Remove the bottom hinge pin from the hinge bracket.
3. Remove the decals covering the holes on the opposite side of the
bottom hinge.
4. Reinstall the bottom hinge pin in the alternate hole in the hinge
bracket. See Graphic 3.
5. Reinstall the hinge bracket to the cabinet with the 4 hex-head
hinge screws.
Door
1. Remove the hinge thimble hole plug from the top of the door. See
Graphic 4.
2. Remove the door stop from the bottom of the door.
3. Move the door stop to the opposite side making sure that the hole
in the door stop plate is aligned perfectly with the hole in the door
for the bottom hinge pin.
4. Using the screws removed in Step 2, fasten the door stop bracket
to the bottom of the door.
5. Tighten all screws. Set aside the door until the bottom hinge is in
place.
Replace Door and Hinges
NOTE: Graphic may be reversed if door swing is reversed.
1. Replace the parts for the bottom hinge as shown and tighten
screws. See Bottom Hinge graphic. Replace the freezer door.
NOTE: Provide additional support for the door while the hinges are
being moved. Do not depend on the door magnets to hold the door
in place while you are working.
2. Assemble the parts of the top hinge as shown in the Top Hinge
graphic. Do not tighten the screws completely.
Final Steps
1. Check all holes to make sure that hole plugs and screws are in
place. Reinstall top hinge cover. See Top Hinge graphic.
2. Using the provided decals, cover the remaining holes located on
the opposite side from the bottom hinge.
3. Plug into a grounded 3 prong outlet.
4. Reset the control. See “Using the Control.”
5. Return all removable door parts to door and food to freezer.
Hex-head hinge screws
Electrical Shock Hazard
Plug into a grounded 3 prong outlet.
Do not remove ground prong.
Do not use an adapter.
Do not use an extension cord.
Failure to follow these instructions can result in death,
fire, or electrical shock.
WARNING
Electrical Shock Hazard
Plug into a grounded 3 prong outlet.
Do not remove ground prong.
Do not use an adapter.
Do not use an extension cord.
Failure to follow these instructions can result in death,
fire, or electrical shock.
WARNING

6
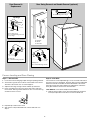
Freezer Leveling and Door Closing
Style 1—without Grille
1. Locate the 2 front leveling legs taped among the packing materials.
2. Screw these legs into the front holes on the bottom of the freezer.
The back of the freezer rests on 2 fixed supports.
3. Adjust the front legs enough to lift the cabinet up off the floor.
4. Place a leveling tool on top of the freezer first side to side, then
front to back. Turn leg counterclockwise to raise a corner. Turn leg
clockwise to lower a corner.
5. Repeat Step 4 until freezer is level.
6. After freezer is fully loaded with food, recheck with level as in
Step 4.
Style 2—with Grille
Your freezer has 2 front adjustable legs, one on each side. The back of
the freezer rests on 2 fixed rollers. The base grille covers the adjustable
brake feet and roller assemblies located at the bottom of the freezer
below the freezer door. Before making any adjustments, remove the
base grille and move the freezer to its final location.
Tools Needed: ¹⁄₄" hex driver, Phillips head screwdriver
1. Remove the base grille screws. Grasp the grille firmly and pull it
toward you. Open the freezer door to access the brake feet.
A. Cabinet Hinge Hole Plugs
A
Door Swing Reversal and Handle Removal (optional)
2
A. Grommet
B. Handle
C. Setscrews
A
B
C
1
3
Door Removal &
Replacement
Top Hinge
A. Top Hinge Cover
B.
5
/
16
"
Hex-Head Hinge Screws
C. Top Hinge
A
B
B
C
Bottom Hinge
A. Hinge Pin
B.
3
/
8
"
Hex-Head Hinge Screws
A
B
A. Hinge Pin
B.
3
/
8
"
Hex-Head Hinge Screws
A
B

7
NOTE: To allow the freezer to roll more easily, raise the brake feet
by turning them counterclockwise. The front rollers will be touching
the floor.
2. Move the freezer to its final location.
3. Lower the brake feet, by turning them clockwise, until the rollers
are off the floor and both brake feet are snug against the floor. This
keeps the freezer from rolling forward when you are opening the
freezer door.
IMPORTANT: If you need to make further adjustments involving the
brake feet, you must turn both brake feet the same amount to keep
the freezer level.
4. Make sure the door closes easily. If you are satisfied with the door
opening and closing, skip the next section. If, however, the door
does not close easily or the door pops open, adjust the tilt.
To Adjust the Cabinet Tilt:
NOTE: Having someone push against the top of the freezer takes some
weight off the brake feet. This makes it easier to turn them.
■ Open the freezer door. Use a ¹⁄₄" hex driver to turn both brake feet
clockwise the same amount. This will raise the front of the freezer. It
may take several turns to allow the door to close more easily.
5. Make sure the freezer is steady. If the freezer seems unsteady or
rolls forward when the door is pulled open, adjust the brake feet.
To Steady the Refrigerator:
■ Open the freezer door. Using a ¹⁄₄" hex driver, turn both brake
feet clockwise the same amount until the brake feet are snug
against the floor. Check again. If not satisfied, continue to adjust
the brake feet by half turns of the screw until the freezer does
not roll forward when the door is opened.
6. Replace the base grille by aligning the ends of the grille with the
leveling assemblies on each side and snapping the grille into
place. Reinstall the Phillips screws.
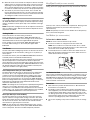
Ensuring Proper Air Circulation
In order to ensure proper temperature, you need to permit proper
airflow in the freezer. As shown in the illustration, cool air enters from
the freezer wall and moves down. The air then recirculates through the
vent near the bottom.
Do not block any of these vents with food packages. If the vents are
blocked, airflow will be restricted, and temperature and moisture
problems may occur.
IMPORTANT: To avoid odor transfer and drying out of food, wrap or
cover foods tightly.
Using the Control
The temperature control is located at the top front of the freezer
compartment.
Temperature Control
For your convenience, the temperature control is preset at the factory.
When you first install your freezer, check that the control is still set to
the recommended setting as shown.
Recommended setting is the center snowflake.
IMPORTANT:
■ The recommended setting is designed to maintain the temperature
at or near 0°F (-17.8°C) under normal operating conditions.
■ Allow the freezer to cool 6 to 8 hours before filling with frozen food.
A. Brake foot
B. Front roller
A
¹⁄₄"
B
OPERATING YOUR FREEZER

8
■ When the freezer is first started, the compressor will run constantly
until the freezer is cooled. It may take up to 6 or 8 hours (or longer),
depending on room temperature and number of times the freezer
door is opened. After the freezer is cooled, the compressor will turn
on and off as needed to keep the freezer at the proper temperature.
■ The outside of your freezer may feel warm. This is normal. The
freezer’s design and main function is to remove heat from packages
and airspace inside the freezer. The heat is transferred to the room
air, making the outside of the freezer feel warm.
Adjusting Control
If you need to adjust the temperature in the freezer compartment, press
the TEMP SETTING button to display the desired temperature setting
from the snowflake on the left (least cold) to the snowflake on the right
(coldest).
NOTE: Except when starting the freezer, do not adjust the control more
than one setting at a time. Wait 24 hours between adjustments for the
temperature to stabilize.
Cooling On/Off
Your freezer will not cool when cooling is turned off.
To turn cooling off, press and hold the TEMP SETTING button for
3 seconds. In the off condition, none of the lights on the control panel
will be illuminated. The main freezer light bulb will still operate.
To turn cooling on, press and hold the TEMP SETTING button for
3 seconds. When cooling is on, the control panel lights will be
illuminated.
Fast Freeze
Use this feature before adding large amounts of unfrozen food. For the
best food quality, do not exceed 3 lbs (1,361 g) per cu. ft (28.32 L) of
freezer space.
To activate Fast Freeze, press the TEMP SETTING button until all the
snowflake positions are illuminated simultaneously.
The freezer will remain in the Fast Freeze setting for 24 hours after the
extra-low temperature is reached. Once the time has expired, the
freezer will return to the previous temperature setting. Fast Freeze may
be manually turned off by pressing the TEMP SETTING button to select
the desired temperature setting from the snowflake on the left (least
cold) to the snowflake on the right (coldest).
Over Temperature Alert (on some models)
The Over Temperature Alert lets you know if the freezer temperature
has risen to 19°F (-7°C) or higher. This alert feature will sound a
continuous alert tone and repeatedly flash a red light on the control
panel. The tone can be turned off by pressing the TEMP SETTING
button on the control panel once. As you press the TEMP SETTING
button, the red light will then also change from flashing to continuously
illuminated. The red light will remain illuminated until the freezer
temperature falls below 19°F (-7°C).
NOTE: If the red light on the control panel is repeatedly flashing, but the
alert tone is not sounding, this means that an over temperature
condition has occurred but the freezer temperature has since returned
to below 19°F (-7°C). To turn off the red light indicator for this condition,
press the TEMP SETTING button on the control panel once.
Door Ajar Alarm (on some models)
The Door Ajar alarm lets you know when the freezer door has been
open for 5 minutes or longer and the cooling is turned on. This alarm
feature will sound an alert tone that will repeat every 2 minutes. Close
the door to turn off the tone. The feature is reset and will reactivate
when the door is again left open for 5 minutes.
NOTE: To mute the alert tone while keeping the door open, such as
while cleaning the inside of the freezer, press TEMP SETTING button
on the control panel. The alert tone will be temporarily turned off.
Key Eject Lock (on some models)
To lock or unlock the freezer, you must hold the key in the lock while
turning. The lock is spring loaded, so the key cannot be left in the lock.
If the key is lost, contact your dealer for a replacement. Always give the
model and serial number of your freezer when requesting a
replacement key.
NOTE: Keep the key out of the reach of children. Do not keep the key
close to the freezer/refrigerator.
Ice Maker (on some models)
To Turn the Ice Maker On/Off
NOTE: Do not force the wire shutoff arm up or down.
■ To turn the ice maker on, simply lower the wire shutoff arm.
NOTE: Your ice maker has an automatic shutoff. As ice is made,
the ice cubes fill the ice storage bin and the ice cubes will raise the
wire shutoff arm to the OFF (arm up) position.
■ To manually turn the ice maker off, lift the wire shutoff arm to the
OFF (arm up) position and listen for the click to make sure the ice
maker will not continue to operate.
Ice Production Rate
The ice maker should produce approximately 7 to 9 batches of ice in a
24-hour period. If ice is not being made fast enough, press the TEMP
SETTING button to display the next colder setting. Wait 24 hours and, if
necessary, set the temperature control to the highest setting, waiting
24 hours between each increase.
Remember
■ Allow 24 hours to produce the first batch of ice. Discard the first
three batches of ice produced.
■ The quality of your ice will be only as good as the quality of the
water supplied to your ice maker. Avoid connecting the ice maker to
a softened water supply. Water softener chemicals (such as salt)
can damage parts of the ice maker and lead to poor quality ice. If a
softened water supply cannot be avoided, make sure the water
softener is operating properly and is well maintained.
■ Do not store anything on top of the ice maker or in the ice storage
bin.

9
Freezer Features
This manual covers several different models. The freezer you have
purchased may have some or all of the items listed. The locations of the
features may not match those of your model.
Door Bin
To Remove and Replace the Bin:
1. Remove the bin by tipping the front of the bin forward and sliding
out.
2. Replace the bin by sliding it in above the desired support tilting it
back into place.
Storage Basket (on some models)
The slide out basket provides separate storage space for items that are
difficult to store on freezer shelves. To remove the basket, pull out and
lift up.
Storage Gate (on some models)
To Remove the Storage Gate:
1. Lift up the top of the gate and out of the supports.
2. Return the gate to original position. Lower the gate into the
supports.
Freezer Shelves
Store similar foods together and adjust the shelves to fit different
heights. This reduces the time the freezer door is open and saves
energy.
To Remove and Replace a Shelf:
1. Remove the shelf by lifting straight up and pulling the shelf out.
2. Replace the shelf by lowering the shelf onto the supports on the
side wall.
Cleaning Your Frost-Free Freezer
Frost-free means that you will not have to defrost your freezer. Frost is
removed by air moving and collecting any moisture and depositing it on
the cooling coil. The cooling coil periodically warms up enough to melt
the frost, and it then flows down to the drain pan (located behind the
base grille) where it is evaporated.
Complete cleaning should be done at least once a year.
1. Press and hold TEMP SETTING for 3 seconds to turn off cooling.
2. Unplug freezer or disconnect power.
3. Remove all frozen food. Wrap frozen food in several layers of
newspaper and cover with a blanket. Food will stay frozen for
several hours. You may also store frozen food in a cooler,
additional refrigerator-freezer, or in a cool area.
4. Remove all removable parts from inside, such as shelves, bins,
etc.
5. Hand wash, rinse, and dry removable parts and interior surfaces
thoroughly. Use a clean sponge or soft cloth and a mild detergent
in warm water.
■ Do not use abrasive or harsh cleaners such as window sprays,
scouring cleansers, flammable fluids, cleaning waxes,
concentrated detergents, bleaches or cleansers containing
petroleum products on plastic parts, interior and door liners or
gaskets. Do not use paper towels, scouring pads, or other
harsh cleaning tools. These can scratch or damage materials.
■ To help remove odors, you can wash interior walls with a
mixture of warm water and baking soda (2 tbs to 1 qt [26 g to
0.95 L] of water).
6. Replace the removable parts.
7. Use the appropriate cleaning method for your exterior finish.
Painted metal: Wash exteriors with a clean sponge or soft cloth
and a mild detergent in warm water. Do not use abrasive or harsh
cleaners, or cleaners designed for stainless steel. Dry thoroughly
with a soft cloth.
CARING FOR YOUR FREEZER
WARNING
Explosion Hazard
Use nonflammable cleaner.
Failure to do so can result in death, explosion, or fire.

10
8. Clean the condenser coils regularly. Coils may need to be cleaned
as often as every other month. This may help save energy.
■ Open the freezer door and remove the base grille by removing
2 Phillips-head screws and pulling the grille toward you.
■ Use a vacuum with an extended attachment to clean the
condenser coils when they are dusty or dirty.
■ Replace the base grille by aligning the ends of the grille with the
leveling assemblies on each side and snapping the grille into
place. Reinstall the screws.
9. Replace all frozen food.
10. Plug in freezer or reconnect power.
11. Set temperature control to desired setting. See “Using the
Control.”
Changing the Light Bulb
NOTE: Not all appliance bulbs will fit your freezer. Be sure to replace
the bulb with one of the same size, shape, and wattage.
1. Unplug freezer or disconnect power.
2. Remove the light shield by squeezing the lens from the sides,
pushing back and pulling down.
3. Replace bulb with a 40-watt maximum appliance bulb or LED bulb.
NOTE: LED bulb must be purchased from an authorized dealer.
4. Replace the light shield.
5. Plug in freezer or reconnect power.
Power Interruptions
If the power will be out for 24 hours or less, keep the door closed to help
food stay cold and frozen.
If the power will be out for more than 24 hours, do one of the following:
■ Remove all frozen food and store it in a frozen food locker.
■ If a food locker is not available, consume or can perishable food at
once.
REMEMBER: A full freezer stays cold longer than a partially filled one.
A freezer full of meat stays cold longer than a freezer full of baked
goods. If you see that food contains ice crystals, it may be refrozen,
although the quality and flavor may be affected. If the condition of the
food is poor, dispose of it.
Moving Care
When you are moving your freezer to a new home, follow these steps to
prepare it for the move.
1. Remove all frozen food.
2. Unplug the freezer.
3. Take out all removable parts, wrap them well, and tape them
together so they don’t shift and rattle during the move.
4. Clean the freezer thoroughly.
5. Tape the freezer shut and tape the electrical cord to the cabinet.
When you get to your new home, refer to the “Installing Your Freezer”
and “Operating Your Freezer” sections for information on installation
and setting the controls.

11
First try the solutions suggested here. If you need further assistance or more recommendations that may help you avoid a service call, refer to the
warranty page in this manual and scan the code there with your mobile device, or visit www.whirlpool.com/product_help for recommendations
that may help you avoid a service call. In Canada, visit http://www.whirlpool.ca.
Contact us by mail with any questions or concerns at the address below:
In the U.S.A.:
Whirlpool Brand Home Appliances
Customer eXperience Center
553 Benson Road
Benton Harbor, MI 49022-2692
In Canada:
Whirlpool Brand Home Appliances
Customer eXperience Centre
200 – 6750 Century Ave.
Mississauga ON L5N 0B7
Please include a daytime phone number in your correspondence
Freezer Operation
PROBLEM SOLVER
WARNING
Explosion Hazard
Use nonflammable cleaner.
Failure to do so can result in death, explosion, or fire.
Electrical Shock Hazard
Plug into a grounded 3 prong outlet.
Do not remove ground prong.
Do not use an adapter.
Do not use an extension cord.
Failure to follow these instructions can result in death,
fire, or electrical shock.
WARNING
PROBLEM RECOMMENDED SOLUTIONS
Freezer Will Not Operate Check that the freezer is not running an automatic defrost cycle.
Check that it is plugged into a grounded 3 prong outlet.
Check that the temperature control is turned on.
Replace the fuse or reset the circuit breaker.
NOTE: If problems continue, contact an electrician.
Lights Do Not Work Check that it is plugged into a grounded 3 prong outlet.
Check that the light bulb is tight in the socket and is not burned out.
Water in Defrost Drain Pan It is normal for water to drip into the defrost drain pan when freezer is defrosting.
When humidity is high, it is normal for water in the defrost pan to take longer to evaporate.
Motor Seems to Run Too
Much
Check that door closes properly.
Adding a large amount of food warms the freezer causing the freezer to run longer to cool back down. If this is
the situation, wait approximately 6 to 8 hours to allow the freezer to reach the correct temperature.
Get all items out at one time, keep food organized and close door as soon as possible.
Check that the door gasket is sealed all the way around. If not, contact a qualified person or technician.
Check that space around freezer meets air circulation requirements. See “Location Requirements.”
NOTE: If none of the above, your new freezer will run longer than your old one due to its high-efficiency motor.
Temperature Is Too Warm Check that air vents are clear. See “Ensuring Proper Air Circulation” for air vent locations.
Get all items out at one time, keep food organized and close door as soon as possible.
Adding a large amount of food warms the freezer causing the freezer to run longer to cool back down.
Check that the temperature control is set correctly for surrounding conditions.

12
Ice Production
Ice Quality
The Door Will Not Close
Completely or Is Difficult To
Open
Check that there are no food packages blocking the door.
On some models, check that the shelves and basket are in the correct position.
Check that gaskets are clean. See “Caring for Your Freezer.”
Check that the freezer is stable. See “Freezer Leveling and Door Closing.”
Freezer Makes Loud Buzzing/
Clicking Sound
If the freezer has recently been plugged in or turned on following a defrost or product move, or if there has been
an extended power failure, turn off the temperature alarm for the next 24 hours.
Adding a large amount of food warms the freezer. It can take several hours for the freezer to return to normal
temperature. Turn the temperature alarm off for the next 24 hours.
PROBLEM RECOMMENDED SOLUTIONS
WARNING
Electrical Shock Hazard
Disconnect power before servicing.
Replace all parts and panels before operating.
Failure to do so can result in death or electrical shock.
PROBLEM RECOMMENDED SOLUTIONS
Ice Maker Produces No Ice or
Very Little Ice
If ice maker has just been installed, wait 72 hours for full ice production to begin.
Check that the temperature control is cold enough.
Check that the wire shutoff arm is in the ON (arm down) position.
Check that the water supply is properly connected and turned on.
Check that the ejector arm is not blocked by an ice cube.
If a large amount of ice has been removed recently, allow 24 hours to produce more ice.
NOTE: If not due to any of the above, there may be a problem with the water line. Call for service.
PROBLEM RECOMMENDED SOLUTIONS
Off Taste, Odor or Gray Color
in the Ice
Discard the first few batches of ice.
If there is unusually high mineral content in the water supply, the water may need to be treated.
If there is mineral scale buildup, clean your ice maker mold.
If the ice cubes have been stored too long, throw the old ice away and make a new supply.
Check that the freezer and ice bin are clean.
Thin, Soft or Clumps of Ice If there is unusually high mineral content in the water supply, the water may need to be treated.
If there is mineral scale buildup, clean your ice maker.
If there are clumps of ice in the bin and if ice is not used regularly, it will melt and form clumps. Break the clumps
with the ice scoop provided.

1/14
WHIRLPOOL
®
MAJOR APPLIANCE
LIMITED WARRANTY
ATTACH YOUR RECEIPT HERE. PROOF OF PURCHASE IS REQUIRED
TO OBTAIN WARRANTY SERVICE.
Please have the following information available when you call the
Customer eXperience Center:
■ Name, address and telephone number
■ Model number and serial number
■ A clear, detailed description of the problem
■ Proof of purchase including dealer or retailer name and address
IF YOU NEED SERVICE:
1. Before contacting us to arrange service, please determine whether your product requires repair. Some
questions can be addressed without service. Please take a few minutes to review the Troubleshooting or
Problem Solver section of the Use and Care Guide, scan the QR code on the right to access additional
resources, or visit www.whirlpool.com/product_help.
2. All warranty service is provided exclusively by our authorized Whirlpool Service Providers
. In the U.S. and
Canada, direct all requests for warranty service to:
Whirlpool Customer eXperience Center
In the U.S.A., call 1-800-253-1301. In Canada, call 1-800-807-6777.
If outside the 50 United States or Canada, contact your authorized Whirlpool dealer to determine whether another
warranty applies.
www.whirlpool.com/product_help
ONE YEAR LIMITED WARRANTY
WHAT IS COVERED WHAT IS NOT COVERED
For one year from the date of purchase, when this major
appliance is installed, operated and maintained according to
instructions attached to or furnished with the product, Whirlpool
Corporation or Whirlpool Canada LP (hereafter “Whirlpool”) will
pay for Factory Specified Replacement Parts and repair labor
to correct defects in materials or workmanship that existed
when this major appliance was purchased, or at its sole
discretion replace the product. In the event of product
replacement, your appliance will be warranted for the remaining
term of the original unit's warranty period.
YOUR SOLE AND EXCLUSIVE REMEDY UNDER THIS
LIMITED WARRANTY SHALL BE PRODUCT REPAIR AS
PROVIDED HEREIN. Service must be provided by a Whirlpool
designated service company. This limited warranty is valid only
in the United States or Canada and applies only when the
major appliance is used in the country in which it was
purchased. This limited warranty is effective from the date of
original consumer purchase. Proof of original purchase date is
required to obtain service under this limited warranty.
1. Commercial, non-residential, multiple-family use, or use inconsistent with published
user, operator or installation instructions.
2. In-home instruction on how to use your product.
3. Service to correct improper product maintenance or installation, installation not in
accordance with electrical or plumbing codes or correction of household electrical
or plumbing (i.e. house wiring, fuses or water inlet hoses).
4. Consumable parts (i.e. light bulbs, batteries, air or water filters, preservation
solutions, etc.).
5. Conversion of products from natural gas or L.P. gas.
6. Damage from accident, misuse, abuse, fire, floods, acts of God or use with products
not approved by Whirlpool.
7. Repairs to parts or systems to correct product damage or defects caused by
unauthorized service, alteration or modification of the appliance.
8. Cosmetic damage including scratches, dents, chips, and other damage to the
appliance finishes unless such damage results from defects in materials and
workmanship and is reported to Whirlpool within 30 days.
9. Discoloration, rust or oxidation of surfaces resulting from caustic or corrosive
environments including but not limited to high salt concentrations, high moisture or
humidity or exposure to chemicals.
10. Food or medicine loss due to product failure.
11. Pick-up or delivery. This product is intended for in-home repair.
12. Travel or transportation expenses for service in remote locations where an
authorized Whirlpool servicer is not available.
13. Removal or reinstallation of inaccessible appliances or built-in fixtures (i.e. trim,
decorative panels, flooring, cabinetry, islands, countertops, drywall, etc.) that
interfere with servicing, removal or replacement of the product.
14. Service or parts for appliances with original model/serial numbers removed, altered
or not easily determined.
The cost of repair or replacement under these excluded circumstances shall
be borne by the customer.
DISCLAIMER OF IMPLIED WARRANTIES
IMPLIED WARRANTIES, INCLUDING ANY IMPLIED WARRANTY OF MERCHANTABILITY OR IMPLIED WARRANTY OF FITNESS FOR A
PARTICULAR PURPOSE, ARE LIMITED TO ONE YEAR OR THE SHORTEST PERIOD ALLOWED BY LAW. Some states and provinces do not allow
limitations on the duration of implied warranties of merchantability or fitness, so this limitation may not apply to you. This warranty gives you specific legal
rights, and you also may have other rights that vary from state to state or province to province.
DISCLAIMER OF REPRESENTATIONS OUTSIDE OF WARRANTY
Whirlpool makes no representations about the quality, durability, or need for service or repair of this major appliance other than the representations
contained in this warranty. If you want a longer or more comprehensive warranty than the limited warranty that comes with this major appliance, you
should ask Whirlpool or your retailer about buying an extended warranty.
LIMITATION OF REMEDIES; EXCLUSION OF INCIDENTAL AND CONSEQUENTIAL DAMAGES
YOUR SOLE AND EXCLUSIVE REMEDY UNDER THIS LIMITED WARRANTY SHALL BE PRODUCT REPAIR AS PROVIDED HEREIN. WHIRLPOOL
SHALL NOT BE LIABLE FOR INCIDENTAL OR CONSEQUENTIAL DAMAGES. Some states and provinces do not allow the exclusion or limitation of
incidental or consequential damages, so these limitations and exclusions may not apply to you. This warranty gives you specific legal rights, and you
also may have other rights that vary from state to state or province to province.

SÉCURITÉ.............................................................................................1
INSTALLATION DU CONGÉLATEUR.................................................2
Déballage...........................................................................................2
Exigences d'emplacement................................................................3
Spécifications électriques..................................................................3
Spécifications de l’alimentation en eau.............................................3
Raccordement de la canalisation d’alimentation en eau..................4
Retrait et réinstallation de la poignée................................................5
Porte du congélateur.........................................................................5
Nivellement du congélateur et fermeture de la porte .......................7
UTILISATION DU CONGÉLATEUR ....................................................8
Pour s’assurer d’une circulation d’air appropriée.............................8
Utilisation de la commande...............................................................8
Serrure à éjection de clé....................................................................9
Machine à glaçons.............................................................................9
Caractéristiques du congélateur .................................................... 10
ENTRETIEN DU CONGÉLATEUR ....................................................10
Nettoyage du congélateur sans givre .............................................10
Remplacement de l’ampoule d’éclairage .......................................11
Pannes de courant électrique .........................................................11
Déménagement...............................................................................11
RÉSOLUTION DE PROBLÈMES ......................................................12
Fonctionnement du congélateur.....................................................12
Production de glaçons ....................................................................13
Qualité des glaçons.........................................................................13
GARANTIE..........................................................................................14
Guide d’utilisation
Congélateur vertical
Nous vous REMERCIONS d'avoir acheté ce produit de haute qualité. Enregistrer le congélateur sur
www.whirlpool.com
. Au Canada, enregistrer le
congélateur sur
www.whirlpool.ca
.
Pour référence ultérieure, consignez par écrit les numéros de modèle et de série de votre produit. Vous trouverez les numéros de modèle et de série à
l'intérieur du congélateur.
Numéro de modèle . . . . . . . . . . . . . . . . . . . . . . . . . . . . . . . . . . . . . . . . .
Numéro de série . . . . . . . . . . . . . . . . . . . . . . . . . . . . . . . . . . . . . . . . . . .
TABLE DE MATIÈRES
SÉCURITÉ
Risque possible de décès ou de blessure grave si vous ne suivez pas
immédiatement les instructions.
Risque possible de décès ou de blessure grave si vous ne suivez pas
les instructions.
Tous les messages de sécurité vous diront quel est le danger potentiel et vous disent comment réduire le risque de blessure et ce qui peut
se produire en cas de non-respect des instructions.
Votre sécurité et celle des autres est très importante.
Nous donnons de nombreux messages de sécurité importants dans ce manuel et sur votre appareil ménager. Assurez-vous de
toujours lire tous les messages de sécurité et de vous y conformer.
AVERTISSEMENT
DANGER

2
MISE AU REBUT APPROPRIÉE DE VOTRE VIEUX
CONGÉLATEUR OU RÉFRIGÉRATEUR
IMPORTANT :
Le problème des enfants trouvés enfermés ou étouffés n’est
pas un problème révolu. Les congélateurs ou réfrigérateurs jetés ou
abandonnés présentent des dangers, même s’ils sont abandonnés
pendant “quelques jours” seulement. Si vous vous débarrassez de votre
vieux réfrigérateur ou congélateur, veuillez suivre les instructions suivantes
pour aider à éviter les accidents.
Avant de mettre au rebut votre vieux congélateur ou
réfrigérateur :
■
Enlever les portes ou le couvercle.
■
Laisser les tablettes en place, de sorte que les enfants ne puissent pas
facilement se glisser à l’intérieur.
Déballage
Enlèvement des matériaux d’emballage
■
Enlever le ruban adhésif et la colle des surfaces du congélateur avant
de le mettre en marche. Frotter une petite quantité de savon liquide
pour la vaisselle sur l’adhésif avec les doigts. Rincer à l’eau tiède et
essuyer.
■
Ne pas utiliser d’instruments coupants, d’alcool à friction, de liquides
inflammables ou de nettoyants abrasifs pour enlever le ruban adhésif
ou la colle. Ces produits peuvent endommager la surface de votre
congélateur. Pour plus de renseignements, voir “Sécurité”.
IMPORTANTES INSTRUCTIONS DE SÉCURITÉ
Pour réduire les risques d'incendie, de choc électrique ou des blessures lors de l'utilisation du
congélateur, prendre quelques précautions fondamentales, y compris les suivantes :
AVERTISSEMENT :
CONSERVEZ CES INSTRUCTIONS
■ Brancher l'appareil sur une prise à 3 alvéoles reliée à la terre.
■ Ne pas enlever la broche de liaison à la terre.
■ Ne pas utiliser un adaptateur.
■ Ne pas utiliser un câble de rallonge.
■ Débrancher la source de courant électrique avant l'entretien.
■ Replacer pièces et panneaux avant de faire la remise en
marche.
■ Utiliser un produit de nettoyage ininflammable.
■ Garder les matériaux et les vapeurs inflammables, telle que
l'essence, loin du congélateur.
■ Utiliser deux ou plus de personnes pour déplacer et installer le
congélateur.
■ Garder la clé loin des enfants.
■ Enlever les portes ou le couvercle de votre vieux congélateur ou
réfrigérateur.
■ Débrancher la source de courant électrique avant l'installation de
la machine à glaçons (seulement pour modèles prêts à recevoir
une machine à glaçons).
AVERTISSEMENT
Risque de suffoquer
Enlever les portes ou le couvercle de votre vieux
congélateur ou réfrigérateur.
Le non-respect de cette instruction peut causer
un décès ou des lésions cérébrales.
Renseignements importants à propos de la mise au
rebut des fluides réfrigérants :
Mettre le congélateur au rebut conformément à la
réglementation fédérale et locale. Les fluides réfrigérants
doivent être évacués par un technicien certifié et agréé par
l’EPA conformément aux procédures établies.
INSTALLATION DU CONGÉLATEUR
AVERTISSEMENT
Risque du poids excessif
Utiliser deux ou plus de personnes pour déplacer et
installer le congélateur.
Le non-respect de cette instruction peut causer
une blessure au dos ou d'autre blessure.
Déplacement de votre congélateur :
Votre congélateur est lourd. Lors du déplacement de votre
congélateur pour le nettoyage ou un entretien, veiller à
recouvrir le plancher avec du carton ou un panneau de fibre
dur pour éviter qu'il ne subisse tout dommage. Toujours
tirer le congélateur tout droit lors du déplacement. Ne pas
incliner le congélateur d’un côté ou de l’autre ni le “faire
marcher” en essayant de le déplacer car le plancher pourrait
être endommagé.

3
Nettoyage avant l’utilisation
Après avoir enlevé tous les matériaux d’emballage, nettoyer l’intérieur du
congélateur avant l’utilisation. Voir les instructions de nettoyage à
“Entretien du congélateur”.
Exigences d’emplacement
Ventilation et dégagement
■
Garder les matériaux et les vapeurs inflammables, tels que l’essence,
loin du congélateur.
■
Ne pas couvrir le congélateur avec des articles tels que couvertures,
draps, nappes de table, etc. Ceci réduit la circulation d’air.
■
Laisser un espace d’au moins 3" (7,5 cm) des deux côtés du
congélateur et de 1" (2,5 cm) entre l’arrière du congélateur et le mur. Si
le congélateur est installé contre un mur, laisser un espace
supplémentaire du côté des charnières pour une plus grande ouverture
de la porte.
Température
Le congélateur fonctionne à son efficacité maximale lorsqu’il se trouve
dans un endroit où la température ne descend pas en dessous de 40°F
(5°C). Installer le congélateur dans un endroit où la température ne
descend pas en dessous de cette température recommandée.
En cas de déplacement à son emplacement final
REMARQUE :
Laisser un dégagement de 3" (7,5 cm) sur le dessus et les
côtés et un dégagement de
¹⁄₄
" (6,4 mm) entre les appareils.
Spécifications électriques
Avant de déplacer le congélateur à son emplacement final, il est important
de vous assurer d'avoir le raccordement électrique approprié.
Méthode recommandée de mise à la terre
Une source de courant électrique de 115 V, 60 Hz, CA seulement, et
protégée par un fusible de 15 ou 20 ampères, adéquatement mise à la
terre est nécessaire. Il est recommandé d’utiliser un circuit distinct pour
alimenter uniquement le congélateur. Utiliser une prise de courant murale
qui ne peut pas être mise hors circuit à l’aide d’un commutateur. Ne pas
employer un câble de rallonge.
REMARQUE :
Avant de procéder à tout type d’installation, de nettoyage ou
de changement d’une ampoule, appuyer sans relâcher sur TEMP
SETTING (réglage de la température) pendant 3 secondes pour désactiver
le refroidissement, puis déconnecter le congélateur de la source de courant
électrique.
Importants renseignements à savoir au sujet des tablettes
et des couvercles en verre :
Ne pas nettoyer les tablettes ou couvercles en verre avec de
l’eau tiède quand ils sont froids. Les tablettes et les
couvercles peuvent se briser s'ils sont exposés à des
changements soudains de température ou à un impact tel
que coup brusque. Le verre trempé est conçu pour éclater
en d’innombrables pièces minuscules. Ceci est normal. Les
tablettes et les couvercles en verre sont lourds. Les saisir à
deux mains lors de leur dépose afin d'éviter de les faire
tomber.
Risque d'explosion
Garder les matériaux et les vapeurs inflammables, telle
que l'essence, loin du congélateur.
Le non-respect de cette instruction peut causer
un décès, une explosion ou un incendie.
AVERTISSEMENT
3" (7,5 cm)
3" (7,5 cm)
AVERTISSEMENT
Risque de choc électrique
Brancher sur une prise à 3 alvéoles reliée à la terre.
Ne pas enlever la broche de liaison à la terre.
Ne pas utiliser un adaptateur.
Ne pas utiliser un câble de rallonge.
Le non-respect de ces instructions peut causer
un décès, un incendie ou un choc électrique.

4
Spécifications de l’alimentation en eau
(sur certains modèles)
Rassembler les outils et pièces nécessaires avant de commencer
l'installation. Lire et suivre les instructions fournies avec les outils indiqués
ici.
Outils requis
REMARQUE :
Votre marchand de congélateurs propose une trousse
disponible avec un robinet d’arrêt à étrier de
¹⁄₄
" (6,35 mm), un raccord et
un tube en plastique. Avant l’achat, s’assurer que le robinet d’arrêt à étrier
est conforme à vos codes locaux de plomberie. Ne pas employer de robinet
d’arrêt à étrier de
³⁄₁₆
" (4,76 mm) ou de type à percer, ce qui réduit le débit
d’eau et cause une obstruction plus facilement.
IMPORTANT :
■
Si on doit utiliser le congélateur avant qu’il soit raccordé à la
canalisation d’eau, placer la commande de la machine à glaçons à la
position d’ARRÊT.
■
Toutes les installations doivent être conformes aux exigences des
codes locaux de plomberie.
■
Utiliser un tube en plastique et vérifier l’absence de fuites. Installer les
tubes en plastique seulement à des endroits où la température se
maintient au-dessus du point de congélation.
Pression de l’eau
Une alimentation en eau froide avec une pression entre 30 et 120 lb/po
2
(207 et 827 kPa) est nécessaire pour faire fonctionner le distributeur d’eau
et la machine à glaçons. Si vous avez des questions au sujet de la pression
de votre eau, consulter “Résolution de problèmes” ou faire appel à un
plombier qualifié agréé.
Alimentation en eau par osmose inverse
Si un système de purification de l’eau par osmose inverse est raccordé à
votre alimentation en eau froide, la pression de l’eau au système doit être
d’un minimum de 40 à 60 lb/po
2
(276 à 414 kPa).
Si la pression de l’eau au système d’osmose inverse est inférieure à 40 à
60 lb/po
2
(276 à 414 kPa), une pompe de surpression peut être insérée
dans le petit tube qui va de la canalisation d’eau froide au système
d’osmose inverse.
Si le distributeur d’eau ne distribue toujours pas l’eau correctement :
■
Vérifier pour voir si le filtre à sédiments dans le système d'osmose
inverse est bloqué et le remplacer si nécessaire.
■
Laisser le réservoir du système d’osmose inverse se remplir après une
utilisation intense.
■
Si votre réfrigérateur comporte un filtre à eau, celui-ci peut réduire
encore plus la pression de l’eau lorsqu’il est utilisé avec un système
d’osmose inverse. Retirer le filtre à eau.
Si vous avez des questions au sujet de la pression de votre eau, consulter
“Résolution de problèmes” ou appeler un plombier qualifié agréé.
Raccordement de la canalisation
d’alimentation en eau
(sur certains modèles)
Raccordement à une canalisation d’eau
1.
Débrancher le congélateur ou déconnecter la source de courant
électrique.
2.
FERMER le robinet principal d’arrivée d’eau. OUVRIR le robinet de
puisage le plus proche pendant une période suffisante pour que la
canalisation d’eau se vide.
3.
Trouver une canalisation d’eau froide verticale de
¹⁄₂
" à 1
¹⁄₄
" (12,7 mm à
3,18 cm) près du congélateur.
IMPORTANT :
■ Assurez-vous qu’il s’agit d’un conduit d’eau froide.
■ Un conduit horizontal fonctionnera, mais percer par le dessus
de la canalisation et non pas par le dessous. Ainsi, l’eau ne
risquera pas d’arroser la perceuse. Ceci empêche également
les sédiments qu’on trouve normalement dans l’eau de
s’accumuler dans le robinet.
4.
Pour déterminer la longueur du tube en plastique, il faut mesurer la
distance entre le point de connexion inférieur gauche à l’arrière du
congélateur et la canalisation d’eau. Ajouter une longueur de 7 pi
(2,1 m) pour permettre le nettoyage. Utiliser un tube en plastique de
¹⁄₄
"
(6,35 mm) de diamètre extérieur. Veiller à ce que le tube soit coupé
d’équerre aux deux extrémités.
5.
À l’aide d’une perceuse sans fil, percer un trou de
¹⁄₄
" (6,35 mm) dans
le tuyau de canalisation d’eau froide choisi.
6.
Fixer le robinet d’arrêt sur la canalisation d’eau froide avec la bride de
tuyau. Vérifier que l’extrémité du raccord de sortie du robinet est bien
engagée dans le trou de
¹⁄₄
" (6,35 mm) percé dans la canalisation et
que la rondelle d’étanchéité est placée sous la bride de tuyau. Serrer
l’écrou de serrage. Serrer lentement et uniformément les vis fixant la
bride de tuyau sur la tuyauterie afin que la rondelle forme une jonction
étanche. Ne pas serrer excessivement car ceci pourrait provoquer
l’écrasement du tube en plastique.
7.
Enfiler l’écrou et la bague de compression du raccord sur le tube en
plastique comme on le voit sur l’illustration. Insérer l’extrémité du tube
directement et aussi loin que possible dans l’ouverture de sortie du
robinet. Visser l’écrou de compression sur l’extrémité du raccord de
sortie avec une clé à molette. Ne pas serrer excessivement.
8.
Placer le bout libre du tube dans un contenant ou évier et OUVRIR le
robinet principal d’arrivée d’eau; laisser l’eau s’écouler par le tube
jusqu’à ce que l’eau soit limpide. FERMER le robinet de la canalisation
d’eau. Enrouler le tube en plastique.
■
Un tournevis à lame plate
■
Clés plates de
⁷⁄₁₆
" et
¹⁄₂
" ou deux
clés à molette réglables
■
Tourne-écrou de
¹⁄₄
"
■
Foret de
¹⁄₄
"
■
Perceuse sans fil
A. Canalisation d’eau froide
B. Bride de tuyau
C. Tube en plastique
D. Écrou de compression
E. Bague de compression
F. Robinet d’arr êt
G. Écrou de serrage
A
B
C
DEF
G

5
Raccordement au congélateur
1.
Fixer le tube en plastique à l’entrée du robinet d’eau en utilisant un
écrou et une bague de compression tel qu’illustré. Serrer l’écrou de
compression. Ne pas serrer excessivement.
2.
Utiliser la bride du tube à l’arrière du congélateur pour fixer le tube au
congélateur tel qu’illustré. Ceci aidera à empêcher les dommages au
tube lorsque le congélateur est poussé contre le mur.
3.
OUVRIR le robinet d’arrêt.
4.
Vérifier l’absence de fuites. Serrer tous les raccords (y compris les
raccordements du robinet d’arrivée d’eau) ou les écrous qui coulent.
5.
La machine à glaçons est équipée d’un filtre à eau incorporé. Si la
qualité de l’eau distribuée localement nécessite un deuxième filtre à
eau, l’installer dans la canalisation d’eau de
¹⁄₄
" (6,35 mm), à l’un ou
l’autre des points de raccordement. On peut obtenir un tel filtre à eau
chez le marchand d’appareils électroménagers le plus proche.
6.
Brancher sur une prise à 3 alvéoles reliée à la terre.
Retrait et réinstallation de la poignée
Retrait de la poignée :
1.
Desserrer les vis de blocage situées sur le côté de la poignée à chaque
extrémité. Voir l’illustration “Inversion du sens d’ouverture de la porte et
retrait de la poignée”.
2.
Retirer la poignée des œillets.
Réinstallation de la poignée :
1.
Placer la poignée sur les œillets en s’assurant que les œillets sont bien
installés dans les trous de la poignée.
2.
Serrer les vis de blocage supérieures et inférieures à l’aide de la clé à
tête hexagonale fournie. Voir l’illustration “Inversion du sens
d’ouverture de la porte et retrait de la poignée”. Ne pas serrer
excessivement les vis de blocage.
Porte du congélateur
Outillage nécessaire :
clé à douille à tête hexagonale de
⁵⁄₁₆
", clé à douille
à tête hexagonale de
³⁄₈
", couteau à mastic de 2".
IMPORTANT :
■
Toutes les illustrations mentionnées dans les instructions suivantes
sont incluses plus loin dans cette section après “Étapes finales”. Les
illustrations correspondent à une porte s’ouvrant à droite (charnières
installées à droite à l’usine).
■
Si vous désirez seulement enlever et réinstaller la porte, voir
“Démontage - Porte et charnières” et “Réinstallation - Porte et
charnières”.
■
Avant de commencer, tourner la commande à OFF (arrêt), et retirer les
aliments et tout balconnet réglable ou compartiment utilitaire de la
porte.
Démontage – Porte et charnières
1.
Débrancher le congélateur ou déconnecter la source de courant
électrique.
2.
Laisser la porte du congélateur fermée jusqu’à ce que vous soyez prêt
à la soulever pour la dégager de la caisse.
REMARQUE :
Prévoir un support additionnel de la porte pendant le
déplacement des charnières. La force d’attraction des aimants de porte
ne suffit pas à la maintenir en place.
3.
Enlever les pièces de la charnière supérieure - voir l’illustration de la
charnière supérieure.
4.
Soulever la porte du congélateur pour la séparer de la charnière
inférieure et de la caisse et la conserver à part.
5.
Retirer les 4 vis de charnière à tête hexagonale et la charnière
inférieure. Voir l’illustration de la charnière inférieure.
A. Bride du tube
B. Vis de bride du tube
C. Tube en plastique
D. Écrou de compression
E. Entrée du robinet
A
C
B
D
E
AVERTISSEMENT
Risque de choc électrique
Brancher sur une prise à 3 alvéoles reliée à la terre.
Ne pas enlever la broche de liaison à la terre.
Ne pas utiliser un adaptateur.
Ne pas utiliser un câble de rallonge.
Le non-respect de ces instructions peut causer
un décès, un incendie ou un choc électrique.
Vis de charnière à tête hexagonale

6
Inversion du sens d’ouverture de la porte
(facultatif - sur certains modèles)
IMPORTANT :
Si vous souhaitez inverser le sens d’ouverture de la porte,
suivre les instructions de la section “Inversion du sens d’ouverture de la
porte (facultatif - sur certains modèles)”. S’il n’est pas nécessaire de
changer l’orientation de la porte, voir “Réinstallation - Porte et charnières”.
Caisse
1.
Enlever les bouchons d’obturation des trous de charnière au sommet
de la caisse; transférer ceux-ci dans les trous de charnière du côté
opposé (voir l’illustration 2).
2.
Retirer l’axe de charnière inférieure de la bride de charnière.
3.
Retirer les œillets recouvrant les trous du côté opposé de la charnière
inférieure.
4.
Réinstaller l’axe de charnière dans l’autre trou de la bride de charnière.
Voir l’illustration 3.
5.
Réinstaller la bride de charnière sur la caisse à l’aide des 4 vis de
charnière à tête hexagonale.
Porte
1.
Enlever le bouchon d’obturation de la partie supérieure de charnière au
sommet de la porte. Voir l’illustration 4.
2.
Retirer la butée de porte du bas de la porte.
3.
Placer la butée de porte du côté opposé en s’assurant que le trou de la
plaque de butée de porte est parfaitement aligné avec le trou de la
porte destiné à l’axe de charnière inférieure.
4.
À l’aide des vis retirées à l’étape 2, fixer le support de butée de porte
au bas de la porte.
5.
Serrer toutes les vis. Conserver la porte du congélateur à part jusqu’à
la mise en place de la charnière inférieure.
Réinstallation – Porte et charnières
REMARQUE :
Si on inverse le sens d’ouverture de la porte, considérer
l’image symétrique.
1.
Assembler les pièces de la charnière inférieure (tel qu’indiqué) et
serrer les vis. Voir l’illustration de la charnière inférieure. Réinstaller la
porte du congélateur.
REMARQUE :
Prévoir un support additionnel de la porte pendant le
déplacement des charnières. La force d’attraction des aimants de porte
ne suffit pas à la maintenir en place.
2.
Assembler les pièces de la charnière supérieure (voir l’illustration de la
charnière supérieure). Ne pas complètement serrer les vis.
Étapes finales
1.
Inspecter tous les trous. Vérifier que tous les bouchons d’obturation et
vis sont en place. Réinstaller le couvercle de la charnière supérieure.
Voir l’illustration de la charnière supérieure.
2.
À l’aide des œillets fournis, recouvrir les trous restants situés sur le
côté opposé de la charnière inférieure.
3.
Brancher sur une prise de courant à 3 alvéoles, reliée à la terre.
4.
Réinitialiser la commande. Voir “Utilisation de la commande”.
5.
Réinstaller toutes les pièces amovibles de la porte et remettre les
aliments dans le congélateur.
AVERTISSEMENT
Risque de choc électrique
Brancher sur une prise à 3 alvéoles reliée à la terre.
Ne pas enlever la broche de liaison à la terre.
Ne pas utiliser un adaptateur.
Ne pas utiliser un câble de rallonge.
Le non-respect de ces instructions peut causer
un décès, un incendie ou un choc électrique.

7
Nivellement du congélateur et fermeture de la porte
Style 1—sans grille
1.
Repérer les deux pieds de nivellement avant fixés parmi les matériaux
d'emballage.
2.
Visser ces pieds dans les trous avant situés au bas du congélateur.
L’arrière du congélateur repose sur 2 supports fixes.
3.
Ajuster suffisamment les pieds avant pour séparer la caisse du sol.
4.
Placer un niveau au sommet de la caisse du congélateur,
transversalement puis dans le sens avant-arrière. Pour soulever un
coin, faire tourner le pied dans le sens antihoraire. Pour abaisser un
coin, faire tourner le pied dans le sens horaire.
5.
Répéter l’étape 4 jusqu’à ce que le congélateur soit d’aplomb.
6.
Une fois le congélateur complètement rempli d’aliments, vérifier de
nouveau l’aplomb comme expliqué à l’étape 4.
Style 2—avec grille
Le congélateur est équipé de 2 pieds avant réglables, un de chaque côté.
L’arrière du congélateur repose sur 2 roulettes fixes. La grille de la base
recouvre les pieds de stabilisation réglables et les roulettes situées au bas
du congélateur sous la porte du congélateur. Avant de réaliser les
ajustements, retirer la grille de la base et déplacer le congélateur à son
emplacement définitif.
Outillage nécessaire :
tourne-écrou de
¹⁄₄
", tournevis Phillips
1.
Retirer les vis de la grille de la base. Saisir la grille fermement et la tirer
vers soi. Ouvrir la porte du congélateur pour accéder aux pieds de
stabilisation.
A.
Bouchons d’obturation des trous
de charnière de la caisse
A
Inversion du sens d’ouverture de la porte (facultatif)
2
A. Œillets
B.
Poignée
C. Vis de montage
A
B
C
1
3
Dépose et réinstallation
de la porte
Charnière supérieure
A.
Couvercle de charnière
supérieure
B.
Vis de charnière à tête
hexagonale de
5
/
16
"
C.
Charnière supérieure
A
B
B
C
Charnière inférieure
A.
Vis de butée de porte
B.
Vis de charnière à tête
hexagonale de
3
/
8
"
A
B
A.
Axe de charnière
B.
Vis de charnière à tête
hexagonale de
3
/
8
"
A
B
La page est en cours de chargement...
La page est en cours de chargement...
La page est en cours de chargement...
La page est en cours de chargement...
La page est en cours de chargement...
La page est en cours de chargement...
La page est en cours de chargement...
La page est en cours de chargement...
-
 1
1
-
 2
2
-
 3
3
-
 4
4
-
 5
5
-
 6
6
-
 7
7
-
 8
8
-
 9
9
-
 10
10
-
 11
11
-
 12
12
-
 13
13
-
 14
14
-
 15
15
-
 16
16
-
 17
17
-
 18
18
-
 19
19
-
 20
20
-
 21
21
-
 22
22
-
 23
23
-
 24
24
-
 25
25
-
 26
26
-
 27
27
-
 28
28


Whirlpool WZF56R16DW Mode d'emploi
- Catégorie
- Congélateurs
- Taper
- Mode d'emploi
- Ce manuel convient également à
dans d''autres langues
- English: Whirlpool WZF56R16DW User guide
Documents connexes
-
Whirlpool WZF57R16FW Manuel utilisateur
-
-
Whirlpool EV201NZTQ01 Mode d'emploi
-
Whirlpool WSZ57L18DM Manuel utilisateur
-
-
Bauknecht EV250NXTQ Le manuel du propriétaire
-
-
Whirlpool WZF56R16DW Mode d'emploi
-
-
Whirlpool WSR57R18DM Mode d'emploi