Breville the Smoking Gun Manuel utilisateur
- Taper
- Manuel utilisateur

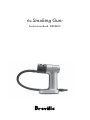
the Smoking Gun
‰
Instruction Book - BSM600

2
BREVILLE
RECOMMENDS
SAFETY FIRST
At Breville we are very safety
conscious. We design and
manufacture consumer
products with the safety of you,
our valued customer, foremost
in mind. In addition we ask that
you exercise a degree of care
and adhere to the following
precautions.
IMPORTANT
SAFEGUARDS
READ ALL
INSTRUCTIONS BEFORE
USE AND SAVE FOR
FUTURE REFERENCE
• Remove any packaging
material and promotional
labels before using the
Smoking Gun
‰
for the
first time.
• Do not place the Smoking
Gun
‰
near the edge of a
table, counter or bench
top during operation.
Ensure that the surface is
level, clean and free
of water.
• Do not place any part of
the Smoking Gun
‰
in a
gas, electric or microwave
oven or on a hot gas or
electric burner.
• Keep smoking gun
clear of walls, curtains
and other heat or steam
sensitive materials.
Minimum 8 inch distance.
2 Breville Recommends Safety First
6 Components
7 Assembly
8 Functions
9 Tips
10 Care & Cleaning
11 Troubleshooting
Contents

3
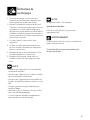
• Always ensure the
Smoking Gun
‰
is properly
assembled before use.
Follow the instructions
provided in this book.
• Do not leave the product
unattended when in use.
• Do not touch hot surfaces.
• Do not use harsh
abrasives or caustic
cleaners when cleaning
this product.
• Keep the product clean.
Follow the care and
cleaning instructions
provided in this book.
• This product is not
intended for use by
persons (including
children) with reduced
physical, sensory or
mental capabilities,
or lack of experience
and knowledge, unless
they have been given
supervision or instruction
concerning use of the
product by a person
responsible for their safety.
• This product is intended
for household use only.
Do not use this product
for anything other than its
intended use. Do not use
in moving vehicles
or boats.
• It is recommended to
regularly inspect the
product.
• Any maintenance other
than cleaning should
be performed at an
authorized Breville
Service Center.
• Do not attempt to burn
anything other than
small wood chips, wood
sawdust, dried herbs,
cooking spices, or
tea leaves in the burn
chamber.
• Do not leave the Smoking
Gun
‰
unattended.

4
• Use only in a well
ventilated area; the
burning of wood chips/
dust, dried herbs, cooking
spices, and/or tea
leaves may result in the
emission of combustion
by-products which are
known to cause cancer,
birth defects, and/or
reproductive harm.
• The metal barrel and burn
chamber of the Smoking
Gun
‰
will become very
hot when in use. Allow
device to cool completely
before touching barrel or
burn chamber, cleaning,
or storing.
• Always use the Smoking
Gun
‰
in an upright
position. Heated smoking
materials may fall out
of the burn chamber if
tipped, resulting in a
fire hazard.
• Always empty ash and
burnt material into a
non-flammable receptacle.
• Exercise proper care when
igniting the smoking
materials; improper
ignition of flammable
materials may result in
explosion or fire hazard.
• Always use a match
or lighter to ignite the
materials in the Smoking
Gun
‰
; DO NOT USE a
kitchen torch or other heat
device as the excessive
heat may damage the unit.
• Do not point the Smoking
Gun
‰
at any person or
flammable object.
• Avoid using the Smoking
Gun
‰
in areas where
smoke may activate
smoke alarms or fire
suppression systems.

5
• Never operate the
Smoking Gun
‰
without
the stainless steel mesh
filter in place; burning/
glowing embers may
enter the body damaging
the unit or be ejected
through the nozzle,
creating a fire or burn
hazard.
• Removal or disassembly
of any parts of the
Smoking Gun
‰
other
than the burn chamber;
stainless steel mesh filter,
battery compartment
cover, or batteries may
result in irreparable
damage and void the
warranty.
CALIFORNIA
PROPOSITION 65:
(Applicable to California
residents only).
Combustion of wood or
charcoal products may
contain chemicals known
to the State of California to
cause cancer, birth defects
and/or reproductive harm.
This warning is required
and issued pursuant to
California Health & Safety
Code Section 25249.6.

6
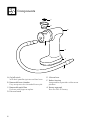
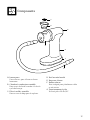
Components
A. On/off switch
With dual speed for ignition and slow burn.
B. Removable burn chamber
Easy to tap out ash at the end of burn cycle.
C. Removable mesh filter
Push out with finger to replace.
D. Die-cast barrel
E. Silicone hose
F. Robust housing
Integrated base provides stable secure
platform.
G. Battery operated
Uses 4 x AA 1.5V battery.
A
D
B
C
E
G
F

7
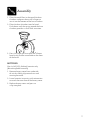
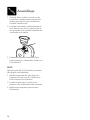
Assembly
1. Place the mesh filter in the top of the burn
chamber and press down with a finger to
seat it into the bottom of the burn chamber.
2. Place the burn chamber into the barrel.
Push down until the spring around the burn
chamber provides a small click sensation.
CLICK
3. Press the larger plastic end on the silicone
hose firmly into the round hole on the front
of the barrel.
BATTERIES
Use 4 x AA (1.5V alkaline) batteries only.
(No rechargeable batteries)
1. Remove battery cover from underside
of unit by sliding clip towards rear and
rotating outwards.
2. Insert batteries into cavity with orientation
to match the outer face of the battery cover.
3. Replace battery cover and press to
snap into place.

8
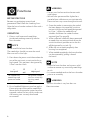
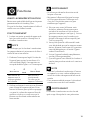
Functions
BEFORE FIRST USE
Remove any packaging material and
promotional labels from the Smoking Gun
‰
.
Wipe the burn chamber and mesh filter with a
damp cloth.
OPERATION
1. Place a small amount of wood chips
(or desired smoking materials) into the
burn chamber.
NOTE
Do not overfill the burn chamber.
The wood chips should just cover the mesh
filter area with a thin layer.
2. Press down the power switch located on the
rear of the main unit, to activate the fan at
high speed. This position is designated by
2 lines = on the switch.
–
Low Speed
O
Off
=
High Speed
To smolder the
wood chips and
generate smoke.
For greater airflow
to assist in initially
igniting wood
chips.
3. Use a handheld lighter or match to apply a
flame to the top surface of the wood chips.
Move the flame around to ignite the entire
exposed surface. For best results make sure
the burning area is evenly distributed
or centered.
WARNING
• Do not use a kitchen torch or butane torch
style lighter.
• Maintain the presence of the lighter for a
period of time sufficient to start ignition only.
Excessive heat may cause damage to the unit.
4. Once the smoke is seen exiting the end of
the hose, depress the top of the switch to
maintain the fan on low speed (designated
by 1 line – ). Allow the wood chips to
smolder and direct the smoke to where
required (see Tips page 9).
5. When sufficient smoke has been generated
or wood chips are extinguished, return the
switch the central position to turn the fan
off (designated by a circle O).
6. Allow the unit to cool completely after
burning has completed.
7. When cooled completely the burn chamber
can be removed by pulling it free of
the barrel.
NOTE
• Invert the burn chamber and tap on a solid
surface to remove any remaining wood chips
or ash.
• It is recommended to clean the burn chamber
prior to re-assembly.
WARNING
The burn chamber is very hot after use.
Exercise caution.

9
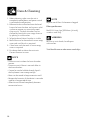
Tips
• To provide smoke flavor and aroma for
meats, fish, fruits, or vegetables after cooking,
simply place the food in a covered casserole,
stockpot, Dutch oven, or other covered dish/
pan and inject smoke under the lid.(See
below table for smoking techniques. See
recipe cards included separately for more
ideas and details.)
• To enhance the presentation of a finished
dish, add a hint of smoke under a domed
plate cover.
• Use the Smoking Gun
‰
to infuse delicate
foods, such as cheeses and vegetables, with
smoky flavor and aroma without changing
their texture.
• One to three minutes under smoke is
generally all that is needed to infuse foods
with a smoky flavor and aroma. When using
the Smoking Gun
‰
with a covered receptacle,
simply inject the smoke under the lid and let
stand for a few minutes.
• Don't place hose directly in the food. Place it
just slightly above.
• Continuous smoking with the Smoking Gun
‰
is NOT required.
• Ensure the unit has had sufficient time to cool
before reloading and operating additional
burn cycles if required.
• Hickory chips impart a pungent, smoky
bacon-like flavor that goes particularly well
with most meats, especially pork (ham,
ribs, etc.) and beef. They are good for most
vegetables because they impart a strong
earthy flavor.
• Applewood chips work well with poultry,
game birds and pork. These woods provide a
slightly sweet but denser, fruity smoke flavor.
• Use wood chips that have been specifically
prepared for the purpose of smoking - these
timbers will have been dried to the correct
level and will produce less resinous materials
in the smoke output from the unit.
TECHNIQUES
CONTAINER
OR BAG
1. When smoking cooked foods, apply smoke after cooking.
2. Place food in a container, cover with plastic wrap, insert tube and fill with smoke.
Alternatively, place food in sealable bag, insert tube and fill bag with smoke.
3. Let food absorb smoke for 1–3 minutes and repeat 2–3 times for a stronger smoke flavor.
TABLESIDE 1. Plate food for serving.
2. Hold drinking glass upside down and fill with smoke.
3. Place glass over food and let smoke absorb while serving.
4. Lift glass at table in front of your guests.
STAND MIXER 1. Whip or beat food in a stand mixer.
2. Spread food evenly on mixing bowl walls for maximum surface area.
3. Cover mixing bowl with plastic wrap, insert tube and fill with smoke.
4. Let food absorb smoke for 1 minute and repeat 2–3 times for a stronger smoke flavor.
SHAKER 1. Prepare beverage.
2. Fill shaker with smoke, remove tube, cover with lid and shake.

10
Care & Cleaning
1. Before cleaning, make sure the unit is
completely cooled down and power switch
is positioned to off position.
2. Remove the burn chamber from the barrel.
Invert the burn chamber and tap on a solid
surface to remove any remaining wood
chips or ash. The burn chamber may be
cleaned by hand with warm soapy water or
by placing in a dishwasher.
3. Wipe the barrel clean if residue is visible.
4. Mesh filter can be cleaned with warm soapy
water and small brush as required.
5. Clean hose and tube ends in warm soapy
water as required.
6. Use damp cloth to clean the main unit.
Do not immerse in water.
NOTE
• Do not use unit without the burn chamber
present.
• Do not use unit if there is no mesh filter in
the burn chamber.
• Cannot be used to bubble through liquid –
the fan/motor is not strong enough.
• Hose can be stored in loop to contain smell.
• Remove the batteries if the device is not to be
used for a long period of time.
• Allow the unit to cool completely between
consecutive burns.
NOTE
Replace mesh filter if it becomes clogged.
Filter specification:
No.20 US Sieve Size [Ø19.0mm (¾ inch),
stainless steel 304].
WARNING
Resin may stain hands, handle parts
with caution.
Visit Breville.com to order more wood chips.

11
Troubleshooting
POSSIBLE PROBLEM EASY SOLUTION
Fan not starting.
•
Check orientation of batteries.
•
Switch not turned to High or Low speed.
•
Replace batteries.
No smoke generated.
•
Ensure mesh filter is not blocked.
•
Ensure the hose is not blocked.
•
When using a container ensure there is an outlet for the air to escape.
•
Ensure the fan starts when the switch is pressed to High or Low.
•
Ensure wood chips are dry and small.
•
Increase fan speed to High.
Not enough smoke.
•
Turn fan to High Speed to increase burn rate.

the Smoking Gun
‰
Manuel d'instructions - BSM600

13
BREVILLE VOUS
RECOMMANDE
LA SÉCURITÉ
AVANT TOUT
Chez Breville, la sécurité
occupe une place de choix.
Nous concevons et fabriquons
des produits de consommation
sans jamais perdre de vue la
sécurité de notre précieuse
clientèle. De plus, nous
vous demandons d'être très
vigilant lorsque vous utilisez
un appareil électrique et de
respecter les mesures de
sécurité décrites ci-dessous.
IMPORTANTES
MESURES DE
SÉCURITÉ
LISEZ TOUTES LES
INSTRUCTIONS AVANT
USAGE ET CONSERVEZ-
LES À TITRE DE
RÉFÉRENCE.
• Retirez tout matériel
d'emballage et étiquettes
promotionnelles avant
d'utiliser le Smoking Gun
®
pour la première fois.
• Ne placez pas le Smoking
Gun
®
sur le bord d'une
table ou d'un comptoir
lorsqu'il est en marche.
Assurez-vous que la
surface est de niveau,
propre et sèche.
• Ne placez aucune pièce
du Smoking Gun
®
dans
un four à gaz, électrique
ou micro-ondes ou sur
un brûleur à gaz ou
électrique.
13 Breville vous recommande la
sécurité avant tout
17 Composants
18 Assemblage
19 Fonctions
20 Trucs
21 Entretien & Nettoyage
22 Guide de dépannage
Table des
matières

14
• Gardez le Smoking Gun
®
loin des murs, rideaux ou
autres matériaux sensibles
à la vapeur ou à la chaleur.
Un minimum de 20 cm
(8 po) est requis.
• Assurez-vous toujours
de bien assembler le
Smoking Gun
®
avant
de l'utiliser. Suivez les
consignes fournies dans le
manuel d'instructions.
• Ne laissez pas l'appareil
sans surveillance lorsqu'il
est en marche.
• Ne touchez pas les
surfaces chaudes.
• Ne nettoyez pas l'appareil
avec des produits abrasifs
ou caustiques.
• Gardez l'appareil propre.
Suivez les consignes
d'entretien et nettoyage
fournies dans ce manuel.
• Ce produit ne doit pas
être utilisé par des
personnes, incluant les
enfants, avec capacités
physiques, sensorielles
ou mentales réduites, ou
manque d'expérience et
de connaissances, à moins
d'avoir été conseillés
et initiés à l'usage
de l'appareil par une
personne responsable de
leur sécurité.
• Ce produit est conçu pour
un usage domestique
seulement. Ne l'utilisez
pas à d'autres fins que
celles prévues, et ne
l'utilisez pas dans un
véhicule ou un bateau en
mouvement.
• Il est recommandé de
vérifier régulièrement
l'appareil.
• Tout entretien autre que
le nettoyage doit se faire
dans un centre de service
autorisé Breville.

15
• Ne tentez d'allumer
aucune autre substance
que de petits copeaux ou
sciures de bois, herbes
séchées, épices ou feuilles
de thé dans la chambre à
combustion.
• Ne laissez pas le Smoking
Gun
®
sans surveillance.
• Utilisez l'appareil
uniquement dans un
endroit bien aéré; le fait
d'allumer des copeaux/
sciures de bois, herbes
séchées, épices et/
ou feuilles de thé peut
entraîner l'émission
de sous-produits de
combustion connus
comme pouvant causer le
cancer, des malformations
congénitales et/ou
des problèmes de
reproduction.
• Le baril métallique et la
chambre à combustion
du Smoking Gun
®
deviennent très chauds
lors de l'utilisation.
Laissez l'appareil refroidir
complètement avant
de toucher le baril ou la
chambre à combustion,
ou avant le nettoyage et le
rangement.
• Utilisez toujours le
Smoking Gun
®
en
position verticale.
Certains débris calcinés
peuvent s'échapper de la
chambre à combustion,
si l'appareil est penché,
causant un risque
d'incendie.
• Transvidez toujours
la cendre et les débris
calcinés dans un récipient
non inflammable.
• Soyez très prudent
lorsque vous allumez
les matériaux à fumer;
un mauvais allumage
peut causer un risque
d'explosion ou d'incendie.

16
• Utilisez toujours
une allumette ou un
briquet pour allumer
les matériaux dans
le Smoking Gun
®
;
N'UTILISEZ PAS de
torche de cuisine ou autre
dispositif d'allumage, car
la chaleur excessive peut
endommager l'appareil.
• Ne pointez pas le
Smoking Gun
®
en
direction d'une personne
ou d'un objet inflammable.
• Évitez d'utiliser le
Smoking Gun
®
dans
des endroits où la fumée
pourrait activer un
détecteur de fumée ou
un système d'extinction
d'incendie.
• N'utilisez jamais le
Smoking Gun
®
sans le
filtre à mailles en acier
inoxydable en place, car
des braises vives peuvent
pénétrer dans le boîtier et
endommager l'appareil,
ou être éjectées par le
bec, causant un risque
d'incendie ou de brûlure.
• Le fait de retirer ou
désassembler les pièces
du Smoking Gun
®
autres que la chambre
à combustion, le filtre
à mailles en acier
inoxydable, le couvercle
du compartiment des
piles ou les piles peut
causer des dommages
irréparables et annuler la
garantie.
PROPOSITION 65 DE LA
CALIFORNIE :
(Applicable aux résidents
de la Californie seulement).
La combustion du bois
ou du charbon peut
contenir des produits
chimiques connus de
l'État de la Californie
comme pouvant causer le
cancer, des malformations
congénitales ou
autres problèmes de
reproduction. Cet
avertissement est requis et
émis en vertu de la section
25249.6. du Code de Santé
& Sécurité de la Californie.

17
Composants
A. Interrupteur
Deux vitesses, pour allumer et fumer
lentement.
B. Chambre à combustion amovible
Pour retrait facile de la cendre à la fin du
cycle de fumage.
C. Filtre à mailles amovible
Pousser avec le doigt pour le replacer.
D. Baril en métal moulé
E. Boyau en silicone
F. Boîtier robuste
Base intégrée pour plateforme stable
et sécuritaire.
G. Fonctionnement à piles
Utilise 4 piles AA de 1,5V.
A
D
B
C
E
G
F

18
Assemblage
1. Placez le filtre à mailles sur le dessus de
la chambre à combustion et pressez avec
le doigt pour bien l'asseoir au fond de la
chambre à combustion.
2. Installez la chambre à combustion dans le
baril. Poussez vers le bas jusqu'à ce que le
ressort autour de la chambre à combustion
s'enclenche en un déclic.
CLICK
3. Enfoncez fermement l'extrémité la plus
large du boyau en silicone dans l'orifice sur
l'avant du baril.
PILES
Utilisez 4 piles AA (1,5V alcalines) seulement.
(Pas de piles rechargeables)
1. Retirez le couvercle des piles logé sous
l'appareil en le glissant vers l'arrière et le
faisant tourner vers l'extérieur.
2. Insérez les piles dans la cavité en les
orientant vers le côté externe du couvercle.
3. Replacez le couvercle et poussez pour
l'enclencher.

19
Fonctions
AVANT LA PREMIÈRE UTILISATION
Retirez tout matériel d'emballage et étiquettes
promotionnelles du Smoking Gun
®
.
Essuyez la chambre à combustion et le filtre à
mailles avec un chiffon humide.
FONCTIONNEMENT
1. Insérez une petite quantité de copeaux de
bois (ou autre matériau à fumer) dans la
chambre à combustion.
NOTE
Ne surchargez pas la chambre à combustion.
Les copeaux doivent à peine couvrir le filtre à
mailles d'une mince couche.
2. Enfoncez l'interrupteur logé à l'arrière de
l'appareil pour activer le ventilateur à la
vitesse élevée (High). Cette position est
marquée de deux lignes = sur l'interrupteur.
–
Basse vitesse
O
Arrêt
=
Vitesse élevée
Pour couver les
copeaux sous la
centre et générer
de la fumée.
Pour activer la
circulation de
l'air afin que les
copeaux s'allument.
3. Utilisez un briquet à main ou une allumette
pour allumer les copeaux de bois. Faites
tourner la flamme pour qu'elle se propage
sur toute la surface des copeaux. Pour de
meilleurs résultats, assurez-vous que la
flamme est distribuée uniformément ou
bien centrée.
AVERTISSEMENT
• N'utilisez pas de torche de cuisine ou de
briquet au butane.
• Maintenez la flamme du briquet le temps
qu'il faut pour démarrer l'allumage, mais
sans plus. Une chaleur excessive peut
endommager l'appareil.
4. Dès que vous verrez la flamme sortir
du boyau, enfoncez l'interrupteur pour
maintenir le ventilateur à basse vitesse
(position marquée par une ligne –). Laissez
les copeaux couver sous la cendre, puis
dirigez la flamme où elle est requise (voir
Trucs en page 20).
5. Lorsqu'une quantité suffisante de fumée
aura été générée ou que les copeaux seront
éteints, remettez l'interrupteur à la position
centrale (désignée par un cercle O) pour
arrêter le ventilateur.
6. Laissez l'appareil refroidir complètement,
une fois le fumage complété.
7. Quand l'appareil sera refroidi, la chambre à
combustion peut être retirée en la soutirant
du baril.
NOTE
• Tournez la chambre à combustion à l'envers
et tapotez-la sur une surface solide pour en
retirer les résidus de copeaux de bois ou de
cendre.
• Il est recommandé de nettoyer la chambre à
combustion avant de la réassembler.
AVERTISSEMENT
La chambre à combustion est très chaude
après usage. Manipulez-la avec précaution.

20
Trucs
• Pour donner une saveur de fumée à vos
viandes, poissons, fruits ou légumes après la
cuisson, il suffit de mettre les aliments dans
une casserole couverte, un chaudron, un
faitout ou tout autre récipient/plat couverts et
d'injecter de la fumée sous le couvercle. (Pour
plus de détails, voir le tableau ci-dessous sur
les techniques de fumage; et pour des idées,
consultez les cartes de recettes incluses
séparément)
• Pour agrémenter la présentation d'un
plat, ajoutez un soupçon de fumée sous le
couvercle en dôme d'une assiette.
• Utilisez le Smoking Gun
®
pour donner une
saveur et un arôme de fumée aux aliments
délicats, comme le fromage et les légumes,
sans pour autant changer leur texture.
• Une à trois minutes suffiront pour infuser
les aliments d'une saveur et d'un arôme de
fumée. Si vous utilisez le Smoking Gun
®
avec
un récipient couvert, vous n'avez qu'à injecter
la fumée sous le couvercle et laisser reposer
quelques minutes.
• Ne laissez pas le boyau toucher les aliments.
Placez-le juste au-dessus.
• Un usage continu du Smoking Gun
®
n'est
PAS recommandé.
• Assurez-vous que l'appareil a suffisamment
refroidi avant de le remplir et de le faire
fonctionner à nouveau.
• Les copeaux de bois Hickory donnent
une saveur prononcée de bacon fumé qui
accompagne à merveille la plupart des
viandes, surtout le porc (jambon, côtelettes,
etc.). Ils conviennent tout autant à la plupart
des légumes, car ils procurent une saveur de
terre assez relevée.
• Les copeaux de pommier Applewood iront
bien avec la volaille, le gibier et le porc, et
fourniront une saveur de fumée plus douce,
dense et fruitée.
• Utilisez des copeaux de bois qui ont été
spécifiquement préparés pour le fumage -
des copeaux qui auront été séchés au niveau
requis et laisseront moins de dépôts résineux
dans le bec de sortie de l'appareil.
TECHNIQUES
CONTENANT
OU SAC
1. Toujours faire fumer les aliments après la cuisson.
2. Mettre les aliments dans un contenant, couvrir d'une pellicule plastique, insérer le boyau
et remplir de fumée. Vous pouvez aussi mettre les aliments dans un sac scellable, insérer
le boyau et remplir le sac de fumée.
3. Laisser les aliments absorber la fumée 1–3 minute et répéter 2-3 fois pour une saveur de
fumée plus prononcée.
SERVICE À
TABLE
1. Disposer les aliments sur une assiette.
2. Tenir un verre à l'envers et le remplir de fumée.
3. Déposer le verre sur les aliments et les laisser absorber la fumée pendant le service.
4. Soulever le verre à la table, devant vos invités.
BATTEUR SUR
SOCLE
1. Fouetter ou battre les aliments dans un batteur sur socle.
2. Disperser les aliments également sur les parois du bol pour maximiser la surface de
fumage.
3. Couvrir le bol d'une pellicule plastique, insérer le boyau et remplir de fumée.
4. Laisser les aliments absorber la fumée durant 1 minute, puis répéter 2-3 fois pour une
saveur de fumée plus prononcée.
SHAKER 1. Préparer la boisson.
2. Remplir le shaker de fumée, retirer le boyau, mettre le couvercle et remuer.
La page est en cours de chargement...
La page est en cours de chargement...
La page est en cours de chargement...
La page est en cours de chargement...
-
 1
1
-
 2
2
-
 3
3
-
 4
4
-
 5
5
-
 6
6
-
 7
7
-
 8
8
-
 9
9
-
 10
10
-
 11
11
-
 12
12
-
 13
13
-
 14
14
-
 15
15
-
 16
16
-
 17
17
-
 18
18
-
 19
19
-
 20
20
-
 21
21
-
 22
22
-
 23
23
-
 24
24


Breville the Smoking Gun Manuel utilisateur
- Taper
- Manuel utilisateur
dans d''autres langues
- English: Breville the Smoking Gun User manual