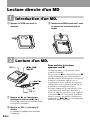
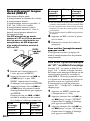
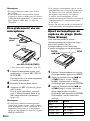
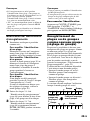
Sony MZ-N707 Mode d'emploi
- Catégorie
- Joueurs de minidisc
- Taper
- Mode d'emploi

3-234-038-63(1)
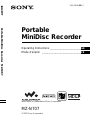
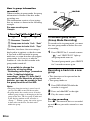
Portable
MiniDisc Recorder
Operating Instructions
_
________________________
_
Mode d’emploi
_
_____________________________
_
GB
FR
© 2002 Sony Corporation
MZ-N707
WALKMAN is a trademark of Sony Corporation.
Portable MiniDisc Recorder MZ-N707

2-GB
To prevent fire or shock hazard, do
not expose the unit to rain or
moisture.
To prevent fire, do not cover the ventilation of
the apparatus with news papers, table cloths,
curtains, etc. And don’t place lighted candles
on the apparatus.
To prevent fire or shock hazard, do not place
objects filled with liquids, such as vases, on
the apparatus.
Certain countries may regulate disposal of the
battery used to power this product.
Please consult with your local authority.
Caution
The use of optical instruments with this
product will increase eye hazard.
CAUTION — INVISIBLE LASER
RADIATION WHEN OPEN
AVOID EXPOSURE TO BEAM
Information
For customers in the USA and
Canada
For customers who purchased
this product in the USA
Owner’s Record
The serial number is located at the rear of
the disc compartment lid and the model
number is located at the top and bottom.
Record the serial number in the space
provided below. Refer to them whenever
you call upon your Sony dealer regarding
this product.
Model No. MZ-N707
Serial No.
Do not install the appliance in a
confined space, such as a bookcase or
built-in cabinet.
IN NO EVENT SHALL SELLER BE
LIABLE FOR ANY DIRECT,
INCIDENTAL OR
CONSEQUENTIAL DAMAGES OF
ANY NATURE, OR LOSSES OR
EXPENSES RESULTING FROM
ANY DEFECTIVE PRODUCT OR
THE USE OF ANY PRODUCT.
WARNING
RECYCLING NICKEL
CADMIUM BATTERIES
Nickel cadmium
batteries are recyclable.
You can help preserve
our environment by
returning your used
rechargeable batteries to
the collection and recycling location
nearest you.
Note: In some areas the disposal of
nickel cadmium batteries in household
or business trash may be prohibited.
For more information regarding
recycling of rechargeable batteries, call
toll free 1-800-822-8837, or visit
http://www.rbrc.org/
Caution: Do not handle damaged or
leaking nickel cadmium batteries.

3-GB
Product registration
Please register this product on line at
www.sony.com/walkmanreg
<http://www.sony.com/walkmanreg>
Proper registration will enable us to send
you periodic mailings about software
upgrades, new products, services and
other important announcements. Thank
you.
If you have any questions about
this product, you may call:
Sony Customer Information
Services
1-(866)-456-7669.
or write to:
Sony Customer Information
Services
12451 Gateway Blvd. Fort Myers,
FL 33913
This equipment has been tested and found
to comply with the limits for a Class B
digital device, pursuant to Part 15 of the
FCC Rules. These limits are designed to
provide reasonable protection against
harmful interference in a residential
installation. This equipment generates,
uses, and can radiate radio frequency
energy and, if not installed and used in
accordance with the instructions, may
cause harmful interference to radio
communications. However, there is no
guarantee that interference will not occur
in a particular installation. If this
equipment does cause harmful
interference to radio or television
reception, which can be determined by
turning the equipment off and on, the user
is encouraged to try to correct the
interference by one or more of the
following measures:
— Reorient or relocate the receiving
antenna.
— Increase the separation between the
equipment and receiver.
— Connect the equipment into an outlet
on a circuit different from that to
which the receiver is connected.
— Consult the dealer or an experienced
radio/TV technician for help.
You are cautioned that any changes or
modifications not expressly approved in
this manual could void your authority to
operate this equipment.
The CE mark is valid only for
products marketed in the
European Union.
Declaration of Conformity
Trade Name: SONY
Model No.: MZ-N707
Responsible Party: Sony Electronics
Inc.
Address: 680 Kinderkamack Road,
Oradell, NJ 07649 USA
Telephone No.: 201-930-6972
This device complies with Part 15 of
the FCC Rules. Operation is subject to
the following two conditions: (1) This
device may not cause harmful
interference, and (2) this device must
accept any interference received,
including interference that may cause
undesired operation.
SONY MZ-N707
Tested To Comply
With FCC Standards
FOR HOME OR OFFICE USE
GB

4-GB
• OpenMG and its logo are trademarks of
Sony Corporation.
• US and foreign patents licensed from
Dolby Laboratories.
• All other trademarks and registered
trademarks are trademarks or registered
trademarks of their respective holders.
• ™ and ® marks are omitted in this
manual.
Notice for users
On the supplied software
• Copyright laws prohibit reproducing the
software or the manual accompanying it
in whole or in part, or renting the
software without the permission of the
copyright holder.
• In no event will SONY be liable for any
financial damage, or loss of profits,
including claims made by third parties,
arising out of the use of the software
supplied with this recorder.
• In the event a problem occurs with this
software as a result of defective
manufacturing, SONY will replace it.
However, SONY bears no other
responsibility.
• The software provided with this player
cannot be used with equipment other
than that which is so designated.
• Please note that, due to continued efforts
to improve quality, the software
specifications may be changed without
notice.
• Operation of this player with software
other than that provided is not covered
by the warranty.
• Duplication of any or all of the contents
of this software and instruction manual
or lending of this software to third
parties without the express permission
of the copyright holder is strictly
prohibited by copyright law.
• Sony cannot be held liable in any way
for monetary losses, lost profits or
claims from third parties arising from
the use of this software.
• Should any manufacturing defects
occur, Sony’s responsibility shall be
limited solely to replacing said defective
merchandise.
• This software is approved for use only
with the specified equipment.
• Sony reserves the right to change
software specifications without prior
notice.
Program © 2000 Sony Corporation
Documentation © 2002 Sony Corporation

5-GB
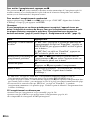
This operating instructions explains
how to operate the portable MiniDisc
recorder itself. For details on how to
use the supplied software (OpenMG
Jukebox), refer to the OpenMG
Jukebox Operating Instructions.

6-GB
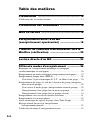
Table of contents
Overview .........................................................10
Checking the supplied accessories ........................................................11
Looking at the controls .................................. 12
Getting started! .............................................. 15
Recording an MD right away!
(Synchro-recording) ........................................18
Transferring songs from the computer to the
MiniDisc (Check-out) ......................................22
Playing an MD right away! ..............................24
Various ways of recording .............................. 26
Note on digital and analog recording (Digital input and analog input) 26
Recording in analog (Analog Recording) .............................................27
Long-time recording (MDLP) ..............................................................28
When you do not want “LP:” added automatically at the
beginning of a track .........................................................28
Recording tracks using the group function (Group Mode Recording) .29
To activate group mode (Group Mode Recording) ........................30
Recording a track into a new group ................................................30
Recording a track into an existing group ........................................31
Recording without overwriting existing material .................................31
Recording from a microphone ..............................................................32
Adding track marks automatically (Auto Time Stamp) ........................32
Adjusting the recording level manually (Manual Recording) ..............33
Checking the remaining recordable time .............................................35

7-GB
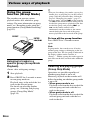
Various ways of playback .............................. 36
Using the group function (Group Mode) ............................................. 36
Listening to tracks in a specific group (Group Mode Playback) ... 36
Selecting and playing groups (Group Skip Mode) ........................ 36
Changing play modes ........................................................................... 37
Creating a program (Program Play) ............................................... 38
To adjust the sound quality (Digital Sound Preset) ............................. 39
Selecting the sound quality ............................................................ 39
Adjusting the sound quality ........................................................... 39
Checking the remaining time or the playing position .......................... 40
Playing an MD within your car stereo system 42
Before installation ................................................................................ 42
Installation ............................................................................................ 42
Connection ........................................................................................... 44
Fuse Replacement ................................................................................ 45
Playing an MD within your car stereo system ..................................... 46
Editing recorded tracks .................................. 47
Labeling/relabeling recordings ............................................................ 47
Labeling recordings ....................................................................... 48
Relabeling recordings .................................................................... 49
Registering tracks or groups as a new group (Group Setting) ............. 49
To release a group setting .................................................................... 50
Moving recorded tracks ....................................................................... 51
Moving a track to a different group ..................................................... 52
Changing the order of a group on a disc (Group Move) ...................... 52
Adding a track mark ............................................................................. 53
Erasing a track mark ............................................................................ 54
Erasing tracks ....................................................................................... 55
To erase a track .............................................................................. 55
To erase the whole disc .................................................................. 55
To erase a group ............................................................................. 56
Other Operations ............................................ 57
Protecting your hearing (AVLS) .......................................................... 57
Turning off the beep sound .................................................................. 57
Locking the controls (HOLD) .............................................................. 58

8-GB
Power sources ................................................59
Battery life ............................................................................................59
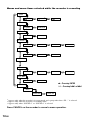
Additional information .................................... 60
Precautions ............................................................................................60
System limitations .................................................................................63
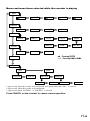
Troubleshooting ....................................................................................65
List of menus ........................................................................................68
Messages ...............................................................................................73
Specifications ........................................................................................75
Explanations ..........................................................................................76
Index .....................................................................................................78

9-GB

10-GB
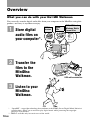
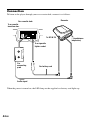
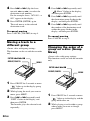
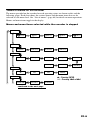
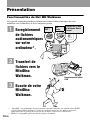
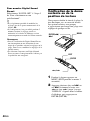
Overview
What you can do with your Net MD Walkman
You can easily transfer digital audio files from your computer to the MiniDisc using this
product, and carry it anywhere to enjoy.
1 Store digital
audio files on
your computer*.
2 Transfer the
files to the
MiniDisc
Walkman.
3 Listen to your
MiniDisc
Walkman.
Audio
CDs
MP3, WAV and
Windows Media
Format files
USB cable connection
* “OpenMG”, a copyright technology that conforms to the SDMI (Secure Digital Music Initiative)
specifications, allows you to record or play digital music while protecting the copyright
privileges of its holders.
** EMD is available onl
y
in certain areas of the world.
EMD**
Services

11-GB
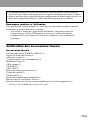
Notes on use
The recording may not be completed properly or the recorded data may be lost if:
— you take the disc out of the recorder, disconnect the AC power adaptor from the
recorder, or unplug the USB cable during reading or writing of data.
— the disc you used was subjected to static electricity or electrical noise.
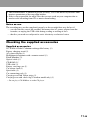
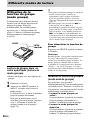
Checking the supplied accessories
Supplied accessories
NC-WMAA Nickel Cadmium rechargeable battery (1)
Battery charging stand (1)
AC power adaptor (1)
Headphones/earphones with a remote control (1)
Blank Minidisc (1)
Optical cable (1)
CD-ROM (1)*
USB cable (1)
Battery carrying case (1)
Car battery cord (1)
Spiral tube (1)
Car connecting pack (1)
Carrying case with Velcro strips (1)
Carrying case with a belt clip (Canadian model only) (1)
∗ Do not play a CD-ROM on an audio CD player.
• The recorded music is limited to private use only. Use of the music beyond this limit
requires permission of the copyright holders.
• Sony is not responsible for music files that are not saved on your computer due to
unsuccessful recording from CD or music downloading.

12-GB
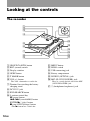
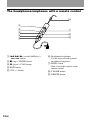
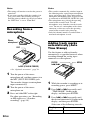
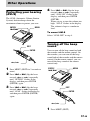
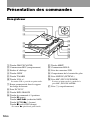
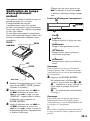
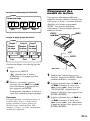
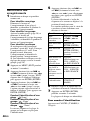
Looking at the controls
The recorder
A GROUP/CANCEL button
B REC (record) switch
C Display window
D OPEN button
E T MARK button
F VOL +/– button
The VOL + button has a tactile dot.
G
Terminal for attaching the battery
charging stand
H DC IN 3V jack
I END SEARCH button
J 5 positon control key
X (pause) button
./> (search/AMS) button
ENTER/N* (play) button
x (stop)/CHG (charge) button
*The N button has a tactile dot.
K
MENU button
L HOLD switch
M USB connecting jack
N Battery compartment
O LINE IN (OPTICAL) jack
P MIC (PLUG IN POWER) jack
There is a tactile dot left side of the MIC
(PLUG IN POWER) jack.
Q
i (headphones/earphones) jack
1
3
2
4
5
6
qg
qf
qh
qj
qa
qs
qd
7
8
9
J
ENTER
C
H
G

13-GB
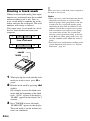
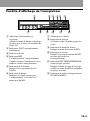
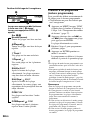
The display window of the recorder
A Character information display
Displays the disc and track names,
error messages, track numbers, etc.
B SYNC (synchro-recording) indication
C Sound indication
D REC indication
Lights up while recording. When
flashing, the recorder is in record
standby mode.
E Battery level indication
Shows approximate battery condition.
F Disc indication
Shows that the disc is rotating for
recording, playing or editing an MD.
G Time display
H Group indication
Lights up when group mode is on.
I Play mode indication
Shows play mode of the MD.
J Level meter
Shows the volume of the MD being
played or recorded.
K REC REMAIN/REMAIN (remaining
time/tracks) indication
Lights up along with the remaining
time of the track, the remaining time
of the MD, or the remaining number
of tracks.
L Recording mode (LP2/LP4/MONO)
indication
132456
7qsqaq;98

14-GB
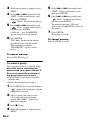
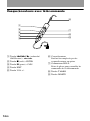
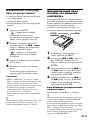
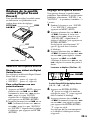
The headphones/earphones with a remote control
A ./>/N (search/AMS/play) •
>/. button
B x (stop) • ENTER button
C X (pause) • CAPS button
D EDIT button
E VOL +/– button
F Headphones/earphones
Can be replaced with optional
headphones/earphones.
G HOLD switch
Slide to lock the controls of the
remote control.
H T MARK button
I DELETE button
B
A
C
D
E
G
F
I
H

15-GB
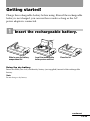
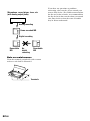
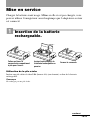
Getting started!
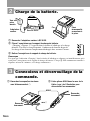
Charge the rechargeable battery before using. Even if the rechargeable
battery is not charged, you can use the recorder as long as the AC
power adaptor is connected.
1
Insert the rechargeable battery.
Using the dry battery
Insert one LR6 (size AA) alkaline dry battery (not supplied) instead of the rechargeable
battery.
Note
Do not charge a dry battery.
e
E
Insert the rechargeable
battery minus end first.
Slide to open the battery
compartment lid.
Close the lid.
continued

16-GB
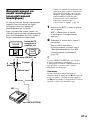
2
Charging the rechargeable battery.
3
Make connections and unlock the
control.
1 Connect the headphones/earphones
with the remote control to i.
2 Slide HOLD to the direction of the arrow
(.) in the illustration to unlock the
controls.
AC power
adaptor
Attach the
connector to
the jack
firmly.
To DC IN 3V
1 Connect the AC power adaptor to DC IN 3V.
2 Place the recorder on the battery charging stand.
“Charging” flashes, e appears in the display, and charging starts. When
charging is completed, the battery indication disappears.
Full charging of a completely discharged rechargeable battery takes about 3
hours.
3 Remove the recorder from the battery charging stand.
Note
The “Charging” indication in the display may not flash immediately after you place the recorder on th
e
battery charging stand in step 2. The indication will, however, begin flashing after about 3 minutes
and charging will begin
.
To a wall
outlet
HOLD
to i
Connect firmly.
Connect firmly.

17-GB
z
You can also charge the rechargeable battery by
connecting the AC power adaptor directly to the
recorder.
Connect the AC power adaptor to DC IN 3V on
the recorder, and then press x/CHG while the
recorder is stopped.
“Charging” and e appear in the display and
charging starts. Full charging takes about 3
hours. Charging is complete when e
disappears. Charging time may vary depending
on the battery condition.
Notes
• The supplied battery charging stand can be
used only with this recorder. Any other model
cannot be charged.
• Do not use the recorder to charge any other
battery besides the supplied one or the one
designated for it (NC-WMAA).
• Though the battery charging stand and the
battery may become hot during the charging
procedure, this poses no danger.
• Be sure to use the supplied AC power adaptor.
• If you are recharging the battery for the first
time or after a long period of disuse, the
battery may not charge up to its rated capacity.
This is a normal characteristic. After you use
and recharge the battery a few times, it will
return to its normal charge capacity.
• When the battery life of a fully charged
rechargeable battery becomes about half the
normal life, replace it.
• If the recorder will not be used for a long
period of time, disconnect the AC power
adaptor from a wall outlet and remove the
recorder from the battery charging stand.
• If during operation the recorder stops with
“LOW BATT” in the display, charge the
rechargeable battery. You may be able to
operate the recorder for a while after “LOW
BATT” has appeared. However, if you operate
the recorder until the rechargeable battery is
completely discharged, you may not be able to
recharge it again by placing the recorder on
the battery charging stand. If this happens,
remove the battery from the recorder once,
then reinsert it before placing the recorder on
the battery charging stand.
• Please note the following points when
charging the battery:
—If you press x/CHG immediately after
charging has completed, charging will
begin again. If this happens, press x/CHG
again to stop the charging operation since
the battery is already fully charged.
—Charging stops when you try to operate the
recorder during charging.
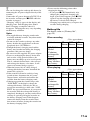
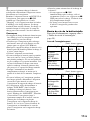
Battery life
For details, refer to (“Battery life”,
page 59).
When recording
(Unit: approx.hours)
When playing
(Unit: approx.hours)
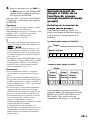
Batteries SP
Stereo
LP2
Stereo
LP4
Stereo
NC-WMAA
Nickel
Cadmium
rechargeable
battery
4 6 7.5
LR6 (SG)
Sony alkaline
dry battery
91316
Batteries SP
Stereo
LP2
Stereo
LP4
Stereo
NC-WMAA
Nickel
Cadmium
rechargeable
battery
15 16 20
LR6 (SG)
Sony alkaline
dry battery
42 48 56

18-GB
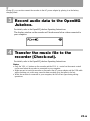
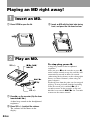
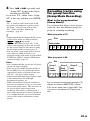
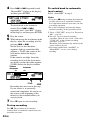
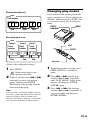
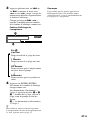
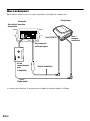
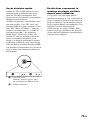
Recording an MD right away!
(Synchro-recording)
This section explains the basic procedure for making digital
recordings using an optical cable connected to a CD player, Digital
TV or other digital equipment. (For further information, see “System
limitations” (page 63)) During synchro-recording, the recorder starts
and stops recording in sync with the sound source. Track marks are
added wherever they appear in the sound source. It is recommended to
use the AC power adaptor when recording.
To record from an analog source such as a cassette deck or a radio t “Recording in analog
(Analog Recording)” (page 27).
To record using group mode t “Recording tracks using the group function (Group Mode
Recording)” (page 29).
1
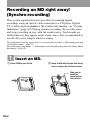
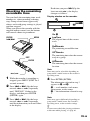
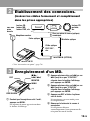
Insert an MD.
1 Press OPEN to open the lid. 2 Insert an MD with the label side facing
front, and press the lid down to close.
Make sure to
check the
record-protect
tab is closed.

19-GB
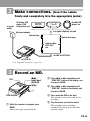
2
Make connections.
(Insert the cables
firmly and completely into the appropriate jacks)
3
Record an MD.
1 While the recorder is stopped, press
MENU.
Menu items appear in the display.
2 Press . or > repeatedly until
“SYNC REC” flashes in the display, and
then press ENTER.
3 Press . or > repeatedly until
“SYNC ON” flashes in the display, and
then press ENTER.
4 Press and slide REC to the right.
The recorder pauses and stands by for
recording.
5 Play the source you want to record.
The recorder starts recording
automatically when it receives the
playing sound.
to a wall
outlet
AC power adaptor
CD player, MD
player, DVD
video player, etc.
Portable CD
player, etc.
Optical cable
POC-15B*,
etc.
Optical plug
Optical mini-plug
to a digital (Optical) out jack
to LINE IN (OPTICAL)
to DC IN 3V
∗ See “Optional accessories” (page 76).
REC
x/N/
./ >/
X/ENTER
END SEARCH
MENU

20-GB
To stop recording, press x.
After you press x to stop, the recorder will automatically turn off in about 10 seconds (when using the
dry battery or the rechargeable battery) or about 3 minutes (when using the AC power adaptor).
To cancel synchro-recording
Press . or > repeatedly until “SYNC OFF” flashes in the display in step 3, and then press
ENTER.
Note
If you record on a previously recorded disc, the recorder is factory set to overwrite the
entire contents of the disc. If you want the recording to start after the existing contents,
do the procedure “Recording without overwriting existing material” (page 31) before
doing step 3, “Record an MD.” (page 19).
If the recording does not start
• Make sure the recorder is not locked (page 16, 58).
• Make sure the MD is not record-protected (page 16, 61).
• Premastered MDs cannot be recorded over.
To Press
Record from the end of the
current contents
1)
If “REC-Posi” (the record-starting position setting) is set
to “From Here”, press END SEARCH, and then press
and slide REC to the right.
1)
If “REC-Posi” is set to “From End”, press and slide REC
to the right.
Record over partway through
the previous recording
1)
N, ., or > to find the start point of recording and
press x to stop. Then press and slide REC to the right.
Pause X
2)
.
Press X again to resume recording.
Remove the MD x and open the lid.
3)
(The lid does not open while “TOC
Edit” is flashing in the display.)
1)
If “REC-Posi” is set to “From End”, recording operations will always start from the end of the
previously recorded material without pressing the END SEARCH button (page 31).
2)
A track mark is added at the point where you press X again to resume recording while pausing; thus
the remainder of the track will be counted as a new track.
3)
If you open the lid while “REC-Posi” is set to “From Here”, recording will begin from the top of the
disc the next time you record. Check the point to start recording on the display.
La page est en cours de chargement...
La page est en cours de chargement...
La page est en cours de chargement...
La page est en cours de chargement...
La page est en cours de chargement...
La page est en cours de chargement...
La page est en cours de chargement...
La page est en cours de chargement...
La page est en cours de chargement...
La page est en cours de chargement...
La page est en cours de chargement...
La page est en cours de chargement...
La page est en cours de chargement...
La page est en cours de chargement...
La page est en cours de chargement...
La page est en cours de chargement...
La page est en cours de chargement...
La page est en cours de chargement...
La page est en cours de chargement...
La page est en cours de chargement...
La page est en cours de chargement...
La page est en cours de chargement...
La page est en cours de chargement...
La page est en cours de chargement...
La page est en cours de chargement...
La page est en cours de chargement...
La page est en cours de chargement...
La page est en cours de chargement...
La page est en cours de chargement...
La page est en cours de chargement...
La page est en cours de chargement...
La page est en cours de chargement...
La page est en cours de chargement...
La page est en cours de chargement...
La page est en cours de chargement...
La page est en cours de chargement...
La page est en cours de chargement...
La page est en cours de chargement...
La page est en cours de chargement...
La page est en cours de chargement...
La page est en cours de chargement...
La page est en cours de chargement...
La page est en cours de chargement...
La page est en cours de chargement...
La page est en cours de chargement...
La page est en cours de chargement...
La page est en cours de chargement...
La page est en cours de chargement...
La page est en cours de chargement...
La page est en cours de chargement...
La page est en cours de chargement...
La page est en cours de chargement...
La page est en cours de chargement...
La page est en cours de chargement...
La page est en cours de chargement...
La page est en cours de chargement...
La page est en cours de chargement...
La page est en cours de chargement...
La page est en cours de chargement...
La page est en cours de chargement...
La page est en cours de chargement...
La page est en cours de chargement...
La page est en cours de chargement...
La page est en cours de chargement...
La page est en cours de chargement...
La page est en cours de chargement...
La page est en cours de chargement...
La page est en cours de chargement...
La page est en cours de chargement...
La page est en cours de chargement...
La page est en cours de chargement...
La page est en cours de chargement...
La page est en cours de chargement...
La page est en cours de chargement...
La page est en cours de chargement...
La page est en cours de chargement...
La page est en cours de chargement...
La page est en cours de chargement...
La page est en cours de chargement...
La page est en cours de chargement...
La page est en cours de chargement...
La page est en cours de chargement...
La page est en cours de chargement...
La page est en cours de chargement...
La page est en cours de chargement...
La page est en cours de chargement...
La page est en cours de chargement...
La page est en cours de chargement...
La page est en cours de chargement...
La page est en cours de chargement...
La page est en cours de chargement...
La page est en cours de chargement...
La page est en cours de chargement...
La page est en cours de chargement...
La page est en cours de chargement...
La page est en cours de chargement...
La page est en cours de chargement...
La page est en cours de chargement...
La page est en cours de chargement...
La page est en cours de chargement...
La page est en cours de chargement...
La page est en cours de chargement...
La page est en cours de chargement...
La page est en cours de chargement...
La page est en cours de chargement...
La page est en cours de chargement...
La page est en cours de chargement...
La page est en cours de chargement...
La page est en cours de chargement...
La page est en cours de chargement...
La page est en cours de chargement...
La page est en cours de chargement...
La page est en cours de chargement...
La page est en cours de chargement...
La page est en cours de chargement...
La page est en cours de chargement...
La page est en cours de chargement...
La page est en cours de chargement...
La page est en cours de chargement...
La page est en cours de chargement...
La page est en cours de chargement...
La page est en cours de chargement...
La page est en cours de chargement...
La page est en cours de chargement...
La page est en cours de chargement...
La page est en cours de chargement...
La page est en cours de chargement...
La page est en cours de chargement...
La page est en cours de chargement...
La page est en cours de chargement...
La page est en cours de chargement...
La page est en cours de chargement...
La page est en cours de chargement...
La page est en cours de chargement...
La page est en cours de chargement...
La page est en cours de chargement...
La page est en cours de chargement...
La page est en cours de chargement...
La page est en cours de chargement...
La page est en cours de chargement...
-
 1
1
-
 2
2
-
 3
3
-
 4
4
-
 5
5
-
 6
6
-
 7
7
-
 8
8
-
 9
9
-
 10
10
-
 11
11
-
 12
12
-
 13
13
-
 14
14
-
 15
15
-
 16
16
-
 17
17
-
 18
18
-
 19
19
-
 20
20
-
 21
21
-
 22
22
-
 23
23
-
 24
24
-
 25
25
-
 26
26
-
 27
27
-
 28
28
-
 29
29
-
 30
30
-
 31
31
-
 32
32
-
 33
33
-
 34
34
-
 35
35
-
 36
36
-
 37
37
-
 38
38
-
 39
39
-
 40
40
-
 41
41
-
 42
42
-
 43
43
-
 44
44
-
 45
45
-
 46
46
-
 47
47
-
 48
48
-
 49
49
-
 50
50
-
 51
51
-
 52
52
-
 53
53
-
 54
54
-
 55
55
-
 56
56
-
 57
57
-
 58
58
-
 59
59
-
 60
60
-
 61
61
-
 62
62
-
 63
63
-
 64
64
-
 65
65
-
 66
66
-
 67
67
-
 68
68
-
 69
69
-
 70
70
-
 71
71
-
 72
72
-
 73
73
-
 74
74
-
 75
75
-
 76
76
-
 77
77
-
 78
78
-
 79
79
-
 80
80
-
 81
81
-
 82
82
-
 83
83
-
 84
84
-
 85
85
-
 86
86
-
 87
87
-
 88
88
-
 89
89
-
 90
90
-
 91
91
-
 92
92
-
 93
93
-
 94
94
-
 95
95
-
 96
96
-
 97
97
-
 98
98
-
 99
99
-
 100
100
-
 101
101
-
 102
102
-
 103
103
-
 104
104
-
 105
105
-
 106
106
-
 107
107
-
 108
108
-
 109
109
-
 110
110
-
 111
111
-
 112
112
-
 113
113
-
 114
114
-
 115
115
-
 116
116
-
 117
117
-
 118
118
-
 119
119
-
 120
120
-
 121
121
-
 122
122
-
 123
123
-
 124
124
-
 125
125
-
 126
126
-
 127
127
-
 128
128
-
 129
129
-
 130
130
-
 131
131
-
 132
132
-
 133
133
-
 134
134
-
 135
135
-
 136
136
-
 137
137
-
 138
138
-
 139
139
-
 140
140
-
 141
141
-
 142
142
-
 143
143
-
 144
144
-
 145
145
-
 146
146
-
 147
147
-
 148
148
-
 149
149
-
 150
150
-
 151
151
-
 152
152
-
 153
153
-
 154
154
-
 155
155
-
 156
156
-
 157
157
-
 158
158
-
 159
159
-
 160
160


Sony MZ-N707 Mode d'emploi
- Catégorie
- Joueurs de minidisc
- Taper
- Mode d'emploi
dans d''autres langues
- English: Sony MZ-N707 Operating instructions
Documents connexes
-
Sony MZ-N707 Manuel utilisateur
-
Sony MZ-G755 Mode d'emploi
-
-
Sony MDS-JB980 Manuel utilisateur
-
-
Sony MZ-N505 Mode d'emploi
-
-
 Sony Série MZ-S1 Manuel utilisateur
-
-
Sony MDS-NT1 Manuel utilisateur
