Toro Weight Kit, Power Max Snowthrowers Guide d'installation
- Catégorie
- Souffleuses à neige
- Taper
- Guide d'installation

2003—The Toro Company
8111 Lyndale Ave., Bloomington, MN 55420, USA
Printed in the USA
All Rights Reserved
Original Instructions (EN)
Weight Kit
Power Max Snowthrowers
Model No. 107-3815
Form No. 3350-778
Installation Instructions
Use the weight kit when you install the optional snow cab
on a Power Max snowthrower.
Save these instructions with your Operator’s Manual for
future reference.
Operating a Power Max snowthrower with a snow
cab without properly installing a counterweight to
the front of the snowthrower can cause it to tip
backward and fall on the operator, causing injury.
• Do not operate a snowthrower that has a snow
cab but does not have the proper
counterweight.
• Install this weight kit to the front of the
snowthrower in order to balance the added
weight of the snow cab.
Warning
Contents of the Kit
DESCRIPTION QUANTITY
Weight bar 1
Bolts 2
Washers 4
Nuts 2
Spacers 2
Installing the Weight Bar on
the Snowthrower
1. Disconnect the wire from the spark plug.
Note: For snowthrowers with a covered 2-cycle
engine, remove the ignition key.
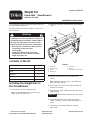
2. Center the weight bar on the top of the auger housing
(Fig. 1).
1
2
3
4
5
6
4
7
Figure 1
1. Weight bar
2. Auger housing
3. Bolt (2)
4. Washer (4)
5. Spacer (2)
6. Nut (2)
7. Bend in the auger housing
3. Mark the locations where you will need to drill
2 holes.
Note: Mark each hole one inch (2.5 cm) behind the
bend in the auger housing.
4. Drill 2 holes (11/32 inch) in the auger housing at the
locations you marked.
5. Align the holes in the weight bar with the holes in the
auger housing.
Important Ensure that the danger decal on the weight
bar is visible.
6. Secure the weight bar to the auger housing with
2 bolts, 4 washers, 2 spacers, and 2 nuts provided in
the kit.
7. Connect the wire to the spark plug or insert the
ignition key.

2003 – The Toro Company
8111 Lyndale Ave., Bloomington, MN 55420, États-Unis
Imprimé aux États-Unis
Tous droits réservés
Traduction de l’original (F)
Kit contrepoids
Déneigeuses Power Max
Modèle Nº 107-3815
Form No. 3350-778
Instructions d’installation
Utilisez le kit contrepoids si vous montez l’option cabine
sur une déneigeuse Power Max.
Conservez ces instructions avec le Manuel de l’utilisateur
à titre de référence.
Si vous utilisez une déneigeuse Power Max
équipée d’une cabine sans monter également un
contrepoids à l’avant de la machine, celle-ci
risque de basculer en arrière et de blesser
gravement l’utilisateur dans sa chute.
• N’utilisez pas la déneigeuse munie d’une cabine
si le contrepoids approprié n’est pas en place.
• Montez le kit contrepoids à l’avant de la
déneigeuse pour compenser le poids
supplémentaire imposé par la cabine.
Attention
Composition du kit
DESCRIPTION QUANTITÉ
Barre contrepoids 1
Boulons 2
Rondelles 4
Écrous 2
Entretoises 2
Montage de la barre
contrepoids sur la déneigeuse
1. Débranchez la bougie.
Remarque : Pour les déneigeuses équipées d’un
moteur à 2 temps couvert, retirez la clé de contact.
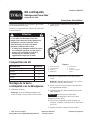
2. Centrez la barre contrepoids en haut du carter de
tarière (Fig. 2).
1
2
3
4
5
6
4
7
Figure 2
1. Barre contrepoids
2. Carter de tarière
3. Boulon (2)
4. Rondelle (4)
5. Entretoise (2)
6. Écrou (2)
7. Courbe du carter de
tarière
3. Marquez les emplacements où vous devrez percer
2 trous.
Remarque : Marquez chaque trou à 2,5 cm (1 pouce)
derrière la courbe du carter de tarière.
4. Percez 2 trous (11/32 pouce) dans le carter de tarière
aux emplacements marqués.
5. Alignez les trous de la barre contrepoids sur ceux du
carter de tarière.
Important Assurez-vous que l’autocollant
d’avertissement de danger qui se trouve sur la barre
contrepoids est bien visible.
6. Fixez la barre contrepoids au carter de tarière avec
2 boulons, 4 rondelles, 2 entretoises et 2 écrous fournis
avec le kit.
7. Branchez la bougie ou insérez la clé de contact.
-
 1
1
-
 2
2


Toro Weight Kit, Power Max Snowthrowers Guide d'installation
- Catégorie
- Souffleuses à neige
- Taper
- Guide d'installation
dans d''autres langues
Documents connexes
-
Toro 1028 Power Shift Snowthrower Manuel utilisateur
-
Toro 826 Snowthrower Manuel utilisateur
-
Toro 824 Snowthrower Manuel utilisateur
-
-
Toro 1232 Power Shift Snowthrower Manuel utilisateur
-
-
-
Toro 724 Snowthrower Manuel utilisateur