Danby Silhouette Select DIM3225BLSST Owner's Use And Care Manual
- Taper
- Owner's Use And Care Manual

BUILT IN ICE MAKER
MACHINE À GLAÇONS
EQUIPO PARA FABRICAR HIELO
Owner’s Use and Care Guide
Guide d’utilisation et soin de Propriètaire
Guía del Proprietario para utilizar y cuidar
Model • Modèle • Modelo
DIM3225BLSST
V3.07.10.DM

ICE MAKER
Owner’s Use and Care Guide...............................................
• Safety Instructions
• Installation Instructions
• Operating Instructions
• Care and Maintenance
• Troubleshooting
• Warranty
MACHINE À GLAÇONS
Guide d’utiliser et soin de propriètaire...............................
• Consignes de sécurité
• Consignes de Installation
• Opération
• Soins et entretien
• Dépannage
• Garantie
EQUIPO PARA FABRICAR HIELO
Guía para utilizar y cuidar del Proprietario.........................
• Instruciónes de Seguridad Importantes
• Instrucciones d’instalación
• Instruciónes Operadoras
• Limpieza y Mantenimiento
• Solución Sugeridad
• Garantia
1-13
14-26
CONTENTS
27-39
CAUTION
Read and follow all safety rules and
operating instructions before first use of this
product.
Veuillez lire attentivement les consignes de
sécurité et les instructions d’utilisation avant
l’utilisation initiale de ce produit.
PRECAUTION
Lea y observe todas las reglas de seguri-
dad y las instrucciones de operación antes
de usar este producto por primera vez.
PRECAUCION
Model • Modèle • Modelo
DIM3225BLSST
• Makes 32IBS daily / Ice box capacity is 25IBS
• 32 livres par jour / la capacité de la boîte de
glace est 25IBS
• 32IBS por día / El hielo es la capacidad de
cuadro de 25IBS

GROUNDING
INSTRUCTIONS
To avoid installation/operation difficulties, read
these instructions thoroughly.
• This appliance must be grounded. Connect only to a
properly grounded outlet. See “Grounding Instructions”
section.
• Do not operate this appliance if it has a damaged power
cord or plug, if it is not working properly, or if the
appliance has been damaged or dropped.
• Never allow children to operate, play with, or crawl
inside the appliance.
• Never clean appliance parts with flammable fluids. The
fumes can create a fire hazard or explosion.
• Do not store or use gasoline or any other flammable
vapors or liquids in the vicinity of this or any other
appliance. The fumes can create a fire hazard or
explosion.
• Do not splice the power cord that is equipped with this
appliance.
• Keep power cord away from heated surfaces.
• Do not immerse power cord plug or the appliance itself
in water.
• Do not use this product near water-for example, in a wet
basement, near a swimming pool or near a sink.
• Do not use corrosive chemicals or vapors in this
appliance.
• Use this appliance only for its intended use, as
described in this manual.
• Store beverages in sealed containers only.
• See door surface cleaning instructions in the Care and
Cleaning section(s) of this manual.
• Do not cover or block any openings on the appliance.
• This appliance is intended for household use only. Do
not attempt to operate or store this appliance outdoors.
• This appliance should be serviced only by qualified
service personnel. Contact the nearest authorized
service facility for examination, repair or adjustment.
• This appliance must be grounded. In the event of an
electrical short circuit, grounding reduces the risk of
electric shock by providing an escape wire for the
electric current.
• This appliance is equipped with a power cord having a
grounding wire with a grounding plug. The plug must be
plugged into an outlet that is properly installed and
grounded.
• Consult a qualified electrician or service technician if the
grounding instructions are not completely understood, or
if doubt exists as to whether the appliance is properly
grounded.
• If the outlet is a standard 2-prong wall outlet, it is your
personal responsibility and obligation to have it replaced
with a properly grounded 3-prong wall outlet.
• For best operation, plug this appliance into its own
electrical outlet to prevent flickering of lights, blowing of
fuse or tripping of circuit breaker.
• Do not under any circumstances cut or remove the third
(ground) prong from the power cord.
• Do not use an adapter plug with this appliance.
• Do not use an extension cord with this appliance. If the
power cord is too short, have a qualified electrician or
service technician install an outlet near the appliance.
IMPORTANT SAFETY INFORMATION
PRECAUTIONS
GROUNDING INSTRUCTIONS
WARNING:
Improper use of the grounding plug can result in a
risk of electric shock.
SAVE THESE INSTRUCTIONS
An empty ice maker is a very dangerous attraction to children. Remove either the gasket, latches, lids, lock and/or
doors from unused or discarded appliances, or take some other action to guarantee it harmless.
DONT WAIT DO IT NOW!
1
READ ALL SAFETY INFORMATION BEFORE USING
WARNING: RISK OF CHILD ENTRAPMENT

2
INSTALLATION INSTRUCTIONS
BEFOR USING YOUR
ICE MAKER
INSTALLATION OF YOUR
ICE MAKER
• Remove the exterior and interior packaging.
• Before connecting the Ice Maker to the power source, let
it stand upright for approximately 2 hours. This will
reduce the possibility of a malfunction in the cooling
system from handling during transportation.
• Clean the interior surface with lukewarm water using a
soft cloth.
• Attach the water inlet and outlet pipe, loosen the screw
nut, choose the function switch. (see Ice Maker
performance mode instructions)
• Before use, please make two full boxes of ice and then
dispose it to insure the ice is clean and healthy.
• When disposing your appliance, please choose an
authorized disposal site.
• Place your Ice Maker on a floor that is strong enough to
support it when it is fully loaded. To level your Ice Maker,
adjust the front leveling leg at the bottom of the unit.
• Locate the Ice Maker away from direct sunlight and
sources of heat (stove, heater, radiator, etc.). Direct
sunlight may affect the acrylic coating on the exterior of
the unit and heat sources may increase electrical
consumption. Extreme cold ambient temperatures may
also cause the unit not to perform properly.`
• Avoid locating the unit in moist areas.
• Plug the unit into an exclusive, properly installed-
grounded wall outlet. Do not under any circumstances
cut or remove the third (ground) prong from the power
cord. Any questions concerning power and/or grounding
should be directed toward a certified electrician or an
authorized Products service center.
ATTENTION
• Do not open the door unless necessary.
• Should the Ice Maker be stored without use for long
periods it is suggested, after a careful cleaning, to leave
the door ajar to allow air to circulate inside the cabinet
in order to avoid possible formations of condensation,
mold or odors.

3
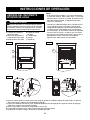
INSTALLATION INSTRUCTIONS
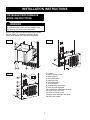
ICE MAKER PERFORMANCE
MODE INSTRUCTIONS
WARNING
Please follow the steps below only when the ice maker is
disconnected from the power and has no water or else
may cause electric shock or a wet floor board.
Your ice maker has three different performance modes,
you can choose the suitable one according to your
requirements, please see below detail instructions.
Fig A.
Fig B.
Fig C.
1. Ice box
2. bottom bord of ice box
3. screw nut(front)
4. seal washer(front)
5. water level ruler
6. seal washer(back)
7. screw nut(back)
8. pumped water outlet switch
9. water inlet pipe connector
10. pumped water outlet pipe connector
11. screw nut for valve seal
12. screw nut for valve seal
13. direct water outlet pipe connection
14. water tank outside

4
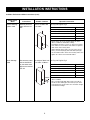
INSTALLATION INSTRUCTIONS
Ice Maker Performance Mode Instructions (cont)
Performance
Mode
Instructions
Suitable situation
Operation instruction
Manual drainage
system mode
Manually drain the
water from the ice
box.
There is no drain hole
in the room
Ref: Fig.A & Fig.B & Fig.C
Screw Nut and Switch
Condition
screw nut(front) (3) + seal washer(front)(4)
screw nut(back) (7) + seal washer(back) (6)
screw nut for valve seal (11)
screw nut for valve seal (12)
force water outlet switch (8)
lock
lock
lock
lock
OFF
1. Please insure the screw nut and switch are in the
above condition to avoid water leakage
2. Periodically check the Ice box (1), water level ruler(5).
If the water level exceeds the ruler water level,please
drain off the unnecessary water.
3. When draining off the water, you can remove the Ice
box(1), screw nut(front)(2) and seal washer(front)(4)
use the holder to take out the unnecessary water, then
tighten the above screw and seal washer.
Direct drainage
mode
Unnecessary water
will be drained off
by the outlet water
pipe on the back of
the unit
The height of drain hole
in the room <100mm>
100mm
Ref: Fig.A & Fig.B & Fig.C
Screw Nut and Switch
Condition
screw nut(front) (3) + seal washer(front)(4)
screw nut(back) (7) + seal washer(back) (6)
screw nut for valve seal (11)
screw nut for valve seal (12)
force water outlet switch (8)
lock
open
lock
open
OFF
1. Please insure the screw nut and switch are in the
above condition;
2. Use a certain length drain pipe,connect one side to
the direct water outlet pipe connection (13) the other
to the drain hole. Please insure the connection is tight
to avoid water leakage.

5
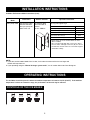
INSTALLATION INSTRUCTIONS
Ice Maker Performance Mode Instructions (cont)
Performance
Mode
Instructions
Suitable situation
Operation instruction
Drain pump mode.
Unnecessary water
will force the drain
out by the pump on
back of the unit.
The height of drain
hole in the room is
between
101mm~1500mm
Ref: Fig.A & Fig.B & Fig.C
Screw Nut and Switch
Condition
screw nut(front) (3) + seal washer(front)(4)
screw nut(back) (7) + seal washer(back) (6)
screw nut for valve seal (11)
screw nut for valve seal (12)
force water outlet switch (8)
lock
open
lock
open
OFF
1. Please insure the screw nut and switch are in the
above condition;
2. Use a certain length drain pipe, connect one side to
the force water outlet pipe connector (10), the other to
the drain hole. Please insure the connection is tight to
avoid water leakage.
NOTE:
1. If you take out the bottom board of the ice box, it will make the volume of the ice box larger and
therefor will keep more ice.
2. If your operating using the “Manual drainage system mode”, ice will restrict drain water from flowing out.
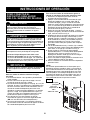
OPERATING INSTRUCTIONS
The Ice Maker should be placed in where the ambient temperature is between 5-35°C (41-95°F). If the ambient
temperature is above or below this range, the performance of the unit may be affected.
CONTROLS OF THE ICE MAKER
Small
Med
Large
On/Off

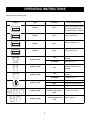
OPERATING INSTRUCTIONS
Controls of the Ice Maker (cont)
Control
Type
Condition
Function Explanation
Button Press
To turn the Ice Maker on/off
(press and hold this button
for approximately 3 seconds)
Button Press
Small amount of ice
Button Press
Medium amount of ice
Button Press
Large amount of ice
Indicator Light
Indicator Light
Indicator Light
ON
FLASHING
Small amount of ice is
selected.
Water tank is full.
ON
Medium amount of ice is
selected.
ON
FLASHING
Large amount of ice is
selected.
Ice box full of ice.
Indicator Light
Indicator Light
Indicator Light
ON
OFF
FLASHING
Compressor works
Compressor stopped working
Stand by condition
Flashing at the same
time
Flashing at the same
time
Ice maker low on water
Sensor breakdown
On / Off
Small
Med
Large
6

7
OPERATING INSTRUCTIONS
SETTING THE TEMPERATURE
CONTROLS
1. Please insure the water pipe is well connected to the
ice maker and keep the switch open.The factory setting
of the ice maker is set to make medium ice, if you need
to revise the ice size, you can press buttons
the relevant Indicator light
will open.
2. If you want to stop making ice, please press
button for about 3 seconds, all the indicator lights
will go off and indicator
light will keep on flashing. If you want to return to
making ice, you only need to press the button one
more time.
Small Med
Large
On / Off
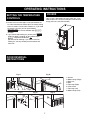
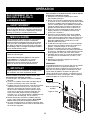
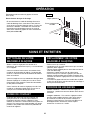
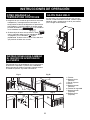
ICE BOX
Your ice box is designed to be easily taken out, if you
want to take it out. Lift up the front part of the box then
simply pull it out. (see picture below)
DOOR REVERSAL
INSTRUCTIONS
This appliance has the capability of the door opening from
either the left or the right side. The unit is delivered to you
with the door opening from the left side. Should you desire
to reverse the opening direction, please follow
these instructions.
12
3
4
A
5
4
B
5
6
7
8
CD
E
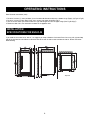
1. Screws
2. Bottom hinge (Right)
3. Door axis
4. Door
5. Top hinge (Right)
6. Lock screws
7. Top hinge (Left)
8. Bottom hinge (Left)
Fig. A
Fig. B
Fig. C
Fig. D
Fig. E

OPERATING INSTRUCTIONS
Door Reversal Instructions (cont)
1. Remove 2 screws (1), then pull door (4) as of arrowhead direction and then the bottom hinge (Right) (2)(Fig.A & Fig.B)
2. Remove 3 screws of right upper Hinge, then remove right upper hinge(See Fig.C)
3. Use the screws which you removed from the right side hinges to fix the left upper hinge (See Fig.D &Fig.E)
4. Rotate the door 180°, then assemble the door on the opposite side.
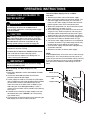
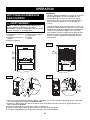
INSTALLATION
SPECIFICATIONS FOR BUILD-IN
If you need the ice maker to be “built in”, we suggest you keep a distance of at least 25mm from every left, right and top
side of the wall and at least 100mm to the back side of the wall in order to well ventilate the hot air. Please see below
detail drawing.
Front View
Side View
Top View
8

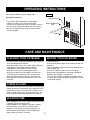
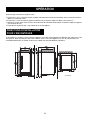
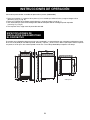
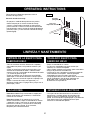
INNER WATER CONTAINER
CLEANING
WARNING
Please follow the steps below only when the ice maker is
disconnected from the power and has no water or else
may cause electric shock or a wet floor board.
OPERATING INSTRUCTIONS
1
2
3
5
4
7
6
Fig A.
Fig B.
Fig C.
Fig D.
1. Ice maker machine cover board
2. Ice maker machine cover plate
3. Ice maker machine
4. Inner water container
5. Water pipe
6. Valve
7. Fixed screw
1. Take out the cover board (1) of the ice maker machine (3) press one side of the cover plate (2) and pull out the other
side, then easily take out the cover plate. (Fig.A & Fig.B)
2. Prepare a water tray,take downwords of the water pipe (5) of the inner water container (4) ,then drain the water to the
water tray. (Fig.C)
3. Take down the valve (6) and fixed screw, then clean the valve (7).
4. Use the brush to clean all the parts, then use clean water to flush them.
5. After cleaning, fix the parts on opposite sides.
NOTE:
• If the unit is unplugged, power lost, or turned off you
must wait 3 to 5 minutes before restarting the unit. If
you attempt to restart before this time delay, the Ice
Maker will not start.
• When you use the Ice Maker for the first time or restart
the Ice Maker after having been shut off for a long time,
there could be a few degrees variance between the
temperature you select and the one indicated on the
LED readout. This is normal and it is due to the length
of the activation time. Once the Ice Maker is running for
a few hours everything will be back to normal.
9

OPERATING INSTRUCTIONS
CONNECTING ICE MAKER TO
WATER SUPPLY
WARNING
To avoid electric shock, which can cause death or severe
personal injury, disconnect the Ice Maker from an
electrical power outlet before connecting a water supply
line to the Ice Maker.
CAUTION
Copper tubing is recommended for the water supply line.
Water supply tubing made of 1/4” plsstic is not recom-
mended since it greatly increases the potential for water
leaks. Manufacturer will not be responsible for any
damange if plastic tubing is used for the supply line.
DO NOT install water supply tubing in areas where
temperatures fall below freezing.
- Connect the ice maker to a drinkable water source
that is not tied into a water softening system.
Chemicals from the softener may damage the ice
maker, causing it to malfunction.
IMPORTANT
Ensure that your water supply line connections comply
with all local plumbing codes.
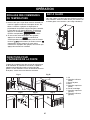
Before installing The Water Supply Line, You
Will Need
1. Basic tools: adjustable wrench and standard, falt blade
screwdriver.
2. Access to a household cold water line with water
pressure between 20 and 120 psi.
3. A water supply line made of 1/4 inch(6.4mm)OD,copper
tubing, To determine the length of copper tubing needed,
you will need to measure the distance form the ice
maker inlet valve at the back of the Ice Maker to your
cold water pipe.Then add approximadtely 7 feet(2.1
meters),so the Ice Maker can be moved out for cleaning.
See Figure 1.
4. A shutoff valve to connect the water supply line to your
household water sytem. (DO NOT use a self-piercing
type shutoff valve.)
5. A compression nut and ferrule(sleeve) for connecting the
water supply line to the ice maker inlet valve.
To Connect Water Supply Line To lce Maker
Inlet Valve
1. disconnect Ice Maker from electric power supply.
2. place end of water supply line into sink or bucket. Turn
ON water supply and flush supply line until water is
clear, turn OFF water supply at shutoff valve.Unscrew
plastic cap from water valve inlet and save them
3. Slide brass compression nut, then ferrule(sleeve),onto
water supply line, as shown in Fig.A.
4. Push water supply line into water valve inlet as far as it
will go(1/4 inch). Slide ferrule(sleeve) into valve inlet
and finger tighten compression nut onto valve.Tighten
another half turn with a wrench; DO NOT over tighten.
5. With steel clamp and screw, secure water supply line to
rear panel of Ice Maker at location shown in Fig.A.
6. Coil excess water supply line(about 2 1/2 turns)behind
Ice Maker as shown in Fig.A and arrange coils so they
do not vibrate or wear against any other surface.
7. Turb ON water supply at shutoff valve and tighten any
connections that leak.
8. Reconnect Ice Maker to electric power supply.
NOTE:
It takes approximately 24 hours for the ice maker to begin
producing ice. Air in new plumbing lines may cause ice
maker to cycle two or three times before making a full tray
of ice. New plumbing may cause ice to be discolored or
have poor flavor. Discard ice made during the first 24
hours.
Fig A.
Furrele (sleeve)
Brass Compression
Nut
Copper Tubing
Steel Clamp
10

OPERATING INSTRUCTIONS
Connecting Ice Maker To Water Supply (cont)
Drain-pipe Connection
• If you choose direct drainage or force drainage
mode,you need to buy the external drain pipe
yourself,the connection instruction is as below: Connect
one side of the external drain pipe linker to the outlet
pipe of ice macker,the other side is put into the drain
hole. (see Fig B.)
Fig B.
Furrele (sleeve)
Brass Compression
Nut
Tubing
CARE AND MAINTENANCE
CLEANING YOUR ICE MAKER
• Turn off the power, unplug the appliance, and remove all
items including shelves and rack.
• Wash the inside surfaces with a warm water and baking
soda solution. The solution should be about 2
tablespoons of baking soda to a quart of water.
• Wash the Ice box with a mild detergent solution.
• Wring excess water out of the sponge or cloth when
cleaning area of the controls, or any electrical parts.
• Wash the outside cabinet with warm water and mild
liquid detergent. Rinse well and wipe dry with a clean
soft cloth.
POWER FAILURE
• Most power failures are corrected within a few hours and
should not affect the temperature of your appliance if you
minimize the number of times the door is opened. If the
power is going to be off for a longer period of time, you
need to take the proper steps to protect your contents.
VACATION TIME
• Short vacations: Leave the Ice Maker operating during
vacations of less than three weeks.
• Long vacations: If the appliance will not be used for
several months, remove all items and turn off the
appliance. Clean and dry the interior thoroughly. To
prevent odor and mold growth, leave the door open
slightly: blocking it open if necessary.
MOVING YOUR ICE MAKER
• Remove all items.
• Securely tape down all loose items (shelves) inside your
appliance.
• Turn the adjustable leg up to the base to avoid damage.
• Tape the door shut.
• Be sure the appliance stays secure in the upright
position during transportation. Also protect outside of
appliance with a blanket, or similar item.
• The Ice Maker should be located in the coolest area of
the room, away from heat producing appliances, and out
of the direct sunlight.
11

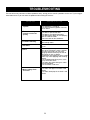
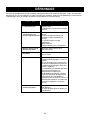
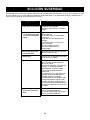
TROUBLESHOOTING
You can solve many common Ice Maker problems easily, saving you the cost of a possible service call. Try the sugges-
tions below to see if you can solve the problem before calling the servicer.
1) The Ice Maker does not
operate.
2) The ice is not big
enough or melts too
quickly.
3) Ice Maker Alarming
4) Vibrations
5) Noise
6) Water leakage from
ice maker.
• Not plugged in
• The appliance is turned off
• The circuit breaker tripped or fuse has
been blown.
• The ambient temperature is too high.
• The door is opened too often.
• The door is not closed completely.
• The door gasket does not seal properly.
• Set the incorrect mode
• Too much dust on the condenser
• Outside water tank is full
• Not enough water
• Check to assure that the Ice Maker is
level.
• The rattling noise may come from the
flow of the refrigerant, which is normal.
• As each cycle ends, you may hear
gurgling sounds caused by the flow of
refrigerant in your Ice Maker.
• Contraction and expansion of the inside
walls may cause popping and crackling
noises.
• The ice dispensing during every cycle
may cause little noise
• The water flow noise during ice maker
normal operation;
• The Ice Maker is not level.
• The water inlet pipe in the back is too
loose
• The water outlet pipe in the back is too
loose
POSSIBLE CAUSE
PROBLEM
12

LIMITED COMPACT
REFRIGERATOR WARRANTY
This quality product is warranted to be free from manufacturer’s defects in material and workmanship, provided that the unit is used under the normal operating
conditions intended by the manufacturer.
This warranty is available only to the person to whom the unit was originally sold by Danby or by an authorized distributor of Danby, and is non-transferable.
TERMS OF WARRANTY
Plastic parts, are warranted for thirty (30) days only from purchase date, with no extensions provided.
First Two Years During the first twenty four (24) months, any electrical parts of this product found to be defective, including any sealed system units, will
be repaired or replaced, at warrantor’s option, at no charge to the ORIGINAL purchaser.
To obtain Danby reserves the right to limit the boundaries of “In Home Service” to the proximity of an Authorized Service Depot. Any appliance
Service requiring service outside the limited boundaries of “In Home Service” ,
it will be the consumer’s responsibility to transport the appliance
(at their own expense) to the original retailer (point of purchase) or a service depot for repair. Contact your dealer from whom your unit
was purchased, or contact your nearest authorized Danby service depot, where service must be performed by a qualified service technician.
If service is performed on the units by anyone other than an authorized service depot, or the unit is used for commercial application, all
obligations of Danby under this warranty shall be at an end.
Nothing within this warranty shall imply that Danby will be responsible or liable for any spoilage or damage to food or other contents of this appliance, whether
due to any defect of the appliance, or its use, whether proper or improper.
EXCLUSIONS
Save as herein provided, Danby Products Limited (Canada) or Danby Products Inc. (U.S.A.), there are no other warranties, conditions, representations or guar-
antees, express or implied, made or intended by Danby Products Limited or its authorized distributors and all other warranties, conditions, representations or
guarantees, including any warranties, conditions, representations or guarantees under any Sale of Goods Act or like legislation or statue is hereby expressly
excluded. Save as herein provided, Danby Products Limited (Canada) or Danby Products Inc. (U.S.A), shall not be responsible for any damages to persons or
property, including the unit itself, howsoever caused or any consequential damages arising from the malfunction of the unit and by the purchase of the unit, the
purchaser does hereby agree to indemnify and save harmless Danby Products Limited from any claim for damages to persons or property caused by the unit.
GENERAL PROVISIONS
No warranty or insurance herein contained or set out shall apply when damage or repair is caused by any of the following:
1) Power Failure.
2) Damage in transit or when moving the appliance.
3) Improper power supply such as low voltage, defective house wiring or inadequate fuses.
4) Accident, alteration, abuse or misuse of the appliance such as inadequate air circulation in the room or abnormal operating conditions,
(extremely high or low room temperature).
5) Use for commercial or industrial purposes.
6) Fire, water damage, theft, war, riot, hostility, acts of God such as hurricanes, floods etc.
7) Service calls resulting in customer education.
Proof of purchase date will be required for warranty claims; so, please retain bills of sale. In the event warranty service is required, present this document to our
AUTHORIZED SERVICE DEPOT.
Danby Products Limited
PO Box 1778, 5070 Whitelaw RD, Guelph, Ontario, Canada N1H 6Z9
Telephone: (519) 837-0920 FAX: (519) 837-0449
Danby Products Inc.
PO Box 669, 101 Bentley Court, Findlay, Ohio, U.S.A. 45840
Telephone: (419) 425-8627 FAX: (419) 425-8629
07/08
Warranty Service
In Home Service

GROUNDING
INSTRUCTIONS
Cet appareil est conçu pour un usage domestique à
l’intérieur seulement. N’entreposez ni n’utilisez pas cet
appareil à l’extérieur.
• Cet appareil doit être mis à la terre. Branchez le
seulement dans une prise correctement mise à la terre.
Référez-vous au chapitre “Instructions de mise à la
terre” ci-dessus.
• Ne faites pas fonctionner cet appareil s’il a un cordon ou
fiche électrique endommagé, s’il ne fonctionne pas
correctement, ou si l’appareil a été endommagé ou
échappé.
• N'épissez pas le cordon électrique.
• Ne permettez jamais à un enfant de faire fonctionner
l’appareil, de jouer avec ou de ramper à l’intérieur.
• Ne nettoyez jamais des pièces de l’appareil avec un
liquide inflammable. Les vapeurs peuvent constituer un
risque d’incendie ou provoquer une explosion.
• N’entreposez et n’utilisez pas d’essence ou d’autres
liquides ou vapeurs inflammables à proximité de cet
appareil ou de tout autre appareil. Les vapeurs peuvent
constituer un risque d’incendie ou provoquer une
explosion.Gardez le cordon électriqueéloigné des
sources de chaleur.
• N’immersez pas le cordon ou sa fiche dans aucun
liquide.
• N’utilisez pas cet appareil près de bassins d’eau, par
exemple dans un sous-sol détrempé, près d’une piscine
ou d’un évier.
• N’utilisez pas de produits chimiques ou vapeurs
corrosives dans/près de cet appareil.
• N’utilisez cet appareil que pour les fins aux quelles il est
conçu comme indiqué dans ce guide.
• Ne placez pas les articles périssables de nourriture dans
votre appareil (pour example, les viandes et les
produits laitiers)
• Référez-vous aux instructions de nettoyage du fini de la
porte se trouvant au chapitre de Soins et nettoyage de
ce guide.
• Ne recouvrez pas ou n’obstruez aucune ouverture de
l’appareil.
• Cet appareil ne devrait être réparé que par du personnel
qualifié. Pour tout examen, réparation ou réglage,
contactez votre centre de service le plus rapproché.
• Cet appareil doit être mis à la terre. Dans l’éventualité
d’un court-circuit, la mise à la terre procure un chemin
direct decontournement du courant pour prévenir
l’électrocution des manipulateurs de l’appareil.
• Cet appareil est muni d’un cordon comprenant une fiche
et fil de mise à la terre.
• La fiche doit être branchée dans une prise correctement
installée et mise à la terre.
• Si les directives de mise à la terre ne sont pas tout à fait
comprises ou en cas de tout doute relatif à la mise à la
terre appropriée de l’appareil, faites appel à un
électricien ou à un technicien qualifié.
• Si la prise murale est une prise à 2 branches, c’est votre
obligation, et la responsabilité vous en incombe, de la
faire remplacer par une prise à trois branches
adéquatement mise à la terre.
• Pour un meilleur rendement et pour éviter que les
ampoules d’éclairage de la résidence soient affectées
d’un affaissement de tension, ou que le fusible ou
disjoncteur du circuit ne grille ou ne se déclenche,
dédiez un circuit individuel d’alimentation à la machine à
glaçons (prise (double) unique sur le circuit).
• Sous aucun prétexte il est permis de couper ou
d’enlever la troisième branche (mise à la terre) de la
fiche du cordon électrique.
• N’utilisez pas d’adaptateur de fiche avec cet appareil.
• N’utilisez pas de cordon de rallonge avec cet appareil.
Si le cordon électrique de l’appareil ne rejoint pas la
prise murale, faites installer une prise plus rapprochée
par un électricien ou un technicien qualifié.
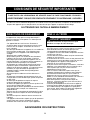
CONSIGNES DE SÉCURITÉ IMPORTANTES
DIRECTIVES DE RANGEMENT
MISE À LA TERRE
SAUVEGARDE CES INSTRUCTIONS
Un vidé unité est une attraction dangereuse aux enfants. Enlever les joints étanches, les loquets, les couvercles ou
les porte des appareils qui ne sont pas utiliser, ou faites de soit que l’appareil ne présente aucun danger.
N’ATTENDEZ PAS! FAITES-LE IMMEDIATEMENT!
14
L
ISEZ TOUTES LES INFORMATIONS DE SÉCURITÉ AVANT DE FAIRE FONCTIONNER L
’APPAREIL.
ADVERTISSEMENT: RISQUE DES DENFANTS DEVIENNENT COINCERADANS L’APPAREIL.
utilisation incorrecte de la prise de terre peut
entraîner un risque de choc électrique.
ADVERTISSEMENT

15
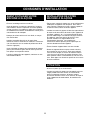
CONSIGNES D’INSTALLATION
AVANT D’UTILISER VOTRE
MACHINE À GLAÇONS
INSTALLATION DE VOTRE
MACHINE À GLAÇONS
• Enlevez l’emballage extérieur et intérieur.
• Avant de brancher la machine à glaçons sur la source
d’alimentation, laissez-la reposer à la verticale pendant
environ 2 heures. Cela réduira le risque que le système
de refroidissement subisse une défaillance causée par la
manutention lors du transport.
• Nettoyez la surface intérieure à l’eau tiède, au moyen
d’un chiffon doux.
• Installez la conduite d’arrivée et de sortie d’eau,
desserrez l’écrou et choisissez un mode sur le sélecteur.
(voir les directives sur les modes de performance de la
machine à glaçons)
• Avant l’utilisation, préparez deux contenants de glaçons
pleins, puis éliminez la glace afin de vérifier qu’elle est
bien propre et exempte de résidus.
• Lors de la vidange de votre appareil, choisissez un site
d’élimination autorisé.
• Placez votre machine à glaçons sur un sol suffisamment
solide pour la supporter une fois pleine. Pour mettre
votre machine à glaçons au niveau, ajustez la patte de
nivellement avant, située au bas de l’appareil.
• Installez la machine à glaçons à l’abri des rayons directs
du soleil et de toute source de chaleur (four, appareil de
chauffage, radiateur, etc.). Les rayons directs du soleil
peuvent endommager le revêtement acrylique extérieur
de l’appareil; quant aux sources de chaleur, elles
peuvent entraîner une augmentation de sa
consommation électrique. Les températures
extrêmement basses peuvent peuvent provoquer un
mauvais fonctionnement de l’appareil.
• Évitez d’installer l’appareil dans une zone humide.
• Branchez l’appareil dans une prise murale exclusive,
bien installée et mise à la terre. Sous aucun prétexte,
vous ne devez couper ou enlever la troisième broche
(mise à la terre) de la fiche du cordon électrique. Pour
toute question relative à l’alimentation ou à la mise à la
terre, faites appel à un électricien qualifié ou à un centre
de service autorisé.
ATTENTION
• N’ouvrez la porte qu’en cas de besoin.
• Lorsque la machine à glaçons est entreposée pour une
longue période sans être utilisée, on recommande,
après un nettoyage minutieux, de laisser la porte
ouverte afin de faire circuler l’air à l’intérieur, de façon à
éviter l’apparition de condensation, de moisissure ou
d’odeurs.

16
CONSIGNES D’INSTALLATION
Fig A.
Fig B.
Fig C.
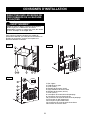
DIRECTIVES SUR LES MODES DE
PERFORMANCE DE LA MACHINE
À GLAÇONS
AVERTISSEMENT
Veuillez ne suivre les étapes ci-dessous que lorsque la
machine à glaçons est débranchée de la source
d’alimentation et qu’elle ne contient pas d’eau, afin d’éviter
les chocs électriques ou les dégâts d’eau.
Votre machine à glaçons comporte trois modes de
performance différents, que vous pouvez sélectionner en
fonction de vos besoins. Veuillez vous reporter aux
directives détaillées ci-dessous.
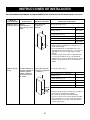
1. Bac à glace
2. Fond du bac à glace
3. Écrou (avant)
4. Rondelle de fermeture (avant)
5. Règle indicatrice de niveau d’eau
6. Rondelle de fermeture (arrière)
7. Écrou (arrière)
8. Interrupteur de la sortie d’eau de pompage
9. Connecteur du tuyau d’entrée d’eau
10. Connecteur du tuyau de sortie d’eau de pompage
11. Écrou pour le joint d’étanchéité
12. Écrou pour le joint d’étanchéité
13. Connecteur du tuyau de sortie d’eau directe
14. Extérieur du réservoir d’eau

17
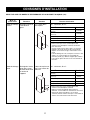
CONSIGNES D’INSTALLATION
DIRECTIVES SUR LES MODES DE PERFORMANCE DE LA MACHINE À GLAÇONS (suit)
Mode de
performance
Directives
Situation
Directive d’utilisation
Mode de drainage
manuel
Drainage manuel de
l’eau du bac à
glace.
Il n’y a aucun drain
dans la pièce.
Réf. : schémas A, B et C
Écrou et interrupteur
Condition
Écrou (avant) (3) + rondelle de fermeture
(avant) (4)
Écrou (arrière) (7) + rondelle de fermeture
(arrière) (6)
Écrou pour le joint d’étanchéité (11)
Écrou pour le joint d’étanchéité (12)
Interrupteur de sortie d’eau forcée (8)
Verrouillé
Verrouillé
Verrouillé
Verrouillé
Éteint
1. Assurez-vous que l’écrou et l’interrupteur sont
conformes à la description ci-dessus, afin d’éviter
toute fuite d’eau.
2. Vérifiez régulièrement le bac à glace (1) et la règle
indicatrice de niveau d’eau (5). Si le niveau d’eau
dépasse le niveau de la règle, veuillez vider l’excès
d’eau.
3. Lors du drainage de l’eau, vous pouvez enlever le bac
à glace (1), l’écrou (avant) (2) et la rondelle de
fermeture (avant) (4); utilisez le support pour éliminer
l’excès d’eau, puis resserrez l’écrou et la rondelle de
fermeture.
Mode de drainage
direct
Drainage de l’excès
d’eau par le tuyau
de sortie d’eau situé
à l’arrière de
l’appareil.
Le drain de la pièce est
situé à une hauteur de
<100 mm>
100 mm
Réf. : schémas A, B et C
Écrou et interrupteur
Condition
Écrou (avant) (3) + rondelle de fermeture
(avant) (4)
Écrou (arrière) (7) + rondelle de fermeture
(arrière) (6)
Écrou pour le joint d’étanchéité (11)
Écrou pour le joint d’étanchéité (12)
Interrupteur de sortie d’eau forcée (8)
Verrouillé
Ouvert
Verrouillé
Ouvert
Éteint
1. Assurez-vous que l’écrou et l’interrupteur sont
conformes à la description ci-dessus.
2. Utilisez un tuyau de drainage d’une longueur
suffisante, en raccordant une extrémité au connecteur
du tuyau de sortie d’eau directe (13) et l’autre
extrémité au drain. Assurez-vous que le raccordement
est bien serré, afin d’éviter toute fuite d’eau.

18
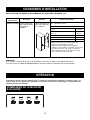
CONSIGNES D’INSTALLATION
DIRECTIVES SUR LES MODES DE PERFORMANCE DE LA MACHINE À GLAÇONS (suit)
OPÉRATION
Mode de
performance
Directives
Situation
Directive d’utilisation
Mode de pompage
Excès d’eau drainé
par la pompe située
à l’arrière de
l’appareil.
Le drain de la pièce est
situé à une hauteur de
101 à 1 500 mm.
Réf. : schémas A, B et C
Écrou et interrupteur
Condition
Écrou (avant) (3) + rondelle de fermeture
(avant) (4)
Écrou (arrière) (7) + rondelle de fermeture
(arrière) (6)
Écrou pour le joint d’étanchéité (11)
Écrou pour le joint d’étanchéité (12)
Interrupteur de sortie d’eau forcée (8)
Verrouillé
Ouvert
Verrouillé
Ouvert
Éteint
1. Assurez-vous que l’écrou et l’interrupteur sont
conformes à la description ci-dessus.
2. Utilisez un tuyau de drainage d’une longueur
suffisante, en raccordant une extrémité au connecteur
de sortie d’eau forcée (10) et l’autre extrémité au
drain. Assurez-vous que le raccordement est bien
serré, afin d’éviter toute fuite d’eau.
REMARQUE :
1. En enlevant le fond du bac à glace, vous obtiendrez un volume plus grand et une capacité plus élevée.
2. Si vous utilisez le « mode de drainage manuel »,la glace empêchera l’évacuation de l’eau de drainage.
La machine à glaçons doit être installée dans un endroit où la température ambiante est comprise entre 5 et
35°C (41 à 95 °F). Si la température ambiante est supérieure ou inférieure à cette plage, les performances de
l’appareil peuvent être affectées.
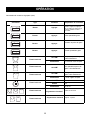
COMMANDES DE LA MACHINE
À GLAÇONS
Small
Med
Large
On/Off
La page est en cours de chargement...
La page est en cours de chargement...
La page est en cours de chargement...
La page est en cours de chargement...
La page est en cours de chargement...
La page est en cours de chargement...
La page est en cours de chargement...
La page est en cours de chargement...
La page est en cours de chargement...
La page est en cours de chargement...
La page est en cours de chargement...
La page est en cours de chargement...
La page est en cours de chargement...
La page est en cours de chargement...
La page est en cours de chargement...
La page est en cours de chargement...
La page est en cours de chargement...
La page est en cours de chargement...
La page est en cours de chargement...
La page est en cours de chargement...
La page est en cours de chargement...
La page est en cours de chargement...
-
 1
1
-
 2
2
-
 3
3
-
 4
4
-
 5
5
-
 6
6
-
 7
7
-
 8
8
-
 9
9
-
 10
10
-
 11
11
-
 12
12
-
 13
13
-
 14
14
-
 15
15
-
 16
16
-
 17
17
-
 18
18
-
 19
19
-
 20
20
-
 21
21
-
 22
22
-
 23
23
-
 24
24
-
 25
25
-
 26
26
-
 27
27
-
 28
28
-
 29
29
-
 30
30
-
 31
31
-
 32
32
-
 33
33
-
 34
34
-
 35
35
-
 36
36
-
 37
37
-
 38
38
-
 39
39
-
 40
40
-
 41
41
-
 42
42


Danby Silhouette Select DIM3225BLSST Owner's Use And Care Manual
- Taper
- Owner's Use And Care Manual
dans d''autres langues
- English: Danby Silhouette Select DIM3225BLSST
- español: Danby Silhouette Select DIM3225BLSST