Maytag 4GMVWC100YQ0 Mode d'emploi
- Catégorie
- Machines à laver
- Taper
- Mode d'emploi
Ce manuel convient également à

TOP=LOADING WASHER
USE AND CARE GUIDE
GUIDE D'UTILISATION ET D'ENTRETIEN
DU LAVE-LINGE A CHARGEMENT PAR LE DESSUS
LAVADORA DE CARGA SUPERIOR
MANUAL DE USO Y CUIDADO
Table of Contents
WASHER SAFETY ............................................................................................ 2
WHAT'S NEW UNDER THE LiD ...................................................................... 3
SPECI FICATIONS ............................................................................................ 3
CONTROL PANEL AND FEATURES ............................................................... 4
CYCLE GUIDE .................................................................................................. 5
USING YOUR WASHER ................................................................................... 6
WASHER MAINTENANCE ............................................................................... 9
TROUBLESHOOTING .................................................................................... 11
Table des mati_res
SECURITE DU LAVE-LINGE .......................................................................... 16
OUOI DE NEUF SOUS LE COUVERCLE? .................................................... 17
SPECiFiCATiONS .......................................................................................... 17
TABLEAU DE COMMANDE ET CARACTERISTIQUES ................................ 18
GUIDE DE PROGRAMMES ........................................................................... 19
UTILISATION DU LAVE=LINGE ..................................................................... 20
ENTRETIEN DU LAVE-LINGE ....................................................................... 23
DEPANNAGE .................................................................................................. 25
indice
SEGURIDAD DE LA LAVADORA .................................................................... 30
_.QUI_ HAY DE NUEVO DEBAJO DE LA TAPA? ............................................ 32
ESPECIFICACIONES ...................................................................................... 32
PANEL DE CONTROL Y CARACTER|STICAS .............................................. 33
GUIA DE CICLOS ............................................................................................ 34
USO DE SU LAVADORA ................................................................................. 35
MANTENIMIENTO DE LA LAVADORA .......................................................... 38
SOLUCION DE PROBLEMAS ......................................................................... 40
W10549305A 4GMVWC100
4GMVWC300

WASHER SAFETY
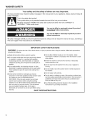
Your safety and the safety of others are very important.
We have provided many important safety messages in this manual and on your appliance. Always read and obey all
safety messages.
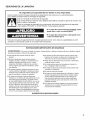
This is the safety alert symbol.
This symbol alerts you to potential hazards that can kill or hurt you and others.
All safety messages will follow the safety alert symbol and either the word "DANGER" or
"WARNING." These words mean:
You can be killed or seriously injured if you don't
immediately follow instructions.
You can be killed or seriously injured if you don't
follow instructions.
All safety messages will tell you what the potential hazard is, tell you how to reduce the chance of injury, and tell you
what can happen ifthe instructionsare not followed.
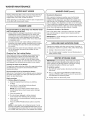
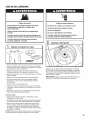
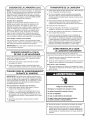
iMPORTANT SAFETY iNSTRUCTiONS
WARNING: To reduce the risk of fire, electric shock, or injury to persons when using the washer, follow basic precautions,
including the following:
[] Read all instructions before using the washer.
[] Do not wash articles that have been previously cleaned
in, washed in, soaked in, or spotted with gasoline,
dry=cleaning solvents, other flammable, or explosive
substances as they give off vapors that could ignite or
explode.
[] Do not add gasoline, dry=cleaning solvents, or other
flammable, or explosive substances to the wash water.
These substances give off vapors that could ignite or
explode.
[] Under certain conditions, hydrogen gas may be
produced in a hot water system that has not been used
for 2 weeks or more. HYDROGEN GAS iS
EXPLOSIVE. if the hot water system has not been
used for such a period, before using the washing
machine, turn on all hot water faucets and let the water
flow from each for several minutes. This will release
any accumulated hydrogen gas. As the gas is
flammable, do not smoke or use an open flame during
[]
[]
Do not allow children to play on or in the washer. Close
supervision of children is necessary when the washer is used
near children.
Before the washer is removed from service or discarded,
remove the door or lid.
[] Do not reach into the washer if the drum, tub or agitator is
moving.
[] Do not install or store the washer where it will be exposed to
the weather.
[] Do not tamper with controls.
[] Do not repair or replace any part of the washer or attempt any
servicing unless specifically recommended in this manual or in
published user-repair instructions that you understand and
have the skills to carry out.
[] See "Electrical Requirements" located in the installation
instructionsfor grounding instructions.
this time.
SAVE THESE iNSTRUCTiONS
2

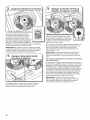
WHAT'S NEW UNDER THE LiD?
Your new washer will operate differently than your past agitator-style washer.
lidLockedLid Lock ¢1111
-,_ i|
To allow for higher spin speeds, the lid will lock and the
Lid Locked light will turn on. When this light is lit, the lid is
locked and cannot be opened. When this light is blinking,
the washer is paused. When this light is off, the lid can
be opened. If you need to open the lid to add a garment
after this point, you must press START/PAUSE/UNLOCK
and wait for the lid to unlock. The lid will only unlock after
washer movement has stopped. Depending on when in
the cycle you try to pause, it may take several seconds to
several minutes for the lid to unlock.
Sounds
At different stages of the wash cycle, you may hear
sounds and pauses that are different from those of your
previous washer. For example, you may hear a clicking
and hum at the beginning of the cycle as the lid lock goes
through a
self-test. There will be different kinds of humming and
whirring sounds as the agitator tests for load balance or
moves the load. And, sometimes, you may hear nothing
at all as the washer allows time for clothes to soak.
Sensing
This washer will perform a series of spins to check
for load balance. When a load is started, it may take 2-3
minutes before water begins to enter the basket. During
this time, a series of clicks and a whirring noise signal
that sensing technology is determining if there is an off-
balance load.
Spray Rinse
Select cycles default to a spray rinse. During these cycles,
you will hear water enter the washer as the tub spins,
allowing the rinse water to penetrate clothes. Check the
"Cycle Guide" for details.
IMPORTANI"."
=After the washer basket fills to the selected water level, the lid must be closed before the wash cycle can start.
If filling stops with the lid open, close lid and press START button.
• Fabric Softener option must be selected to ensure fabric softener dispenses at the correct time.
NOTE: Fabric Softener dispenser not available on all models.
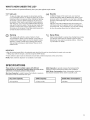
SPECIFICATIONS
These units are sold in multiple regions with different
requirements for measuring capacity. Below are a few of the
valid forms of measure posted on this product:
Dry Linen Capacity: A weight measure that reflects a maximum
load size that can be leaded into the dryer.
SASO Capacity: A capacity measure that represents the
capacity at which performance testing was completed.
SASO Water Consumption: Water consumption which the
manufacturer declares will be used in aspecific cycle.
Dry Linen Capacity
10,5 kg (23 Ib)
]
J
SASO Capacity
6,5 kg (14,3 Ib)
]
i
SASO Water Consumption
160 litres
]
J
3

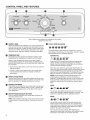
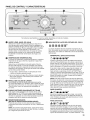
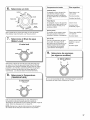
CONTROL PANEL AND FEATURES
O
O
O
O
O
4
Not all features and options are available on all models.
Appearance may vary.
WATER LEVEL
Select the setting most suitable for your load. Small will add
a low amount of water for smaller loads and Super Plus will
add the most amount of water for large or bulky loads. Items
need to move freely. Tightly packing can lead to poor clean-
ing performance, and may increase wrinkling and tangling.
TEMPERATURE
Temperature Control senses and maintains uniform water
temperatures by regulating incoming hot and cold water.
Select a wash temperature based on the type of fabric
and soils being washed. For best results and following the
garment label instructions, use the warmest wash water safe
for your fabric.
* Warm and hot water will be cooler than what your previous
washer provided.
* Even in a cold and cool water wash, some warm water
may be added to the washer to maintain a minimum
temperature.
WASH CYCLE KNOB
Use the Wash Cycle knob to select available cycles on your
washer. Turn the knob to select a cycle for your laundry load.
See "Cycle Guide" for detailed descriptions of cycles.
FABRIC SOFTENER
This option can be added to most cycles and must be set to
"YES" if using fabric softener during a cycle. It ensures that
fabric softener is added at the correct time in the rinse for
even distribution.
START/PAUSE/UNLOCK BUTTON
Press to start the selected cycle; press again to pause the
cycle and unlock the lid.
NOTE: Ifthe washer is spinning, it may take several minutes
to unlock the lid. Press and hold for 3 seconds to cancel a
cycle.
O CYCLE STATUS LIGHTS
fill wash rinse spin done [idlocked
The Cycle Status Lights show the progress of a cycle. At
each stage of the process, you may notice sounds or pauses
that are different from traditional washers.
SENSING/FILL
flu wash rinse spin done lid locked
When the START/Pause/Unlock button is pressed, the
washer will fill to the selected water level. If the lid is
closed when the machine is done filling, the lid will lock
and the machine will begin operation.
If the lid is open when the water stops entering the ma-
chine, the cycle will not begin until the lid has been closed
and the START/Pause/Unlock button is pressed. If the
cycle has not been started within 10 minutes of the water
filling the washer, the washer will pump out the water.
NOTE: Avoid opening lid during sensing phase. The
sensing process will start over when the washer is
restarted. The sensing light may also come on during the
Soak and Wash portions of the cycle. This is normal. To
restart the washer after the lid has been opened, press
Start.
WASH
flu wash rinse spin done iidlocked
You will hear the agitator moving the load. The motor
sounds may change at different stages in the cycle. The
wash time is determined by the selected soil level.
RINSE
fill wash rinse spin done lidlocked
You will hear sounds similar to the wash cycle as the
washer rinses and moves the load. You may hear the
motor turning on briefly (short hum) to move the basket
while filling. Fabric softener will be added if the Fabric
Softener-Yes option was selected.
Some cycles use spray rinsing. After draining and
spinning out wash water, the washer will continue to spin
and spray in rinse water for the entire rinse time.

SPiN
flU wash rinse spin done lid locked
The washer spins the load at increasing speeds for
proper water removal, based on the selected cycle and
spin speed.
DONE
fill wash rinse spin done lid locked
Once the cycle is complete, this light will come on.
Remove the load promptly for best results,
LID LOCKED
flu wash rinse spin done lid locked
To allow for higher spin speeds, the lid will lock and the
Lid Locked light will turn on. When this light is lit, the
lid is locked and cannot be opened. When this light is
blinking, the washer is paused. When this light is off,
the lid can be opened.
If you need to open the lid, press
START/Pause/Unlock. The lid will
unlock once the washer movement
has stopped. This may take several
minutes if the load was spinning at
high speed. Press START/Pause/
Unlock again to resume the cycle.
start
_auseiunlock
O ho/d3sec.
tocance!
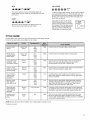
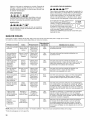
CYCLE GUIDE
For best fabric care, choose the cycle that best fits the load being washed.
Not all cycles and options are available on all models.
Heavily soiled
fabrics
Heavy Duty
Heavy
Hot
Warm
Cool
Cold
High Use this cycle for heavily soiled or sturdy items.
Sturdy fabrics, Heavy Duty Hot High Use this cycle for normally soiled or sturdy items.
colorfast items, Regular Warm
towels, jeans Cool
Cold
Large items such
as sheets, small
comforters, jackets
Cottons, linens,
sheets, and mixed
garment loads
No-iron fabrics,
cottons, perm
press, linens,
synthetics
Machine-wash
silks, lingerie,
washable wools
Swimsuits and
items requiring
rinsing without
detergent
Dripping wet or
hand-washed
items
k.
Normal
Heavy
Normal
Regular
Casual
Delicate
Rinse &
Spin
Drain &
Spin
Cold
Hot
Warm
Cool
Cold
Hot
Warm
Cool
Cold
Hot
Warm
Cool
Cold
Hot
Warm
Cool
Cold
rinse
N/A
only
High
High
Low
Low
High
High
Use this cycle for heavily soiled cottons or mixed fabric
loads. This cycle uses spray rinses only and is the
recommended cycle for use in washer care.
Use this cycle for normally soiled cottons and mixed fabric
loads. This cycle features a spray rinse.
Use this cycle to wash loads of no-iron fabrics such as
sport shirts, blouses, casual business clothes, permanent
press, and blends.
Use this cycle to wash lightly soiled garments indicating
"Machine Washable Silks" or "Gentle" cycle on the care
label. Place small items in mesh garment bags before
washing. This cycle features a spray rinse.
Combines a rinse and high speed spin for loads requiring
an additional rinse cycle or to complete a load after power
interruption. Also use for loads that require rinsing only.
This cycle uses a spin to shorten drying times for heavy
fabrics or special-care items washed by hand. Use this
cycle to drain washer after cancelling a cycle or completing
a cycle after a power failure, j
NOTE: Be sure to select Fabric Softener-Yes, if adding fabric softener to load.
*All rinses are cold.
5

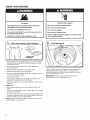
USING YOUR WASHER
Fire Hazard
Never place items in the washer that are dampened
with gasoline or other flammable fluids.
No washer can completely remove oil.
Do not dry anything that has ever had any type of oil on
it (including cooking oils).
Doing so can result in death, explosion, or fire.
"1, Sort and prepare your laundry
%,.... _,
• Empty pockets. Loose change, buttons, or any small object
can pass under the agitator and become trapped, causing
unexpected sounds.
• Sort items by recommended cycle, water temperature,
and colorfastness.
• Separate heavily soiled items from lightly soiled.
• Separate delicate items from sturdy fabrics.
• Do not dry garments if stains remain after washing, because
heat can set stains into fabric.
• Treat stains promptly.
• Close zippers, fasten hooks, tie strings and sashes, and
remove non-washable trim and ornaments.
• Mend rips and tears to avoid further damage to items during
washing.
Helpful Tips:
• When washing water-proof or water-resistant items, load
evenly.
• Use mesh garment bags to help avoid tangling when washing
delicate or small items.
• Turn knits inside out to avoid pilling. Separate lint-takers from
lint-givers. Synthetics, knits, and corduroy fabrics will pick up
lint from towels, rugs, and chenille fabrics.
NOTE: Always read and follow fabric care label instructions to
avoid damage to your garments.
Electrical Shock Hazard
Plug into a grounded (earthed) outlet.
Do not remove ground prong.
Do not use an adapter.
Do not use an extension cord.
Failure to follow these instructions can result in death,
fire, or electrical shock.
Add detergent
Add a measured amount of detergent into the bottom of the
washer basket before adding clothes. If using an Oxi or
color-safe bleach laundry boost product, add to the bottom
of the washer basket, as well.
iMPORTANT: Follow the manufacturer's instructions to
determine the amount of detergent to use.
6

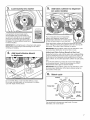
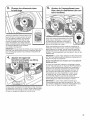
Load laundry into washer
Load garments in loose heaps evenly
around basket wall. For best results, do
not pack the load tightly. Do not wrap large
items such as sheets around the agitator;
load them in loose piles around the sides of
the basket. Try mixing different sized items
to reduce tangling.
iMPORTANT: Do not tightly pack or force items into washer.
Items need to move freely for best cleaning and to reduce
wrinkling and tangling.
Add liquid chlorine bleach
to dispenser
Do not overfill, dilute, or use more than 236 mL (1 cup).
Do not use color-safe bleach or Oxi products in the same
cycle with liquid chlorine bleach.
Add fabric softener to dispenser
(on some models)
Pour a measured amount of liquid fabric
softener into dispenser; always follow
manufacturer's directions for correct amount
of fabric softener based on your load size.
Dilute liquid fabric softener by filling the dispenser with warm
water until liquid reaches the underside of the rim. See max fill
line arrows. Then select Fabric Softener-Yes option.
iMPORTANT: Fabric Softener option must be selected to "Yes"
to ensure proper distribution at correct time in cycle.
Adding Liquid Fabric Softener Manually to Wash Load
During the final rinse, wait until the washer has completed filling,
press the START/Pause/Unlock button to pause the washer. Lift
the lid and add the measured recommended amount of liquid
fabric softener. Do not allow liquid fabric softener to spill, splash,
drip,
or run into the basket or on load. Do not use more than the
recommended amount. Close the lid and press the START/
Pause/Unlock button again to start the washer.
iMPORTANT: Fabric Softener option must be selected to "Yes"
to ensure proper distribution of the fabric softener during the
rinse portion of the cycle.
Turn cycle knob to choose your wash cycle. For more
information, see "Cycle Guide".
7

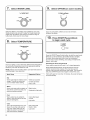
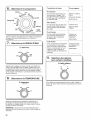
7, Select WATER LEVEL
Y- water level
medium
super
plus
Select the Water Level setting most suitable for your load.
Small will add a low amount of water for smaller loads and
Super Plus will add the most amount of water for large or
bulky loads. Items need to move freely.
8= Select TEMPERATURE
temperature
all coldrinses
cool warm
hot
Once you select a cycle, select the desired wash temperature
by turning the Temperature knob to the appropriate setting
based on your load. All rinses are cold.
NOTE: Always read and follow fabric care label instructions to
avoid damage to your garments.
Not ::
Some cold water is added to save ::iWhites and pastels
energy. This will be cooler than ::iDurable garments
your hot water heater setting. Heavy soils
Warm
Some cold water will be added, so
this will be cooler than what your
Cool
Warm water may be added to
assist in soil removal and to help
dissolve detergents.
Bright colors
Moderate to light soils
Colors that bleed
or fade
9, Select OPTION (on some models)
U fabric softener
added
o I
no yes
If you are using fabric softener, be sure to set Fabric
Softener-Yes option.
O, Press START/Pause/Unlock
to begin wash cycle
I>start
pause/unlock
O holdJsec.
to cQncel
Press the START/Pause/Unlock button to start the wash cycle.
When the cycle has finished, the DONE indicator will light.
Promptly remove garments after cycle has completed
to avoid odor, reduce wrinkling, and rusting of metal hooks,
zippers, and snaps.
Unlocking the lid to add garments
If you need to open the lid to add 1 or 2 missed garments:
Press START/Pause/Unlock; the lid will unlock once the
washer movement has stopped. This may take several
minutes if the load was spinning at high speed. Then close lid
and press START/Pause/Unlock again to restart the cycle.
If lid is left open for more than 10 minutes, the water will pump
out automatically.
Cold
This is the temperature from your Dark colors that
faucet. If your tap cold water is bleed or fade
very cold, warm water may be Light soils
added to assist in soil removal
and help dissolve detergent.
8

WASH ER MAINTENANCE
WATER iNLET HOSES
Replace inlet hoses after 5 years of use to reduce the risk of
hose failure. Periodically inspect and replace inlet hoses if
bulges, kinks, cuts, wear, or leaks are found.
When replacing your inlet hoses, mark the date of replacement
on the label with a permanent marker.
f
WASHER CARE
Recommendations to Help Keep Your Washer Clean
and Performing at its Best
1. Always follow the detergent manufacturer's instructions
regarding the amount of detergent to use. Never use
more than the recommended amount because that may
increase the rate at which detergent and soil residue
accumulate inside your washer, which in turn may result
in undesirable odor.
2. Use warm and hot wash water settings sometimes (not
exclusively cold water washes), because they do a better
job of controlling the rate at which soils and detergent
accumulate.
3. Always leave the washer lid open between uses to help
dry out the washer and prevent the buildup of odor-
causing residue.
Cleaning Your Top Loading Washer
Read these instructions completely before beginning the
routine cleaning processes recommended below. This
Washer Maintenance Procedure should be performed,
at a minimum, once per month or every 30 wash cycles,
whichever occurs sooner, to control the rate at which soils
and detergent may otherwise accumulate in your washer.
Cleaning the inside of the Washer
To keep your washer odor-free, follow the usage instructions
provided above, and use this recommended monthly
cleaning procedure:
Recommended Cycle for Cleaning the Washer
Refer to the "Cycle Guide" for the optimal cycle for cleaning
the inside of the washer. Use this cycle with liquid chlorine
bleach as described below.
Begin procedure
1. Chlorine Bleach Procedure:
a. Open the washer lid and remove any clothing
or items.
b. Add 236 mL (1 cup) of liquid chlorine bleach
to the bleach compartment.
NOTE: Use of more liquid chlorine bleach than is
recommended above could cause washer damage
over time.
c. Close the washer lid.
d. Do not add any detergent or other chemical
to the washer when following this procedure.
e. Select the cycle recommended for cleaning the inside
of the washer.
f. Press the START/PAUSE/Unlock button to start the
cycle.
NOTE: For best results, do not interrupt cycle. If cycle
must be interrupted, press START/PAUSE/Unlock once or
twice [depending on model]. After the cycle has stopped,
run a RINSE and SPIN cycle to rinse cleaner from washer.
f
WASHER CARE (cont.)
Cleaning the Dispensers
After a period of using your washer, you may find some
residue buildup in the washer's dispensers. To remove
residue from the dispensers, wipe them with a damp cloth
and towel dry. Do not attempt to remove the dispensers or
trim for cleaning. The dispensers and trim are not removable.
If your model has a dispenser drawer, however, remove the
drawer and clean it before or after you run the Clean Washer
cycle. Use an all-purpose surface cleaner, if needed.
Cleaning the Outside of the Washer
Use a soft, damp cloth or sponge to wipe away any spills.
Use only mild soaps or cleaners when cleaning external
washer surfaces.
IMPORTANT: To avoid damaging the washer's finish, do not
use abrasive products.
NON=USE AND VACATION CARE
Operate your washer only when you are home. If moving, or
not using your washer for a period of time, follow these steps:
1. Unplug or disconnect power to washer.
2. Turn off water supply to washer, to avoid flooding due to
water pressure surge.
r WINTER STORAGE CARE
iMPORTANT: To avoid damage, install and store washer
where it will not freeze. Because some water may stay in
hoses, freezing can damage washer. If storing or moving
during freezing weather, winterize your washer.
To winterize washer:
1. Shut off both water faucets; disconnect and drain water
inlet hoses.
2=
Put 1 L (1 qt.) of R.V.-type antifreeze in basket and run
washer on RINSE & SPIN cycle for about 30 seconds to
mix antifreeze and remaining water.
3. Unplug washer or disconnect power.
9

TRANSPORTING YOUR WASHER
1. Shut off both water faucets. Disconnect and drain water
inlet hoses.
2. Ifwasher will be moved during freezing weather, follow
Winter Storage Care directions before moving.
3. Disconnect drain from drain system and drain any remain-
ing water into a pan or bucket. Disconnect drain hose from
back of washer.
4. Unplug power cord.
5. Place inlet hoses and drain hose inside washer basket.
6. Drape power cord over edge and into washer basket.
7. Place packing tray from original shipping materials back
inside washer. If you do not have packing tray, place heavy
blankets or towels into basket opening. Close lid and place
tape over lid and down front of washer. Keep lid taped until
washer is placed in new location.
f
RE! NSTALL! NG/USI NG WASH ER AGAI N
To reinstall washer after non-use, vacation, winter storage,
or moving:
1. Refer to "Installation Instructions" to locate, level, and
connect washer.
2. Before using again, run washer through the following
recommended procedure:
To use washer again:
1. Flush water pipes and hoses. Reconnect water inlet hoses.
Turn on both water faucets.
Electrical Shock Hazard
Plug into a grounded (earthed) outlet.
Do not remove ground prong.
Do not use an adapter.
Do not use an extension cord,
Failure to follow these instructions can result in death,
fire, or electrical shock.
2. Plug in washer or reconnect power.
3. Run washer through Casual cycle to clean washer and
remove antifreeze, if used. Use half the manufacturer's
recommended amount of detergent for a medium-size load.
10

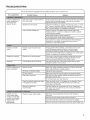
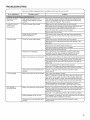
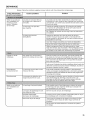
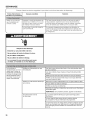
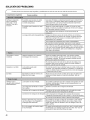
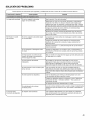
TROUBLESHOOTING
First try the solutions suggested here to possibly avoid the cost of a service call.
if you experience Possible Causes
Check the following for Feet may not be in contact with the
proper installation or floor and locked.
see "Using Your
Washer" section Washer may not be level.
Clicking or metallic
noises
Gurgling or humming
Load could be unbalanced.
Objects caught in washer drain
system.
Washer may be draining water.
Solution
Front and rear feet must be in firm contact with floor, and washer
must be level to operate properly. Jam nuts must be tight
against the bottom of the cabinet.
Check floor for flexing or sagging. If flooring is uneven, a 19 mm
(3/4") piece of plywood under your washer will reduce sound.
See "Level the Washer" in Installation Instructions.
Load dry items in loose heaps evenly around basket wall.
Adding wet items to washer or adding more water to basket
could unbalance washer.
Wash smaller loads to reduce imbalance.
Do not tightly pack. Avoid washing single items.
Use Super Plus or Large water level and the Normal Regular
cycle and for oversized, non-absorbent items such as
comforters or poly-filled jackets.
Empty pockets before washing. Loose items such as coins
could fall between basket and tub or may block pump.
It may be necessary to call for service to remove items.
It is normal to hear metal items on clothing such as metal snaps,
buckles, or zippers touch against the basket.
It is normal to hear the pump making a continuous humming
sound with periodic gurgling or surging as final amounts of
water are removed during the Drain & Spin cycles.
Humming Load sensing may be occurring. You may hear the hum of the sensing spins after you have
started the washer. This is normal.
Check the following for Washer not level. Water may splash off basket if washer is not level. Check that
proper installation: load is not unbalanced or tightly packed.
Fill hoses not attached tightly.
Fill hose washers.
Drain hose connection.
Check household plumbing for leaks
or clogged sink or drain.
Washer not loaded as
recommended.
Check for proper water supply.
Washer won't run
or fill, washer stops
working or wash light
remains on (indicating
that the washer was
unable to fill
_,appropriately)
Tighten fill-hose connection.
Make sure all four fill hose flat washers are properly seated.
Pull drain hose from washer cabinet and properly secure it to
drainpipe or laundry tub.
Do not place tape over drain opening.
Water can back up out of a clogged sink or drainpipe. Check
all household plumbing for leaks (laundry tubs, drain pipe,
water pipes, and faucets.)
Improper loading can cause basket to be out of alignment
and cause water to splash off tub. See "Using Your Washer"
for loading instructions.
Both hoses must be attached and have water flowing to
inlet valve.
Both hot and cold water faucets must be turned on.
Check that inlet valve screens have not become clogged.
Check for any kinks in inlet hoses, which can restrict water flow.,
J
11

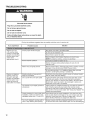
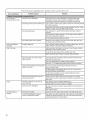
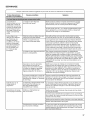
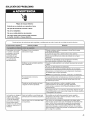
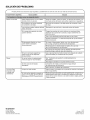
TROUBLESHOOTING
Electrical Shock Hazard
Plug into a grounded (earthed) outlet.
Do not remove ground prong.
Do not use an adapter.
Do not use an extension cord.
Failure to follow these instructions can result in death,
fire, or electrical shock.
First try the solutions suggested here to possibly avoid the cost of a service call.
if you experience
Washer won't run
or fill, washer stops
working or wash light
remains on (indicating
that the washer was
unable to fill
appropriately) (cont.)
Washer not draining/
spinning, loads are
still wet or spin light
remains on (indicating
that the washer was
unable to pump out
water within 10 minutes
Check proper electrical supply.
Normal washer operation.
Washer may be tightly packed.
Empty pockets and use garment
bags for small items.
Use a cycle with a low spin speed.
The washer may be tightly packed or
unbalanced.
Check plumbing for correct drain hose
installation. Drain hose extends into
standpipe farther than 114 mm (4.5").
Plug power cord into a grounded outlet.
Do not use an extension cord.
Ensure there is power to outlet.
Reset a tripped circuit breaker. Replace any blown fuses.
NOTE: If problems continue, contact an electrician.
Lid must be closed for washer to run.
Washer will pause during certain phases of cycle. Do not
interrupt cycle.
Remove several items, rearrange load evenly in basket, and add
detergent. Close lid and press START/Pause/Unlock.
Do not add more than 1 or 2 additional items after cycle has
started to avoid tightly packing or unbalancing.
Small items may have been caught in pump or between basket
and tub, which can slow draining.
Cycles with lower spin speeds remove less water than cycles
with high spin speeds. Use the recommended cycle/speed
spin for your garment. To remove extra water in the load, select
Drain & Spin. Load may need to be rearranged to allow even
distribution of the load in the basket.
Tightly packed or unbalanced loads may not allow the washer to
spin correctly, leaving the load wetter than normal. Evenly
arrange the wet load for balanced spinning. Select the Drain &
Spin cycle to remove excess water. See "Using Your Washer" for
loading recommendations.
Check drain hose for proper installation. Use drain hose form
and securely attach to drainpipe or tub. Do not tape over drain
opening. Lower drain hose if the end is higher than 1.25 m (4')
above the floor. Remove any clogs from drain hose.
Too much detergent causing suds to Always measure and follow detergent directions for your load.
slow or stop draining and spinning. To remove extra suds, select Rinse & Spin. Do not add detergent.
k. .J
12

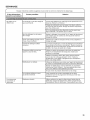
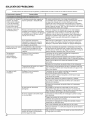
TROUBLESHOOTING
if you experience
First try the solutions suggested here to possibly avoid the cost of a service call.
j Possible causes Solution
Dry spots on load High speed spins extract more
after cycle moisture than traditional top-load
washers.
Check for proper water supply.Incorrect or wrong
wash or rinse
temperatures
Energy saving controlled
wash temperatures.
Load not rinsed Check for proper water supply. Make sure hot and cold inlet hoses are not reversed.
Using too much detergent.
Washer not loaded as recommended.
The high spin speeds combined with air flow during the final
spin can cause items near the top of the load to develop dry
spots during the final spin. This is normal.
Make sure hot and cold inlet hoses are not reversed.
Both hoses must be attached to both washer and faucet, and
have both hot and cold water flowing to inlet valve.
Check that inlet valve screens are not clogged.
Remove any kinks in hoses.
This washer uses cooler wash and rinse water temperatures
than your previous washer. This includes cooler hot and warm
washes.
Both hoses must be attached and have water flowing to the
inlet valve.
Both hot and cold water faucets must be on.
Inlet valve screens on washer may be clogged.
Remove any kinks in the inlet hose.
The suds from too much detergent can keep washer from
operating correctly. Always measure detergent and follow
detergent directions based on load size and soil level.
The washer is less efficient at rinsing when load is tightly packed.
Load garments in loose heaps evenly around the basket wall.
The washer will not rinse well if tightly packed. Load with dry
items only.
Use cycle designed for the fabrics being washed.
Add only 1 or 2 additional garments after washer has started.
Using too low a load size/water level Choose a load size (water level) that matches the load
selection, being washed.
Load is tangling Washer not loaded as recommended. See "Using Your Washer" section.
Washer not loaded as recommended.
Not cleaning or
removing stains
Adding detergent on top of load.
Select a cycle with a slower wash action and spin speed; how-
ever, items will be wetter than those using a higher speed spin.
See the "Cycle Guide" to match your load with the best cycle.
Load garments in loose heaps evenly around the basket wall.
Reduce tangling by mixing types of load items. Use the
recommended cycle for the type of garments being washed.
Washer is less efficient at cleaning when load is tightly packed.
Load garments in loose heaps evenly around the basket wall.
Load with dry items only.
Add only 1 or 2 additional garments after washer has started.
Add detergent, oxi products, and color-safe bleach to the bottom
of the basket before adding the load items.
Using too low a load size/water level Choose a load size (water level) that matches the load
k_ selection, being washed, j
13

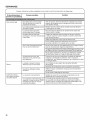
if you experience
First try the solutions suggested here to possibly avoid the cost of a service call.
Possible Causes Solution
Not cleaning or Using too much detergent. The suds from too much detergent can keep washer from
removing stains (cont.) operating correctly. Always measure detergent and follow
manufacturer's directions based on load size and soil level.
Not using correct cycle for fabric type. Use a higher soil level cycle option and warmer wash temperature
to improve cleaning.
Not using dispensers.
Not washing like colors together.
Use Heavy Duty-Heavy cycle for tough cleaning. See the "Cycle
Guide" to match your load with the best cycle.
Use dispensers to avoid chlorine bleach and fabric softener
staining.
Load dispensers before starting a cycle. Select Fabric Softener-
Yes when using fabric softener.
Do not add products directly onto load.
Wash like colors together and remove promptly after the cycle
is complete to avoid dye transfer.
Incorrect dispenser Clogged dispenser. Use only liquid chlorine bleach in the bleach dispenser. Use only
operation fabric softener in the fabric softener dispenser.
Fabric damage Empty pockets, zip zippers, and snap or hook fasteners before
washing to avoid snags and tears.
Tie all strings and straps before starting wash load.
Mend rips and broken threads in seams before washing.
Fabric damage can occur if load is
tightly packed.
Liquid chlorine bleach may have been
added incorrectly.
Garment care instructions may not
have been followed.
Odors Monthly maintenance not done as
recommended.
Using too much detergent.
Load garments in loose heaps evenly around the basket wall.
Load with dry items only.
Use cycle designed for the fabrics being washed.
Add only 1 or 2 additional garments after washer has started.
Do not pour liquid chlorine bleach directly onto load.
Wipe up bleach spills.
Undiluted bleach will damage fabrics. Do not use more than
recommended by manufacturer.
Do not place load items on top of bleach dispenser when
loading and unloading washer.
Always read and follow garment manufacturer's care label
instructions. See the "Cycle Guide" to match your load with the
best cycle.
See "Washer Care" in Washer Maintenance.
Unload washer as soon as cycle is complete.
Be sure to measure correctly. Always follow the manufacturer's
directions.
See "Washer Care".
Lid locked light is The lid is not closed. Close the lid. The washer will not start or fill with the lid open.
flashing A cycle was stopped or paused The washer may still be spinning. The lid will not unlock until the
using the Start/Pause button, basket has stopped spinning. This may take several minutes if
k,, washing large loads or heaw fabrics, j
14

NOTES
15

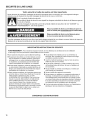
SECURITE DU LAVE-LINGE
Votre s6curit6 et celle des autres est tr_s importante,
Nous donnons de nombreux messages de s6curit6 importants dans ce manuel et sur votre appareil m6nager.
Assurez-vous de toujours lire tousles messages de s6curit6 et de vous y conformer.
Voici le symbole d'alerte de securit6.
Ce symbole d'alerte de s6curit6 vous signale les dangers potentiels de d6c_s et de blessures graves
vous eta d'autres.
Tousles messages de s6curit6 suivront le symbole d'alerte de securit6 et le mot "DANGER" ou
"AVERTISSEMENT". Ces mots signifient :
Risque possible de d_c_s ou de blessure grave si
vous ne suivez pas imm_diatement les instructions,
Risque possible de d_c_s ou de blessure grave
si vous ne suivez pas les instructions.
Tousles messages de s6curit6 vous diront quel est le danger potentiel et vous disent comment r6duire le risque de
blessure et ce qui peut se produire en cas de non-respect des instructions.
IMPORTANTES iNSTRUCTiONS DE SECURITE
AVERTISSEMENT : Pour r6duire les risques d'incendie, de choc electrique ou de blessures Iors de I'utilisation
du lave-linge, suivre les pr6cautions fondamentales dont les suivantes :
I Lire toutes les instructions avant d'utiliser le lave=linge.
I Ne pas laver des articles qui ont 6t6 nettoy6s ou laves
avec de I'essence ou imbib6s d'essence, solvants de
nettoyage & sec, ou autres substances inflammables
ou explosives; ces substances peuvent emettre des
vapeurs susceptibles de s'enflammer ou d'exploser.
[] Ne pas ajouter d'essence, solvant de nettoyage &sec
ou autre produit inflammable ou explosif dans I'eau de
lavage. Ces substances peuvent 6mettre des vapeurs
susceptibles de s'enflammer ou d'exploser.
[] Darts certaines conditions, de I'hydrog_ne gazeux peut
se former dans un circuit d'eau chaude qui n'a pas et6
utilise pendant 2 semaines ou plus. LE GAZ
HYDROGENE EST EXPLOSIBLE. Si le circuit d'eau
chaude n'a pas et6 utilise pendant une telle periode,
avant d'utiliser la laveuse, ouvrir tous les robinets
d'eau chaude et laisser I'eau s'6couler pendant
plusieurs minutes par chaque robinet. Ceci permettra
I'evacuation de I'hydrogene gazeux accumule. Comme
ce gaz est inflammable, ne pas fumer ou utiliser une
flamme nue au cours de cette periode.
[] Ne pas laisser des enfants jouer sur ou & I'int6rieur du
lave=linge. Bien surveiller les enfants Iorsque le lave=linge
est utilis6 & proximit6 d'enfants.
[] Avant de mettre le lave-linge au rebut ou hors de service,
enlever la porte ou le couvercle.
[] Ne pas tenter d'atteindre un article & I'interieur de la cuve
du lave-tinge Iorsque le tambour, la cuve ou I'agitateur est
en mouvement.
[] Ne pas installer ou remiser ce lave-Iinge & un endroit oQ il
serait expose aux intemperies.
[] Ne pas modifier les organes de commande.
[] Ne pas reparer ou remplacer un composant quelconque du
lave-linge, ni entreprendre une operation de service, si ce
n'est specifiquement recommande darts ce manuel ou darts
un manuel d'instructions de reparations destine & I'utilisateur;
il est alors essentiel que la personne concernee comprenne
ces instructions et soit competente pour les executer.
[] Pour les instructions de liaison & la terre, voir "Specifications
electriques" dans les instructions d'installation.
CONSERVEZ CES iNSTRUCTiONS
16

QUOI DE NEUF SOUS LE COUVERCLE?
Votre nouveau lave-linge fonctionne diff6remment de votre pr6c6dent lave-linge de type agitateur.
lid Locked
®
Lid Locked (Verrouiflage couvercle) <]lj I
Pour permettre des essorages a vitesse plus 61ev6e,
le couvercle se verrouille et le t6moin de couvercle
verrouill6 s'allume. Lorsque ce t6moin lumineux s'allume,
cela signifie que le couvercle est verrouill6 et ne peut
_tre ouvert. Lorsque ce t6moin lumineux clignote, cela
signifie que le lave-linge effectue une pause. Lorsque ce
t6moin lumineux est 6teint, cela signifie qu'on peut ouvrir
le couvercle. Si I'on doit ouvrir le couvercle pour ajouter
un v6tement apres cette p6riode, il faut appuyer sur
START/PAUSE/UNOCK (mise en marche/pause/
d6verrouillage) puis attendre que le couvercle se
d6verrouille. Le couvercle se d6verrouille uniquement
une fois que le mouvement du lave-linge a cess& Selon ,_::o^
le moment oQ I'on souhaite suspendre le programme, %0
le couvercle peut mettre entre plusieurs secondes et
plusieurs minutes a se d6verrouiller.
Sensing (D6tection}
Ce lave-linge effectue une s6rie d'essorages pour
contr61er 1'6quilibre de la charge. Une fois une charge mise
en route, il peut s'6couler de 2 & 3 minutes avant que de
I'eau ne p6netre dans le panier. Durant cette p6riode, une
s6rie de cliquetis et un bruit de frottements rythmiques
indiquent que la technologie de d6tection d6termine si la
charge est d6s6quilibr6e.
Sounds (Bruits)
A diff6rents stades du programme de lavage, votre
nouveau lave-linge 6mettra peut-_tre des bruits et pauses
que votre lave-linge pr6c6dent ne produisait pas. II est
par exemple possible que vous entendiez un cliquetis
et un bourdonnement au d6but du programme, Iorsque
le systeme de verrouillage du couvercle effectue un
test automatique. Diff6rents bourdonnements et bruits
de frottements rythmiques se produiront a mesure
que I'agitateur 6value 1'6quilibre de la charge et qu'il la
d6place. II est aussi possible que le lave-linge soit parfois
completement silencieux, Iorsqu'il laisse tremper les
v_tements.
Spray Rinse (Ringage par vaporisation)
Certains programmes utilisent un ringage par vaporisation
par d6faut. Au cours de ces programmes, on entend I'eau
p6n6trer dans le lave-linge tandis que la cuve tourne, ce
qui permet &I'eau de ringage de p6n6trer les v_tements.
Consulter le "Guide de programmes" pour plus de d6tails.
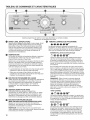
iMPORTANT :
= Apres que le panier de la laveuse se soit rempli jusqu'au niveau d'eau s_lectionn_, le couvercle doit _tre rabattu pour que le
programme de lavage puisse commencer. Si le remplissage s'arr_te alors que le couvercle est ouvert, fermer le couvercle
et appuyer sur le bouton START (mise en marche).
• Uoption Fabric Softener (assouplissant pour tissu) doit 6tre plac6e sur "Yes" (oui) pour que I'assouplissant pour tissu soit distribu6
au moment ad6quat.
REMARQUE : Le distributeur d'assouplissant pour tissu n'est pas disponible sur tousles modeles.
SPECIFICATIONS
Ces appareils sont vendus darts diverses r_gJons aux crit_res
de capacit_ de mesure diff6rents. Vous trouverez ci-dessous
quelques=unes des formes de mesures valables indiqu_es
sur ce produit :
Capacit_ linge sec : Poids refl6tant la taille de charge maximale
pouvant 6tre plac6e dans le lave-linge.
Capacit_ SASO : Mesure de capacit6 repr6sentant la capacit6 &
laquelle les tests de performance ont 6t6 effectu6s.
Consomrnation d'eau SASO : Niveau de consommation d'eau
d6termin6 par le fabricant pour un programme donn&
Capacit6 lingo sec ] [ Capacit6 SASO
10,5 kg (23 Ib) j [ 6,5 kg (14,3Ib)
] [ Consommation d'eau SASO
j 116011tres
17

TABLEAU DE COMMANDE ET CARACTERISTIQUES
Certains programmes et options ne sont pas disponibles sur certains modeles.
Uapparence des appareils peut varlet.
O WATER LEVEL (NIVEAU D'EAU}
S61ectionner le r6glage le plus adapt6 a votre charge. Small
(petite) ajoute une faible quantit6 d'eau pour les charges
plus petites et Super Plus (ultra grande) ajoute la quantit6
d'eau la plus importante pour les grandes charges ou les
charges volumineuses. Trop tasser le linge peut entra_ner
une mauvaise performance de lavage et augmenter le
froissement et I'emm_lement.
O
O
O
O
18
TEMPERATURE
La fonction de contr61e de temp@ature d6tecte et maintient
une temp@ature uniforme de I'eau en r6guJant le d6bit
d'arriv6e d'eau chaude et d'eau froide.
S61ectionner une temp@ature de lavage en fonction du type
de tissu et de salet6 a laver. Pour des r6sultats optimaux,
suivre les instructions sur 1'6tiquette du v_tement et utiliser
la temp@ature d'eau de lavage la plus chaude possible qui
reste sans danger pour le tissu.
•Les temp6ratures de I'eau tiede et de I'eau chaude seront
inf@ieures a celles de votre lave-linge pr6c6dent.
• M_me avec un lavage & I'eau fraTche ou froide, il est
possible que de I'eau tiede soit ajout6e au lave-linge pour
maintenir une temp@ature minimale.
BOUTON DE PROGRAMME DE LAVAGE
Utiliser le bouton de programme de lavage pour s61ectionner
les programmes disponibles sur le lave-linge. Tourner le
bouton de programme pour s61ectionner un programme
correspondant a la charge de linge. Voir "Guide de
programmes" pour des descriptions de programmes
d6taill6es.
ASSOUPMSSANT POUR TiSSU
Cette option peut _tre ajout6e a la plupart des
programmes; on doit la r6gler sur "YES" (oui) si I'on utilise
de I'assouplissant pour tissu durant un programme. Ceci
garantit que I'assouplissant pour tissu est ajout6 au bon
moment Iors du ringage pour _tre correctement distribu&
BOUTON START/PAUSE/UNLOCK
(MISE EN MARCHE/PAUSE/DEVERROUILLAGE}
Appuyer sur ce bouton pour d6marrer le programme
s61ectionn_, puis appuyer de nouveau pour suspendre le
programme et d6verrouiller le couvercle.
REMARQUE : Si le lave-linge tourne, le couvercle peut
mettre quelques minutes a se d6verrouiller. Appuyer pendant
3 secondes pour annulet un programme.
TEMOINS LUMINEUX DE PROGRAMME
fill wash rinse spin done lidlocked
Les t6moins lumineux indiquent la progression du
programme. A chaque 6tape du processus, il est possible
que I'on remarque des pauses ou des sons diff@ents de
ceux que I'on remarque avec des lave-linge ordinaires.
SENSING/FILL (D_tection/Remplissage)
fill wash rinse spin clone lidlocked
Lorsqu'on appuie sur le bouton START/Pause/Unlock
Lid (mise en marche/pause/d6verrouillage couvercle),
la laveuse se remplit jusqu'au niveau d'eau selectionn&
Sile couvercle est ferm6 Iorsque la machine a fini de se
remplir, le couvercle se verrouille et la machine commence
fonctionner.
Sile couvercle est ouvert alors que I'eau cesse d'entrer
dans la machine, le programme ne d6marre pas tant que
I'on n'a pas ferm6 le couvercle et que I'on n'a pas appuy6
sur le bouton START/Pause/Unlock Lid (mise en marche/
pause/d6verrouillage couvercle). Sile programme n'a pas
commenc6 dans les 10 minutes qui suivent le remplissage
de la laveuse, la laveuse commence a pomper I'eau pour
1'6vacuer.
REMARQUE : Eviter d'ouvrir le couvercle durant le
processus de d6tection. Le processus de d6tection
recommencera une fois la laveuse remise en marche.
Le t6moin de d6tection s'allume 6galement lots des
6tapes de trempage et de lavage du programme.
Ceci est normal. Pour remettre la laveuse en marche
apr_s que le couvercle a 6t6 ouvert, appuyer sur START
(mise en marche).
WASH (LAVAG E)
flU wash rinse spin done [idlocked
On entend I'agitateur d6placer la charge. Les bruits 6mis
par le moteur peuvent changer lots des diff@entes 6tapes
du programme. La dur6e de lavage est d6termin6e par le
niveau de salet6 s61ectionn&
RINSE (RIN(_AGE)
fill wash rinse spin done [idtocked
it-lm-c_-iB-ii-im
On entend des sons similaires & ceux entendus Iors du
programme de lavage a mesure que le lave-linge rince
et d6place la charge. Le moteur 6mettra peut-_tre un
court bourdonnement pour d6placer le panier pendant
le remplissage. L'assouplissant pour tissu sera ajout6
si I'option Fabric Softener (assouplissant pour tissu) est
s_lectionnee.

Certainsprogrammesutilisentunrin(_ageavec
vaporisation.Apr_savoireffectu6lavidangeet
I'extractiondeI'eau,lelavelingepoursuitI'essorage
etlavaporisationd'eauderin(_agependanttoute
ladur6ederin(_age.
SPIN(ESSORAGE)
fill wash rinse spin done lld locked
Le lave-linge essore la charge a des vitesses augmentant
graduellement pour une bonne extraction de I'eau, en
fonction du programme et de la vitesse d'essorage
s61ectionnes.
DONE (TERMINE)
fill wash rinse spin done lid locked
Une fois le programme termin6, ce t6moin s'allume.
Retirer la charge rapidement pour un r6sultat optimal.
GUIDE DE PROGRAMMES
LID LOCKED (COUVERCLE VERROUILLE)
flu wash rinse spin done lid locked
Pour permettre des essorages a vitesse plus 61ev6e,
le couvercle se verrouille et le t6moin de verrouillage du
couvercle s'allume. Lorsque ce t6moin lumineux s'allume,
cela signifie que le couvercle est verrouill6 et ne peut _tre
ouvert. Lorsque ce t6moin lumineux clignote, cela signifie
que le lave-linge effectue une pause. Lorsque ce t6moin
lumineux est 6teint, cela signifie qu'on peut ouvrir le
couvercle.
Si I'on doit ouvrir le couvercle,
appuyer sur START/Pause/Unlock.
Le couvercle se d6verrouille une fois
que le mouvement du lave-linge
a cess& IIse peut que cela prenne
plusieurs minutes sile lave-linge
essorait la charge & grande vitesse.
start ]
pause!unlock I
Appuyer de nouveau sur START/Pause/Unlock pour
poursuivre le programme.
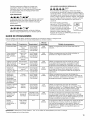
Pour un meilleur soin des tissus, choisir le programme qui convient le mieux a la charge a laver.
Certains programmes et options ne sont pas disponibles sur certains modeles.
Articles _ laver :
Tissus tr_s sales
Tissus r6sistants,
articles grand-
teint, serviettes,
jeans
Articles de grande
taille tels que les
draps, les petits
duvets, les vestes
Charges de
v_tements en
coton, lin, draps et
charges mixtes
Articles non
repassables,
articles en coton,
de pressage
permanent, linge
de maison, tissus
synth6tiques
Programme :
Heavy Duty
Heavy
(Service intense
avanc6)
Heavy Duty
Regular
(Service
ordinaire intense
avanc6)
Normal Heavy
(service intense
normal)
Normal Regular
(service
ordinaire normal
Casual
(tout-aller)
Temperature* :
Hot (Chaude)
Warm (Tiede)
Cool (FraTche)
Cold (Froide)
Hot (Chaude)
Warm (Tiede)
Cool (FraTche)
Cold (Froide)
Hot (Chaude)
Warm (Tiede)
Cool (FraTche)
Cold (Froide)
Hot (Chaude)
Warm (Tiede)
Cool (FraTche)
Cold (Froide)
Hot (Chaude)
Warm (Tiede)
Cool (FraTche)
Cold (Froide)
d'essorage :
.High
(Elev6e)
.High
(Elev6e)
.High
(Elev6e)
.High
(Elev6e)
Low
(Faible)
D_tails du programme :
Utiliser ce programme pour les articles tr_s sales OU
robustes.
Utiliser ce programme pour les articles robustes ou
pr6sentant un degr6 de salet6 normal.
Utiliser ce programme pour les articles en coton ou
les charges mixtes tr_s sales. Ce programme utilise
uniquement des ringages par vaporisation; c'est le
programme recommand6 pour I'entretien du lave-linge.
Utiliser ce programme pour les articles en coton et
les charges de tissus mixtes pr6sentant un degr6 de
salet6 normal. Ce programme utilise des ringages par
vaporisation.
Utiliser ce programme pour laver des charges de
v_tements qui nese repassent pastels que chemises de
sport, chemisiers, v_tements de travail tout-aller, articles &
pressage permanent et melanges de tissus.
Lingerie et articles
en soie ou en
laine lavables en
machine
Maillots et articles
n6cessitant un
rin(_age sans
detergent
Delicate
(articles
d61icats)
Rinse & Spin
(rin(_age et
essorage)
Hot (Chaude)
Warm (Tiede)
Cool (FraTche)
Cold (Froide)
Ringage A I'eau
froide uniquement
(Cold rinse only)
Low
(Faible)
.High
(Elev6e)
Utiliser ce programme pour laver des v_tements
16gerement sales dont 1'6tiquette de soin indique "Soie
lavable en machine" ou "Programme d61icat". Placer les
petits articles dans des sacs a linge avant le lavage.
Ce programme utilise des ringages par vaporisation.
Combine un rin(_age et un essorage a.haute vitesse
pour les charges n6cessitant un programme de ringage
suppl6mentaire ou pour finir de prendre soin d'une charge
apr_s une coupure de courant. Utiliser 6galement pour les
charges n6cessitant uniquement un ringage.
Articles Drain & Spin S.O. .High Ce programme utilise un essorage pour r6duire les dur6es
tremp6s ou (vidange et (Elev6e) de s6chage pour les tissus Iourds ou les articles laves
articles laves A essorage) Ala main qui n_cessitent un soin special. Utiliser ce
la main programme pour vidanger le lave-linge apr_s avoir annul_
un programme ou termin_ un programme apres une
coupure de courant.
J
REMARQUE : S_lectionner "Fabric Softener - Yes" si I'on utilise de I'assouplissant pour tissu a la charge.
*Tousles rin(_ages se font a I'eau froide.
19

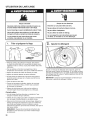
UTILISATION DU LAVE-LINGE
Risque d'incendie
Ne jarnais mettre des articles humect_s d'essence ou
d'autres fluides inflammables clans le lave=lingo.
Aucun lave=linge ne peut compl_tement enlever I'huile.
Ne pas faire s_cher des articles qui ont _t_ sails par
tout genre d'huile (y compris les huiles de cuisson).
Le non=respect de ces instructions peut causer
un d_cbs, une explosion ou un incendie.
1. Trier et preparer ie iinge
r
• Vider les poches. Des pieces de monnaie, des boutons
ou objets de petite taille sont susceptibles de glisser sous
I'agitateur et de s'y coincer, ce qui peut entraTner des bruits
inattendus.
• Trier les articles en fonction du programme et de la
temp6rature recommand6s, ainsi que la solidit6 des teintures.
• S6parer les articles tr_s sales des articles peu sales.
• S6parer les articles d61icats des tissus r6sistants.
• Ne pas s6cher les v_tements si les taches sont toujours
pr6sentes apr_s le lavage car la chaleur pourrait fixer les
taches sur le tissu.
• Traiter les taches sans d61ai.
• Fermer les fermetures a glissiere, attacher les crochets,
cordons et ceintures en tissu, et retirer tout accessoire
et ornement non lavables.
• R6parer les d6chirures pour 6viter que les articles ne
s'endommagent encore davantage lots du nettoyage.
Conseils utiles :
= Lors du lavage d'articles 6tanches ou r6sistants a I'eau,
charger la machine de fa£:on uniforme.
• Utiliser des sacs a linge pour aider a emp_cher I'emm_lement
lots du lavage d'articles d61icats ou de petits articles.
• Retourner les tricots pour 6viter le boulochage. S6parer les
articles qui forment les peluches de ceux qui la retiennent.
Les articles synth6tiques, tricots et articles en velours
retiennent les peluches provenant des serviettes, des tapis et
des tissus chenille.
REMARQUE : Toujours life et suivre les instructions des
6tiquettes de soin des tissus pour 6viter d'endommager
les v_tements.
Risque de choc dlectrique
Brancher sur une prise reli_e b la terre.
Ne pas en|ever la broche de liaison b la terre.
Ne pas utiliser d'adaptateur.
Ne pas utiliser de c_ble de rallonge.
Le non=respect de cos instructions peut causer
un d_cbs, un incendie ou un choc _lectrique.
Ajouter ie d tergent
Ajouter une mesure de d6tergent dans le fond du panier du
lave-linge avant d'ajouter les v_tements. Si I'on utilise un agent
activateur de d6tergent Oxi ou un agent de blanchiment produit
sans danger pour les couleurs, I'ajouter 6galement dans le fond
du panier du lave-linge.
IMPORTANT : Suivre les recommandations du fabricant pour
d6terminer la quantit6 de d6tergent a utiliser.
2O
La page est en cours de chargement...
La page est en cours de chargement...
La page est en cours de chargement...
La page est en cours de chargement...
La page est en cours de chargement...
La page est en cours de chargement...
La page est en cours de chargement...
La page est en cours de chargement...
La page est en cours de chargement...
La page est en cours de chargement...
La page est en cours de chargement...
La page est en cours de chargement...
La page est en cours de chargement...
La page est en cours de chargement...
La page est en cours de chargement...
La page est en cours de chargement...
La page est en cours de chargement...
La page est en cours de chargement...
La page est en cours de chargement...
La page est en cours de chargement...
La page est en cours de chargement...
La page est en cours de chargement...
La page est en cours de chargement...
La page est en cours de chargement...
-
 1
1
-
 2
2
-
 3
3
-
 4
4
-
 5
5
-
 6
6
-
 7
7
-
 8
8
-
 9
9
-
 10
10
-
 11
11
-
 12
12
-
 13
13
-
 14
14
-
 15
15
-
 16
16
-
 17
17
-
 18
18
-
 19
19
-
 20
20
-
 21
21
-
 22
22
-
 23
23
-
 24
24
-
 25
25
-
 26
26
-
 27
27
-
 28
28
-
 29
29
-
 30
30
-
 31
31
-
 32
32
-
 33
33
-
 34
34
-
 35
35
-
 36
36
-
 37
37
-
 38
38
-
 39
39
-
 40
40
-
 41
41
-
 42
42
-
 43
43
-
 44
44


Maytag 4GMVWC100YQ0 Mode d'emploi
- Catégorie
- Machines à laver
- Taper
- Mode d'emploi
- Ce manuel convient également à
dans d''autres langues
- English: Maytag 4GMVWC100YQ0 User guide
- español: Maytag 4GMVWC100YQ0 Guía del usuario