Yamaha SY85 Le manuel du propriétaire
- Catégorie
- Synthétiseur
- Taper
- Le manuel du propriétaire

YAMAHA
SY85 Music Synthesizer
Owner’s Manual 1
- Getting Started -

The SY85 Music Synthesizer delivers the incredible Yamaha AWM sound
with improved quality and performance power. In addition to superior sound,
the SY85 features “Quick Edit” modes that provide fast, easy access to the
most important voice and performance editing jobs so you can customize the
sound without having to deal with the details. Of course, you still have full
programming power when you want to do some serious voicing. For unmatched
on-stage expression the SY85 also features a sophisticated real-time control
system that lets you modify up to 8 different parameters as you play — in
addition to the traditional pitch and modulation wheels. There’s even a full-
featured sequencer that allows the SY85 to function as a complete music
workstation. In terms of sound, real-time control, and total production power,
the SY85 offers unprecedented levels of quality and performance.
We urge you to read the owner’s manuals thoroughly in order to realize the
full potential of the SY85 (see “About the Manuals” on page 7), and keep the
manuals in a safe place for future reference.
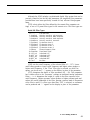
MAIN FEATURES
● AWM2 Tone Generator System
2nd-generation Advanced Wave Memory (AWM2) technology delivers
dazzling, true-to-life sound with 30-note polyphony.
● Large-capacity Waveform ROM
A large 6-megabyte waveform ROM provides plenty of capacity for top-
quality samples.
● Expandable Waveform RAM
The SY85 comes supplied with 512 kilobytes of waveform RAM that can
be used to load extra waveforms from a supplied waveform disk or disks from
other sources. Up to 3-megabytes additional RAM can be installed for dramati-
cally increased capacity.
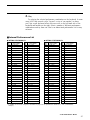
● 256 Voices and 128 Performance Combinations
4 internal memory banks hold 256 individual voices. Voices can be played
individually, or up to four voices can be combined and “layered” to form as
many as 128 performance combinations.
● Advanced Digital Filters
Programmable digital filters allow the SY85 sound to be tailored as re-
quired. The filters also feature a resonance parameter equivalent to that found
on the SY77 and SY99.
● Top-quality Effects
The basic quality of the SY85 voices is further enhanced by a range of
programmable effects offering quality rivalling some of the finest separate
signal processing systems — these are essentially the same effects that enhance
the musical impact of the SY99.

● Extensive Real-time Control
In addition to the pitch and modulation wheels, and dual output level con-
trols, the SY85 has 8 slide controls that can be used to control a range of
parameters while performing for unmatched expressive power.
● Easy Editing Interface
8 function keys and slide controls below the large 40-character x 2-line
LCD display allow direct selection and control of the parameters appearing
directly above them in the display for efficient, intuitive editing. A 5x5 mode
selection matrix further enhances operation by allowing fast, easy access to any
of the SY85 modes.
● 9-track 10-song Sequencer
Full-function sequencer with 8 standard tracks and 1 dedicated rhythm
track. Each sequencer “song” has its own 16-part multi-instrument setup.
Rhythm parts can be recorded as “patterns” and then chained to form the com-
plete rhythm track. The SY85 also includes 100 rhythm patterns that you can
simply select and use.
● Other Features
• 3.5” floppy disk drive for versatile data management and storage.
• External memory card slots.
• Quick and in-depth editing modes.
• Function select matrix enhances operating ease.
• 61-key initial and after-touch sensitive keyboard.
• 2 assignable stereo outputs.
1

2
Contents
Precautions ............................................................................4
About the Manuals
■ The Getting Started Manual (this manual)................................................................ 7
■ Icons................................................................................................................................. 8
■ The Feature Reference Manual.................................................................................. 9
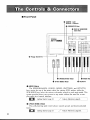
The Controls & Connectors
■ Front Panel....................................................................................................................10
■ Rear Panel ....................................................................................................................15
1. Setting Up Your System
■ Connections...................................................................................................................17
■ Power-on Procedure ....................................................................................................18
■ Load & Play the Sequencer Demo............................................................................18
■ Load the Pre-programmed Voice, Performance, & Pattern Data ..........................20
2. Selecting And Playing Voices
■ Play the Internal Voices ..............................................................................................21
■ CARD Voice Memory................................................................................................... 26
■ Real-time Control..........................................................................................................27
• PITCH BEND WHEEL ..............................................................................................27
• MODULATION WHEEL............................................................................................. 27
• CONTINUOUS SLIDERS.......................................................................................... 28
• FOOT CONTROLLER...............................................................................................29
• KEYBOARD AFTERTOUCH.....................................................................................29
3. The Performance Mode
■ Play the Internal Performance Combinations ...........................................................30
■ CARD Performance Memory.......................................................................................32
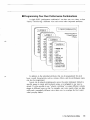
■ Programming Your Own Performance Combinations ..............................................33
■ Further Possibilities … ................................................................................................ 39

3
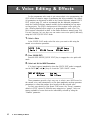
4. Voice Editing & Effects.................................................40
■ Further Possibilities … ................................................................................................ 46
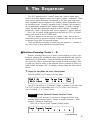
5. The Sequencer
■ Real-time Recording (Tracks 1 … 8) ........................................................................47
■ Step Recording (Tracks 1 … 8).................................................................................52
■ Creating A Rhythm Track............................................................................................55
• LISTEN TO THE INTERNAL PATTERNS.............................................................. 55
• RECORDING AN ORIGINAL PATTERN — REAL TIME..................................... 56
• RECORDING AN ORIGINAL PATTERN — STEP RECORD.............................. 58
• BUILDING A RHYTHM TRACK............................................................................... 60
• [F5]: “INS” = Rhythm Track Insert.......................................................................... 62
• [F6]: “DEL” = Rhythm Track Delete .......................................................................62
• [F7]: “CPY” = Rhythm Track Copy.........................................................................63
• [F8]: “SCH” = Rhythm Track Search...................................................................... 63
6. Data Management
■ Cards or Disks?............................................................................................................64
• MCD64 RAM Cards ..................................................................................................64
• Floppy Disks ..............................................................................................................64
■ Create a Well-organized Data Library.......................................................................65
■ Make Separate Performance Disks or Cards...........................................................65
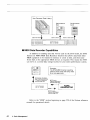
■ MIDI Data Recorder Capabilities................................................................................66
INDEX ...................................................................................67

4
Precautions
■ Location
Do not expose the instrument to the following conditions to avoid deforma-
tion, discoloration, or more serious damage.
• Direct sunlight (e.g. near a window).
• High temperatures (e.g. near a heat source, outside, or in a car during the
daytime).
• Excessive humidity.
• Excessive dust.
• Strong vibration.
■ Power Supply
• Turn the power switch OFF when the instrument is not in use.
• The power supply cord should be unplugged from the AC outlet if the
instrument is not to be used for an extended period of time. (Reconnecting
AC power will re-initialize all settings. As a result, user memory will be
erased.)
• Unplug the instrument during electric storms.
• Avoid plugging the instrument into the same AC outlet as appliances with
high power consumption, such as electric heaters or ovens. Also avoid using
multi-plug adapters since these can result in reduced sound quality and
possibly damage.
■ Turn Power OFF When Making Connections
• To avoid damage to the instrument and other devices to which it is con-
nected (a sound system, for example), turn the power switches of all related
devices OFF prior to connecting or disconnecting audio and MIDI cables.
■ MIDI Connections
• When connecting the SY85 to MIDI equipment, be sure to use high-quality
cables made especially for MIDI data transmission.
• Avoid MIDI cables longer than about 15 meters. Longer cables can pick up
electrical noise that can causes data errors.
■ Handling and Transport
• Never apply excessive force to the controls, connectors or other parts of the
instrument.
• Always unplug cables by gripping the plug firmly,
not by pulling on the
cable.
• Disconnect all cables before moving the instrument.
• Physcal shocks caused by dropping, bumping, or placing heavy objects on
the instrument can result in scratches and more seious damage.
!! PLEASE READ THIS BEFORE PROCEEDING !!

5
■ Cleaning
• Clean the cabinet and panel with a dry soft cloth.
• A slightly damp cloth may be used to remove stubborn grime and dirt.
• Never use cleaners such as alcohol or thinner.
• Avoid placing vinyl objects on top of the instrument (vinyl can stick to and
discolor the surface).
■ Electrical Interference
• This instrument contains digital circuitry and may cause interference if
placed too close to radio or television receivers. If this occurs, move the
instrument further away from the affected equipment.
■ Data Backup
• The SY85 contains a special long-life battery that retains the contents of its
internal voice, performance, song, and non-volatile wave memory even when
the power is turned OFF. The backup battery should last for several years.
When the backup battery needs to be replaced “Change internal battery !”
will appear on the display when the power is turned on. When this happens,
have the backup battery replaced by qualified Yamaha service personnel. DO
NOT ATTEMPT TO REPLACE THE BACKUP BATTERY YOURSELF!
• Internal memory data can be corrupted due to incorrect operation. Be sure to
“save” important data to a floppy disk frequently so you have a backup to
revert to if something happens to damage the data in memory. Also note
that magnetic fields can damage data on the disk, so it is advisable to make
a second back-up copy of disks that contain very important data, and keep
backup disks in a safe place away from stray magnetic fields (i.e. away
from speakers, appliances containing motors, etc.).
■ Handle Floppy Disks and the Disk Drive With Care
• Use only 3.5” 2DD type floppy disks.
• Do not bend or apply pressure to the floppy disk. Do not open the shutter
and touch the surface of the floppy disk inside.
• Do not expose the disk to high temperatures. (e.g. direct sunlight)
• Do not expose the disk to magnetic fields. Magnetic fields can partially or
totally erase data on the disk, rendering the disk unreadable.
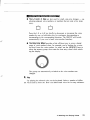
• To eject a floppy disk, press the eject button slowly as far as it will go
then, when the disk is fully ejected, remove it by hand.
The disk may not be ejected properly if the eject button is pressed too
quickly, or it is not pressed in as far as it will go (the eject button may
become stuck in a half-pressed position and the disk extends from the drive
slot by only a few millimeters). If this happens, do not attempt to pull out
the partially ejected disk. Using force in this situation can damage the disk-
drive mechanism or the floppy disk. To remove a partially ejected disk, try
pressing the eject button once again, or push the disk back into the slot and
then repeat the eject procedure carefully.
• Do not insert anything but floppy disks into the disk drive. Other objects
may cause damage to the disk drive or the floppy disk.

6
■ Data Card and Wave Card
• Never attempt to force a voice card into the waveform slot, or vice versa.
Doing so can cause serious damage to the card connectors.
■ Service and Modification
• The SY85 contains no user serviceable parts. Opening it or tampering with
it in anyway can lead to irreparable damage and possibly electric shock.
Refer all servicing to qualified YAMAHA personnel.
■ Third-party Software
• Yamaha can not take any responsibility for software produced for this prod-
uct by third-party manufacturers. Please direct any questions or comments
about such software to the manufacturer or their agents.
YAMAHA is not responsible for damage caused by improper handling
or operation.

7
About the Manuals
The SY85 comes with two manuals — Getting Started and Feature Refer-
ence.
■ The Getting Started Manual (this manual)
In addition to an overview of the SY85 controls and connectors (page 10),
the Getting Started manual contains six chapters that take you through the
main procedures you will need to know to become familiar with your SY85:
1. Setting Up Your System [Page 17]
Basic system connections, powering up, loading and playing the demo,
and loading the pre-programmed voice and performance data.
2. Selecting And Playing Voices [Page 21]
Selecting and playing voices from the INTERNAL 1, INTERNAL 2 and
CARD memories, and using the real-time controls.
3. The Performance Mode [Page 30]
Selecting and playing performance combinations from the INTERNAL 1,
INTERNAL 2 and CARD memories, and programming original perform-
ance combinations.
4. Voice Editing & Effects [Page 40]
Fast, easy voice editing and effect setup using the VOICE QUICK EDIT
mode.
5. The Sequencer [Page 47]
Recording and playing sequences and patterns.
6. Data Management [Page 64]
Some ideas on how to efficiently manage your SY85 data.
We recommend that you go through the tutorials in sequence while actually
carrying out procedures on your SY85. Once you’ve gone through the entire
TUTORIALS section in this way, you should be familiar enough with the SY85
to need only the Feature Reference manual in future.

8
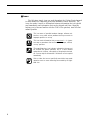
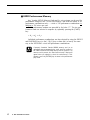
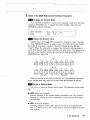
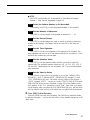
■ Icons
The following simple icons are used throughout the Getting Started manual
to draw attention to important points and information where necessary. The
icons also make it easier to differentiate between information that you should
read immediately and information that can be skipped until later, hopefully
helping you to become familiar with the SY85 in the quickest, most efficient
manner possible.
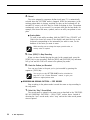
This icon warns of possible hardware damage, software mal-
function, or any other serious problem that may occur due to
improper operation or set up.
This icon marks information that you must read — i.e. impor-
tant steps or procedures that are essential for proper, efficient,
or easy operation.
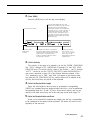
The magnifying-glass icon indicates information that may not
be essential for general operation, but is a more detailed
explanation of a feature, a description of the principle involved,
etc. You can skip this information if full details are not required
immediately.
Hints or ideas that are not specifically musical but may make
operation easier or more interesting are marked by the light-
bulb icon.
IMPORTANT
CAUTION
DETAIL
HINT

9
■ The Feature Reference Manual
The Feature Reference manual is the “nuts and bolts” reference for the
SY85, individually describing its many functions in detail. The Feature Refer-
ence manual is divided into 7 main sections, each describing the various func-
tions within a particular SY85 edit or utility mode.
1. Performance Edit Mode ...... [Page 13]
2. Voice Edit Mode ................... [Page 57]
3. Drum Voice Edit Mode ........ [Page 119]
4. Song Edit Mode .................... [Page 147]
5. Pattern Edit Mode ................ [Page 201]
6. Utility Mode............................ [Page 209]
7. Wave Edit Mode.................... [Page 237]
Once you have become familiar with the way the SY85 works by going
through the Getting Started manual, you should only need to refer to the Fea-
ture Reference manual from time to time to get details on functions you’ve
never used before, or refresh your memory about functions that you don’t use
very often.
Each section of the Feature Reference manual has its own table of contents,
so you should be able to locate any particular function quickly and easily.
Functions and references can also be located by referring to the index at the
back of the manual.


12
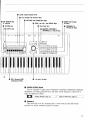
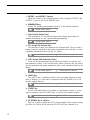
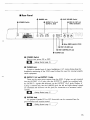
5 OUTPUT 1 and OUTPUT 2 Controls
Adjust the volume of the sound delivered via the rear-panel OUTPUT1 and
OUTPUT 2 jacks as well as the PHONES jack.
6 SEQUENCER Keys
Control the recording and playback functions of the internal sequencer.
Getting Started: page 51.
7 Liquid Crystal Display Panel
This 40-character x 2-line backlit liquid crystal display panel shows all
essential information for easy operation and programming.
Getting Started: page 21.
8 [F1] through [F8] Function Keys
The functions of these keys depend on the selected mode. They are used to
engage a function indicated on the display immediately above the key, or select
a parameter immediately above the key for editing.
Getting Started: page 19. Feature Reference: page 10.
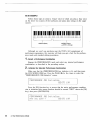
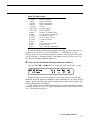
9 [CS1] through [CS8] Continuous Sliders
In the voice and performance play modes these controls are used for real-
time expressive control. In the edit and utility modes, however, they are used to
edit the parameters that appear immediately above each continuous slider on the
display.
Getting Started: page 28. Feature Reference: page 10.
0 [SHIFT] Key
The [SHIFT] key is sometimes used to access secondary functions, param-
eters, or displays. It is also used in conjunction with the [STORE] key to call
the edit compare function.
Getting Started: page 35. Feature Reference: page 14.
! [STORE] Key
Used to store edited data to an internal or card memory location. It is also
used in conjunction with the [SHIFT] key to call the edit compare function.
Getting Started: page 38. Feature Reference: page 55.
@ [EF BYPASS] Key & Indicator
This key is used to bypass the SY85’s internal digital effect system, turning
all effects off. Effects are off when the [EF BYPASS] key indicator is lit.

13
# [EXIT/NO] and [ENTER/YES] Keys
The [EXIT/NO] key can generally be used to exit from any sub-mode or
function, while the [ENTER/YES] key is used to engage a variety of sub-modes
and functions. These keys are also used to respond to the “Are you sure?”
confirmation prompt when saving or initializing data.
Getting Started: page 27. Feature Reference: page 9.
$ [-1] and [+1] Keys
Can be used to select voices, performance combinations, sequencer songs,
and patterns. These keys can also be used to edit parameter values in any of
the SY85 edit modes. Either key can be pressed briefly for single stepping in
the specified direction, or held for continuous scrolling.
Getting Started: page 23. Feature Reference: page 9.
% Data Entry Dial
The data entry dial provides a fast, efficient way to cover a broad range of
voice or performance numbers when, for example, you’re looking for a voice
but don’t know the voice number. It’s also handy for making large value
changes in any of the edit modes.
Getting Started: page 23. Feature Reference: page 9, 10.
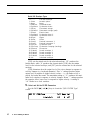
^ PAGE [ ], [ ], and [MENU] Keys
In any of the edit and utility modes these keys are used to select the vari-
ous edit screens. The [ ] and [ ] are used to scroll backward or forward
through the available screens one at a time, while the [MENU] key calls a
menu that allows the desired screen to be directly specified and accessed by
number.
Getting Started: page 19. Feature Reference: page 8.
& MEMORY [INTERNAL1], [INTERNAL2], & [Card] Keys
Select the memory area — internal 1, internal 2, or card — from which
voices or performance combinations will be selected.
Getting Started: page 21. Feature Reference: page 14.
* GROUP [A] Through [H] Keys
In addition to their function in selecting voice or performance numbers, the
GROUP keys are used to enter characters for voice, performance, song, and
pattern names. They are also used to enter note lengths when recording with
the internal sequencer.
Getting Started: page 22. Feature Reference: page 14.

14
( PROGRAM [1] Through [8] Keys
The PROGRAM keys are used in conjunction with the MEMORY and
GROUP keys to select voices and performance combinations. They are also
used to enter characters for voice, performance, song, and pattern names, and
to enter ties, rests, and accents when recording with the internal sequencer.
When editing performance combinations they are also used to select the layer
to be edited, and to mute specific layers as required.
Getting Started: page 22. Feature Reference: page 14.
) Floppy Disk Drive
The SY85’s built-in floppy disk drive allows easy, economical, high-volume
storage of voice, performance, sequencer, and wave data. The disk-in-use
indicator below the drive slot lights while any disk operation is in progress
(
NEVER attempt to remove a disk or turn the power off while a disk operation
is in progress). The eject button, also below the disk slot, is used to remove
disks from the drive.
Getting Started: page 18. Feature Reference: page 225.
q DATA & WAVEFORM Card Slots
The DATA slot accepts Yamaha MCD64 Memory Cards for storage and
retrieval of SY85 voices and performance combinations. It will also accept pre-
programmed ROM voice/performance cards. The WAVEFORM slot accepts pre-
programmed ROM cards containing wave data that can be used by the SY85.
The card wave data can be loaded into the SY85’s internal wave RAM
memory.
Getting Started: page 64. Feature Reference: page 250.


16
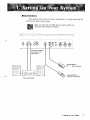
y FOOT CONTROLLER Jack
An optional Yamaha FC7 or FC9 foot controller connected here can be
used for amplitude modulation, pitch modulation, frequency modulation,
envelope generator bias, and filter cutoff frequency control.
Getting Started: page 17.
u FOOT VOLUME Jack
An optional Yamaha FC7 or FC9 foot controller connected here can be
used for volume control.
Getting Started: page 17.
i CLICK VOLUME Control
This knob adjusts the volume of the click (metronome) produced by the
sequencer.
Feature Reference: page 217.
o MIDI IN, OUT and THRU Connectors
The MIDI IN connector receives the data from an external sequencer or
other MIDI device which is to control or transmit data to the SY85. The MIDI
THRU connector simply re-transmits the data received at the MIDI IN connec-
tor, allowing convenient chaining of MIDI devices. The MIDI OUT connector
transmits data corresponding to all SY85 performance operations, or bulk data
when one of the MIDI data transmission functions are activated.
p Wave RAM Expansion Slots
You can insert extra memory modules into these slots to expand the wave
memory to a maximum of 3 Megabytes.
Feature Reference: page 285.


18 1. Setting Up Your System
■ Power-on Procedure
Believe it or not, there’s actually a “right” way to turn on a sound system
that will minimize the possibility of damage to the equipment (and your ears!).
1. Make sure your sound system’s volume control and the SY85 volume
controls are turned all the way down prior to turning power on.
2. Turn on the SY85.
3. Turn on the sound system.
4. Raise the sound system volume to a reasonable level.
5. Gradually raise the SY85 OUTPUT1 and OUTPUT2 controls while playing
the keyboard to set the desired listening level.
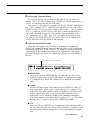
The SY85 automatically transmits MIDI control change data
corresponding to its control status when its power switch is
turned ON or OFF. This can interfere with operation of other
MIDI equipment connected to the SY85 MIDI OUT connector.
If the SY85 is connected to other MIDI equipment, the SY85
power switch should be turned ON first, and turned OFF last.
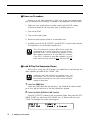
■ Load & Play the Sequencer Demo
Once you’ve set up your SY85 system, you might like to load and play the
demo sequence provided on the “DEMO” disk.
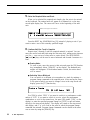
Loading the demo data overwrites the sequencer, wave , and
voice memory, so if you have any important data in either of
these memory areas make sure it is safely stored to disk before
loading the demo data.
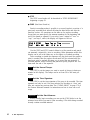
1. Insert the DEMO Disk
Insert the DEMO disk into the disk drive. The sliding disk shutter should
go in first, and the label side of the disk should face upward.
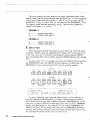
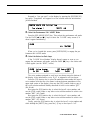
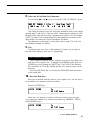
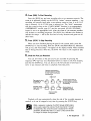
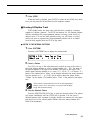
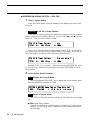
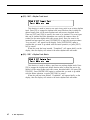
2. Select the Utility DISK ALL LOAD Function
Press the [UTILITY] button so that its indicator lights, then press the SUB
MODE [DISK] key (the lowest SUB MODE key). A display with the word
“DISK” in the upper left corner should appear.
IMPORTANT
IMPORTANT
La page charge ...
La page charge ...
La page charge ...
La page charge ...
La page charge ...
La page charge ...
La page charge ...
La page charge ...
La page charge ...
La page charge ...
La page charge ...
La page charge ...
La page charge ...
La page charge ...
La page charge ...
La page charge ...
La page charge ...
La page charge ...
La page charge ...
La page charge ...
La page charge ...
La page charge ...
La page charge ...
La page charge ...
La page charge ...
La page charge ...
La page charge ...
La page charge ...
La page charge ...
La page charge ...
La page charge ...
La page charge ...
La page charge ...
La page charge ...
La page charge ...
La page charge ...
La page charge ...
La page charge ...
La page charge ...
La page charge ...
La page charge ...
La page charge ...
La page charge ...
La page charge ...
La page charge ...
La page charge ...
La page charge ...
La page charge ...
La page charge ...
La page charge ...
La page charge ...
-
 1
1
-
 2
2
-
 3
3
-
 4
4
-
 5
5
-
 6
6
-
 7
7
-
 8
8
-
 9
9
-
 10
10
-
 11
11
-
 12
12
-
 13
13
-
 14
14
-
 15
15
-
 16
16
-
 17
17
-
 18
18
-
 19
19
-
 20
20
-
 21
21
-
 22
22
-
 23
23
-
 24
24
-
 25
25
-
 26
26
-
 27
27
-
 28
28
-
 29
29
-
 30
30
-
 31
31
-
 32
32
-
 33
33
-
 34
34
-
 35
35
-
 36
36
-
 37
37
-
 38
38
-
 39
39
-
 40
40
-
 41
41
-
 42
42
-
 43
43
-
 44
44
-
 45
45
-
 46
46
-
 47
47
-
 48
48
-
 49
49
-
 50
50
-
 51
51
-
 52
52
-
 53
53
-
 54
54
-
 55
55
-
 56
56
-
 57
57
-
 58
58
-
 59
59
-
 60
60
-
 61
61
-
 62
62
-
 63
63
-
 64
64
-
 65
65
-
 66
66
-
 67
67
-
 68
68
-
 69
69
-
 70
70
-
 71
71


Yamaha SY85 Le manuel du propriétaire
- Catégorie
- Synthétiseur
- Taper
- Le manuel du propriétaire
dans d''autres langues
- italiano: Yamaha SY85 Manuale del proprietario
- English: Yamaha SY85 Owner's manual
- español: Yamaha SY85 El manual del propietario
- Deutsch: Yamaha SY85 Bedienungsanleitung
- русский: Yamaha SY85 Инструкция по применению
- Nederlands: Yamaha SY85 de handleiding
- português: Yamaha SY85 Manual do proprietário
- dansk: Yamaha SY85 Brugervejledning
- polski: Yamaha SY85 Instrukcja obsługi
- čeština: Yamaha SY85 Návod k obsluze
- svenska: Yamaha SY85 Bruksanvisning
- Türkçe: Yamaha SY85 El kitabı
- suomi: Yamaha SY85 Omistajan opas
- română: Yamaha SY85 Manualul proprietarului
Documents connexes
-
Yamaha SY85 Manuel utilisateur
-
-
Yamaha W7 Le manuel du propriétaire
-
-
-
-
-
-
Autres documents
-
Bartscher 296065 Information produit
-
Lego 10298 Icons Building Instructions
-
Zeck Audio Vision12 1297 Le manuel du propriétaire
-
-
 STAC Vision14 97 Lay Le manuel du propriétaire
-
VESPA P150X Le manuel du propriétaire
-
Mares Abyss 22 Extreme - Abyss 22 Navy - Octopus Abyss Extreme Le manuel du propriétaire
