Indesit ASL700V (EX) Mode d'emploi
- Catégorie
- Sèche-linge
- Taper
- Mode d'emploi

Contents
TUMBLE DRYER
ASL700V
ASL700VX
Instruction booklet
Important Information, 2
Installation, 3-4
Where to put your dryer
Ventilation
Electrical connection
Before you start using your dryer
Dryer description, 5
The front
The back
Control panel
Start and programmes, 6-8
Choosing a programme
Table of programmes
Laundry, 9-10
Sorting your laundry
Wash care labels
Special clothing items
Drying times
Warnings and Suggestions, 11
General safety
Disposal
Saving energy and respecting the environment
Maintenance and Care, 12
Switching off the electricity
Cleaning the filter after each cycle
Check the drum after each cycle
Cleaning the dryer
Troubleshooting, 13
Service, 14
Spare parts
GB
English, 1
F
Français, 15
A
Arabic, 44
GB
1
! Keep this instruction booklet on hand in order to refer to it when necessary. Take it with you when you move, and
should you sell this appliance or pass it on to another party, make sure that this booklet is supplied along with the
dryer so that the new owner may be informed about warnings and suggestions on how the appliance works.
! Read these instructions carefully; the following pages contain important information on installation and suggestions
on how the appliance works.
This symbol reminds you to read this booklet.

2
GB
Important Information
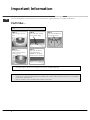
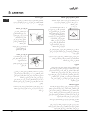
! You MUST clean the fluff filter after EVERY drying
cycle.
Fluff Filter...
! Failure to clean the filter after EVERY drying cycle will affect the drying performance of your machine.
- It will take longer to dry and as a result will use more electricity during drying.
STEP 1.
Open the door of your
dryer.
STEP 2.
Pull out the filter (using
the two finger grips).
STEP 3.
Clean any fluff deposits
from the filter mesh.
For your Venting dryer to operate efficiently, you must follow the regular maintenance schedule shown below:
STEP 4.
Refit the filter.
- Make sure the arrows
are facing you.
STEP 5.
Make sure the filter is
pushed fully home.
- NEVER run the dryer
without the filter in position.
! You MUST clean fluff build up around the filter housing and the vent tube periodically, EVERY two or three months:
- Check the vent tube and any permanent venting fixture to make sure that there has been no accumulation
of fluff or lint, and remove it.
- Remove lint that collects around the filter and the outlet vents.

GB
3
Installation
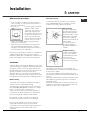
Permanent venting
In conjunction with the vent tube we recommend
using a Wall/Window Vent Kit, available at a retail
location or the nearest Spare Parts Dealer.
Wall mounting
1. Leave an opening in
the wall to the left of the
dryers proposed position.
2. Keep the tube as short
and straight as possible
to prevent condensed
moisture from backing up
into the dryer.
3. Similarly, the duct in
the wall should slope
downwards towards the
outside.
Window mounting
1. With a stacked dryer
the hole in the window
should ideally be made
below the vent.
2. The tube should be
kept as short as possible.
Depending on how often you use your dryer, it is
essential that areas A and B are checked periodically
to remove lint or debris.
The vent tube adaptor must be fitted securely thus
preventing any humid air from being emitted back into
the room.
! The Dryer should not be pushed so far back that the
tube adaptor is pulled out of position or the tube is
squashed or bent.
! The tube should be kept clear of the air intake vent
and kinks or ‘U’ bends must be avoided as these will
obstruct the tube or trap condensation.
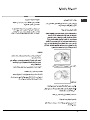
Where to put your dryer
●
Place your dryer at a distance from gas ranges,
stoves, heaters, or cook tops because flames can
damage the appliance.
●
If you are going to install the
appliance under a work
counter, be sure to leave a
10mm space between the
top and any other objects on
or above the machine and a
15mm space between the
sides and lateral furnishings
or walls. This is to ensure
proper air circulation. Make sure that the back
vents are not obstructed.
●
Make sure you put your dryer in an environment
that is not damp and has proper air circulation
throughout, the dryer will not operate efficiently in
an enclosed space or cupboard.
! We do not recommend that the dryer is installed in a
cupboard but the dryer must never be installed
behind a lockable door, a sliding door or a door with a
hinge on the opposite side to that of the dryer door.
Ventilation
The Dryer dries your laundry by drawing in cool, clean
and relatively dry air, heating it, and then distributing it
through the clothes as they are gently tumbled. For
optimum performance, the moist air is then blown out
through a vent tube at the back of the dryer.
When the dryer is in use, there has to be adequate
ventilation to avoid the back flow of gases into the room
from appliances burning other fuels, including open fires.
Mobile venting
A vent tube must always be fitted when the dryer is
used in conjunction with Mobile Venting.
The tube must be fitted securely into the back of the
dryer (see Dryer Description). If possible, it is always
best to connect the tube to a permanent
outlet close to the dryer. If permanent installation is
not possible, the dryer will work just as well with the
tube passing through a partly-opened window.
! Ensure that the end of the tube is not directed
toward the air intake vent at the rear of the dryer.
! The vent tube should not exceed 2.4 metres in
length and should be kept free of any possible
accumulation of fluff, lint and water by shaking it out
frequently. Always ensure that the tube is not
squashed.
Minimum gap 10mm
Minimum gaps
15mm

4
GB
Installation
! Do not use extension cords.
! The power cord must not be bent or squashed.
! The power supply cord should be checked periodically
and replaced by a cord specially prepared for this dryer
and fitted only by authorised technicians (see
Service). New or longer power cords are supplied at
an extra charge by authorised dealers..
! The manufacturer denies any responsibility should
any of these rules not be followed.
! If in doubt about any of the above consult a qualified
electrician.
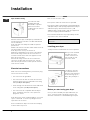
Levelling your dryer
The dryer must be installed level for correct operation.
When you have installed
your dryer in its final
location check that it is
level first side to side,
then front to back.
If the dryer is not level,
use a wooden block to
support it while adjusting
the two front legs up or
down, until your dryer is
level.
Before you start using your dryer
Once you have installed your dryer and before you
use it, clean the inside of the drum to remove any
dust that could have accumulated during transport.
Open window venting
The end of the tube
should be directed
downwards, to prevent
warm moist air from
condensing in the room or
in the dryer.
! Ensure that the dryer is adequately ventilated and
that the end of the vent tube is not directed towards
the air intake duct.
! The vent tube must always be fitted for optimum
performance.
! Make sure that the vent tube and air intake vents are
not obstructed or blocked.
! The dryer must not recycle exhaust air.
! Misusing a tumble dryer may create a fire hazard.
! Do not discharge exhaust air into a flue which is
used for exhaust fumes from other appliances that
burn gas or other fuels.
! Do not discharge exhaust air into an extraction
system or any duct with an extractor fan. This will
affect the way the thermal controls operate and can
result in a fire hazard.
Electrical connections
Make sure of the following before you insert the plug
into the the electrical socket:
●
The socket must be grounded.
●
The socket must be able to sustain the machines
maximum power, which is indicated on the rating
label (see Dryer Description).
●
Power voltage must be within the values indicated
on the rating label (see Dryer Description).
●
The socket must be compatible with the dryers
plug. Should this not be the case, replace the
plug or the socket.
! The dryer must not be installed outdoors, even if the
space is sheltered. It can be very dangerous if it is
exposed to rain or storms.
! Once installed, the dryers electrical wire and plug
must be within easy reach.

GB
5
Dryer Description
The light is green when the programme is running,
flashing amber if the programme has been paused or
flashing green if on standby waiting to start a programme
(see Start and Programmes).
The CHILD LOCK button/light : Press and hold this
button after selecting your programme and any options,
this prevents the programme settings from being
changed. When the light is lit the other buttons and
the programme knob are disabled. Hold the button to
cancel and the light will go out.
The Progress lights show you the status of the
programme. As each stage of the programme starts
the corresponding light turns on.
The Clean Filter light gives you a reminder before
every programme that it is essential to clean the filter
every time the dryer is used (see Maintenance and Care).
The ON/OFF button/light : If the dryer is running
and this button is pressed, the dryer is turned off.
Press again, the dryer restarts. The light signals that
your dryer is in use or ready to select a programme.
The PROGRAMMES knob sets the programme: rotate
it until the indicator is pointing to the programme you want
to select (see Start and Programmes).
The OPTION buttons/lights select available options for
your selected programme. The lights indicate that the
option has been selected. If an option is not available
the buzzer will beep three times (see Start and
Programmes).
The START/PAUSE button/light starts a selected
programme. When you press this button there will be
one beep and the progress lights will flash to confirm
the action. When a programme is running, holding this
button in pauses the programme and stops the dryer.
Control panel
Clean Filter
Light
PROGRAMMES
Knob
DISPLAY
START/PAUSE
Button & Light
CHILD LOCK
Button & Light
Indicator
Progress
Lights
OPTION
Buttons & Lights
ON/OFF
Button & Light
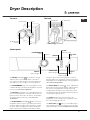
The front The back
Control Panel
Drum
Model & Serial
numbers
Filter
Air Intake Vent
Vent Tube fitted here
Caution: Hot!
Rating plate

6
GB
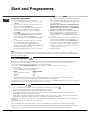
Start and Programmes
Choosing a programme
1. Plug the dryer into the electrical socket.
2. Sort your laundry according to fabric type (see
Laundry).
3. Open the door and make sure the filter is clean
and in place (see Maintenance).
4. Load the machine and make sure items are not
in the way of the door seal. Close the door.
5. If the On/Off light is not lit: Press the ON/OFF
button .
6. Choose a programme by checking the Programmes
Guide (see Programmes) as well as the indications
for each type of fabric (see Laundry).
- select a programme by rotating the PROGRAMMES
knob.
7. Set a delay time and other options if necessary.
8. The START/PAUSE light is flashing green:
- press the START/PAUSE button to begin.
The green light stops flashing and the display will
show the estimated time to end.
During the drying programme, you can check on
your laundry and take out items that are dry while
others continue drying. When you close the door
again, press the START/PAUSE button in order
to resume drying.
(When the door is opened the START/PAUSE light
will flash Amber, after the door is closed and the
START/PAUSE button pressed, the START/PAUSE
light will stop flashing and show green.)
9. During the last few minutes of Drying Programmes,
before the programme is completed, the final
COOL TUMBLE phase is entered (fabrics are
cooled), this phase should always be allowed to
complete.
10. The buzzer will warn you when the programme is
complete. Open the door, take the laundry out,
clean the filter and replace it (see Maintenance).
If the Post Creasecare Option has been selected
and you do not remove the laundry immediately,
the dryer will tumble occasionally for 10 hours
or until you open the door.
11. Unplug the dryer.
Easy Iron Programme
‘Easy Iron’ is a short 10 minute programme (8 minutes of heat followed by a 2 minute cool tumble period) which
fluffs the fibres of clothing that have been left in the same position/location for an extended period of time.
The cycle relaxes the fibres and makes them easier to iron and fold.
! ‘Easy Iron’ is not a drying programme and should not be used for wet articles of clothing.
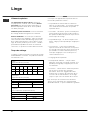
For best results:
1. Do not load more than the maximum capacity.
These numbers refer to the dry weight:
Fabric Maximum load
Cotton and Cotton mixtures 2.5kg
Synthetics 2kg
Denim 2kg
2. Unload the dryer immediately after the end of the programme, hang, fold or iron the articles and put
them away in the closet. Should this not be possible repeat the programme.
The ‘Easy Iron’ effect varies from one fabric to the next. It works well on traditional fabrics like Cotton or Cotton mix,
and less well on acrylic fibres and on materials such as Tencel®.
Wool Programme
●
This is a programme for tumble dryer safe garments marked with the symbol .
●
It can be used for load sizes up to 1kg (approximately 3 sweaters).
●
We recommend that garments are turned inside out before drying.
●
This programme will take about 60 minutes, but may take longer depending on the size and density of the
load and the spin speed used in your washer.
●
Loads dried using this programme are usually ready to wear, but on some heavier garments the edges may be
slightly damp. Allow these to dry naturally as over-drying could damage garments.
! Unlike other materials, the mechanism of wool shrinkage is irreversible; i.e. it will not stretch back to original size
and shape.
! This programme is not suitable for Acrylic garments.
The wool drying cycle of this tumble dryer has been approved by The Woolmark Company for the drying of
Woolmark garments labelled as machine wash and tumble dry, provided that the garments are dried according to
instructions on the garment label and those issued by the manufacturer of this tumble dryer (M0615).
Note:
This tumble dryer, in compliance with new energy saving regulations, is fitted with an automatic standby system
which is enabled after about 30 minutes if no activity is detected. Press the ON/OFF button briefly and wait for the
machine to start up again.

GB
7
Start and Programmes
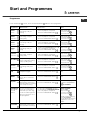
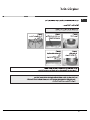
Programmes
! If the On/Off light is not lit; Press the ON/OFF button and then select programme.
Programme
What it does... How to set it... Note:
1
Cottons
Extra Dry
Dries your clothes on High
heat setting, ready for
wearing.
1. Position the PROGRAMME knob on 1.
2. Select any Options, if required.
3. Press the START/PAUSE button .
2
Cottons
Hanger Dry
Dries your clothes on High
heat setting, ready for
putting away.
1. Position the PROGRAMME knob on 2.
2. Select any Options, if required.
3. Press the START/PAUSE button .
Timed Drying
(120, 90, 60,
30 or 20
minutes)
Dries wet clothing that you
wish to dry on low heat or
small loads (less than 1kg).
Can be used with high heat
option if you prefer to use a
timed programme.
Options available:
High Heat ,
Delayed Start ,
Pre Creasecare ,
Post Creasecare .
Consult suggested drying
times (see Laundry).
The last 10 minutes of these
programmes is the Cool
Tumble.
Options available:
None
1. Position the PROGRAMME knob on 11
2. Press the START/PAUSE button .
Brief programme
(approximately 10 minutes)
that cools fibres or clothing.
1. Position the PROGRAMME knob on
the desired time: 120, 90, 60, 30 or 20.
2. Select any Options, if required.
3. Press the START/PAUSE button .
11
Cool Tumble
Brief programme
(approximately 10 minutes)
that softens fibres of clothing
that is ready for ironing.
! This is not a drying
programme (see previous
page).
Options available:
None
1. Position the PROGRAMME knob on 10.
2. Press the START/PAUSE button .
3
Cottons
Cupboard Dry
Dries your clothes on High
heat setting, ready for
hanging.
1. Position the PROGRAMME knob on 3.
2. Select any Options, if required.
3. Press the START/PAUSE button .
4
Cottons
Iron Dry
Dries your clothes on High
heat setting, ready for
ironing.
1. Position the PROGRAMME knob on 4.
2. Select any Options, if required.
3. Press the START/PAUSE button .
5
Synthetics
Cupboard Dry
Dries your clothes on High
heat setting , ready for
putting away.
1. Position the PROGRAMME knob on 5.
2. Select any Options, if required.
3. Press the START/PAUSE button .
6
Bed & Bath
Dries your bedding and
towels on High heat setting,
ready for putting away.
1. Position the PROGRAMME knob on 6.
2. Select any Options, if required.
3. Press the START/PAUSE button .
7
Delicates
(e.g. Acrylics)
Dries your clothes on Low
heat setting, ready to be
worn.
Options available:
Delayed start
Pre Creasecare
Post Creasecare
1. Position the PROGRAMME knob on 7.
2. Select any Options, if required.
3. Press the START/PAUSE button .
8
Wool
Dries your Woollen clothes,
(see previous page).
Options available:
None
1. Position the PROGRAMME knob on 8.
2. Press the START/PAUSE button .
9
AIRING
10
Easy Iron
Airs your clothes with cool
air, use also to cool warm
clothes.
Options available:
None
1. Position the PROGRAMME knob on 9.
2. Press the START/PAUSE button .
Options available:
Delayed start
Pre Creasecare
Post Creasecare
Options available:
Delayed start
Pre Creasecare
Post Creasecare
Options available:
Delayed start
Pre Creasecare
Post Creasecare
Options available:
Delayed start
Pre Creasecare
Post Creasecare
Options available:
Delayed start
Pre Creasecare
Post Creasecare
Options available:
Delayed start
Pre Creasecare
Post Creasecare

8
GB
Start and Programmes
●
DISPLAY
The display shows either the amount of time delay
remaining or an indication of the amount of time left for
a drying programme.
The delay time is displayed in hours and counts down
each minute.
The time to end is displayed in hours and minutes and
counts down each minute, this includes the cool
tumble phase. When timed programmes are selected
the time displayed throughout the cycle is the actual
time remaining.
When a sensing programme is selected the time
displayed is an estimate of the time remaining. When
the programme is selected the display shows the time
required to dry a full load, after around 10 minutes the
controller calculates a better estimate of the cycle time.
The colons between the hours and minutes in the
display flash to show that the time is counting down.
When the programme finishes its cool tumble phase
the display will show .
The display also shows if there is a problem with your
dryer, if this occurs the display will show F followed by
a fault code number (see Troubleshooting).
●
Door Opening
Opening the door (or pressing the START/PAUSE
button ) during a programme will stop the dryer and
have the following effects:
●
The START/PAUSE light flashes Amber.
●
During a delay phase the delay will continue to
count down. The START/PAUSE button must
be pressed to resume the delay programme. The
progress lights will change to show current status.
●
During the drying part of the programme, the
time to end count continues but the colons do not
flash. The START/PAUSE button must be
pressed to resume the programme. The progress
lights will change to show the current status.
●
During the post creasecare phase of a drying
programme, the programme will finish. Pressing
the START/PAUSE button will re-start a new
programme at the beginning.
●
The START/PAUSE button must be pressed to
resume the programme. The progress lights will
change to show the current status and the
START/PAUSE light will stop flashing and turn green.
●
Changing the programmes knob will select a new
programme and the START/PAUSE light will flash
green. You can use this to select the Cool Tumble
programme to cool the clothes, if you find them
dry enough. Press the START/PAUSE button to
begin a new programme.
●
Note
If you have a power cut, switch off the power or
remove the plug. When the power is restored, press
the START/PAUSE button and the programme will
resume.
●
PROGRAMMES knob
! Warning, if after pressing the START/PAUSE button
the programme knob position has changed, the new
position will NOT change the programme selected.
To change a selected programme, press the
START/PAUSE button , the light flashes Amber to
indicate the programme is paused. Select the new
programme and any options required, the light will
then flash green. Press the START/PAUSE button
again and the new programme will start.
●
OPTION buttons / lights
These buttons are used to customise the selected
programme to your requirements. A programme must
have been selected on the programme knob before
an option can be selected. Not all options are available
for all programmes (see Start and Programmes). If an
option is not available and you press the button, the
buzzer will beep three times. If the option is available
there will be one beep and the option light next to the
button lights to confirm the selection.
After the START/PAUSE button has been pressed only
the Pre Creasecare and Post Creasecare options can
be changed.
Time Delay
The start of some programmes (see Start and
Programmes) can be delayed for up to 24 hours.
Press this button, the display shows and the
option light comes on. Press again and a 1 hour delay
is selected and the display indicates 1hr, each further
press of the button adds 1hr to the delay. When 24hr
is displayed a further press the display shows
and after a couple of seconds cancels the delay. You
can also cancel the delay by pressing the ON/OFF
button.
Pre Creasecare
This option is only available if a delayed start has
been selected. It tumbles the clothes occasionally
during the delayed period to help prevent creases
developing.
High Heat
Available for Timed Drying programmes. Press this
button and a high heat setting is selected and the
light next to the button comes on.
Timed programmes have a default of low heat, if the
light next to the button is on then pressing this button
selects a low heat setting and the light goes out.
Post Creasecare
When available and selected, the clothes are
occasionally tumbled after the end of the drying and
cool tumble cycles, to help prevent creases
developing should you not be available to remove the
load immediately the programme is complete.
OFF
OFF
E88
The Controls

GB
9
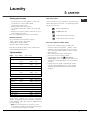
Laundry
Sorting your laundry
●
Check symbols on clothing labels to make sure
that the articles can be tumble dried.
●
Sort laundry by fabric type.
●
Empty pockets and check buttons.
●
Close zippers and hooks and tie loose belts and
strings.
●
Wring out each item in order to eliminate as much
excess water as possible.
! Do not load dripping wet clothes into the dryer.
Maximum load size
Do not load more than maximum capacity.
These numbers refer to dry weight:
Natural fibres: 7kg max (15lb)
Synthetic fibres: 3kg max (6.6lb)
! DO NOT overload the dryer as this could result in
reduced drying performance.
Typical weights
Note: 1kg = 1000g (1lb = 16oz)
Clothes
Blouse Cotton 150g (5oz)
Other 100g (3oz)
Dress Cotton 500g (1lb 2oz)
Other 350g (12oz)
Jeans 700g (1lb 6oz)
10 nappies 1000g (2lb 3oz)
Shirt Cotton 300g (10oz)
Other 200g (7oz)
T-Shirt 125g (4oz)
Household Items
Duvet cover Cotton 1500g (3lb 5oz)
(Double) Other 1000g (2lb 3oz)
Large Tablecloth 700g (1lb 6oz)
Small Tablecloth 250g (9oz)
Tea Towel 100g (3oz)
Bath Towel 700g (1lb 6oz)
Hand Towel 350g (12oz)
Double Sheet 500g (1lb 2oz)
Single Sheet 350g (12oz)
At the end of a drying cycle, cottons could still be
damp if you grouped cottons and synthetics together.
If this happens simply give them an additional short
period of drying.
●
Note: The last 10 minutes of any time set is the
Cool Tumble, so allow for this when setting the time,
as this period will not dry your laundry.
Wash Care Labels
Look at the labels on your garments, especially when
tumble drying for the first time. The following symbols
are the most common:
May be tumble dried
Do not tumble dry
Tumble dry at high heat setting
Tumble dry at low heat setting
Items not suitable for tumble drying
●
Articles that containing rubber or rubber-like
materials or plastic film (pillows, cushions, or PVC
rainwear), any other flammable articles or objects
that contain flammable substances (towels soiled
with hair spray).
●
Glass fibres (certain types of draperies)
●
Items which have been dry cleaned
●
Items with the ITCL Code (see Special
clothing items). These can be cleaned with special
at-home dry cleaning products. Follow instructions
carefully.
●
Large bulky items (quilts, sleeping bags, pillows,
cushions, large bedspreads etc). These expand
when drying and would prevent airflow through
the dryer.

10
GB
Laundry
Times are approximate and can vary depending
upon:
●
Amount of water retained in clothes after spin
cycle: towels and delicates retain a lot of water.
●
Fabrics: items that are the same type of fabric but
different textures and thicknesses may not have
the same drying time.
●
Quantity of laundry: single items or small loads
may take longer to dry.
●
Dryness: If you are going to iron some of your
clothes, they can be taken out while still a bit
damp. Others can be left longer if you need them
to be completely dry.
●
Heat setting.
●
Room temperature: if the room where the dryer is
located is cold, it will take longer for the dryer to
dry your clothes.
●
Bulk: some bulky items can be tumble dried with
care. We suggest that you remove these items
several times, shake them out, and return them to
the dryer until finished.
! Do not over-dry your clothes.
All fabrics contain a little natural moisture, which
keeps them soft and fluffy.
Special clothing items
Blankets and Bedspreads: acrylic items (Acilan,
Courtelle, Orion, Dralon) must be dried with special
care on LOW heat setting. Avoid drying for a long
period of time.
Pleated or creased garments: read the manufacturer’s
drying instructions on the garment.
Starched articles: do not dry these with non-starched
items. Make sure that as much of the starch solution is
removed from the load as possible before placing it in
the dryer. Do not over-dry: the starch will become
powdery and leave your clothing limp, which defeats
the purpose of starch.
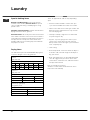
Drying times
The table below presents APPROXIMATE drying times
in minutes. Weights refer to dry garments:
Cottons
High (full) Heat
Drying times 800-1000rpm in washing machine
Half Load Full Load
1kg 2kg 3kg 4kg 5kg 6kg 7kg
20-30 35-45 45-60 60-70 70-80 80-100 90-120
Synthetics
High (full) Heat
Drying times on reduced spin in washing machine
Half Load Full Load
1kg 2kg 3kg
20-40 30-50 40-70
Delicates (e.g.Acrylics)
Low (gentle) Heat
Drying times on reduced spin in washing machine
Half Load Full Load
1kg 2kg
50-70 90-130

GB
11
Warnings and Suggestions
! The appliance has been designed and built according
to international safety standards.
These warnings are given for safety reasons and must
be followed carefully.
General safety
●
This tumble dryer is not intended for use by
persons (including children) with reduced physical,
sensory or mental capabilities, or lack of experience
and knowledge, unless they have been given
supervision or instruction concerning use of the
appliance by a person responsible for their safety.
●
This tumble dryer has been designed for home,
and not professional use.
●
Do not touch the appliance while barefoot or with
wet hands or feet.
●
Unplug the machine by pulling on the plug, not
the cord.
●
Children must not be in proximity of the dryer
when in use. After using the dryer, turn it off and
unplug it. Keep the door closed to make sure that
children do not use it as a toy.
●
Children should be supervised to ensure that they
do not play with the dryer.
●
The appliance must be installed correctly and
have proper ventilation. The air intake vents
behind the machine, the outlet vents and the vent
tube should never be obstructed (see Installation).
●
Never direct the vent tube outlet towards the air
intake at the back of the machine.
●
Never allow the tumble dryer to recycle exhaust air.
●
Never use the dryer on carpeting where the pile
height would prevent air from entering the dryer
from the base.
●
Check to see if the dryer is empty before loading it.
●
The back of the dryer could become very
hot. Never touch it while in use.
●
Do not use the dryer unless the filter is securely
in place (see Maintenance).
●
Do not use liquid fabric softeners in the dryer, add
it to the final rinse of your wash.
●
Do not overload the dryer (see Laundry) for
maximum loads.
●
Do not load items that are dripping wet.
●
Tumble dry items only if they have been washed
with detergent and water, rinsed and been through
the spin cycle. It is a fire hazard to dry items that
HAVE NOT been washed with water.
●
Carefully check all instructions on clothing labels
(see Laundry).
●
Do not dry garments that have been treated with
chemical products.
●
Never dry articles that are contaminated with
flammable substances (cooking oil, acetone, alcohol,
petrol, kerosene, spot removers, turpentine, waxes,
wax removers and hair sprays), unless washed in
hot water with an extra amount of detergent.
●
Do not tumble dry rubber, rubber backed articles and
clothes, pillows fitted with foam rubber pads, foam
(latex foam), rubber, plastic, shower caps, waterproof
textiles, nappy pants or liners, polythene or paper.
●
Do not tumble dry large, very bulky items.
●
Do not tumble dry acrylic fibres at high temperatures.
●
Remove all objects from pockets, especially lighters
(risk of explosion).
●
Complete each programme with its Cool Tumble Phase.
●
Do not turn off the dryer when there are still warm
items inside.
●
Clean the filter after each use (see Maintenance).
●
Do not allow lint to collect around the dryer.
●
Never climb on top of the dryer. It could result in
damage.
●
Always follow electrical standards and requirements
(see Installation).
●
Always buy original spare parts and accessories
(see Service).
! WARNING: Never stop the dryer before the end of the
drying cycle unless all items are quickly removed and
spread out so that the heat is dissipated.
Recycling and disposal information
As part of our continued commitment to helping the
environment, we reserve the right to use quality recycled
components to keep down customer costs and minimise
material wastage.
●
Disposing of the packaging material: follow local
regulations, so the packaging can be recycled.
●
To minimise risk of injury to children, remove the
door and plug - then cut off mains cable, flush
with the appliance. Dispose of these parts separately
to ensure that the appliance can no longer be
plugged into a mains socket.
Disposal of old electrical appliances
The European Directive 2002/96/EC on Waste Electrical
and Electronic Equipment (WEEE), requires that old
household electrical appliances must not be disposed
of in the normal unsorted municipal waste stream. Old
appliances must be collected separately in order to
optimise the recovery and recycling of the materials
they contain and reduce the impact on human health
and the environment.
The crossed out “wheeled bin” symbol on the
product reminds you of your obligation, that
when you dispose of the appliance it must be
separately collected.
Consumers should contact their local authority or
retailer for information concerning the correct disposal
of their old appliance.
Saving energy and respecting the
environment
●
Wring out items to eliminate excess water before
tumble drying (if you use a washing machine first,
select a high spin cycle). Doing this will save time
and energy during drying.
●
Always dry full loads - you save energy: single
items or small loads take longer to dry.
●
Clean the filter after each use to contain energy
consumption costs (see Maintenance).

12
GB
Maintenance and Care
Check the drum after each cycle
Turn the drum manually in order to remove small items
(handkerchiefs) that could have been left behind.
Cleaning the drum
! Do not use abrasives, steel wool or stainless steel
cleaning agents to clean the drum.
A coloured film may start to appear on the stainless
steel drum, this may be caused by a combination of
water and, or cleaning agents such as fabric conditioner
from the wash. This coloured film will not affect the
dryer performance.
Cleaning
●
External parts in metal or plastic and rubber parts
can be cleaned with a damp cloth.
●
Periodically check the vent tube and any
permanent venting fixture to make sure that there
has been no accumulation of fluff or lint, and
remove it.
●
Remove lint that collects around the filter and the
outlet vents.
! Do not use solvents or abrasives.
! Your dryer uses special bearing components which
do not need lubrication.
! Have your dryer checked regularly by authorised
technicians to ensure electrical and mechanical safety
(see Service).
Switching off the electricity
Unplug your dryer when not using it, when cleaning it
and during all maintenance operations.
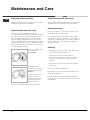
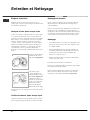
Clean the filter after each cycle
The filter is an important part of your dryer:
it accumulates lint and fluff that is formed while drying.
Small items could also become trapped in the filter.
When finished drying, therefore, clean the filter by
rinsing it under running water or with your vacuum
cleaner. Should the filter become clogged up, the airflow
inside the dryer will be seriously compromised: drying
times lengthen and you will consume more energy. It
may also damage your dryer.
The filter is found in front
of the dryer trim
(see diagram).
Removing the filter:
1. Pull the plastic grip of
the filter upwards (see
diagram).
2. Clean the filter and
replace it correctly.
Ensure the filter is fully
located flush into the
tumble dryer trim.
! Do not use the dryer without replacing the filter..

GB
13
Troubleshooting
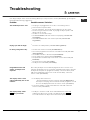
One day your dryer seems not to be working. Before you call your Service Centre (see Service), go through the
following troubleshooting suggestions:
Problem:
The tumble dryer won’t start.
Drying cycle will not begin.
Its taking a long time to dry.
Programme finishes and
clothes are damper than
expected.
The display shows a fault
code F followed by one or two
numbers.
The display briefly shows
every 6 seconds.
Possible causes / Solution:
●
The plug is not plugged into the socket, or not making contact.
●
There has been a power failure.
●
The fuse has blown. Try to plug another appliance into the socket.
●
You are using an extension cord? Try to plug the dryer’s power cord
directly into the socket.
●
The door is not closed securely?
●
The PROGRAMMES knob has not been set properly (see Start and
Programmes).
●
The START/PAUSE button has not been pressed (see Start and
Programmes).
●
You have set a delayed time (see Start and Programmes).
●
The filter has not been cleaned (see Maintenance).
●
The correct programme has not been selected for the load (see Start
and Programmes).
●
The flexible vent tube is obstructed (see Installation).
●
The air intake vent is obstructed (see Installation).
●
The permanent ventilation flap on the storm cover is obstructed (see
Installation).
●
The items were too wet (see Laundry).
●
The dryer was overloaded (see Laundry).
! For safety the dryer has a maximum programme time of 3 hours. If an
automatic programme has not sensed the required final moisture in this time
the dryer will complete the programme and stop. Check the above points
and run the programme again, if the results are still damp, contact the
Service Centre (see Service).
●
If the display shows F10 or F15:
- Turn off and remove the plug. Clean the filter (see Maintenance).
Then replace the plug, turn on and start another programme. If F10
or F15 is still displayed contact the Service Centre (see Service).
●
If any other number is shown: Note down the code and contact the
Service Centre (see Service).
●
The dryer is in ‘Demo’ mode. Press and hold both the On/Off and
Start/Pause buttons for 3 seconds. The display will show for
3 seconds and then the dryer will resume normal operation.

14
GB
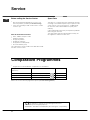
Service
Spare Parts
This dryer is a complex machine. Repairing it yourself
or having a non-authorised person try to repair it could
cause harm to one or more persons, could damage
the machine and could invalidate the spare parts
warranty.
Call an authorised technician if you experience problems
while using the machine.
The spare parts have been designed exclusively for
this appliance and not for other uses.
Before calling the Service Centre:
●
Use the troubleshooting guide to see if you can
solve the problem yourself (see Troubleshooting).
●
If not, turn off the dryer and call the Service Centre
closest to you.
What to tell the Service Centre:
●
name, address and post code.
●
telephone number.
●
the type of problem.
●
the date of purchase.
●
the appliance model (Mod.).
●
the serial number (S/N).
This information can be found on the data label inside
the door of the machine.
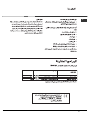
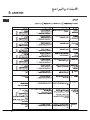
Comparative Programmes
●
Programmes recommended for comparative test to EN61121
! Note: This is not a full list of programme options (see Start and Programmes).
Programme Programme to select Load size
(EN61121)
Dry Cotton 2 Cottons - Cupboard Dry 7 kg
Iron Dry Cotton 4 Cottons - Iron Dry 7 kg
Easy-care textile 5 Synthetics - Cupboard Dry 3 kg
This appliance conforms to the following EC Directives:
- 2006/95/EC (Low Voltage Equipment)
- 89/336/EEC, 92/31/EEC and 93/68/EEC (Electromagnetic Compatibility)

Table des Matières
SÈCHE-LINGE
ASL700V
ASL700VX
Notice d’utilisation et installation
Informations importantes, 16
Installation, 17-18
Où installer votre sèche-linge
Ventilation
Connexions électrique
Avant de commencer à utiliser votre
sèche-linge
Description du sèche-linge, 19
Vue de face
Vue de l’arrière
Panneau de commandes
Démarrage et programmes, 20-22
Choisir un programme
Tableau des programmes
Linge, 23-24
Trier votre linge
Étiquettes d’entretien
Vêtements spéciaux
Temps de séchage
Avertissements et Suggestions, 25
Sécurité générale
Élimination
Économiser de l’énergie et respecter l’environnement
Entretien et Nettoyage, 26
Éteindre l’électricité
Nettoyer le filtre après chaque cycle
Vérifier le tambour après chaque cycle
Nettoyer le sèche-linge
Que faire en cas de panne, 27
Service Après-vente, 28
Pièces de rechange
GB
English, 1
F
Français, 15
A
Arabic, 44
15
F
! Conservez cette notice d’utilisation et d’installation à portée de main de manière à pouvoir vous y référer si
nécessaire. Emmenez-la avec vous si vous déménagez, et, si vous vendez cet appareil ou que vous le donniez à un tiers,
faites en sorte que cette notice accompagne le sèche-linge de manière à ce que le nouveau propriétaire soit informé
des avertissements et suggestions concernant le fonctionnement de ce sèche-linge.
! Lisez attentivement ce mode d’emploi; les pages suivantes contiennent des informations importantes concernant
l’installation et des suggestions relatives au fonctionnement de cet appareil.
Ce symbole vous rappele de lire le livret d’instructions.

16
F
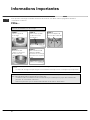
Informations Importantes
! Vous devez IMPERATIVEMENT nettoyer le filtre à
peluches A CHAQUE cycle de séchage.
Filtre...
! Négliger de nettoyer le filtre après CHAQUE cycle de séchage nuira aux performances de séchage de votre
machine.
- Le temps de séchage sera plus long et la consommation électrique sera en conséquence plus importante.
ETAPE 1.
Ouvrez la porte du
sèche-linge.
ETAPE 2.
Sortez le filtre (à l'aide
des deux encoches
passe-doigts)
Pour que votre sèche-linge à ventilation fonctionne efficacement, vous devez suivre le programme d’entretien
courant décrit ci-dessous :
! Vous devez IMPERATIVEMENT enlever périodiquement les accumulations de peluches autour du logement du
filtre et du tube d’évacuation, TOUS les deux ou trois mois :
- Contrôlez le tube et l’installation fixe d’évacuation de façon à vérifier qu’il n’y a pas d’accumulation de
peluches. Le cas échéant, enlevez-les.
- Enlevez les peluches qui s’accumulent autour du filtre et des orifices d’évacuation.
ETAPE 3.
Enlevez les dépôts de
peluches des mailles du
filtre.
ETAPE 4.
Remontez le filtre.
- Veillez à orienter les
flèches vers vous.
ETAPE 5.
Enforce le filtre à fond.
- NE faites JAMAIS
fonctionner le sèche-linge
sans avoir remis en place
le filtre

F
17
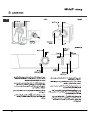
Installation
! Assurez-vous que l’extrémité du tuyau ne soit pas
dirigée vers l’orifice d’entrée d’air à l’arrière du sèche-
linge.
! Le tuyau de ventilation ne doit pas dépasser 2,4
mètres de longueur et vous devez faire en sorte
d’éviter toute accumulation éventuelle de peluches et
d’eau en le secouant fréquemment. Assurez-vous
toujours que ce tuyau ne soit pas écrasé.
Ventilation permanente
Conjointement avec le tuyau de ventilation, nous vous
recommandons d’utiliser un Kit de Ventilation
Mur/Fenêtre, disponible dans le commerce ou chez
votre Revendeur de Pièces de Rechange le plus
proche.
Montage au mur
1. Laissez une ouverture
dans le mur à gauche
l’endroit où sera installé le
sèche-linge.
2. Faites en sorte que le
tuyau soit aussi court et
droit que possible pour
éviter que de l’humidité
condensée ne revienne
dans le sèche-linge.
3. De même, le conduit
dans le mur doit être
incliné vers le bas vers
l’extérieur.
Montage à la fenêtre
1. Avec un sèche-linge
superposé, le trou dans la
fenêtre doit idéalement
être effectué au-dessous
de l’orifice de ventilation.
2. Le tuyau doit être aussi
court que possible.
En fonction de la fréquence à laquelle vous utilisez
votre sèche-linge, il est essentiel que les zones A et B
soient vérifiées périodiquement pour retirer les
peluches ou les débris. L’adaptateur du tuyau de
ventilation doit être installé solidement, ce qui évite
ainsi que de l’air humide ne soit ré-émis dans la pièce.
! Le sèche-linge ne doit pas être repoussé à une
distance telle que l’adaptateur du tuyau soit arraché
ou que le tube soit écrasé ou plié.
! Le tuyau doit être placé à l’écart de l’orifice d’entrée
d’air ne doit être ni entaillé, ni crasé, ni plié en forme
de ‘U’ afin d’évitér d’obstruer le tuyau et de bloquer la
condensation.
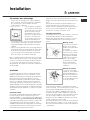
Où installer votre sèche-linge
●
Placez votre sèche-linge à une certaine distance
des cuisinières, fourneaux, radiateurs, ou plaques
de cuisson à gaz, car les flammes peuvent
endommager cet appareil.
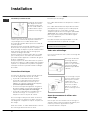
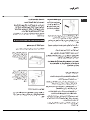
●
Si vous installez cet appareil
sous un plan de travail, faites
en sorte de laisser un espace
de 10 mm entre le dessus
de l’appareil et tout autre
objet sur ou au-dessus de la
machine, et un espace de
15 mm entre les côtés et les
éléments d’ameublement
ou les murs latéraux. Ceci a pour objectif d’assurer
une ventilation convenable. Assurez-vous que les
orifices de ventilation situés à l’arrière ne soient pas
obstrués.
●
Faites en sorte d’installer votre sèche-linge dans un
environnement qui n’est pas humide et qui est doté
d’une bonne circulation d’air dans toute la pièce.
Le sèche linge ne fonctionnera pas efficacement
dans un espace clos ou dans un placard.
! Nous vous déconseillons d’installer votre sèche-linge
dans un placard. En revanche, le sèche-linge ne doit
en aucun cas être placé derrière une porte fermant à
clé, une porte coulissante ou une porte montée sur
des gonds du côté opposé à la porte de chargement
du sèche-linge.
Ventilation
Cet appareil sèche votre linge en aspirant de l’air frais,
propre et relativement sec, en le chauffant, et en le
distribuant ensuite parmi les vêtements qui sont brassés
doucement par la rotation du tambour. Pour une
performance optimale, l’air humide est ensuite expulsé à
travers un conduit de ventilation situé à l’arrière du
sèche-linge. Lorsque le sèche-linge est en marche, une
aération adéquate est nécessaire afin d’éviter le retour de
gaz dans la pièce, provenant de la combustion d’autres
combustibles par des appareils, y compris les feux de
cheminée.
Ventilation mobile
Un tuyau de ventilation doit toujours être installé lorsque
le sèche-linge est utilisé conjointement avec une
Ventilation Mobile. Ce tuyau doit être fixé solidement à
l’arrière du sèche-linge (voir la Description du Sèche-linge).
Si possible, il vaut toujours mieux connecter ce tuyau à une
sortie permanente située près du sèche-linge. Si une
installation permanente n’est pas possible, le sèche-linge
fonctionnera tout aussi bien en faisant passer le tuyau à
travers une fenêtre partiellement ouverte.
minimale espace 10mm
minimale
espace 15mm

18
F
Installation
! N’utilisez pas de rallonges.
! Le cordon d’alimentation ne doit pas être courbé ou
écrasé.
! Le cordon d’alimentation électrique doit être vérifié
périodiquement et remplacé par un cordon préparé
spécialement pour ce sèche-linge, et installé
uniquement par des électriciens agréés (voir Service
Après-vente). Des cordons d’alimentation neufs ou
plus longs sont fournis par les revendeurs agréés
contre un supplément.
! Le fabricant rejète toute responsabilité en cas de
non-respect de toutes ou partie de ces règles.
! En cas de doute au sujet des points precedents,
consultez un electricien qualfie.
Caler votre sèche-linge
Pour un fonctionnement correct, votre sèche-linge doit
être à niveau.
Après avoir installé votre
sèche-linge dans son
emplacement définitif,
veillez à ce qu'il soit bien
à niveau tout d'abord
latéralement puis devant
et derrière.
Si le sèche-linge n'est pas
au niveau, utilisez un bloc
de bois pour le soutenir
pendant que vous
ajustez, vers le haut ou
vers le bas, les deux
pieds et ce, jusqu'à ce
que le sèche-linge soit au
niveau.
Avant de commencer à utiliser votre
sèche-linge
Une fois que vous avez installé votre sèche-linge, et
avant de l’utiliser, nettoyez l’intérieur du tambour pour
retirer les poussières qui pourraient s’y être
accumulées durant le transport.
Ventilation par fenêtre ouverte
L’extrémité du tuyau doit
être dirigée vers le bas,
de manière à éviter que
de l’air chaud humide se
condense dans la pièce
ou dans le sèche-linge.
! Assurez-vous que le sèche-linge soit convenablement
ventilé et que l’extrémité du tuyau de ventilation ne
soit pas dirigée vers le conduit d’entrée d’air.
! Le tuyau de ventilation doit toujours être installé de
manière optimale.
! Assurez-vous que le tuyau de ventilation et les orifices
d’entrée d’air ne soient pas obstrués ou bloqués.
! Le sèche-linge ne doit pas recycler de l’air d’évacuation.
! Une mauvaise utilisation d’un sèche-linge peut
entraîner un danger d’incendie.
! Ne pas expulser l’air d’évacuation dans un conduit
qui est utilisé pour les évacuations des émanations
provenant d’autres appareils à combustion de gaz ou
d’autres combustibles.
! Ne pas expulser l’air d’évacuation dans un système
d’extraction ni dans un conduit équipé d’un ventilateur
aspirant. Ceci perturberait la façon dont la régulation
thermique fonctionne et pourrait entraîner un danger
d’incendie.
Connexions électriques
Assurez-vous des points suivants avant de brancher
la fiche de l’appareil dans la prise de courant:
●
La prise de courant doit être reliée à la terre.
●
La prise de courant doit pouvoir supporter la
puissance maximale de la machine, qui est
indiquée sur la plaque signalétique de l’appareil
(voir la Description du Sèche-linge).
●
La tension électrique doit appartenir à la gamme
de valeurs indiquée sur la plaque signalétique de
l’appareil (voir la Description du Sèche-linge).
●
La prise de courant doit être compatible avec la
fiche du sèche-linge. Si ce n’est pas le cas,
remplacez la fiche ou la prise de courant.
! Le sèche-linge ne doit pas être utilisé à l’extérieur,
même si l’espace en question est abrité. Cela peut
être dangereux si l’appareil est exposé à la pluie ou à
des orages.
! Une fois installés, le cordon d’alimentation et la fiche
du sèche-linge doivent être d’accès facile.

F
19
Description du sèche-linge
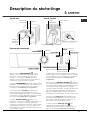
Panneau de commandes
Vue de face Vue de l’arrière
Panneau de
commande
Tambour
Filtre
Numéro du
Modèle et
Numéro de
Série
Orifice d’entrée
d’air
Tuyau de ventilation fixé ici
Attention: Chaud!
Plaque
signalétique
Témoin
Nettoyage filtre
Bouton
PROGRAMMES
AFFICHAGE
DÉPART/PAUSE
Bouton et Témoin
SÉCURITÉ ENFANTS
Bouton et Témoin
Indicateur
Témoins
Progression
MARCHE/ARRÊT
Bouton et Témoin
Boutons et Témoins
OPTION
Le témoin est vert lorsque le programme fonctionne,
orange clignotant si le programme a été mis en pause
ou vert clignotant si le sèche-linge est en attente du
lancement d’un programme (voir Démarrage et
Programmes).
B
outon et témoin SÉCURITÉ ENFANTS : appuyez
sur ce bouton pendant quelques instants après avoir
sélectionné votre
programme et d’éventuelles options.
Ceci empêche toute modification des réglages.
Lorsque le témoin est allumé, les autres boutons ainsi
que le sélecteur de programmes sont désactivés.
Appuyez pendant quelques instants sur le bouton
pour annuler la sécurité enfants. Le témoin s’éteint alors.
Les témoins de Progression vous indiquent l’état
d’avancement du programme. Au fur et à mesure
que chaque stade du programme commence, le
témoin lumineux correspondant s’allume.
Le témoin lumineux Nettoyage filtre vous
rappelle avant chaque programme qu’il est
essentiel de nettoyer le filtre à chaque fois que l’on
utilise le sèche-linge (voir Entretien et Nettoyage).
Bouton et témoin MARCHE/ARRÊT : si vous
appuyez sur ce bouton alors que le sèche-linge
fonctionne, ce dernier s’arrête. Appuyez de
nouveau, le séche-linge redémarre. Le témoin
indique si votre sèche-linge est en fonctionnement
ou prêt pour la sélection d’un programme.
Le bouton PROGRAMMES permet de sélectionner un
programme : tournez-le jusqu’à ce que l’indicateur se
positionne sur le programme que vous souhaitez
sélectionner (voir Démarrage et Programmes).
Les boutons/témoins OPTION sélectionnent les
options disponibles pour le programme choisi. Les
témoins allumé indique que l’option a été sélectionnée.
Si une option n’est pas disponible, l’alarme émet trois
bips sonores (voir Démarrage et Programmes).
Le bouton DÉPART/PAUSE commence un
programme sélectionné. Quand vous appuyez sur ce
bouton, il y a un bip et les témoins lumineux de
progression clignotent pour confirmer l’action. Quand
un programme fonctionne, et que l’on maintient ce
bouton appuyé, le programme marque une pause et
le sèche-linge s’arrête.

20
F
Démarrage et Programmes
Choisir un programme
1. Branchez la fiche du sèche-linge dans la prise
électrique.
2. Triez votre linge en fonction du type de textiles
(voir Linge).
3. Ouvrez la porte et en assurant-vous que le filtre
soit propre et en place (voir Entretien).
4. Chargez la machine et assurez-vous que des
articles ne bloquent pas le joint de la porte.
Fermez la porte.
5. Si le témoin lumineux Marche/arrêt ne s’allume
pas : appuyez sur le bouton MARCHE/ARRET
6. Choisissez un programme en vérifiant avec le
guide des programmes (voir Programmes) ainsi
que les indications pour chaque type de tissu
(voir Linge).
- Sélectionnez un programme en tournant le
bouton PROGRAMMES dans le sens des
aiguilles d’une montre.
7. Réglez le depart différé de temporisation et
d’autres options si nécessaire.
8. Le témoin DÉPART/PAUSE clignote en vert :
- appuyez sur le bouton DÉPART/PAUSE pour
commencer.
Le témoin vert cessera de clignoter et
l’affichage indiquera le temps qu’il reste jusqu’à la fin.
Au cours d’un programme de séchage, vous
pouvez vérifier votre linge et sortir les articles qui
sont secs pendant que les autres continuent à
sécher. Lorsque vous refermez la porte, appuyez
sur le bouton DÉPART/PAUSE afin de continuer
le séchage.
(Lorsque la porte est ouverte, le témoin
DÉPART/PAUSE clignote en orange. Dès que
vous aurez fermé la porte et appuyé sur le bouton
DÉPART/PAUSE, le témoin DÉPART/PAUSE
cessera de clignoter et restera allumé en vert.)
9. Pendant les quelques dernières minutes des
programmes de séchage, avant de terminer le
programme, celui-ci entre dans la phase finale
de REFROIDISSEMENT (les textiles sont refroidis),
que vous devez toujours laisser se terminer.
10. Le buzzer vous avertit quand le programme est
terminé. Ouvrez la porte, sortez votre linge, net
toyez le filtre et remettez-le en place (voir
Entretien).
Si vous avez sélectionné l’option Anti-froissement
mais que vous ne retirez pas le linge
immédiatement, le sèche-linge tournera de
temps à autres pendant 10 heures ou jusqu’à ce
que vous ouvriez la porte.
11. Débranchez le sèche-linge.
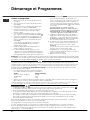
Programme de Repassage Facile
Le ‘Repassage Facile’ est un programme court de 10 minutes (8 minutes de chauffage suivies d’une période de
refroidissement de 2 minutes) qui ‘ébouriffe’ les fibres de vêtements qui ont été laissés dans la même position/le même
endroit pendant une durée de temps prolongée. Ce cycle relâche les fibres et les rend plus faciles à repasser et à plier.
! ‘Repassage Facile’ n’est pas un programme de séchage et ne doit pas être utilisé pour des vêtements mouillés.
Pour des résultats impeccables:
1. Ne chargez pas plus que la capacité maximum.
Les chiffres suivants font référence au poids sec:
Textile Charge maximum
Coton et cotons mélangés 2,5 kg
Synthétiques 2 kg
Jeans 2 kg
2. Videz le sèche-linge aussitôt le programme terminé, suspendez, pliez ou repassez les articles et rangez-les
dans l’armoire. Si cela n’est pas possible, répétez le programme.
L’effet ‘Repassage Facile’ varie d’un textile à l’autre. Il fonctionne bien sur les textiles traditionnels comme le Coton ou
les Cotons mélangés, et moins bien sur les fibres acryliques et sur les matériaux comme le Tencel®.
Programme Lainage
●
Il s’agit d’un programme pour faire tourner les vêtements tolérant le sèche-linge et marqués du symbole .
●
Le programme peut être utilisé pour des charges jusqu’à 1kg (environ 3 pull-overs).
●
Nous recommandons de retourner les vêtements avant de les sécher.
●
Ce programme mettra environ 60minutes, mais peut prendre plus longtemps en fonction de la taille et de la
densité de la charge et de la vitesse d’essorage utilisée dans votre lave-linge.
●
Les charges séchées dans ce programme sont normalement prêtes à porter, mais pour certains vêtements
plus lourds, les bords peuvent être légèrement humides. Laissez sécher naturellement car un séchage
excessif pourrait les endommager.
! Au contraire des autres matières, le mécanisme du rétrécissement de la laine est irréversible ; c’est-à-dire
qu’elle ne reviendra pas à sa taille et à sa forme d’origine.
! Ce programme ne convient pas pour les vêtements acryliques.
Le cycle séchage laine de ce sèche-linge a été approuvé par la Woolmark pour le séchage en tambour
d'articles Woolmark étiquetés lavables en machine et séchage en tambour, sous réserve que ces articles
soient séchés conformément aux instructions mentionnées sur l'étiquette de l'article et celles indiquées par le
fabricant de ce sèche-linge (M0615).
Remarque: Ce sèche-linge, conformément aux nouvelles normes en vigeur dans le domaine de l’économie d’énergie,
est équipée d’un syst
ème d’extinction automatique (veille) activé après environ 30 minutes d’inutilisation. Appuyez
brièvement sur la
bouton MARCHE/ARRÊT
et attendre que la machine soit réactivée.
La page est en cours de chargement...
La page est en cours de chargement...
La page est en cours de chargement...
La page est en cours de chargement...
La page est en cours de chargement...
La page est en cours de chargement...
La page est en cours de chargement...
La page est en cours de chargement...
La page est en cours de chargement...
La page est en cours de chargement...
La page est en cours de chargement...
La page est en cours de chargement...
La page est en cours de chargement...
La page est en cours de chargement...
La page est en cours de chargement...
La page est en cours de chargement...
La page est en cours de chargement...
La page est en cours de chargement...
La page est en cours de chargement...
La page est en cours de chargement...
La page est en cours de chargement...
La page est en cours de chargement...
La page est en cours de chargement...
La page est en cours de chargement...
-
 1
1
-
 2
2
-
 3
3
-
 4
4
-
 5
5
-
 6
6
-
 7
7
-
 8
8
-
 9
9
-
 10
10
-
 11
11
-
 12
12
-
 13
13
-
 14
14
-
 15
15
-
 16
16
-
 17
17
-
 18
18
-
 19
19
-
 20
20
-
 21
21
-
 22
22
-
 23
23
-
 24
24
-
 25
25
-
 26
26
-
 27
27
-
 28
28
-
 29
29
-
 30
30
-
 31
31
-
 32
32
-
 33
33
-
 34
34
-
 35
35
-
 36
36
-
 37
37
-
 38
38
-
 39
39
-
 40
40
-
 41
41
-
 42
42
-
 43
43
-
 44
44


Indesit ASL700V (EX) Mode d'emploi
- Catégorie
- Sèche-linge
- Taper
- Mode d'emploi
dans d''autres langues
- English: Indesit ASL700V (EX) User guide
Documents connexes
Autres documents
-
Ariston ASL 70 CX (EX) Manuel utilisateur
-
Whirlpool TCL731EU/HA Mode d'emploi
-
HOTPOINT/ARISTON TCL731X Mode d'emploi
-
-
-
Hotpoint TL64 Manuel utilisateur
-
-
-