Maytag LAV-3 Manuel utilisateur
- Catégorie
- Machines à laver
- Taper
- Manuel utilisateur

M_&YI?AG
b
LAV-3
Table of Contents
Safety .................. 1-2
Care & Cleaning ............ 8
Operating Tips ............. 3
Detergent
Loading
Additional Tips
Using the Controls ....... 4-6
Select Load Size
Extra Rinse
Select Temperature
Select Wash/Spin Speed
Select Cycle
Pull Control Dial Out to Start
Special Features ............ 7
Bleach Dispenser
Fabric Softener Dispenser
Storing the Washer ......... 8
Troubleshooting ......... 9-10
Service & Warranty ........ 11
Guide d'utUisation
et d'entretien ........... 12
Guia de uso y cuidado ..... 24
Form No. Y81915 A Part No. 2206683 www.maytag.com Litho U.S.A. _2006 Maytag Appliances Sales Co.

Safety
What You Need to Know About
Safety Instructions
Warning and Important Safety Instructions appearing in
this manual are not meant to cover all possible
conditions and situations that may occur. Common
sense, caution and care must be exercised when
installing, maintaining or operating appliance.
Always contact your dealer, distributor, service agent or
manufacturer about problems or conditions you do not
understand.
Recognize Safety Symbols, Words,
Labels

1. Read all instructions before using the appliance,
2, As with any equipment using electricity and having
moving parts, there are potential hazards, To use this
appliance safely, the operator should become familiar
with the instructions for operation of the appliance
and always exercise care when using it.
3. Do not install or store this appliance where it will be
exposed to the weather.
4, Install and level washer on a floor that can support
the weight.
5. This appliance must be properly grounded. Never
plug the appliance cord into a receptacle which is not
grounded adequately and in accordance with local
and national codes. See installation instructions for
grounding this appliance.
6, To avoid the possibility of fire or explosion:
a. Do not wash items that have been previously
cleaned in, washed in, soaked in, or spotted with
gasoline, dry-cleaning solvents, other flammable or
explosive substances as they give off vapors that
could ignite or explode. Hand wash and line dry
any items containing these substances,
Any material on which you have used a cleaning
solvent, or which is saturated with flammable
liquids or solids, should not be placed in the
washer until all traces of these liquids or solids
and their fumes have been removed.
C.
These items include acetone, denatured alcohol,
gasoline, kerosene, some liquid household
cleaners, some spot removers, turpentine, waxes
and wax removers.
Do not add gasoline, dry-cleaning solvents, or
other flammable or explosive substances to the
wash water. These substances give off vapors that
could ignite or explode.
Under certain conditions, hydrogen gas may be
produced in a hot water system that has not been
used for two weeks or more. HYDROGEN GAS IS
EXPLOSIVE. If the hot water system has not been
used for such a period, before using a washing
machine or combination washer-dryer, turn on all
hot water faucets and let the water flow from each
for several minutes, This will release any
7.
8,
9,
10,
11,
12,
13.
14.
15.
16.
17.
18.
19.
accumulated hydrogen gas. As the gas is
flammable, do not smoke or use an open flame
during this time.
D. Do not wash or dry items that are soiled with
vegetable or cooking oil. These items may contain
some oil after laundering. Due to the remaining oil,
the fabric may smoke or catch fire by itself.
Do not reach into the appliance if the tub or agitator
is moving.
Do not allow children or pets to play on, in, or in front
of the appliance. Close supervision is necessary when
the appliance is used near children and pets.
Do not tamper with controls.
Do not repair or replace any part of the appliance or
attempt any servicing unless specifically
recommended in published user-repair instructions
that you understand and have the skills to carry out.
Unplug power supply cord before attempting to
service your washer. Service is to be done only by
qualified service personnel,
The agitator should not be removed. If the agitator is
removed, it must be replaced by pushing down
completely and the locking screw tightened before
the washer is operated,
Keep all laundry aids such as detergents, bleach, etc.,
out of the reach of children, preferably in a locked
cabinet. Use laundry aids only as directed by the
manufacturer. Observe all warnings on container labels.
Keep the area around and underneath washer free
from the accumulation of combustible materials, such
as lint, paper, rags, gasoline, and all other flammable
vapors and liquids.
Do not use chlorine bleach and ammonia or acids
(such as vinegar or rust remover) in the same wash,
Hazardous fumes can form,
Do not machine wash fiberglass materials. Small
particles can stick to fabrics washed in following
loads and cause skin irritation,
For flame resistant finishes - follow garment
manufacturer's instructions carefully. Improper
laundering could remove the finish.
Before the appliance is removed from service or
discarded, remove the door to the washing compartment.
Inlet hoses are subject to damage and deterioration
over time. Check the hoses periodically for bulges, kinks,
cuts, wear or leaks and replace them every five years,
SAVE THESE iNSTRUCTiONS
2

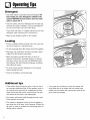
Operutin9Tips
Detergent
• Use either liquid or granular laundry detergent. For
best results, he sure detergent is added to the
washer BEFORE the load and he sure the wash
water is above 65 ° E
• Use the correct amount of detergent for the load size,
soil level and water conditions. Use more detergent if
you have hard water and very soiled loads.
If you have soft water or a lightly soiled load, use less
detergent. (See manufacturer's instructions.)
• Wipe up any detergent spills on the washer.
Loading
• Put dry, unfolded clothes loosely in the tub, up to the
top row of holes for a maximum load.
• Do not wrap large items like sheets around the agitator.
• Mix large and small items for best circulation. Wash
bulky items like blankets separately.
• When laundering wrinkle free items or items of
delicate construction, washable woolens or loosely
knit items, never use less than the MEDIUM water
level setting. This will minimize shrinkage, wrinkling
and pulling of seams.
• For best results add the detergent to the washtub
before adding the load.
• Close lid carefully to avoid slamming.
Additional tips
• If the washer stops during the spin, it may be due to
an unevenly distributed load. If this happens, push in
the control knob, open the lid, redistribute the load,
close the lid and pull out the control knob. The spin
will resume at the point it was interrupted.
• The washer will pause briefly throughout each cycle.
These pauses are normal.
• This washer is designed so that it will not agitate or
spin when the lid is open. It will, however, fill with the
lid open so water is available for pretreating stains or
diluting fabric softener.
• If you open the lid during a cycle, the washer will
stop. When the lid is closed and the control knob
pulled out, the washer will continue the cycle at the
point it was interrupted.

UsingtheControls
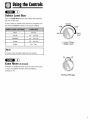
Select Load Size
Turn the Load Size knob to the setting that matches
the size of the load.
If more water is needed once the fill is complete, turn
the knob to reset and then to the proper setting.
Mini 1/4 Full
Small 1/4 - 1/3 Full
Medium 1/3 - 1/2 Full
Large 1/2 - 3/4 Full
Super 3//4- Full
I Note
• Items must circulate freely for best results.
Small
Mini
Medium
Load Size
Water Level
Large
Super
reset
Extra Rinse (if desired)
Provides an additional rinse near the end of the cycle
to more completely remove laundry additives,
perfumes, etc.
Extra Rinse

UsingtheControls
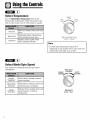
Select Temperature
Turn the Wash/Rinse Temperature knob to the
desired water temperatures. Follow the garment care
label for best results. Use the chart below as a guide.
White and heavily soiled, color-fast
Hot/Cold
items
Warm/Cold Moderately soiled, colored items;
most permanent press items
Cold/Cold Brightly colored, lightly soiled
items; washable woolens
Warm
Hot Cold Cold
0id
Note
• In wash water temperatures below 65° F,
detergents do not dissolve well or clean well. Care
labels define cold water as up to 85° F.
Select Wash/Spin Speed
Your washer has selectable wash and spin speed
combinations.
Regular
Fast/Fast
Perm. Press
Fast/Slow
Gentle
Slow/Slow
Sturdy fabrics needing maximum
water extraction
Sturdy fabrics needing a slower spin
speed because of wrinkling
Delicate fabrics needing slower spin
speed because of clothing
construction
Perm. Press
Regular Fast/Slow Gentle
Slow/Slow
iiiiiiii
Speed
Wash / Spin

UsingtheControls
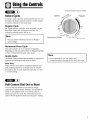
Select Cycle
To select a cycle, push the control dial IN and turn it to
the right (clockwise) until the pointer is at the number
of minutes desired for the wash load.
Regular Cycle
For regular fabrics, select the cycle time and turn the
Wash/Spin Speed dial to Regular/Fast/Fast. For
maximum cleaning set the dial at 16.
Note
• The spin speed will always be Fast on Regular
cycle settings.
Permanent Press Cycle
This cycle provides up to 10 minutes of agitation.
Depending on the load, select either the Regular/Fast/Fast
or Perm. Press/Fast/Slow wash spin speed.
Gentle Cycle
The Gentle Cycle provides approximately 10 minutes of
agitation and soaking to help remove stains.
Soak Only
There will be a brief period of agitation followed by a
soak. Soaking should be no longer than 30 minutes.
The control dial must be advanced manually to a spin
or a wash setting.
Gentle
off_ii:
Extra
Rinse
Off
Spin
Cool Down
Permanent Press
Control features vary by model
Extra
Off Rinse Off
16
Regular
12
8
b4
Rinse
6 8
ixtra
Rinse
Off
Soak Only
Pull to Start/Push to Stop
Note
• Do not attempt to turn the control dial
counterclockwise. Damage to the timer will result.
Pull Control Dial Out to Start
You may stop the washer at any time by simply
pushing the control dial IN. Therefore it is possible to
obtain a non-agitated soak or to shorten, skip or
repeat any part of a cycle. The control dial must be
pushed IN (off position) when you change the setting.

SpecialFeatures
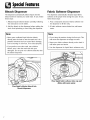
Bleach Dispenser
The dispenser automatically dilutes liquid chlorine
bleach before it reaches your wash load. To use, follow
these steps:
1. Measure liquid chlorine bleach carefully, following
the instructions on the bottle.
2. Add the bleach to the dispenser before adding the
load. Avoid splashing or over-filling the dispenser.
Fabric Softener Dispenser
The dispenser automatically releases liquid fabric
softener at the proper time during the cycle. To use,
follow these steps:
1. Pour a measured amount of fabric softener into
the dispenser to fill line only.
2. If fabric softener comes below line, add warm
water.
Note
Never pour undiluted liquid chlorine bleach
directly onto the load or into the wash tub. It is a
powerful chemical and can cause fabric damage,
such as tearing or color loss, if not used properly.
If you prefer to use color-safe, non-chlorine
bleach, pour it into the wash tub with your
detergent. Do not pour non-chlorine bleaches into
the bleach dispenser.
Note
• Do not stop the washer during the first spin. This
will cause the dispenser to empty too soon.
• Never pour fabric softener directly on the load. It
will leave spots and stains.
• Use the dispenser for liquid fabric softeners only.
Pour liquid chlorine bleach into
bleach dispenser.
Pour liquid fabric softener into cup and
dilute with warm water.

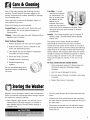
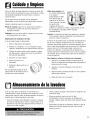
Care&Cleanin9
Turn off the water faucets after finishing the day's
washing. This will shut off the water supply to the
washer and prevent the unlikely possibility of damage
from escaping water.
Use a soft cloth to wipe up all detergent, bleach or
other spills as they occur.
Clean the following as recommended:
Oontrol Panel - clean with a soft, damp cloth and
glass cleaner. Do not use abrasive powders or
cleaning pads.
Cabinet - clean with soap and water followed with an
appliance wax, if desired.
Fabric Softener Dispenser
1. Pull the dispenser off of the top of the agitator.
2. Soak for one hour in sink or container in hot
water and dishwashing liquid.
3. Hold hands over top and bottom of dispenser
and shake to loosen buildup.
4. Rinse with clean, hot water.
5. Repeat process if necessary.
6. Replace dispenser on
agitator.
Do not use dishwashing liquid
inside the washer. Oversudsing
can Occur.
Lint Filter - it is self-
cleaning and requires
no maintenance. The
filter is located under
the agitator on the
bottom of the
washtub. During the
wash and rinse portion
of the cycle, lint is collected on the filter. Then
during the spin and drain the filter is cleaned
automatically.
Interior - hard water deposits may be removed, if
needed, using a recommended cleaner labeled
washer safe.
The interior of the washer should be cleaned
periodically to remove dirt, soil, odor or bacteria
residue that may remain in the washer as a result of
washing clothes. We recommend taking the following
steps every 60 to 120 days to clean and freshen your
washer interior. The frequency with which the washer
should be cleaned and freshened depends on factors
such as usage, the amount of dirt, soil or bacteria
being run through your washer, or the use of cold
water.
To clean and freshen the washer interior:
1. Add a measured amount of chlorine bleach to
the bleach dispenser, following package
directions.
2. Add 1/4 cup of detergent to the tub.
3. Run the washer through a complete cycle using
hot water.
/4. Repeat the process if necessary.
Storin9thekVusher
Washers can be damaged if water is not removed from
hoses and internal components before storage. Prepare
the washer for storage as follows:
• Select Regular, eight minutes, and add one cup of
chlorine bleach OR white vinegar to a full load of
water without clothes. Run the washer through a
complete cycle.
Turn the water faucets off and disconnect the inlet
hoses.
Advance the cycle control knob to Spin and lower
the drain hose to eliminate any water that may be in
the drain hose.
Disconnect the washer from the electrical supply
and leave the washer lid open to let air circulate
inside the tub.

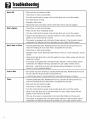
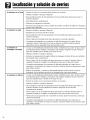
Troubleshooting
Won't Fill
Won't Agitate
Won't Spin or Drain
Load is Wet
Stops
Plug cord into live electrical outlet.
Check fuse or reset circuit breaker.
Turn the control knob to proper cycle and pull knob out to start the washer.
Turn both faucets on fully.
Straighten inlet hoses.
Disconnect hoses and clean screens. Hose filter screens may be plugged.
Check fuse or reset circuit breaker.
Make sure the lid is completely closed.
Turn the control knob to proper cycle and pull knob out to start the washer.
Close lid and pull knob out to start the washer. For your safety, washer will not
agitate or spin unless the lid is closed.
The washer is equipped with a lid switch failure detector. If the lid switch should
malfunction, the detector will stop operations for your safety. Call for service.
• Unevenly distributed load. Redistribute the load, close the lid and pull knob out.
Check for leveling. Be sure water level is acceptable for load size.
• Check fuse or reset circuit breaker.
• Straighten drain hoses. Eliminate kinked hoses. If there is a drain restriction, call for
service.
• Close lid and pull knob out to start the washer. For your safety, washer will not spin
unless lid is closed.
• The washer is equipped with a lid switch failure detector. If the lid switch should
malfunction, the detector will stop operations for your safety. Call for service.
• Suds lock - caused by too much suds. Rewash without detergent. Use correct
amount of a low-sudsing detergent.
The washer may have sensed an unevenly distributed load. Redistribute the load in
the tub, close the lid and pull the control knob out.
A normal spin speed is recommended for heavy loads like jeans or towels.
Unevenly distributed load. Redistribute the load, close the lid and pull knob out.
Check for leveling. Be sure water level is acceptable for load size.
• Plug cord into live electrical outlet.
• Check fuse or reset circuit breaker.
• Turn the control knob to proper cycle and pull knob out to start the washer.
• Close lid and pull knob out to start the washer. For your safety, washer will not
agitate or spin unless lid is closed.
• This may be a pause or soak period in the cycle. Wait briefly and it may start.
• The washer is equipped with a lid switch failure detector. If the lid switch should
malfunction, the detector will stop fill operations for your safety. Call for service.

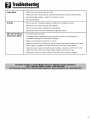
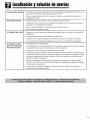
Troubleshooting
Leaks Water
Is Noisy
Fills with the Wrong
Temperature Water
• Make sure hose connections are tight.
• Make sure end of drain hose is correctly inserted and secured to drain facility.
• Avoid extended soaking - soak for 30 minutes or less.
• Avoid overloading.
• Be sure washer is leveled properly as outlined in installation manual.
• Weak floors can cause vibration and walking.
• Be sure rubber feet are installed on leveling legs.
• Operating sounds will vary depending on agitation speed.
• Turn both faucets on fully.
• If equipped with a temperature selector knob, be sure it is set directly on a
temperature setting and not between settings.
• Make sure temperature selection is correct.
• Make sure hoses are connected to correct faucets and inlet connections. Be sure
water supply is regulated correctly. Flush water line before filling washer.
• Check the water heater. It should be set to deliver a minimum 120° F (49° C) hot
water at the tap. Also check water heater capacity and recovery rate.
• Disconnect hoses and clean screens. Hose filter screens may be plugged.
10

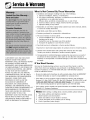
Service& Wurru,t¥
CUSTOMER'S SOLEAND EXCLUSIVE
REMEDY UNDER THIS LIMITED
WARRANTY SHALL BE PRODUCT REPAIR
AS PROVIDED HEREIN. IMPLIED
WARRANTIES, INCLUDING WARRANTIES
OF MERCHANTABILITY OR FITNESS FOR
A PARTICULAR PURPOSE,ARE LIMITED
TO ONE YEAR OR THE SHORTEST
PERIOD ALLOWED BY LAW. MAYTAG
CORPORATION SHALL NOT BE LIABLE
FOR INCIDENTAL OR CONSEQUENTIAL
DAMAGES. SOME STATESAND
PROVINCES DO NOT ALLOW THE
EXCLUSION OR LIMITATION OF
INCIDENTAL OR CONSEQUENTIAL
DAMAGES, OR LIMITATIONS ON THE
DURATION OF IMPLIED WARRANTIES OF
MERCHANTABILITY OR FITNESS,SO
THESE EXCLUSIONS OR LIMITATIONS
MAY NOT APPLYTO YOU. THIS
WARRANTY GIVESYOU SPECIFIC LEGAL
RIGHTS AND YOU MAY ALSO HAVE
OTHERRIGHTS,WHICH VARY STATETO
STATEOR PROVINCE TO PROVINCE.
What is Not Covered By These Warranties
1. Conditions and damages resulting from any of tile following:
a. Improper installation, delivery, or maintenance.
b. Any repair, modification, alteration, or adjustment not authorized by the
manufacturer or an authorized servicer.
c. Misuse, abuse, accidents, unreasonable use, or acts of God.
d. Incorrect electric current, voltage, electrical and/or gas supply.
e. Improper setting of any control.
2. Warranties are void if the original serial numbers have been removed, altered,
or cannot be readily determined.
3. Light bulbs, water filters and air filters.
4. Products purchased for commercial or industrial use.
5. Tile cost of service or service call to:
a. Correct installation errors. For products requiring ventilation, rigid metal
ducting must be used.
b. Instruct the user on the proper use of the product.
c. Transport tile appliance to and from the servicer.
6. Any food loss due to refrigerator or freezer product failures.
Z Expenses for travel and transportation for product service in remote locations.
8. Outside of the United States and Canada this warranty does not apply.
Contact your dealer to determine if another warranty applies.
9. Consequential or incidental damages sustained by any person as a result of
any breach of these warranties. Some states do not allow the exclusion or
limitation of consequential or incidental damages, so tile above exclusion may
not apply.
If You Need Service
First see the Troubleshooting section in your Use and Care Guide or call the
dealer from whom your appliance was purchased or call Maytag Services, LLC,
Customer Assistance at 1-800-688-9900 USA and 1-800-688-2002 Canada to
locate an authorized servicer.
• Be sure to retain proof of purchase to verify warranty status. Refer to WARRANTY
for further information on owner's responsibilities for warranty service.
• If the dealer or service company cannot resolve the problem, write to Maytag
Services, LLC,Attn: CAIR" Center, EO. Box2370,Cleveland,TN 37320-2370,or call
1-800-688-9900 US/&and 1-800-688-2002 Canada. U.S.customers using
TTY for deaf, hearing impaired or speech impaired, call 1-800-688-2080.
• User'sguides, service manuals and parts information are available from Maytag
Services, LLC, Customer Assistance.
Notes: When writing or calling about a service problem, please include:
a. Your name, address and telephone number;
b. Model number and serial number;
c. Name and address of your dealer or servicer;
d. A clear description of the problem you are having;
e. Proof of purchase (sales receipt).
11

]MIA AG
LAV-3
lUl
Table des mati res
S_curit_ ............... 13-14 Nettoyage et entretien ..... 20
Fonctionnement ........... 15
D6tergent
Chargement
Conseils supplementaires
Employer les commandes .. 16-18
S6lection du volume de charge
Selection de Extra Rinse
Selection de la temperature
Selection le cycle de lavage/d'essorage
Selection du cycle
Tirer le s61ecteur pour mettre en marche
Caract_ristiques sp_ciales .. 19
Distributeur de javellisant liquide
Distributeur d'assouplissant
Remisage de la machine
laver ................. 20
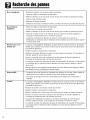
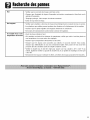
Recherche des pannes ..21-22
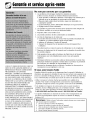
Garantie et service
apri_s-vente ............ 23
Guia de use y cuidado ..... 24

S6curtt6
Ce qu'il faut savoir _ propos
des consignes de s_curitd
Les consignes de s6curit_ et les mises en garde pr6sent6es
dans ce manuel ne couvrent pas toutes les situations
possibles. Faire preuve de jugement, de prudence et
d'attention Iors de I'installation, de I'entretien et de
I'utilisation du propri6taire.
Lorsque survient un probleme ou une situation inhabituelle,
toujours communiquer avec le d6taillant, le distributeur, le
technicien agr66 ou le fabricant.
Reconnaissez les _tiquettes, phrases
ou symboles sur la securite
13

S6curtI6
1. Lire toutes les instructions avant d'utiliser la machine.
2. Comme avec tout equipement fonctionnant _ I'electricite
et comportant des pieces mobiles, il existe toujours des
possibilites de danger. Pour utiliser cette machine dans
les meilleures conditions de securite, I'operateur doit se
familiariser avec les instructions de fonctionnement de
I'appareil et user de prudence pendant son utilisation.
3. Ne pas installer ni remiser la machine dans un endroit
o0 elle est exposee aux intemperies.
4. Installer la machine et la mettre de niveau sur un
plancher pouvant supporter son poids.
5. Cet appareil doit etre correctement mis _ la terre. Ne
jamais brancher le cable electrique d'une machine
laver sur une prise murale non mise _ la terre
conformement aux codes Iocaux et nationaux. Voir les
instructions d'installation pour la mise _ la terre de cette
machine.
6. Pour eviter les risques d'incendie ou d'explosion :
a. Ne pas laver d'articles qui ont auparavant ete nettoyes
ou laves _ I'aide d'essence, de solvants de nettoyage
sec ou d'autres produits explosifs ou inflammables, ou
qui en sont imbibes ou eclabousses, car ces
substances produisent des vapeurs qui peuvent
s'enflammer ou exploser. Laver _ la main et secher
I'air tout article contenant ces substances.
Tout tissu sur lequel des solvants de nettoyage ont ete
utilises ou qui sont satures de liquides ou solides
inflammables ne doit pas etre mis dans la machine
laver avant que toute trace et toute vapeur de ces
liquides ou solides nesoient completement eliminees.
Ces produits comprennent I'acetone, I'alcool denature,
I'essence, le kerosene, certains produits de nettoyage
menagers, les detachants, la terebenthine, les cires et
les decapants de cire.
b. Ne pas ajouter d'essence, de solvants de nettoyage
sec ou toute autre substance inflammable ou
explosive _ I'eau de lavage. Cessubstances produisent
des vapeurs qui pourraient s'enflammer ou exploser.
c. Dans certaines conditions, il peut y avoir production
d'hydrogene dans un systeme de chauffage d'eau qui
n'est pas utilise pendant 2 semaines ou plus.
L'HYDROGI_NEESTUN EXPLOSIF.Si votre systeme
de chauffage d'eau n'est pas utilise sur une telle
duree, ouvrir tousles robinets d'eau chaude et laisser
couler I'eau pendant plusieurs minutes avant d'utiliser
votre machine _ laver ou votre ensemble machine
laver-secheuse. Ceci elimine toute accumulation
d'hydrogene. Ce gaz etant inflammable, ne pas fumer
CONSERVER CES
ni utiliser de flamme vive pendant ces quelques
minutes.
d. Ne pas laver ou secher d'articles taches d'huile
vegetale ou de cuisson. Ces articles pourraient etre
encore impregnes d'huile apres la lessive. Pour cette
raison, le tissu pourrait emettre des fumees ou
prendre feu de lui-meme.
Z Ne pas mettre la main ou le bras dans la machine si
I'agitateur ou cuve est en mouvement.
8. Ne pas permettre aux enfants ou aux animaux familiers
de jouer sur I'appareil, _ I'interieur ou en face de celui-
ci. Une supervision etroite est necessaire Iorsque
I'appareil est utilise _ proximite d'enfants ou d'animaux
familiers.
9. Ne pas modifier les mecanismes de commande.
l 0. Ne pas r@arer ou remplacer une piece de la machine
ou proceder _ un d@annage, saul si les instructions
publiees le recommandent et que la personne effectuant
la reparation les comprend et possede les
connaissances voulues pour les executer.
l 1. Debrancher le cordon d'alimentation electrique avant
d'essayer de r@arer la laveuse. Les r@arations ne
doivent etre effectuees que par du personnel qualifi&
12. I'agitateur ne doit pas etre retire. S'il est retire, le
replacer en I'enfon_ant _ fond, puis serrer la vis de
blocage avant de faire fonctionner la machine.
13. Conserver tousles produits de lessive, les detergents,
les produits de blanchiment, etc., hors de portee des
enfants, et de preference dans une armoire fermee
cle. N'utiliser ces produits que selon les directives du
fabricant. Observer tousles avertissements paraissant
sur les etiquettes des differents produits.
14. S'assurer que toute la zone autour de la laveuse et en
dessous, soit degagee de toute accumulation de
materiaux combustibles comme charpie, papier, chiffons,
essence et tout autre liquide ou vapeur inflammable.
15. Ne pas melanger de javellisant et d'ammoniaque ou
d'acides (tels que du vinaigre ou du produit pour enlever
la rouille} pour une meme charge de linge. Des vapeurs
nocives peuvent se former.
16. Ne pas laver d'articles en fibre de verre a la machine.
De petites particules peuvent se coller sur le linge lave
par la suite et provoquer des irritations cutanees.
IZ Apprets resistants aux flammes - suivre attentivement
les instructions du fabricant du vetement. Un vetement
incorrectement lave ou seche pourrait perdre son appret
ignifuge.
18. Avant de mettre la machine hors service ou au rebut,
retirer la porte du compartiment de lavage.
19. Les tuyaux d'alimentation se deteriorent progressivement.
Inspecter les tuyaux _ intervalle regulier; rechercher
dilatations, ecrasements, coupures, fuites et indices
d'usure. Remplacer les tuyaux apres 5 ans de service.
iNSTRUCTiONS
14

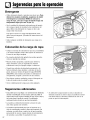
I:oncdonnement
Ddtergent
• Utiliser du d6tergent liquide ou en poudre. Pour des
r_sultats optimums, ajouter suffisamment de
d_tergent dans la machine AVANT de la remplir et
r_gler la temperature de I'eau _ plus de 18° C (65 ° F).
• Utiliser la quantit6 de d6tergent qui convient _ la charge,
au degr6 de salet6 et _ la duret6 de I'eau. Utiliser plus de
d6tergent si I'eau est dure et que la charge est tr6s sale.
Si I'eau est douce ou que la charge est peu sale, utiliser
moins de d6tergent. (Voir les instructions du fabricant.)
Essuyer la machine si elle se trouve 6clabouss6e de
d6tergent.
Chargement
• Mettre le linge sec, non pli6 sans le tasser dans la
machine, en remplissant le panier jusqu'au rang sup6rieur
de trous pour une charge maximum.
Ne pas enrouler de grands articles tels que des draps
autour de I'agitateur.
Pour une meilleure circulation, m61anger les petits et les
grands articles. Laver les articles volumineux comme les
couvertures s6par6ment.
Lors du lavage d'articles infroissables, fragiles, de lainages
lavables ou d'articles en tricot _ mailles laches, ne jamais
utiliser un niveau d'eau inf_rieur au r6glage MEDIUM
(moyen). IIs auront moins tendance _ r6tr6cir, _ se froisser
et les coutures tiendront mieux.
Pour des r6sultats optimums, mettre du d_tergent dans la
cuve avant d'ajouter le linge.
Refermer soigneusement le couvercle pour qu'il ne
claque pas.
Conseils supplementaires
• II est possible pour la charge peut 6tre d6s6quilibr6e
pendant I'essorage. Si cela se produit, pousser sur le
s61ecteur,ouvrir le couvercle, r66quilibrer la charge, fermer
le couvercle et tirer sur le s61ecteur. I'essorage reprend au
point ot] il s'6tait interrompu.
• Cette machine effectue des pauses _ plusieurs reprises au
cours d'un cycle de lavage. Ces pauses momentan6es font
partie de son fonctionnement normal.
• Cette laveuse est congue pour ne pas essorer Iorsque que
le couvercle est ouvert. Toutefois, elle se remplit et
I'agitation a lieu m_.mesi le couvercle est ouvert pour que
I'eau soit disponible et permettre le pr61avagedes taches
ou la dilution de I'adoucissant.
• Si le couvercle est ouvert au cours d'un cycle, la machine
s'arr_.te.Une lois le couvercle ferm6 et le s61ecteurtire, le
cycle reprend I_ ot] il avait 6t6 interrompu.
15

Employerlescommundes
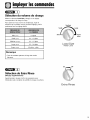
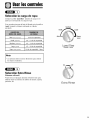
Sdlection du volume de charge
Mettre le s61ecteurLoad Size (charge) sur le r6glage
correspondant _ la charge de linge.
Pour ajouter de I'eau _ la fin du remplissage, r6gler le
s61ecteursur la position <<reseb>(nouveau r6glage), puis le
positionner face au r6glage d6sir6.
Small
Medium
Large
Mini (mini) 1/4 plein
Small (petit) 1/4 - 1/3 plein
Medium (moyen) 1/3- 1/2 plein
Large (61ev6) 1/2 - 3/4 plein
Super (super) 3/4 plein - plein
Remarque
• Pour des r6sultats optimums, le linge doit circuler
librement.
Mini
Load Size
Water Level
Super
reset
Sdlection de Extra Rinse
(Rin_age suppl_mentaire)
Suppl6mentaire rin£;age_ la fin du programme pour
1'61iminationplus complete des additifs de lavage et parfums.
Extra Rinse
16

Employerlescommundes
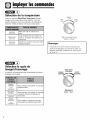
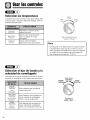
S61ection de la temp6rature
Tourner le s61ecteurWash/Rinse Temperature (]avage/
rin£;age)sur les temp6ratures d'eau d6sir6es. Pour des
r6sultats optimums, suivre las indications de 1'6tiquette du
v6tement. Utiliser le tableau ci-dessous comme guide.
Hot/Cold
(chaud/froid)
Warm/Cold
(ti_de/froid)
Cold/Cold
(froid/froid)
Blanc tres sale et couleurs bon
teint
Linge mod6r6ment sale, articles de
couleur ; la plupart des articles _ pli
permanent
Articles aux couleurs vives, peu sales
lainages lavables
Warm
Hot Cold Cold
0id
>,
Remarque
• A moins de 18° C, (65° F),I'eauest trop froide pour
dissoudre lesd6tergents en poudre et les activer.Les
_tiquettes d'entretien consid_rent I'eaufroide jusqu'i
29° C(85° F).
S61ection le cycle de
lavage/d'essorage
La machine est programm6e pour combinaisons de vitesse
de lavage et d'essorage.
Regular
Fast/Fast
nornlal
rapide/rapide
Perm.Press
Fast/Slow
v_tements infroissables
rapide/lente
Gentle
Slow/Slow
douce
lente/lente
Tissus robustes n6cessitant un essorage
maximum literie
Tissus robustes n6cessitant un essorage
moindre vitesse qui minimisera le
froissement
Tissus fragiles, couvertures ou draps
n6cessitant une attention particuli_re
Perm. Press
Regular Fast/Slow
iiiiiiii
Speed
Wash / Spin
Gentle
Slow/Slow
17

Employerlescommundes
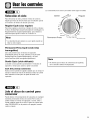
Les caract4ristiques des commandes et le style varient selon le modele.
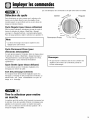
Sdlection du cycle
Pour selectionner un cycle, pousser sur le s61ecteuret le
tourner vers la droite (clans le sens des aiguilles d'une
montre) jusqu'_ ce que la fl6che soit vis-a-vis la dur6e de
lavage (en minutes) d_sir_e.
Cycle Regular ([pour tissus ordinaires)
Pour les tissus ordinaires, s61ectionner le temp de cycle et
tourner le s61ecteurde vitesse _<Wash/Spin _>Oavage/
essorage) _ _{Regular/Fast/Fast _>01ormale/rapide/rapide).
Pour un lavage optimum, r6gler le s61ecteur_ la position 16.
Note
• La vitesse d'essorage sera toujours rapide Iors des
r6glages pour cycle normal.
Off
Extra iii
Rinse
Off
Spin
Cool Down
Permanent Press
Regular
16
12
8
b4
Rinse
ix_ra
Rinse
Off
Soak Only
Pull lo Start/Push to Stop
Cycle Permanent Press ([pour
v_tements infroissables)
Ce cycle procure jusqu'_ 10 minutes. Selon la charge, placer
le s61ecteurde vitesse _<Wash/Spin >>(lavage/essorage)
_<Regular/Fast/Fast >>(normale/rapide/rapide) OU _<Perm.
Press/Fast/Slow >>(pour v6tements infroissables/
rapide/lente).
Cycle Gentle ([pour tissus delicats)
Le cycle delicats environ 10 minutes d'agitation et de
trempage pour enlever la salet&
Soak Only (trempage seulement)
II se compose d'une br_ve p6riode d'agitation suivie d'un
trempage. Le trempage ne doit pas d@asser 30 minutes. Le
s61ecteurdoit _.tre pass6 manuellement_ un cycle de
lavage ou _ I'essorage.
Remarque
• Ne pas tourner le s61ecteurdans le sens contraire des
aiguilles d'une montre car la minuterie pourrait se
trouver endommag6e.
Tirer le sdlecteur pour mettre
en marche
La machine peut _.tre arr_.t6e_ tout moment en poussant sur
le s61ecteur.II est alors possible d'obtenir un trempage sans
agitation ou de raccourcir, sauter ou r@6ter toute partie
d'un cycle. Le s61ecteurdoit _.treenfonc6 (position _<off >0
Iorsque le r6glage est modifi&
18

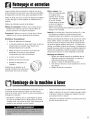
CaractGristiquesspeciales
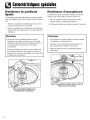
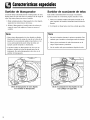
Distributeur de javellisant
liquide
Le distributeur dilue automatiquement le javellisant liquide
avant qu'il atteigne le linge. Pour I'utiliser, proc6der comme
suit :
1. Mesurer la quantit6 de javellisant liquide avec soin en
suivant les instructions sur le r6cipient.
2. Verser le javellisant dans le distributeur avant d'ajouter
le linge, l_viter les 6claboussures ou le d6bordement du
distributeur.
Distributeur d'assouplissant
Ce distributeur ajoute I'assouplissant liquide au moment
voulu du cycle. Pour I'utiliser, proc6der comme suit :
1. Verser la quantit6 voulue de liquid dans le godet,
jusqu'au rep6re de remplissage seulement.
2. Si le liquide n'atteint pas le rep6re, ajouter de I'eau ti6de.
Remarque
Ne jamais verser de javellisant liquide non dilu6
directement sur le linge ou dans la cuve. Ce produit
chimique est puissant et peut endommager les tissus,
en les d6chirant ou d6colorant, s'il n'est utilis6
correctement.
Lorsqu'un javellisant sans chlore et sans danger pour
les couleurs est utilis6, le verser dans la cuve avec le
d_tergent. Ne pas verser de javellisant sans chlore dans
le distributeur de javellisant.
Remarque
Ne pas arr6ter la machine durant le premier essorage.
Le distributeur se viderait trop tot.
Ne jamais verser d'assouplissant directement sur le
linge. II laisserait des trainees et des taches.
Utiliser le distributeur pour I'assouplissant liquide
uniquement.
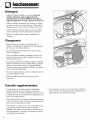
Verser le javellisant liquide dans
le distributeur de javellisant.
Verser I'assouplissant liquide dans le godet et
diluer avec de I'eau tilde.
19
La page est en cours de chargement...
La page est en cours de chargement...
La page est en cours de chargement...
La page est en cours de chargement...
La page est en cours de chargement...
La page est en cours de chargement...
La page est en cours de chargement...
La page est en cours de chargement...
La page est en cours de chargement...
La page est en cours de chargement...
La page est en cours de chargement...
La page est en cours de chargement...
La page est en cours de chargement...
La page est en cours de chargement...
La page est en cours de chargement...
La page est en cours de chargement...
-
 1
1
-
 2
2
-
 3
3
-
 4
4
-
 5
5
-
 6
6
-
 7
7
-
 8
8
-
 9
9
-
 10
10
-
 11
11
-
 12
12
-
 13
13
-
 14
14
-
 15
15
-
 16
16
-
 17
17
-
 18
18
-
 19
19
-
 20
20
-
 21
21
-
 22
22
-
 23
23
-
 24
24
-
 25
25
-
 26
26
-
 27
27
-
 28
28
-
 29
29
-
 30
30
-
 31
31
-
 32
32
-
 33
33
-
 34
34
-
 35
35
-
 36
36


Maytag LAV-3 Manuel utilisateur
- Catégorie
- Machines à laver
- Taper
- Manuel utilisateur
dans d''autres langues
- English: Maytag LAV-3 User manual
- español: Maytag LAV-3 Manual de usuario
Documents connexes
-
Maytag LAT9356AAE Manuel utilisateur
-
-
-
Maytag Atlantis MAV8551AWW Manuel utilisateur
-
-
-
-
-
-