BLACK DECKER BCKM101 Manuel utilisateur
- Catégorie
- Mélangeurs
- Taper
- Manuel utilisateur

final page size: 8.5 x 5.5 in
Please read before returning this product for anyreason.
Àlire avant de retourner ce produit pour quelque raison que cesoit.
Lea el manual antes de devolver este producto por cualquiermotivo.
INSTRUCTION MANUAL
MODE D’EMPLOI
MANUAL DE INSTRUCCIONES
BCKM101
8V CORDLESS HAND BLENDER
AND ATTACHMENTS
MÉLANGEUR À MAIN SANS FIL
8V ET ACCESSOIRES
BATIDORA PORTÁTIL
INALÁMBRICA DE 8V Y
ACCESORIOS

English (original instructions) 10
Français (traduction de la notice d’instructions originale) 19
Español (traducido de las instrucciones originales) 30

1
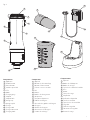
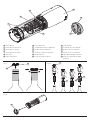
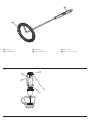
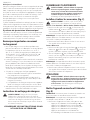
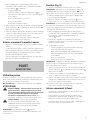
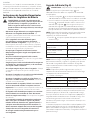
Composants
1 Appareil
2 Bouton de déverrouillage
3 Bouton d’alimentation
4 Cadran à vitesse variable
5 DEL
6 Moteur
7 Broches de chargement
8 Adaptateur
9 Trou pour adaptateur
10 Gobelet mélangeur
11 Couvercle du gobelet mélangeur
12 Chargeur
13 Cordon du chargeur
14 Connecteur du chargeur
15 Station de recharge
Componentes
1 Aparato
2 Botón de desbloqueo
3 Botón de energía
4 Carátula de velocidad variable
5 LEDs
6 Motor
7 Clavijas de carga
8 Adaptador
9 Orificio de adaptador
10 Taza de mezclado
11 Tapa de taza de mezclado
12 Cargador
13 Cable de cargador
14 Conector de cargador
15 Puerto de carga
Components
1 Appliance
2 Unlock button
3 Power button
4 Variable‑speed dial
5 LEDs
6 Motor
7 Charging pegs
8 Adaptor
9 Adaptor hole
10 Mixing cup
11 Mixing cup lid
12 Charger
13 Charger cord
14 Charger connector
15 Charging dock
Fig. A
7
6
2
5
12
8
13
9
11
10
15
14
4
3
1

2
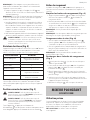
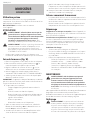
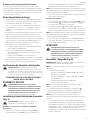
Fig.B Fig.C
14
15
7
7
55
6
55
98
55
21
16
17
19
22
18
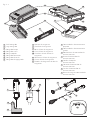
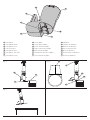
16 Petit bac de rangement
17 Grand bac de rangement
18 Bosse du bac de rangement
19 Creux du bac de rangement
20 Cannelures d’arrêt du bac de
rangement
21 Connecteur du bac de rangement
22 Canaux du bac de rangement
23 Encoche de chargement du bac de
rangement
16 Contenedor de almacenamiento
pequeño
17 Contenedor de almacenamiento
grande
18 Protuberancia de contenedor de
almacenamiento
19 Hueco de contenedor de
almacenamiento
20 Costillas de tope de
almacenamiento
21 Conector de contenedor de
almacenamiento
22 Canales de contenedor de
almacenamiento
23 Ranura de carga de contenedor de
almacenamiento
16 Small storage bin
17 Large storage bin
18 Storage bin bump
19 Storage bin recess
20 Storage stop ribs
21 Storage bin connector
22 Storage bin channels
23 Storage bin charging notch
Fig. A ‑ 2
20
14
23

3
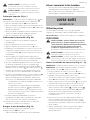
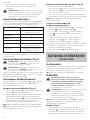
Fig.D Fig.E
Fig.F Fig.G
Fig.H Fig.I
23
1
5
4
21
22
23
13
12
17
14
56
57
2
17
20
16
18
19
3

4
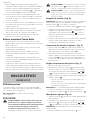
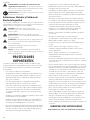
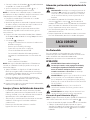
Fig.J
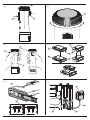
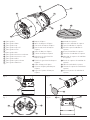
24 Immersion blender
25 Immersion blender head
26 Immersion blender blade
27 Immersion blender slots
28 Guard
29 Guard detents
26
24
25
24 Mélangeur à main
25 Tête du mélangeur à main
26 Lames du mélangeur à main
27 Fentes du mélangeur à main
28 Protecteur du mélangeur
29 Crans
24 Batidora de inmersión
25 Cabeza de batidora de inmersión
26 Aspas de batidora de inmersión
27 Ranuras de batidora de inmersión
28 Protector de la batidora
29 Encastres
3
4
10
25
2
26
Fig.K
27 28
29
27
29

5
Fig.L Fig.M
Fig.N
30 Wine opener
31 Wine opener corkscrew
32 Wine opener spring
33 Wine opener windows
34 Foil cutter
35 Foil cutter blades
30
33
33
32
31
34
35
30 Ouvre‑bouteille
31 Tire‑bouchon d’ouvre‑bouteille
32 Ressort d’ouvre‑bouteille
33 Ouvertures d’ouvre‑bouteille
34 Coupe‑capsule
35 Lames de coupe‑capsule
30 Saca corchos
31 Tirabuzón de saca corchos
32 Resorte de saca corchos
33 Ventanas de saca corchos
34 Cortador de papel aluminio
35 Aspas de cortador de papel
aluminio
4
33
32
31
35
34
34

6
Fig.O
Fig.Q
Fig.P
36 Can opener
37 Can opener blade
38 Can opener lever
39 Can center line
40 Can opener base
41 Can opener side wall
42 Can opener recess
38
41
42
40
39
36
38
37
61
37
36 Ouvre‑boîte
37 Lame d’ouvre‑boîte
38 Levier de l’ouvre‑boîte
39 Ligne centrale de la boîte
40 Base de l’ouvre‑boîte
41 Paroi latérale de l’ouvre‑boîte
42 Cavité de l’ouvre‑boîte
36 Abrelatas
37 Cuchilla de abrelatas
38 Palanca de abrelatas
39 Línea central de lata
40 Base de abrelatas
41 Pared lateral de abrelatas
42 Hueco de abrelatas
4
41
40
39
42

7
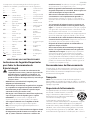
Fig.R Fig.S
Fig.T Fig.U
43
44
48
49
50 45
47
46
52
53
44
48
49
50
49
48
51
53
52
47
46
45
51
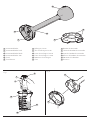
43 Spice grinder
44 Spice grinder doors
45 Spice grinder cap
46 Spice grinder cap wall
47 Spice grinder recess
48 Spice grinder dials
49 Spice grinder coarseness indicator
50 Spice grinder coarseness scale
51 Spice grinder collar
52 Spice grinder spice selector
53 Spice grinder door lines
43 Broyeur d’épices
44 Portes de broyeurs d’épices
45 Couvercle de broyeur d’épices
46 Mur du couvercle du broyeur
d’épices
47 Niche du broyeur d’épices
48 Cadrans du broyeur d’épices
49 Indicateur de granularité du
broyeur d’épices
50 Échelle de granularité du broyeur
d’épices
51 Collet du broyeur d’épices
52 Sélecteur d’épices pour broyeur
d’épices
53 Lignes de la porte du broyeur
d’épices
43 Moledor de especias
44 Puertas de moledor de especias
45 Tapa de moledor de especias
46 Pared de tapa de moledor de
especias
47 Hueco de moledor de especias
48 Carátulas de moledor de especias
49 Indicador de aspereza de moledor
de especias
50 Escala de aspereza de moledor de
especias
51 Collar de moledor de especias
52 Selector de especia de moledor de
especias
53 Líneas de puerta de moledor de
especias

8
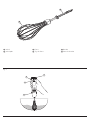
54 Fouet
55 Tige du fouet
54 Batidor
55 Poste de batidor
Fig.V
54
55
54 Whisk
55 Whisk pole
4
3
8
2

9
56 Frother
57 Frother pole
57
56
56 Mousseur
57 Tige de mousseur
56 Espumador
57 Poste de espumador
Fig.W
4
3
2

ENGLISH
10
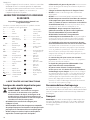
The label on your tool may include the following symbols. The
symbols and their definitions are asfollows:
V ......................... volts
Hz .......................hertz
min ..................... minutes
or DC ......direct current
...................... Class I Construction
(grounded)
…/min ..............per minute
BPM .................... beats per minute
IPM ..................... impacts per minute
OPM .................... oscillations per
minute
RPM .................... revolutions per
minute
sfpm ................... surface feet per
minute
SPM .................... strokes per minute
A ......................... amperes
W ........................watts
Wh ......................watt hours
• Do not touch moving parts, disks or blades. The blades
are sharp. Handle carefully with your hands away from
cutting edge. Always store out of reach of children with
cutting edge away fromyou.
• When mixing liquids, especially hot liquids, use a
tall container or make small quantities at a time to
reducespillage.
• Do not leave appliance unattended. Store away when
not inuse.
• Do not use the appliance with wethands.
• Always operate appliance with attachment and/or lid
locked securely inplace.
• Do not attempt to override any lid interlockmechanism.
• Never blend hot oil or fat. Use care when working with
other hot liquids to avoidsplattering.
• Never add ingredients to a container or attachment
compartment while the appliance isrunning.
• Do not operate the appliance continuously for more than
2minutes. Allow the motor to rest for 1minute between
eachuse.
• Never mix dry, thick or heavy mixtures for more than
30seconds. Stop the operation and stir the ingredients
with a suitable utensil after the motor has stopped before
continuing. Allow the motor to rest for 1minute between
eachuse.
• When used with heavy load, the appliance should not be
operated for more than 15seconds.
• Do not remove the appliance with attachment from
ingredients during operation. Ensure the appliance is off
and has stopped before removing to avoid contact with
moving blades orwhisk.
• Keep fingers, hands, hair, clothing, jewelry, and utensils
away from any moving parts including blades anddisks.
• Do not wear loose clothing or jewelry such as long
necklaces that can dangle into the food preparationarea.
• Turn appliance off, allow motor to stop, and keep away
from the power button when adjusting, removing/
installing, or cleaning attachments oraccessories.
• Never modify the appliance, attachments, or any
partsthereof.
SAVE THESE INSTRUCTIONS.
This product is for household useonly.
IMPORTANT SAFEGUARDS
When using electrical appliances, basic safety precautions
should always be followed to reduce the risk of fire, electric
shock, and/or injury, including the following:
• Read and save allinstructions.
• To protect against risk of electrical shock, do not immerse
appliance, motor, cord, or plug in water or other liquid.
Do not use the appliance in the bathroom, near water,
oroutdoors.
• This appliance should not be used by children or by
persons with reduced physical, sensory, or mental
capabilities, or lack of experience and knowledge. Close
supervision is necessary when any appliance is used near
children. Children should be supervised to ensure that
they do not play with theappliance.
• Do not operate in explosive atmospheres, such as in the
presence of flammable liquids or gases
• Do not operate any appliance after the appliance
malfunctions, or is dropped or damaged in any manner.
Call the appropriate toll‑free number in thismanual.
• The use of attachments not recommended or sold by the
appliance manufacturer may cause fire, electric shock, or
injury; do not use attachments or appliances for anything
other than intendeduse.
• This appliance is not intended for commercial,
professional, or industrial use. It is designed and built
exclusively for householduse.
• Do not place appliance on, near, or in a hot item such
as a stove, oven, pot, or container. Only use metal
attachments with hot liquids or fooditems.
Definitions: Safety Alert Symbols and Words
This instruction manual uses the following safety alert
symbols and words to alert you to hazardous situations and
your risk of personal injury or propertydamage.
DANGER: Indicates an imminently hazardous
situation which, if not avoided, will result in death or
seriousinjury.
WARNING: Indicates a potentially hazardous situation
which, if not avoided, could result in death or
seriousinjury.
CAUTION: Indicates a potentially hazardous situation
which, if not avoided, may result in minor or
moderateinjury.
(Used without word) Indicates a safety relatedmessage.
NOTICE: Indicates a practice not related to
personal injury which, if not avoided, may result in
propertydamage.
WARNING: Read all safety warnings and all
instructions. Failure to follow the warnings and
instructions may result in electric shock, fire and/or
seriousinjury.
WARNING: To reduce the risk of injury, read the
instructionmanual.
English (original instructions)

11
ENGLISH
Important Safety Instructions for All
Battery Chargers
WARNING: Read all safety warnings, instructions,
and cautionary markings for the battery, charger
and product. Failure to follow the warnings and
instructions may result in electric shock, fire and/
or seriousinjury.
• DO NOT attempt to charge the battery with any
chargers other than a BLACK+DECKER charger.
BLACK+DECKER chargers and batteries are specifically
designed to worktogether.
• These chargers are not intended for any uses other
than charging BLACK+DECKER rechargeable
batteries. Charging other types of batteries may cause
them to overheat and burst, resulting in personal injury,
property damage, fire, electric shock orelectrocution.
• Do not expose the charger to rain orsnow.
• Do not allow water or any liquid to entercharger.
• Pull by the plug rather than the cord when
disconnecting the charger. This will reduce the risk of
damage to the electric plug andcord.
• Make sure that the cord is located so that it will not
be stepped on, tripped over or otherwise subjected to
damage orstress.
• Do not place any object on top of the charger. Place
the charger in a position away from any heatsource.
• Do not operate the charger with a damaged cord
orplug–have them replacedimmediately.
over or damaged in any way (e.g., pierced with a nail, hit
with a hammer, stepped on). Damaged tools should be
returned to the service center forrecycling.
Storage Recommendations
The best storage place is one that is cool and dry, away
from direct sunlight and excess heat or cold. Store the fully
charged tool disconnected from thecharger.
Transportation
NOTE: Integral Li‑ion tools should not be put in checked
baggage on airplanes and must be properly protected from
short circuits if they are in carry‑onbaggage.
Tool Disposal
This product uses a lithium‑ion rechargeable
and recyclable battery. When the battery
no longer holds a charge, the tool should
be recycled. The tool should not be
incinerated or placed in the trash or curbsiderecycling.
The tool can be taken for disposal to an Authorized Service
Center. Some local retailers are also participating in a national
recycling program (refer to RBRC®). For more information visit
www.call2recycle.org or call the toll‑free number in the
RBRC Seal. RBRC is a registered trademark of Call 2Recycle,
Inc. If you bring the tool to an Authorized Service Center,
the Center will arrange to recycle the tool and its battery.
Or, contact your local municipality for proper disposal
instructions in your city/town.
READ ALL INSTRUCTIONS
Important Safety Instructions for All
Integral Battery Tools
WARNING: Read all safety warnings, instructions,
and cautionary markings for the battery, charger
and product. Failure to follow the warnings and
instructions may result in electric shock, fire and/
or seriousinjury.
• NEVER force a charger plug to fit thetool.
• DO NOT
modify the charger plug of a non‑compatible
charger in any way to fit the tool as the battery may
rupture causing serious personalinjury.
• DO NOT charge or use the battery in explosive
atmospheres, such as in the presence of flammable
liquids, gases or dust. Inserting or removing the charger
plug from the tool may ignite the dust orfumes.
• Only charge the battery with the providedcharger.
• DO NOT splash or immerse in water or otherliquids.
• DO NOT allow water or any liquid to entertool.
• DO NOT store or use the tool in locations where the
temperature may reach or exceed 104°F (40°C) (such
as outside sheds or metal buildings in summer). For
best life store tools in a cool, drylocation.
NOTE: Do not store the tool with the switch locked on.
Never tape the switch in the ONposition.
• DO NOT incinerate the tool even if it is severely
damaged or is completely worn out. The battery can
explode in a fire. Toxic fumes and materials are created
when lithium‑ion batteries areburned.
• If battery contents come into contact with the skin,
immediately wash area with mild soap and water. If
battery liquid gets into the eye, rinse water over the open
eye for 15minutes or until irritation ceases. If medical
attention is needed, the battery electrolyte is composed of a
mixture of liquid organic carbonates and lithiumsalts.
• Contents of opened battery cells may cause
respiratory irritation. Provide fresh air. If symptoms
persist, seek medicalattention.
• Battery liquid may be flammable if exposed to spark
orflame.
• Never attempt to open the tool for any reason. If the
tool case is cracked or damaged, do not charge. Do
not crush, drop or damage the tool. Do not use a tool or
charger that has received a sharp blow, been dropped, run
Ah ....................... amp hours
or AC ...........alternating current
or AC/DC .... alternating or direct
current
...................... Class II Construction
(double insulated)
no .......................no load speed
n .........................rated speed
PSI....................... pounds per square
inch
......................earthing terminal
.....................safety alert symbol
..................... visible radiation
do not stare into
the light
..................... wear respiratory
protection
..................... wear eye protection
..................... wear hearing
protection
..................... r
ead all documentation
.....................
do not expose to rain

ENGLISH
12
ASSEMBLY AND ADJUSTMENTS
WARNING: To reduce the risk of serious personal
injury, turn unit off and keep hands away from
the switch before making any adjustments or
removing/installing attachments or accessories.
An accidental start‑up can causeinjury.
Hot/Cold Delay
When the charger detects a battery that is too hot or
too cold, it automatically starts a Hot/Cold Pack Delay,
suspending charging until the battery has reached an
appropriate temperature. The charger then automatically
switches to the charging mode. This feature ensures
maximum batterylife.
A cold battery may charge at a slower rate than a warmbattery.
The hot/cold pack delay will be indicated by all 3LEDs
continuously flashing a short ON followed by a longer ON.
Once the battery has reached an appropriate temperature,
the charger will resume the chargingprocedure.
Electronic Protection System
Li‑Ion tools are designed with an Electronic Protection
System that will protect the battery against overloading,
overheating or deep discharge. The tool will automatically
turn off and the battery will need to berecharged.
Important Charging Notes
1. Longest life and best performance can be obtained if
the battery pack is charged when the air temperature
is between 65°F – 75°F (18° C– 24°C). DO NOT charge
when the battery pack is below +40°F (+4.5°C), or
above +104°F (+40°C). This is important and will
prevent serious damage to thebattery.
2. The charger and tool may become warm to the touch
while charging. This is a normal condition and does
not indicate a problem. To facilitate the cooling of
the tool after use, avoid placing the charger or tool
in a warm environment such as in a metal shed or an
uninsulatedtrailer.
3. If the battery does not charge properly:
a. Check operation of receptacle by plugging in a lamp
or otherappliance.
b. Check to see if receptacle is connected to a light
switch which turns power off when you turn out
thelights.
c. If charging problems persist, take the tool and charger
to your local servicecenter.
4. You may charge a partially used battery whenever you
desire with no adverse effect on thebattery.
Charger Cleaning Instructions
WARNING: Shock hazard. Disconnect the charger
from the AC outlet before cleaning. Soiling may be
removed from the exterior of the charger using a cloth
or soft non‑metallic brush. Do not use water or any
cleaningsolutions.
SAVE THESE INSTRUCTIONS FOR
FUTURE USE
• Do not operate the charger if it has received a sharp
blow, been dropped or otherwise damaged in any
way. Take it to an authorized servicecenter.
• Do not disassemble the charger; take it to an
authorized service center when service or repair
is required. Incorrect reassembly may result in a risk of
electric shock, electrocution orfire.
• The charger is designed to operate on standard
120V household electrical power. Do not attempt to
use it on any other voltage. This does not apply to the
vehicularcharger.
• Foreign materials of a conductive nature, such as, but
not limited to, grinding dust, metal chips, steel wool,
aluminum foil or any buildup of metallic particles
should be kept away from the chargerconnector.
• Always unplug the charger from the power supply
when there is no battery beingcharged.
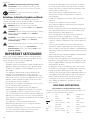
Charging a Battery (Fig.B)
WARNING: For use only with the suppliedcharger.
NOTE: Ensure the charging dock15 is placed securely on a
flat level countertopsurface.
1. Plug the charger12 into any standard 120Volt 60Hz
electrical outlet. Do not use an extensioncord.
2. Insert unit into the charging dock with the charging
pegs7 on the appliance aligned with the notches on
the charger connector14. Ensure the charger connector
is fully attached to the chargingdock. To ensure charger
connector is properly assembled, press on lower section
of the connector with 2 thumbs to fully seat connector in
correct position.
NOTE: The charger connector can be removed from the
charging dock to charge the unit separately or in the
storagebins.
3. The LEDs5 on the top of the appliance will illuminate
whilecharging.
1 flashing LED < 33% charged
First LED solid, second
flashing
33 ‑ 66% charged
2 solid LEDs, third flashing 66 ‑ 99% charged
3 solid LEDs 100% charged
4. The LEDs will turn off upon completion ofcharging.
NOTE: While charging, the charger may get warm, this is
perfectly normal and safe. It is safe to leave the appliance
connected to the charger indefinitely. The charger
automatically reduces power consumption when charging
iscomplete.
NOTE: The appliance can be charged while in the storage
bin. Refer to the CHARGING IN STORAGE BINsection.
5. When discharging:
1 LED < 33% charged
2 LEDs < 66% charged
3 LEDs > 66% charged

13
ENGLISH
Storage Bins
The storage bins 16 and17 can be connected horizontally
or stacked vertically for convenientstorage.
Stacking Storage (Fig. G)
1. Line up the bump18 of the top bin with the recess19
of the bottombin.
2. Place the first bin on top of the second bin so it is engaged
with the stop ribs20 to prevent shifting. The bins will not
lock together so tipping may dislodge thebins.
NOTE: It is not recommended to stack higher than twobins.
NOTE: Two small bins can be stored on top of a largebin.
Side‑by‑Side Storage (Fig. H)
1. Slide the storage bin connector21 onto the storage bin
channel22 of one bin until it clicks into place and issecure.
2. Slide the channel of a second bin along the connector
until it clicks into place and issecure.
NOTE: It is not recommended to connect two large bins side
byside.
Charging in Storage Bin (Fig. I)
1. Place the charger connector14 into the connector detent56
of the large bin17.
2. Run the charger cord13 through the cord channel57
of the bin and out of the charging notch23.
3. Lay the unit in the bin so the charging pegs7 on the
unit fully engage with the chargerconnector.
Proper Hand Position (Fig.F)
WARNING: To reduce the risk of serious personal injury,
ALWAYS use proper hand position as shown.
WARNING: To reduce the risk of serious personal
injury, ALWAYS hold securely in anticipation of a
suddenreaction.
Hold the appliance1 so your palm presses down the unlock
button2 and use your thumb or a finger to push down the
powerbutton3.
Speed Control (Fig.E)
The appliance has a variable‑speed dial4. Turn the dial to
the appropriate speed for the attachment being used (1 is
the lowest speed, 5is the highestspeed).
ATTACHMENT SPEED
Immersion Blender Start at 1, increase as needed
Wine Opener 5
Can Opener 5
Spice Grinder 5
Whisk Start at 1, increase as needed
Frother Start at 5, decrease as desired
NOTE: With a 5‑second delay before the unit turns off, you
can release the buttons and use your thumb to adjust speed
without turning the unitoff.
On / Off (Fig.D)
IMPORTANT: Never turn the motor on unless attachments
are securelyattached.
NOTE: Optimal temperature for use is between 50–104°F
(10–40°C).
1. To turn unit on, either:
‑Press unlock button2, then press power button3.
‑Press power button, then press unlockbutton.
‑Press unlock and power buttonssimultaneously.
NOTE: There is a slight delay between pressing both buttons
and the appliancestarting.
2. When the appliance is ready to use, the LEDs5 will
illuminate and remain solid. If they do not, refer to the
TROUBLESHOOTINGsection.
NOTE: If LEDs go off during use, or don't light when starting
unit, release buttons and go back to step1.
3. Once the unit is on, the buttons may be released for up to
5seconds. The motor will stop running after the buttons
are released but the appliance remains active for 5seconds.
As long as the power button is pressed at least once within
5seconds after releasing, the appliance will turn backon.
4. To turn off, release both buttons. The appliance will
remain active for 5seconds before turningoff.
WARNING: The LEDs will stay on after buttons are
released. Ensure the LEDs are off and the unit has fully
stopped before removingattachments.
OPERATION
WARNING: To reduce the risk of serious personal
injury, turn unit off and keep hands away from
the switch before making any adjustments or
removing/installing attachments or accessories.
An accidental start‑up can causeinjury.
Installing and Removing Attachments (Fig.C)
WARNING: Ensure LEDs are off and the system is noton.
Blender / Wine Opener / Can Opener / Spice Grinder
1. To install, slide the attachment head55 of the attachment
onto the motor6 and turn clockwise (as viewed from the
end of the attachment) until it securely locksin.
NOTE: The attachment can be installed on the motor in four
different locations, so it does not need to be placed in any
one specificorientation.
2. To remove, turn counterclockwise and pull attachmentoff.
Whisk / Frother
1. To install, slide the whisk pole55 or frother pole57 into
the adaptor hole9until it clicks into place and issecure.
2. Slide the adaptor8 onto the motor6 and turn
clockwise (as viewed from the end of the attachment)
until it locks insecurely.
NOTE: The attachment can be installed on the motor in four
different locations, so it does not need to be placed in any
one specificorientation.
3. To remove, turn adaptor counterclockwise and pull it off,
then pull the whisk or frother from theadaptor.

ENGLISH
14
OPERATION
WARNING: To reduce the risk of serious personal
injury, turn unit off and keep away from the
power button before making any adjustments or
removing/installing attachments or accessories.
An accidental start‑up can causeinjury.
WINE OPENER
BCKM101WN
Intended Use
This wine opener is intended for residential use only for the
removal of corks from wine bottles. Do not use on bottles
with carbonatedcontents.
DO NOT let children come into contact with theappliance.
Attaching and Removing Blender Guard
(Fig. K)
CAUTION: Do not attach or remove immersion blender
guard 28 while the immersion blender attachment
is installed to the motor. Avoid contact with the blade
while attaching and removing the blender guard.
1. To attach the blender guard, align detents 29 with the
slots 27 on the immersion blender attachment. Slide the
blender guard onto the immersion blender attachment.
Ensure the guard clicks firmly into the detents.
2. To remove, depress the detents and slide the guard off.
3. Clean the blender guard as needed. For more
information, refer to cleaning section.
NOTE: Do not pull blender out quickly. Blending creates
suction at the bottom of the cup which can cause contents
to splatter.
8. Keep blender attachment inside the mixing cup to
prevent dripping oncounter.
9. After processing, disassemble the immersion blender from
the motor by turning the attachment counterclockwise
10. Clean the attachment as needed. For more information,
refer to cleaning section.
Immersion Blender Tips and Tricks
• The immersion blender blends foods and liquids
rapidly, therefore it is easy to overprocess. Stop the
motor and check food throughout the operation to
avoidoverprocessing.
• When pureeing and blending, cut food into uniform
sizes. This will ensure smooth and consistentresults.
• Allow hot food to cool slightly beforeblending.
WARNING: Ensure the immersion blender attachment
head is assembled to the motor as detailed in the
INSTALLING AND REMOVING ATTACHMENTSsection.
NOTE: Do not use the immersion blender24 with non‑stick
cookware as it may scratch or mark non‑stickcoatings.
Blending (Fig. J)
1. Place food to be processed in mixing cup10. The
container should only be 1⁄2 full or less when blending
liquids or when making a puree of fruit and/or
vegetables to prevent food fromoverflowing.
2. Immerse the blender head25 as deeply as possible into
the mixingcup.
3. Set the variable‑speed dial4 to 1and increase speed
by turning thedial. This will help avoid splattering and
overprocessing.
4. Turn the unit on as described in the ON / OFFsection.
5. Blend the ingredients by moving the appliance up and
down and in circles. Do not pull immersion blender head
out of food
IMPORTANT: The continuous operating time must be less
than 30seconds. Never blend hot oil, fat, ormeat.
6. After you have completed blending, release the unlock
button2 and power button3 to stop the motor6.
7. If the blade26 becomes blocked:
‑Turn unit off while keeping the blender
headsubmerged,
‑Allow the blade to stop,
‑Wait until the LEDs turn off,
‑Lift the blender out of the container
‑Disassemble the blender from the motor by turning
the attachment counterclockwise,
‑Remove blockage,
‑Securely reattach theblender.
OPERATION
WARNING: To reduce the risk of serious personal
injury, turn unit off and keep away from the
power button before making any adjustments or
removing/installing attachments or accessories.
An accidental start‑up can causeinjury.
IMMERSION BLENDER
BCKM101MB
Intended Use
This immersion blender is intended for residential use only.
It blends liquids such as sauce, soup, and smoothies, mixes
batters, and purees fruits andvegetables.
DO NOT let children come into contact with theappliance.
4. Ensure the LEDs on the top of the unit illuminate. If they
do not, check the connection between the unit and
chargerconnector.
5. Plug the charger12 into anoutlet.

15
ENGLISH
WARNING: Do not touch blade. It is sharp and may
cause seriousinjury.
WARNING: Ensure the can opener attachment is
assembled to the motor as detailed in the INSTALLING
AND REMOVING ATTACHMENTSsection.
Opening a Can (Fig. O–Q)
IMPORTANT: The can needs to remain vertical at alltimes.
NOTE: Can opener cuts cans from the side below the can's
end seam61 instead of thetop.
1. Set the variable‑speed dial4 to 5.
2. Ensure the lever38 on the can opener36 is vertical as
shown in Fig. O.
3. Slide the can opener onto the can so the blade37
comes in contact with the side of thecan.
4. Align the can opener center line39 with the center of
the can as shown in Fig. P.
5. Ensure the can sits flush against the can opener base40
the side wall41, and inside the can opener recess42
as shown in Fig. P. The can must stay in contact with the
base, wall, and recess at alltimes.
6. Push the lever down to puncture the can as shown in
Fig.P. Ensure the lever is engaged and the can is fully
punctured. Keep lever down while opening thecan.
7. After puncturing, lift the can slightly off the surface so it
rotates freely whileopening.
8. Turn the unit on as described in the ON / OFF section.
9. Once the top of the can is fully cut off, release the unlock
button2 and power button3 to stop the motor6.
10. Ensure the motor has completely stopped before lifting
the can opener off the can. The can lid will be attached to
the can opener as long as the lever is still down.
11. Hold the can opener over the garbage and pull the lever
up as shown in Fig. Q to release the cantop.
12. After opening the can, disassemble the can opener from
the motor by turning the attachment counterclockwise
13. Clean the attachment as needed. For more information,
refer to cleaning section.
OPERATION
WARNING: To reduce the risk of serious personal
injury, turn unit off and keep away from the
power button before making any adjustments or
removing/installing attachments or accessories.
An accidental start‑up can causeinjury.
CAN OPENER
BCKM101CN
Intended Use
This can opener is intended for residential use only. It cuts the
side of cans to openthem.
DO NOT let children come into contact with theappliance.
WARNING: Ensure the wine opener attachment head
is assembled to the motor as detailed in the INSTALLING
AND REMOVING ATTACHMENTSsection.
WARNING: Do not touch corkscrew or cutter blades.
They are sharp and may cause seriousinjury.
WARNING: Do not place objects into the wine opener
other than those describedbelow.
Cutting Foil (Fig. L)
NOTE: Foil on top of the wine bottle must be removed
before using the wine opener30.
1. Remove the foil cutter34 from the wineopener.
2. Place the foil cutter on top of the wine bottle so the foil
cutter blades35 surround the neck of thebottle.
3. Squeeze the sides and turn the cutter around the bottle
until the foil is fullycut.
4. Remove cutter andfoil.
Removing the Cork (Fig. M)
1. Ensure the foil cutter is removed from the wineopener.
2. Place wine bottle on a flatsurface.
3. Set the variable‑speed dial4 to5.
4. Place the wine opener vertically on top of the bottle and
press down until you feel resistance. The corkscrew31
will be slightly above thecork.
5. Turn the unit on as described in the ON / OFF section. The
corkscrew will move down into thecork.
6. Once the cork is fully removed, you will see it freely
spinning above the bottle's neck. Release the unlock
button2 and power button3 to stop the motor6.
7. Ensure the motor has completely stopped before lifting
the wine opener off thebottle.
8. Once the wine opener is off, the internal spring32 will
automatically push the cork to the end of the corkscrew
and drop the cork out of the wine opener. Place your
hand under the wine opener to catch thecork.
‑If the cork does not come all the way off of the
corkscrew, manually twist it off.
‑If the cork is jammed, place a small, flat object into
one of the windows33 to unjam the cork so it can
be ejected by the spring. Do not turn appliance on
when doingthis.
9. After the bottle is open, disassemble the wine opener from
the motor by turning the attachment counterclockwise
10. Clean the attachment as needed. For more information,
refer to cleaning section.
Storing Wine Opener (Fig. N)
It is recommended to store the wine opener with the foil cutter34
attached to thebottom.
• Snap the cutter onto the bottom of the wineopener.
Wine Opener Tips and Tricks
• When you can see the cork begin to move freely outside
the bottle, pull the bottle away from theunit.
• Place your hand under the wine cork after removing from
the bottle to easily grab it whenreleasing.

ENGLISH
16
OPERATION
WARNING: To reduce the risk of serious personal
injury, turn unit off and keep away from the
power button before making any adjustments or
removing/installing attachments or accessories.
An accidental start‑up can causeinjury.
WHISK
BCKM101WH
Intended Use
This whisk is intended for residential use only. It can be used to
beat eggs, mix batters, and make meringue and whipcream.
DO NOT let children come into contact with theappliance.
line ( or )53, the dial will rotate but not change
thecoarseness.
3. Set the coarseness of the spice by turning the grinder dials48:
‑Clockwise for more finespices.
‑Counterclockwise for more coarsespices.
NOTE: There is one dial for each side of the grinder.
4. The level of coarseness is shown by where the coarseness
indicator49 sits along the coarseness scale50.
Grinding (Fig. U)
1. Turn the collar51 left or right to choose which side togrind.
2. Select the desired spice by aligning the door selector52
with the door line ( or )53 that matches the line on
the dooritself.
NOTE: Only one side of the grinder can be used at atime.
3. Set the variable‑speed dial4 to 5.
4. Turn the unit on as described in the ON / OFF section.
5. If the dials48 become blocked:
‑Turn unit off,
‑Disassemble the grinder from the motor6 by
turning the attachment counterclockwise,
‑Remove cap if needed,
‑Remove blockage,
‑Reattach thegrinder.
6. After you have completed grinding, release the unlock
button2 and power button3 to stop the motor.
7. After grinding, disassemble the spice grinder from the
motor by turning the attachment counterclockwise
8. Clean the attachment as needed. For more information,
refer to cleaning section.
Spice Grinder Tips and Tricks
• Use a funnel to help load the spicegrinders.
• If you want to adjust the size of the spice being ground,
rotate the grinder dials on the bottom of the grinder as
described in the SETTING SPICE COARSENESSsection.
• Place the cap on the unit when not in use to prevent
excess spicespills.
WARNING: Do not adjust grinder dials 48 while in
use. They may cause seriousinjury.
WARNING: Ensure the spice grinder attachment head
is assembled to the motor as detailed in the INSTALLING
AND REMOVING ATTACHMENTSsection.
Loading Grinder (Fig. R)
NOTE: Use hard spices only. Soft and wet ingredients may obstruct
and damage the spice grinder43 and its internal grindingwheels.
1. Pull grinder doors44 open from the top.
2. Load spices into the dedicated compartment. Place one
spice in the door marked with and another spice in the
door marked with . If you only want to grind one spice,
either door may beused.
3. Close the door until it clicks, ensuring it is fully closed so
spices do not come out whilegrinding.
Grinder Cap (Fig. S)
1. Take cap45 off to grind spices directly on food. To
remove the cap, pull off at the spice grinder recess47.
2. Put cap on by lining it up with the bottom of the spice grinder
and snapping it into place. The cap wall46 will separate
spices so they don't mix and keep the spices off yourcounter.
Adjust Spice Coarseness (Fig. T)
1. Remove the cap ifneeded.
2. Set the spice selector52 to the side you wish to adjust. If
the spice selector is not lined up with the matching door
OPERATION
WARNING: To reduce the risk of serious personal
injury, turn unit off and keep away from the
power button before making any adjustments or
removing/installing attachments or accessories.
An accidental start‑up can causeinjury.
SPICE GRINDER
BCKM101SP
Intended Use
This spice grinder is intended for residential use only. It grinds
hard spices such as salt and pepper for use infood.
DO NOT let children come into contact with theappliance.
Can Opener Tips and Tricks
• Do not release the lever until you are over the trash can
to prevent the need of grabbing the canlid.
• Do not begin using until the lever is completelyhorizontal.
• Once you have begun, raise the can off of the counter to
remove the resistance torotating.
• Keep the can perpendicular to the counter and just
slightly off the countertop to preventmesses.
• If draining the can is needed, angle can lid slightly and
move to the sink. Rotate the can to allow excess liquid to
exit while holding the lid inplace.

17
ENGLISH
Troubleshooting
Unit not running: Place the appliance on charger until all
LEDs are on and solid. Then try using the unitagain.
Splatters food outside container: Adjust the
variable‑speed dial. Start with the speed on the lowest
setting to prevent making a mess and adjust to higher
speeds as ingredients become well mixed, and as you feel
more comfortable with thespeed.
WARNING: Ensure the frother pole is assembled to
the adaptor and that the adaptor is assembled to the
motor as detailed in the INSTALLING AND REMOVING
ATTACHMENTSsection.
• Do not use frother with non‑stick cookware as it may
scratch or mark non‑stickcoatings.
Frothing (Fig.W)
1. Place ingredients to be frothed into acup.
2. For best results, hold the frother56 in the middle of the
liquid. Do not push to thebottom.
3. Set the variable‑speed dial4 to 5and decrease speed by
turning the dial asdesired.
4. Turn the unit on as described in the ON / OFFsection.
5. Hold the frother in the middle of the cup for bestresults.
IMPORTANT: The continuous operating time must be less
than 2minutes. Never froth hot oil, fat, ormeat.
6. If your frother becomes blocked:
‑Turn unit off while keeping the frother submerged,
‑Lift frother out of the cup,
‑Disassemble the frother and adaptor from the motor by
turning the adaptor counterclockwise,
‑Remove blockage,
‑Reattach the frother andadaptor.
7. After you have completed frothing, release the unlock
button2 and power button3 to stop themotor.
8. Ensure the motor has completely stopped before lifting
the frother out of thecontainer.
9. After use, pull the frother pole from the adaptor and
remove the adaptor from the motor by turning the
adaptor counterclockwise
10. Clean the attachment as needed. For more information,
refer to cleaning section.
Frother Tips and Tricks
• It is recommended to use at the top speed to create the
greatest froth quickly. Use with whole milk orcream.
OPERATION
WARNING: To reduce the risk of serious personal
injury, turn unit off and keep away from the
power button before making any adjustments or
removing/installing attachments or accessories.
An accidental start‑up can causeinjury.
to froth cream or milk fordrinks.
DO NOT let children come into contact with theappliance.
FROTHER
BCKM101MF
Intended Use
This frother is intended for residential use only. It can be used
WARNING: Ensure the whisk pole is assembled to the adaptor
and that the adaptor is assembled to the motor as detailed in
the INSTALLING AND REMOVING ATTACHMENTSsection.
NOTE: Do not use the whisk54 with non‑stick cookware as
it may scratch or mark non‑stickcoatings.
Whisking (Fig.V)
1. Place ingredients to be whisked into abowl.
NOTE: To incorporate air into the ingredients when whisking,
use a deep and wide container and move the whisk54 in
gentle up‑and‑down and side‑to‑sidemotions.
2. Immerse the whisk completely in the ingredients, to the
bottom of thecontainer.
3. Set the variable‑speed dial4 to 1and increase speed by
turning the dial asdesired.
NOTE: If selecting a higher speed, it is recommended that
you start on low speed and then increase to high speed to
avoid splattering and overprocessing.
4. Turn the unit on as described in the ON / OFF section. Do
not remove whisk from bowl while motor6 isrunning.
5. Whisk ingredients by moving the appliance slowly up
and down and in circles. Do not remove whisk fromfood.
6. If your whisk becomes blocked:
‑Turn unit off while keeping the whisk submerged,
‑Lift whisk out of the container,
‑Disassemble the whisk and adaptor35 from the motor
by turning the adaptor counterclockwise,
‑Remove blockage,
‑Securely reattach the whisk andadaptor.
IMPORTANT: The continuous operating time must be less
than 2minutes. Never whisk hot oil, fat, ormeat.
7. After you have completed whisking, release the unlock
button2 and power button3 to stop the motor.
8. Ensure the motor has completely stopped before lifting
the whisk out of thecontainer.
9. After use, pull the whisk from the adaptor and remove
the adaptor from the motor by turning the adaptor
counterclockwise
10. Clean the attachment as needed. For more information,
refer to cleaning section.
Whisk Tips and Tricks
• For whipping cream, always use fresh chilledcream.
• For egg whites, whisk fresh, room temperature eggs in a
glass bowl to achieve greater and more stablevolume.
• It is recommended to use the highest speed when
whisking egg whites andcream.

ENGLISH
18
TWOYEAR LIMITED WARRANTY
Black & Decker (U.S.) Inc. warranties this product to be free
from defects in material or workmanship for a period of
two(
2
) years following the date of purchase, provided that
the product is used in a home environment. This limited
warranty does not cover failures due to abuse, accidental
damage or when repairs have been made or attempted
by anyone other than BLACK+DECKER and its Authorized
Service Centers. A defective product meeting the warranty
conditions set forth herein will be replaced or repaired at no
charge in either of two ways:
The first, which will result in exchanges only, is to return
the product to the retailer from whom it was purchased
(provided that the store is a participating retailer). Returns
should be made within the time period of the retailer’s policy
for exchanges. Proof of purchase may be required. Please
check with the retailer for its specific return policy regarding
time limits for returns or exchanges. The second option is
to take or send the product (prepaid) to a BLACK+DECKER
owned or authorized Service Center for repair or replacement
at BLACK+DECKER’s option. Proof of purchase may be
required. BLACK+DECKER owned and authorized service
centers are listed online at ww.blackanddecker.com. This
warranty does not apply to accessories. This warranty gives
you specific legal rights and you may have other rights which
vary from state to state or province to province. Should you
have any questions, contact the manager of your nearest
BLACK+DECKER Service Center. This product is not intended
for commercial use, and accordingly, such commercial use
of this product will void this warranty. All other guarantees,
express or implied, are hereby disclaimed.
LATIN AMERICA: This warranty does not apply to products
sold in Latin America. For products sold in Latin America,
check country specific warranty information contained in
the packaging, call the local company or see the website for
suchinformation.
Imported by.Black & Decker (U.S.) Inc.,
701 E. Joppa Rd.
Towson, MD 21286
BlackandDecker.com
(1-800-544-6986)
Register Online
Thank you for your purchase. Register your product nowfor:
• WARRANTY SERVICE: Registering your product will
help you obtain more efficient warranty service in case
there is a problem with yourproduct.
• CONFIRMATION OF OWNERSHIP: In case of an
insurance loss, such as fire, flood or theft, your registration
of ownership will serve as your proof ofpurchase.
• FOR YOUR SAFETY: Registering your product will allow
us to contact you in the unlikely event a safety notification
is required under the Federal Consumer SafetyAct.
• Register online at www.BlackandDecker.com
/
NewOwner
Repairs
The charger and internal battery are notserviceable. There
are no serviceable parts inside the charger orappliance.
Optional Accessories
WARNING: Since accessories, other than those offered
by BLACK+DECKER, have not been tested with this
product, use of such accessories with this appliance
could be hazardous. To reduce the risk of injury, only
BLACK+DECKER recommended accessories should be
used with thisproduct.
Consult your dealer for further information on the
appropriateaccessories.
Cleaning
WARNING: Never use solvents or other harsh
chemicals for cleaning the non‑metallic parts of the
tool. These chemicals may weaken the plastic materials
used in these parts. Use a cloth dampened only with
water and mild soap. Never let any liquid get inside the
tool; never immerse any part of the tool into aliquid.
CAUTION: Blender guard, whisk, frother, mixing cup,
and mixing cup lid are top rack only, dishwasher safe.
It is recommended that you manually rinse before
placing them in the top rack of the dishwasher.
1. Remove the attachment from the motor 6 as detailed in
the INSTALLING AND REMOVING ATTACHMENTS section.
2. Blender guard, whisk, frother, mixing cup and mixing cup lid
are dishwasher safe on top rack only on normal setting. All
other attachments and components, clean by hand with
a cloth and warm, soapy water.
3. Ensure the attachment or component is dry before
reinstalling.
MAINTENANCE
WARNING: To reduce the risk of serious personal
injury, turn unit off and keep away from power
button before making any adjustments or
removing/installing attachments or accessories.
An accidental start‑up can causeinjury.
Your BLACK+DECKER appliance has been designed to
operate over a long period of time with a minimum of
maintenance. Continuous satisfactory operation depends
upon proper appliance care and regularcleaning.
If unit is not charging:
• Ensure the charger is plugged in.
• Wipe down the charging pegs on the appliance as well
as the charger connector. Use a cloth dampened only
with water and mildsoap.
• Temperature fault or overcurrent conditions may
haveoccurred.
‑Temperature fault: LEDs will blink in the following pattern
‑ . ‑ . (250ms ON, 250ms OFF, 10ms ON, 250msOFF).
‑ Over current: unit will shut down with noflashing.
‑Refer to the HOT/COLD DELAY section for
moreinformation.
La page est en cours de chargement...
La page est en cours de chargement...
La page est en cours de chargement...
La page est en cours de chargement...
La page est en cours de chargement...
La page est en cours de chargement...
La page est en cours de chargement...
La page est en cours de chargement...
La page est en cours de chargement...
La page est en cours de chargement...
La page est en cours de chargement...
La page est en cours de chargement...
La page est en cours de chargement...
La page est en cours de chargement...
La page est en cours de chargement...
La page est en cours de chargement...
La page est en cours de chargement...
La page est en cours de chargement...
La page est en cours de chargement...
La page est en cours de chargement...
La page est en cours de chargement...
La page est en cours de chargement...
La page est en cours de chargement...
La page est en cours de chargement...
-
 1
1
-
 2
2
-
 3
3
-
 4
4
-
 5
5
-
 6
6
-
 7
7
-
 8
8
-
 9
9
-
 10
10
-
 11
11
-
 12
12
-
 13
13
-
 14
14
-
 15
15
-
 16
16
-
 17
17
-
 18
18
-
 19
19
-
 20
20
-
 21
21
-
 22
22
-
 23
23
-
 24
24
-
 25
25
-
 26
26
-
 27
27
-
 28
28
-
 29
29
-
 30
30
-
 31
31
-
 32
32
-
 33
33
-
 34
34
-
 35
35
-
 36
36
-
 37
37
-
 38
38
-
 39
39
-
 40
40
-
 41
41
-
 42
42
-
 43
43
-
 44
44


BLACK DECKER BCKM101 Manuel utilisateur
- Catégorie
- Mélangeurs
- Taper
- Manuel utilisateur
dans d''autres langues
- English: BLACK DECKER BCKM101 User manual
- español: BLACK DECKER BCKM101 Manual de usuario
Autres documents
-
Braun MQ60 Mode d'emploi
-
KALORIK NBL 43216 BK Manuel utilisateur
-
Hamilton Beach 80335R Mode d'emploi
-
Hamilton Beach 840174701 Manuel utilisateur
-
Adler AD 4433 Mode d'emploi
-
Hamilton Beach 80350 Manuel utilisateur
-
-
KALORIK PPG-36584 Manuel utilisateur
-
Hamilton Beach 80350R Mode d'emploi
-
GE G8H1AASSPSS Manuel utilisateur