Frigidaire EFIC235 Le manuel du propriétaire
- Catégorie
- Fabricants de glaçons
- Taper
- Le manuel du propriétaire

Introduction.....................................................................................
Important Safety Information...................................................
Getting to Know Your Unit........................................................
Operating Procedures & Maintenance...................................
Using Your Ice Maker...................................................................
Troubleshooting.............................................................................
Product Specifications...............................................................
Limited Warranty..........................................................................
2
3
4
5
6
9
10
11
USA CANADA 1-800-
ICE MAKER
EFIC235, EFIC235-AMZ,
EFIC237-SSBLACK, EFIC237-SSRED
K86274 Owners Manaul

INTRODUCTION
2

WARNING
WARNING indicates a potentially
hazardous situation which, if not avoided,
could result in death or serious injury.
IMPORTANT
IMPORTANT indicates installation, oper-
ation or maintenance information which
is important but not hazard-related.
DANGER
DANGER indicates an imminently
hazardous situation which, if not avoided,
will result in death or serious injury.
CAUTION
CAUTION indicates a potentially
hazardous situation which, if not
avoided, may result in minor or
moderate injury.
Safety Definitions
This is the safety alert symbol. It is
used to alert of potential personal injury
hazards. Obey all safety messages that
follow this symbol to avoid possible injury
or death.
Safety Instructions
•DO NOT store or use gasoline, or
other flammable liquids in the vicinity
of this or any other appliance. Read
product labels for warnings regarding
flammability and other hazards.
•Avoid contact with any moving parts
of automatic ice maker.
•Remove all staples from the carton.
Staples can cause severe cuts, and also
destroy finishes if they come in contact
with other appliances or furniture.
WARNING
Please read all instructions before using
this appliance.
Child Safety
3IMPORTANT SAFETY INFORMATION
Destroy or recycle the carton, plastic
bags, and any exterior wrapping material
immediately after the Ice Maker is unpacked.
Children should NEVER use these items to
play. Cartons covered with rugs, bedspreads,
plastic sheets or stretch wrap may become
airtight chambers, and can quickly cause
suocation.

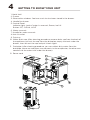
1. Metal shell
2. Drawer
3. Observation window: See how much ice has been stored in the drawer.
4. Handle for drawer.
5. Control Panel:
Indicator light: Lack of water in reservoir, Power, Ice full
Button: ICE, CLEAN, LIGHT
6. Water reservoir
7. Handle for water reservoir
8. Hot Air outlet
9. Drip tray
Water drain cap: After cleaning procedure, remove drain cap from the back of
the appliance, pull out the cap from the drainpipe, empty the tank under the
drawer, then reinsert the cap and put it back again.
Drainpipe: After cleaning procedure, you can collect dirty water from the
drainpipe (there are two pipes: one connects to the evaporator, the other one
connects to the water tank under the drawer).
Power cord
10.
11.
12.
GETTING TO KNOW YOUR UNIT
4

DANGER
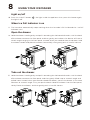
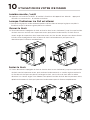
1. Remove the exterior and interior packaging, and then check all the accessories are included.
If any parts are missing, please contact our customer service.
2. Remove all the tapes on the unit; take out the accessory parts inside.
3. Clean the interior with lukewarm water and a soft cloth.
4. Locating your ice maker on a level counter table far from direct sunlight and other sources
of heat (i.e.: stove, furnace, and radiator). Make sure that there is at least 6 inches between
the back and sides of your ice maker with the wall.
5. Allow one hour for the refrigerant fluid to settle down before plugging your ice maker in.
6. The power plug must be accessible directly.
WARNING: fill with potable water only. Only use drinking water.
*Improper use of the grounded plug can result in the risk of electrical shock. If the
power cord is damaged please call our customer service.
1. This unit should be properly grounded for your safety. The power cord of this appliance is
equipped with a grounding plug which mates with standard grounding wall outlets to
minimize the possibility of electric shock.
2. Plug your appliance into an exclusive, properly installed, grounding wall outlet. Do not be
under any circumstances; damage the grounding means of the plug. Any questions
concerning power and or grounding should be directed toward a certified electrician.
3. This appliance requires a standard 110-120Volt, 60Hz electrical outlet with good grounding
means.
Before using your ice maker, it is strongly recommended to clean it thoroughly. Unplug the
unit before cleaning or making any maintenance.
1. Take out the drawer and water reservoir on the top.
2. Clean the interior with diluted detergent, warm water and a soft cloth. First pour the warm
water with diluted detergent into the internal water reservoir, and then use the soft cloth
to wipe the surface.
3. Again use the water to rinse the inside parts, and drain out the water by unplugging the
drain cap on the back.
4. The outside of the ice maker should be cleaned regularly with a mild detergent solution and
warm water.
5. Dry the interior and exterior with a soft cloth.
6. When the appliance is not in use for a long time, open water drain cap to drain out water
completely from water reservoir.
UNPACKING YOUR ICE MAKER
CONNECTING YOUR ICE MAKER
CLEANING AND MAINTAINING YOUR ICE MAKER
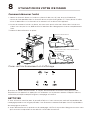
5OPERATING PROCEDURES & MAINTENANCE

4.
CLEAN
If you use the machine for the first time, or you have not run the cleaning procedure for a
long time, it is highly recommended to run the cleaning procedure first.
Before starting the cleaning process, please check the drain pipe and make sure it is with the
cap on and hung on the back side of the machine.
Plug in the power cord, the power indicator is on: you can operate this appliance by touch
the button on panel as shown above, the main function includes: ice, clean, and light.
How to start the unit
1. Take out the water reservoir on the top, place the bottom up, open the cap, pour potable
water into water reservoir, 0.97 gallon (3.7 liters) water at most at one time. Screw the cap
on to the reservoir, and put it back on the top of the appliance again.
2. Before you put back the drawer, please make sure the water tank under the drawer is empty
if not, unplug water drain cap to drain out water completely.
3. Put the drip tray in position.
Add water, screw the cap
and put it back.
Open the cap
Operation and display areas
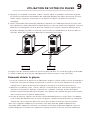
USING YOUR ICE MAKER
6

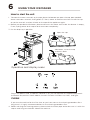
5. Press“CLEAN”button “ ”, the icon lights up. After 5 seconds, this icon flashes, and the
machine will run cleaning procedure for at least 20 minutes. Then the icon goes out. Press
this "CLEAN" button again, the machine will stop cleaning.
6. After cleaning procedure, move the appliance to the edge of the desktop, make sure that
the appliance is placed steady, place a water container under the appliance, remove drain
plug from the back, unscrew the tie on the pipe, pull out the plug from the drainpipe, water
in the tank under the drawer and the evaporator will drain into the water container, then
reinsert the plug and put it back again.
Change water in the water reservoir every 24 hours to ensure a reasonable hygiene level. If
the unit isn’t to be used, drain all water & dry the water reservoir.
How to obtain the ice cube
7.
8.
9.
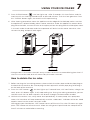
Before starting the ice making process, please check the drain pipe and drain pipe plug on
the back of the machine. Be sure to plug the drain pipe with a drain pipe plug and hang it
on the back of the machine.
Press the “ICE” button “ ”, the icon lights up, 5 seconds later, this icon flashes, it begins to
work, press this button again, it will stop making ice. During ice making procedure, you can
see how much ice has been stored in the drawer through the observation window.
While the ice-maker is on, verify water level periodically. If water pump can’t pump out
water, the ice maker will stop automatically, and the “Add water” indicator will be on. Need
to pour water into the water reservoir inside.
We suggest you should press “ICE” button to turn o the unit first, then fill water up, again
press “ICE” button to restart the unit. Allow the refrigerant liquid inside the compressor at
least 3 minutes to settle before restarting.
7USING YOUR ICE MAKER

Light on/off
10. Press the “LIGHT” button “ ”, the light inside the appliance is on, press this button again,
the light is o.
When Ice Full indicator is on
11. The ice maker automatically stops working when the ice-cube is full inside and the “ ice full”
Indicator is on.
Open the drawer
12. Hold the drawer handle gently and pull it out along the horizontal direction, until the back
of the drawer contacts the front panel and then gently put it down, the drawer will have a
certain angle hanging in the front panel. Instead, when you need to close the drawer, hold
the drawer handle and place the drawer horizontally, then gently push it into full closure.
Take out the drawer
13. Hold the drawer handle gently and pull it out along the horizontal direction, until the back
of the drawer contacts the front panel, and then gently lifted it up at a certain angle and
pulled it out. Instead, when you need to reload the drawer, you tilt the drawer in the same
direction at a certain angle. First, you put the back side of the drawer into the front panel,
slowly flatten the drawer, and then gently push it into full closure.
USING YOUR ICE MAKER
8

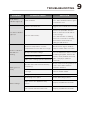
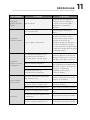
PROBLEM POSSIBLE CAUSE SOLUTION
“Add Water”
indicator lights up Lack of Water.
Stop the ice maker, fill water, and
press “ICE”/“CLEAN” button again
to restart the unit.
“Ice-Full” indicator
lights up
There is too much ice. Suggest you to obtain the ice-cube.
(No ice cube inside).
Remove the probable obstacle
inside or clean the inside wall of
the ice storage.
Press and hold the ice making
button for 5 seconds to forcibly
cancel full ice and restart ice
making for 80 minutes.
“Power” indicator
and ICE icon
flashing
Ambient temperature or water
temperature in inner tank is too high.
Please run the ice maker below
90 Fahrenheit degree ambient
and pour colder water into tank.
Refrigerant liquid leakage. Press the ICE button twice, restart
ice making program, wait for 50
minutes, if this problem show up
again, verify by a qualified
technician.
Cover motor is broken.
Pipe in the cooling system is blocked.
Making Ice too
slowly
Hot Air outlet has been blocked by
something.
Hot Air outlet must be guaranteed
to have more than 15 CM of
ventilation distance.
Water temperature in inner tank is
too high.
Water temperature requirement
between 44.6℉-89.6℉.
Refrigeration system malfunctions. Verify by a qualified technician.
Water leakage
Drain plug not in place. Put the drain plug in place.
Pipe Joint in the appliance may
Loose. Verify by a qualified technician.
The seal has reached service life Verify by a qualified technician.
9TROUBLESHOOTING

Input Voltage: 115V 60Hz
Power Consumption: 200 W
Daily Ice Output: 20 KGS/24H
Refrigerant: R600a
Dimensions
Product Depth (IN.) 16.9
Product Height (IN.) 19
Product Width (IN.) 9.8
PRODUCT SPECIFICATIONS
10

To make a warranty claim, do not return this product to the store.
1 Year warranty
This product is warranted to be free from defects in material and workmanship for a
period of one (1) year from the date of original purchase. During this period, your
exclusive remedy is repair or replacement of this product or component found to be
defective, at our option; however, you are responsible for all costs associated with
returning the product to us. If the product or component is no longer available, we will
replace with a similar one of equal or greater value. Prior to a replacement being sent,
the product must be rendered inoperable or returned to us.
This warranty does not cover glass, filters, wear from normal use, use not in conformity
with the printed directions., or damage to the product resulting from accident,
alteration, abuse, or misuse. This warranty extends only to the original consumer
purchaser or gift recipient. Keep the original sales receipt, as proof of purchase is
required to make a warranty claim. This warranty is void if the product is used for other
than single-family household use or subjected to any voltage and waveform other than
as on the specified rating on the label (e.g., 120V~60Hz).
We exclude all claims for special, incidental, and consequential damages caused by
breach of express or implied warranty. All liability is limited to the amount of the
purchase price. Every implied warranty, including any statutory warranty or condition
of merchantability or fitness for a particular purpose, is disclaimed except to the extent
prohibited by law, in which case such warranty or condition is limited to the duration of
this written warranty. This warranty gives you specific legal rights. You may have other
legal rights that vary depending on where you live. Some states or provinces do not
allow limitations on implied warranties or special, incidental, or consequential damages,
so the foregoing limitations may not apply to you.
For faster service, locate the model, type, and serial numbers on your appliance.
Canada
11LIMITED WARRANTY


Les Instructions de Sécurité Importantes........................
Préparer Votre Machine À Glaçons Pour L'utiliser.......
Apprendre À Connaître Votre Unité..................................
Procedures D'exploitation et Maintenance......................
Utilisation de Votre Ice Maker..............................................
Dépannage..................................................................................
Spécifications du Produit......................................................
Carte de Garantie.....................................................................
2
3
5
6
8
11
12
13
USA CANADA 1-800-
APPAREIL À GLAÇON
EFIC235, EFIC235-AMZ,
EFIC237-SSBLACK, EFIC237-SSRED

DANGER
ATTENTION
Votresécuritéetlasécuritédesautressonttrèsimportant
Nousavonsfourniplusieursmanuelsdesécuritéimportantsetvotreappareil.
Lire et obéir à tous les messages de sécurité, s'il vous plaît
C'estlesymboled'alertedesécurité:
!
Touslesmessagesdesécuritésuivrontlesymboled'alertedesécuritéetlesmots«
DANGER»ou«ATTENTION».
Lessensdecesmots:
Vouspouvezêtretuéougravementblessésivousnesuivezpasinstructions
immédiatement.
Touslesmessagesdesécuritévousdirontquelestledangerpotentiel, commentréduire
lerisquedeblessureetcequipeutarriversilesinstructionsnesontpassuivies.
LES INSTRUCTIONS DE SÉCURITÉ IMPORTANTES
2

Lors de l'utilisation d'appareils électriques, des précautions de sécurité élémentaires
doivent être respectées afin de réduire les risques d'incendie, d'électrocution et de
blessures aux personnes ou aux biens. Lisez toutes les instructions avant d'utiliser un
appareil.
Ne l'utilisez pas, ou tout autre appareil avec un cordon endommagé.
Connecter aux prises correctement polarisées uniquement. Aucun autre appareil ne
doit être branché sur la même prise. Assurez-vous que la fiche est complètement
insérée dans le réceptacle.
Ne faites pas passer le cordon d'alimentation sur un tapis ou d'autres isolants
thermiques. Ne couvre pas le cordon. Éloignez le cordon des zones de circulation et
ne l'immergez pas dans l'eau.
Nous ne recommandons pas l'utilisation d'une rallonge, car elle pourrait surchauer
et devenir un risque d'incendie. Si vous devez utiliser une rallonge, utilisez une taille
minimale de 14 AWG et une puissance d'au moins 1875 watts.
Débranchez la machine à glaçons avant de la nettoyer ou de la réparer ou de la
réparer.
Faire preuve de prudence et utiliser une surveillance raisonnable lorsque l'appareil
est utilisé à proximité d'enfants
N'utilisez pas votre machine à glaçons à l'extérieur. Placez le fabricant de glace loin
de la lumière directe du soleil et assurez-vous qu'il y a au moins 6 pouces d'espace
entre l'arrière de votre appareil et le mur. Gardez une distance minimale de 6 pouces
de chaque côté de votre appareil libre
N'utilisez pas d'autre liquide pour faire du glaçon autre que de l'eau.
Ne nettoyez pas votre machine à glaçons avec des liquides inflammables. Les
vapeurs peuvent créer un risque d'incendie ou une explosion.
Ne pas basculer.
Si la machine à glaçons est apportée de l'extérieur en hiver, laissez-la quelques
heures réchauer à température ambiante avant de la brancher.
LESCONSEILSDESÉCURITÉIMPORTANTS
3
PRÉPARER VOTRE MACHINE À GLAÇONS POUR L'UTILISER

IMPORTANT:
Les fils de ce cordon d'alimentation sont colorés conformément au code suivant:
Vert ou vert avec une bande jaune: mise à la terre
Blanc: neutre
Noir: Live
Pour éviter un danger dû à l'instabilité de l'appareil, celui-ci doit être placé sur une
surface plane ou plane.
PRÉPARER VOTRE MACHINE À GLAÇONS POUR L'UTILISER
4

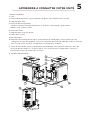
1. Coque métallique
2. Tiroir
3. Fenêtre d'observation: voyez combien de glace a été stockée dans le tiroir.
4. Poignée pour tiroir.
5. Panneau de configuration:
Voyant lumineux: manque d'eau dans le réservoir, alimentation, glace pleine
Bouton: ICE, CLEAN, LIGHT
6. Réservoir d'eau
7. Poignée pour réservoir d'eau
8. Sortie d'air chaud
9. Bac collecteur
10. Bouchon de vidange d'eau: après la procédure de nettoyage, retirez le bouchon de
vidange à l'arrière de l'appareil, retirez le capuchon du tuyau de vidange, videz le réservoir
sous le tiroir, puis réinsérez le capuchon et remettez-le en place.
11. Tuyau d'évacuation: Après la procédure de nettoyage, vous pouvez collecter l'eau sale
du tuyau d'évacuation (il y a deux tuyaux: l'un se connecte à l'évaporateur, l'autre se
connecte au réservoir d'eau sous le tiroir).
12. Cordon d'alimentation
5APPRENDRE À CONNAÎTRE VOTRE UNITÉ

DANGER
1. Retirez l'emballage extérieur et intérieur. Vérifiez que la corbeille à glace et la pelle à
glace sont incluses. Si des pièces manquent, veuillez contacter notre service clientèle.
2. Nettoyez l'intérieur avec de l'eau tiède et un chion doux. Sortez le panier de glace et
nettoyez-le.
3. Trouvez un endroit pour votre machine à glaçons qui est protégée de la lumière directe
du soleil et d'autres sources de chaleur (c'est à dire. :. La cuisinière, la fournaise, le
radiateur). Placez la machine à glaçons sur une surface plane. Assurez-vous qu'il y a au
moins 6 pouces d'espace entre le dos et les côtés de votre machine à glaçons et le mur.
4. Attendez une heure pour que le fluide frigorigène se stabilise avant de brancher la
machine à glaçons.
5. L'appareil doit être positionné de manière à ce que la fiche soit accessible.
Une mauvaise utilisation de la fiche mise à la terre peut entraîner un risque de
choc électrique. Si le cordon d'alimentation est endommagé, veuillez contacter
notre service clientèle.
1. Cette unité doit être correctement mise à la terre pour votre sécurité. le cordon
d'alimentation de cet appareil est équipé d'une prise à trois broches qui se raccorde
aux prises murales standard à trois broches afin de minimiser les risques
d'électrocution.
2. Faites passer votre appareil dans une prise de courant murale exclusive,
correctement installée et mise à la terre. Ne coupez ou enlevez-en aucun cas la
troisième broche (mise à la terre) du cordon d'alimentation. Toute question concernant
l'alimentation et / ou la mise à la terre doit être adressée à un électricien certifié.
3. Cet appareil nécessite une prise électrique standard de 110-120 volts, 60 Hz avec une
mise à la terre à trois broches.
Avant d'utiliser votre machine à glaçons, il est fortement recommandé de le nettoyer
soigneusement.
1. Sortez le panier de glace.
2. Nettoyez l'intérieur avec du détergent dilué, de l'eau chaude et un chion doux.
DÉBALLERVOTREMACHINEÀGLAÇONS
CONNECTERVOTREMACHINEÀGLAÇONS
CLEANNETTOYERETENTRETENIRVOTREMACHINEÀGLAÇONS
PROCEDURES D'EXPLOITATION ET MAINTENANCE
6

3. Ensuite, utilisez l'eau pour rincer les pièces internes et vider l'eau de l'orifice de vidange
en débranchant le bouchon de vidange à l'arrière.
4. L'extérieur de la machine à glaçons doit être nettoyé régulièrement avec une solution
détergente douce et de l'eau chaude.
5. Séchez l'intérieur et l'extérieur avec un chion doux.
6. Lorsque la machine n'est pas utilisée pendant une longue période, ouvrez le bouchon de
vidange pour évacuer complètement l'eau du réservoir d'eau.
7
PROCEDURES D'EXPLOITATION ET MAINTENANCE

1. Sortez le réservoir d'eau sur le dessus, placez le bas vers le haut, ouvrez le bouchon,
versez de l'eau potable dans le réservoir d'eau, au plus 0,97 gallon (3,7 litres) d'eau à la fois.
Visser le bouchon sur le réservoir et le remettre sur le dessus de l'appareil.
2. Avant de remettre le tiroir en place, assurez-vous que le réservoir d'eau sous le tiroir est
vide.Si ce n'est pas le cas, débranchez le bouchon de vidange pour évacuer complètement
l'eau.
3. Mettez le bac collecteur en place.
.
4. Avant de commencer le processus de nettoyage, vérifiez le tuyau de vidange et assurez-vous
qu'il est avec le capuchon et accroché à l'arrière de la machine.
Branchez le cordon d'alimentation, le voyant d'alimentation est allumé: vous pouvez faire
fonctionner cet appareil en appuyant sur le bouton sur le panneau comme indiqué ci-dessus,
la fonction principale comprend: glace, nettoyage et lumière.
NETTOYER
Si vous utilisez la machine pour la première fois ou si vous n'avez pas exécuté la procédure de
nettoyage pendant une longue période, il est fortement recommandé pour lancer la procédure
de nettoyage en premier.
Comment démarrer l'unité
Zones de fonctionnement et d'achage
Ajouter de l'eau, visser le bouchon
et le remettre.
Ouvrez le bouchon
UTILISATION DE VOTRE ICE MAKER
8
La page est en cours de chargement...
La page est en cours de chargement...
La page est en cours de chargement...
La page est en cours de chargement...
La page est en cours de chargement...
La page est en cours de chargement...
-
 1
1
-
 2
2
-
 3
3
-
 4
4
-
 5
5
-
 6
6
-
 7
7
-
 8
8
-
 9
9
-
 10
10
-
 11
11
-
 12
12
-
 13
13
-
 14
14
-
 15
15
-
 16
16
-
 17
17
-
 18
18
-
 19
19
-
 20
20
-
 21
21
-
 22
22
-
 23
23
-
 24
24
-
 25
25
-
 26
26


Frigidaire EFIC235 Le manuel du propriétaire
- Catégorie
- Fabricants de glaçons
- Taper
- Le manuel du propriétaire
dans d''autres langues
- English: Frigidaire EFIC235 Owner's manual