Power Fist 8571762 Le manuel du propriétaire
- Catégorie
- Outils électroportatifs
- Taper
- Le manuel du propriétaire

3/8 in. dr Angle
Air Drill

3/8 in. dr Angle
Air Drill

V4.0
3/8
in.
dr
Angle
Air
Drill
8571762
SAFETY
WARNING!
Read
and
understand
all
instructions
before
using
this
tool.
The
operator
must
follow
basic
precautions
to
reduce
the
risk
of
personal
injury
and/or
damage
to
the
equipment.
Keep
this
manual
for
safety
warnings,
precautions,
operating
or
inspection
and
maintenance
instructions.
HAZARD
DEFINITIONS
Please
familiarize
yourself
with
the
hazard
notices
found
in
this
manual.
A
notice
is
an
alert
that
there
is
a
possibility
of
property
damage,
injury
or
death
if
certain
instructions
are
not
followed.
DANGER!
This
notice
indicates
an
immediate
and
specific
hazard
that
will
result
in
severe
personal
injury
or
death
if
the
proper
precautions
are
not
taken.
WARNING!
This
notice
indicates
a
specific
hazard
or
unsafe
practice
that
could
result
in
severe
personal
injury
or
death
if
the
proper
precautions
are
not
taken.
CAUTION!
This
notice
indicates
a
potentially
hazardous
situation
that
may
result
in
minor
or
moderate
injury
if
proper
practices
are
not
taken.
NOTICE!
This
notice
indicates
that
a
specific
hazard
or
unsafe
practice
will
result
in
equipment
or
property
damage,
but
not
personal
injury.
WORK
AREA
1.
Operate
in
a
safe
work
environment.
Keep
your
work
area
clean,
well
lit
and
free
of
distractions.
2.
Keep
anyone
not
wearing
the
appropriate
safety
equipment
away
from
the
work
area.
Visit
www.princessauto.com
for
more
information
3

8571762
3/8
in.
dr
Angle
Air
Drill
V4.0
3.
Store
tools
properly
in
a
safe
and
dry
location.
Keep
tools
out
of
the
reach
of
children.
4.
Do
not
install
or
use
in
the
presence
of
flammable
gases,
dust
or
liquids.
PERSONAL
SAFETY
WARNING!
Wear
personal
protective
equipment
approved
by
the
Canadian
Standards
Association
(CSA)
or
American
National
Standards
Institute
(ANSI).
PERSONAL
PROTECTIVE
EQUIPMENT
1.
Always
wear
impact
safety
goggles
that
provide
front
and
side
protection
for
the
eyes.
Wear
a
full-face
shield
if
your
work
creates
metal
filings
or
wood
chips.
a.
Eye
protection
equipment
should
comply
with
ANSI
Z87.1
standards.
2.
Wear
gloves
that
provide
protection
based
on
the
work
materials
or
to
reduce
the
effects
of
tool
vibration.
3.
Non-skid
footwear
is
recommended
to
maintain
footing
and
balance
in
the
work
environment.
4.
Steel
toe
footwear
or
steel
toe
caps
to
prevent
injury
from
falling
objects.
5.
Wear
protective
clothing
designed
for
the
work
environment
and
tool.
6.
Wear
a
NIOSH
approved
respirator
when
working
on
materials
that
produce
dust
or
particulate
matter.
7.
This
tool
can
cause
hearing
damage.
Wear
hearing
protection
gear
with
an
appropriate
Noise
Reduction
Rating
to
withstand
the
decibel
levels.
PERSONAL
PRECAUTIONS
Control
the
tool,
personal
movement
and
the
work
environment
to
avoid
personal
injury
or
damage
to
the
tool.
4
For
technical
questions
call1·800-665-8685

V4.0
3/8
in.
dr
Angle
Air
Drill
8571762
1.
Do
not
operate
any
tool
when
tired
or
under
the
influence
of
drugs,
alcohol
or
medications.
2.
Avoid
wearing
clothes
or
jewelry
that
can
become
entangled
with
the
moving
parts
of
a
tool.
Keep
long
hair
covered
or
bound.
3.
Do
not
overreach
when
operating
the
tool.
Proper
footing
and
balance
enables
better
control
in
unexpected
situations.
4.
Support
the
workpiece
or
clamp
it
to
a
stable
platform.
Holding
the
workpiece
by
hand
or
against
your
body
may
lead
to
personal
injury.
SPECIFIC
SAFETY
PRECAUTIONS
1.
Only
use
accessories
that
are
specifically
designed
for
use
with
the
tool.
Make
sure
accessories
are
capable
of
handling
the
tool's
maximum
speed
of
1,500
RPM.
Ensure
the
accessory
is
tightly
installed.
2.
Keep
hands
and
fingers
away
from
drilling
area.
Any
part
of
body
coming
in
contact
with
moving
parts
could
cause
injury.
3.
When
operating
the
tool,
use
proper
eye,
breathing
and
hearing
protection
as
well
as
protective
gloves.
WARNING!
Flying
debris
can
cause
permanent
eye
damage.
Prescription
eyeglasses
are
not
a
replacement
for
proper
eye
protection.
4.
Use
protective
gloves
that
will
reduce
vibration
and
protect
your
hands
in
case
of
unexpected
situations.
5.
Never
point
the
tool
towards
yourself.
If
it
should
slip,
part
of
your
body
could
come
in
contact
with
moving
parts.
6.
Never
force
the
tool.
Excessive
pressure
could
bend
or
break
the
bit,
resulting
in
damage
to
the
tool,
your
work
piece
or
serious
personal
injury.
If
your
tool
runs
smoothly
under
no
load,
but
does
not
run
smoothly
under
load,
then
excessive
pressure
is
being
used.
Visit
www.princessauto.com
for
more
information
5

8571762
3/8
in.
dr
Angle
Air
Drill
V4.0
7.
This
tool
will
not
stop
moving
immediately.
Do
not
lay
the
tool
down
or
leave
it
unattended
until
it
has
come
to
a
complete
stop.
A
part
that
is
moving
could
make
the
tool
jump
or
grab
a
surface
and
pull
the
tool
out
of
your
control.
8.
Use
an
appropriate
dust
res
pi
rat
or
when
working
for
an
extended
period
of
time.
This
will
help
prevent
breathing
in
the
fine
dust
created
while
working.
WARNING!
Dust
that
is
created
by
power
sanding,
sawing,
grinding,
drilling,
and
other
construction
activities
may
contain
chemicals
that
are
known
to
cause
cancer,
birth
defects,
or
other
genetic
abnormalities.
The
level
of
risk
from
exposure
to
these
chemicals
varies,
according
to
how
often
this
type
of
work
is
performed.
In
order
to
reduce
exposure
to
these
chemicals,
work
in
a
well-ventilated
area,
and
use
approved
safety
equipment,
such
as
a
dust
mask
that
is
specifically
designed
to
filter
out
microscopic
particles.
9.
Always
make
sure
the
work
surface
is
free
from
nails
and
other
foreign
objects.
Cutting
into
a
nail
can
cause
the
bit
and
tool
to
jump
and
damage
the
bit.
10.
After
changing
the
bits
and
accessories
or
making
adjustments
,
make
sure
the
chuck
and
any
other
adjustment
devices
are
securely
tightened.
Loose
adjustment
devices
will
be
violently
thrown.
11.
Always
use
the
correct
chuck
size.
If
the
chuck
size
is
larger
than
the
accessory
shank
size
it
will
not
grip
the
shank
properly,
leading
to
possible
injury
to
the
operator
,
damage
to
the
tool
or
work
piece.
12.
Always
check
accessory
bits,
etc.
for
damage
before
each
use.
Damaged
accessories
can
break
during
use
and
cause
serious
injury.
13.
Never
use
dull
or
damaged
bits.
Sharp
bits
must
be
handled
with
care.
Damaged
bits
can
snap
during
use.
Dull
bits
require
more
force
to
push
the
tool,
possibly
causing
the
bit
to
break.
14.
Never
touch
the
bit
during
or
immediately
after
use.
After
use,
the
bit
will
be
too
hot
to
be
touched
by
bare
hands.
6
For
technical
questions
call1-800·665·8685

V4.0
3/8
in.
dr
Angle
Air
Drill
8571762
15.
If
devices
are
used
for
the
connection
of
dust
extraction
and
collection
facilities,
ensure
these
are
connected
and
properly
used.
Use
of
a
dust
collection
system
reduces
dust-related
hazards.
AIR
TOOL
PRECAUTIONS
1.
Extended
exposure
to
air
tool
noise
may
cause
hearing
loss.
Ear
protection
gear
can
reduce
or
eliminate
the
noise
level.
2.
Inspect
the
tool's
air
line
for
cracks,
fraying
or
other
faults
before
each
use.
Discontinue
use
if
the
air
line
is
damaged
or
hissing
is
heard
from
the
air
line
or
connectors,
while
operating
the
tool.
Replace
the
defective
component/air
line.
3.
Do
not
allow
people,
mobile
equipment
or
vehicles
to
pass
over
the
unprotected
air
line.
Position
the
air
line
away
from
high
traffic
areas,
in
a
reinforced
conduit
or
place
planks
on
both
sides
of
the
airline
to
create
a
protective
trench.
4.
Prevent
damage
to
the
air
line
by
observing
the
following:
a.
Never
carry
the
tool
by
the
air
line.
b.
Keep
the
air
line
behind
the
tool
and
out
of
the
tool's
work
path.
c.
Keep
the
air
line
away
from
heat,
oil,
sharp
edges
or
moving
parts.
d.
Do
not
wrap
the
air
line
around
the
tool
as
sharp
edges
may
pierce
or
crack
the
airline.
Coil
the
air
line
when
storing.
5.
A
damaged
or
disconnected
air
line
under
pressure
may
whip
around
and
inflict
personal
injury
or
damage
the
work
area.
Secure
the
compressor's
air
line
to
a
fixed
or
permanent
structure
with
clamps
or
cable
ties.
6.
Install
an
in-line
shutoff
valve
or
regulator
to
allow
immediate
control
over
the
air
supply
in
an
emergency,
even
if
a
hose
is
ruptured.
Visit
www.princessauto.com
for
more
information
7

8571762
3/8
in.
dr
Angle
Air
Drill
V4.0
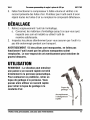
VIBRATION
PRECAUTIONS
This
tool
vibrates
during
use.
Repeated
or
long-term
exposure
to
vibration
may
cause
temporary
or
permanent
physical
injury,
particularly
to
the
hands,
arms
and
shoulders.
1.
Anyone
using
vibrating
tools
regularly
or
for
an
extended
period
should
first
be
examined
by
a
doctor
and
then
have
regular
medical
check-ups
to
ensure
medical
problems
are
not
being
caused
by
or
worsened
from
tool
use.
Pregnant
women
or
people
who
have
impaired
blood
circulation
to
the
hands,
past
hand
injuries,
nervous
system
disorders,
diabetes,
or
Raynaud's
Disease
should
not
use
this
tool.
If
you
feel
any
medical
symptoms
related
to
vibrations
(such
as
tingling,
numbness,
and
white
or
blue
fingers),
seek
medical
attention
as
soon
as
possible.
2.
Do
not
smoke
during
use.
Nicotine
reduces
the
blood
flow
to
the
hands
and
fingers,
increasing
the
risk
of
vibration-related
injury.
3.
Wear
suitable
gloves
to
reduce
the
vibration
effects
on
the
user.
4.
Use
tools
with
the
lowest
amount
of
vibration
when
there
is
a
choice
between
different
processes.
5.
Do
not
use
for
extended
periods.
Take
frequent
breaks
when
using
this
tool.
6.
Let
the
tool
do
the
work.
Grip
the
tool
as
lightly
as
possible
(while
still
keeping
safe
control
of
it).
WARNING!
If
abnormal
vibrations
occur,
stop
using
this
tool
immediately.
USE
AND
CARE
OF
THE
TOOL
1.
Use
the
correct
tool
for
the
job.
This
tool
was
designed
for
a
specific
function.
Do
not
modify
or
alter
this
tool
or
use
it
for
an
unintended
purpose.
2.
Do
not
carry
the
tool
with
fingers
near
or
on
the
trigger/switch.
8
For
technical
questions
call1·800-665-8685

V4.0
3/8
in.
dr
Angle
Air
Drill
8571762
3.
Avoid
unintentional
starts.
Be
sure
that
the
regulator/throttle
switch
is
in
the
neutral
or
OFF
position
when
not
in
use
and
before
connecting
it
to
any
air
source.
4.
Remove
adjusting
keys
and
wrenches
from
the
tool
before
operation
or
connecting
it
to
a
power
source.
A
wrench
or
key
that
is
left
attached
to
a
rotating
part
of
the
tool
increases
the
risk
of
personal
injury.
INSTALLING
AIR
QUICK
COUPLER
Prepare
a
standard
1/4
in.
NPT
male
air
quick
coupler
for
use
with
your
tool.
1.
Wrap
the
external
threads
of
the
male
quick
coupler
with
sealant
tape.
a.
Wrap
the
tape
in
a
clockwise
direction
so
it
will
not
unravel.
b.
Do
not
tape
all
the
threads.
Leave
several
leading
threads
unwrapped
for
easier
alignment.
2.
Screw
the
quick
coupler
into
the
tool's
air
inlet
and
tighten
with
a
wrench
until
snug.
3.
Run
the
compressor
at
a
low
volume
and
check
the
connection
for
air
leaks.
Do
not
use
the
tool
until
all
air
leaks
are
repaired
or
the
faulty
component
is
replaced.
UNPACKING
1.
Carefully
remove
the
tool
from
the
package.
a.
Retain
the
packing
material
until
you
have
carefully
inspected
and
satisfactorily
installed
or
operated
the
tool.
2.
Inspect
the
parts
carefully
to
make
sure
the
tool
was
not
damaged
while
shipping.
WARNING!
Do
not
operate
the
tool
if
any
part
is
missing.
Replace
the
missing
part
before
operating.
Failure
to
do
so
could
result
in
a
malfunction
and
serious
personal
injury.
Visit
www.princessauto.com
for
more
information
9

8571762
3/8
in.
dr
Angle
Air
Drill
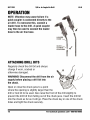
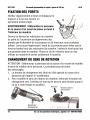
OPERATION
NOTE:
Vibration
may
cause
failure
if a
quick
coupler
is
connected
directly
to
the
air drill.
To
overcome
this,
connect
a
leader
hose
to
the
drill. A
quick
coupler
may
then
be
used
to
connect
the
leader
hose
to
the
air
line
hose.
ATTACHING
DRILL
BITS
Regularly
check
the
drill
bit
and
always
change
if
worn,
cracked
or
otherwise
damaged.
WARNING!
Disconnect
the
drill
from
the
air
supply
before
placing
a drill
bit
into
the
chuck.
Open
or
close
the
chuck
jaws
to
a
point
where
the
opening
is
slightly
larger
than
the
V4.0
QUICK........_
CHANGE
........._
,
"'
COUPLING
~
drill
or
tool
bit
to
be
used.
Also
raise
the
front
of
the
drill
slightly
to
prevent
the
drill
bit
from
falling
out
of
the
chuck
jaws.
Insert
the
drill
bit
into
the
chuck
as
far
as
it
will
go.
Place
the
chuck
key
in
one
of
the
chuck
holes
and
tight
the
chuck
securely.
10
For
technical
questions
call1·800-665-8685

V4.0
3/8
in.
dr
Angle
Air
Drill
8571762
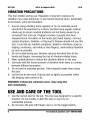
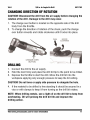
CHANGING
DIRECTION
OF
ROTATION
CAUTION!
Disconnect
the
drill
from
the
air
supply
before
changing
the
rotation
of
the
drill.
Damage
to
the
drill
may
occur.
1.
The
change
over
button
is
located
on
the
opposite
side
of
the
drill
body
from
the
throttle.
2.
To
change
the
direction
of
rotation
of
the
chuck,
push
the
change
over
button
inwards
and
rotate
clockwise
until
it
locks
into
place.
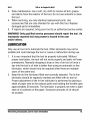
DRILLING
CHANGE OVER
BUTTON
1.
Connect
the
drill
to
the
air
supply.
PUSH ROTATE
CLOCKWISE
2.
Hold
the
tool
firmly
and
place
the
drill
bit
tip
to
the
point
to
be
drilled.
3.
Depress
the
throttle
to
start
the
drill.
Move
the
drill
bit
into
the
workpiece
applying
only
enough
pressure
to
keep
the
bit
cutting.
CAUTION!
Do
not
force
or
apply
side
pressure
to
elongate
the
hole.
4.
If
the
material
to
be
drilled
is
free
standing
it
should
be
secured
in
a
vice
or
with
clamps
to
keep
it
from
turning
as
the
drill
bit
rotates.
NOTE:
When
drilling
metals,
use
a light oil
on
the
drill bit
to
keep
from
overheating.
Oil
will
prolong
the
drill bit life
and
improve
the
drilling
action.
Visit
www.princessauto.com
for
more
information
11

8571762
3/8
in.
dr
Angle
Air
Drill
V4.0
NOTE:
For
hard
smooth
surfaces,
use
a
centre
punch
to
mark
the
desired
hole
location.
This
will
prevent
the
drill
bit
from
slipping
as
drilling
commences.
5.
A
pilot
hole
may
be
necessary
to
assist
the
final
drill
size
through
the
workpiece.
Insert
a
smaller
drill
bit
into
the
chuck.
Follow
steps
1
through
3
above
and
drill
a
pilot
hole
in
the
middle
of
the
centre
punch
mark
where
the
final
hole
is
to
be
drilled.
Insert
the
final
sized
drill
bit
in
the
chuck.
Hold
the
drill
firmly
and
place
the
bit
at
the
entrance
of
the
pilot
hole
and
depress
the
trigger.
WARNING!
Be
prepared
for
drill
bit
binding
on
breakthrough.
When
these
situations
occur,
the
drill
has
a
tendency
to
grab
and
kick
in
the
opposite
direction
which
could
cause
loss
of
control.
If
you
are
not
prepared,
this
loss
of
control
can
result
in
damage
and/or
personal
injury.
6.
If
the
drill
bit
jams
in
the
workpiece
or
if
the
drill
stalls,
release
the
throttle
immediately.
Remove
the
drill
bit
from
the
workpiece
and
determine
the
reason
for
jamming.
MAINTENANCE
1.
Make
sure
the
throttle
lever
is
in
the
OFF
position
and
the
air
source
is
removed
from
the
tool
before
performing
any
inspection,
maintenance,
or
cleaning.
2.
Before
each
use:
Check
the
general
condition
of
the
tool.
Check
for
misalignment
or
binding
of
moving
parts,
cracked
or
broken
parts,
damaged
hoses,
and
any
other
conditions
that
may
affect
the
safe
operation
of
the
tool.
If
abnormal
noise
or
vibration
occurs,
have
the
problem
corrected
before
further
use.
Do
not
use
damaged
equipment.
12
For
technical
questions
call1·800-665-8685

V4.0
3/8
in.
dr
Angle
Air
Drill
8571762
3.
Daily
maintenance:
Use
a
soft,
dry
cloth
to
remove
all
dirt,
grease,
and
debris
from
the
exterior
of
the
tool.
Do
not
use
solvents
to
clean
the
tool.
4.
When
servicing,
use
only
identical
replacement
parts.
Use
accessories
that
are
only
intended
for
use
with
this
tool.
Replace
damaged
parts
immediately.
5.
If
repairs
are
required,
bring
your
tool
to
an
authorized
service
center.
WARNING!
Only
qualified
service
personnel
should
repair
the
tool.
An
improperly
repaired
tool
may
present
a
hazard
to
the
user
and/or
others.
LUBRICATION
Only
use
air
tool
oil
to
lubricate
the
tool.
Other
lubricants
may
not
be
suitable
and
could
damage
the
tool
or
cause
a
malfunction
during
use.
1.
It
is
very
important
that
the
tool
be
properly
lubricated.
Without
proper
lubrication,
the
tool
will
not
work
properly
and
parts
will
wear
prematurely.
Manually
dropping
a
drop
or
two
of
air
tool
oil
once
a
day
into
the
tool's
oil
inlet
is
better
than
using
an
automatic
in-line
lubricator,
which
should
only
be
required
when
there
are
multiple
users
of
the
same
tool.
2.
Keep
the
air
line
lubricator
filled
and
correctly
adjusted.
The
in-line
lubricator
should
be
regularly
checked
and
filled
with
air
tool
oil.
Proper
adjustment
of
the
in-line
lubricator
is
performed
by
placing
a
sheet
of
paper
next
to
the
exhaust
ports
and
holding
the
throttle
open
approximately
30
seconds.
The
lubricator
is
properly
set
when
a
light
stain
of
oil
collects
on
the
paper.
Excessive
amounts
of
oil
should
be
avoided.
Visit
www.princessauto.com
for
more
information
13

8571762
3/8
in.
dr
Angle
Air
Drill
V4.0
3.
Air
tool
oil
is
the
only
recommended
lubricant
for
use
in
all
air
tools.
Do
not
try
to
use
other
types
of
lubricants
to
oil
your
tools.
Using
the
wrong
lubricant
will
cause
premature
tool
failure
and
I
or
loss
of
power.
Use
only
recommended
lubricants,
specially
made
for
pneumatic
applications.
Substitutes
may
harm
the
rubber
compounds
in
the
tool's
0-rings
and
other
rubber
parts.
4.
Oiling
your
air
tool
regularly
is
important,
but
also
is
important
not
to
OVER
oil
your
air
tool.
Over
oiling
can
cause
premature
tool
failure.
Your
tool
may
not
be
ruined,
but
it
will
begin
to
experience
loss
of
power
that
will
continually
get
worse
until
it
no
longer
works.
The
tool
then
has
to
be
taken
apart
and
cleaned
of
excess
oil.
5.
All
air
tools
are
packed
in
grease
to
prevent
corrosion
of
internal
parts
during
shipping
and
storage.
We
recommend
that
you
clean
this
out
to
have
optimum
performance
from
your
new
air
tool.
Use
two
drops
of
air
tool
oil
to
lubricate
the
tool
and
run
the
tool
under
no
load
until
exhaust
is
clear.
6.
In
the
event
that
it
becomes
necessary
to
store
the
tool
for
an
extended
period
of
time
(overnight,
weekend,
etc.),
it
should
receive
a
generous
amount
of
lubrication
at
that
time.
The
tool
should
be
run
for
approximately
30
seconds
to
ensure
oil
has
been
evenly
distributed
throughout
the
tool.
The
tool
should
be
stored
in
a
clean
and
dry
environment.
CAUTION!
Do
not
at
any
time
allow
brake
fluids,
gasoline,
petroleum-
based
products,
penetrating
oils,
etc.
to
come
in
contact
with
plastic
parts.
They
contain
chemicals
that
can
damage,
weaken
or
destroy
plastic.
STORAGE
When
not
in
use
for
an
extended
period,
apply
a
thin
coat
of
lubricant
to
the
steel
parts
to
avoid
rust.
Remove
the
lubricant
before
using
the
tool
again.
Keep
this
tool
and
its
accessories
in
a
clean,
dry
location
and
out
of
the
reach
of
children.
14
For
technical
questions
call1·800-665-8685

V4.0
3/8
in.
dr
Angle
Air
Drill
8571762
DISPOSAL
If
your
tool
has
become
damaged
beyond
repair,
do
not
throw
it
out.
Bring
it
to
the
appropriate
recycling
facility.
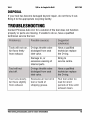
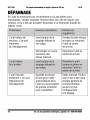
TROUBLESHOOTING
Contact
Princess
Auto
Ltd.
for
a
solution
if
the
tool
does
not
function
properly
or
parts
are
missing.
If
unable
to
do
so,
have
a
qualified
technician
service
the
tool.
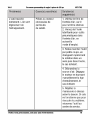
Problem(s)
Possible
cause(s)
Suggested
solution(s)
Tools
will
not
run.
0-rings
throttle
valve
Have
a
qualified
Air
flows
freely
dislodged
from
seat
technician
replace
from
exhaust.
inlet
valve.
the
0-ring.
Damage
to,
or
Bring
to
excessive
wearing
of
service
centre.
internal
parts.
Tool
will
not
0-rings
throttle
valve
Have
a
qualified
shut
off.
dislodged
from
seat
technician
replace
inlet
valve.
the
0-ring.
Tool
runs
slowly.
Excessive
air
tool
oil
in
Run
tool
under
no
Air
flows
slightly
tool
or
build
of
load
for
short
from
exhaust.
shipping
grease.
periods
of
time
until
exhaust
clears.
Visit
www.princessauto.com
for
more
information
15

8571762
3/8
in.
dr
Angle
Air
Drill
V4.0
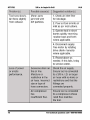
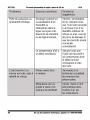
Problem(s)
Possible
cause(s)
Suggested
sol
uti
on
(
s)
Tool
runs
slowly.
Motor
parts
1.
Check
air
inlet
filter
Air
flows
slightly
jammed
with
for
blockage.
from
exhaust.
dirt
particles.
2.
Pour
air
tool
oil
into
air
inlet
as
per
instructions.
3.
Operate
tool
in
short
bursts
quickly
reversing
rotation
back
and
forth
where
applicable.
4.
Disconnect
supply.
Free
motor
by
rotating
drive
shank
manually
where
applicable.
5.
Repeat
above
as
needed.
If
this
fai
Is,
bring
to
service
center.
Loss
of
power
Excessive
drain
on
Check
the
air
supply
.
or
erratic
the
air
line
.
Ensure
tool
is
connected
performance
.
Mo
i
sture
or
to
a 3/8
in
.
I.D
.
or
larger
restriction
in
the
air
hose
w
ith
no
kinks
or
air
hose
.
Incorrect
restrictions
and
that
the
si
ze
or
type
of
fittings
are
hose
connectors
.
connected
properly.
Air
compressor
Ensure
tool
is
connected
has
to
a
compressor
w
hose
insufficient
flo
w.
rated
flo
w
matches
the
tool.
16
For
technical
questions
call1-800·665·8685

V4.0
3/8
in.
dr
Angle
Air
Drill
8571762
Problem(s)
Possible
cause(s)
Suggested
sol
uti
on
(
s)
Tool
runs
at
Motor
parts
worn.
Have
a
qualified
normal
speed
but
technician
replace
loses
power
worn
parts.
under
load.
Lack
of
air
tool
oil.
Pour
air
tool
oil
into
air
inlet
per
instructions.
Visit
www.princessauto.com
for
more
information
17

...
co
"'1"1
~
-
CD
n
=-
::::1
c:;·
!!!..
..c:z
c
CD
~
c;·
::I
Cll
n
!!!..
c:io
Cl
Cl
=
en
Ul
c:io
en
co
Ul
12
9
6
~
4
~
2
1\
~
----
28
27
26
s~
----
8.
4
SO"
------
40
-
41
43
44
47
;g
co
Ul
......
...
......
:a
en
N
.....
en
m
:a
m
:.::-
37
=-=
c:l
~
=
~·
5!-
:e
z
6"
u:::z
CD'
~
~
~
i::::t

V4.0
3/8
in.
dr
Angle
Air
Drill
8571762
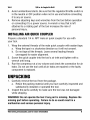
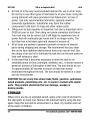
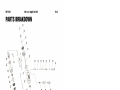
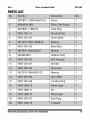
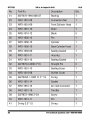
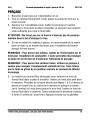
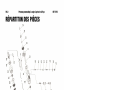
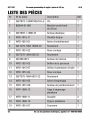
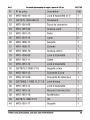
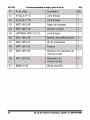
PARTS
LIST
No.
Part
No.
Description
Qty.
1
GB/T819.1-2000
M5x18-LH
Screw
1
2
BQ04A-01-B01
3/8
in.
Drill
Chuck
1
3
G
B/T893.1-1986
32
Snap
Ring
1
4
WFG-1015-11
Woodruff
Key
1
5
WFD-1
051-01
Driver
Shaft
1
6
G
B-
T276-1994
16002-2Z
Bearing
1
7
WFD-1
051-02
Bevel
Gear
1
8
G
B/T276-1
004
626-2Z
Bearing
2
9
GB
896-86
5
Retainer
Ring
1
10
WFD-1
051-03
Drill
Housing
1
11
WFG-1
015-07
Oil
Inlet
1
12
WFD-1
051-04
Bevel
Gear
1
13
GB/T276-1994
6001-2Z
Bearing
1
14
WFD-1
051-05
Gear
Shaft
1
15
WFD-1
051-06
Location
Ring
1
16
WFR-1
060-12
Planet
Cage
1
17
WFR-1
060-11
Pin
3
18
WFR-1
060-10
Planet
Gear
3
19
WFD-1
051-07
Gear
Ring
1
20
WFD-1
050-15
V-Gasket
1
Visit
www.princessauto.com
for
more
information
19

8571762
3/8
in.
dr
Angle
Air
Drill
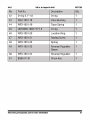
V4.0
No
.
Part
No.
Description
Qty.
21
G
B/T276-1994
608-2Z
Bearing
1
22
WFD-1
051-08
Connection
Nut
1
23
WFD-1051-09
Front
Cylinder
Head
1
24
WFD-1
051-10
Rotor
1
25
WFG-131
0-12
Blade
5
26
WFD-1
050-13
Pin
1
27
WFD-1
050-12
Cylinder
1
28
WFD-1
050-1
0
Back
Cylinder
Head
1
29
WFD-1
050-09
Sealing
Gasket
1
30
WFD-1051-11
Housing
1
31
WFD-1051-12
Sealing
Gasket
1
32
GB/T879
.
2-2000
3*16
Straight
Pin
2
33
WFD-1051-13
Sealing
Cover
1
34
WFG-1310-08
Muffler
Cover
1
35
GB/T3452.1-199211.2*1.8
0-ring
1
36
WFD-1051-14
Gasket
1
37
WFD-1051-15
Air
Inlet
Connector
1
38
WFD-1
051-16
Throttle
1
39
GB/T873-1986
3*24
Screw
1
40
WFD-1051-17
Pin
1
41
0-ri
ng
3.3
*
1.5
0-ring
1
20
For
technical
questions
call1-800·665·8685
La page est en cours de chargement...
La page est en cours de chargement...
La page est en cours de chargement...
La page est en cours de chargement...
La page est en cours de chargement...
La page est en cours de chargement...
La page est en cours de chargement...
La page est en cours de chargement...
La page est en cours de chargement...
La page est en cours de chargement...
La page est en cours de chargement...
La page est en cours de chargement...
La page est en cours de chargement...
La page est en cours de chargement...
La page est en cours de chargement...
La page est en cours de chargement...
La page est en cours de chargement...
La page est en cours de chargement...
La page est en cours de chargement...
La page est en cours de chargement...
La page est en cours de chargement...
La page est en cours de chargement...
La page est en cours de chargement...
La page est en cours de chargement...
La page est en cours de chargement...
La page est en cours de chargement...
La page est en cours de chargement...
La page est en cours de chargement...
-
 1
1
-
 2
2
-
 3
3
-
 4
4
-
 5
5
-
 6
6
-
 7
7
-
 8
8
-
 9
9
-
 10
10
-
 11
11
-
 12
12
-
 13
13
-
 14
14
-
 15
15
-
 16
16
-
 17
17
-
 18
18
-
 19
19
-
 20
20
-
 21
21
-
 22
22
-
 23
23
-
 24
24
-
 25
25
-
 26
26
-
 27
27
-
 28
28
-
 29
29
-
 30
30
-
 31
31
-
 32
32
-
 33
33
-
 34
34
-
 35
35
-
 36
36
-
 37
37
-
 38
38
-
 39
39
-
 40
40
-
 41
41
-
 42
42
-
 43
43
-
 44
44
-
 45
45
-
 46
46
-
 47
47
-
 48
48


Power Fist 8571762 Le manuel du propriétaire
- Catégorie
- Outils électroportatifs
- Taper
- Le manuel du propriétaire
dans d''autres langues
- English: Power Fist 8571762 Owner's manual
Documents connexes
-
Power Fist 8625022 Le manuel du propriétaire
-
-
-
-
-
-
-
-
-