
Travisano Bernini
mosaic tile shown in grid pattern
Installation of
MOSAIC GLASS
& STONE
INSTALLATION INSTRUCTIONS | GLASS & STONE MOSAIC | PAGE 1 OF 5
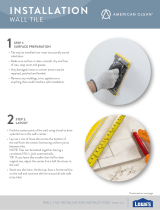
• Tile may be
installed over most
structurally sound
substrates.
• Make sure surface
is clean, smooth,
dry and free of
wax, soap scum
and grease.
• Any damaged,
loose or uneven
areas must be
repaired, patched
and leveled.
• Remove any
moldings, trim,
appliances or
anything that
could interfere
with installation.
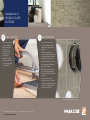
•
Find the center point of the wall,
using a level to draw a plumb line
in the wall’s center.
• Lay out a row of loose tiles across
the bottom of the wall from the
center line leaving uniform joints
between tiles.
NOTE: Tiles can be butted together
leaving a consistent 1/16 in. joint
automatically.
TIP: If cuts leave tiles smaller than
half to their original size, adjust
the center line a half tile closer to
the wall.
• Stack two tiles here. At the top,
draw a horizontal line on the wall
and continue the line around all side
walls to be tiled.
STEP 1: SURFACE PREPARATION
1
STEP 2: WALL LAYOUT
2
CONTINUED ON NEXT PAGE

Travisano Bernini
mosaic tile shown in grid pattern
Installation of
MOSAIC GLASS
& STONE
INSTALLATION INSTRUCTIONS | GLASS & STONE MOSAIC | PAGE 2 OF 5
• It is recommended to use
a drill bit that is specially
designed for glass, metal
and stone.
NOTE: The tile must be
securely clamped into place to
prevent movement of the tile
during the drilling process.
• When drilling the hole, keep
the bit and hole lubricated
to prevent chipping.
• Drill from both sides of the
tile, starting with the back
and drilling half of the depth
of the tile.
• Turn the tile over and
complete the hole. This will
prevent the glass, metal and
stone from chipping as the
drill bit exits the tile.
• It is recommended
to use a diamond
blade, as blades
designed for
ceramic tile will
chip the stone
and/or glass.
NOTE: Cut edges
should be placed in
corners where they
can be hidden.
STEP 4: CUTTING
4
STEP 5: DRILLING
5
CONTINUED ON NEXT PAGE

Travisano Bernini
mosaic tile shown in grid pattern
Installation of
MOSAIC GLASS
& STONE
INSTALLATION INSTRUCTIONS | GLASS & STONE MOSAIC | PAGE 3 OF 5
• Penetrating/impregnating
stone sealers are a no-
sheen, natural-look sealer
that can be water-based or
solvent-based.
• A premium, natural-look,
penetrating/impregnating
sealer is the normal choice
for natural stone when a
natural color of the stone
is desired. A stone-
enhancer sealer is often
used when a darker,
enriched, or highlighted
character is desired.
• Make sure the brand
you have chosen is
formulated to provide
maximum stain protection
for stone products.
• Stone products should
be tested periodically to
ensure that the sealer is
working eectively.
STEP 6: SEALING STONE TILE ONLY
6
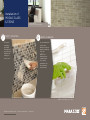
• Suitable for use in wet, but not fully submersed
areas, such as shower walls.
• It is recommended to use a white thin-set mortar
with a flexible acrylic additive or a white polymer
fortified thin-set mortar.
•
Apply this mixture with the manufacturer’s
recommendations of a notch trowel (typically 3/16 in.
x 3/16 in. V-notch).
• Knock down the trowel ridges with the flat edge of the
trowel to produce and evenly layer the thin-set mortar.
•
Spread only enough thin-set to install a few sheets
at a time. Fully butter the back of each sheet with
the flat edge of the trowel in order to avoid the notch
marks in the thin-set from showing through the glass.
•
Carefully press into the thin-set, leaving even spaces
in between tiles. A grout float can be used to tap
the tiles into place. Allow for movement joints where
the tiles abut restraining surfaces and around the
perimeter of the installation.
NOTE: We recommend allowing a
1/8 in. joint between tiles.
• If stone, seal prior to grouting.
STEP 5: INSTALLATION
5
CONTINUED ON NEXT PAGE

Travisano Bernini
mosaic tile shown in grid pattern
Installation of
MOSAIC GLASS
& STONE
INSTALLATION INSTRUCTIONS | GLASS & STONE MOSAIC | PAGE 4 OF 5
• It is recommended
to use a non-
abrasive cleaner to
prevent scratching
of the tile.
NOTE: Tiles
that have been
scratched prior
to or during
installation are
the customer’s
responsibility.
STEP 8: CLEANING
8
CONTINUED ON NEXT PAGE
• To prevent
scratching,
grout with
an unsanded
grout after the
adhesive has
had proper
time to cure.
STEP 7: GROUTING
7

Travisano Bernini
mosaic tile shown in grid pattern
Installation of
MOSAIC GLASS
& STONE
LEGAL
B
ATTENTION / ATENCIÓN / ATTENTION
Do not dry cut using motorized equipment due to the potential for exposure
to harmful silica dust. Use a wet saw or a score and snap tool when cutting is
necessary during the installation process.
No corte en seco usando equipo motorizado debido a la posibilidad de
exposición a polvo dañino de sílice. En caso de que sea necesario cortar durante
el proceso de instalación, usar una sierra de corte en húmedo o una herramienta
cortadora manual.
Ne pas couper à sec à l’aide d’un équipement motorisé en raison du risque
d’exposition à la poussière de silice nuisible. Utiliser une scie à eau ou un outil à
inciser et rompre lorsqu’il faut couper pendant le processus d’installation.
INSTALLATION INSTRUCTIONS | GLASS & STONE MOSAIC | PAGE 5 OF 5
Back-butter spreading of a bond coat
to the back of a ceramic tile
before placing the tile to
ensure a strong bond with
the thin-set mortar.
Balanced cuts perimeter tile cut at equal
size and installed on
opposite sides of an area;
also, equally sized cuts on
each side of a miter.
Butt joint
a plain square joint
between two members
with no grout joint.
Grout
a mix used for filling tile
joints, commonly based
of cement.
Mortar a mixture of cement paste
and fine aggregate used to
bond masonry together.
Plumb perpendicular to true level.
Substrate the underlying support for
a ceramic tile installation
GLOSSARY OF TERMS
A
-
 1
1
-
 2
2
-
 3
3
-
 4
4
-
 5
5


dans d''autres langues
- English: MARAZZI ULNM Installation guide
Documents connexes
Autres documents
-
 American Olean GS7126BJMSCC1U Guide d'installation
-
Natural Stone Veneer R27-C-TA-RF Manuel utilisateur
-
 SAVOGRAN 6559 Manuel utilisateur
-
daltile ST53DGMTRMSCCHN Manuel utilisateur
-
 Timberwall 1314122 Guide d'installation
-
SunTouch Floor Warming 12000830R Mode d'emploi
-
WECO WE1071069 Guide d'installation
-
 The Tile Doctor C.00 - 5kg Manuel utilisateur


