Salora DAB3010FM Le manuel du propriétaire
- Catégorie
- Radios
- Taper
- Le manuel du propriétaire

Instruction Manual
DAB3010FM
IMPORTANT: Please read all instructions carefully before use and keep for future reference
Ver 1.0
DAB/FM Radio

Safety Warnings
• Retain the manual. If you pass the unit onto a third
party make sure to include this manual.
• Check that the voltage marked on the rating label
matches your mains voltage.
Damage
• Please inspect the unit for damage after unpacking.
• Do not continue to operate the unit if you are in any
doubt about it working normally, or if it is damaged in
consult your dealer.
Location of Unit
•
not subjected to vibrations.
• Do not place the unit on sloped or unstable surfaces
• The mains socket must be located near the unit and
should be easily accessible.
• This unit is designed for indoor, domestic use only.
Temperature
• Avoid extreme degrees of temperature, either hot or
cold. Place the unit well away from heat sources such
• Avoid exposure to direct sunlight and other sources
of heat.
• Do not expose the battery to direct sunlight or
sources of excessive heat.
Naked Flames
•
top of or near the unit.
Moisture
•
damage, do not expose this unit to rain, moisture,
such as vases, should be placed on the unit. Do not
operate the unit with wet hands, near water or other
liquid.
• If you spill any liquid into the unit, it can cause serious
Withdraw the mains adapter and consult your dealer.
Ventilation
•
due to overheating, ensure that curtains and other
materials do not obstruct the ventilation vents.
• Do not install or place this unit in a bookcase, built-in
is well ventilated.
Safety
• Always disconnect the unit from the mains supply
before connecting/disconnecting other devices or
moving the unit.
• Unplug the unit from the mains socket before a
lightning storm.
• In the interests of safety and to avoid unnecessary
energy consumption, never leave the unit switched
on while unattended for long periods of time, e.g.
overnight, while on holiday or while out of the house.
the mains socket.
Mains Adapter Cable
• Make sure the unit or unit stand is not resting on top
of the mains adapter cable, as the weight of the unit
may damage the cable and create a safety hazard.
Mains Adapter
• The mains adapter will continue to draw electricity
from the mains supply when plugged in the mains
socket. In the interests of safety and to avoid
unnecessary energy consumption, never leave
the adapter plugged in the mains socket while
unattended for long periods of time. Disconnect the
adapter from the power supply.
Interference
• Do not place the unit on or near appliances which
may cause electromagnetic interference. If you do,
cause a distorted sound.
Batteries
• Please dispose of batteries correctly by following the
guidance in this manual.
• Do not expose the battery to direct sunlight or
sources of excessive heat.
Earphones
• Listening to loud sounds for prolonged
periods of time may permanently damage
your hearing.
• Before putting on earphones, turn the volume
down then put the earphones on and slowly increase
the volume until you reach a comfortable listening
level.
Supervision
• Children should be supervised to ensure that they do
not play with the unit.
• Never let anyone especially children push anything
into the holes, slots or any other openings in the case
- this could result in a fatal electric shock.
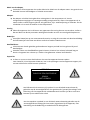
CAUTION
RISK OF ELECTRIC SHOCK
DO NOT OPEN
within an equilateral triangle, is intended to
alert the user to the presence of uninsulated
“dangerous voltage” within the unit’s
magnitude to constitute a risk of electric
shock.
The exclamation point within an equilateral
triangle is intended to alert the user to the
presence of important operating and
maintenance (servicing) instructions in the
manual accompanying the unit.
Service
• To reduce the risk of electric shock, do not remove
screws. The unit does not contain any user-serviceable
personnel.
•
dangerous voltages.
Maintenance
• Ensure to unplug the unit from the mains socket
before cleaning.
• Do not use any type of abrasive pad or abrasive
cleaning solutions as these may damage the unit’s
surface.
• Do not use liquids to clean the unit.

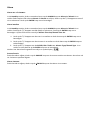
for purchasing your new Salora Portable DAB radio.
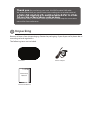
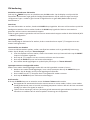
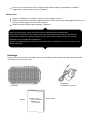
Mains AdapterMain Unit
Instruction Manual
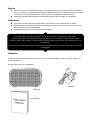
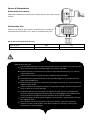
Unpacking
Remove all items from the packaging. Retain the packaging. If you dispose of it please do so
according to local regulations.
The following items are included:
Instruction
Manual
Thank you
We recommend that you spend some time reading this instruction manual
Read all the safety instructions carefully before use and keep this instruction
manual for future reference.
for purchasing your new SALORA Portable DAB radio.

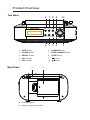
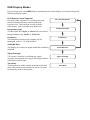
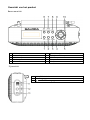
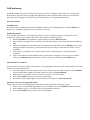
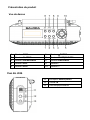
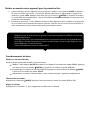
Product Overview
Top View
Enter
Mode
Info
Scan
Alarm
Preset
Sleep
Snooze
1 2 3 4 5
6 7 8 9 10
1.
2.
/MODE Button
3.
INFO Button
4. VOL- Button
VOL+ Button
6.
ALARM Button
7.
Button
Button
8. PRESET Button
9.
SLEEP/SNOOZE Button
5.
SCAN Button
10.
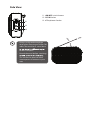
Rear View
14. Telescopic Aerial
15. Battery compartment cover
14 15

12. DC IN Socket
11. ON/OFF switch button
13. Earphones Socket
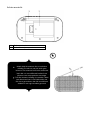
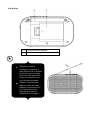
Side View
• Always unclip and extend the
aerial when listening to DAB or FM
radio. The aerial has a swivel base
for best reception.
• Extend the aerial before switching
This will ensure that the initial
scan captures all stations in your
area.
11
12
13

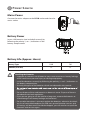
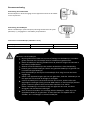
Power Source
Mains Power
Connect the mains adapter to the DC IN socket and then the
mains socket.
Battery Power
Insert 4 AA batteries (not included) correctly by
following the polarity (+ or –) indications in the
battery compartment.
Battery Life (Approx. Hours)
Battery Type DAB FM
Alkaline (Size AA) 12 13
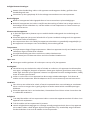
Handling the Batteries
• Improper or incorrect use of batteries may cause corrosion or battery leakage,
which could cause personal injury or damage to property.
• Install the batteries correctly by following the polarity (+ and –) indications in
the battery compartment.
• Use only the types of the batteries which are indicated in this manual.
•
batteries.
• Do not dispose of the used batteries as domestic waste. Dispose of them in
accordance with local regulations.
• If you are not going to use the unit for a long time, remove the batteries to
avoid damage from battery leakage and corrosion.
• Do not take more than 1 minute to replace the batteries, otherwise the clock,
any list of receivable broadcasts for DAB scan, preset favourite services and
all settings will be erased. Should that happen, you will need to set up all the
functions and services again.

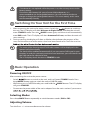
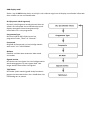
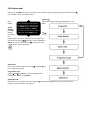
Switching On Your Unit for the First Time
1. After connecting the unit to the power source, Switch the button to switch on
the unit. The LCD display will show Welcome to Digital Radio, and then the unit will
enter STANDBY mode. Press the /MODE button again, and the unit will automatically
enter DAB mode. The LCD display will show Autotune Full scan, and then the unit will
start scanning.
2. During scanning, the display will show a slide bar that indicates the progress of the
scan, and the amount of radio stations that have been found so far. Once the scan has
• The name of the found group of DAB radio stations will be displayed in the
bottom half of the display.
• The clock will be updated automatically if you can receive DAB signal in your
location. In order to synchronise to the current local time, you must leave it on
the DAB station for a period of time.
• The LCD display shows the time in STANDBY mode.
Basic Operation
Powering ON/OFF
After connecting the unit to the power source:
• Switch button to switch on the unit, and it will enter STANDBY mode. Press
the /MODE button again to switch the unit to DAB/FM mode.
• While the unit is in DAB/FM mode, press and hold the /MODE button. The LCD display
will go to STANDBY.
• Disconnect the power cable of the mains adapter from the mains socket if you want to
Selecting Modes
Press the /MODE Button repeatedly to switch between modes (DAB or FM).
Adjusting Volume
Turn the Press +/- to increase/decrease the volume.
• If the batteries are replaced while the power is on, the unit may revert to the
factory setting.
• Due to the short battery life span of some alkaline batteries. It is
recommended to use rechargeable batteries. You will need
charger to charge the rechargeable batteries. This saves money
to purchase a
environmentally friendly.
and is more

Alarm
When the unit is in standby mode, press the ALARM button repeatedly to set the alarm
status of Alarm1 or Alarm 2. When the LCD display shows Alarm1 and Alarm2, press the
/ Button to select to choose ON or OFF. Press the ENTER
Alarm setup
In standby mode, press the ALARM Button repeatedly to set the alarm status of Alarm1 or
Alarm2. Press the / Button to select ON and then press the ENTER Button to
Alarm1 Time Set/Alarm 2 Time Set.
1. Press the
/ Button to set the hour and then press the ENTER Button to
2. Press the / Button to set the minute and then press the ENTER Button to
3. Press / Button to select BEEPER, FM or DAB for Alarm1 Type/Alarm 2 Type and
then press the ENTER
After setting up the alarm, the LCD display will show 1/ 2.
Snooze Function
When the alarm rings, press the SNOOZE Button to enter snooze mode. The alarm
will ring again after 9 minutes.
When the unit is in snooze mode, press the
/MODE
Stop the alarm
When the alarm rings, press the /MODE Button to stop the alarm.

DAB Operation
To listen to the tuned stations press the / Button. Each time you press the / Button,
you will skip to the previous or next stored station (including primary and secondary
station). The unit will display the station name.
Auto Scan Modes
Full scan
Searches all DAB channels in DAB Band III. Press and hold the SCAN Button for about 2
seconds to start searching.
Manual Scan
As well as the auto tune function, you can manually tune the receiver. This can help you
when aligning your aerial or when adding stations that were missed while auto tuning.
1. Press and hold the ENTER Button, the display will show Manual tune.
2. Press the / Button to cycle through the DAB channels, which are numbered from
5A to 13F.
3. After your desired channel number is selected, press the ENTER Button
multiplex.
4. Press the / Button to see what stations are present in the available multiplex.
5. Once you have reached the last station in the available multiplex, it will revert back to
Manual tune
mode, just press the ENTER
button.
Presetting Stations
You can store up to 10 of your favourite stations to the memory. This will enable you to
access your favourite stations quickly and easily.
1.
like to save, press and hold the PRESET Button. The display will show “Preset Empty #”.
2. Press the / Button to select your desired preset station number.
3. Press the ENTER
4. The station will be stored and the display will show “Preset # Stored”.
Recalling a Preset Station
1. Once you have saved a station to one of the preset buttons, you can recall it by pressing
the PRESET Button.
2. Press the
/ Button to select your desired preset station number.
3. Press the ENTER

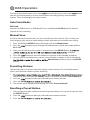
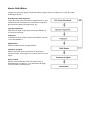
DAB Display Modes
Every time you press the INFO Button, the bottom line of the display will cycle through the
following display modes.
DLS (Scrolling Text)
Programme Type
Frequency
Audio Bit Rate
Time/Date
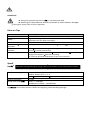
DLS (Dynamic Label Segment)
Dynamic Label Segment is a scrolling message
that the broadcaster may include with their
transmissions. The message usually includes
information, such as programme details etc.
Programme Type
This describes the “Style” or “Genre” of music that is
being broadcast e.g. “Rock” or “Classical”.
Frequency
The frequency of the present station will be
displayed, such as “11C 220.352MHz”.
Audio Bit Rate
The display will show the digital audio bit rate being
received.
Signal Strength
This shows a slide bar to indicate the signal
strength, the stronger the signal, the longer the bar
will be from left to right.
Time/Date
The broadcaster (radio station) provides clock and
date information automatically so there’s no need
to manually set this information.
Signal Strength

FM Operation
Switching from DAB to FM Mode
Press the /MODE Button to switch to FM mode. The display will show FM frequency.
On the top line of the display is the current frequency. On the bottom of the display,
<Programme Type> will show since no channel is tuned in and no RDS (Radio Data System)
data are available.
Auto Scan
To search for an FM station, press the SCAN Button. This will start scanning up the
frequency band. To scan down the frequency band, press and hold the SCAN Button. Once
a station has been found, the scanning will stop automatically.
If no station is found, then the tuning will stop once it has cycled through the entire FM
band (87.5-108MHz).
Manual Scan
To search for FM stations manually, simply press the / Button repeatedly until your
desired frequency is reached.
Presetting Stations
You can store up to 10 of your favourite stations to the memory. This will enable you to
access your favourite stations quickly and easily. The display will then show “Preset Empty
#”.
1.
like to save, then press and hold the PRESET Button.
2. Press the / Button to select your desired preset station number.
3. Press the ENTER
4. The station will be stored and the display will then show “Preset # stored”.
Recalling a Preset Station
1. Once you have saved a station to one of the preset stations, you can recall it by pressing
the PRESET button. The display will then show frequency you have stored.
2. Press the / Button buttons to select your desired preset station number.
3. Press the ENTER
Audio Mode
Press the ENTER Button to toggle between the Auto or Mono audio mode.
• The unit will automatically switch between stereo and mono mode, when auto mode is
selected but you can override this and switch this function manually by changing it to
mono mode. This is helpful when receiving poor signal reception.
• During stereo reception, the received L/R stereo sound will be automatically combined
into one single channel to suit the single speaker design of this radio.

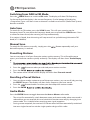
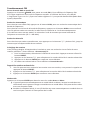
FM Display Modes
Every time you press the INFO Button, the bottom line of the display will cycle through the
following display modes.
Frequency
Audio Mode
Radio Text
Programme Type
Signal Strength
Date and Time
Frequency
This shows the frequency of the current station,
e.g. 89.80 MHz.
Audio Mode
When in FM mode, the display will show if the
station being received is in mono or stereo mode.
The receiver will automatically switch between
Stereo and Mono modes. You can however
override this function, so that you can manually
switch between Stereo and Mono modes, which is
helpful if you’re listening to a poor FM signal.
To switch between mono and stereo,
press the ENTER Button once,
see on the display “
you will
Auto” or
“
Mono
To toggle between each mode
”.
the
just press
ENTER Button again.button
Radio Text
This is a scrolling message displaying
information about the current programme.
Programme Type
This describes the “Style” or “Genre” of music that
is being broadcast e.g. “Rock” or “Classical”.
Signal Strength
The display will show a slide bar to indicate the
signal strength, the stronger the signal, the longer
the bar will be from left to right.
Time/Date
Time and date will show on the display.
Time and date cannot be updated in
FM mode. To ensure correct time and
date is displayed, synchronise in DAB

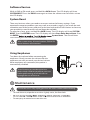
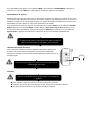
Using Earphones
Turn down the volume before connecting the
earphones. Slowly increase the volume with the
earphones on until you reach your desired volume.
When earphones are connected, the speaker is
automatically disabled.
Avoid listening to sound at excessive
levels which could be harmful to your ears.
Prolonged listening at full volume can
damage the ears of the user.
Maintenance
Ensure the unit is fully unplugged from the mains socket before cleaning.
• To clean the unit, wipe the case with a slightly moist, lint-free cloth.
•
• Do not spray an aerosol at or near the unit.
Software Version
While in DAB or FM mode, press and hold the INFO Button. The LCD display will show
SYSTEM RESET. Press the INFO Button again to show the software version of this unit on
the LCD display.
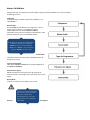
System Reset
There may be times when you need to reset your unit to the factory settings. If you
experience reception problems you may want to reset and try again. If you move the unit
to another part of the country and pick up the local and national DAB stations in that area,
your previously tuned channels may no longer be available.
To reset the system, press and hold the INFO Button. The LCD display will show SYSTEM
RESET. Press the ENTER Button. The LCD display will show Press Enter Key to
the
Reset. Press
ENTER System Reset.
start scanning for DAB channels immediately.
The unit will then
After system reset, all tuned stations, DAB & FM
preset stations will be erased.

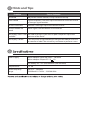
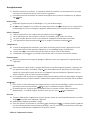
Hints and Tips
Problem Cause / Solution
No Sound Adjust the volume control, it may not be turned up.
Static Sound Signal reception is too low. Adjust the aerial or move the unit to
a stronger signal location.
Sound is distorted Volume is too high. Adjust the volume control.
Desired station not
found
Weak signal. Use the Manual Tune function.
The display shows “Not
available”
No DAB coverage in your area or poor reception. Adjust the
position of the aerial.
The display is blank This may occur if the broadcaster changes the label of a service
or removes a label. The unit will try to retune or perform a scan.
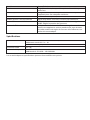
Mains Supply Mains adapter Input 100-240 V ~ 50/60 Hz
Mains adapter Output DC 5 V 1A
DC battery 4 x 1.5 V (AA) batteries (not included)
Output Power 1 x 1W
Radio Frequency
Range
FM 87.5 – 108 MHz
DAB Band III 174.928 – 239.200 MHz

Veiligheidswaarschuwingen
Bewaar deze handleiding. Indien u dit apparaat overdraagt aan derden, geef dan deze
handleiding ook mee.
Controleer op het typeplaatje of dit het voltage overeenkomt met uw stopcontact.
Beschadigingen
Nadat u het apparaat hebt uitgepakt dient u het te controleren op beschadigingen.
Gebruik het apparaat niet indien u twijfelt aan de werking of indien het op enige manier is
beschadigd. Zet de schakelaar uit, trek de stekker uit het stopcontact en neem contact op
met uw leverancier.
Plaatsen van het apparaat
U dient dit apparaat te plaatsen op een stabiele vlakke ondergrond niet onderhevig aan
trillingen.
Plaats dit apparaat niet op een hellend vlak of op een instabiele ondergrond. Het apparaat
zou kunnen vallen of omkiepen.
Het stopcontact dient zich vlakbij het apparaat te bevinden en gemakkelijk toegankelijk zijn.
Het apparaat is ontworpen voor huishoudelijk, binnenshuis gebruik.
Temperatuur
Vermijd extreem hoge of lage temperaturen. Plaats het apparaat niet bij een hiebron zoals
radiatoren of gas of elektrische haarden.
Vermijd blootstelling aan direct zonlicht en andere hiebronnen.
Stel de baerijen niet bloot aan direct zonlicht of andere hiebronnen.
Open vuur
Plaats geen enkel type kaars of ander open vuur op of bij het apparaat.
Vochgheid
Om de kans op een elektrische schok of schade te verkleinen, dit apparaat niet blootstellen
aan regen, vochgheid, druppels of speers. Plaats geen objecten gevuld met water of enig
ander type vloeistof op het apparaat. Hanteer het apparaat niet met vochge handen, vlakbij
water of ander type vloeistof.
Indien u vocht morst in het apparaat kan dit ernsge schade toebrengen. Trek direct de
stekker uit het sto
pcontact. Haal de adapter eruit en neem contact op met uw leverancier.
Venlae
Om risico op een elektrische schok, of brand veroorzaakt door oververhing te voorkomen
dient u ervoor te zorgen dat er geen gordijnen of ander materiaal de venlaeopeningen
blokkeert.
Plaats dit apparaat niet in een boekenkast, inbouwkast of een kleine ruimte. Controleer dat
er voldoende venlae is.
Veiligheid
Trek aljd de stekker uit het stopcontact indien u een ander apparaat aansluit of indien u het
apparaat wilt verplaatsen.
Trek de stekker uit het
stopcontact bij onweer.
Vanuit veiligheidsoverwegingen en vanwege onnodig energieverbruik, dient u het apparaat
uit te zeen indien u deze langere jd niet zult gebruiken, bijv. weekendje weg of vakane.
Zet de schakelaar uit en trek de stekker uit het stopcontact.

Kabel van de adapter
Controleer of het apparaat niet op de elektrische kabel van de adapter staat. Het gewicht zou
de kabel kunnen beschadigen en schade veroorzaken.
Adapter
De adapter zal elektriciteit gebruiken zolang deze in het stopcontact zit. Vanuit
veiligheidsoverwegingen en vanwege onnodig energieverbruik, dient u het apparaat uit te
zeen indien u deze langere jd niet zult gebruiken, bijv. weekendje weg of vakane. Zet de
schakelaar uit en trek de stekker uit het stopcontact.
Storing
Plaats dit apparaat niet in de buurt van apparaten die storing kunnen veroorzaken. Indien u
dat w
el doet kan dit de prestaes nadelig beïnvloeden en een vervormd geluid opleveren.
Baerijen
Verwijder baerijen op een verantwoorde manier en volg de instruces uit deze handleiding.
Stel de baerijen niet bloot aan direct zonlicht of andere hiebronnen.
Hoofdtelefoon
Luisteren naar harde geluiden gedurende een langere periode kan het gehoor blijvend
beschadigen.
Voordat u door een hoofdtelefoon gaat luisteren, draait u het volume helemaal laag en
draait u langzaam het volume op. Totdat u het gewenste volume hee bereikt.
Supervisie
U dient er op toe te zien dat kinderen niet met
het apparaat kunnen spelen.
Laat niemand, in het bijzonder kinderen, iets in de openingen van het apparaat stoppen, dit
zou een elektrische schok kunnen opleveren.
Het bliksemschicht met een pijl symbool in een driehoek waarschuwt de
gebruiker op de aanwezigheid van niet-geïsoleerde “gevaarlijke voltage”in de
behuizing van het apparaat die voldoende sterk kunnen zijn dat er een kans
bestaat op een elektrische schok.
Het uitroepteken symbool in een driehoek waarschuwt de gebruiker op de
aanwezigheid van belangrijke instruces, bijgesloten bij dit apparaat, met
betrekking
tot de bediening en onderhoud van dit apparaat.
ATTENTIE
RISICO OP EEN ELEKTRISCHE
SCHOK
NIET OPENEN

Service
Om het risico op een elektrische schok te vermijden, dient u de schroeven van dit apparaat
niet los te maken. Dit apparaat bevat geen onderdelen die door de gebruiker kunnen worden
vervangen. Voor onderhoud dient u zich te wenden tot gekwalificeerd personeel.
Open geen vastgemaakte deksels om blootstelling aan hoge voltages te voorkomen.
Onderhoud
Voordat u het apparaat wilt reinigen dient u de stekker uit het stopcontact te halen.
Gebruik geen schuursponsjes of schuurmiddelen om het apparaat schoon te maken dit zou
het oppervlak kunnen beschadigen.
Gebruik geen vloeistof om het apparaat te reinigen.
Uitpakken
Verwijder al het verpakkingsmateriaal. Indien u het materiaal weggooit doet u dat dan volgens de
lokale regelgeving.
De volgende items zijn inbegrepen:
Adapter
Apparaat
Handleiding
Hartelijk dank voor uw aankoop van uw nieuwe Salora draagbare DAB radio.
Wij adviseren deze handleiding zorgvuldig door te lezen zodat u precies weet welke
funces deze radio u biedt. Tevens leest u enkele hints en ps voor het oplossen van uw
problemen.
Lees alles instruces goed door en bewaar deze handleiding om eventueel later te kunnen
raadplegen

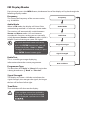
Overzicht van het product
Boven aanzicht
1. INFO knop 6.
q/MODE knop
2. ALARM knop 7. SLEEP/SNOOZE knop
3. PRESET knop 8. SCAN knop
4. VOL- knop 9.
7 knop
5. VOL+ KNOP 10.
8 knop
Zij aanzicht
11. AAN/UIT schakelaar
12. DC IN ingang
13.
hoofdtelefoon ingang

Achter aanzicht
14. Telescopische Antenne
15. Deksel baerij comparment
Maak aljd de antenne los en trek deze
volledig uit zodra u naar de radio gaat
luisteren. De antenne hee een roterende
basis die u in verschillende hoeken kunt
plaatsen voor een opmale ontvangst.
Trek de antenne volledig uit voordat u deze
voor de eerste keer in de DAB modus zet.
Dit om te garanderen dat alle beschikbare
staons in uw regio worden gescand.

Stroomvoorziening
Voorziening door elektriciteit
Doe de adapter in de DC IN ingang van het apparaat en daarna de stekker
in het stopcontact.
Voorziening door baerijen
Plaats 4 AA baerijen (niet inberepen) rekening houdend met de juiste
polariteit (+/-) aangegeven in het baerij comparment.
Levensduur van de baerijen (Indicae in uren)
Baerij type DAB FM
Alkaline (soort AA) 12 13
Hanteren van de baerijen
Onjuist gebruik kan leiden tot corrosie of lekkage van de baerijen, waardoor
gevaar ontstaat voor lichamelijk letsel of schade aan eigendommen.
Plaats de baerijen rekening houdend met de polariteit volgens de indicae in
het baerij comparment.
Gebruik uitsluitend batterijen die worden aanbevolen in deze handleiding.
Gebruik geen nieuwe baerijen samen met gebruikte baerijen of gebruik niet
verschillende type baerijen.
Gooi deze baerijen niet bij het huishoudelijk afval. Volg hiervoor de lokale
regelgeving.
Indien u het apparaat langere jd niet zult gebruiken, haal dan de baerijen uit
het apparaat om corrosie of lekkage te vermijden.
U dient de baerijen te verwisselen binnen één minuut, anders zullen alle
opgeslagen instellingen (klok, gescande DAB staons en favorietenlijst) worden
gewist. Indien dit gebeurt dient u alles weer opnieuw in te stellen.
Indien u de baerijen verwisselt terwijl het apparaat aan staat, kan deze
teruggaan naar de fabrieksinstellingen.
Door de korte levensduur van sommige alkaline baerijen, raden wij u aan
oplaadbare baerijen te gebruiken. U dient daarvoor een oplader aan te
schaffen. Dit is voordeliger en milieuvriendelijker.
La page est en cours de chargement...
La page est en cours de chargement...
La page est en cours de chargement...
La page est en cours de chargement...
La page est en cours de chargement...
La page est en cours de chargement...
La page est en cours de chargement...
La page est en cours de chargement...
La page est en cours de chargement...
La page est en cours de chargement...
La page est en cours de chargement...
La page est en cours de chargement...
La page est en cours de chargement...
La page est en cours de chargement...
La page est en cours de chargement...
La page est en cours de chargement...
La page est en cours de chargement...
La page est en cours de chargement...
La page est en cours de chargement...
La page est en cours de chargement...
La page est en cours de chargement...
La page est en cours de chargement...
-
 1
1
-
 2
2
-
 3
3
-
 4
4
-
 5
5
-
 6
6
-
 7
7
-
 8
8
-
 9
9
-
 10
10
-
 11
11
-
 12
12
-
 13
13
-
 14
14
-
 15
15
-
 16
16
-
 17
17
-
 18
18
-
 19
19
-
 20
20
-
 21
21
-
 22
22
-
 23
23
-
 24
24
-
 25
25
-
 26
26
-
 27
27
-
 28
28
-
 29
29
-
 30
30
-
 31
31
-
 32
32
-
 33
33
-
 34
34
-
 35
35
-
 36
36
-
 37
37
-
 38
38
-
 39
39
-
 40
40
-
 41
41
-
 42
42


Salora DAB3010FM Le manuel du propriétaire
- Catégorie
- Radios
- Taper
- Le manuel du propriétaire
dans d''autres langues
- English: Salora DAB3010FM Owner's manual
- Nederlands: Salora DAB3010FM de handleiding
Documents connexes
Autres documents
-
Lenco PDR-030 Le manuel du propriétaire
-
Muse Micro-chaîne M39 DBT Le manuel du propriétaire
-
Lenco CR-630WH Le manuel du propriétaire
-
Denver Electronics DAB-56C Manuel utilisateur
-
Lenco 9000-0046-3114 Manuel utilisateur
-
Lenco DAR-010BK Le manuel du propriétaire
-
Tangent DAB2go Junior Black Manuel utilisateur
-
Lenco CR-630 Le manuel du propriétaire