Edge 375LM Le manuel du propriétaire
- Catégorie
- Porte de garage
- Taper
- Le manuel du propriétaire
Ce manuel convient également à

MODELS 375LM & 375LMC
Universal Remote Control
To prevent possible SERIOUS INJURY or DEATH from a moving gate or garage door:
• ALWAYS keep remote controls out of reach of children. NEVER permit children to
operate, or play with remote control transmitters.
• Activate gate or door ONLY when it can be seen clearly, is properly adjusted and there
are no obstructions to door travel.
• ALWAYS keep gate or garage door in sight until completely closed. NEVER permit
anyone to cross path of moving gate or door.
© 2007, The Chamberlain Group, Inc.
114A3492 All Rights Reserved
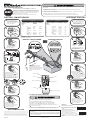
Read instructions thoroughly BEFORE beginning.
Start with garage door closed. Identify garage door opener type -
Smart/Learn button or DIP Switch. Smart/Learn button or DIP Switches
are located on motor unit or external receiver.
Refer to owner’s manual if necessary.
Proceed with instructions according to your type of garage door opener.
ON
2 3
1
KG
KG
NOTE:
2 Position DIP Switch:
If programming fails reverse
DIP switches (OFF to ON and
ON to OFF).
**3 Position DIP Switch:
For Chamberlain remotes DO NOT
use the “0” position, use “+” or “-”.
If you already have a 3-button
remote, DIP switch #1 must be set to “-” if the large
button is to open the door. It may be necessary to
reprogram original remote controls.
2
1211109853 7641 2
Clicker Remote
Existing Remote
3
4
Press program button
until LED lights.
5
Match DIP switches. Turn
extra switches OFF.**
OR
DIP SWITCH
SMART/LEARN BUTTON
2 3
1
KG
KG
4
Motor Unit
Select a button to program.
Press button times
ensuring LED stops flashing
after each press. Code is
accepted when door
activates.
REMOTE CONTROL BATTERY
NOTICE: To comply with FCC and or Industry Canada (IC) rules, adjustment or modifications of this
receiver and/or transmitter are prohibited, except for changing the code setting or replacing the battery.
THERE ARE NO OTHER USER SERVICEABLE PARTS.
Tested to Comply with FCC Standards FOR HOME OR OFFICE USE. Operation is subject to the following
two conditions: (1) this device may not cause harmful interference, and (2) this device must accept any
interference received, including interference that may cause undesired operation.
Dispose of batteries properly. Replace ONLY with 3V2032 coin
batteries.
To prevent possible SERIOUS INJURY or DEATH:
• NEVER allow small children near batteries.
• If battery is swallowed, immediately notify doctor.
To reduce risk of fire, explosion or chemical burn:
• Replace ONLY with 3V2032 coin batteries.
• Do NOT recharge, disassemble, heat above 212°F (100°C) or incinerate.
CHART B
# of Brand Description Year
times to
press
button
11 Chamberlain
®
* 9 Position ’90-’92
12 Chamberlain
®
* 9 Position
Canada ’83-’89
13 Genie
®
12 Position ’85
14 Linear Multicode
®
10 Position ’76
15 Chamberlain
®
8 Position ’83-’89
16 Stanley/Multicode
®
10 Position ’76
17 Genie
®
9 Position ’85
18 Linear
®
Moore-O-Matic
®
8 Position ’76
19 Chamberlain
®
* 7 Position ’83-’89
CHART A
# of Brand Type/Color of Year
times to Smart/Learn
press
button
1 Linear
®
Mega-Code ’97-Current
2 Chamberlain
®
* Orange ’97-’05
3 Chamberlain
®
* Purple ’05-Current
4 Chamberlain
®
* Green ’93-’96
5 Genie
®
Overhead Door
®
Intellicode ’95-’05
6 Genie
®
Overhead Door
®
Intellicode ’05-Current
7 Stanley
®
Secure Code ’98
9 Wayne Dalton
®
Rolling Code ’99
11 Chamberlain
®
* 9 Position ’90-’92
1-800-442-1255
Chamberlain, LiftMaster and Moore-O-Matic are Trademarks of Chamberlain Group. Genie
is a Trademark of Overhead Door Corporation. Overhead Door is a Trademark of Overhead
Door Corporation. Linear is a Trademark of Linear Corporation. Master Mechanic is a
Trademark of TruServ. Sears is a Trademark of Sears & Roebuck. Stanley is a Trademark of
The Stanley Works. Wayne Dalton is a trademark of Wayne Dalton Corporation. Do It is a
trademark of Do It Best Corporation.
Press program button.
6
7
Programming complete.
Press selected button
to test. If unit does not
work, return to Step 3.
Press and release the
smart/learn button.
5
Select a button to program.
Press button times
ensuring LED stops flashing
after each press. Code is
accepted when one of the
following occurs:
OR
OR
1
See Chart B to
determine # of times to
press button and write
in blank on step 5.
DIP SWITCH
SMART/LEARN BUTTON
Press program button.
6
7
Programming complete.
Press selected button
to test. If unit does not
work, return to Step 3.
3
Press program button
until LED lights.
2
1
See Chart A to
determine # of times to
press button and write
in blank on step 5.
NOTE: Your opener may
appear different and you
may have to remove the
light lens to access the
learn button.
*NOTE: LiftMaster, Do-It, Master Mechanic, Raynor, True Value and Sears Craftsman are compatible
with Chamberlain technology.
Click
www.LiftMaster.com
1211109853 7641 2
LED Indicator
Button 1
Button 2
Program Button
Battery
DIP Switches
Battery Cover
Motor
Unit
ON
STOP

MODÈLES 375LM ET 375LMC
Télécommande universelle
Afin d’éliminer les risques de BLESSURES GRAVES ou de MORT découlant de l’actionnement d’une clôture ou d’une
porte de garage :
• NE JAMAIS laisser la télécommande à portée des enfants. Ne JAMAIS laisser un enfant manipuler une
télécommande ni jouer avec elle
• Actionner la clôture ou la porte UNIQUEMENT lorsqu’elle est clairement visible, correctement ajustée et que le
mécanisme est libre de toute entrave.
• TOUJOURS garder la clôture ou la porte de garage en vue jusqu’à sa fermeture complète.
NE JAMAIS permettre à quiconque de passer lorsqu’une clôture ou une porte est en mouvement.
ATTENTION
AVERTISSEMENTAVERTISSEMENT AVERTISSEMENT
AVERTISSEMENT
AVERTISSEMENT
© 2007, The Chamberlain Group, Inc.
114A3492 Tous droits réservés
Lire les instructions en entier AVANT de commencer.
Commencer avec la porte du garage fermée. Identifier le type
d’ouvre-porte de garage : bouton “Smart/Learn” ou interrupteur
DIP. Le bouton “Smart/Learn” ou les interrupteurs DIP sont situés
sur l’unité motrice ou sur le récepteur externe. Se référer au
manuel du propriétaire si nécessaire.
Procéder aux instructions selon votre type d’ouvre-porte.
ON
2 3
1
KG
KG
REMARQUE :
Interrupteur DIP 2 Positions :
Si la programmation échoue, inverser les
interrupteurs DIP (de OFF à ON et de ON
à OFF).
**Interrupteur DIP 3 Positions :
Pour les télécommandes Chamberlain ne pas
utiliser la position “0”, utiliser “+” ou “ -” . Si
vous avez déjà une télécommande à trois
boutons, l’interrupteur DIP numéro 1 doit être
positionné sur “ -” si le gros bouton est celui censé ouvrir la porte. Il
sera peut-être nécessaire de reprogrammer les télécommandes
d’origine.
2
1211109853 7641 2
Télécommande
Clicker
3
4
Appuyer sur le bouton
“programme” jusqu’à ce
que LED s’allume.
5
Assembler les interrupteurs
DIP. ETEINDRE les
interrupteurs DIP en surplus.**
OU
INTERRUPTEUR DIP
BOUTON “SMART/LEARN”
2 3
1
KG
KG
4
Unité Motrice
Sélectionner un bouton pour
programmer. Appuyer fois
sur le bouton en vous assurant
que la LED arrête de clignoter
après chaque pression. Le
code est accepté lorsque la
porte s’actionne.
Les Piles de Télécommande
Remplacer les piles UNIQUEMENT par des piles capsules 3V2032.
Pour prévenir d’éventuelles BLESSURES GRAVES ou LA MORT :
• Ne JAMAIS laisser de petits enfants à proximité des piles.
• Aviser immédiatement un médecin en cas d’ingestion d’une pile.
Pour réduire le risque d'incendie, d'explosion ou de brûlure chimique :
• Remplacer les piles UNIQUEMENT par des piles capsules 3V2032.
• NE PAS recharger, ni démonter, ni chauffer à une température supérieure à
100 °C (212 °F), ni incinérer.
ATTENTION
AVERTISSEMENT AVERTISSEMENT
AVERTISSEMENT
AVERTISSEMENTAVERTISSEMENT
Schéma B
Nombre de Marque Description Année
Fois à
Appuyer
sur bouton
11 Chamberlain
®
* 9 Position ’90-’92
12 Chamberlain
®
* 9 Position
Canada ’83-’89
13 Genie
®
12 Position ’85
14 Linear Multicode
®
10 Position ’76
15 Chamberlain
®
8 Position ’83-’89
16 Stanley/Multicode
®
10 Position ’76
17 Genie
®
9 Position ’85
18 Linear
®
Moore-O-Matic
®
8 Position ’76
19 Chamberlain
®
7 Position ’83-’89
Schéma A
Nombre de Marque Type/Couleur Année
Fois à de l’année
Appuyer sur Smart/Learn
bouton
1 Linear
®
MegaCode ’97-Actuel
2 Chamberlain
®
* Orange ’97-’05
3 Chamberlain
®
* Violet ’05-Actuel
4 Chamberlain
®
* Vert ’93-’96
5 Genie
®
Overhead Door
®
Intellicode ’95-’05
6 Genie
®
Overhead Door
®
Intellicode ’05-Actuel
7 Stanley
®
Secure Code ’98
9 Wayne Dalton
®
Rolling Code ’99
11 Chamberlain
®
* 9 Position ’90-’92
1-800-442-1255
Chamberlain, LiftMaster et Moore-O-Matic sont des marques de commerce de Chamberlain Group. Genie
est une marque de commerce d’Overhead Door Corporation. Overhead Door est une marque de commerce
d’Overhead Door Corporation. Linear est une marque de commerce de Linear Corporation. Master
Mechanic est une marque de commerce de TruServ. Sears est une marque de commerce de Sears &
Roebuck. Stanley est une marque de commerce de The Stanley Works. Wayne Dalton est une marque de
commerce de Wayne Dalton Corporation. Do It est une marque de commerce de Do It Best Corporation.
Appuyer sur le bouton
programme.
6
7
Programmation effectuée.
Appuyer sur le bouton
sélectionné pour faire un test.
Si l’unité ne fonctionne pas,
retourner à l’étape 3.
Presser et relâcher le
bouton “Smart/Learn”.
5
Sélectionner un bouton pour
programmer. Appuyer fois
sur le bouton en vous assurant
que LED arrête de clignoter
après chaque pression. Le code
est accepté lorsqu l’une des
choses suivantes se produit :
OU
OU
1
Voir le Schéma B afin de
voir combien de fois il faut
appuyer sur le bouton et
inscrire le nombre dans le
blanc de l’étape 5.
INTERRUPTEUR DIPBOUTON “SMART/LEARN”
Appuyer sur le bouton
programme.
6
7
Programmation effectuée.
Appuyer sur le bouton
sélectionné pour faire un test.
Si l’unité ne fonctionne pas,
retourner à l’étape 3.
3
Appuyer sur le bouton
“programme” jusqu’à ce
que LED s’allume.
2
1
Voir le Schéma A afin de
voir combien de fois il faut
appuyer sur le bouton et
inscrire le nombre dans le
blanc de l’étape 5.
REMARQUE : Votre ouvre-
porte apparaîtra peut-être
différent et vous aurez peut-être
à retirer la lentille de la lumière
pour avoir accès au bouton
“learn”.
*REMARQUE : LiftMaster, Do-It, Master Mechanic, Raynor, True Value et Sears Craftsman sont compatibles avec la
technologie Chamberlain.
Clic
www.LiftMaster.com
1211109853 7641 2
Indicateur LED
Bouton 1
Bouton 2
Bouton Programme
Batterie
Interrupteurs DIP
Couvercle de Batterie
Unité
Motrice
ON
Télécomande
existante
AVIS : Les règles de la FCC ou d’Industrie Canada (IC), ou les deux, interdisent tout ajustement ou toute
modification de ce récepteur et/ou de cet émetteur, sauf pour modifier le code ou pour
remplacer la pile. IL N’EXISTE AUCUNE AUTRE PIÈCE SUSCEPTIBLE D’ÊTRE ENTRETENUE PAR
L’UTILISATEUR.
Vérifié pour conformité avec les normes de la FCC POUR UTILISATION À LA MAISON OU AU BUREAU.
L’utilisation est sujette aux deux conditions ci-après : (1) ce dispositif ne peut causer des interférences
nuisibles, et (2) ce dispositif doit accepter toute interférence reçue, y compris une interférence pouvant
causer un fonctionnement non désiré.
ARRÊT
-
 1
1
-
 2
2


Edge 375LM Le manuel du propriétaire
- Catégorie
- Porte de garage
- Taper
- Le manuel du propriétaire
- Ce manuel convient également à
dans d''autres langues
- English: Edge 375LM Owner's manual
Autres documents
-
Chamberlain KLIK3U-BK2 Manuel utilisateur
-
Chamberlain 387LM Manuel utilisateur
-
Chamberlain Clicker KLIK2U Manuel utilisateur
-
Chamberlain MC100-P2 Mode d'emploi
-
-
-
-
LiftMaster 387LM Manuel utilisateur
-
-