Sony DAV-HDX465 Le manuel du propriétaire
- Catégorie
- Lecteurs DVD / Blu-Ray portables
- Taper
- Le manuel du propriétaire

©2007 Sony Corporation
3-099-783-41(1)
HDMI CONTROL
Guide
Operating Instructions
Mode d’emploi
GBUS
FR

2
US
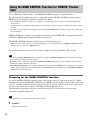
To use ‘BRAVIA’ Theatre Sync, set the HDMI CONTROL function as explained below.
By connecting Sony components that are compatible with the HDMI CONTROL function with an
HDMI cord (not supplied), operation is simplified as below:
– One-Touch Play: By pressing only H on the unit or remote, the TV turns on and is set for DVD input mode
automatically.
– System Audio Control: While watching TV, you can switch the sound to come out of either the TV or this system’s
speakers.
– System Power Off: When you turn the TV off by using the POWER button on the TV’s remote, the system turns
off automatically.
HDMI CONTROL is a mutual control function standard used by HDMI CEC (Consumer Electronics
Control) for HDMI (high-definition multimedia interface).
The HDMI CONTROL function will not operate in the following cases:
– When you connect this system to a component which is not correspond with Sony’s HDMI CONTROL function.
– A component does not have a HDMI terminal.
We recommend that you connect this system to products featuring ‘BRAVIA’ Theatre Sync.
Note
• Do not use the THEATRE SYNC button on the remote while the HDMI CONTROL function is active. For details,
see the operating instructions of the system.
• Depending on the connected component, the HDMI CONTROL function may not work. Refer to the operating
instructions supplied with the component.
• When [HDMI CONTROL] is set to [ON] without being connected by the HDMI cord (not supplied), you can not
switch to the TV input mode even if connected by SCART (EURO AV) cord. In this case, turn [HDMI CONTROL]
to [OFF] (European models only).
Preparing for the HDMI CONTROL function
To use the HDMI CONTROL function, make sure that this system is connected to your TV (which
should be correspond with HDMI CONTROL) by a HDMI cord (not supplied). Turn on the system and
your TV, and then switch the input selector on your TV so that the signal from the system appears on
the TV screen. Then set the respective HDMI CONTROL functions to on.
The following explanation is for this system. For details on TV setting, refer to the operating
instructions supplied with the TV.
Note
• Displayed items vary depending on the country model.
1 Press "/1.
The system turns on.
Using the HDMI CONTROL Function for ‘BRAVIA’ Theatre
Sync

3
US
GBUS
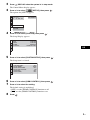
2 Press DISPLAY when the system is in stop mode.
The Control Menu display appears.
3 Press X/x to select [SETUP], then press .
The options for [SETUP] appear.
4 Press X/x to select [CUSTOM], then press .
The Setup Display appears.
5 Press X/x to select [CUSTOM SETUP], then press .
The Setup item is selected.
6 Press X/x to select [HDMI CONTROL], then press .
7 Press X/x to select the setting.
The default setting is underlined.
•[OFF
]: sets the [HDMI CONTROL] function to off.
• [ON]: sets the [HDMI CONTROL] function to on.
8 Press .
1 2
(
2 7
)
QUICK
QUICK
RESET
DVD VIDEO
BNR
T
0 : 0 0 : 0 2
1 8
(
3 4
)
CUSTOM
LANGUAGE SETUP
MENU:
AUDIO:
SUBTITLE:
ORIGINAL
AUDIO FOLLOW
OSD:
ENGLISH
ENGLISH
CUSTOM SETUP
HDMI CONTROL:
PAUSE MODE:
OFF
AUTO
OFF
ON
TRACK SELECTION:
MULTI-DISC RESUME:
OFF
AUDIO DRC:
OFF
AUDIO (HDMI):

4
US
Watching DVD by a single button press
(One-Touch Play)
Press H on the unit or remote.
When the system starts playback, the TV is turned on simultaneously and, the TV input is automatically
switched to DVD input.
The TV input will also switch to DVD input automatically, in the following cases:
– You place a DVD disc on the tray, and then press A.
– You press DISC SKIP on the remote or DISC 1-5 on the unit to load a disc (disc changer models only).
Note
• When a CD/DATA-CD is loaded into the unit, the One-Touch Play function does not work. However, when you
insert a disc in the system whose power is standby, the TV turns on regardless of disc.
• When the “DMPORT” function (depending on the model, “DMPORT1” or “DMPORT2” appears) is active, One-
Touch Play will not work.
• Depending on the TV, the start of the content may not be output.
Ti
p
• One-Touch Play is operated with System Audio Control at the same time.
Enjoying the TV sound from the speakers in this system
(System Audio Control)
You can enjoy the TV sound in this system by easy operation.
While watching the TV and the function is swithed to “TV” (depending on the model, “TV/VIDEO”
appears), TV sound is output from the system speakers. You can also operate this from the TV menu.
For details, see the operating instructions of TV.
Note
• When the TV is turned on before turning on the system, the TV sound will not output for a moment.
• If the function is set to “DVD” when you turn on the system, One-Touch Play is activated. In this case, set the
function to “TV” (depending on the models, “TV/VIDEO” appears).
• When you select the TV program (the active picture is highlighted) or return to the TV mode while watching the
TV and a DVD by PAP (picture and picture) mode, the DVD playback will stop.
• To output the sound from the TV, set [AUDIO (HDMI)] to [ON] on the system. For details, see the operating
instructions of the system.

5
US
GBUS
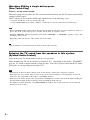
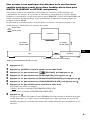
To Enjoy STB (Set Top Box) digital sound or digital satellite tuner sound
from the system (Models with DIGITAL IN (COAXIAL or OPTICAL) jack
only)
You can enjoy digital sound of STB or a digital satellite tuner from speakers of this system by
performing to following connections and settings. Connect to a TV with the HDMI IN jacks by an
HDMI cord (not supplied) (make sure to connect from the smallest number). The names of HDMI
inputs in the following illustration are examples.
By connecting as the following illustration, you can enjoy Multi Channel Broadcasted Audio from the
speakers of the system.
1 Press "/1.
2 Press DISPLAY when the system is in stop mode.
3 Press X/x to select [SETUP], then press .
4 Press X/x to select [CUSTOM], then press .
5 Press X/x to select [CUSTOM SETUP], then press .
6 Press X/x to select [STB SYNCHRO], then press .
7 Press X/x to select the setting.
The default setting is underlined.
•[OFF
]: sets the [STB SYNCHRO] function to off.
• [ON]: sets the [STB SYNCHRO] function to on.
8 Press .
The setting is made. Select the HDMI input of your TV connected to the STB or digital satellite
tuner. The system accepts the signal from the SAT/CABLE jacks automatically and outputs the
sound of the STB or digital satellite tuner from the speakers of the system.
Ti
p
• You can operate this function on STB or a digital satellite tuner which is not correspond with HDMI CONTROL.
to HDMI 1 (HDMI cord)
Video signal
Sound signal
DAV STB
TV
Digital Sound (Coaxial/Optical cord)
Sets the [STB SYNCHRO] to [ON].
to HDMI 2 (HDMI cord)


ESFR

2
FR
Pour utiliser ‘BRAVIA’ Theatre Sync, réglez la fonction COMMANDE HDMI de la manière
expliquée ci-dessous.
En raccordant les composants Sony compatibles avec la fonction COMMANDE HDMI à l’aide d’un
cordon HDMI (non fourni), l’opération est simplifiée comme ci-dessous :
– Lecture une Touche : en appuyant simplement sur la touche H de l’appareil ou de la télécommande, le téléviseur
est mis sous tension et est automatiquement réglé sur le mode d’entrée DVD.
– Commande du son du système : lorsque vous regardez la télévision, vous pouvez spécifier si vous voulez que le
son soit reproduit par le téléviseur ou par les enceintes de ce système.
– Extinction automatique du système : lorsque vous mettez le téléviseur hors tension à l’aide de la touche POWER
de sa télécommande, le système se met hors tension automatiquement.
La COMMANDE HDMI est une norme de fonction de commande mutuelle utilisée par HDMI CEC
(Consumer Electronics Control) pour l’interface HDMI (High-Definition Multimedia Interface).
La fonction COMMANDE HDMI ne fonctionne pas dans les cas suivants :
– Lorsque vous raccordez ce système à un composant qui ne prend pas en charge la fonction COMMANDE HDMI
de Sony.
– Avec un composant qui ne possède pas de borne HDMI.
Nous vous recommandons de raccorder ce système à des produits équipés de la fonction ‘BRAVIA’
Theatre Sync.
Remarque
• N’utilisez pas la touche THEATRE SYNC de la télécommande alors que la fonction COMMANDE HDMI est
active. Pour plus d’informations, reportez-vous au mode d’emploi du système.
• En fonction du composant connecté, il se peut que la fonction COMMANDE HDMI ne fonctionne pas. Consultez
le mode d’emploi fourni avec le composant.
• Si la fonction [COMMANDE HDMI] est réglée sur [OUI] alors que la connexion n’a pas été établie via le cordon
HDMI (non fourni), vous ne pouvez pas passer en mode d’entrée TV, même si la connexion est établie à l’aide d’un
cordon SCART (EURO AV). Dans ce cas, réglez [COMMANDE HDMI] sur [NON] (modèles européens
uniquement).
Préparation de la fonction COMMANDE HDMI
Pour utiliser la fonction COMMANDE HDMI, assurez-vous que le système est raccordé à votre
téléviseur (qui doit prendre en charge la COMMANDE HDMI) via un cordon HDMI (non fourni).
Mettez sous tension le système et votre téléviseur, puis commutez le sélecteur d’entrée de votre
téléviseur de manière à ce que le signal du système apparaisse sur l’écran du téléviseur. Activez ensuite
les fonctions COMMANDE HDMI respectives.
L’explication suivante est valable pour le système. Pour plus de détails sur le réglage du téléviseur,
consultez le mode d’emploi qui l’accompagne.
Remarque
• Les éléments affichés varient en fonction du modèle du pays.
Utilisation de la fonction COMMANDE HDMI pour ‘BRAVIA’
Theatre Sync

3
FR
FRFR
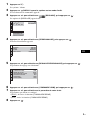
1 Appuyez sur "/1.
Le système s’allume.
2 Appuyez sur DISPLAY quand le système est en mode d’arrêt.
L’écran du menu de commande apparaît.
3 Appuyez sur X/x pour sélectionner [REGLAGE], puis appuyez sur .
Les options de [REGLAGE] apparaissent.
4 Appuyez sur X/x pour sélectionner [PERSONNALISE], puis appuyez sur .
Le menu d’installation apparaît.
5 Appuyez sur X/x pour sélectionner [REGLAGE PERSONNALISE], puis appuyez sur .
Le paramètre de réglage est sélectionné.
6 Appuyez sur X/x pour sélectionner [COMMANDE HDMI], puis appuyez sur .
7 Appuyez sur X/x pour sélectionner le paramètre de votre choix.
Le paramètre par défaut est souligné.
•[NON
] : désactive la fonction [COMMANDE HDMI].
• [OUI] : active la fonction [COMMANDE HDMI].
8 Appuyez sur .
1 2
(
2 7
)
RAPIDE
RAPIDE
REINITIALISATION
DVD VIDEO
BNR
T
0 : 0 0 : 0 2
1 8
(
3 4
)
PERSONNALISE
CHOIX DE LA LANGUE
MENU:
AUDIO:
SOUS-TITRE:
ORIGINAL
IDEM AUDIO
ECRANS:
ANGLAIS
ANGLAIS
REGLAGE PERSONNALISE
COMMANDE HDMI:
MODE DE PAUSE:
NON
AUTO
NON
OUI
SELECTION DE PLAGE:
REPRISE LECTURE:
NON
AUDIO DRC:
NON
AUDIO (HDMI):

4
FR
Lecture d’un DVD par simple appui de touche
(Lecture une Touche)
Appuyez sur la touche H de l’appareil ou de la télécommande.
Lorsque la lecture démarre, le téléviseur est mis sous tension automatiquement et l’entrée du téléviseur
bascule automatiquement vers l’entrée DVD.
L’entrée du téléviseur passe elle aussi automatiquement en mode d’entrée DVD dans les cas suivants :
– Vous posez un DVD sur le plateau, puis appuyez sur A.
– Vous appuyez sur la touche DISC SKIP de la télécommande ou sur une touche DISC 1-5 de l’appareil pour charger
un disque (modèles dotés d’un changeur de disque uniquement).
Remarque
• Lorsqu’un CD/DATA-CD est chargé dans l’appareil, la fonction Lecture une Touche ne fonctionne pas. Toutefois,
lorsque vous insérez un disque dans le système en mode de veille, le téléviseur s’allume quel que soit le disque.
• Si la fonction « DMPORT » (« DMPORT1 » ou « DMPORT2 » apparaît selon le modèle) est activée, la Lecture
une Touche ne fonctionne pas.
• En fonction du téléviseur, le début du contenu risque de ne pas être reproduit.
Conseil
• La fonction Lecture une Touche s’utilise simultanément avec la fonction Commande du son du système.
Ecoute du son du téléviseur à partir des enceintes du système
(Commande du son du système)
Vous pouvez écouter aisément le son du téléviseur sur ce système.
Lorsque vous regardez la télévision alors que la fonction est réglée sur « TV » (« TV/VIDEO » apparaît
selon le modèle), le son du téléviseur est reproduit par les enceintes du système. Vous pouvez
également effectuer cette procédure à partir du menu du téléviseur. Pour plus d’informations, reportez-
vous au mode d’emploi du téléviseur.
Remarque
• Si vous mettez le téléviseur sous tension avant le système, le son du téléviseur n’est pas reproduit avant un certain
temps.
• Si la fonction est réglée sur « DVD » lorsque vous mettez le système sous tension, la fonction Lecture une Touche
est activée. Dans ce cas, réglez la fonction sur « TV » (« TV/VIDEO » apparaît selon le modèle).
• Lorsque vous sélectionnez le programme TV (l’image active apparaît en surbrillance) ou lorsque vous revenez au
mode TV tout en regardant la télévision et un DVD en mode PAP (picture and picture), la lecture du DVD s’arrête.
• Pour reproduire le son provenant du téléviseur, réglez [AUDIO (HDMI)] sur [OUI] sur le système. Pour plus
d’informations, reportez-vous au mode d’emploi du système.

5
FR
FRFR
Pour écouter le son numérique d’un décodeur ou le son d’un tuner
satellite numérique à partir du système (modèles dotés d’une prise
DIGITAL IN (COAXIAL ou OPTICAL) uniquement)
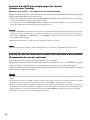
Vous pouvez écouter le son numérique d’un décodeur ou d’un tuner satellite numérique par
l’intermédiaire des enceintes de ce système en effectuant les raccordements et réglages suivants.
Etablissez le raccordement à un téléviseur dotés de prises HDMI IN à l’aide d’un cordon HDMI (non
fourni) (raccordez en commençant par le plus petit numéro). L’illustration suivante propose des
exemples d’entrées HDMI.
En effectuant les raccordements de la manière illustrée ci-dessous, vous pouvez écouter le son
multicanaux par l’intermédiaire des enceintes du système.
1 Appuyez sur "/1.
2 Appuyez sur DISPLAY quand le système est en mode d’arrêt.
3 Appuyez sur X/x pour sélectionner [REGLAGE], puis appuyez sur .
4 Appuyez sur X/x pour sélectionner [PERSONNALISE], puis appuyez sur .
5 Appuyez sur X/x pour sélectionner [REGLAGE PERSONNALISE], puis appuyez sur .
6 Appuyez sur X/x pour sélectionner [SYNCHRONISATION STB], puis appuyez sur .
7 Appuyez sur X/x pour sélectionner le paramètre de votre choix.
Le paramètre par défaut est souligné.
•[NON
] : désactive la fonction [SYNCHRONISATION STB].
• [OUI] : active la fonction [SYNCHRONISATION STB].
8 Appuyez sur .
Le réglage est terminé. Sélectionnez l’entrée HDMI du téléviseur raccordé au décodeur ou au tuner
satellite numérique. Le système accepte automatiquement le signal provenant des prises SAT/
CABLE et reproduit le son du décodeur ou du tuner satellite numérique par l’intermédiaire de ses
enceintes.
vers HDMI 1
(cordon HDMI)
Signal vidéo
Signal sonore
DAV Décodeur
Téléviseur
Son numérique (cordon coaxial/optique)
Réglez [SYNCHRONISATION STB] sur [OUI].
vers HDMI 2
(cordon HDMI)

Sony Corporation Printed in China
3-099-783-41(1)
Remarque
• Vous pouvez commander cette fonction sur un décodeur ou un tuner satellite numérique qui n’est pas équipé d’une
COMMANDE HDMI.
Remarque
• Pour activer la fonction [SYNCHRONISATION STB], commencez par régler [COMMANDE HDMI] sur [OUI]
(voir page 2).
• Selon le téléviseur, cette fonction risque de ne pas fonctionner lorsqu’un décodeur ou un tuner satellite numérique
est raccordé à la prise HDMI 1 du téléviseur.
-
 1
1
-
 2
2
-
 3
3
-
 4
4
-
 5
5
-
 6
6
-
 7
7
-
 8
8
-
 9
9
-
 10
10
-
 11
11
-
 12
12


Sony DAV-HDX465 Le manuel du propriétaire
- Catégorie
- Lecteurs DVD / Blu-Ray portables
- Taper
- Le manuel du propriétaire
dans d''autres langues
- English: Sony DAV-HDX465 Owner's manual