
The Lock/Alarm 'Mini' is designed to help protect your valuable possessions from theft in 2 ways: (1) If the cable is cut, or, (2) if the
movement sensor is set the alarm will also sound if there is any movement of the lock.
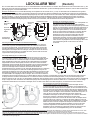
Battery Installation: The Lock/Alarm 'Mini' requires four LR44 (1.5 volt) batteries. For security, the battery cover can only be opened when
the unit is in the "unlocked" mode. Firstly set the dials to the correct combination code (the factory preset is 0-0-0). Then push down the
Lock Release Button and hold down. At the same time push the battery cover up, as shown on figure 1 below. Insert the batteries into
the compartment and then replace the battery cover. You will need to once again hold down the Lock Release Button while you slide the
battery cover back in place. Let go of the Lock Release Button and ensure the battery cover is secure..
Setting the Combination:
When new, the combination is preset at 0-0-0. To change
the code set the dials at the current combination. If the
cable is locked in place push down the Lock Release
Button to release the cable. Whilst pressing the Cable
Trigger Button pull out enough cable so the plug end of
the cable can touch the Combination Set Button at the
base of the unit. Firmly push in the Combination Set
Button with the plug end of the cable (as shown if figure 2)
and turn the dials to your desired combination. Then push
the Lock Release Button down until the end of the
Combination Set Button is back in its original position.
The new combination is now set and ready to use.
Lock Release
Button
LED Light
Combination
Dials
Combination
Set Button
Movement
Sensor
Activation
Button
Battery Cover
Cable
Trigger
Button
Siren
Using the Lock/Alarm 'Mini'
With the Lock/Alarm 'Mini' in the "unlocked" mode, press the Cable Trigger
Button and pull out as much steel cable as required. Guide the cable around
the item(s) you wish to protect and preferably also an immovable object such
as a post or railing (to prevent your items from being easily snatched by a
thief). Insert the plug end of the cable into the lock hole on the top of the unit
and firmly push down until it clicks in place. Turn the dials to scramble the
combination. If the motion sensor feature is required, after locking the unit
press the Movement Sensor Activation Button on the front of the unit. The
LED light will begin flashing and the unit will make a "beep" sound. You have
approximately 5 seconds to leave the Lock/Alarm 'Mini' and your item(s)
before the unit becomes armed. After this period, if the unit detects any
movement then the unit will "beep" for several seconds before the alarm
starts sounding. The alarm will then continue to sound for approximately
30 seconds before resetting. To unlock the Lock/Alarm 'Mini' simply set the
dials to the correct combination and press down the Lock Release Button
until the plug end of the cable ejects out of the lock hole. If the movement sensor
is set you have approximately 5 seconds to conduct this procedure before the
alarm sounds. When the cable unlocks the alarm automatically disarms.
Low Battery Indication and Power Saving
The LED will normally flash a red color, however if the battery condition
is low the LED will flash yellow. When battery level is low replace
batteries immediately before using. To conserve batteries, when not in
use always unlock the unit and unplug the cable end from the lock hole.
Using the Computer Slot Adapter
To enable you to secure a laptop computer you will require the computer
slot adapter. Firstly locate the security slot on your computer (this is
normally located on the side or the back of the computer). Turn the
flattened end of the adapter until it springs partially out of the cylinder.
Slide the small 'T' shaped end of the adapter into the security slot on
your computer until it has pushed in as far as it will go. Rotate the
adapter 90 degress so the 'T' shaped end engages in the security slot
and the adapter cannot be pulled out. Push in the flattened knob of the
adaptor (ensuring the prongs at the other end slide into the security slot)
and turn 180 degrees until the holes in the side of the adapter are
aligned. Thread the steel cable of Lock/Alarm 'Mini' through the holes
in the computer slot adapter and loop the cable around an immovable
object such as the leg of a heavy table, before locking the end of the
cable in place. See "Using the Lock/Alarm 'Mini" section.
LOCK/ALARM 'MINI' (English)
Figure 1
Figure 2
TROUBLESHOOTING
Alarm doesn’t sound or only makes a “clicking” sound when activated
Check battery life, and replace batteries if necessary. If battery life is OK, remove
and refit batteries to reset.
The steel cable will not totally retract back into the main unit
Whilst pressing the cable trigger button gently pull some of the cable out again
and then allow it to retract back slowly into the unit. Repeat several times if
necessary pulling out less cable each time.
Email [email protected] or check the website www.lockalarm.com for
more troubleshooting hints.
Push
Push
Push
Hold
down
Disclaimer: Lock/Alarm’Mini’ has been designed as a deterrent to theft. The manufacturer
or supplier cannot accept any liability for personal injury, property damage or loss.

Le Verrou/Alarme “Mini” est conçu pour vous aider à protéger du vol vos biens de valeur de 2 manières: (1) si le câble est coupé, l’alarme
se mettra à sonner, (2) si le senseur de mouvement est programmé, l’alarme sonnera aussi si le verrou est manipulé.
Le Verrou/Alarme “Mini” fonctionne avec 4 piles LR44 (1.5V). Par mesure de sécurité, le compartiment à piles ne peut être ouvert que
lorsque l'unité est en mode "déverrouillé". Programmez d'abord le code sur les cadrans (le réglage par défaut est 0-0-0). Ensuite appuyez
sur le bouton d’ouverture du verrou et maintenez-le enfoncé. En même temps, soulevez le couvercle du compartiment à piles, comme
indiqué sur la figure ci-contre. Insérez les piles dans le compartiment et ensuite remettez le couvercle. Maintenez enfoncé le bouton
d’ouverture du verrou pendant que vous remettez le couvercle en place. Relâchez le bouton d’ouverture du verrou et vérifiez que le
couvercle du compartiment à piles est bien fermé.
Réglage de la combinaison
Pour changer le code, réglez les cadrans sur la
combinaison souhaitée. Si le câble est bloqué, appuyez
sur le bouton d’ouverture du verrou pour libérer le câble.
Pendant que vous appuyez sur le bouton de libération
du câble, sortez suffisamment de câble pour que
l'extrémité du câble puisse toucher le bouton de
combinaison à la base de l'unité. Introduisez fermement
l’extrémité du câble dans le bouton de combinaison et
tournez les cadrans sur votre combinaison souhaitée.
Ensuite appuyez sur le bouton d'ouverture du verrou
jusqu'à ce que l'extrémité du bouton de combinaison
revienne à sa position originale. La nouvelle combinaison
est maintenant programmée et prête à l’utilisation.
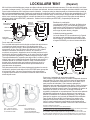
LED
Cadrans à
combinaison
Bouton de réglage
de combinaison
Sirène
Indication de batterie faible et d'économie d'énergie
Le LED clignotera normalement en rouge, cependant si les piles sont faibles,
il clignotera en jaune. Lorsque le niveau de batterie est faible, remplacez
immédiatement les piles avant l’utilisation. Pour conserver les piles, lorsque
vous ne vous servez pas du verrou, déverrouillez-le et débranchez l’extrémité
du câble de la serrure.
Utilisation du Verrou/Alarme “Mini”
Avec le Verrou/Alarme “Mini” en mode “déverrouillé", appuyez sur le bouton
de libération du câble et sortez autant de câble que nécessaire. Guidez le
câble autour de(des) l’objet(s) que vous souhaitez protéger. Insérez l’extrémité
du câble dans la serrure sur le dessus de l'unité et poussez fermement vers le
bas jusqu'à l'enclenchement. Tournez les cadrans pour brouiller la combinaison.
Si vous souhaitez utiliser le senseur de mouvement, après avoir verrouillé
l’unité appuyez sur le bouton de déclenchement du senseur à l’avant de l’unité.
Le voyant LED clignotera et l’unité émettra un "bip"sonore. Vous avez environ
5 secondes pour quitter le Verrou/Alarme "Mini" et votre(vos) objet(s) avant que
l’unité ne soit armée. Après cette période, si l’unité détecte un mouvement, alors
elle émettra un « bip » sonore pendant plusieurs secondes avant que l’alarme ne
se mette à sonner. Pour déverrouiller le Verrou/Alarme “Mini” il suffit de placer
les cadrans sur la combinaison correcte et d’appuyer sur le bouton d’ouverture du
verrou jusqu’à ce que l’extrémité du câble soit éjectée de la serrure. Si le senseur de mouvement est programmé, vous avez environ 5
secondes pour effectuer cette procédure avant que l'alarme ne se mette à sonner. Lorsque le câble est déverrouillé, l’alarme se désarme
automatiquement.
DEPANNAGE
L’alarme ne sonne pas ou ne produit qu’un son de déclic en l’activant:
Vérifiez l’état des piles et remplacez-les si nécessaire. Si les piles sont encore bonnes,
sortez-les et remettez-les pour un nouveau réglage.
Le câble en acier ne se rétracte pas complètement dans l’unité principale
Tout en appuyant sur le bouton de libération du câble, ressortez doucement un peu de câble et
ensuite laissez-le se rétracter lentement dans l’unité. Répétez l’opération plusieurs fois si
nécessaire en sortant chaque fois moins de câble.
Envoyez un courrier électronique à [email protected] ou consultez le site internet
www.lockalarm.com
LOCK/ALARM MINI a été conçue pour décourager le vol. Les fabricants et fournisseurs
ne peuvent pas accepter la responsabilité des lésions personnelles, vol ou dégâts,
délibérés ou accidentels.
VERROU/ALARME 'MINI' (Français)
Réglage de la combinaison: Introduisez fermement l’extrémité
du câble dans le bouton de combinaison et tournez les cadrans
sur votre combinaison souhaitée. Ensuite appuyez sur le bouton
d'ouverture du verrou jusqu'à ce que l'extrémité du bouton de
combinaison revienne à sa position originale.
Bouton
d’ouverture
Bouton
de
libération
du câble
Bouton
du senseur
de
mouvement
Compartiment à piles
Pousser
Pousser
Pousser
Tenir

Der Lock Alarm MINI wurde entwickelt, um Sie vor dem Diebstahl Ihres wertvollen Besitzes zu schützen. Dies funktioniert auf zwei verschiedene Arten: (1) Der
Alarm ertönt wenn das Kabel durchschnitten wird oder das Gehäuse attackiert wird. (2) Wenn der Bewegungssensor aktiviert ist, wird der Alarm zusätzlich bei
jeder Bewegung des Lock Alarm MINI ertönen.
Einsetzen der Batterien: Der Lock Alarm Mini benötigt vier Knopfzellen mit der Nummer LR 44 (1,5 Volt). Zur Sicherheit kann das Batteriefach nur geöffnet
werden, wenn der Lock Alarm MINI im unversperrten Zustand ist. Zuerst bitte den richtigen Kombinationscode eingeben. Bei Lieferung ist die Voreinstellung
auf „000“ gesetzt. Anschließend den Schloss-Entriegelungsknopf nach unten drücken und in der Position halten. Zum selben Zeitpunkt den Batteriefachdeckel
nach oben schieben – so wie in nebenstehender Zeichnung gezeigt. Daraufhin die Batterien einsetzen und den Batteriefachdeckel wieder aufschieben.
Während man den Batteriefachdeckel wieder nach unten drückt, um ihn wieder zu schließen, bitte den Schloss- Entriegelungsknopf nach unten drücken.
Anschließend den Schloss-Entriegelungsknopf wieder loslassen und sicherstellen, daß der Batteriefachdeckel wieder eingerastet ist.
Einstellen des Kombinations-Schlosses
Bei Lieferung ist das Zahlenschloss auf „000“ voreingestellt. Um
den Zahlencode zu ändern, bitte die aktuelle Kombination
eingeben. Daraufhin den Schloss-Entriegelungsknopf nach unten
drücken, um sicherzugehen, daß das Kabel nicht eingerastet ist.
Während man den Freigabeknopf für das Kabel drückt, soviel
Kabel wie möglich ausziehen, um den Kombinations-Einstell-
Knopf am unteren Ende des Gehäuses zu erreichen. Mit dem
Ende des Kabels fest in den Kombinations-Einstellknopf
hineindrücken, damit er mit einem kleinen Klick einrastet.
Anschließend den gewünschten Kombinations-code am
Zahlenschloss einstellen, dann den Schloss-Entriegelungsknopf
nach unten drücken, damit der Kombinations-Einstellknopf
wieder in seine ursprüngliche Position zurückspringt. Nun ist die
neue Kombination gesetzt und Sie können das Schloss
verwenden.
LED Licht
Kombination
zahlen
Kombinations-
Einstell-Knopf
Sirene
Schonung der Batterie und Funktion der Batteriestandsanzeige
Normalerweise leuchtet die kleine LED-Lampe an der Vorderseite des Gehäuses
in roter Farbe, ist jedoch der Batteriezustand schon sehr schwach, leuchtet diese
LED-Lampe in gelber Farbe. Ist der Batterielevel bereits sehr gering, tauschen Sie
unbedingt die Batterien vor Benutzung sofort aus. Um Batterien zu sparen und die
Nutzungsdauer dementsprechend zu verlängern, entriegeln Sie immer das Schloss,
wenn es nicht in Verwendung ist, und stellen Sie sicher, daß das Kabel in der dafür
vorgesehenen Öffnung nicht eingerastet ist.
Die richtige Benützung des Lock Alarm MINI
In unversperrtem Zustand bitte den Kabel-Freigabeknopf drücken und das Kabel
soweit wie möglich ausziehen. Nun das Kabel um das zu schützende Objekt wickeln.
Um zu verhindern daß Ihr zu schützendes Objekt von Dieben in einfacher Art und
Weise weggetragen werden kann, wickeln Sie das Kabel gleichzeitig um befestigte
Gegenstände wie einen Laternenpfahl, eine Säule oder andere nicht verrückbare
Gegenstände. Drücken Sie bitte das Ende des Kabels in die zur Schlossverriegelung
vorgesehene Öffnung am oberen Ende des Gehäuses kräftig hinunter, bis man ein
kurzes und eindeutiges Klicken wahrnimmt. Anschließend die Zahlen des
Kombinationsschlosses verstellen. Um den optionalen Bewegungssensor zu aktivieren,
drücken Sie nach Versperren des Schlosses den Bewegungssensor-Knopf an der
Vorderseite des Gehäuses. Das LED-Licht beginnt anschließend zu leuchten und gibt
gleichzeitig einen Piepston von sich. Man hat daraufhin ca. 5 Sekunden Zeit um den
Lock Alarm MINI in die endgültige Position zu bringen, bevor das Schloss aktiviert ist.
Anschließend wird bei jeder Bewegung des Lock Alarm MINI der Alarmton ausgelöst. Vorangekündigt wird dieser Alarmton durch Ertönen eines Piepstons
für einige Sekunden. Der Alarm wird daraufhin für ca. 30 Sekunden ertönen und danach automatisch abgeschaltet, um für jede weitere Bewegung des
Schlosses aktiviert zu sein. Um den Lock Alarm MINI zu deaktivieren, bitte das Zahlen-schloss auf die richtige Position drehen und den Schloss- Entriegelungs
knopf so lange nach unten drücken bis das Kabel herausspringt. Wenn der Bewegungssensor aktiviert ist, haben Sie ca. 5 Sekunden Zeit, um die richtige
Kombination einzustellen und das Schloss zu entriegeln, bevor der Alarm ertönt. Wenn das Kabel entriegelt ist, ist automatisch der Alarm deaktiviert.
Die Verwendung des Computer-Slot-Adapters
Um ein Notebook mit dem Lock Alarm MINI zu sichern benötigen Sie den
Computer-Slot-Adapter, der jeder Packung beigefügt ist. Zuerst lokalisieren Sie
bitte den Sicherheits-Schacht an Ihrem Computer, der sich normalerweise an der
Seite bzw. Rückseite des Notebooks befindet. Drehen Sie das abgeflachte Ende
des Adapters, bis es teilweise aus dem Zylinder herausspringt. Schieben Sie das
schmale „T-Ende“ des Adapters in den Sicherheits- Schacht Ihres Computers, so
lange, bis Sie es nicht mehr weiter hineindrücken können. Drehen Sie
anschließend den Adapter um 90 Grad, solange bis das T-Ende im Sicherheits-
Schacht des Computers vollkommen eingerastet ist und nicht mehr
herausgezogen werden kann. Drücken Sie die flache Seite des Adapters hinein
und drehen Sie sie um 180 Grad, so lange bis die beiden seitlichen Löcher des
Adapters genau übereinander liegen. Stecken Sie das Stahlkabel des Lock Alarm
MINI durch diese Löcher im Computer-Slot-Adapter und wickeln Sie das Kabel
rund um unbewegliche Objekte wie Säulen, Geländer od er fest in der Wand
verankerte Gegenstände. Anschließend stecken Sie wieder das Ende des
Stahlseiles in die zur Verriegelung vorgesehene Öffnung am oberen Ende des
Gehäuses (siehe unter: „Die richtige Benützung des Lock Alarm MINI“).
LOCK/ALARM 'MINI' (Deutsch)
Schloss-
Entriegelungs
knopf
Kabel-
Freigabe
knopf
Bewegungs
sensor-
Knopf
Batteriefach-Deckel
Stoß
Stoß
Stoß
Halt
FEHLERBEHEBUNG
Wenn der Alarm nicht ertönt oder nur ein klickendes Geräusch verursacht, wenn er aktiviert ist:: Überprüfen Sie die Batterien und ersetzen Sie sie gegebenenfalls durch neue. Wenn
die Batterien in Ordnung sind, entfernen Sie diese kurz und setzen Sie sie wieder ein um das Gerät wieder in den Ausgangszustand zurückzubringen.
Wenn sich das Stahlkabel nicht vollständig in das Gehäuse zurückziehen läßt: Während man den Kabel-Entriegelungsknopf hinunterdrückt, ziehen Sie das Kabel leicht aus dem
Gehäuse ein Stück heraus und lassen Sie es anschließend wieder leicht in das Gehäuse zurückgleiten. Wiederholen Sie diesen Vorgang einige Male, bis sich das Kabel zum Großteil
in das Gehäuse zurück-gezogen hat.
Einstellen des Kombinations-Schlosses

Mini Lock Alarm está diseñada para proteger tus objetos valiosos de robos de dos diferentes maneras:1 Si el cable de la Mini Lock Alarm
es cortado, la alarma sonará, 2 Si el sensor de movimiento está activado, la alarma sonará ante cualquier movimiento del Mini Lock Alarm
Como Instalar las Baterías: Mini Lock Alarm necesita 4 baterías , La tapa que cubre las baterías puede ser únicamente abierta cuando la
Mini Lock Alarm está desbloqueada. Establece la combinación de la alarma de la Mini Lock Alarm, de fábrica viene preestablecido (0-0-0),
Pulsa el botón RELEASE hacia abajo para desbloquear la alarma y manténlo abajo. Al mismo tiempo, empuja la tapa de baterías hacia
arriba, como muestra el esquema adjunto, Introduce las baterías es su compartimento y vuelve a poner la tapa, para cerrarla debes de
pulsar hacia abajo el botón RELEASE y mantenerlo . Suelta el botón de desbloqueo RELEASE y comprueba que la tapa está
correctamente cerrada
Establecer la combinación
La combinación de Mini Lock Alarm, de fábrica viene
preestablecido (0-0-0), para cambiarla introduzca la
combinación inicial Presiona el botón RELEASE hacia
abajo como indica la ilustración 2, al liberar el cable de
acero coger la punta de este y alargarlo
Indicador de baterías agotadas
La Luz de Alarma LED es normalmente roja, Cuando
las baterías están agotadas la luz es amarilla. Para
ahorrar baterías, si no está utilizando la alarma abra
el seguro RELEASE y no cierre el extremo del cable
LED Luz
Combinación
Botón para
cambiar combinación
Sirena
Como usar el Mini Lock Alarm
Con la unidad abierta presiona el botón del enrollador del cable de acero
y extraiga hasta donde sea necesario. Guíe el cable entre el/los
elementos que quiera proteger y átelos preferiblemente a un objeto fijo,
para prevenir el robo, cierre el extremo del cable en el orificio superior,
cambie la combinación moviendo los números, Si el sensor de
movimiento es necesario, después de cerrar la unidad presione el botón
de Activación del Sensor de Movimiento, en el centro frontal de la unidad,
la luz roja empezará a parpadear y la alarma comenzará a sonar “beep”.
Tiene aproximadamente 5 segundos para dejar el Mini Lock Alarm y el/los
objeto/s antes que la unidad quede armada. Después de este periodo, si
la alarma detecta un movimiento sonará un "beep" intermitentemente
durante varios segundos antes que la alarma comience a sonar. La
alarma entonces continuará sonando durante aproximadamente 30
segundos antes de rearmarse.
Para desconectar la Mini Lock Alarm simplemente introduzca la correcta
combinación, presione hacia abajo el botón RELEASE hasta que expulse
el extremo del cable, si el sensor de movimiento está activado tiene
5 segundos para introducir la combinación cuando el cable se libera la
alarma deja de sonar.
Como usar el adaptador de ranura para ordenador
Para proteger un ordenador portàtil, necesitará el adaptador de ranura
para ordenador. En primer lugar, localice la ranura de seguridad del
ordenador (normalmente, se encuentra en uno de los lados o en la
parte posterior del ordenador). Gire el extremo aplanado del
adaptador hasta que salte parcialmente del cilindro. Deslice el extremo
pequeño en forma de T del adaptador e introdúzcalo en la ranura de
seguridad del ordenador hasta el tope. Gire el adaptador 90 grados de
manera que el extremo en forma de T se acople a la ranura de
seguridad y el adaptador no se pueda extraer. Pulse el botón aplanado
del adaptador (asegúrese de que los dientes en el otro extremo se
deslicen e introduzcan en la ranura de seguridad) y gire 180 grados
hasta que los agujeros en el costado del adaptador estén alineados.
Pase el cable de acero del Mini Lock Alarm por los agujeros del
adaptador de ranura del ordenador y átelo alrededor de un objeto
inmóvil –como la pata de una mesa pesada– antes de asegurar el
extremo del cable. Véase el apartado “Como usar el Mini Lock Alarm”.
Solución de Problemas Frecuentes
La alarma no suena o sólo hace un "clic" cuando se activa:
Compruebe las baterías, Si la batería esta bien extraiga y reinserte las baterías para rearmarlo
El cable de acero no se enrolla correctamente dentro de la unidad:
Vuelva a repetir la operación de recogerlo varias veces y cada vez con menos cable
Si es necesario, vuelva a repetir la operación de recoger el cable cada vez con menos cable
Si continua teniendo problemas envíe un e-mail a [email protected] o contacte en la
web www.lockalarm.com para más ayudas sobre otros problemas también puede contactar
LOCK/ALARM 'MINI' (Espanol)
Paso 1, Presionar el Botón
para cambiar la combinación
con el extremo del cable
Paso 2, Establezca la
combinación deseada y
pulse el botón RELEASE
(Activar /Desactivar) hacia abajo
Botón Activado
Desactivado
Botón
Cable
Retráctil
Botón de
Activación
del Sensor
Movimiento
Tapa Batería
Ilustración 1
Ilustración 2
Empujar
Mant
-ener
-
 1
1
-
 2
2
-
 3
3
-
 4
4


dans d''autres langues
- English: LOCK ALARM Mini User manual
- español: LOCK ALARM Mini Manual de usuario
- Deutsch: LOCK ALARM Mini Benutzerhandbuch
Autres documents
-
Master Lock 4605D Le manuel du propriétaire
-
APC PNOTESL Fiche technique
-
 Xenarc Technologies XN14 Manuel utilisateur
-
Kensington 64036 Manuel utilisateur
-
Olympia ULA 400 Universal Keylock Le manuel du propriétaire
-
-
Targus UNIVERAL SECURITY DEFCON VPCL Le manuel du propriétaire
-
AIPTEK 3D HD-DV Camcorder Le manuel du propriétaire
-
Kensington COMBOSAVER PORTABLE LOCK Manuel utilisateur
-
Polaroid XS100 Manuel utilisateur
