ZALMAN Reserator 3 Max Manuel utilisateur
- Catégorie
- Refroidissement liquide d'ordinateur
- Taper
- Manuel utilisateur
La page charge ...
La page charge ...
La page charge ...
La page charge ...
La page charge ...
La page charge ...
La page charge ...
La page charge ...
La page charge ...
La page charge ...
La page charge ...
La page charge ...
La page charge ...
La page charge ...

13
.COM
English
Français
Deutsch
Español

1
.COM
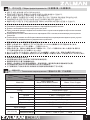
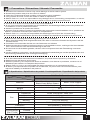
2. Specifications / Spécifications du produit / Produktspezifikatio / Especificación del producto
1. Precautions / Précautions / Hinweis / Precaución
■
Excessive force exerted on the fan may cause damage to the fan and/or system.
■
Please keep product away from the reach of children.
■
Check the components list and condition of the product before installation.
■
If any problem is found, contact the retailer to obtain a replacement.
■
Zalman Tech Co., Ltd. is not responsible for any damages due to overclocking, transportation, or misues.
■
Product design and specications may be revised to improve quality and performance.
■
Assurez-vous de lire le manuel d'instructions avant l'installation.
■
Si une force excessive est appliquée lors de l’installation, des dommages fatals peuvent se produire sur
le ventilateur ou sur le produit en lui-même.
■
Garder le produit hors de portée des enfants.
■
Assurez-vous de vérier le produit et l’ensemble des composants avant l'installation. Si un problème est
détecté, contactez le revendeur pour obtenir un remplacement.
■
Zalman Tech Co., Ltd n'est pas responsable des dommages sur le CPU dus à l'overclocking.
■
La conception et les spécications peuvent être modiées an d'améliorer la qualité et la performance
■
Bitte lesen Sie unbedingt die Bedienungsanleitung vor der Installation.
■
Wenn eine übermäßige Kraft angewendet wird, kann dies zu schweren Schäden des Systems und des
Produkts führen.
■
Fernhalten und verwenden Sie bitte von der Reichweite von Kindern
■
Stellen Sie bitte die Produkte und Komponenten vor der Installation sicher, und fragen Sie Ihren Händler
nach dem Austausch oder der Rückerstattung für den Fall.
■
Es wird nicht für die Schäden gehaftet, die dem CPU und System durch die Übertaktung verursacht
wurden.
■
Um die Qualität zu verbessern, das Erscheinungsbild des Produkt-Designs und die Spezikationen sind
der Änderung freibleibend ohne vorherige Ankündigung.
■
Lea el manual de instrucción antes de la instalación,
■
Si se hace demasiada fuerza durante la instalación, se puede dañar el producto y el sistema.
■
Mantener fuera del alcance de los niños.
■
Revise el producto y los componentes antes de instalarlo, si se detecta un problema, contacte con el
distribuidor para obtener un reemplazo del producto.
■
Zalman Tech Co. Ltd. no es responsable por daños causados por el overclocking del CPU.
■
El diseño y las especicaciones pueden ser modicados, sin previo aviso de los consumidores, para
mejorar la calidad y el rendimiento del producto.
RESERATOR3 MAX
Radiator Water Block
Material
Pure Copper &
Black-Pearl Nickel Plated
Base : Pure Copper
Dimensions
120(L)
x
145(W)
x
79(H)mm 70(L)
x
85(W)
x
37(H)mm
Weight
897g
Pump Embedded Pump
Fan
Dimension Ø120 x 25(H)mm , Blue LED
Speed 1,000 ~ 2,200rpm ±10%
Noise Level 18.9 ~ 36.7dBA ±10%
Bearing Long Life Bearing
Speed control PWM (Pulse Width Modulation)
Connector 4Pin(Radiator), 3Pin(Pump)
Input Voltage 12V
Thermal Grease
[ZM-STG2M]
Contents 1g
Temperature Range
-40°C ~ +150°C (-40
℉
~ +302
℉
)
Model
Spec.

2
.COM
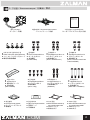
■
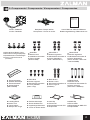
Gold Bolt
■
Boulon doré
■
Goldfarbene Schrauben
■
Perno dorado
(Socket 1366)
■
Silver Bolt
■
Boulon argenté
■
Silberfarbener Schrauben
■
Perno plateado
(3mm / Clip)
■
Loading Block
■
Boulon noir
■
Trägerplatte
■
Bloque de carga
■
Intel Clip
■
Pince Intel
■
Klemmplatte für Intel CPU
■
Grapa Intel
■
AMD Clip
■
Pince AMD
■
Klemmplatte für AMD CPU
■
Grapa AMD
■
Double-sided tape
■
Scotch double face
■
Doppelseitiger Klebeband
■
Cinta de doble lados
Backplate / Plaque arrière
Rückplatte / Placa de atrás
■
Silver Bolt A
■
Boulon argenté A
■
Silberfarbener Schrauben A
■
Perno plateado A
(4mm / Socket 2011)
■
Black Bolt A
■
Boulon noir A
■
Schwarze Schrauben A
■
Perno negro A
(Radiator)
■
Silver Bolt B
■
Boulon argenté B
■
SilberfarbenerSchrauben B
■
Perno plateado B
(3mm / Socket 1156/1155
1150/775/AMD)
■
Black Bolt B
■
Boulon noir B
■
Schwarze Schrauben B
■
Perno negro B
(Rear Fan + Radiator)
User’s Manual / Manuel utilisateur
Bedienungsanleitung / Manual de uso
Cooler / Radiateur
Cooler / Radiador
■
Nuts & Nuts(Slide) Caps
■
Ecrou & écrou borgne (diapositif)
■
Gewindemutter und Seitenkappe
■
Tuerca y cabeza de tuerca
(corredera)
■
Thermal Grease
■
Graisse thermique
■
Thermal Grease
■
Grasa térmica
(ZM-STG2M)
3. Components / Composants / Komponenten / Componentes

3
.COM
4.
Installation Requirements / Verification avant installation /
Vorsichtsmaßnahmen vor der Installation / Verificación antes de la instalación
1) Water block Space Requirements / Bloc de l'eau Vérifiez d’espace libre
/ Kühler Platzbedarf berücksichtigen / Water block requerimiento de espacio
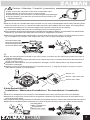
■
The cooler installation requires unobstructed
space
■
Assurez des espaces nécessites pour éviter l’
interférence des composants
■
Übergriff von benachbarten Bauteilen
vermeiden
■
Requerimiento de espacio para que no hay
interferencia con las partes periféricas
For case without the rear exhaust fan
En cas d’absence de ventilateur d’évacuation arrière
Ohne hinterem Absaugventilator
En caso de no haber el ventilador de escape tracer
For case the rear exhaust fan
En cas d’existence de ventilateur d’évacuation arrière
Mit hinterem Absaugventilator
En caso de haber el ventilador de escape tracero
3) Remove the water block protection film / Enlevez le film de protection du bloc de l’ eau
/ Schutzfolie von dem Wasser-Block entfernen / Eliminar la película protectora del bloque de agua
■
Remove the water block bottom base protection
lm as shown in the image
■
Enlevez le lm de protection à l’inférieure du
bloc de l'eau, comme indiqué dans l'image
■
Die untere Schutzfolie des Wasser-Blocks
entfernen, wie in der Abbildung dargestellt
■
Elimine la película protectora de la parte inferior
del bloque de agua como se muestra en la gura.
Protection lm
lm de protection
protective lm
película protectora
145mm
104mm
120mm
145mm
79mm
120mm
■
The cooler installation requires unobstructed space
■
Assurez des espaces nécessites pour éviter l’ interférence des composants
■
Übergriff von benachbarten Bauteilen vermeiden
■
Requerimiento de espacio para que no hay interferencia con las partes periféricas
85mm
70mm
37mm
2) Radiator Space Requirements / Radiateur Vérifiez d’espace libre
/ Heizkörper Platzbedarf berücksichtigen / Radiador Requerimiento de espacio
※ ※
La page charge ...
La page charge ...

6
.COM
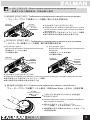
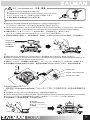
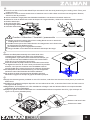
1) Intel Socket LGA 2011
Installation / Méthodes d'installation / Zur Installation / Instalación
■
Apply the thermal grease provided on the CPU surface, and then use the matching Silver bolt A (4mm) with the
socket to install the water block (Socket 2011 does not need to use the back plate and the loading block for installation)
■
Appliquer la graisse thermique disposée sur la surface de la CPU, et ensuite xer le bloc de l’eau avec la vis argentée A
(4mm). (Socket 2011 n'a pas besoin d'utilisation de la plaque arrière et le bloc de chargement pour l'installation)
■
Mitgelieferte Thermalpaste auf CPU-Oberäche auftragen und den Wasser-Block mit entsprechenden Schrauben
A (4mm) befestigen. (Für Sockel 2011 keine Rückplatte und Trägerplatte verwenden.)
■
Aplique la grasa termal suministrada con cantidad adecuada a la supercie de CPU y je el bloque de agua con el
perno plateado(4mm). (El casquillo 2011 no necesita la placa de atrás y el bloque de carga.)
※
Chose the appropriate installation method on the pages depending on a user’s socket type, and then
install clip support
※
Veuillez monter votre socket d’après le manuel d’installation.
※
Entsprechend des vorhandenen Sockels die Montageanleitung auf relevante Seite folgen.
※
Instálela haciendo referencia al método de instalación de la página correspondiente según casquillo del usuario.
Common Caution / Attention commune / Allgemeine Vorsichtshinweise / Precaución común
■
Please make sure to use the Bolts with correct color and thread length as they can
appear quite similar.
■
Vériez la taille du boulon pour éviter la confusion entre les boulons argentés A et B.
■
Silberfarbene Schraube A und B sind miteinander verwechselbar. Überprüfen Sie
Schraubengröße.
■
Asegúrese sin falta del tamaño de pernos ya que se puedan confundir entre el perno
plateado A y el B.
Socket 2011/1366
Socket 1156/1155/1150
Socket 775
1
2
Intel Socket 1156/1155/1150
Intel Socket 1366
Intel Socket 775
B.
Socket Installation / Installation socket / Installation der für jeden Sockeltyp /
Cómo instalar de cada casquillo
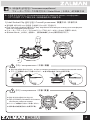
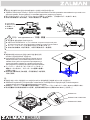
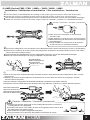
1) Intel Socket LGA 1366 / 1156 / 1155 / 1150
Installation / Méthodes d'installation / Zur Installation / Instalación
①
■
Insert the Nuts to the Backplate according to the socket type and secure them with Side Caps.
■
Insérez les écrous à la plaque arrière selon le type de socket et xez-les avec l’écrou borgne.
■
Dem Sockel entsprechende Schraubenmutter in die Rückplatte einstecken und mit der Seitenkappe befestigen.
■
Instale las tuercas en la placa de atrás según el tipo de casquillo de usuario y luego fíjelas con cabezal lateral.

7
.COM
②
■
Peel off one side of the Double-sided Tape and attach it to the center of the Backplate with the sticky side facing down.
Then, peel off the top cover. (
※
Socket LGA 1366/1156/1155/1150 Installation does not require the Loading Block.)
■
Collez le scotch double face au centre de la plaque arrière. Ensuite, enlevez le lm de protection.
(
※
Socket LGA 1366/1156/1155/1150 ne nécessitent pas le bloc de chargement)
■
Das mitgelieferte doppelseitige Klebeband auf die Mitte der Rückplatte aufkleben und Schutzfolie des Klebebandes
entfernen (
※
Für Sockel LGA 1366/1156/1155/1150 keine Trägerplatte verwenden.)
■
Adhiera la cinta de doble lados suministrada en el centro de la placa de atrás y elimine la cubierta del lado
opuesto.
(
※
La instalación de casquillo LGA 1366/1156/1155/1150 no require el bloque de carga.)
③
■
Apply the thermal grease provided on the CPU surface, and then use the matching bolt with the socket to
install the water block
■
Appliquer la graisse thermique disposée sur la surface de la CPU, et ensuite xer le bloc de l’eau avec la
vis qui correspond avec
■
Mitgelieferte Thermalpaste auf CPU-Oberäche auftragen und den Wasser-Block mit entsprechenden
Schrauben befestigen.
■
Aplique la grasa termal suministrada en la supercie de CPU , y luego je el bloque de agua con perno
adecuado al casquillo correspondiente.
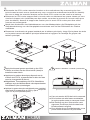
①
■
Peel off the Loading Block cover and attach it to the Backplate with the sticky side facing the center of the Backplate.
■
Détachez la couverture de scotch du bloc de chargement et l'attacher à la plaque arrière avec le côté collant vers le
centre de la plaque arrière.
■
Das mitgelieferte doppelseitige Klebeband auf die Mitte der Rückplatte aufkleben und Schutzfolie des Klebebandes entfernen.
■
Adhiera la cinta de doble lados suministrada en el centro de la placa de atrás y elimine la cubierta del lado opuesto.
■
Double-sided tape
■
Scotch double face
■
Doppelseitiger Klebeband
■
Cinta de doble lados
■
Take note of the orientation of the Nuts and the Side Caps.
■
Faite attention au sens de l’écrou et écrou borgne.
■
Einsteckrichtung der Schrauben und Seitenkappe berücksichtigen
■
Tenga cuidado con la dirección de inserción de las tuercas y los
cabezales laterales.
Caution / Attention / Vorsicht / precaución
Socket 2011/1366
Socket 1156/1155/1150
Socket 775
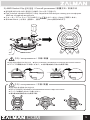
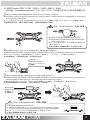
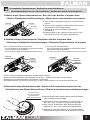
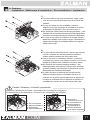
3) Intel Socket LGA 775
Installation / Méthodes d'installation / Zur Installation / Instalación
■
Loading Block
■
Bloc à chargement
■
Trägerplatte
■
Bloque de carga
1
2
O

8
.COM
③
■
Attach the Backplate assembly to the back side of the
motherboard by aligning the Nuts to the motherboard
mountingholes. If you were unsuccessful at rst attempt, you
may continue with the installation without the Double-sided
Tape as it is not a necessary component.
■
Fixez l'ensemble de plaque arrière à l'arrière de la carte mère
en alignant les écrous. Si vous n'avez pas réussi à la première
tentative, vous pouvez continuer avec l'installation sans le
scotch double face comme il n'est pas un élément nécessaire.
■
Die Rückplatte mit der Aufnahmebohrung von der Hauptplatine
zentrieren und auf der Rückseite der Platine aufkleben.
■
Fije la placa de atrás a la parte tracera del tablero principal
alineando el agujero de montaje de garpas del tablero principal.
④
■
Apply the thermal grease provided on the CPU surface, and then use the silver bolt B (3mm) to install the
water block.
■
Appliquer la graisse thermique disposée sur la surface de la CPU, et ensuite xer le bloc de l’eau avec la
vis argentée B (3mm).
■
Mitgelieferte Thermalpaste auf CPU-Oberäche auftragen und den Wasser-Block mit entsprechenden
Schrauben B (3mm) befestigen.
■
Aplique la grasa termal suministrada con cantidad adecuada a la supercie de CPU y je el bloque de
agua con el perno plateado(3mm).
②
■
Peel off one side of the Double-sided Tape and attach it with the sticky side facing the Loading block. Then, peel
off the top cover.
■
Détachez un côté du scotch double face et l’attachez avec le côté collant vers le bloc de chargement. Ensuite,
enlevez le lm de protection.
■
Auf der einbauten Trägerplatte das Klebeband aufkleben und dessen Schutzfolie entfernen.
■
Adhiera la cinta de doble lado sobre el bloque de carga adherido y elimine la cubierta del lado opuesto.
■
Please note that the sticky side of the Loading Block serves to attach the
Loading Block to the backplate.
■
Veuillez noter que le côté collant du bloc de chargement sert à xer le bloc
de chargement à la plaque arrière.
■
Die Einbaurichtung der Trägerplatte beachten.
■
Tenga cuidado con la dirección de adhesión del bloque de carga.
O
■
Double-sided tape
■
Scotch double face
■
Doppelseitiger Klebeband
■
Cinta de doble lados
Caution / Attention / Vorsicht / precaución
Socket 2011/1366
Socket 1156/1155/1150
Socket 775

9
.COM
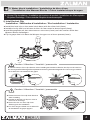
①
■
Insert the Nuts to the Backplate according to the socket type and secure them with Side Caps.
■
Insérez les écrous à la plaque arrière selon le type de socket et xer avec l’écrou borgne.
■
Dem Sockel entsprechende Schraubenmutter in die Rückplatte einstecken und mit der Seitenkappe befestigen.
■
Instale las tuercas a la placa de atrás según el tipo de casquillo y fíjelas con cabezales laterales.
1
4) AMD Socket FM2 / FM1 / AM3+ / AM3 / AM2+ / AM2
Installation / Méthodes d'installation / Zur Installation / Instalación
■
Take note of the orientation of the Nuts and
the Side Caps.
■
Faite attention au sens de l’écrou et écrou borgne
■
Einsteckrichtung der Schrauben und Seitenkappe
berücksichtigen.
■
Tenga cuidado con la dirección de la insersión
de las tuercas y los cabezales laterales.
Caution / Attention / Vorsicht / precaución
O
②
■
Peel off the Loading Block cover and attach it to the Backplate with the sticky side facing the center of the Backplate.
■
Détachez la couverture de scotch du bloc de chargement et l'attacher à la plaque arrière avec le côté collant
vers le centre de la plaque arrière
■
Die Schutzfolie des Klebebandes auf der Trägerplatte entfernen und an der Rückplatte befestigen.
■
Elimine la cubierta del bloque de carga y adhiérala a la placa de atrás.
③
■
Peel off one side of the Double-sided Tape and attach it with the sticky side facing the Loading block. Then, peel off
the top cover.
■
Détachez un côté du scotch double face et l’attachez avec le côté collant vers le bloc de chargement. Ensuite,
enlevez le lm de protection.
■
Auf der einbauten Trägerplatte das Klebeband aufkleben und dessen Schutzfolie entfernen.
■
Adhiera la cinta de doble lado sobre el bloque de carga adherido y elimine la cubierta del lado opuesto.
■
Please note that the sticky side of the Loading Block serves to attach the
Loading Block to the backplate.
■
Veuillez noter que le côté collant du bloc de chargement sert à xer le bloc
de chargement à la plaque arrière.
■
Die Einbaurichtung der Trägerplatte beachten.
■
Tenga cuidado con la dirección de adhesión del bloque de carga.
O
Caution / Attention / Vorsicht / precaución
2
2
1
■
Double-sided tape
■
Scotch double face
■
Doppelseitiger Klebeband
■
Cinta de doble lados
■
Loading Block
■
Bloc à chargement
■
Trägerplatte
■
Bloque de carga

10
.COM
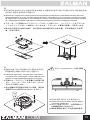
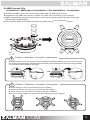
④
■
Dismantle the CPU cooler retention bracket on the motherboard by unscrewing the four
bolts located at each corner (method may vary; consult the motherboard manual for details).
Be sure to keep the retention bracket so the stock CPU cooler can be used as a backup.
■
Démonter le CPU cooler support xé à la carte mère en dévissant les quatre visses qui sont
situées à chaque coin (méthode peut être variés, consulter le manuel de la carte mère pour
plus de détails). Assurer le support de xation pour le stock CPU cooler peut être utilisé
comme une sauvegarde.
■
Nach dem Ausbauen des Halteklammers von der Mutterplatine die Rückplatte mit der
Aufnahmebohrung von der Hauptplatine zentrieren und auf der Rückseite der Platine
aufkleben.
■
Desmonte la ménsula de grapa instalada en el tablero principal y luego je la placa de atrás
en la parte tracera del tablero principal alineando el agujero de montaje de grapas del
tablero principal
⑤
■
Apply the thermal grease provided on the CPU
surface, and then use the silver bolt B (3mm) to
install the water block.
■
Appliquer la graisse thermique disposée sur la
surface de la CPU, et ensuite xer le bloc de l’eau
avec la vis argentée B (3mm).
■
Mitgelieferte Thermalpaste auf CPU-Oberäche
auftragen und den Wasser-Block mit entsprechenden
Schrauben B (3mm) befestigen.
■
Aplique la grasa termal suministrada con cantidad
adecuada a la supercie de CPU y je el
bloque de
agua con el perno plateado(3mm).
M/B
M/B
Caution / Attention / Vorsicht / precaución
■
Can not receive A/S if the bolt is removed.
■
Si le boulon est retiré sans autorisation,
le sevice après-vente ne sera pas fourni.
■
Bei Entfernung der Schrauben nach
eigenem Ermessen kein kostenloser
Kundendienst möglich
■
Si se elimina el perno arbitariamente, no se
puede recibir el servicio de post-venta.

11
.COM
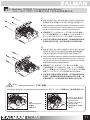
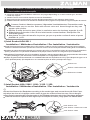
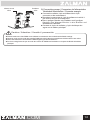
6. Radiator
Installation / Méthodes d'installation / Zur Installation / Instalación
1)
■
For case without the rear exhaust fan- align it with
rear air vent and use the black bolt A to install the
radiator
■
En cas de l’absence de ventilateur d’arrière –
alignez le trou de montage de ventilateur d’arrière
et tinstallez le radiateur avec le boulon noir A.
■
Bei Gehäuse ohne hinterem Absaugventilator – den
Radiator auf der Aufnahmebohrung für Absaugventilator
ausrichten und mit den schwarzen Schrauben A befestigen.
■
En caso de no haber el ventilador de escape tracero –
Adhiera el radiador con el perno negro A alineando el
agujero de montaje de ventilador tracero en la parte
tracera de la caja.
2)
■
For case with the rear exhaust fan- remove the exhaust
fan rst, and then use the black bolt B to install the
radiator and the exhaust fan at the same time.
■
Pour le cas avec un ventilateur d’arrière – enlevez le
ventilateur en premier, puis utilisez le boulon noir B pour
installer le radiateur et le ventilateur en même temps.
■
Bei Gehäuse mit hinterem Absaugventilator – den
Absaugventilator demontieren. Danach den Ventilator
und den Radiator mit schwarzen Schrauben B auf der
Rückplatte des Gehäuses befestigen.
■
En caso de haber el ventilador de escape tracero –
Adhiera al mismo tiempo el ventilador tracero y el
radiador con el perno negro B alineando el agujero de
montaje de ventilador tracero después de separar
el
ventilador de escape en la parte tracera de caja.
Radiator Installation direction / Orientation de montage du radiateur /
Einbaurichtung des Radiators / Dirección de instalación de radiador
■
Recommended
■
Recommandations
■
Empfehlung
■
Recomendaciones
■
When there is
interference from case.
■
en cas d'interférence
■
Beim Eingri durch
Computergehäuse
■
al ocurrir interferencia
por la caja de computador
Caution / Attention / Vorsicht / precaución

12
.COM
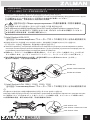
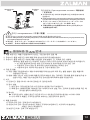
3)
Connecting power / Connexion de l'alimentation
Netzkabel anschließen / Conectar energía
■
Connect the radiator 4-pin and Water block 3-pin
connector to the motherboard
■
Branchez le connecteur à 4 pin du radiateur et celui à 3
pin du bloc de l’eau à la carte mère.
■
Den 4-poligen Stecker von Radiator und 3-poligen
Stecker des Wasser-Blocks in die Buchse auf
Motherboard stecken.
■
Conecte el 4-pin de radiador y 3-pin de bloque de
agua con el tablero principal.
■
Please make sure that PWM Control Mode is activated in the motherboard’s BIOS settings.
■
Assurez-vous que le mode de contrôle PWM est activé dans les paramètres du BIOS de la carte mère
■
Nach dem Einbauen des Kühlers PWM-Regelung im BIOS aktivieren.
■
Por favor asegúrese de que el modo de control de PWM está activado en el ajuste de BIOS del tablero
principal.
Caution / Attention / Vorsicht / precaución
Water block
3Pin
Radiator
4Pin
La page charge ...
-
 1
1
-
 2
2
-
 3
3
-
 4
4
-
 5
5
-
 6
6
-
 7
7
-
 8
8
-
 9
9
-
 10
10
-
 11
11
-
 12
12
-
 13
13
-
 14
14
-
 15
15
-
 16
16
-
 17
17
-
 18
18
-
 19
19
-
 20
20
-
 21
21
-
 22
22
-
 23
23
-
 24
24
-
 25
25
-
 26
26
-
 27
27
-
 28
28


ZALMAN Reserator 3 Max Manuel utilisateur
- Catégorie
- Refroidissement liquide d'ordinateur
- Taper
- Manuel utilisateur
dans d''autres langues
Documents connexes
-
ZALMAN CNPS10X OPTIMA-II Manuel utilisateur
-
-
ZALMAN CNPS20X Manuel utilisateur
-
ZALMAN LGA2066 Manuel utilisateur
-
ZALMAN CNPS9800 MAX Manuel utilisateur
-
ZALMAN CNPS17X Manuel utilisateur
-
ZALMAN CNPS Manuel utilisateur
-
-
-
ZALMAN Z3 PLUS WHITE Manuel utilisateur
Autres documents
-
Scythe Kotetsu Guide d'installation
-
Cooler Master Hyper 101 Universal PWM Manuel utilisateur
-
Phanteks PH-TC14PE Manuel utilisateur
-
Hummer H-360 ARGB Quick Manual
-
Xigmatek Thor's Hammer S126384 W Guide d'installation
-
 RAIJINTEK EREBOSS CORE EDITION Manuel utilisateur
-
 RAIJINTEK PallaS Manuel utilisateur
-
 RAIJINTEK Aidos Manuel utilisateur
-
NZXT HAVIK 120 Manuel utilisateur
-


