OKI C710DN Le manuel du propriétaire
- Catégorie
- Imprimantes laser / LED
- Taper
- Le manuel du propriétaire


2
Contents
Table des matières
Ordering Replacement
Supplies . . . . . . . . . . . . . . . 4
Using the Printer Menu . . . . 5
Navigating. . . . . . . . . . . . . 5
Menu Summary . . . . . . . . . 6
Print Media Settings . . . . . . . 7
Print Media Settings . . . . . . . 8
Tray 1 and Optional Trays 2
and 3. . . . . . . . . . . . . . . . . . 9
Usable Print Media . . . . . . . 9
Loading Paper . . . . . . . . . .10
Multi-Purpose Tray. . . . . . . 11
Usable Print Media . . . . . . .11
Loading Print Media . . . . . .12
Exit Trays . . . . . . . . . . . . . . 13
Power Save Mode . . . . . . . . 14
Clearing Media Jams. . . . . . 15
Troubleshooting . . . . . . . . . 23
Service & Support. . . . . . . . 24
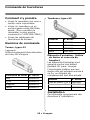
Commande de
fournitures . . . . . . . . . . . 25
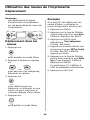
Utilisation des menus de
l'imprimante . . . . . . . . . . .26
Déplacement. . . . . . . . . . . 26
Sommaire des menus. . . . . 27
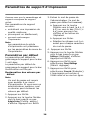
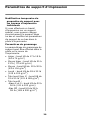
Paramètres de support
d’impression . . . . . . . . . . . 28
Paramètres de support
d’impression . . . . . . . . . . . 29
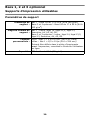
Bacs 1, 2 et 3 optionnel . . . 30
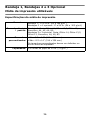
Supports d'impression
utilisables . . . . . . . . . . . . 30
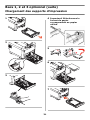
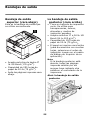
Chargement des supports
d'impression . . . . . . . . . . 31
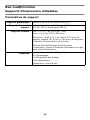
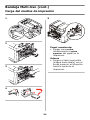
Bac multifonction . . . . . . . . 32
Supports d'impression
utilisables . . . . . . . . . . . . 32
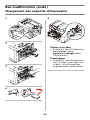
Chargement des supports
d'impression . . . . . . . . . . 33
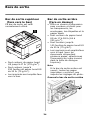
Bacs de sortie . . . . . . . . . . . 34
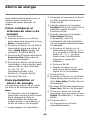
Mode d'économie d'énergie 35
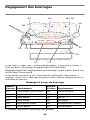
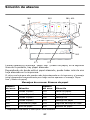
Dégagement des bourrages 36
Dépannage . . . . . . . . . . . . . 44
Service et support . . . . . . . 45
59395701

3
Cómo hacer sus pedidos de
suministros . . . . . . . . . . 46
Uso el menú de la
impresora . . . . . . . . . . . . . 47
Navegar . . . . . . . . . . . . . .47
Resumen de la menú . . . . .48
Configuración de los Medios
de Impresión . . . . . . . . . . 49
Configuración de los Medios
de Impresión . . . . . . . . . . 50
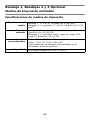
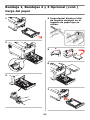
Bandeja 1, Bandejas 2 y 3
Opcional . . . . . . . . . . . . . . 51
Medios de Impresión
utilizable . . . . . . . . . . . . .51
Carga del papel . . . . . . . . .52
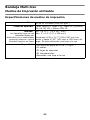
Bandeja Multi-Uso . . . . . . . 53
Medios de Impresión
utilizable . . . . . . . . . . . . .53
Carga del medios de
impresión . . . . . . . . . . . .54
Bandejas de salida . . . . . . . 55
Ahorro de energía . . . . . . . 56
Solución de atascos . . . . . . 57
Resolución de problemas . . 65
Servicio y Soporte . . . . . . . 66
Pedidos de suprimentos de
reposição . . . . . . . . . . . . 67
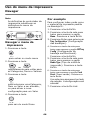
Uso do menu da impressora . .
68
Navegar . . . . . . . . . . . . . . 68
Resumo do menu. . . . . . . . 69
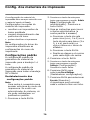
Config. dos materiais de
impressão . . . . . . . . . . . . . 70
Config. dos materiais de
impressão . . . . . . . . . . . . . 71
Bandeja 1, Bandejas 2 e 3
Opcional . . . . . . . . . . . . . . 72
Mídia de impressão
utilizáveis . . . . . . . . . . . . 72
Colocação do papel . . . . . . 73
Bandeja multifuncional. . . . 74
Mídia de impressão
utilizáveis . . . . . . . . . . . . 74
Colocação do mídia de
impressão . . . . . . . . . . . . 75
Escaninhos de saída . . . . . .76
Economia de energia . . . . . 77
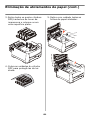
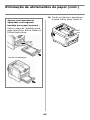
Eliminação de atolamentos de
papel . . . . . . . . . . . . . . . . . 78
Resolução de problemas. . .86
Assistência técnica e
suporte . . . . . . . . . . . . . . . 87
Contenido Sumário

4
•
English
English
Ordering Replacement Supplies
How to Order
• Consult the dealer where you
purchased your printer.
• Consult an Oki Data
Authorized Sales or Service
Dealer. For your nearest
dealer, call 1-800-654-3282.
• U.S., Puerto Rico, Guam,
U.S. Virgin Islands only:
Order on the Internet at
WWW.OKIPRINTINGSOLUTIONS.COM
• U.S. only: Order toll-free by
phone at 1-800-654-3282,
using VISA
®
, MasterCard
®
,
or AMEX
®
.
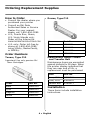
Order Numbers
Toners, Type C12
Important! Use only genuine Oki
Toner Cartridges.
Drums, Type C12
Maintenance Items: Fusers
and Transfer Belt
Maintenance items are warranted
against defects for 90 days. When
the printer display indicates that
they are near end of life, a
replacement must be purchased.
Installation
These items include installation
instructions.
Toner Part No.
Black 43866104
Cyan 43866103
Magenta 43866102
Yellow 43866101
Drum Part No.
Black 43913804
Cyan 43913803
Magenta 43913802
Yellow 43913801
Item Part No.
Fuser, 120V 43854901
Fuser, 230V 43854902
Transfer Belt 43363411

5
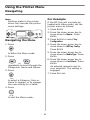
Using the Printer Menu
Navigating
Note
Settings made in the printer
driver will override the printer
menu settings.
Navigating the Menu
1. Press
to enter the Menu mode.
2. Press
or
repeatedly to scroll through the
Categories, Items and Values.
3. Press
to select a Category, Item or
Value to change, or to engage
the new setting for a Value.
4. Press
to exit the Menu mode.
For Example
If the MP Tray will normally be
loaded with index cards, set the
printer menu as follows:
1. Press E
NTER
.
2. Press the down arrow key to
move down to
Menus
. Press
E
NTER
3. Press E
NTER
to select
Tray
Configuration
.
4. Press the down arrow key to
move down to
MPTray Config
.
Press E
NTER
.
5. Press the down arrow key to
move down to
Media Type
. Press
E
NTER
.
6. Press the down arrow key to
move down to
Card Stock
. Press
E
NTER
.
An asterisk appears next to
your selection. The setting is
engaged.
7. Press O
N
L
INE
.

6
Using the Printer Menu
Menu Summary
Summary of Menu
Categories
Configuration
•Page Count
• Supplies Life
•Network
•System
Print Information
Menus
• Tray Configuration
•MPTray Config
System Adjust
Admin Setup
For use by the System
Administrator. To access this
menu you must enter the
password. If you have no
administrator, the default
password is aaaaaa.
Calibration
Printing the
Configuration Report
The Configuration report provides
a listing of the current printer
menu settings.
1. Press
E
NTER
.
2. Press the down arrow key to
select
Print Information
.
3. Press
E
NTER
.
4. Press E
NTER
to select
Configuration
.
5. Press E
NTER
. to select
Execute
.
The Configuration report prints
and the printer goes back on
line.

7
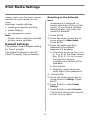
Print Media Settings
Always make sure the media setting
matches the print media you are
using.
Improper media settings:
• cause poor quality printing
• cause flaking
• can damage the printer
Note
Printer driver settings override
printer menu settings.
Default Settings
The default media weight setting
for Tray1 is Light.
The default setting for the MP
(Multi Purpose) Tray is Medium.
Resetting to the Defaults
Note
A password is required to
access this area of the printer
menu. If you have a System
Administrator, only they can
reset the defaults.
1. Press E
NTER
.
2. Press the down arrow key to
move down to
Admin Setup
.
Press E
NTER
.
3. Enter the administrative
password (the default
password is aaaaaa).
a. Press the up arrow key (a to
z, 0 to 9) or the down arrow
key (9 to 0, z to a) to scan
through the various
numbers and letters of the
alphabet.
b. Press Enter.
c. Repeat a and b above for
each digit of the password.
4. Press E
NTER
.
5. Press the down arrow key to
move down to
Settings
. Press
E
NTER
.
6. Press E
NTER
to select
Reset
Settings
.
7. Press E
NTER
to select
Execute
.
The printer resets and returns
to the on-line state.

8
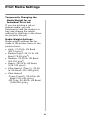
Print Media Settings
Temporarily Changing the
Media Weight for an
Individual Print Job
If you are printing a job on
special media, you can
temporarily load the media in a
tray and change the media
settings for that tray in the driver
as you print the job.
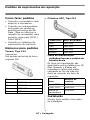
Media Weight Settings
Media weight settings can be
made in the printer menu or the
printer driver.
• Light: 17-19 lb. US Bond
(64-74 g/m²)
• Medium Light: 20-21 lb. US
Bond (75-82 g/m
2
)
• Medium: 22-30 lb. US Bond
(83-104 g/m
2
)
• Heavy: 28-32 lb. US Bond
(105-120 g/m
2
)
• Ultra Heavy1 (Tray 1): 32-50
lb. US Bond (121-188 g/m
2
)
•Ultra Heavy2
-Trays 2 and 3: 3
2-54 lb. US
Bond (121-203 g/m
2
)
-MP Tray: 32-58 lb. US Bond
(189-220 g/m
2
)

9
Tray 1 and Optional Trays 2 and 3
Usable Print Media
Media Specifications
Weight Range
Tray 1: 17-50 lb. US Bond (64-188 g/m
2
)
Optional Trays 2 and 3: 17-54 l
b. US Bond
(6
4-203 g/m
2
)
Standard Sizes:
Tray 1: Letter, Legal-14, Legal-13.5, Legal-13,
Executive, A4, A5, A6, B5.
Optional Trays 2 and 3: Letter , Legal-14,
Legal-13.5, Legal-13, Executive, A4, A5, B5.
Custom Sizes:
•Min.: 5.5 x 8.3'' (140 x 211 mm)
• Max.: 8.5 x 14'' (216 x 356 mm)
Must be defined in driver before printing: see your
on-line User’s Guide.
Capacity:
530 sheets of 20-lb. (75 g/m
2
) paper

10
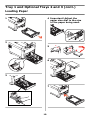
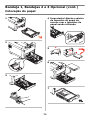
Tray 1 and Optional Trays 2 and 3 (cont.)
Loading Paper
1
2
3
4Important! Adjust the
paper size dial to the size
of the paper being used.
5
6
7
3

11
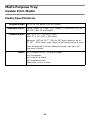
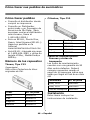
Multi-Purpose Tray
Usable Print Media
Media Specifications
Weight Range
32-58 lb. US Bond (189-220 g/m
2
)
Standard Sizes:
Letter, Legal-14, Legal-13.5, Legal-13, Executive, A4, A5,
A6, B5, Com-10 envelopes.
Custom Sizes:
Min. 3 x 11.7" (76 x 297 mm)
Max. 5" x 14" (127 x 356 mm)
Banners: 8.25 to 11.7" (216 to 297 mm) wide by up to
47.25"'' (1220 mm) long. Must be fed one sheet at a time.
Must be defined in driver before printing: see your on-
line User’s Guide.
Takes:
• 100 sheets 20-lb. (75 g/m
2
) paper
•10 envelopes
• 20 sheets of labels
• 50 transparencies
• Banners, one at a time

12
Multi-Purpose Tray (cont.)
Loading Print Media
1
2
3
4
5
Letterhead Stationery
• Load face
up
, top edge
into
the printer.
Envelopes
• Load print side up (flap
down) with top edge aimed
into the printer.
3

13
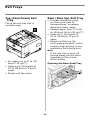
Exit Trays
Top (Face Down) Exit
Tray
This is the exit tray that is
normally used.
• For papers up to 47 lb. US
Bond (176 g/m
2
).
• Holds up to 250 sheets of
20-lb. US Bond (75 g/m
2
)
paper.
• Sheets exit face down.
Rear (Face Up) Exit Tray
• Provides straight-through,
curl-free print path for
transparencies, envelopes,
labels and heavy paper.
• Handles paper from 17 to 58
lb. US Bond (64 to 220 g/m
2
).
• Holds up to 100 sheets of
20-lb. US Bond (75 g/m
2
)
paper.
• Sheets exit face up (for
multi-page documents, select
reverse order printing in your
application Print dialog box).
Note
If the rear tray is open, all
printed pages will exit there
regardless of the printer
driver setting.
Opening the Rear-Feed Tray

14
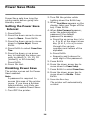
Power Save Mode
Power Save sets how long the
printer waits before going into
standby mode.
Setting the Power Save
Interval
1. Press E
NTER
.
2. Press the down arrow to move
down to
Menus
. Press E
NTER
.
3. Press the down arrow to move
down to
System Adjust
. Press
E
NTER
.
4. Press E
NTER
to select
Power Save
Time
.
5. Press the down or up arrow
key to highlight the value you
wish to select (5, 10. 15, 30
[default], or 60 minutes).
Press E
NTER
.
6. Press O
N
L
INE
.
Disabling Power Save
The printer comes set for Power
Save enabled.
Note
A password is required to
access this area of the printer
menu. If you have a System
Administrator, only they can
disable or enable Power Save.
1. Turn OFF the printer.
2. Turn ON the printer while
holding down the E
NTER
key.
3. When
Boot Menu
appears on the
display, take your finger off the
key. Press E
NTER
.
4. When
Enter Password
appears,
enter the administrative
password (the default
password is aaaaaa).
a. Press the up arrow key (a to
z, 0 to 9) or the down arrow
key (9 to 0, z to a) to scan
through the various
numbers and letters of the
alphabet.
b. Press E
NTER
.
c. Repeat a and b above for
each digit of the password.
5. Press E
NTER
.
6. Press the down arrow key to
move down to
Power Setup
.
7. Press E
NTER
to select
Power Save
.
8. Press the down arrow key to
move down to
Disable
. Press
E
NTER
.
9. Press the B
ACK
key.
The printer will automatically
re-boot.

15
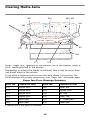
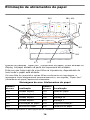
Clearing Media Jams
When “Paper Jam” appears on the second line of the display, there is
print media jammed in the printer.
Depending on where the media is jammed, there may be more than
one sheet stuck in the printer.
If one sheet is removed and there are still more sheets in the printer, the
initial message will go away temporarily, then “Paper Jam” will appear again.
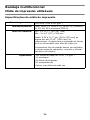
Paper Jam Error Message Summary
Error No. Location of Jam Error No. Location of Jam
370
Duplex unit
1
1.Applies only if this option is installed.
382 Paper exit
371 Duplex unit* 383 Duplex unit*
372 Duplex unit* 390 MP Tray
373 Duplex unit* 391 Paper Tray
380 Paper feed 392
2
nd
Paper tray*
381 Paper path 400 Paper size
370
373
382
383
381
372371
391
392
380, 400
390

16
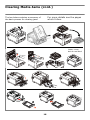
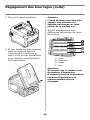
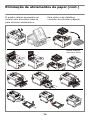
Clearing Media Jams (cont.)
The box below contains a summary of
the basic process for clearing jams
.
For more details see the pages
which follow.
Lower cover,
but do not latch

17
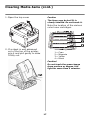
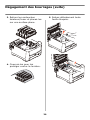
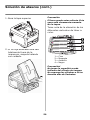
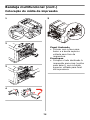
Clearing Media Jams (cont.)
1. Open the top cover.
2. If a sheet is well advanced
out of the top of the printer,
grip it and pull gently to draw
it fully out.
Caution
The fuser may be hot! It is
clearly labelled. Do not touch it.
Note the location of the various
color toner cartridges.
1 = Cyan
2 = Magenta
3 = Yellow
4 = Black
Caution!
Do not touch the green image
drum surface or expose it to
light for more than 5 minutes.

18
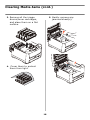
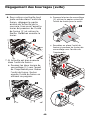
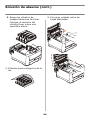
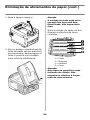
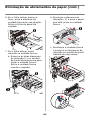
Clearing Media Jams (cont.)
3.
Remove all the image
drums/toner cartridges,
and place them on a flat
surface.
4.
Cover them to protect
them from light.
5.
Gently remove any
jammed sheet(s).

19
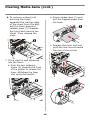
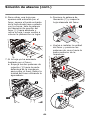
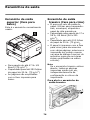
Clearing Media Jams (cont.)
6.
To remove a sheet just
entering the fuser,
separate the trailing edge
of the sheet from the belt,
pull the fuser pressure
release lever (1) towards
the front and remove the
sheet. Then release the
lever.
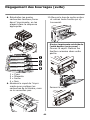
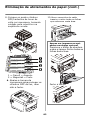
7. If the sheet is well advanced
into the fuser:
a. Push the two retaining
levers (1) towards the front
of the printer to release the
fuser. Withdraw the fuser
unit using the handle.
b. Press release lever (1) and
pull the trapped paper from
the fuser.
c. Replace the fuser unit and
push the lock levers toward
the rear of the printer.

20
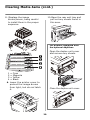
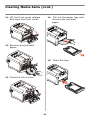
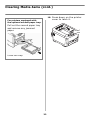
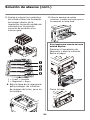
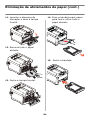
Clearing Media Jams (cont.)
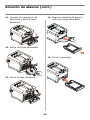
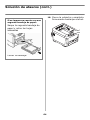
8. \Replace the image
drums/toners, being careful
to install them in the proper
sequence.
1 = Cyan
2 = Magenta
3 = Yellow
4 = Black
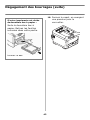
9.
Lower the printer cover to
protect the image drums
from light, but do not latch
it.
10.Open the rear exit tray and
pull out any sheets found in
this area.
For printers equipped with
the optional duplexer:
Open the duplex unit cover
and remove any sheets.
Close the duplex unit cover.
La page est en cours de chargement...
La page est en cours de chargement...
La page est en cours de chargement...
La page est en cours de chargement...
La page est en cours de chargement...
La page est en cours de chargement...
La page est en cours de chargement...
La page est en cours de chargement...
La page est en cours de chargement...
La page est en cours de chargement...
La page est en cours de chargement...
La page est en cours de chargement...
La page est en cours de chargement...
La page est en cours de chargement...
La page est en cours de chargement...
La page est en cours de chargement...
La page est en cours de chargement...
La page est en cours de chargement...
La page est en cours de chargement...
La page est en cours de chargement...
La page est en cours de chargement...
La page est en cours de chargement...
La page est en cours de chargement...
La page est en cours de chargement...
La page est en cours de chargement...
La page est en cours de chargement...
La page est en cours de chargement...
La page est en cours de chargement...
La page est en cours de chargement...
La page est en cours de chargement...
La page est en cours de chargement...
La page est en cours de chargement...
La page est en cours de chargement...
La page est en cours de chargement...
La page est en cours de chargement...
La page est en cours de chargement...
La page est en cours de chargement...
La page est en cours de chargement...
La page est en cours de chargement...
La page est en cours de chargement...
La page est en cours de chargement...
La page est en cours de chargement...
La page est en cours de chargement...
La page est en cours de chargement...
La page est en cours de chargement...
La page est en cours de chargement...
La page est en cours de chargement...
La page est en cours de chargement...
La page est en cours de chargement...
La page est en cours de chargement...
La page est en cours de chargement...
La page est en cours de chargement...
La page est en cours de chargement...
La page est en cours de chargement...
La page est en cours de chargement...
La page est en cours de chargement...
La page est en cours de chargement...
La page est en cours de chargement...
La page est en cours de chargement...
La page est en cours de chargement...
La page est en cours de chargement...
La page est en cours de chargement...
La page est en cours de chargement...
La page est en cours de chargement...
La page est en cours de chargement...
La page est en cours de chargement...
La page est en cours de chargement...
-
 1
1
-
 2
2
-
 3
3
-
 4
4
-
 5
5
-
 6
6
-
 7
7
-
 8
8
-
 9
9
-
 10
10
-
 11
11
-
 12
12
-
 13
13
-
 14
14
-
 15
15
-
 16
16
-
 17
17
-
 18
18
-
 19
19
-
 20
20
-
 21
21
-
 22
22
-
 23
23
-
 24
24
-
 25
25
-
 26
26
-
 27
27
-
 28
28
-
 29
29
-
 30
30
-
 31
31
-
 32
32
-
 33
33
-
 34
34
-
 35
35
-
 36
36
-
 37
37
-
 38
38
-
 39
39
-
 40
40
-
 41
41
-
 42
42
-
 43
43
-
 44
44
-
 45
45
-
 46
46
-
 47
47
-
 48
48
-
 49
49
-
 50
50
-
 51
51
-
 52
52
-
 53
53
-
 54
54
-
 55
55
-
 56
56
-
 57
57
-
 58
58
-
 59
59
-
 60
60
-
 61
61
-
 62
62
-
 63
63
-
 64
64
-
 65
65
-
 66
66
-
 67
67
-
 68
68
-
 69
69
-
 70
70
-
 71
71
-
 72
72
-
 73
73
-
 74
74
-
 75
75
-
 76
76
-
 77
77
-
 78
78
-
 79
79
-
 80
80
-
 81
81
-
 82
82
-
 83
83
-
 84
84
-
 85
85
-
 86
86
-
 87
87


OKI C710DN Le manuel du propriétaire
- Catégorie
- Imprimantes laser / LED
- Taper
- Le manuel du propriétaire
dans d''autres langues
- español: OKI C710DN El manual del propietario
- português: OKI C710DN Manual do proprietário
Documents connexes
-
OKI MPS710C Le manuel du propriétaire
-
OKI C610n Le manuel du propriétaire
-
OKI C711n Le manuel du propriétaire
-
-
OKI C830DTN Le manuel du propriétaire
-
OKI C 5650dn Le manuel du propriétaire
-
OKI C8800dtn Manuel utilisateur
-
OKI C9650HDN Le manuel du propriétaire
-
OKI C6150DTN Le manuel du propriétaire
-