Electrolux EFME627UIW Manuel utilisateur
- Catégorie
- Sèche-linge électriques
- Taper
- Manuel utilisateur
Ce manuel convient également à

EN FRONT LOAD DRYER
FR SÉCHEUSE Á CHARGEMENT FRONTAL
ES SECADORA DE CARGA FRONTAL
USE & CARE GUIDE
GUIDE D’UTILISATION ET D’ENTRETIEN
GUÍA DE USO Y CUIDADO
A11199701 January 2018

2
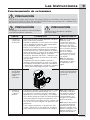
Finding Information
©2017 Electrolux Major Appliances All rights reserved.
Electrolux model number
Electrolux serial number
NOTE
The instructions appearing in this
Use &
Care Guide
are not meant to cover every
possible condition and situation that may
occur. Common sense and caution must
be practiced when installing, operating
and maintaining any appliance.
Purchase date
Keep a record for quick
reference
Read all instructions before operating this dryer.
Table of Contents
Finding Information ............................... 2
Safety ................................................... 3
Features ...............................................7
Operating Instructions ..........................9
Controls and Settings .........................11
Care & Cleaning ..................................20
Solutions to Common Inquiries ........... 22
Warranty Information ..........................26
Notes .................................................27
SAVE THESE INSTRUCTIONS FOR FUTURE REFERENCE.
Electrolux model series*
* The series number can be found
within the Model number (example
EFMC627UIW = 600 series)
NOTE
Registering your product with Electrolux
enhances our ability to serve you. You
can register online at www.electrolux-
appliances.com, by sending your
Product Registration Card in the mail,
or PHOTOREGISTER
SM
using a smart
phone.
See registration card for details.
Please read and save
this guide
Thank you for choosing Electrolux, our
premium brand in home appliances. This
Use & Care Guide
is part of our commit-
ment to customer satisfaction and product
quality throughout the service life of your
new appliance.
We view your purchase as the beginning
of a relationship. To ensure our ability to
continue serving you, please use this page
to record important product information.
Questions?
For toll free telephone support or online
support in the US and Canada contact:
U.S.
1-877-4ELECTROLUX (1-877-435-3287)
www.electroluxappliances.com
Canada
1-800-265-8352
www.electroluxappliances.ca

3
Safety
Important Safety Instructions
WARNING
FIRE OR EXPLOSION HAZARD
Failure to follow safety warning exactly could
result in serious injury, death, or property
damage.
DO NOT store or use gasoline or other flam-
mable vapors and liquids in the vicinity of this
or any other appliance.
WHAT TO DO IF YOU SMELL GAS:
• DO NOT try to light any appliance.
• DO NOT touch any electrical switch; DO
NOT use any phone in your building.
• Clear the room, building or area of all oc-
cupants.
• Immediately call your gas supplier from a
neighbor’s phone. Follow the gas supplier’s
instructions.
• If you cannot reach your gas supplier, call
the fire department.
• Installation and service must be performed
by a qualified installer, service agency or
the gas supplier.

4
Prevent Fire
• DO NOT dry items that have been
previously cleaned in, soaked in, or
spotted with gasoline, cleaning solvents,
kerosene, waxes, or other flammable or
explosive substances. DO NOT store
these items on or near the dryer. These
substances give off vapors that could
ignite or explode.
WARNING
FIRE HAZARD
Clean the lint screen before or after each
load. The interior of the dryer, lint screen
housing and exhaust duct should be
cleaned approximately every 18 months
by qualified service personnel. An exces-
sive amount of lint build-up in these ar-
eas could result in inefficient drying and
possible fire. See
Care and Cleaning
.
WARNING
FIRE HAZARD
A clothes dryer produces combustible
lint. The dryer must be connected to an
outdoor exhaust. Regularly inspect the
outdoor exhaust opening and remove
any accumulation of lint around the
opening and in the surrounding area.
WARNING
FIRE HAZARD
To reduce the risk of fire, electrical
shock, or injury to persons when using
this dryer, comply with the basic warn-
ings listed below. Failure to comply with
the Important Safety Instruction warn-
ings could result in property damage,
serious personal injury, or death.
Safety
WARNING
WARNING indicates a potentially haz-
ardous situation which, if not avoided,
could result in death or serious injury.
IMPORTANT
Indicates installation, operation, or main-
tenance information which is important
but not hazard-related.
CAUTION
CAUTION indicates a potentially hazard-
ous situation which, if not avoided, may
result in minor or moderate injury.
DANGER
DANGER indicates an imminently haz-
ardous situation which, if not avoided,
will result in death or serious injury.
Definitions
This is the safety alert symbol. It is
used to alert you to potential personal
injury hazards. Obey all safety messages
that follow this symbol to avoid possible
injury or death.
• DO NOT place items exposed to cooking
oils in your dryer. Items contaminated
with cooking oils may contribute to a
chemical reaction that could cause a load
to catch fire. To reduce the risk of fire
due to contaminated loads, the final part
of a tumble dryer cycle occurs without
heat (cool down period). Avoid stopping
a tumble dryer before the end of the
drying cycle unless all items are quickly
removed and spread out so that the heat
is dissipated.
• DO NOT dry articles containing rubber,
plastic or similar materials such as bras,
galoshes, bath mats, rugs, bibs, baby
pants, plastic bags and pillows that may
melt or burn. Some rubber materials,
when heated, can under certain circum-
stances produce fire by spontaneous
combustion.
• DO NOT operate the dryer if the lint
screen is blocked, damaged or missing.
Fire hazard, overheating and damage to
fabrics can occur.
• DO NOT obstruct the flow of ventilating
air. DO NOT stack or place laundry or
throw rugs against the front or back of
the dryer.
• DO NOT spray any type of aerosol into,
on or near dryer at any time.

5
Safety
• DO NOT use fabric softeners or products
to eliminate static unless recommended
by the manufacturer of the fabric softener
or product.
• To prevent personal injury or damage to
the dryer, the electrical power cord of a
gas dryer must be plugged into a proper-
ly grounded and polarized 3-prong outlet.
The third grounding prong must never
be removed. Never ground the dryer to a
gas pipe. DO NOT use an extension cord
or an adaptor plug.
• ALWAYS disconnect the dryer from the
electrical supply before attempting any
service or cleaning. Failure to do so can
result in electrical shock or injury.
• DO NOT use any type of spray cleanser
when cleaning dryer interior. Hazardous
fumes or electrical shock could occur.
• To prevent injury, DO NOT reach into the
dryer if the drum is moving. Wait until
the dryer has stopped completely before
reaching into the drum.
Prevent Injury And Damage To
The Dryer
• All repairs and servicing must be per-
formed by an authorized service provider
unless specifically recommended in this
Use & Care Guide
. Use only authorized
factory parts.
• DO NOT tamper with controls.
• DO NOT sit on, step on or stand on the
dryer. DO NOT rest heavy loads on top.
The dryer is not meant to support weight.
• DO NOT install or store the dryer where it
will be exposed to the weather.
• Thermal limiter switches automatically
turn off the motor in the unlikely event of
an overheated situation. A service techni-
cian must replace the thermal limiter
switch(es) after correcting the fault.
• Failure to comply with these warnings
could result in serious personal injuries.
WARNING
DO NOT continue to use the dryer if you
hear squeaking, grinding, rubbing or oth-
er unusual noises. This could be a sign of
mechanical breakdown and lead to fire or
serious injury. Contact a qualified tech-
nician immediately.
• Failure to comply with these warnings
could result in fire, explosion, serious
bodily injury and/or damage to the dryer.
Protect Children
• DO NOT allow children to play on or in
the dryer. Close supervision of children is
necessary when the dryer is used near
children. As children grow, teach them
the proper, safe use of all appliances.
• Destroy the carton, plastic bag and
other packing materials after the dryer is
unpacked. Children might use them for
play. Cartons covered with rugs, bed-
spreads or plastic sheets can become
airtight chambers.
• Keep laundry products out of children’s
reach. To prevent personal injury, observe
all warnings on product labels.
• Before the dryer is removed from service
or discarded, remove the dryer door to
prevent accidental entrapment.
• Failure to comply with these warnings
could result in serious personal injuries.
Prevent Injury
• To prevent shock hazard and assure
stability during operation, the dryer must
be installed and electrically grounded by
a qualified service person in accordance
with local codes. Installation instructions
are packed in the dryer for the installer’s
reference. Refer to
Installation Instruc-
tions
for detailed grounding procedures.
If the dryer is moved to a new location,
have it checked and reinstalled by a
qualified service person.

6
Safety
READ ALL INSTRUCTIONS BEFORE OPERATING THIS DRYER.
CAUTION
The California Safe Drinking Water and Toxic Enforcement Act requires the Governor of
California to publish a list of substances known to the state to cause cancer, birth de-
fects or other reproductive harm, and requires businesses to warn customer of poten-
tial exposure to such substances. Included in this list are soot and carbon monoxide,
both of which may be produced by the use of this product.
WARNING
FIRE/ELECTRICAL SHOCK HAZARD
Avoid fire hazard or electrical shock. DO NOT use an adaptor plug or extension cord or
remove grounding prong from electrical power cord. Failure to follow this warning can
cause serious injury, fire, or death.
240 v Electric Dryer
120 v Gas Dryer
UL-approved service
cord must be installed
on electric dryers (not
provided with unit
except those
manufactured for sale
in Canada).
Do not, under
any circumstances,
cut, remove,
or bypass the
grounding prong.
Power cord
with 3-prong
grounded plug
10-30R
3-wire
(fused 30 amp)
14-30R
4-wire
(fused 30 amp)
Grounding
type wall
receptacle

7
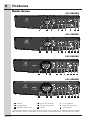
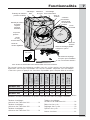
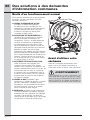
Features
Control
Lock
LED
Display
Drum Light
(on select models)
Exhaust
Channel
Outlet
Optional Heavy Duty
Collapsible Drying Rack*
Reversible
Door
Door Striker
Cycle
Selector
Door Latch
3 Drum
Vanes
LuxCare
TM
Lint Shield
Front-Mounted
Moisture
Sensor
(on select
models)
Adjustable
Leveling Legs
Optional Stacking
Kit for Mounting on
Matching Washer*
Wide-Angle
Door Hinge
*Not included with initial purchase. May be purchased as accessory.
Serial &
Model
drum light
door reversibility
front mounted
moisture sensor
bars
PredictiveDry
LuxCare
TM
Lint Shield filter
perfect steam
anti-static
fast dry
extended tumble
300 Series
no yes yes no yes no no no no
400 Series
yes yes yes no yes yes no 20
min
no
500 Series
yes yes no yes yes yes yes 18
min
yes
600 Series
yes yes no yes yes yes yes 15
min
yes
Cycle Selection ...................................15
Cycle Settings ....................................16
Cycle Options .....................................17
Other Features ....................................18
Not all cycles, options, or features listed are available on every model. Refer to the table
below for an overview of features available for each model series.
A full listing of available settings for each model and detailed explanations of their settings
and options are described on the following pages:
Setting Chart - 300 Series Dryer ......... 11
Setting Chart - 400 Series Dryer ......... 12
Setting Chart - 500 Series Dryer ......... 13
Setting Chart - 600 Series Dryer ......... 14

8
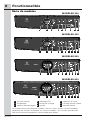
Model Series
Features
1
power
2
cycle LED display
3
cycle selector
4
temperature
5
dryness (dry level)
6
time dry (dry time)
7
options/select (set)
8
cancel
9
start/pause
This manual covers many models and not all cycles, options, or features listed are avail-
able on every model. Consoles shown above for reference only. Your model may differ.
300 SERIES
400 SERIES
500 SERIES
600 SERIES
2
7
1 63 954 10
8
2 71 63 854 9
2
7
1 6 954 10
8
3
2 71 6 954 10
8
3

9
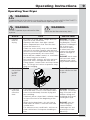
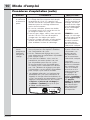
Operating Instructions
WARNING
DO NOT operate dryer without lint filter
in place.
STEPS
TIPS IMPORTANT
1. Prepare
load for
drying.
• Dry items of similar fabric, weight and con-
struction in the same load.
• Separate dark items from light-colored
items. Separate items that shed lint from
those that attract lint.
• Check for stains which may not have been
removed in washing. Repeat stain removal
process and wash again before drying. Dryer
heat may permanently set some stains.
• Place delicate, rubber coated, or small items
in a mesh bag (not included).
• Be sure buckles, buttons and trim are heat-
proof and won’t damage the drum finish.
Close zippers; fasten hooks and loop fasten-
ers. Tie strings and sashes to prevent snag-
ging and tangling.
DO NOT machine
wash items contain-
ing fiberglass. Small
particles of fiberglass
left in drum may
transfer to fabrics
in other loads and
cause skin irritation
and/or damage to
fabrics.
DO NOT wash water
resistant and water
repellent type cloth-
ing or other materials.
2. Check that
the lint filter
is clean
and in
place.
DO NOT operate
dryer without lint filter
in place.
3. Load the
dryer and
close the
door.
• Load items loosely. The average wet load
will fill the drum 1/3 to 1/2 full. Items need
room to tumble freely for even drying and
less wrinkling.
• If desired, place a dryer fabric softener sheet
on top of the load at the beginning of the
cycle.
• When drying large items, dry only two or
three items at a time. Fill out the load with
smaller items.
• For delicate or very small loads, add two or
three similar items to improve tumbling ac-
tion.
DO NOT overload
the dryer. To save en-
ergy, time and avoid
uneven drying and
wrinkling avoid over-
loading the dryer.
DO NOT over-dry.
Over-drying can
cause wrinkles,
shrinkage, lint, and
a build up of static
electricity.
Operating Your Dryer
WARNING
Clean the lint filter after every load.
WARNING
To reduce the risk of fire, electric shock or injury to persons, read the IMPORTANT SAFETY
INSTRUCTIONS in this
Use & Care Guide
before operating your dryer.

10
Operating Instructions
STEPS
TIPS IMPORTANT
4. Select the
appropriate
cycle and
settings for
each load.
• See
Cycle Selection
and
Cycle Settings
for
detailed descriptions of cycle controls.
• See
Cycle Setting Charts
to determine which
settings are available for each cycle.
• To provide the best care, not every setting
or option is available with every cycle. If a
setting or option is not available for the cycle
selected, the indicator will not light. See
Set-
ting Chart
for information of available options
for each cycle by model.
• Adjustments made to most cycle settings will
be remembered and recalled each time that
cycle is selected in the future. To return to
factory settings, press the dryness button
and the options button at the same time
and hold until the signal sounds.
Over-drying can
cause wrinkles,
shrinkage, lint, harsh-
ness, and a build up
of static electricity.
To prevent uninten-
tional and accidental
exposure of delicate
material to excess
heat or unexpected
steam, the sanitize
temperature setting
and the perfect
steam™ option will
not be remembered
and must be rese-
lected each time.
5. Close the
dryer door
and start
the drying
cycle.
• To start the drying cycle, close the door and
press the start/pause button.
• To add an item to the dryer drum, press
start/pause. Add the item, close the door
and press start/pause to resume the cycle.
• To change settings or options after the cycle
has begun, press start/pause, change the
settings, and then press start/pause. If the
cycle is not paused first, the unit will emit sev-
eral beeps when the buttons are pressed but
no changes to the cycle will be applied.
• To change the cycle once the cycle has be-
gun, press cancel to cancel the cycle, select
the new cycle, and press start/pause to
begin the new cycle. Changing a cycle selec-
tion without cancelling the current WILL NOT
change the cycle.
• To cancel a cycle, press cancel.
The dryer WILL NOT
operate with the door
open.
When drying a single
large or bulky item,
such as a comforter,
pause the cycle part
way through to turn
the item “inside out”
and maximize drying
effectiveness.
6. Remove
items when
done.
• A signal will sound at the end of the cycle if
the chime option is not set to mute.
• Immediately remove items when the cycle is
completed and hang or fold.
See product manu-
facturer’s instruc-
tions.
7. Clean the
lint filter.
• See
Care and Cleaning
section of this in-
struction.
• CLEAN LINT will be displayed at the end of
the cycle as a reminder to remove lint from
filter.
ALWAYS REMOVE
LINT at the end
of the cycle (see
warning on previ-
ous page).
Operating Procedures (continued)
To return to factory settings,
press the dry level/dryness and
options buttons at the same time
and hold until the signal sounds.

11
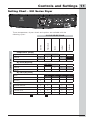
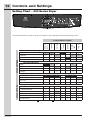
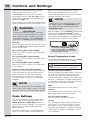
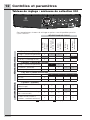
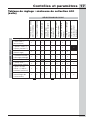
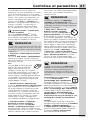
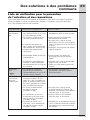
Controls and Settings
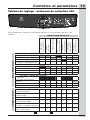
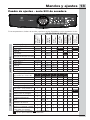
These temperature, dryness levels and options are available with the
following cycles:
dry time
heavy duty
towels
normal
delicates
temperature (temp)
high
normal
air dry
dry level (dryness)
high
normal
damp
dry time (dry time)
auto
60 min
30 min
options
wrinkle release
eco
control lock
press & hold chime
= Available selections. = Factory presets. = Non-modifiable presets.
Setting Chart - 300 Series Dryer
CYCLE SELECTIONS
CYCLE SETTINGSCYCLE OPTIONS

12
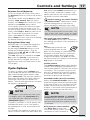
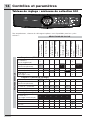
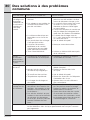
Controls and Settings
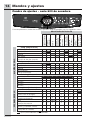
These temperature, dryness levels and options are available with the following cycles:
heavy
duty
towels
normal
20
min
fast dry
delicates
mixed
load
time dry
temperature (temp)
high
normal
low
air dry
dry level (dryness)
high
normal
less
damp
dry time (dry time)
auto dry
60 min
45 min
30 min
options
perfect steam™
wrinkle release
eco
delay time
press & hold chime
control lock
= Available selections. = Factory presets. = Non-modifiable presets.
Setting Chart - 400 Series Dryer
CYCLE SELECTIONS
CYCLE SETTINGSCYCLE OPTIONS

13
Setting Chart - 500 Series Dryer
These temperature, dryness levels and options are available with the following cycles:
heavy/
towels
normal
active
wear
mixed
load
18
min
fast dry
delicates
time dry
instant
refresh
temperature (temp)
sanitize
high
normal
low
air dry
dry level (dryness)
max
high
normal
less
damp
dry time (dry time)
auto dry
75 min
60 min
45 min
30 min
options
anti-static
perfect steam™
wrinkle release
extended tumble
eco
delay time
press & hold chime
control lock
= Available selections. = Factory presets. = Non-modifiable presets.
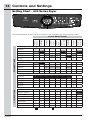
Controls and Settings
CYCLE SELECTIONS
CYCLE SETTINGS
CYCLE OPTIONS

14
Controls and Settings
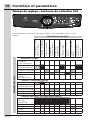
Setting Chart - 600 Series Dryer
These temperature, dryness levels and options are available with the following cycles:
heavy/
towels
allergen
normal
active
wear
mixed
load
15
min
fast dry
delicates
time dry
instant
refresh
temperature (temp)
sanitize
high
normal
low
air dry
dry level (dryness)
max
high
normal
less
damp
time dry (dry time)
auto dry
75 min
60 min
45 min
30 min
options
anti-static
perfect steam™
wrinkle release
extended tumble
eco
delay time
press & hold chime
control lock
= Available selections. = Factory presets. = Non-modifiable presets.
CYCLE SELECTIONS
CYCLE SETTINGS
CYCLE OPTIONS

15
Press the power button to turn on the
unit. Turn the cycle selector in either direc-
tion or repeatedly press the cycles button
(depending on your model) to scroll to the
desired cycle. The indicator light for the
cycle selected will be illuminated and the
estimated drying time for Auto Dry cycles
or the actual drying time for Time Dry
cycles will be displayed on the LED display
screen.
Default settings and options will automati-
cally be indicated for the cycle selected. In
most cases cycle settings and options can
be changed. See
Cycle Settings, Cycle Op-
tions,
and
Setting Charts
for more details.
To change the cycle once it has be-
gun, press the cancel button before
selecting a new cycle. Just turning
the cycle selector ring or pressing the
cycles button WILL NOT change the
cycle.
Auto Dry Cycles
Auto dry cycles take the guesswork out of
selecting the correct drying time for each
load. Moisture sensors sense the moisture
level of the load as it tumbles through the
heated air. With Auto Dry cycles, the load
will automatically be dried at the selected
temperature to the desired dryness level.
Auto Dry cycles save time and energy and
protect fabrics. When the load has reached
the selected dryness level, it will continue to
tumble, unheated, during a cool down pe-
riod. This helps reduce wrinkling and makes
items easier to handle during unloading.
Controls and Settings
SELECTING THE RIGHT CYCLE TO SAVE ENERGY
This dryer has been specifically designed with options to help you save energy and at
the same time utilize the optimal drying setting for your clothing.
The normal cycle was used to rate the dryer for energy efficiency.
The normal cycle defaults to normal temperature setting, normal
dryness level and eco mode option (if available) on.
Some cycles save more energy than others. Cycles that use the least amount of heat
save the most energy. Use the lowest heat setting (auto and timed dry cycles) and less
dry setting (auto dry cycles) to save on energy and prevent over drying your clothing.
NOTE
Initial cycle times for Auto Dry Cycles are
only estimates, the actual drying time
may differ slightly from the time displayed.
Cycle Selection
Drying times vary depending on size and
dampness of the load and fabric type. If
the load is too small or almost dry, the
moisture sensors may not detect enough
moisture to continue the cycle and the
cycle may end after a few minutes. If this
occurs, then select the time dry cycle to
dry such loads.
Room temperature and humidity, type of
installation and electrical voltage or gas
pressure can also affect drying time.
heavy duty (on select models)
Select this cycle to dry durable fabrics
such as jeans and overalls.
towels (on select models)
Select this cycle to dry heavy loads such as
towels and non-rubber-backed bath mats.
heavy/towels (on select models)
Select this cycle to dry heavy loads and
durable fabrics such as towels, jeans and
overalls.
allergen (on select models)
Select this cycle where you wish to reduce
allergens as you dry your load. Items prone
to heat damage are not recommended for
this cycle.
normal
Select this cycle to dry everyday fabrics
including cottons, linens and sheets.
active wear (on select models)
Select this cycle to dry lightweight synthetic
athletic apparel including stretch fabrics.
delicates
Select this cycle to dry knits and delicates.
mixed load (on select models)
Select this cycle to dry loads containing a
mix of fabrics.
Timed Dry Cycles
The timed drying cycles allow the selection
of exact drying times. The time dry cycle
allows the option to select drying time
settings ranging from 30 to 75 minutes
(depending on the model). Various drying

16
Controls and Settings
Follow the fabric care label in-
structions on items to be dried.
For best results
To change the temperature, press the temp
button to scroll to the desired setting.
Drying Temperature (temp)
time dry
Select this cycle to manually set the drying
time from 30 to 75 minutes (depending on
model) for any load.
20
min
fast dry (400 series model)
Select this cycle to quickly dry small loads
in 20 minutes.
18
min
fast dry (500 series model)
Select this cycle to quickly dry small loads
in 18 minutes.
15
min
fast dry (600 series model)
Select this cycle to quickly dry small loads
in 15 minutes.
instant refresh (on select models)
Select this cycle to refresh fabrics, remove
odors and reduce static by injecting the
perfect amount of steam into clothing
that has been left in the dryer, stored in
crowded closets, drawers, or unpacked
luggage.
NOTE
It is not recommended to use fabric soft-
ener sheets with steam cycles or steam
options as it may cause staining on clothes.
NOTE
To change a cycle setting once the cycle
has begun, press the start/pause but-
ton, make the new selection and press
start/pause again.
sanitize (on select models)
Recommended for durable fabrics and tow-
els. Use this selection to remove harmful
bacteria from your clothing or other items
where sanitization is desired. This option will
kill 99.9% of bacteria. A higher temperature
is required to kill bacteria. Please check fab-
ric care labels to prevent damage.
high
Recommended for most cotton fabrics.
normal
Recommended for wrinkle free, easy care,
lightweight fabrics and bulky loads.
low (on select models)
Recommended for delicate fabrics.
air dry
This setting (no heat) should only be used
with a time dry cycle to dry items contain-
ing feathers, down, foam rubber, plastics
or rubber-like materials; to refresh clothing,
stuffed animal, pillows or blankets; and to
dust draperies.
To return to factory settings,
press the dryness and options
buttons at the same time and hold
until the signal sounds.
Cycle Settings
To set or change the drying temperature,
dryness level, or drying time press the
temp, dryness or time dry buttons to
scroll to the desired settings. The indicator
light for each setting will be illuminated
when selected.
To protect your fabrics, not all tempera-
tures or dryness levels are available with
With exception of the sanitize temperature
setting and the perfect steam
tm
option,
adjustments made to cycle settings and op-
tions will be remembered and recalled each
time that cycle is selected in the future.
WARNING
FIRE HAZARD
To avoid fire hazard, DO NOT use heat
to dry items containing feathers or down,
foam rubber, plastics similarly textured,
rubber-like materials. Use the time dry
cycle and the air dry (no heat) setting.
every cycle. If a temperature or dryness
level is not appropriate for the cycle, it
cannot be selected and will not be lit when
scrolling through the settings.
times and temperature settings can be
selected when using this cycle.
The fast dry cycles (on select models)
have preset times of 15, 18 or 20 minutes
(dependent on model) with a preset tem-
perature of high only.
Dryness levels will not be an available option
when using either of the timed drying cycles.

17
Controls and Settings
Cycle Options
To select an option, press options and
scroll though the options until the indicator
light for the desired option flashes, then
press select (set). The indicator will illumi-
nate when the option has been selected.
Follow the same steps to deselect an
option. The indicator light will turn off when
the option is deselected.
NOTE
To change a cycle option once the cycle
has begun, press the start/pause but-
ton, make the new selection and press
start/pause again.
perfect steam
TM
(on select models)
The perfect steam
TM
option injects steam
into the clothing prior to cool down to
reduce wrinkling, ironing and static cling.
NOTE
It is not recommended to use fabric soft-
ener sheets with steam cycles or steam
options as it may cause staining on clothes.
options
select
de-select
To protect your fabrics, not all options are
available with every cycle. If an option is
not available for a cycle, the indicator will
not light.
Occasionally, two options or settings in the
same cycle will conflict with each other, like
anti-static (on select models)
The anti-static option injects steam into
the clothing just before cycle completion to
reduce static.
eco
The eco option reduces the
drying temperature a few de-
grees to save energy. In conjunction with
automatic moisture sensors, cycle times
will increase slightly, but overall energy
usage will decrease. The eco icon will il-
luminate on the LED display to indicate the
eco option is activated.
wrinkle release
The wrinkle release option helps prevent
wrinkles and tangling by tumbling the dry
load without heat for 5 minutes out of every
10 minutes. The 5 minutes on and 5 min-
utes off is repeated for a total 45 minutes.
A chime will sound after each tumble as a
reminder to remove the dried load.
extended tumble (on select models)
Select the extended tumble option if the
dried load might not be removed promptly
at the end of the cycle. The dried load will
tumble continuously without heat for 30
minutes. A chime will sound periodically to
remind you to remove the dried load.
NOTE
When extended tumble and wrinkle
release options are both selected the
amount of time the load will tumble with-
out heat will increase to a period of up to
75 minutes.
Dryness Level (dryness)
To set or change the dryness level, press
the dryness button to scroll to the desired
setting.
The dryness levels include max (on select
models), high, normal, less (on select
models), and damp. Most Auto Dry cycles
default to the normal dryness level.
Occasionally a load may seem too damp
or over-dried at the end of the cycle. To
increase drying time for similar loads in the
future, select high or max (on select mod-
els). To decrease drying time for similar
loads, select less (on select models).
Select damp for items you wish to partially
dry before hanging or ironing.
Drying time (time dry)
Manually select or change the drying time
for a time dry cycle (on select models)
by pressing the time dry button to scroll
though the available options. Time dry
options include 30, 45, 60 and 75 minutes
(dependent on model).
The auto selection is a default for all auto
dry cycles and fast dry cycles and can-
not be selected or changed. All actual or
predicted dry times will count down on the
LED display.
delay time (on select models)
Use delay time to delay the
start of the drying cycle to a time
convenient to your schedule or
eco option and sanitize temperature (on
select models). When this happens, the
option selected first will cause the conflict-
ing option to not be selectable.

18
Controls and Settings
Other Features
LED Display
chime
A signal will sound at the end of the cycle
(and periodically during extended tumble
or wrinkle release). To mute or unmute
the chime, press and hold the select but-
ton for 3 seconds.
Muting the end of cycle signal will not
mute the button tones.
options
select
de-select
hold ‘select’ 3 s to mute/unmute
NOTE
For step-by-step instructions on door re-
versal, refer to the
Installation Instructions
supplied with this dryer.
WARNING
Clean the filter after every load. A
CLEAN LINT message will appear on
the LED display at the end of the cycle
to remind you to remove the lint from
the filter.
LuxCare
TM
Lint Shield filter
The dryer is equipped with a clamshell
style LuxCare
TM
Lint Shield filter.
control lock
To lock the controls between cycles,
scroll to the control lock option and
press select. The control lock icon
will show on the LED display. To unlock the
controls scroll to the control lock option again
and press select. Use this feature to reduce
the likelihood of accidental operation by
children. Dryer cycles will not run when
Control Lock is activated.
The estimated cycle time for auto dry,
the actual time for time dry, or the delay
time countdown will be displayed when
the cycle is selected. Once the cycle has
started, the estimated remaining time
will be displayed for the remainder of the
cycle.
As the dryer progresses through the cycle
phases, the row of cycle phase indicators
lights up under the cycle time.
Delay time, eco, control lock, mute,
and clean lint icons are also displayed
here when activated.
Drum Light (on select models)
The drum light will come on whenever
the door is opened to illuminate the drum
during loading and unloading. Closing the
door turns off the light. The drum light will
automatically turn off if the door is left open
more than 3 minutes.
Reversible Door
The dryer is equipped with a reversible
door. The door can be hinged on the right
or left side.
NOTE
While counting down during delay time,
you will notice your dryer periodically
tumbling for a few minutes without heat
to redistribute the load, maximizing load
freshness.
during off-peak energy hours. The start of
any cycle can be delayed for 30 minutes
to 12 hours. After selecting the delay time
option, use the cycle selector to scroll to
the desired delay time and press start. The
delay time icon will illuminate on the LED
display to indicate the delay time option is
activated, The delay time will begin counting
down on the LED display once activated.

19
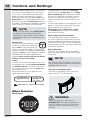
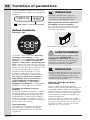
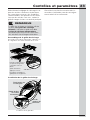
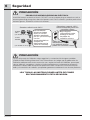
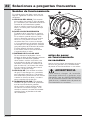
If rack is in separate pieces, press tabs
down and insert rear into front.
Insert rack until
tabs click.
After use, press
tabs down and
collapse rack for
storage.
NOTE
The drying rack accessory should only be
used with time dry cycles. Use of rack
with auto dry cycles will result in a short-
ened cycle with unwanted drying results.
Controls and Settings
Optional Drying Rack
(not included)
Use the drying rack for items which should
not be tumble dried. Extend the collapsed
drying rack and insert the rack into the
dryer drum. Place the front legs into the
front air grill and lower the rear of the rack
onto the back of the dryer drum.
Place items to be dried on top of the rack,
leaving space between items and not
allowing them to hang over the sides or
through the holes. The weight should not
exceed 10 lbs (4.5 kg).
Select the air dry setting for items con-
taining plastic, foam rubber, rubber-like
materials, feathers or down. When items
are dry, remove the rack and store it in a
convenient location.
Assemble the drying rack
Installing drying rack
Front legs in
side of grill
Rear legs
on drum
backsheet
Back-
sheet
of dryer
drum
Install the drying rack
NOTE
For step-by-step instructions cleaning
the lint filter, refer to
Cleaning the Filter
in
the Care & Cleaning
section of this Use
and Care Guide.
See the Accessories section of the
Installation Instructions for ordering
information.

20
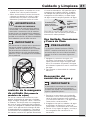
Care & Cleaning
Inside
• Occasionally a waxy build-up may form
on the lint filter and/or moisture sensing
bars from using dryer-added fabric
softener sheets. To remove this build-up,
wash them with warm, soapy water. Dry
the filter thoroughly and replace. DO
NOT operate the dryer without the lint
filter in place.
• If the dryer drum becomes stained from
non colorfast fabrics, clean the drum
with a damp cloth and a mild liquid
household cleanser. Remove cleanser
residue before drying the next load.
• Before cleaning the dryer drum interior,
unplug the electrical power cord to avoid
electrical shock hazards.
• DO NOT use any type spray cleanser
when cleaning the dryer interior. Hazard-
ous fumes or electrical shock could occur.
• Every 18 months a qualified service pro-
fessional should clean the dryer cabinet
interior, lint screen housing and exhaust
duct. These areas can collect lint and
dust over time. An excessive amount
of lint build-up could result in inefficient
drying and possible fire hazard.
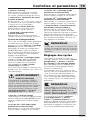
WARNING
To reduce risk of fire or serious injury to
persons or property, comply with the ba-
sic warnings listed in the Important Safe-
ty Instructions and those listed below.
Outside
• Clean the dryer cabinet with mild soap
and water. Never use harsh, gritty or
abrasive cleansers.
• If the cabinet becomes stained, clean
with diluted chlorine bleach (1 part
bleach to 8 parts water). Rinse several
times with clear water.
• Remove glue residue from tape or labels
with a mixture of warm water and mild
detergent. Or, touch residue with the
sticky side of the tape or label.
WARNING
Clean the lint filter after every load.
CLEAN LINT will be displayed at the
end of the cycle to remind you to re-
move lint from the filter.
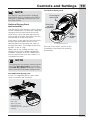
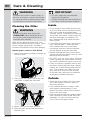
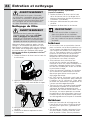
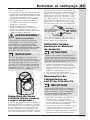
Cleaning the Filter
IMPORTANT
• DO NOT open the clamshell filter
beyond the hinge limit.
• ALWAYS handle the clamshell filter by
the frame, not by the mesh material.
Clean the lint filter after every load. Lint
build-up on the filter restricts air flow, which
causes longer drying times. The filter is
located at the bottom of the door opening.
2. Press down the center tab on the top
of the filter to open the clamshell.
3. Gently clean the lint from the filter.
4. Snap the filter closed and place back
into the dryer.
1. Remove the filter by pulling it straight up
from the dryer.
Cleaning the LuxCare
TM
Lint Shield
La page est en cours de chargement...
La page est en cours de chargement...
La page est en cours de chargement...
La page est en cours de chargement...
La page est en cours de chargement...
La page est en cours de chargement...
La page est en cours de chargement...
La page est en cours de chargement...
La page est en cours de chargement...
La page est en cours de chargement...
La page est en cours de chargement...
La page est en cours de chargement...
La page est en cours de chargement...
La page est en cours de chargement...
La page est en cours de chargement...
La page est en cours de chargement...
La page est en cours de chargement...
La page est en cours de chargement...
La page est en cours de chargement...
La page est en cours de chargement...
La page est en cours de chargement...
La page est en cours de chargement...
La page est en cours de chargement...
La page est en cours de chargement...
La page est en cours de chargement...
La page est en cours de chargement...
La page est en cours de chargement...
La page est en cours de chargement...
La page est en cours de chargement...
La page est en cours de chargement...
La page est en cours de chargement...
La page est en cours de chargement...
La page est en cours de chargement...
La page est en cours de chargement...
La page est en cours de chargement...
La page est en cours de chargement...
La page est en cours de chargement...
La page est en cours de chargement...
La page est en cours de chargement...
La page est en cours de chargement...
La page est en cours de chargement...
La page est en cours de chargement...
La page est en cours de chargement...
La page est en cours de chargement...
La page est en cours de chargement...
La page est en cours de chargement...
La page est en cours de chargement...
La page est en cours de chargement...
La page est en cours de chargement...
La page est en cours de chargement...
La page est en cours de chargement...
La page est en cours de chargement...
La page est en cours de chargement...
La page est en cours de chargement...
La page est en cours de chargement...
La page est en cours de chargement...
La page est en cours de chargement...
La page est en cours de chargement...
La page est en cours de chargement...
La page est en cours de chargement...
La page est en cours de chargement...
La page est en cours de chargement...
La page est en cours de chargement...
La page est en cours de chargement...
La page est en cours de chargement...
La page est en cours de chargement...
La page est en cours de chargement...
La page est en cours de chargement...
-
 1
1
-
 2
2
-
 3
3
-
 4
4
-
 5
5
-
 6
6
-
 7
7
-
 8
8
-
 9
9
-
 10
10
-
 11
11
-
 12
12
-
 13
13
-
 14
14
-
 15
15
-
 16
16
-
 17
17
-
 18
18
-
 19
19
-
 20
20
-
 21
21
-
 22
22
-
 23
23
-
 24
24
-
 25
25
-
 26
26
-
 27
27
-
 28
28
-
 29
29
-
 30
30
-
 31
31
-
 32
32
-
 33
33
-
 34
34
-
 35
35
-
 36
36
-
 37
37
-
 38
38
-
 39
39
-
 40
40
-
 41
41
-
 42
42
-
 43
43
-
 44
44
-
 45
45
-
 46
46
-
 47
47
-
 48
48
-
 49
49
-
 50
50
-
 51
51
-
 52
52
-
 53
53
-
 54
54
-
 55
55
-
 56
56
-
 57
57
-
 58
58
-
 59
59
-
 60
60
-
 61
61
-
 62
62
-
 63
63
-
 64
64
-
 65
65
-
 66
66
-
 67
67
-
 68
68
-
 69
69
-
 70
70
-
 71
71
-
 72
72
-
 73
73
-
 74
74
-
 75
75
-
 76
76
-
 77
77
-
 78
78
-
 79
79
-
 80
80
-
 81
81
-
 82
82
-
 83
83
-
 84
84
-
 85
85
-
 86
86
-
 87
87
-
 88
88


Electrolux EFME627UIW Manuel utilisateur
- Catégorie
- Sèche-linge électriques
- Taper
- Manuel utilisateur
- Ce manuel convient également à
dans d''autres langues
- English: Electrolux EFME627UIW User manual
- español: Electrolux EFME627UIW Manual de usuario
Documents connexes
Autres documents
-
Whirlpool WGD96HEA Mode d'emploi
-
-
-
Whirlpool WGD94HEAC2 Le manuel du propriétaire
-
-
-
-
Frigidaire FGQ1452HE Le manuel du propriétaire
-
 Caframo 7802CA-GBX Manuel utilisateur
