Foster Dissipatore 375 W Manuel utilisateur
- Taper
- Manuel utilisateur
La page charge ...
La page charge ...
La page charge ...
La page charge ...
La page charge ...
La page charge ...
La page charge ...
La page charge ...
La page charge ...
La page charge ...
La page charge ...
La page charge ...
La page charge ...
La page charge ...
La page charge ...
La page charge ...
La page charge ...
La page charge ...
La page charge ...

MODED’EMPLOIPOURL’INSTALLATIONDUBROYEUR
Ăusageexclusifdesinstallateursspécialisés
Lemoded’emploiquisuitestadresséàl’installateurqualifié,afinqu’ilpuisseexécuterlesopérations
delafaçonpluscorrectepossibleetselonlesnormesélectriquesethydrauliquesenvigueur.
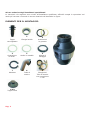
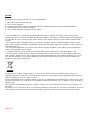
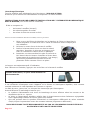
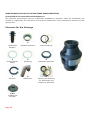
Élémentspourlemontage
1
2
3
Bouchon Manchonde
bonde
Jointdebonde
4 5
6
Joint Anneau
métallique
Anneaude
serrage
7
8
9
Baguede
serrage
Tube
d’évacuation
Bride
métallique,Joint
d’étanchéïté,Vis
defixage
1/bis
BouchonExtra
Pag.20
NOTES
Remindingtherightprocedureforusetheappliance:
1.Openthewater(maximumjet)
2.Turnonthedisposer
3.Graduallypushtheorganicmaterialwithinthegrindingchamberuntilitstotalelimination
4.Letthewaterrunforafewseconds
5.Turnoffthedisposerandturnoffthewater
•It’simportantnottoloadthegrindingchamberbeforeopeningthewaterandturningonthe
disposerorusingaslowjetofwaterduringthegrinding,otherwiseitwouldcreateadoughdifficult
toevacuateorevenworseclogthedrain.Wateristhewastevehiclesomorewatermeansbetter
results.
•Ourdisposerhasnobladesinside,itworkslikeagrater.Thispeculiaritymakesitsafer.Atthe
sametime,absenceofbladescomplicatesstrongfibrouswastedisposal(artichoke,celery,leeksin
bigquantities,etc).
•Itisnotrecommendedtousehotwaterwhileusingthedisposer.Coldwaterkeepsfatparticles
solid,removingthemmoreeasily.
•Tospeedgrindingcutorbreakintosmallerpiecesbonesandpeels,especiallylargerones.
•Ifthedisposerworksloudlyinabsenceofhardwastesuchasbonesorfruitshazels,makesure
thataspoon,bottlecaporsomeobjectdidn’tfallaccidentallyintothegrindingchamber.Ifitisso,
turnoffthedisposer,turnoffthewaterandremovetheobjectusingapairofpincerswithlong
handlesoranyothersimilartool.
Ifyouwanttodisposeofthisproduct,donotmixitwithgeneralhouseholdwaste.Thereisa
separatecollectionsystemforusedelectronicproductsinaccordancewithlegislationthatrequires
propertreatment,recoveryandrecycling.
PrivatehouseholdinthememberstatesoftheEU,inSwitzerlandandNorwaymayreturntheirused
electronicproductsfreeofchargetodesignatedcollectionfacilitiesortoaretailer(ifyoupurchasea
similarone).
Forcountriesnotmentionedabove,pleasecontactyourlocalauthoritiesforthecorrectmethodof
disposal.
Bydoingsoyouwillensurethatyourdisposedproductundergoesthenecessarytreatment,recovery
andrecyclingandthuspreventpotentialnegativeeffectsontheenvironmentandhumanhealth.
Pag.13

SAFETYINSTRUCTIONS
Thewastedisposerhasanoverloadprotection.
Ifanobjectfallsintothehousingorifthereisoverloadthewastedisposerstopsautomatically.You
shouldoperateasfollows:
1. PuttheswitchontheOFFpositionorunplugtheappliance.
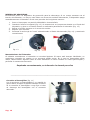
2. Insertthehexwrench(Fig.12)intotheopeningatthebottomofthemotorshaftandrotatethe
toolcounterclockwisetounblockthefoodwastedisposer(Fig.13)
3. Removetheobjectortheoverload.
4. Waitfor5/10minutes.
5.Pushtheredresetdisposerbottom(Fig.14)andrestarttheappliance.
Fig.12
Fig.13
Fig.14
(UK)DISPOSERMAINTENANCE
Withnormaluseyourdisposershouldnotrequireanyspecialcare.
Themotorispermanentlylubricatedandwillnotrequireoilingundernormaluseconditions.Ifused
according to the operating instructions above, yourdisposershouldnotrequirecleaning.However
shoulditstarttosmell,grindingatrayoficecubes in the disposer will clean the grinding
components.Grindingalemoncutintoquarterswillalsogiveyourdisposerafresh,cleansmell.
Ifusedinaproperwaythewastedisposerwilllastforyears
DishwasherConnection(Fig.11)
Itispossibletoconnectthedishwasherdischarge
tubewiththefoodwastedisposerØ25mm.
Withthehelpofascrewdriverandarubber
hammerremovetheplasticstopperpositionedin
theinnerseatofthedishwasherconnection.
Fasten the dishwasher discharge tube to the
garbagedisposer
Fig.11
Pag.12
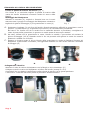
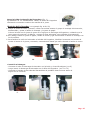
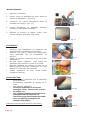
Enleverlabondedel'évier(Fig.1)
Retirerlabondedel'évieravecl'aided'untournevis, ôtant
toutetracedemasticadhéréàlabride.
Montagedubroyeur
Fig.1
A.Desserrerleclamppourenleverlamanchon.Dévisserlabaguedeserrageetdétacherlajointen
papier.
Positionnezensuitelamanchonaveclajointencaoutchoucdansletroudedéchargedel’évier,
faisantattentionàcequelejoint(noiroublanc,choisirlemieuxadapté)soitinstallé
correctement.
B.Parendessous,positionnezlajointenpapier,l’anneaumétalliqueetvisserlabagueàl’évieren
utilisantles3visdefixage.
Unirl’appareilàlamanchonetpositionnerànouveaulabaguedeserrageenfaisantattentionau
côtéàmonter.
C.Pourunbranchementplusfaciledubroyeuràlamanchon,lubrifierlégèrementavecdel’huile
decuisinelebordduparejets.(Fig.D)
A.
B.
C.
D.
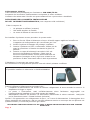
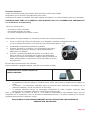
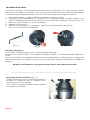
Branchementhydraulique
Attacherletubed’évacuationaubroyeuraveclabrideelevisfournieavecl’équipement.
Brancherensuiteladéchargedudissipateurausiphondel’évier(voirel’exemplefig.E).
Détacherlebouchondanslecollecteurdedéchargedudissipateuravantdelebrancheravec
le«tropplein»del’évier.(voirel’exemplefig.F.1F.2)
Contrôlerl’étatdestuyauteriesenleslibérantdeséventuellesobstructionsavantdeprocéder
aubranchage.
E.
F.1
F.2
Pag.21

Branchageélectrique
Touslesmodèlessontprédisposéspourfonctionnerà220240V/50Hz.
S’assurerquelatensiondel’alimentationcorrespondeàlavaleursusdite.
.
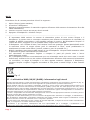
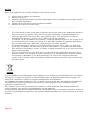
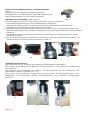
INSTRUCTIONSPOURUNECORRECTEINSTALLATIONDEL’INTERRUPTEURPNEUMATIQUE
PRETAMONTER(noninclusdanslaconfection)
ElKitsecomponede:
• Unboutonàsoufflet(chromé)
• Unrebordangulaireenmétal
• UnmètredetubederaccordenPVC
1. Faireuntroude35mmdediamètresurleplancherdel’évieroubienfixerle
rebordangulaireenmétalavecses3vissesàl’endroitlemieuxindiquépour
sonutilisation.
2. Dévisserlecontreécrouduboutonàsoufflet
3. Insérerleboutondansletrououdanslerebord
angulaire.Introduirelejointparendessousetle
fixerenresserrantlecontreécrouenplastique
4. Introduireunedesextrémitédutubederaccorden
PVCdanslebecduboutonàsouffletetl’autredans
l’interrupteuràairsituésouslebroyeur(voirimage)
aprèsavoirpréalablementdévissél’écroude
protection.Enfinremettrel’écrouenplace.
Lebroyeurestmaintenantprêtàl’utilisation.
Pourl’allumeretl’éteindre,appuyeruneseulefoissurleboutonàsoufflet.
Commealternative,onpeutaussiinstallerun
télécommande.
Branchageducâbled’alimentationélectriqueauréseau
Il est nécessaire d’interposer entre l’appareil et leréseauuninterrupteurbipolaire,aveccourant
nominalminimumde10Arépondantauxnormesenvigueur.
Lecâbledeterre,jaune/vert,nedoitpasêtreinterrompuparl’interrupteur.
Avantd’effectuerlebranchages’assurerque:
• Le système d’alimentation soit muni de branchage de terre efficient selon les normes et les
dispositionsdeloienvigueur.
• La prise et l’interrupteur bipolaire utilisés dans le branchement soient facilement rejoignables
avecl’appareillageinstalléethorsdeportéedesenfants.
• Quesoitprésentdanslesystèmed’électricitéuninterrupteur différentiel de valeur nominale
10A/0,03pourlaprotectioncontrelescontactsindirects(disjoncteurdifférentiel)
NOUSDECLINONSTOUTERESPONSABILITEAUCASOULESMESURESPOUREVITERLES
ACCIDENTSN’ONTPASETERESPECTEES
Pag.22
Fig.G
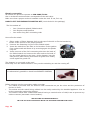
OPERATINGINSTRUCTIONS
1. Removethesinkdrainstopper
2. Turncoldwaterontoamedium
high flow and turn the waste
disposeron.(Fig.GH)
3. Putallfoodwasteintothe
diaposer while the disposer is
operatingandwaterrunning.
(Fig.IL)
5. Let the disposer continue to run
for about half a minute after the
grindingisover.
6. Turnthedisposeroffandleavethe
waterrunningforhalfaminute
(Fig.MN)
Fig.H
Fig.I
Fig.L
Fig.M
CAUTION:
• Make sure that the authorities permit the
installationofthewastedisposer
• The appliance must be installed so that the
resetbuttonsisreadilyaccessible
• Theappliancemustbepositionedsothatthe
plugisaccessible
• Usethegarbagedisposeronlyforfoodwaste.
• Donotusethefoodwastedisposerwithhard
materialslikeglassormetal.
• Turnthemachineofforunplugitwhiletrying
to unblock a blocked grinding wheel with a
tool.
• Useonlycoldwater.
DONOTPUTINSIDE:
• Metal,glass,china.
• Lyeanddraincleaningchemicals.
• Plasticmaterials.
• artichokeorpineappleleaves,
asparagus,celery,
filamentouselementsshouldbe
previouslyshreddedandgradually
spilledtogetherwithahomogeneous
mixofotherfoodwaste
Pag.11
Fig.N

Electricconnection
Allmodelsarepresettooperateat220240V/50Hz.
Seetoitthatthemainstensioncorrespondstothesaidvalue.
Makesurethatapropersocketisinstalledunderthesink.Ifnot,fititup.
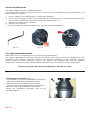
HOWTOFITTHEPNEUMATICSWITCHKIT(notincludedinthepackage)
Thekitconsistsof:
• One(chromiumplated)foldedswitch
• Oneangularmetalbracket
• OnemeterlongPVCconnectingtube
Howtofittheswitch:
1.
Eithermakea35mmdiameterholeonthetopofthesinkorfixthebracketby
meansofthescrewsintheproperposition.
2. Unscrewthefasteningringnutofthefoldedswitch.
3. Inserttheswitchintotheholeorthebracket.Fitthegasket
fromunderneathandfastenitbyscrewingagaintheplastic
ringnut.
4. InsertoneendofthePVCconnectingtubeintothebeakof
thefoldedswitchandconnecttheotherendtothebeakof
theairswitchplacedonthebaseofthedisposer(seethe
sidepicture)afterhavingunscreweditsguardnut.Finally
screwagaintheguardnut.
Thedisposerisnowreadytobeused.
Pressonlyoncethefoldedswitchtocarryouttheswitchingonandtheturningoff.
ItisalternativelypossibletoinstalloneREMOTECONTROL
Beforecarryingouttheconnectionmakesurethat:
• Themainsisprovidedwithanefficientearthconnectionaspertherulesandtheprovisionsof
thelawinforce.
• Thesocketandtheswitchbeingutilizedcanbeeasilyreachedbytheinstalledappliance.Seeto
ittheycannotbereachedbychildren.
• Themainsisfittedwitha
differentialswitchhavinganominalvalueof10A/0.03Atopreventany
indirectcontact(automaticcircuitbreaker).
WEDECLINEANYRESPONSIBILITY
INCASEOFNONCOMPLIANCEWITHTHEACCIDENTPREVENTIONRULES
Pag.10
Fig.G
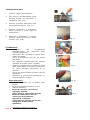
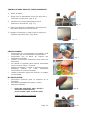
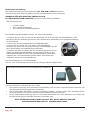
MODED’EMPLOI:
1. Détacherlebouchon.
2. Laisser couler un abondant jet d’eau froide et
allumerledissipateur.(Fig.GH)
3. Introduire les restes alimentaires dans la
chambredebroyage.(Fig.IL)
4. Laisser fonctionner le dispositif quelques
secondesàvideaprèslebroyage.
5. Éteindre le broyeur et laisser couler l’eau
encorequelquessecondes.(Fig.MN)
Fig.H
Fig.I
Fig.L
Fig.M
ATTENTION
:
• S’assurer que l’installation de l’appareil soit
autoriséeparlesautoritéscompétentes.
• Assurezvousqueleboutonderéarmement
reste accessible lors de l’installation du
broyeur.
• Utiliser le broyeur seulement pour les restes
alimentaires.
• Ne pas utiliser l’appareil pour traiter les
matériauxdurscommeleverreetlemétal.
• Éteindre l’appareil ou enlever la fiche de la
prise avant de chercher à débloquer un rotor
bloquéenseservantd’unustensile.
• Utiliser seulement de l’eau froide durant
l’emploidubroyeur.
NEPASMETTRE:
• Dessolutionschimiquespourlenettoyage
deladécharge.
• D’excessives quantités de graisse et d’
huile.
• Desmatièresplastiques
• Feuillesd’artichautoud’ananas,
asperges,céleri,viandecrueoupeau
depouletcru.
• Lesrésidusfilamenteuxdoiventêtre
préalablementdéchiquetéset
introduitsprogressivementensemble
avecunmélangehomogènede
déchetsalimentaire.
Autrementilspourraientbouchervotreévier!
Fig.N
Pag.23

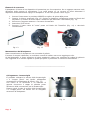
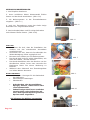
MESURESDESECURITE
Lebroyeurestfournid’undispositifdeprotectionpourlasurcharge.Siuncorpsétrangertombeà
l’intérieurdelachambredebroyage,ous’ilyadanscettedernièreunexcèsdedéchetsalimentaires,
ledispositiféteintautomatiquementlebroyeur.Entelcasprocéderdelamanièresuivante:
1. Porterl’interrupteurenpositionÉTEINToudétacherlafichedelaprise.
2. Introduire la clé hexagonale (Fig. 12)fournie avec l’équipement dans l’ouverture placée sur le
fondsdudispositifettournerensenshoraireouantihorairepourdébloquerlebroyeur(Fig.13).
3. Enleverlecorpsétrangeroul’excèsdematériel.
4. Attendre5/10minutes.
5. Presserlatoucherougede«resettage»placésurlefondsduBroyeurdedéchets
(Fig.14)etleréactivernormalement.
Fig.12
Fig.13
Fig.14
EntretienduBroyeur
Sionl’utilisenormalementlebroyeurn’apasbesoindenettoyage.
Lemoteuresttoujourslubrifié;enconditionsnormalesd’emploi,iln’estpasnécessaired’ajouterde
l’huile.
Silecasseprésenteoùledispositifémettedesodeursdésagréables,ilsuffitdebroyerunplateaude
petitscubesdeglaceenajoutantuncitroncoupéenquatrepournettoyeretparfumerlachambrede
broyage
Employécorrectement,votreappareilvousdureradenombreusesannées
______________________________________________________
Branchagedulavevaisselle(Fig.11)
Ăl’aided’untournevisetd’unmarteaudétacherle
bouchon en caoutchouc situé à l’intérieur de la
connexionpourlelavevaisselle.
Fixerensuiteletubededéchargedulavevaisselle
audissipateur(Ø25mm).
Fig.11
Pag.24
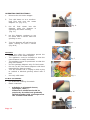
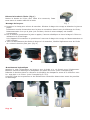
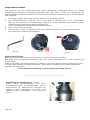
Sinkmountflangeinstallation
Removethesinkwastetrap(fig.1)withascrewdriver and
scrapetheleftoverplumbers’puttyusedtosealthesink
Garbagedisposerinstallation
Loosen the hinged clamp (6) and levering with your hands
remove the garbage disposer flange, unscrew the mount ring
(5)andtaketheflangewasheraway.(4)
Fig.1
A.Putthesinkflange(2)inthesink’swastehole,takingcarethattheblackflangegasket(orthe
whiteone,(3)selectthemostappropriate)setsperfectlywell.Ifit’snotastainlesss
teelsinkbut
asyntheticoraceramicone,youbetterapplyathincoatofsanitarystopperinsteadofflange
gasket.
B
.Underthesink:youneedtofirmlyseatandattachthemountingringwhichhasthreescrews
usedtotightenthemountingring(456)assemblysoitwillhangfirmlyfromthesinkbottom
C.Jointhegarbagedisposertotheflangeandputthehingedclumpinposition(D).Tofacilitate
insertionbetweenthegarbagedisposerandtheflangeputsomecookingoilontheborderofthe
guardsplash.
A.
B.
C.
D.
PlumbingConnection
Attachthedisposerdischargetubewiththetubeflangeusingthegivenscrew.
Connectthegarbagedisposerdischargetube(seefig.E)andtightenittothedraintrap
(ex.F.1F.2)
Toavoidproblems,beforeconnectingtheplumbs,controlthetubescleaningthemif
needed.
E.
Pag.9
F.1
F.2

FOODWASTEDISPOSERINSTALLATIONINSTRUCTIONS
Forqualifiedinstallersuseonly.
The following instructions are for qualified installersabletoperformalltheoperationsinthemost
correctwayaccordingtothelocallyapplicableelectricalandplumbingrules.
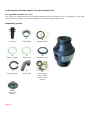
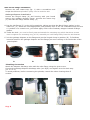
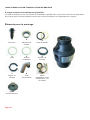
Assemblyparts
1
2
3
Conveyor Sinkflange Flangegasket
4 5
6
Flangewasher Metalring Mountingring
7
8
9
HingedClamp Drainpipe Tubeflange,
tuberubber
gasketand
screws
1/bis
Extrasink
stopper
Pag.8
NOTES
Nousvousrappelonsquelemoded’emploicorrectestlesuivant:
1. Ouvrirl’eaudurobinetaumaximum
2. Allumerlebroyeur
3. Introduireprogressivementlesdéchetsalimentairesdanslechambredetriturationjusqu’à
leurcomplèteélimination
4. Laissercoulerl’eaupourencorequelquessecondes
5. Eteindrelebroyeuretcouperl’eau
______________________________________________________________________
• Ilnefautjamaisverserlesdéchetsàl’intérieurdubroyeursansavoirauparavantalluméle
broyeuretouvertlerobinet.Sanseauoutroppeulesdéchetssetransformeraienten
grumeaudifficilesàévacueroubienboucheraientl’évier.Lafonctiondel’eauestde
transporterlesdéchets;plusilyena,meilleursserontlesrésultats.
• Lebroyeurn’apasdelamesàsonintérieur,ilrâpelesalimentsaulieudelescoupercequi
lerendaussiplussur.Seulinconvénient,’ilnepeutdoncéliminerlesalimentstropfibreux
aveclamêmeefficacité(artichauts,céleripoireauxengrossequantité).
• Iln’estpasconseilléd’utiliserl’eauchaudequandlebroyeurestenroute,eneffetl’eau
froideaideàmaintenirlesparticulesdegrasà‘l’étatsolidecequifaciliteleurélimination.
• Pouraccélérerlatriturationcoupezoucassezenpetitsmorceauxlesosouécorcesdefruits
particulièrementépais.
• Silebroyeurfaittropdebruitalorsqu’iln’yapasdedéchetsparticulièrementdursàson
intérieur(petitsosounoyauxdefruits)vérifiezqu’iln’ysoitpastombéunepetitecuillère,
unbouchonenplastiqueouunobjetquelconque.Sic’estlecas,éteignezlebroyeur,
coupezl’eauetretirezl’objetenquestionàl’aided’unepinceamanchelongouautreoutil
dumêmegenre.
Sivoussouhaitezvousdébarrasserdecetappareil,nelemettezpasàlapoubelleavecvosordures
ménagères:Ilexisteunsystèmedecollecteséparépourlesappareilsélectroniquesusagés,qui
doiventètrerécuperés.Traitésetrecyclésconformémentàlalégislation
Leshabitantsdesétatsmembresdel’UE,deSuisseetdeNorvègepeuventretournergratuitement
leursappareilsélectroniqueusagésauxcentresdecollecteagréésouàundétaillant(sivous
rachetezunappareilneuf)
Danlespaysquinesontpasmentionnéscidessus,veuillezcontacterlesautoritéslocalespour
savoircommentvouspouvezvousdébarrasserdevosappareils.
Vousgarantirezainsiquelesappareilsdontvousdébarrassezsontcorrectementrécupérés,traitéset
recyclésetpréviendrezdecettefaçonlesimpactsnéfastespossiblessurl’environnementetlasanté
humaine
Pag.25
La page charge ...
La page charge ...
La page charge ...
La page charge ...
La page charge ...
La page charge ...
La page charge ...
-
 1
1
-
 2
2
-
 3
3
-
 4
4
-
 5
5
-
 6
6
-
 7
7
-
 8
8
-
 9
9
-
 10
10
-
 11
11
-
 12
12
-
 13
13
-
 14
14
-
 15
15
-
 16
16
-
 17
17
-
 18
18
-
 19
19
-
 20
20
-
 21
21
-
 22
22
-
 23
23
-
 24
24
-
 25
25
-
 26
26
-
 27
27
-
 28
28
-
 29
29
-
 30
30
-
 31
31
-
 32
32


Foster Dissipatore 375 W Manuel utilisateur
- Taper
- Manuel utilisateur
dans d''autres langues
- italiano: Foster Dissipatore 375 W Manuale utente
- English: Foster Dissipatore 375 W User manual
- español: Foster Dissipatore 375 W Manual de usuario
- Deutsch: Foster Dissipatore 375 W Benutzerhandbuch
Autres documents
-
Barazza 1DSEC2 Mode d'emploi
-
Franke Тurbo Elite TE-50 (134.0535.229) Manuel utilisateur
-
Whirlpool CN 8652 JA Mode d'emploi
-
Bort Alligator Plus Manuel utilisateur
-
-
-
-
-
-
Maytag KBDS250X5 Le manuel du propriétaire