
31-5000490 Rev. 0 03-20 GEA
Installation Instructions
for your new
Before you begin - Read these instructions completely and carefully.
IMPORTANT – OBSERVE ALL GOVERNING CODES AND ORDINANCES.
Note to Installer – Be sure to leave these instructions with the Consumer.
Note to Consumer – Keep these instructions with your Owner’s Manual for future reference.
RAG13A
Rear Grille
Tools Needed
• 1/4” Nut Driver
• Pliers
Prepare the wall case for
installation of grille:
1. Remove the indoor protective cover from the wall
case, if present.
2. Remove the outdoor protective cover from the wall
case, if present. Remove the cover from inside the
cabinet following the instructions on the cover.
3. If the air conditioner is already installed in the wall
case, turn off the air conditioner, unplug the unit,
and slide the unit out of the case.
CAUTION
Risk of injury or property damage.
To prevent the grille from falling, hold onto the
ribbon on the grille. If there is no ribbon present,
use pliers and wear gloves to hold the grille.
4. To remove an already installed grille, remove the
two screws at the bottom edge of the grille. Slide
down one inch to free the top edge.
Parts Included
• Grille
• “S” clips (2)
• Screws (2)
NOTE:
The grille can be installed from the inside after the
cabinet is installed.

2
Installation Instructions
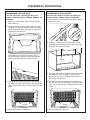
Installatation of new grille
(for wall cases with external grille. Wall case
models: RAB46A, RAB47A, RAB48A, RAB26A, and
RAB26W)
1. Make sure that the grille edge facing up has two
tabs sticking up.
2. Using the ribbon to hold the grille, place the grille
completely through the cabinet so that it is outside.
Angle the grille so that the top edge is against the
top flange of the wall case.
Slot Location
Insert tabs on top of the grille into two slots on
the top rear flange. Make sure that both tabs are
through the slots and visible inside the case.
3. Line up the two plastic grommets in the bottom of
the grille with holes in the bottom rear flange of the
case. Secure with the two included screws from the
inside.
Screws
4. Remove the ribbon from the grille.
Installatation of new grille
(for wall cases with a recessed grille. Wall case
models: RAB20, RAB46, RAB47, and RAB48)
1. Use the pliers to bend back the two tabs on the top
edge of the grille.
2. Install the “S” clips on the top rear flange of the
case approximately 8 inches from each side. Clips
fit through the hole in the flange.
8”
8”
S-CLIP
3. Using the ribbon, place the grille completely through
the cabinet so that it is outside. Then pull back
against the rear of the cabinet and insert the top of
the grille up into the clips.
4. Line up the two plastic grommets in the bottom of
the grille with holes in the bottom rear flange of the
case. Secure with the two included screws from the
inside.
Screws
5. Remove ribbon from the grille.

31-5000490 Rev. 0 03-20 GEA
Instructions pour
l’installation de votre
Avant de commencer – Lisez entièrement et attentivement ces instructions .
IMPORTANT – OBSERVEZ TOUS LES CODES ET TOUTES LES ORDONNANCES EN VIGUEUR.
Note à l’installateur – Veillez à laisser ces instructions au consommateur.
Note au consommateur – Gardez ces instructions avec votre manuel de l’utilisateur pour
RAG13A
Nouvelle Grille
Outils nécessaires
• Tourne-écrou de 64 mm (¼ po)
• Pinces
Préparez le boîtier mural pour
l’installation de la grille
1. Enlevez du boîtier mural le revêtement intérieur de
protection, s’il y en a un.
2. Enlevez du boîtier mural le revêtement extérieur
de protection, s’il y en a un. Enlevez le couvercle
à partir de l’intérieur du boîtier en suivant les
instructions sur le couvercle.
3. Si le climatiseur est déjà installé dans le boîtier
mural, arrêtez le climatiseur, débranchez-le et
glissez-le hors du boîtier.
ATTENTION
Risque de blessure corporelle
ou de dommage aux biens.
Pour éviter que la grille ne tombe, tenez le ruban
sur la grille. S’il n’y a pas de ruban, utilisez une
pince et portez des gants pour tenir la grille.
4. Pour enlever une grille déjà installée, enlevez
les deux vis sur le bord du fond de la grille. Glissez
de 2,54 cm (1 po) le bord supérieur vers le bas.
Pièces incluses
• Grille
• Attache de type S (2)
• Vis (2)
NOTE:
La grille peut être installée de l’intérieur après que le
boîtier est installé.

2
Instructions d’installation
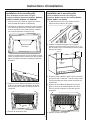
Installation de la nouvelle grille
(Pour les boîtiers muraux avec une grille
extérieure. Boîtiers muraux des modèles: RAB46A,
RAB47A, RAB48A, RAB26A, and RAB26W)
1. Assurez-vous que le bord de la grille face vers le
haut possède deux pattes qui dépassent.
2. Utilisation du ruban pour maintenir la grille, passez-
la au travers du boîtier pour qu’elle soit à l’extérieur.
Inclinez la grille pour que bord supérieur s’appuie
sur le rebord supérieur du boîtier mural.
Slot Location
Insérez les pattes du haut de la grille dans les deux
fentes du rebord arrière. Assurez-vous que les deux
pattes sont dans les fentes et visibles de l’intérieur
du boîtier.
3. Alignez les deux œillets en plastique au fond la
grille sur les trous du rebord inférieur du boîtier.
Fixez la grille de l’intérieur à l’aide des deux vis
comprises.
Screws
4. Enlevez le ruban de la grille.
Installation de la nouvelle grille
(Pour les boîtiers muraux avec une grille
encastrée. Boîtiers muraux des modèles RAB20,
RAB46, RAB47, and RAB48)
1. À l’aide de pinces, pliez vers l’arrière les deux
pattes du bord supérieur de la grille.
2. Installez les attaches de type S sur le rebord
supérieur arrière du boîtier à environ 20,32 cm (8
po) de chaque côté. Les attaches se fixent à travers
les trous du rebord.
8”
8”
S-CLIP
3. À l’aide le ruban, passez la grille à travers le boîtier
pour qu’elle soit à l’extérieur. Tirez-la ensuite contre
l’arrière du boîtier et insérez le haut de la grille sur
les attaches.
4. Alignez les deux œillets en plastique au fond la
grille sur les trous du rebord inférieur du boîtier.
Fixez la grille de l’intérieur à l’aide des deux vis
comprises.
Screws
5. Enlevez le ruban de la grille.
Emplacement
des fentes
Vis
Vis
20,32 cm
(8 po)
20,32 cm
(8 po)
Attache de
type S
-
 1
1
-
 2
2
-
 3
3
-
 4
4


