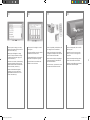
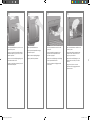
HP DesignJet 4020 Printer series Assembly Instructions
- Taper
- Assembly Instructions

x4
?
In case of difculty, please consult:
- Your printer’s Embedded Web Server
- Using your printer CD
En cas de problème, reportez-vous au :
- Serveur Web intégré de votre imprimante
- CD-ROM Utilisation de votre imprimante
Hilfsmittel bei Problemen:
- Integrierter Web-Server des Druckers
- Drucker-CD
In caso di difcoltà, consultare:
- su EWS della stampante
- sul CD della stampante
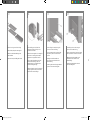
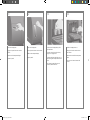
Read these instructions carefully...
What you will need for this procedure
- Some of the printer components are bulky, you
will need up to four people to lift them. When
this is necessary, the symbol shown at the bottom
is shown.
- To assemble the printer you will need at least
3 × 5 m (10 × 16 ft) of empty oor space, and
about four hours.
Lisez attentivement les instructions suivantes...
Conditions requises pour cette procédure
- Dans la mesure où certains des composants
de l’imprimante sont volumineux, jusqu’à quatre
personnes peuvent être requises pour les soulever.
Dans ce cas, le symbole ci-dessous s’afche.
- Pour assembler l’imprimante, vous devez disposer
d’un espace libre d’au moins 3 × 5 m et compter
environ deux heures.
Lesen Sie diese Anleitung sorgfältig durch
Voraussetzungen
- Da einige Komponenten des Druckers relativ
unhandlich und schwer sind, werden zum
Anheben des Geräts bis zu vier Personen
benötigt. In Situationen, in denen dies
erforderlich, wird dieses Symbol verwendet.
- Für den Zusammenbau des Druckers wird eine
freie Bodenäche von ca. 3 x 5 m benötigt.
Die Aktion dauert etwa zwei Stunden.
Leggere queste istruzioni attentamente...
Cosa è necessario per questa procedura
- Poiché alcuni componenti della stampante sono
ingombranti e voluminosi, potrebbero essere
necessarie anche quattro persone per sollevarli.
In questo caso, viene visualizzato il seguente
simbolo.
- Per assemblare la stampante è necessario uno
spazio pari a 3 × 5 m e circa due ore di tempo.
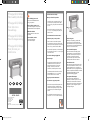
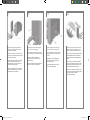
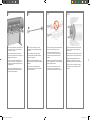
Printer working area
Before you start unpacking, consider where
you are going to put the assembled printer.
You should allow some clear space on all sides
of the printer box. The recommended clearances
are shown in the illustration above.
Zone de travail de l’imprimante
Avant de commencer le déballage, pensez
à l’emplacement où l’imprimante assemblée
sera placée. Vous devez laisser de l’espace
à l’arrière et à l’avant de l’imprimante.
La supercie des espaces libres conseillée
est indiquée dans l’illustration ci-dessous.
Aufstellort des Druckers
Bevor Sie mit dem Auspacken beginnen, sollten
Sie sich bereits darüber im Klaren sein, wo der
Drucker aufgestellt wird. An der Vorder- und
Rückseite des Druckers muss genügend Platz frei
bleiben. Die empfohlenen Abstände zu Wänden
und anderen Gegenständen sind in der
folgenden Abbildung angegeben.
Area operativa della stampante
Prima di cominciare a disimballare la
stampante, considerare lo spazio in cui verrà
sistemata una volta assemblata. È necessario
lasciare dello spazio sia dietro che davanti alla
stampante. Lo spazio consigliato è riportato
nella gura di seguito.
HP Designjet 4020/4020ps
Printer Assembly Instructions
HP Designjet 4020/4020ps
Printer Instructions
d’assemblage
HP Designjet 4020/4020ps
Printer Montageanleitung
HP Designjet 4020/4020ps
Printer Istruzioni per
l’installazione
© 2009 Hewlett-Packard Company
Inkjet Commercial Division
Avenida Graells 501 · 08174
Sant Cugat del Vallès
Barcelona · Spain
All rights reserved
Printed in Germany · Imprimé en Allemagne · Stampato in Germania
10 cm
179 cm
M9_4020_EN_FR_DE_IT.indd 1 29/01/2009 15:26:23

1 2 3 4
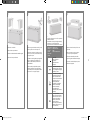
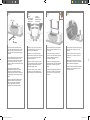
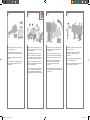
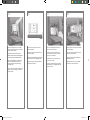
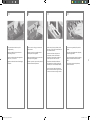
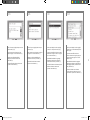
Remove the boxes from the top of the main
printer box.
Retirez les cartons de la partie supérieure
du carton principal de l’imprimante.
Entfernen Sie die Behälter, die auf der
Verpackung der Druckerbasiseinheit liegen.
Rimuovere le scatole dalla parte superiore
della scatola principale.
The shapes on the boxes identify the contents.
Les formes qui gurent sur les cartons permettent
d’identier le contenu.
Die Behälter sind mit Symbolen gekennzeichnet,
an denen sich ihr Inhalt erkennen lässt.
Le gure sulle scatole ne identicano il contenuto.
Mark on box
Marque sur
le carton
Symbol
Segno sulla
scatola
Contents of box
Contenu du carton
Inhalt
Contenuto della scatola
Printer body
Partie principale de
l’imprimante
Druckerbasiseinheit
Stampante
Stand and bin assembly
Assemblage du bac et du support
Sockel-/Ablagefachbaugruppe
Cavalletto e vassoio
Consumables box, including…
Maintenance Kit (keep safe)
Carton des consommables,
y compris le kit de maintenance
(à conserver en lieu sûr)
Verbrauchsmaterialien,
einschließlich… Wartungskit
(bitte sicher aufbewahren)
Scatola di consumabili,
comprendente il kit di
manutenzione (fare particolare
attenzione)
Spare box (used later)
Carton des pièces détachées
(utilisée à la section 3 de ces
instructions d’installation)
Zubehör (siehe Abschnitt
3 dieser Anleitung)
Scatola dei pezzi di ricambio
(utilizzata nella Sezione 3 di
questo documento)
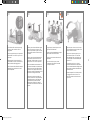
Remove the two side lids.
Retirez les deux capots latéraux.
Nehmen Sie die beiden seitlichen Abdeckungen ab.
Rimuovere i due coperchi laterali.
Cut the strap around the boxes carefully, as the
boxes may fall as soon as the strap is cut.
Coupez avec précaution la sangle qui entoure
les cartons, car ceux-ci peuvent tomber dès que
la sangle est coupée.
Schneiden Sie vorsichtig das, Verpackungsband
durch, mit dem die Kartons gesichert sind.
Achten Sie dabei darauf, dass die Kartons
nicht herabfallen
Nastro Scatola principale della stampante
Tagliare la cinghia di chiusura delle scatole
con cautela perché la scatola potrebbe cadere
nel momento in cui si taglia la cinghia.
M9_4020_EN_FR_DE_IT.indd 2 29/01/2009 15:26:23

5 6 7 8
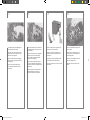
Remove the rst tray from the stand and bin
assembly box.
Retirez le premier bac du carton de l’assemblage
du bac et du support.
Nehmen Sie das erste Tablett aus dem Behälter
mit der Sockel-/Ablagefachbaugruppe.
Rimuovere il primo cassetto dalla scatola del
cavalletto e del vassoio.
When you are unpacking the leg assembly,
you will see that there is anti-slip material
around two of the wheels on the feet.
DO NOT REMOVE this material yet.
Lorsque vous déballez les montants, vous
constatez qu’une bande antidérapante entoure
deux des roues des pieds.
N’ENLEVEZ PAS encore cette bande. Retirez
le premier bac du carton de l’assemblage du
bac et du support.
Beim Auspacken der Standbeinbaugruppe
werden Sie feststellen, dass sich an zwei Rollen
der Füße rutschhemmendes Material bendet.
Entfernen Sie dieses Material jetzt noch NICHT.
Quando si disimballa la confezione delle
gambe, è possibile notare che è presente un
materiale anti-sdrucciolo attorno a due ruote.
NON RIMUOVERE ancora questo materiale.
Remove the main printer box.
Retirez le carton principal de l’imprimante.
Nehmen Sie die Verpackung der
Druckerbasiseinheit ab.
Rimuovere la scatola principale della stampante.
Remove the two packing pieces.
Retirez les deux cales d’emballage.
Entfernen Sie die beiden Sicherungselemente.
Rimuovere le due parti dell’imballaggio.
M9_4020_EN_FR_DE_IT.indd 3 29/01/2009 15:26:24

9 10 11 12
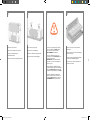
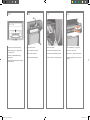
You now need to identify which is the left and
the right side of the cross-brace.
Vous devez à présent identier les côtés
gauche et droit de la traverse.
Stellen Sie fest, welche die linke und welche die
rechte Seite der Querverstrebung ist.
È necessario identicare quale è il lato sinistro
e quale è quello destro del sostegno.
From the rst tray, remove the two boxes marked
with L and R. Place them on the oor as shown.
Retirez du premier bac les deux cartons sur
lesquels sont inscrits L et R. Placez-les sur le
sol comme indiqué.
Nehmen Sie die beiden mit L und R beschrifteten
Elemente heraus, und legen Sie sie auf den
Boden, wie in der Abbildung dargestellt.
Dal primo cassetto rimuovere le due scatole
contrassegnate con L e R (sinistra e destra).
Posizionarle sul pavimento come riportato
di seguito.
Lower the cross-brace on to the L and R boxes.
Abaissez la traverse sur les cartons L et R.
Legen Sie die Querverstrebung auf die mit L und R
beschrifteten Elemente.
Abbassare il sostegno sulle scatole L e R.
2 holes/Deux trous/
Zwei Bohrungen/
Due fori
Left/Gauche/
Links/Sinistra
Right/Droit/
Rechts/Destra
1 hole/Un trou/
Eine Bohrung/
Un foro
Now you will need the bag of screws and the
screwdriver provided. You may notice that the
screwdriver is slightly magnetic.
Vous devez maintenant utiliser le sac de vis et
le tournevis fournis. Vous pouvez noter que le
tournevis est légèrement magnétique.
Sie benötigen nun den Beutel mit den Schrauben
und den mitgelieferten Schraubendreher. Der
Schraubendreher besitzt eine magnetische Spitze.
A questo punto, è necessaria la borsa fornita con
le viti e il cacciavite. Il cacciavite è leggermente
magnetico.
M9_4020_EN_FR_DE_IT.indd 4 29/01/2009 15:26:24

13 14 15 16
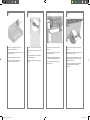
Fix the left leg to the cross-brace using four
screws on the inner side of the leg.
Fixez le montant gauche à la traverse à l’aide
de quatre vis placées sur le côté interne du
montant.
Befestigen Sie das linke Standbein an
der Innenseite mit vier Schrauben an der
Querverstrebung.
Fissare la gamba sinistra al sostegno mediante
quattro viti sul lato interno della gamba.
Remove the two leg covers from the left leg.
Retirez les deux plaques du montant gauche.
Entfernen Sie die beiden Abdeckungen vom
linken Standbein.
Rimuovere i due coperchi dalla gamba sinistra.
Lower the left leg onto the left side of the
cross-brace. The left leg will t only on the
left side of the cross-brace.
Abaissez le montant gauche vers le côté gauche
de la traverse. Le montant gauche s’adapte
uniquement au côté gauche de la traverse.
Setzen Sie das linke Standbein an der linken
Seite der Querverstrebung an. Das linke
Standbein lässt sich nur an der linken Seite
der Querverstrebung anbringen.
Abbassare la gamba sinistra sul lato sinistro del
sostegno. La gamba sinistra può essere ssata
soltanto al lato sinistro del sostegno.
Fix the left leg to the cross-brace using two
screws on the outer side of the leg.
Fixez le montant gauche à la traverse à l’aide de
deux vis placées sur le côté externe du montant.
Befestigen Sie das linke Standbein an der
Außenseite mit zwei Schrauben an der
Querverstrebung.
Fissarla quindi utilizzando altre due viti sul
lato esterno della gamba.
M9_4020_EN_FR_DE_IT.indd 5 29/01/2009 15:26:24

17 18 19 20
Fix the right leg to the cross-brace using
two screws on the outer side of the leg.
Fixez le montant droit à la traverse à l’aide
de deux vis placées sur le côté externe du
montant.
Befestigen Sie das rechte Standbein an
der Außenseite mit zwei Schrauben an
der Querverstrebung.
Fissarla quindi utilizzando altre due viti
sul lato esterno della gamba.
Lower the right leg onto the right side of the
cross-brace. The right leg will t only on the
right side of the cross-brace.
Abaissez le montant droit vers le côté droit de
la traverse. Le montant droit s’adapte uniquement
au côté droit de la traverse.
Setzen Sie das rechte Standbein an der rechten
Seite der Querverstrebung an. Das rechte
Standbein lässt sich nur an der rechten Seite
der Querverstrebung anbringen.
Abbassare la gamba destra sul lato destro del
sostegno. La gamba destra può essere ssata
soltanto al lato destro del sostegno.
Fix the right leg to the cross-brace using four
screws on the inner side of the leg.
Fixez le montant droit à la traverse à l’aide de
quatre vis placées sur le côté interne du montant.
Befestigen Sie das rechte Standbein an
der Innenseite mit vier Schrauben an der
Querverstrebung.
Fissare la gamba destra al sostegno mediante
quattro viti sul lato interno della gamba.
Position a foot on the left leg. There are pins to
help you to position the foot correctly. Do not
remove the anti-slip material from the wheel.
Placez un pied sur le montant gauche. Des broches
vous permettent de positionner correctement le
pied. Ne retirez pas la bande antidérapante de
la roue.
Setzen Sie einen Fuß auf das linke Standbein
auf. Die vorhandenen Noppen erleichtern Ihnen
das Positionieren des Fußes. Belassen Sie das
rutschhemmende Material an der Rolle.
Posizionare un piede sulla gamba sinistra. I pioli
onsentono di posizionare correttamente il piede.
Non rimuovere ancora il materiale
anti-sdrucciolo dalla ruota.
M9_4020_EN_FR_DE_IT.indd 6 29/01/2009 15:26:24

21 22 23 24
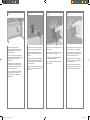
Fix the right foot using four screws.
Fixez le pied droit à l’aide de quatre vis.
Befestigen Sie den rechten Fuß mit vier
Schrauben.
Fissare il piede destro utilizzando quattro viti.
Fix the left foot using four screws.
Fixez le pied gauche à l’aide de quatre vis.
Befestigen Sie den linken Fuß mit vier Schrauben.
Fissare il piede sinistro utilizzando quattro viti.
Position a foot on the right leg. There are pins
to help you to position the foot correctly. Do not
remove the anti-slip material from the wheel.
Placez un pied sur le montant droit. Des broches
vous permettent de positionner correctement le
pied. Ne retirez pas la bande antidérapante de
la roue.
Setzen Sie einen Fuß auf das rechte Standbein
auf. Die vorhandenen Noppen erleichtern Ihnen
das Positionieren des Fußes. Belassen Sie das
rutschhemmende Material an der Rolle.
Posizionare un piede sulla gamba destra.
I pioli consentono di posizionare correttamente
il piede. Non rimuovere ancora il materiale
anti-sdrucciolo dalla ruota.
You now need to identify the left and right of the
printer. This information is shown on the foam
end packs. Also identify the rear of the printer.
Vous devez à présent identier les côtés gauche
et droit de l’imprimante. Ces informations sont
indiquées sur les emballages en mousse aux
extrémités. Identiez également l’arrière de
l’imprimante.
Stellen Sie fest, welche die linke und welche
die rechte Seite des Druckers ist. Auf den
Styroporab-deckungen an den beiden Seiten
benden sich entsprechende Beschriftungen.
Stellen Sie außerdem fest, wo sich die Rückseite
des Druckers bendet.
È necessario distinguere il lato sinistro da quello
destro della stampante. Queste informazioni
sono riportate sull’imballaggio laterale di
polistirolo. Identicare anche il lato posteriore
della stampante.
M9_4020_EN_FR_DE_IT.indd 7 29/01/2009 15:26:24

25 26 27 28
x2
Lift the stand assembly onto the printer body.
The anti-slip material should face to the rear
of the printer.
Soulevez l’assemblage du support pour le
poser sur la partie principale de l’imprimante.
La bande antidérapante doit être face
à l’arrière de l’imprimante.
Setzen Sie die Sockelbaugruppe auf die
Druckerbasiseinheit auf. Das rutschhemmende
Material muss zur Rückseite des Druckers
zeigen.
Sollevare l’assemblaggio del cavalletto sulla
stampante. Il materiale anti- sdrucciolo deve
essere rivolto verso il lato posteriore della
stampante.
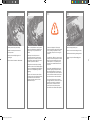
Pull open the protective plastic from the base
of the printer. Please ensure that there is a three-
meter space clear of obstructions to the rear of
the printer. Remove the two desiccant bags from
the printer.
Ouvrez le plastique de protection en tirant dessus
à la base de l’imprimante. Assurez-vous que
vous disposez d’un espace libre de tout obstacle
d’une supercie de trois mètres à l’arrière de
l’imprimante. Retirez les deux sacs dessiccatifs de
l’imprimante.
Öffnen Sie die Schutzhülle, in der die
Druckerbasiseinheit verpackt ist. Achten Sie
darauf, dass an der Rückseite des Druckers
drei Meter freier Platz vorhanden ist. Nehmen Sie
die beiden Beutel mit dem Trockenmittel aus dem
Drucker.
Togliere la plastica protettiva dalla base della
stampante. Vericare che siano disponibili
almeno tre metri di spazio libero dal lato
posteriore della stampante. Rimuovere le
due bustine di essiccante dalla stampante.
Advance warning: in the next step, make sure
you position the stand pins in the holes in the
center of the printer body brackets.
Avertissement : lors de la prochaine étape,
veillez à positionner les broches du support dans
les trous au centre des attaches de la partie
principale de l’imprimante.
Achtung: Im nächsten Schritt müssen die Stifte
am Sockel unbedingt in die dafür vorgesehenen
Aussparungen in den Schienen der Drucker-
basiseinheit eingepasst werden.
Avvertenza: nel passo successivo, assicurarsi
di posizionare i pioli del cavalletto nei fori al
centro del sostegno principale della stampante.
3m (9ft)
3m
3 m
3m (9 piedi)
Left leg/
Montant gauche/
Linkes Standbein/
Gamba sinistra
Right leg/
Montant droit/
Rechtes Standbein/
Gamba destra
Fix the right side of the stand to the printer using
one screw. Make sure that the screw is fully
tightened.
Fixez le côté droit du support à l’imprimante
à l’aide d’une vis. Assurez-vous que la vis est
bien serrée.
Befestigen Sie die rechte Seite des Sockels mit
einer Schraube am Drucker. Achten Sie darauf,
dass die Schraube fest angezogen ist.
Fissare il lato destro del cavalletto alla stampante
utilizzando una vite. Vericare che la vite sia
stretta completamente.
M9_4020_EN_FR_DE_IT.indd 8 29/01/2009 15:26:25

29 30 31 32
x4
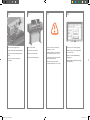
Using four people, rotate the printer on to the
spare and consumables boxes.
Vériez que la bande antidérapante est toujours
xée aux deux roues situées à l’arrière.
Kippen Sie mit vier Personen den Drucker auf
die Behälter.
Con l’aiuto di altre tre persone, ruotare
la stampante sulle scatole dei consumabili
e dei pezzi di ricambio.
Fix the left side of the stand to the printer using
two screws. Make sure that the screws are
fully tightened.
Fixez le côté gauche du support à l’imprimante à
l’aide de deux vis. Assurez-vous que les vis sont
bien serrées.
Befestigen Sie die linke Seite des Sockels mit
zwei Schrauben am Drucker. Achten Sie darauf,
dass die Schrauben fest angezogen sind.
Fissare il lato sinistro del cavalletto alla stampante
utilizzando due viti. Vericare che le viti siano
strette completamente.
Place the spare and consumables boxes against
the rear of the printer box. The arrows on the
boxes must point towards the printer box. Check
that the anti-slip material is still xed to the two
rear wheels.
Placez les cartons des pièces détachées et des
consommables contre l’arrière du carton de
l’imprimante. Les èches situées sur les cartons
doivent pointer vers le carton de l’imprimante.
Setzen Sie die Behälter mit dem Zubehör und
den Verbrauchsmaterialien an der Rückseite der
Druckereinheit an. Die Pfeile auf den Behältern
müssen zum Drucker zeigen. Stellen Sie sicher,
dass sich das rutschhemmende Material noch an
den beiden rückwärtigen Rollen bendet.
Posizionare le scatole dei consumabili e dei
pezzi di ricambio contro il lato posteriore della
scatola della stampante. Le frecce disegnate
sulle scatole devono puntare alla scatola
della stampante. Vericare che il materiale
anti-sdrucciolo sia ancora ssato alle due ruote
posteriori.
Rotate the printer until its rear rests on the spare
and consumables boxes and the wheels with the
anti-slip material touch the oor.
Faites pivoter l’imprimante jusqu’à ce que sa
partie arrière soit posée sur les cartons des
pièces détachées et des consommables, et que
les roues équipées de la bande antidérapante
touchent le sol.
Kippen Sie den Drucker so weit, bis seine
Rückseite auf den Behältern mit dem Zubehör
bzw. den Verbrauchsmaterialien auiegt und die
Rollen mit dem rutschhemmenden Material den
Fußboden berühren.
Ruotare la stampante no a che il lato posteriore
si appoggia alle scatole e le ruote su cui è
presente il materiale anti- sdrucciolo toccano
il pavimento.
M9_4020_EN_FR_DE_IT.indd 9 29/01/2009 15:26:25

33 34 35 36
x4
Rotate the printer into an upright position. The
anti-slip material should stop the printer from
sliding forwards.
Faites pivoter l’imprimante pour la mettre en
position verticale. La bande antidérapante doit
empêcher l’imprimante de glisser vers l’avant.
Bringen Sie den Drucker in eine aufrechte
Position. Das rutschhemmende Material
verhindert ein Verrutschen des Druckers
nach vorne.
Ruotare la stampante in posizione perpendicolare.
Il materiale anti- sdrucciolo evita che la stampante
scivoli in avanti.
Remove the pallet before trying to lift the printer
into an upright position.
Retirez la palette avant d’essayer de soulever
l’imprimante pour la mettre en position verticale.
Entfernen Sie die Palette, bevor Sie den Drucker
aufstellen.
Rimuovere il ripiano su cui appoggia la stampante
prima di sollevarla per metterla in posizione
perpendicolare.
Using four people and the hand holds on the
rear of the printer body, carefully lift the printer
into an upright position.
Aidé de quatre personnes et avec une prise
de main sur l’arrière de la partie principale
de l’imprimante, soulevez l’imprimante avec
précaution pour la mettre en position verticale.
Heben Sie den Drucker mit vier Personen unter
Zuhilfenahme der Haltegriffe an der Rückseite
des Geräts vorsichtig hoch.
Con l’aiuto di altre tre persone e mantenendo
con le mani il lato posteriore della stampante,
sollevare delicatamente la stampante no al
raggiungimento della posizione perpendicolare.
Remove the two foam end packs and the plastic
covering the printer.
Retirez les deux emballages en mousse aux
extrémités et le plastique qui recouvrent
l’imprimante.
Entfernen Sie die beiden Styroporseitenteile und
die Kunststoffhülle des Druckers.
Rimuovere i due imballaggi laterali di polistirolo
e la plastica che copre la stampante.
M9_4020_EN_FR_DE_IT.indd 10 29/01/2009 15:26:25

37 38 39 40
Remove the anti-slip material from the two rear
wheels on the stand assembly.
Retirez la bande antidérapante des deux roues
situées à l’arrière sur l’assemblage du support.
Entfernen Sie das rutschhemmende Material
von den beiden rückwärtigen Rollen der
Sockelbaugruppe.
Rimuovere il materiale anti-sdrucciolo dalle
due ruote posteriori dell’assemblaggio del
cavalletto.
Position the left leg cover on the front of the left
leg (1), then clip the rear edge (2) into place.
Placez la plaque du montant gauche à l’avant
du montant gauche (1), puis enclenchez le bord
arrière (2).
Setzen Sie die Abdeckung des linken Standbeins
an der Vorderseite des linken Beins (1) an, und
lassen Sie die rückseitige Kante (2) einrasten.
Posizionare il coperchio della gamba sinistra
davanti alla gamba (1), quindi agganciare
il bordo posteriore (2).
Position the right leg cover on the front of the
right leg (1), then clip the rear edge (2) into
place.
Placez la plaque du montant droit à l’avant du
montant droit (1), puis enclenchez le bord arrière
(2).
Setzen Sie die Abdeckung des rechten
Standbeins an der Vorderseite des rechten
Beins (1) an, und lassen Sie die rückseitige Kante
(2) einrasten.
Posizionare il coperchio della gamba destra
davanti alla gamba (1), quindi agganciare
il bordo posteriore (2).
Remove the packing tapes 1 to 8. Open the
printer window and remove the two window
inserts 9 and 10.
Retirez les rubans adhésifs d’emballage 1 à 8.
Ouvrez la fenêtre de l’imprimante et retirez les
deux garnitures de fenêtre 9 et 10.
Entfernen Sie die Verpackungsstreifen 1 bis 8.
Öffnen Sie die Druckerabdeckung und entfernen
Sie die beiden Einsätze 9 und 10.
Rimuovere i nastri di imballaggio da 1 a 8.
Aprire la nsetra della stampante e rimuovere
i due inserti 9 e 10.
M9_4020_EN_FR_DE_IT.indd 11 29/01/2009 15:26:25

41 42 43 44
Open the printhead cleaner door and remove
the carriage packing material. Then close the
cleaner door.
Ouvrez la porte du dispositif de nettoyage
de la tête d’impression et retirez le matériel
d’emballage du chariot. Fermez ensuite la
porte du dispositif de nettoyage.
Öffnen Sie die Druckkopfreinigerklappe,
und entfernen Sie das Verpackungsmaterial.
Schließen Sie dann die Reinigerklappe wieder.
Aprire lo sportello dei puliscitestine e rimuovere
il materiale dai carrelli. Chiudere lo sportello
dei puliscitestine.
Remove the protective covering from the printer
window and the front panel screen.
Retirez l’enveloppe de protection de la fenêtre de
l’imprimante et de l’écran du panneau avant.
Ziehen Sie die Schutzhülle vom Druckerfenster
und vom Bedienfeld- Display ab.
Rimuovere la copertura protettiva dalla nestra
della stampante e dal pannello frontale.
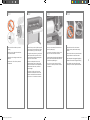
Remove the spindle lock.
Retirez le verrou de la bobine.
Entfernen Sie die Transportsicherung der Spindel.
Rimuovere il blocco del mandrino.
Press the spindle lever down, which will unseat
the right-hand end of the spindle. Remove that
end of the spindle rst, and then the left.
Appuyez sur le levier de la bobine, ce qui
permet de sortir l’extrémité droite de la bobine.
Retirez d’abord cette extrémité, puis la gauche.
Drücken Sie den Spindelhebel nach unten, um
die Arretierung auf der rechten Seite der Spindel
zu lösen. Nehmen Sie die Spindel zuerst an
dieser Seite und danach an der linken Seite
heraus.
Premere la leva del mandrino verso il basso,
rilasciando l’estremità destra. Rimuovere prima
questa parte del mandrino, quindi rimuovere
l’estremità sinistra.
M9_4020_EN_FR_DE_IT.indd 12 29/01/2009 15:26:26

45 46 47 48
Use four screws to attach the brackets to the
lower part of the printer legs. (Each bracket
requires two screws.)
Fixez les attaches à la partie inférieure des
montants de l’imprimante à l’aide de quatre
vis. (Chaque attache nécessite deux vis.)
Befestigen Sie die Halterungen mit vier
Schrauben unten an den Standbeinen des
Druckers. (Für jede Halterung werden zwei
Schrauben benötigt.)
Con quattro viti, collegare le staffe alla parte
inferiore dei piedi stabilizzatori della stampante
(ogni staffa richiede due viti).
Remove the spindle lock foam piece.
Then replace the spindle.
Retirez l’élément en mousse du verrou de la
bobine. Remettez ensuite la bobine en place.
Entfernen Sie das Styroporelement, mit dem
die Spindel während des Transport gesichert
ist. Setzen Sie die Spindel danach wieder ein.
Rimuovere il pezzo di polistirolo del blocco
del mandrino. Quindi, sostituire il mandrino.
Remove the two brackets from the box that
contains the stand and the bin.
Note: The brackets are marked L and R.
Retirez les deux attaches du carton contenant
le support et le bac.
Remarque : Les attaches sont marquées
d’un L et d’un R.
Nehmen Sie die beiden Halterungen aus dem
Karton mit dem Standfuß und der Ablage.
Hinweis: Die Halterungen sind mit L und R
beschriftet.
Rimuovere le due staffe dalla scatola contenente
il piedistallo e il vassoio.
Nota: le staffe sono contrassegnate con le
lettere L e R.
Attach the two plastic brackets to the top part of
the printer legs. Insert the tab at the bottom of the
bracket into the leg, and then ‘click’ the top of the
bracket into place.
Fixez les attaches en plastique à la partie
supérieure des montants de l’imprimante. Insérez
la patte au bas de l’attache dans le montant,
puis enclenchez le haut de l’attache en position.
Befestigen Sie die beiden Kunststoffhalterungen
oben an den Standbeinen des Druckers. Setzen
Sie die Lasche an der Unterseite der Halterung in
die Aussparung am Standbein ein, und drücken
Sie die Halterung dann oben zum Standbein,
bis sie hörbar einrastet.
Collegare le due staffe in plastica alla parte
superiore dei piedi stabilizzatori della stampante
Inserire la linguetta situata nella parte inferiore
della staffa nel piede stabilizzatore e far scattare
la parte superiore della staffa in posizione.
M9_4020_EN_FR_DE_IT.indd 13 29/01/2009 15:26:26

49 50 51 52
Insert the bin cross-bar into the two plastic
brackets.
Insérez la traverse du bac dans les deux
attaches en plastique.
Setzen Sie die Enden der Querverstrebung
in die beiden Kunststoffhalterungen ein.
Inserire il sostegno del vassoio nelle due
staffe in plastica.
Remove the bin assembly from the box that
contains the stand and the bin.
Retirez l’assemblage du bac du carton contenant
le support et le bac.
Nehmen Sie die Ablage aus dem Karton.
Rimuovere il gruppo vassoio dalla scatola
contenente il piedistallo e il vassoio.
Insert the two bin arms into the bin cross-bar.
Insérez les deux bras du bac dans la traverse
du bac.
Setzen Sie die beiden Arme in die Querver-
strebung der Ablage ein.
Inserire i due bracci del vassoio nel relativo
sostegno.
Click the ends of both bin arms into the metal
brackets.
Enclenchez les extrémités des deux bras du bac
dans les attaches en métal.
Drücken Sie die Enden der beiden Arme in die
Metallhalterungen. Die Arme müssen mit einem
Klickgeräusch einrasten.
Inserire le estremità dei due bracci del vassoio
nelle staffe metalliche e farle scattare in
posizione.
M9_4020_EN_FR_DE_IT.indd 14 29/01/2009 15:26:26

53 54 55 56
Use the blue handle to open the bin.
HP recommends that you leave the bin in the
closed position while completing the printer
assembly procedures.
Ouvrez le bac en utilisant la poignée bleue. HP
recommande de laisser le bac en position fermée
pendant les procédures d’assemblage
de l’imprimante.
Die Ablage kann mit Hilfe des blauen Griffs
geöffnet werden. Es wird jedoch empfohlen,
die Ablage während des Zusammenbaus des
Druckers geschlossen zu lassen.
Aprire il vassoio utilizzando la maniglia blu.
HP consiglia di lasciare il vassoio chiuso
durante il completamento dell’installazione
della stampante.
If the power light on the front panel remains off,
press the Power key to switch on the printer.
Si le voyant d’alimentation du panneau avant
est éteint, appuyez sur la touche d’alimentation
pour mettre l’imprimante sous tension.
Falls die Netzkontrollleuchte am Bedienfeld
nicht leuchtet, drücken Sie den Netzschalter, um
den Drucker einzuschalten.
Se l’indicatore luminoso di accensione sul
pannello frontale resta spento, premere il tasto
Alimentazione per accendere la stampante.
Plug the power cable into the rear of the printer,
then plug the other end into the AC power outlet.
Branchez le câble d’alimentation à l’arrière de
l’imprimante, puis l’autre extrémité à la prise
électrique.
Verbinden Sie das eine Ende des Netzkabels mit
dem entsprechenden Anschluss auf der Rückseite
des Druckers, und stecken Sie das andere Ende
in eine Netzsteckdose.
Collegare il cavo di alimentazione sul retro della
stampante, quindi inserire l’altra estremità in una
presa CA.
Turn the power switch at the rear of the printer to
the on position.
Mettez l’interrupteur de marche/arrêt à l’arrière
de l’imprimante en position Marche.
Schalten Sie den Drucker mit dem Netzschalter
auf der Rückseite des Geräts ein.
Premere l’interruttore di alimentazione sul retro
della stampante.
M9_4020_EN_FR_DE_IT.indd 15 29/01/2009 15:26:26

57 58 59 60
Find the ink cartridge door, which is on the left
side of the printer.
Recherchez la porte d’accès aux cartouches
d’encre, qui se trouve sur le côté gauche de
l’imprimante.
Suchen Sie die Tintenpatronenklappe, die sich
auf der linken Seite des Druckers bendet.
Individuare lo sportello delle cartucce di inchiostro,
ubicato sul lato sinistro della stampante.
Wait until you see this message (~10 minutes).
Highlight your language using the Up and Down
keys. Press the Select (ü) key.
Patientez jusqu’à l’afchage de ce message
(environ 10 minutes). Sélectionnez votre langue
à l’aide des touches Haut et Bas. Appuyez sur
la touche Sélectionner (ü).
Warten Sie etwa 10 Minuten, bis diese Meldung
angezeigt wird. Markieren Sie die gewünschte
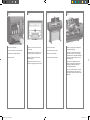
Sprache mithilfe der Aufwärts- und Abwärtstaste.
Drücken Sie die Taste „Auswählen” (ü).
Attendere la visualizzazione del seguente
messaggio (circa 10 minuti). Selezionare la
lingua desiderata utilizzando i tasti Su e Giù.
Premere il tasto Seleziona (ü).
The front panel will now display how to install
the ink supplies.
Le panneau avant afche à présent la procédure
d’installation des cartouches d’encre.
Auf dem Bedienfeld werden nun Anleitungen für
das Einsetzen der Tintenpatronen angezeigt.
Sul pannello frontale verrà visualizzato come
installare le cartucce di inchiostro.
Remove the printheads, printhead cleaners, and
ink cartridges from the consumables box.
Retirez les têtes d’impression, les dispositifs de
nettoyage de têtes d’impression et les cartouches
d’encre du carton des consommables.
Nehmen Sie die Druckköpfe, Druckkopfreiniger
und die Tintenpatronen aus dem Behälter mit
den Verbrauchsmaterialien.
Rimuovere le testine, i puliscitestine e le cartucce
di inchiostro dalla scatola dei consumabili.
M9_4020_EN_FR_DE_IT.indd 16 29/01/2009 15:26:27

61 62 63 64
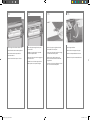
Slide the ink cartridge drawer out.
Faites glisser le tiroir des cartouches d’encre
vers l’extérieur.
Ziehen Sie den Einschub für die Tintenpatrone
heraus.
Far scorrere verso l’esterno il cassetto delle
cartucce.
Press the ink cartridge door.
Appuyez sur la porte d’accès aux cartouches
d’encre.
Drücken Sie auf die Tintenpatronenklappe.
Premere lo sportello.
Open the ink cartridge door.
Ouvrez la porte d’accès aux cartouches d’encre.
Öffnen Sie die Tintenpatronenklappe.
Aprire lo sportello.
To release the ink cartridge drawer, pull the
blue handle down.
Pour libérer le tiroir des cartouches d’encre,
appuyez sur la poignée bleue.
Drücken Sie den blauen Hebel nach unten, um
die Arretierung des Tintenpatroneneinschubs zu
lösen.
Per rilasciare il cassetto delle cartucce di
inchiostro, abbassare la leva blu.
M9_4020_EN_FR_DE_IT.indd 17 29/01/2009 15:26:27

65 66 67 68
Following the same instructions, install the other
three ink cartridges.
En suivant les mêmes instructions, installez les
trois autres cartouches d’encre.
Setzen Sie die drei restlichen Tintenpatronen
auf dieselbe Weise ein.
Seguendo queste stesse istruzioni, installare
le rimanenti tre cartucce di inchiostro.
Place the ink cartridge onto the ink cartridge
drawer. Note that there are marks on the drawer
showing the correct location.
Placez la cartouche d’encre dans le tiroir des
cartouches d’encre. Notez que des marques gurent
sur le tiroir pour indiquer l’emplacement exact.
Legen Sie die Tintenpatrone auf den Einschub.
Achten Sie auf die Markierungen auf dem
Einschub, die für die richtige Positionierung
der Patrone sorgen.
Inserire la cartuccia di inchiostro nel cassetto. Sul
cassetto sono presenti dei segni che indicano la
posizione corretta.
Position the ink cartridge at the rear of the
drawer as indicated.
Placez la cartouche d’encre à l’arrière du tiroir
de la façon indiquée.
Platzieren Sie die Tintenpatrone an der Rückseite
des Einschubs, wie in der Abbildung gezeigt.
Posizionare la cartuccia nella parte posteriore
del cassetto come indicato.
Push the ink cartridge drawer back into the
printer until it locks into poition.
Remettez le tiroir des cartouches d’encre
en place dans l’imprimante en le poussant
jusqu’à ce qu’il s’enclenche.
Schieben Sie den Einschub wieder in den
Drucker, bis er einrastet.
Spingere il cassetto delle cartucce all’interno
della stampante no al raggiungimento della
posizione corretta.
M9_4020_EN_FR_DE_IT.indd 18 29/01/2009 15:26:27

69 70 71 72
Remove the packing tape that is holding down
the printhead carriage latch.
Faites glisser le chariot de la tête d’impression
vers la gauche jusqu’à ce qu’il soit facilement
accessible. Retirez le ruban adhésif d’emballage
qui maintient en place le loquet du chariot de
la tête d’impression.
Ziehen Sie den Druckkopfwagen nach links,
damit er gut zugänglich ist. Entfernen Sie das
Klebeband, mit dem die Verriegelung des
Druckkopfwagens befestigt ist.
Far scorrere il carrello delle testine in modo da
raggiungere facilmente le testine. Rimuovere il
nastro che tiene abbassata la levetta del carrello
delle testine.
Close the ink cartridge door.
Fermez la porte d’accès aux cartouches d’encre.
Schließen Sie die Tintenpatronenklappe.
Chiudere lo sportello.
Wait (about a minute) until you see this front
panel message.
Patientez (environ une minute) jusqu’à ce que
ce message s’afche sur le panneau avant.
Nach etwa einer Minute sehen Sie diese
Bedienfeldmeldung.
Attendere circa un minuto no a che viene
visualizzato il messaggio sul pannello frontale.
Open the printer window.
Ouvrez la fenêtre de l’imprimante.
Öffnen Sie das Druckerfenster.
Aprire la nestra della stampante.
M9_4020_EN_FR_DE_IT.indd 19 29/01/2009 15:26:27

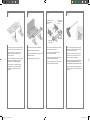
73 74 75 76
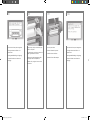
To remove a setup printhead, lift up the blue
handle.
Pour retirer une tête d’impression de conguration,
soulevez la poignée bleue.
Um einen provisorischen Druckkopf zu entfernen,
klappen Sie zunächst den blauen Griff nach
oben.
Per rimuovere una testina di impostazione,
sollevare la levetta blu.
Pull up and release the latch on top of the
carriage assembly.
Remontez et relâchez le loquet au-dessus de
l’assemblage du chariot.
Klappen Sie die Verriegelung der Wageneinheit
nach vorne, um sie zu lösen.
Sganciare e rilasciare la levetta sull’assemblaggio
del carrello.
Lift up the cover. This will give you access to the
setup printheads.
Soulevez le couvercle. Vous accédez ainsi aux
têtes d’impression de conguration.
Heben Sie die Abdeckung an. Die provisorischen
Druckköpfe sind nun zugänglich.
Sollevare il coperchio. In questo modo è possibile
accedere alle testine di impostazione.
Before removing the setup printheads, look at
the window on top of each one and check that
the printhead contains ink.
Avant de retirer les têtes d’impression de
conguration, examinez la fenêtre située
au-dessus de chacune d’elles et vériez que
la tête d’impression contient de l’encre.
Überprüfen Sie anhand der Sichtfenster an
der Oberseite der Druckköpfe, ob diese Tinte
enthalten, bevor Sie die Druckköpfe entfernen.
Prima di rimuovere le testine di impostazione,
dare un’occhiata alla nestra su ognuna di esse
e vericare che la testina contenga l’inchiostro.
M9_4020_EN_FR_DE_IT.indd 20 29/01/2009 15:26:28
La page est en cours de chargement...
La page est en cours de chargement...
La page est en cours de chargement...
La page est en cours de chargement...
La page est en cours de chargement...
La page est en cours de chargement...
La page est en cours de chargement...
La page est en cours de chargement...
La page est en cours de chargement...
La page est en cours de chargement...
La page est en cours de chargement...
La page est en cours de chargement...
La page est en cours de chargement...
La page est en cours de chargement...
-
 1
1
-
 2
2
-
 3
3
-
 4
4
-
 5
5
-
 6
6
-
 7
7
-
 8
8
-
 9
9
-
 10
10
-
 11
11
-
 12
12
-
 13
13
-
 14
14
-
 15
15
-
 16
16
-
 17
17
-
 18
18
-
 19
19
-
 20
20
-
 21
21
-
 22
22
-
 23
23
-
 24
24
-
 25
25
-
 26
26
-
 27
27
-
 28
28
-
 29
29
-
 30
30
-
 31
31
-
 32
32
-
 33
33
-
 34
34


HP DesignJet 4020 Printer series Assembly Instructions
- Taper
- Assembly Instructions
dans d''autres langues
- italiano: HP DesignJet 4020 Printer series
- English: HP DesignJet 4020 Printer series
- Deutsch: HP DesignJet 4020 Printer series
Documents connexes
-
HP DesignJet 4520 Multifunction Printer series Assembly Instructions
-
-
-
-
-
-
-
-
HP DesignJet 130 Printer series Guide de démarrage rapide
-