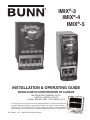
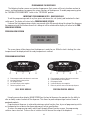
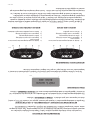
Bunn iMIX-3 Black Guide d'installation
- Catégorie
- Cafetières
- Taper
- Guide d'installation
Ce manuel convient également à

IMIX
®
-3
IMIX
®
-4
IMIX
®
-5
INSTALLATION & OPERATING GUIDE
BUNN-O-MATIC CORPORATION OF CANADA
280 INDUSTRIAL PARKWAY SOUTH,
AURORA, ONTARIO, L4G 3T9
PHONE: (905) 841-2866 FAX: (905) 841-2775
To ensure you have the latest revision of the Operating Manual, or to view the Illustrated Parts
Catalog, Programming Manual, or Service Manual, please visit the Bunn-O-Matic website, at
www.bunn.com. This is absolutely FREE, and the quickest way to obtain the latest catalog and
manual updates. For Technical Service, contact Bunn-O-Matic Corporation at 1-800-263-2256.
37510.7000J 05/11 ©2004 Bunn-O-Matic Corporation

392, AutoPOD, AXIOM, BrewLOGIC, BrewMETER, Brew Better Not Bitter, BrewWISE, BrewWIZARD, BUNN Espress, BUNN
Family Gourmet, BUNN Gourmet, BUNN Pour-O-Matic, BUNN, BUNN with the stylized red line, BUNNlink, Bunn-OMatic,
Bunn-O-Matic, BUNNserve, BUNNSERVE with the stylized wrench design, Cool Froth, DBC, Dr. Brew stylized Dr. design,
Dual, Easy Pour, EasyClear, EasyGard, FlavorGard, Gourmet Ice, Gourmet Juice, High Intensity, iMIX, Infusion Series, In-
tellisteam, My Café, Phase Brew, PowerLogic, Quality Beverage Equipment Worldwide, Respect Earth, Respect Earth with
the stylized leaf and coffee cherry design, Safety-Fresh, savemycoffee.com, Scale-Pro, Silver Series, Single, Smart Funnel,
Smart Hopper, SmartWAVE, Soft Heat, SplashGard, The Mark of Quality in Beverage Equipment Worldwide, ThermoFresh,
Titan, trifecta, Velocity Brew, A Partner You Can Count On, Air Brew, Air Infusion, Beverage Bar Creator, Beverage Profit
Calculator, Brew better, not bitter., BUNNSource, Coffee At Its Best, Cyclonic Heating System, Daypart, Digital Brewer
Control, Nothing Brews Like a BUNN, Pouring Profits, Signature Series, Tea At Its Best, The Horizontal Red Line, Ultra are
either trademarks or registered trademarks of Bunn-O-Matic Corporation.
BUNN-O-MATIC COMMERCIAL PRODUCT WARRANTY
Bunn-O-Matic Corporation of Canada (“Bunn”) warrants equipment manufactured by it as follows:
1) Airpots, thermal carafes, decanters, GPR servers, iced tea/coffee dispensers, MCP/MCA pod brewers
thermal servers and Thermofresh servers (mechanical and digital) - 1 year parts and 1 year labour.
2) All other equipment - 2 years parts and 1 year labour plus added warranties as specified below:
a) Electronic circuit and/or control boards - parts and labour for 3 years.
b) Compressors on refrigeration equipment - 5 years parts and 1 year labour.
c) Grinding burrs on coffee grinding equipment to grind coffee to meet original factory screen sieve
analysis - parts and labour for 4 years or 40,000 pounds of coffee, whichever comes first.
These warranty periods run from the date of installation. Bunn warrants that the equipment manufactured
by it will be commercially free of defects in material and workmanship existing at the time of manufacture and
appearing within the applicable warranty period. This warranty does not apply to any equipment, component
or part that was not manufactured by Bunn or that, in Bunn’s judgement, has been affected by misuse, neglect,
alteration, improper installation or operation, improper maintenance or repair, non periodic cleaning and descaling,
equipment failures related to poor water quality, damage or casualty. In addition, the warranty does not apply to
replacement of items subject to normal use including but not limited to user replaceable parts such as seals and
gaskets. This warranty is conditioned on the Buyer 1) giving Bunn prompt notice of any claim to be made under
this warranty by telephone at (905) 841-2866 or by writing to 280 Industrial Parkway South, Aurora, Ontario, L4G
3T9. 2) if requested by Bunn, shipping the defective equipment prepaid to an authorized Bunn service location;
and 3) receiving prior authorization from Bunn that the defective equipment is under warranty.
THE FOREGOING WARRANTY IS EXCLUSIVE AND IS IN LIEU OF ANY OTHER WARRANTY, CONDITION,
WRITTEN OR ORAL, EXPRESS OR IMPLIED, INCLUDING, BUT NOT LIMITED TO, ANY IMPLIED WARRANTY
OF EITHER MERCHANTABILITY, MERCHANTABLE QUALITY OR FITNESS FOR A PARTICULAR PURPOSE.The
agents, dealers or employees of Bunn are not authorized to make modifications to this warranty or to make
additional warranties that are binding on Bunn. Accordingly, statements by such individuals, whether oral or
written, do not constitute warranties and should not be relied upon.
If Bunn determines in its sole discretion that the defective equipment is covered by warranty, Bunn, at its
exclusive option while the equipment is under warranty, shall either 1) provide at no charge replacement parts
and/or labour (during the applicable parts and labour warranty periods specified above) to repair the defective
components, provided that this repair is done by a Bunn Authorized Service Representative; or 2) shall replace
the equipment or refund the purchase price for the equipment.
THE BUYER’S REMEDY AGAINST BUNN FOR THE BREACH OF ANY OBLIGATION ARISING OUT OF THE
SALE OF THIS EQUIPMENT, WHETHER DERIVED FROM WARRANTY OR OTHERWISE, SHALL BE LIMITED, AT
BUNN’S SOLE OPTION AS SPECIFIED HEREIN, TO REPAIR, REPLACEMENT OR REFUND.
In no event shall Bunn be liable for any other damage or loss, including, but not limited to, lost profits, lost
sales, loss of use of equipment, claims of Buyer’s customers, cost of capital, cost of down time, cost of substitute
equipment, facilities or services, or any other special, incidental, consequential or punitive damages.
RETURN POLICY
CONTACT PLANT FOR RETURN MATERIAL AUTHORIZATION. ALL RETURNS MUST
BE AUTHORIZED BY BUNN-O-MATIC AND ARE SUBJECT TO A RETURN CHARGE.
2
8/12

3
! AVERTISSEMENT
! WARNING
• FILL WATER TANK BEFORE PLUGGING IN UNIT OR
ENERGIZING THE THERMOSTAT.
• DO NOT OVERLOAD CIRCUIT.
• ALWAYS ELECTRICALLY GROUND THE CHASSIS.
• DO NOT DEFORM PLUG OR CORD.
• FOLLOW NATIONAL AND LOCAL ELECTRICAL CODES.
• KEEP COMBUSTIBLES AWAY.
FAILURE TO COMPLY RISKS EQUIPMENT DAMAGE, FIRE OR
SHOCK HAZARD.
READ THE ENTIRE OPERATING MANUAL INCLUDING
THE LIMIT OF WARRANTY AND LIABILITY BEFORE
BUYING OR USING THIS PRODUCT.
THIS EQUIPMENT IS ENERGIZED AT ALL TIMES UNLESS
ELECTRICALLY DISCONNECTED.
00831.0002K 17/11 © 1984 BUNN-O-MATIC CORPORATION
• REMPLIR LE RÉSERVOIR D'EAU AVANT DE BRANCHER
L'APPAREIL OU DE METTRE LE THERMOSTAT SOUS TENSION.
• NE PAS SURCHARGER LE CIRCUIT.
• TOUJOURS METTRE LE BOITIER À LA MASSE.
• NE PAS DÉFORMER LA FICHE OU LE CORDON.
• SE CONFORMER AUX CODES NATIONAL OU LOCAL
D'ÉLECTRICITÉ.
• GARDER LES PRODUITS COMBUSTIBLES À DISTANCE.
TOUT MANQUEMENT À SE CONFORMER À CES DIRECTIVES PEUT
ENTRAINER DES DOMMAGES À L'ÉQUIPEMENT OU PRODUIRE DES
DANGERS D'INCENDIE OU D'ÉLECTROCUTION.
VEUILLEZ LIRE LE MANUEL DE FONCTIONEMENT
EN ENTIER, Y COMPRIS LES LIMITES DE GARANTIES ET
RESPONSABILITÉS,AVANT D’ACHETER
OU D'UTILISER LE PRÉSENT PRODUIT.
L' ÉQUIPEMENT EST TOUJOURS SOUS TENSION
LORSQU'IL N'EST PAS DÉBRANCHÉ.
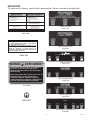
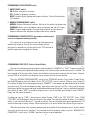
USER NOTICES
The notices on this dispenser should be kept in good condition. Replace unreadable or damaged labels.
00831.0002
IMIX-5 (Self Serve)
28328.7010
37510 051311
RELEASE BUTTON WHEN CUP IS 3/4 FULL
RELÂCHER LE BOUTON LORSQUE LE VERRE EST REMPLI AU 3/4
IMIX-4 (Self Serve)
28328.7012
IMIX-3 (Self Serve)
28328.7011
IMIX-3 (Portion Control)
28328.7013
IMIX-4 (Portion Control)
28328.7014
To reduce the risk of electric shock, do not remove or
open cover. No user-serviceable parts inside.
Authorized service personnel only. Disconnect power
before servicing.
Afin d’éviter un risque d’électrocution, ne pas ouvrir ou
enlever le panneau. Aucune pièce utile pour
l’opérateur à l’intérieur. Seulement le personnel
autorisé peut effectuer les réparations. Débrancher de la
source de courant avant d’effectuer une réparation.
WARNING AVERTISSEMENT
37881.7000
00656.7000
Artwork for P/N: 00656.7000
Artwork Rev: F
Drawn: RN
Date: 06/27/08
Cet équipement doit être installé conformément au code
Canadien de plomberie et aux règlements de santé et de
sécurité qui s’ appliquent. Les modèles destinés à être
installés ailleurs qu’au Canada doivent respecter les codes de
plomberie et d’hygiène de la localité.
This equipment must be installed to comply with Canadian
Plumbing Codes and applicable health and safety regulations.
For models installed outside Canada, comply with the
applicable Plumbing /Sanitation Code.
00824.0002
WARNING
H O T
L I Q U I D
IMIX-5 (with Hot Water Dispense)
28328.0017

4
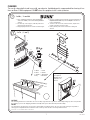
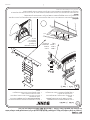
INITIAL SET-UP
1. Apply the four non-skid pads from the parts box to the bottom of the legs.
2. Remove the drip tray assembly, drip tray bracket, and splash panel assembly from the parts box.
3. Place a set of key holes in the drip tray bracket over the lower two screws in the panel below the hopper
access door; push down gently and tighten screws.
4. Place the set of key holes in the splash panel over the upper two screws and position so the screws are
between the holes.
ELECTRICAL REQUIREMENTS
CAUTION - The dispenser must be disconnected from the power source until specified in Electrical Hook-Up.
The 120 volt version of this dispenser has an attached cordset. The mating connector must be a NEMA
5-15R.
To access terminal block for high voltage models without a cordset, remove left side panel.
37510 051311
Electrical Hook-Up
CAUTION - Improper electrical installation will damage electronic components.
1. An electrician must provide electrical service as specified.
2. Using a voltmeter, check the voltage and color coding of each conductor at the electrical source.
3. Place the ON/OFF/NIGHT switch in the “ON” position.
4. Connect the dispenser to the power source.
5. If plumbing is to be hooked up later be sure the dispenser is disconnected from the power source. If plumb-
ing has been hooked up, the dispenser is ready for Initial Fill & Heat.
CE REQUIREMENTS
• This appliance must be installed in locations where it can be overseen by trained personnel.
• For proper operation, this appliance must be installed where the temperature is between 5°C to 35°C.
• Appliance shall not be tilted more than 10° for safe operation.
• An electrician must provide electrical service as specied in conformance with all local and national codes.
• This appliance must not be cleaned by water jet.
• This appliance is not intended for use by persons (including children) with reduced physical, sensory or mental
capabilities, or lack of experience and knowledge, unless they have been given instructions concerning use of
this appliance by a person responsible for its safety.
• Children should be supervised to ensure they do not play with the appliance.
• If the power cord is ever damaged, it must be replaced by the manufacturer or authorized service personnel with
a special cord available from the manufacturer or its authorized service personnel in order to avoid a hazard.
• Machine must not be immersed for cleaning.
230V AC
single phase models
Note: This electrical service
consists of 2 current carry-
ing conductors (L1 and L2)
and a separate conductor
for earth ground.
GREEN GREEN
230V. A.C.
BLK
WHI
L1
L2
GRN/YELGRN

5
PLUMBING REQUIREMENTS
This dispenser must be connected to a cold water system with operating pressure between 20 and 90 psi from a
1⁄2” or larger supply line. A shut-off valve should be installed in the line before the dispenser. Install a regulator
in the line when pressure is greater than 90 psi to reduce it to 50 psi. The water inlet fitting is 1⁄4” flare.
NOTE - Bunn-O-Matic recommends 1⁄4” copper tubing for installations of less than 25 feet and 3⁄8” for more
than 25 feet from the 1⁄2” water supply line. At least 18 inches of an FDA approved flexible beverage tubing,
such as reinforced braided polyethylene or silicone, before the dispenser will facilitate movement to clean the
countertop. Bunn-O-Matic does not recommend the use of a saddle valve to install the dispenser. The size and
shape of the hole made in the supply line by this type of device may restrict water flow.
NOTE - If a backflow preventer is required by code, a shock arrestor should be installed between backflow pre-
venter and dispenser. Installing the shock arrestor as close to the dispenser as possible will provide the best
results.
NOTE - Water pipe connections and fixtures directly connected to a potable water supply shall be sized, installed
and maintained in accordance with federal, state and local codes.
PLUMBING HOOK-UP
1. Flush the water line and securely attach it to the elbow fitting on the bottom of the dispenser.
2. Turn on the water supply.
INITIAL FILL & HEAT
1. Turn on the water supply and connect the dispenser to the power source.
2. Water will automatically flow into the tank to the proper level and then shut-off. This will take less than ten
minutes.
3. When the tank is full of water, open the front door and place the ON/OFF/NIGHT switch in the “ON” (upper)
position. A tank full of cold water will take approximately eighty minutes for the water to heat on 120 volt
versions, and forty minutes on 120/240 volt and 230 volt versions.
4. Fill the hopper(s) with the dry product to be dispensed.
LIQUID LEVEL CONTROL
The system automatically maintains the hot water tank’s level by energizing the refill solenoid when the water
level drops below the liquid level probe. If the system has not successfully refilled in 10 minutes, a refill error
occurs. When a refill error occurs, the refill solenoid is de-energized. Once the cause of the refill error has
been investigated and cured, the system can be reset by either disconnecting (for at least 5 seconds) and then
reconnecting the power to the machine, or by entering one of the program modes (see Programming Modes.)
37510 051311
This equipment must be installed to comply with the National Plumbing Code of Canada and the
Canadian Food Inspection Agency. For models installed outside Canada, you must comply with the
applicable Plumbing/Sanitation Code for your area.

6
RINSE TIMER
The dispenser is shipped from the factory with the rinse timer disabled. To enable the rinse timer, refer to
Programming the Dispenser and select yes in the “Rinse Alarm ?” screen; set timer to the desired time and
exit the programming mode.
When enabled, the rinse timer automatically keeps track of the time since the dispenser was last run through
a rinse sequence. If the dispenser detects that a rinse sequence has not been run for the desired time, a mes-
sage will appear on the LCD display. If the Lockout is set, after an additional 4 hours, a rinse cycle has still not
been run, the LCD display will display a message, and the hopper drives will be disabled until a rinse sequence
has been run.
RUNNING A RINSE SEQUENCE
1. Place the Normal/Program/Rinse switch (page 10) in the “rinse” position.
2. Sequentially at each position, press all of the dispense switches. The dispenser will run for 10 seconds
with the hopper(s) disabled.
3. As each position is rinsed, the LCD display will show which position is being rinsed and count down from
10 seconds.
4. After all positions have been rinsed, return the Normal/Program/Rinse switch to the “Normal” position.
DISPENSER USE - Self Serve
1. Simply place a cup on the drip tray beneath the desired dispensing tip.
2. Press the button to froth and dispense the beverage.
3. Release the button when the cup is approximately
3
/
4
full and allow the mixing chamber to drain.
Note - The mixing chamber must drain at the end of each dispense.
DISPENSER USE - Portion Control
1. Simply place a cup on the drip tray beneath the desired dispensing tip.
2. Select the appropriate button for the cup size under the dispense tip, press momentarily, then release.
3. Let the mixing chamber completely drain before removing cup.
37510 051311
PREVENTIVE MAINTENANCE
Bunn-O-Matic
®
Corporation recommends that preventive maintenance be performed at regular intervals. Maintenance
should be performed by a qualified service technician. For Technical Service, contact Bunn-O-Matic
®
Corporation at
1-800-263-2256.
NOTE: Replacement parts or service caused by failure to perform required maintenance is not covered by warranty.
Cycle
(months)
Item Part Number
6 Mixing Chamber Kit 32906.7001
3 or as
needed
Whipper Shaft Seal 26356.1000
HOT WATER DISPENSE - IMIX-5 only
1. Simply place a cup on the drip tray beneath the hot water dispense arrow.
2. Press the button to dispense hot water.
3. Release the button when the desired amount is reached.

7
CLEANING
The use of a damp cloth rinsed in any mild, non-abrasive, liquid detergent is recommended for cleaning all sur-
faces on Bunn-O-Matic equipment. Do NOT clean this equipment with a water jet device.
1 x 24h / 1 aux 24 h
37254.7000A 01/07 © 2004 BUNN-O-MATIC CORPORATION
NOTICE
The cleaning instructions noted above are for non-dairy sugar based food products. When dispensing any other food product,
the cleaning cycle for the whipping chamber assembly and ejector elbow must be performed daily.
NOTE:
Ces instructions de nettoyage sont réservées aux produits non laitiers à base de sucre. Pour tout autre type de produit, le
nettoyage du compartiment de fouettement et du coude éjecteur doit être effectué quotidiennement.
1 x 7d / 1 aux 7 j
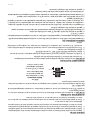
1
2
3
4
5
a. Wash
b. Rinse
c. Sanitize
d. Dry
a. Lavez
b. Rincez
c. Désinfectez
d. Asséchez
7
8
6
a
b
c
9
7
Replace Light Bulbs
as required.
1. Rincez le compartiment de fouettement en plaçant l’interrupteur de
RINÇAGE/DISTRIBUTION à la position RINÇAGE et actionnez les
touches de distribution.
2. Tournez le coude vers le haut, retirez les trémies, remplissez de
produit et remettez les trémies en place.
3. Videz le plateau perforé et lavez-le à l’aide d’un détergent à
vaisselle.
1. Rinse out Whipper Chambers by placing RINSE/RUN
switch in the "RINSE" position and activating DISPENSE
switches.
2. Turn elbow up, remove Hoppers, refill with product and
replace hoppers into dispenser
.
3. Empty Drip Tray and wash in a solution of dish detergent.
Remplacez les
ampoules au
besoin.
37510 022508

8
HOPPER DISPENSE RATE OF PRODUCT
The hopper dispense rates are preset at the factory. With 22 tooth gear and auger wire, the preset dispense
rate is approximately 3 to 5 grams per second. With 30 tooth gear and auger wire, the preset dispense rate is
approximately 5 to 7 grams per second. The hopper dispense rates can be individually programmed to a range
of dispense rates from approximately 1.5 to 12 grams per second, by following the procedures described in
Programming the Dispenser.
HOPPER LEVEL SENSOR CALIBRATION
The dispenser is equipped with sensors to detect a low level in each hopper. When low powder lockout is
enabled, dispensing will be disabled when a low powder condition is detected in a hopper. The LCD screen on
the door will also display a low level condition.
The despenser is shipped from the factory with the low level powder lock disabled. To enable the lock,
place the “NORMAL/PROGRAM/RINSE” switch (page 11) in the “PROGRAM” position. Press button A (page
10) below the BUNN logo on the front of the door. Continue to press this button until the “LOCKS/DISABLES?”
menu is reached. Press button B (page 10} for “YES”, then press it again in the “LOW POWDER LOCK?” menu.
The low powder lockout is now enabled. Press button C (page 10) to exit the program menus, then return the
“NORMAL/PROGRAM/RINSE” button to the “NORMAL” position. To disable the low powder lockout, repeat the
process, and press button D (page 10) for “NO”, in the “LOW POWDER LOCK” menu.
The low level sensors are factory calibrated for most products. If calibration is required for proper opera-
tion, the sensors can be recalibrated to the current product.
The hopper must be at least half full of product for calibration. Place the “NORMAL/PROGRAM/RINSE”
switch in the “PROGRAM” position. Using button A (page 10), forward until the “CALIBRATION?” menu is
reached. Press button B (page 10) for “YES”, then press button A (page 10) until “CAL HOPPER 1?” screen is
reached. Continue to press button A until the hopper to be calibrated is reached.
To calibrate the hopper, press button B (page 10) to indicate “YES” in the “CAL HOPPER#? screen. The
screen will then ask you if the hopper is full. Press the button again to indicate “YES”. The calibration will then
take a few moments, then the screen will display “POWDER LEVEL RESET COMPLETE”. The next hopper may
be calibrated by moving forward in the menu, or press button C (page 10) to exit.
DRAINING THE HOT WATER TANK
CAUTION - The dispenser must be disconnected from the power source throughout these steps
1. Disconnect the dispenser from the power source.
2. Open front door and place ON/OFF/NIGHT switch in the “OFF” (center) position and let the water in the tank
cool before draining.
3. Shut off and disconnect the incoming water supply.
4. Remove the drip tray and access panels below the door.
5. Pull the clamped end of the silicone tube out of the dispenser and direct it into a drain or a container large
enough to hold the volume of water in the tank (7.3 gal for iMIX-4/5 and 4.4 gal for iMIX-3).
6. Make certain the shut off clamp is locked tightly on the tube, then remove the snap type clamp and plug from
end of tube.
7. Carefully release the shut off clamp to let the water drain from the tank.
NOTE - The dispenser must be refilled using the INITIAL FILL & HEAT steps before reconnecting to the power
source.
37510 051311

9
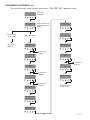
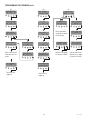
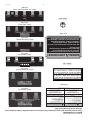
Adjust tank temperature
(190° F maximum)
Adjust minimum tank ready temper-
ature for lockout (185° maximum)
Adjust hopper motor speed
for station selected
TANK TEMP XXX°
(-) EXIT (+)
READY TEMP XXX°
(-) EXIT (+)
DRINK STRENGTH
(-) XX (+)
XX° CAL XX°
(-) Tank Temp (+)
235 REFILL 155
(-) EXIT (+)
CAL WATER ?
PRESS DISPENSE
Calibrate temperature probe
Set refill probe threshold
Calibrates dilution water flow
rate in station selected
CAL POWDER ?
PRESS DISPENSE
Calibrates powder dispense rate
for hopper in station selected
Auger Delay
(-) .XX sec (+)
CAL HOPPER ?
NO YES
Set delay start of hopper after dilution
valve opens in station selected
Calibrates hopper level sensor in station selected
Hopper must be at least half full to calibrate
LOW POWDER LOCK ?
NO EXIT YES
DISPENSE LOCKOUT
NO EXIT YES
RINSE ALARM ?
NO EXIT YES
HEAD 1 DISABLE ?
NO EXIT YES
SET PASSWORD ?
(-) XXXX (+)
Enables lockout of dispensing when low
hopper level is detected
Enables lockout of dispensing if below
minimum water temperature
Enables rinse alarm
Disables all functions and dispensing
for station selected
Allows password to be set to pre-
vent altering setup functions
AUDIBLE ALARM ?
NO EXIT YES
ENABLE ADS ?
NO EXIT YES
ENTER ASSET # ?
EXIT YES
Turns on audio alarm
Enables “ADS” to be displayed
on LCD door display
Enter asset number of machine
Enables service agent telephone
number to be displayed
TEST SWITCHES ?
Use Switch To Test
TEST HEATER ?
EXIT YES
TEST REFILL ?
EXIT YES
TEST HOT WATER ?
EXIT YES
TEST AUGERS ?
DISPENSE TO TEST
TEST DISP HEADS
DISPENSE TO TEST
Allows testing of dispense
switches
Allows manually activating
tank heater
Allows manually activating
refill valve
Allows manually activating hot
water valve (optional)
Allows manually activating
hopper motors
Allows manually activating dis-
pense valves & whipper motors
DISPLAY USAGE ?
EXIT YES
Displays amount dispensed
ENABLE SERVICE #
NO EXIT YES
ENABL EngergySavr
NO EXIT YES
Enables energy saver mode
GLOSSARY
FACTORY DEFAULTS
NO YES
Resets all functions to factory
defaults, and password to 0
DISABLE MESSAGES ?
NO EXIT YES
Disables function that displays fault
messages on LCD door display
SET CUP SIZE
EXMPL TIME
Select setting cup size by Time (seconds) or
by Example (Portion Control models only)
37510 113004
DISPENSE TO ADD
REPEAT SAVE
Press same dispense button to top off
cup, or press save to lock in dispense
time, or, press repeat to erase dispense
time and repeat process.

10
A. Enter program mode and advance to next menu
B. Increment display value positive
C. Exit program mode
D. Increment display value negative
E. Return to previous menu and interrupt dispense
PORTION CONTROL MODELS
Digital Beverage Control Digital Beverage Control
STOP
PROGRAM HOME SCREEN
The screen above will be shown when the dispenser is ready for use. While the tank is heating, the water
temperature will be displayed until the ready temperature is reached.
PROGRAMMING THE DISPENSER
The following function screens are in order of appearance. Each screen will have instructions on how to
access, and the procedures to program the various functions of the dispenser. To enable programming, place
the “NORMAL/PROGRAM/RINSE” switch in the “PROGRAM” position.
IMPORTANT PROGRAMMING NOTES - READ CAREFULLY
To exit the programming mode at any time, press and release the exit (center) pad located on the front
switch panel. The display will return to the PROGRAM HOME SCREEN.
If none of the five programming switches are pressed within 90 seconds during the setup of the dispenser,
the programming of the function screen that is being set will be exited and the display will return to the PRO-
GRAM HOME SCREEN.
DISPENSE READY
BUNN iMIX
ABCDE
P3059
P3057
A. Enter program mode and advance to next menu
B. Increment display value positive
C. Exit program mode
D. Increment display value negative
E. Return to previous menu
SELF SERVE MODELS
Using the menu-driven display (MAIN SCREEN) on the front of dispenser, the operator has the ability to
alter or modify various functions of the dispenser. This allows for precise dispensing of various flavors of
powdered products.
Programming of dispenser is achieved by entering a certain function, then, by use of programming switch-
es, the operator can customize the dispensing process to their specifications.
To access the programming mode, and to scroll through different function screens, the programming
switches shown are used. There are five of switches that will be used for setup of the dispenser.
PROGRAMMING SWITCHES
ABCDE
37510 041207

11
PROGRAMMING CUP SIZES - Portion Control Models
The cup size can be programmed in portion control models by “EXAMPLE” or “TIME”. Programming by EX-
AMPLE is manually pressing desired dispense button, then releasing when the desired cup size is attained. The
time required to fill the cup will be stored in the controller memory when moving to the next menu. Program-
ming by TIME is setting the actual dispense time in seconds for each cup size desired.
Place the “NORMAL/PROGRAM/RINSE” switch in the “PROGRAM” position. Press button A (page 10) be-
low the BUNN logo on front of the door until the “SET CUP SIZE” menu is reached. (Refer to menu J, page 14)
Press button D (page 10) to select programming by “EXAMPLE”. Place proper cup under dispense tip for station
you desire to set. Press desired dispense button, then release when the cup is 3/4 full. If cup is not full enough,
the dispense button can be pressed again to add additional beverage to the cup. If cup has reached desired level,
press button B under “SAVE” to record the dispense time. If cup is overfilled, press button D under “REPEAT”.
Empty cup and repeat the process.
If setting cup sizes by “TIME” is desired, press button B under “TIME” in the “SET CUP SIZE” menu. “HEAD
1 SM TIME” will be displayed, along with current time setting. Pressing either button D below (-) or button B
below (+) will subtract or add time in .1 second increments. Each one second of time equals approximately 1.25
ounces of beverage at factory settings. When desired time is set, press button A to continue to next cup size.
When the desired cup sizes have been programmed, press button C to exit program menus, or press button
A to move to the next menu. If button C was selected to exit the program mode, return the “NORMAL/PRO-
GRAM/RINSE” switch to the “NORMAL” position to return to nomal operation.
PROGRAMMING LOCKOUT SWITCH (on memory board mounted
on rear of component mounting bracket)
This switch can be set to prevent access to the programming
mode of the dispenser. Once all the correct settings are pro-
grammed, the operator can set the switch to the “ON” position to
prohibit anyone from changing the settings.
P3060
1. ON/OFF/NIGHT switch:
ON: Enables all dispenser functions.
OFF: Disables all dispenser functions.
NIGHT: Disables display lighting and dispense switches. Tank refill and heating
still functions.
2. NORMAL/PROGRAM/RINSE switch:
NORMAL: Allows all dispenser functions. Must be in this position for dispensing.
PROGRAM: Allows access to program menus using touch pad and LCD screen.
RINSE: Disables hopper motors. Pressing dispense button on front door will
dispense dilution water and power whipper motor for ten seconds.
2
1
PROGRAMMING THE DISPENSER (cont.)
37510 090407

12
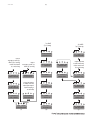
DISABLE MESSAGES ?
NO EXIT YES
Press and release right switch (advance to next menu), “TANK TEMP XXX°” appears on screen.
PROGRAMMING THE DISPENSER (cont.)
TANK TEMP XXX°
READY TEMP XXX°
(-) EXIT (+)
STRENGTH ADJ. ?
(-) EXIT (+)
EXIT YES
ENTER PASSWORD
(-) XXXX (+)
CALIBRATION ?
EXIT YES
LOCKS/DISABLES ?
EXIT YES
AUDIBLE ALARM ?
NO EXIT YES
ENABLE ADS ?
NO EXIT YES
ENTER ASSET # ?
EXIT YES
ENABLE SERVICE ?
NO EXIT YES
ENABLE EnergySavr ?
DIAGNOSTICS ?
EXIT YES
DISPLAY USAGE ?
EXIT YES
FACTORY DEFAULTS
NO YES
NO EXIT YES
(A)
continue to B
(page 13)
(C)
continue to D
(page 13)
(E)
FINISHED, returns
to main screen
(G)
(I)
Adjust tank
temperature
Adjust minimum tank
ready temperature for
lockout
continue to H
(page 14)
continue to F
(page 14)
Self Serve models
Portion control
models only
continue to J
(page 14)
(K)
37510 090407

13
XX° CAL XX°
(-) Tank Temp (+)
PROGRAMMING THE DISPENSER (cont.)
DRINK STRENGTH 1
(-) XX (+)
PRESS DISPENSE
TO CHECK TASTE
TASTE 1 OK ?
NO YES
SET FLAVOR 1 BY
TASTE RECIPE
ENTER RECIPE #
#.# gm/fluid oz
CHANGING VALUES
WILL EFFECT RPM
ARE YOU SURE ?
NO EXIT YES
(B)
Adjust hopper motor
speed for station for
station selected
SELECT UNITS
ENG EXIT METRIC
(D)
235 REFILL 155
(-) EXIT (+)
CAL WATER 1 ?
PRESS DISPENSE
ENTER VOLUME 1
(-) XX.X oz (+)
CAL POWDER 1 ?
PRESS DISPENSE
ENTER WEIGHT 1
(-) XX.X gm (+)
Auger Delay
(-) .XX sec (+)
CAL HOPPER 1 ?
NO YES
Returns to (E)
(page 12)
Goes to next station.
Returns to (A) (page
12) after last station.
Goes to next station.
Continues after last
station.
Goes to next station.
Continues after last
station.
Goes to next station.
Returns to (A) (page
12) after last station.
Goes to next station.
Returns to (A) (page
12) after last station.
37510 090407

14
PROGRAMMING THE DISPENSER (cont.)
LOW POWDER LOCK ?
NO EXIT YES
DISPENSE LOCKOUT
NO EXIT YES
RINSE ALARM ?
NO EXIT YES
HEAD 1 DISABLE ?
NO EXIT YES
SET PASSWORD ?
(-) XXXX (+)
Returns to (G)
(page 12)
TEST SWITCHES ?
Use Switch To Test
TEST HEATER ?
EXIT YES
TEST REFILL ?
EXIT YES
TEST HOT WATER ?
EXIT YES
TEST AUGERS ?
DISPENSE TO TEST
TEST DISPENSE HEAD?
DISPENSE TO TEST
Returns to (I)
(page 12)
(F)
(H)
RINSE ALARM TIME
(-) XX hours (+)
RINSE LOCKOUT ?
NO EXIT YES
Goes to next station.
Continues after last
station.
SET CUP SIZE
EXMPL TIME
(J)
DISPENSE UNTIL
CUP IS 3/4 FULL
HEAD 1 SM TIME
(-) 6.40 SEC (+)
HEAD 1 MD TIME
(-) 9.60 SEC (+)
HEAD 1 LG TIME
(-) 12.40 SEC (+)
DISPENSE TO ADD
REPEAT SAVE
Returns to (K) (page
12) after last station.
Goes to next station.
Returns to (K) (page
12) after last station.
37510 090407
Press and release
any dispense button
to set cup size.

14
PROGRAMMATION DU DISTRIBUTEUR (Suite)
NIVEAU BAS LOCK ?
NON SORTIR OUI
DISP BARRÉE
NON SORTIR OUI
ALARME RINÇAGE ?
NON SORTIR OUI
DISP 1 DISACTIV ?
NON SORTIR OUI
CRÉER MOT PASSE ?
(-) XXXX (+)
Revenir à (G)
(page 12)
TEST INTERRUPT ?
Utilis Int Test
TEST ÉLÉMENT ?
SORTIR OUI
TEST AUTOREMPLI ?
SORTIR OUI
TEST EAU CHAUDE ?
SORTIR OUI
TEST VRILLE ?
DISP POUR TESTER
TEST DISPENSAT?
DISP POUR TESTER
Revenir à (I)
(page 12)
(F)
(H)
TEMPS RINÇAGE
(-) XX heures (+)
LOCK RINÇAGE ?
NON SORTIR OUI
Poursuivre à la
prochaine station.
Continuer après la
dernière station.
RÉGLER GRANDEUR
EXAMPLE TEMPS
(J)
DISPENSE UNTIL
NIVEAU AU 3/4
DISPENS 1 PETIT
(-) 6,40 SEC (+)
DISPENS 1 MOYEN
(-) 9,60 SEC (+)
DISPENS 1 GRAND
(-) 12.40 SEC (+)
PESER DISP PR
RÉPÉTER/GARDER
Revenir (K) (page
12) après la dernière
station.
Poursuivre à la
prochaine station.
Revenir à (K) (page
12) après la dernière
station.
37510 090407
Appuyer sur
n’importe quelle
touche de distribu-
tion pour régler le
format des tasses.

13
XX° CALIB XX°
(-) TEMP RÉSERVOIR (+)
PROGRAMMATION DU DISTRIBUTEUR (Suite)
RÉGLER PDCT 1 PR
(-) XX (+)
PESER SUR DISPEN
PR VÉRIFIER GOÛT
GOÛT 1 OK ?
NON OUI
RÉGLER SAVEUR 1
GOÛT RECETTE
ENTRER RECETTE #
#.# g/oz liquide
MODIF AJUSTEMENT
VA AFFECTER RPM
CERTAIN ?
NON SORTIR OUI
(B)
Ajuster vitesse de
moteur de la trémie de
la station sélectionnée
CHOISIR UNITÉS
ANG SORTIR M…TRI
(D)
235 REMPLISSAGE 155
(-) SORTIR (+)
CALIBRER EAU 1 ?
PESER SUR DISPEN
ENTRER QTÉE 1
(-) XX.X oz (+)
CALIB POUDRE 1 ?
PESER SUR DISPEN
ENTRER POIDS 1
(-) XX.X gm (+)
Auger Delay
(-) .XX sec (+)
CALIB TRÉMIE 1 ?
NON OUI
Revenir à (E)
(page 12)
Poursuivre à la pro-
chaine station. Revenir
à (A) (page 12) après
la dernière station.
Poursuivre à la prochaine
station. Continuer après
la dernière station.
Poursuivre à la prochaine
station. Continuer après la
dernière station.
Poursuivre à la pro-
chaine station. Revenir
à (A) (page 12) après
la dernière station.
Poursuivre à la pro-
chaine station. Revenir
à (A) (page 12) après
la dernière station.
37510 090407

12
MESSAGE DÉACTIV ?
NON SORTIR OUI
Appuyez sur la touche de droite (accéder au prochain menu), et TEMP. RÉSERVOIR XXX° apparaîtra à l’écran.
PROGRAMMATION DU DISTRIBUTEUR (Suite)
TEMP RÉSERVOIR X°
TEMPRATUR PR TE X°
(-) SORTIR (+)
AJUSTER GOÛT ?
(-) SORTIR (+)
SORTIR OUI
ENTRER MOT PASSE
(-) XXXX (+)
CALIBRATION ?
SORTIR OUI
LOQUAGE/DÉSACT ?
SORTIR OUI
ALARME AUDIBLE ?
NON SORTIR OUI
ANNONCE ACTIVÉE ?
NON SORTIR OUI
ENTRE # MACHINE ?
SORTIR OUI
ACTIVE SERVICE ?
NON SORTIR OUI
ACTIV Econ Energ ?
DIAGNOSTIQUES ?
SORTIR OUI
QTÉE UTILISÉE ?
SORTIR OUI
PRGM INITIALE
NON OUI
NON SORTIR OUI
(A)
Poursuivre à B
(page 13)
(C)
Poursuivre à D
(page 13)
(E)
TERMINÉ. Revenir
à l’écran principal.
(G)
(I)
Ajuster la température
du réservoir
Ajuster la température
minimale d’infusion
pour verrouillage
Poursuivre à
H (page 14)
Poursuivre à F
(page 14)
Modèles
libre-service
Modèles à contrôle
de portions seulement
Poursuivre à J
(page 14)
(K)
37510 090407

11
distribution désirée, puis en la relâchant lorsque le format souhaité est atteint.Le temps requis pour remplir
la tasse sera mémorisé par l’unité de commande en accédant au menu suivant. Quant à la programmation
par TEMPS, elle consiste à régler la durée de distribution en secondes pour chaque format de tasse souhaité.
Mettez l’interrupteur NORMAL-PROGRAMMATION-RINÇAGE à la position PROGRAMMATION. Appuyez
sur la touche A (page 10) sous le logo de BUNN sur la porte de la façade jusqu’à ce que vous atteigniez le
menu RÉGLAGE DES PORTION. (Consultez le menu J à la page 14.) Appuyez sur la touche D (page 10) pour
sélectionner la programmation par EXEMPLE. Positionnez une tasse sous le déversoir de la station que vous
désirez régler. Appuyez sur la touche de distribution souhaitée, puis relâchez-la lorsque la tasse est pleine aux
trois quarts. Si la tasse n’est pas suffisamment pleine, la touche de distribution peut être appuyée de nouveau
pour ajouter de la boisson à la tasse. Si la tasse est remplie au niveau désiré, appuyez sur la touche B sous
SAUVEGARDER pour mémoriser le temps de distribution. Si la tasse est trop pleine, appuyez sur la touche D
sous RÉPÉTER. Videz la tasse et recommencez le processus.
Si vous désirez régler le format des tasses grâce au mode TEMPS, appuyez sur la touche B sous TEMPS dans
le menu RÉGLAGE DES PORTIONS. L’écran affichera TÊTE 1 P TEMPS ainsi que la durée qui est présentement
réglée. En appuyant sur soit la touche D sous (-), ou sur B sous (+), vous soustrairez ou ajouterez du temps
par tranche de 0,1 seconde. Chaque tranche équivaut à environ 1,25 oz de boisson selon le réglage en usine.
Lorsque vous avez terminé de régler le temps, appuyez sur la touche A pour régler le format de tasse suivant.
Lorsque tous les formats de tasses ont été réglés, appuyez sur la touche C pour quitter les menus de
programmation, ou sur A pour accéder au prochain menu. Si la touche C a été sélectionnée pour quitter le mode
de programmation, replacez l’interrupteur NORMAL-PROGRAMMATION-RINÇAGE à la position NORMAL pour
reprendre les opérations normales.
PROGRAMMATION DU VERROU DE DISTRIBUTION (sur la
carte mémoire située à l’arrière du support de montage des
composantes)
Cet interrupteur sert à prévenir l’accès au mode de programmation
du distributeur. Lorsque tous les réglages sont effectués
correctement et que la programmation est terminée, il s’agit de
mettre cet interrupteur à la position MARCHE pour prévenir toute
tentative de modification des réglages.
RÉGLAGE DES PORTIONS – Modèles à contrôle des portions
Le format de la tasse peut être programmé selon les modèles de
contrôle des portions soit par EXEMPLE ou par TEMPS. La programmation
par EXEMPLE se fait en appuyant manuellement sur la touche
PROGRAMMATION DU DISTRIBUTEUR (Suite)
1. Interrupteur MARCHE-ARRÊT-NUIT :
MARCHE : Active toutes les fonctions du distributeur.
ARRÊT : Désactive toutes les fonctions du distributeur.
NUIT : Désactive l’éclairage de l’écran et des touches de distribution. Le
remplissage et de réchauffage du réservoir fonctionnent toujours.
2. Interrupteur NORMAL-PROGRAMMATION-RINÇAGE :
NORMAL : Permet d’accéder à toutes les fonctions du distributeur. Doit être à
cette position pour permettre la distribution de boissons.
PROGRAMMATION : Permet d’accéder aux menus de programmation à l’aide
des touches à effleurement et de l’écran à cristaux liquides.
RINÇAGE : Désactive les moteurs de trémie. En appuyant sur
la touche de distribution sur la porte en façade, l’eau de dilution sera distribuée
et le moteur du fouet s’activera pendant 10 secondes.
2
1
37510 090407

10
A. Accéder au mode de programmation et poursuivre au
prochain menu.
B. Augmenter la valeur positive d’affichage
C. Quitter le mode de programmation
D. Augmenter la valeur négative d’affichage
E. Revenir au menu précédent et interrompre la distribution
MODÈLES À CONTRÔLE DES PORTIONS
Digital Beverage Control Digital Beverage Control
STOP
ÉCRAN DE DÉMARRAGE
Cet écran s’affichera lorsque le distributeur est prêt à être utilisé. Pendant le réchauffement du réservoir, la
température de l’eau sera affichée jusqu’à ce que l’eau atteigne la température d’infusion.
PROGRAMMATION DU DISTRIBUTEUR
Les prochains écrans de fonction apparaissent dans l’ordre. Chaque écran affiche des instructions sur
comment accéder aux diverses fonctions du distributeur et sur leur programmation. Pour activer la program-
mation, mettez l’interrupteur NORMAL-PROGRAMMATION-RINÇAGE à la position PRGRAMMATION.
NOTES IMPORTANTES CONCERNANT LA PROGRAMMATION – À LIRE ATTENTIVEMENT
Pour quitter le mode de programmation à n’importe quel moment, appuyez sur la touche QUITTER (au centre)
située sur le panneau avant, puis relâchez-la. L’ÉCRAN DE DÉMARRAGE s’affichera.
Si le mode de programmation est activé pendant plus de 90 secondes sans qu’aucune des cinq touches n’ait
été activée, l’appareil quittera le mode de programmation en cours et L’ÉCRAN DE DÉMARRAGE s’affichera.
PRÊT À SERVIR
BUNN iMIX
ABCDE
P3059
P3057
A. Accéder au mode de programmation et poursuivre au
prochain menu.
B. Augmenter la valeur positive d’affichage
C. Quitter le mode de programmation
D. Augmenter la valeur négative d’affichage
E. Revenir au menu précédent
MODÈLES LIBRE-SERVICE
À l’aide de l’écran à menus (ÉCRAN PRINCIPAL) en façade, l’utilisateur peut modifier les différentes fonctions
du distributeur. Cela permet d’effectuer une distribution précise des différentes saveurs de produits en poudre.
La programmation du distributeur est effectuée à l’aide d’une certaine fonction et, ensuite, grâce aux
interrupteurs de programmation, l’utilisateur peut personnaliser la distribution selon ses spécifications.
Pour accéder au mode de programmation et pour faire défiler les différents écrans de fonctions, les
interrupteurs de programmation illustrés sont utilisés. Il existe cinq interrupteurs de programmation qui
serviront au réglage initial du distributeur.
INTERRUPTEURS DE PROGRAMMATION
ABCDE
37510 041207

9
Ajustez la température du réservoir (maximum
190 °F)
Ajustez la température minimale d’infusion
pour verrouillage (maximum 185°)
Ajustez la vitesse du moteur de la trémie du poste
de distribution correspondant
TEMP RÉSERVOIR X°
(-) SORTIR (+)
TEMPÉRATUR PR TE X°
(-) SORTIR (+)
RÉGLER PDCT
(-) XX (+)
XX° CAL XX°
(-) Temp Réservoir (+)
235 REMPLISSAGE 155
(-) SORTIR (+)
CALIBRER EAU ?
PESER SUR DISPEN
Calibrez la sonde thermique
Réglez le seuil de la sonde de remplissage du
réservoir
Étalonne le débit d’eau de dilution du poste de
distribution sélectionné
CALIB POUDRE ?
PESER SUR DISPEN
Étalonne le taux de distribution de la poudre de la
trémie du poste de distribution sélectionné
DÉLAIS VRILLE
(-) .XX sec (+)
CALIB TR…MIE ?
NON OUI
Réglez le délai de mise en marche de la trémie
après l’ouverture de la soupape de dilution du
poste de distribution sélectionné
Étalonne le capteur électronique de niveau de la
trémie du poste de distribution sélectionné.
La trémie doit être au moins à moitié pleine pour
l’étalonnage.
NIVEAU BAS LOCK ?
NON SORTIR OUI
DISP BARRÉE
NON SORTIR OUI
ALARME RINÇAGE ?
NON SORTIR OUI
DISP 1 DÉSACTIV ?
NON SORTIR OUI
CRÉER MOT PASSE ?
(-) XXXX (+)
Active le verrouillage de distribution lorsque le
niveau de poudre de la trémie est bas
Active le verrouillage de distribution si la tem-
pérature est sous le niveau minimal
Active l’alarme de rinçage
Désactive toutes les fonctions et la distribution
des postes sélectionnés
Permet de régler le code d’accès
afin de prévenir le changement
des fonctions de réglage
ALARME AUDIBLE ?
NON SORTIR OUI
ANNONCE ACTIVÉE?
NON SORTIR OUI
ENTRE # MACHINE?
SORTIR OUI
Active une alarme audible
Active les messages publicitaires
à afficher sur l’écran à cristaux
liquides de la porte
Entrez le numéro d’inventaire de
l’appareil
Permet d’afficher le numéro de
téléphone du centre de service
TEST INTERRUPT ?
Utilis Int Test
TEST ÉLÉMENT ?
SORTIR OUI
TEST AUTOREMPLI ?
SORTIR OUI
TEST EAU CHAUDE ?
SORTIR OUI
TEST VRILLE ?
DISP POUR TESTER
TEST DISPENSAT
DISP POUR TESTER
Permet de vérifier les touches de
distribution
Permet d’activer manuellement
l’élément chauffant du réservoir
Permet d’activer manuellement la
soupape de remplissage
Permet d’activer manuellement la
soupape d’eau chaude (en option)
Permet d’activer manuellement les
moteurs de trémies
Permet d’activer manuellement
les soupapes de distribution et les
moteurs du fouet
QTÉE UTILISÉE ?
SORTIR OUI
Affiche le volume qui a été distribué
ACTIVE # SERVICE
NON SORTIR OUI
ACTIV Econ Energ
NON SORTIR OUI
Active le mode économiseur
d’énergie
GLOSSAIRE
PRGM INITIALE
NON OUI
Réinitialise tous les réglages en
usine par défaut et remet le code
d’accès à 0
MESSAGE DÉSACTIV ?
NON SORTIR OUI
Désactive la fonction qui affiche les
messages d’erreur sur l’afficheur à
cristaux liquides de la porte
RÉGLER GRANDEUR
EXAMPLE TEMPS
Sélectionnez le réglage des portions selon la durée
d’écoulement (temps en secondes) ou selon l’exemple
(modèles à contrôle de portions seulement)
37510 113004
PESER DISP PR +
RÉPÉTER / GARDER
Appuyez sur la même touche de distribution pour
remplir la tasse à ras bords, ou appuyez sur Sau-
vegarder pour enregistrer le temps de distribution,
ou encore appuyez sur Répéter pour supprimer le
temps de distribution et la répétition.
La page est en cours de chargement...
La page est en cours de chargement...
La page est en cours de chargement...
La page est en cours de chargement...
La page est en cours de chargement...
La page est en cours de chargement...
La page est en cours de chargement...
La page est en cours de chargement...
-
 1
1
-
 2
2
-
 3
3
-
 4
4
-
 5
5
-
 6
6
-
 7
7
-
 8
8
-
 9
9
-
 10
10
-
 11
11
-
 12
12
-
 13
13
-
 14
14
-
 15
15
-
 16
16
-
 17
17
-
 18
18
-
 19
19
-
 20
20
-
 21
21
-
 22
22
-
 23
23
-
 24
24
-
 25
25
-
 26
26
-
 27
27
-
 28
28


Bunn iMIX-3 Black Guide d'installation
- Catégorie
- Cafetières
- Taper
- Guide d'installation
- Ce manuel convient également à
dans d''autres langues
- English: Bunn iMIX-3 Black Installation guide
Documents connexes
-
Bunn ULTRA-2 HPR GP,BLK LED GOURMET-EXT HDL Guide d'installation
-
Bunn H10X-80-208 Guide d'installation
-
Bunn JDF-4S Lit Door Guide d'installation
-
Bunn Dual® SH Soft Heat® Stainless 120/208V Manuel utilisateur
-
Bunn Sure Immersion® 220 120V Guide d'installation
-
Bunn ITCB-DV-HV High Volume Le manuel du propriétaire
-
Bunn Dual® SH Soft Heat® DBC® Black Guide d'installation
-
-
Bunn Single® AXIOM® GPR 35 Guide d'installation
-
Autres documents
-
iSi Gourmet Whip Instructions For Use Manual
-
Air Delights MICROBURST 9000 Guide de démarrage rapide
-
Hendi 588024 Manuel utilisateur
-
-
 Kayser 250001 Manuel utilisateur
-
Tork Matic Manuel utilisateur
-
Prince Castle DHB-BK3PC Mode d'emploi
-
Schneider Electric PowerLogic A3S Arc Flash Protection Unit Instruction Sheet
