GE TPG21PRDBB Le manuel du propriétaire
- Catégorie
- Réfrigérateurs-congélateurs
- Taper
- Le manuel du propriétaire
Ce manuel convient également à

English Version...................................2
Version française...........................19
Versión en español ......................39
Safety Instructions.....................2, 3
Operating Instructions, Tips
Automatic Icemaker &Dispenser .........4–6
Freezer Compartment ...................................8
Freezer Baskets ...........................................8
Loading the Freezer Compartment ........8
Shelves..............................................................7
Porta-Bins......................................................7
Quick Space Shelf.......................................7
Slide-Out Spillproof Shelves.....................7
Wine Rack.....................................................7
Storage Drawers.............................................6
Temperature Controls ...................................3
Care and Cleaning
Behind the Refrigerator.................................9
Cleaning—Inside and Outside......................8
Drawer and Cover Removal.........................9
Light Bulb Replacement ...............................9
Under the Refrigerator...................................9
Problem Solver.......................16–18
Normal Operating Sounds.........................16
Preparation
Adding Door Panels.............................11, 12
Clearances.....................................................10
Location..........................................................10
Moving and Vacation..................................10
Rollers/Leveling...........................................10
Water Supply to Icemaker.........................10
Installation ..................................12–15
Earthing...................................................12, 13
Electrical Requirements......................12, 13
Fitting a Different Plug................................13
Great Britain and Ireland ............................13
How to Install Features...............................14
Additional Features .................................15
Mains Lead Replacement .....................3, 13
Model and Serial Numbers ..........................2
Use and Care Guide
Refrigerator—Freezer
Side by Side 21 Built-In,
Export G-Line

HELP US HELP YOU…
Read this guide carefully.
It is intended to help you operate and maintain your new
refrigerator properly.
Keep it handy for answers to your questions.
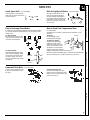
Write down the model and serial numbers.
You’ll see them on a label on the wall beside the top drawer or at the
bottom, inside the fresh food compartment door.
Please write these numbers here:
Model Number
Serial Number
Use these numbers in any correspondence or service calls concerning
your refrigerator.
If you received a damaged refrigerator…
Immediately contact the dealer (or builder) that sold you
the refrigerator.
Save time and money.
Before you request service…
Check the Problem Solver in the back of this guide. It lists minor
operating problems that you can correct yourself.
Products are continuously being improved…
Therefore product features and specifications may change or
vary slightly.
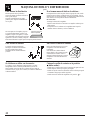
WARNING—When using this appliance,
always exercise basic safety precautions,
including the following:
• Use this appliance only for its intended purpose as
described in this Use and Care Guide.
•
This refrigerator must be properly installed
and located in accordance with the
Installation Instructions before it is used.
WARNING—Connect to potable water
supply only.
• Never unplug your refrigerator by pulling on the
power cord. Always grip plug firmly and pull
straight out from the outlet.
• Repair or replace immediately all electric service
cords that have become frayed or otherwise
damaged. Do not use a cord that shows cracks or
abrasion damage along its length or at either the plug
or appliance end.
•
When moving your appliance away from the wall, be
careful not to roll over or damage the power cord.
• Do not allow children to climb, stand or hang on
the shelves in the refrigerator. They could damage
the refrigerator and seriously injure themselves.
• If your old refrigerator is still around the
house but not in use, be sure to remove the
doors. This will reduce the possibility of
danger to children.
• After your refrigerator is in operation, do not
touch the cold surfaces in the freezer compartment,
particularly when hands are damp or wet. Skin
may adhere to these extremely cold surfaces.
• Do not place fingers or hands on the automatic
ice-making mechanism while the refrigerator is
plugged in. This will prevent contact with the
moving parts of the ejector mechanism, or with the
heating element that releases the cubes.
• Don’t refreeze frozen foods which have thawed
completely. Food safety experts say:
‘‘…You may safely refreeze frozen foods that have
thawed if they still contain ice crystals or if they are
still cold—below 4°C.
‘‘…Thawed ground meats, poultry or fish that have
any off-odor or off-color should not be refrozen and
should not be eaten. Thawed ice cream should be
discarded. If the odor or color of any food is poor or
questionable, get rid of it. The food may be
dangerous to eat.
‘‘…Even partial thawing and refreezing reduces the
eating quality of foods, particularly fruits, vegetables
and prepared foods. The eating quality of red meat is
affected less than that of many other foods. Use
refrozen foods as soon as possible to save as much of
their eating quality as you can.’’
IMPORTANT SAFETY INSTRUCTIONS
Read all instructions before using this appliance.
2

• Unplug your refrigerator before cleaning and
making repairs. NOTE: We strongly recommend that
any servicing be performed by a qualified individual.
• Before replacing a burned-out light bulb, unplug the
refrigerator or turn off power at the circuit breaker or
fuse box in order to avoid contact with a live wire
filament. (A burned-out light bulb may break when
being replaced.) NOTE: Turning control to “ ”
position does not remove power to the light circuit.
• Do not store or use gasoline or other flammable
vapors and liquids in the vicinity of this or any
other appliance.
Mains lead replacement
If the mains lead on your refrigerator needs replacing
at any time, it must be replaced by a special lead which
is obtainable from your local dealer. A charge will be
made for the replacement of the mains lead if you have
damaged the lead.
SAVE THESE INSTRUCTIONS
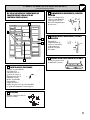
OPERATING YOUR REFRIGERATOR
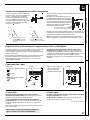
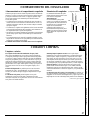
Set the Temperature Controls (appearance may vary)
Two controls let you regulate the temperature in the fresh food and
freezer compartments.
At first, set both the fresh food control and the freezer control to “5.”
Allow 24 hours for the temperature to stabilize, whether you are
setting the controls for the first time or adjusting them later. Then, if
you want colder or warmer temperatures in either compartment, adjust
the controls one step at a time.
NOTE: Moving the freezer control to the “ ” position turns off
cooling in both compartments—fresh food and freezer—but does not
shut off power to the refrigerator.
1
3 5
7
9
1
3
5
9
7
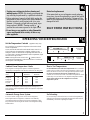
Ambient Room Temperature Limits How to Test Temperatures
This refrigerator is designed to operate in ambient temperatures
specified by its Temperature Class which is marked on the rating plate.
Temperature Symbol Ambient Temperature
Class
Maximum Minimum
Extended-
Temperate SN 32°C 10°C
Temperate N 32°C 16°C
Subtropical ST 38°C 18°C
Tropical T 43°C 18°C
NOTE: Internal temperature may be affected by such factors as the
location of the refrigerator, ambient temperature and frequency of
door openings. Adjust temperature controls as required to compensate
for these factors.
Use the milk test for the fresh food compartment. Place a container
of milk on the top shelf in the fresh food compartment. Check it a day
later. If the milk is too warm or too cold, adjust the temperature controls.
Use the ice cream test for the freezer compartment. Place a
container of ice cream in the center of the freezer compartment. Check
it after a day. If it’s too hard or too soft, adjust the temperature controls.
Always allow 24 hours for the refrigerator to reach the
temperature you set.
3
Important Safety Instructions Operating Your Refrigerator
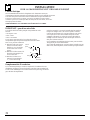
Automatic Energy-Saver System No Defrosting
You won’t find an “energy-saver” switch on this refrigerator.
Warm liquid from the refrigerator’s condenser is automatically
circulated around the front edge of the freezer compartment to help
keep moisture from forming on the outside of the refrigerator during
humid weather.
It is not necessary to defrost the freezer or fresh food compartments.
Although your refrigerator is designed and equipped to defrost itself
automatically, some frost on packages is normal.
Fresh Food
Control
Freezer
Control

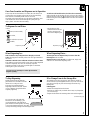
AUTOMATIC ICEMAKER & DISPENSER
(on some models)
How It Works
4
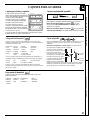
The automatic icemaker makes ice continually. The dispenser
dispenses water, ice cubes or crushed ice through the freezer
compartment door. Here’s how they work.
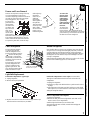
Water flows from the household supply through a
(1)dual solenoid valve
to the
(2)water tubing and to the
(3)automatic icemaker
as needed.
Water is frozen in the
(4)cube mold and ejected
into the
(5)storage bin where a
motor-powered auger
moves cubes forward.
Cubes dispense through the chute in the door when the
dispenser pad is pressed.
When the Crushed pad is pressed (on some models), a
baffle channels cubes through the crusher and crushed ice falls
through a chute into the glass.
When the Water pad is selected (on some models), water
flows through the
(6)tubing in the door and is dispensed when the dispenser pad is
pressed.
(7)A light switch (on some models) turns the night light in the
dispenser on or off.
The light also comes on when the dispenser pad is pressed.
The light in the dispenser should be replaced with a 10 watt maximum
bulb when it burns out.
If you cannot locate the correct bulb, see your local dealer.
3
7
6
4
5
1
2
Important Facts About Your Ice & Water Dispenser
• If this is your first icemaker you’ll hear occasional sounds that
may be unfamiliar. These are normal ice-making sounds and are
not cause for concern.
• Your icemaker will produce eight cubes per cycle—
approximately 120 cubes in a 24-hour period—depending on
freezer compartment temperature, room temperature, number
of door openings and other use conditions.
• Intermittent dispensing of ice is normal. If ice flow interruption
is more than brief, ice clump(s) may be the cause and should be
removed following instructions in this section.
• Avoid over-filling glasses with ice and using narrow or extra-tall
glasses. This can jam the chute or cause the door in the chute to
freeze shut. Periodically open the freezer compartment door and
look down into the chute. If ice is blocking the chute, poke it
through with a wooden spoon.
• To help keep bits of ice from being sprayed beyond the glass,
place the glass close to the ice chute—but not so close that it blocks
out-coming ice.
• Add ice before adding beverage to prevent splashing.
• Beverages and foods should not be quick-chilled in the ice
storage bin. Cans, bottles or food packages in the storage bin may
cause the icemaker or auger to jam.
• Do not add ice from trays or bags to the storage bin. It may not
crush or dispense well.
CAUTION: Some products such as water ices should not be
consumed too cold.
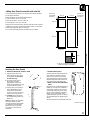
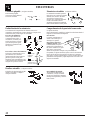
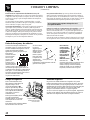
Before Using Your Icemaker and Dispenser
If you use your refrigerator before the water
connection is made, raise the ice access door
and make sure the icemaker feeler arm is in the
(up) position. When the water supply has
been connected to the icemaker, move the
feeler arm to the (down) position.
At first there will be a delay before water is dispensed and ice is made.
On models with a water dispenser, if no
water is dispensed when the refrigerator is
first installed, there may be air in the water line
system. Press the dispenser pad for at least two
minutes to remove trapped air from the water
line and to fill the water system.
The ice cube mold will automatically fill with water AFTER cooling
to freezer temperatures. The first cubes normally freeze after
several hours.
NOTE: With a newly-installed refrigerator, allow about 24 hours
for the freezer compartment to get cold enough to make ice.
(continued next page)
Feeler arm in
(up) position
stops icemaking
Feeler arm in
(down) position
begins icemaking
Push the dispenser pad
until the water line is filled.

5
Automatic Icemaker & Dispenser
Once Your Icemaker and Dispenser are in Operation
Throw away the first few batches of ice cubes (16 or 24 cubes). This
will flush away any impurities in the water line. Do the same thing
after vacations or extended periods when ice isn’t used.
On models with a water dispenser, pour the first six glassfuls of water
in the kitchen sink. The first water through the system picks up a
slight ‘‘plastic’’ taste from the water tubing.
To make sure the bin fills with ice, level the cubes occasionally.
When cubes fall into the bin they may pile up close to the icemaker
and push the feeler arm to the (up) position, which stops icemaking,
before the bin gets full. Keeping the cubes level allows the icemaker
to fill the bin.
To Dispense Ice and Water
• Select:
water (on some models),
ice cubes,
or crushed ice (on some
models).
• Grip the glass or other
container near the rim and
press the rim against the
center of the dispenser pad.
Dispenser pad
Dispenser pad
To Stop Dispensing If Ice Clumps Form in the Storage Bin…
Release pressure from the dispenser
pad and wait a few seconds to catch the
last bits of ice or drops of water.
There may be some dripping after
dispensing crushed ice or water. If there
is a lot of dripping, the spill should be
wiped dry right away.
Do not pour water in the spill shelf
because it is not self draining—pour
it in the kitchen sink. The shelf and its
grille should be cleaned regularly according
to Care and Cleaning instructions. The grille
is easily removed by pressing on the back right corner.
The icemaker ejects cubes in groups of eight, and it is normal for
several cubes to be joined together. However, if you don’t use the ice
very often ice clumps may form in the storage bin and can clog
the dispenser.
If this happens:
• Remove the storage bin from the freezer.
• Break up ice clumps with your hands. Throw away any clumps that
you can’t break up.
• Replace the bin before the remaining cubes melt and fuse together.
(continued next page)
Press here to remove grille
When Dispensing Ice… When Dispensing Water…
Some crushed ice may be dispensed even though you selected
Cubes. This happens occasionally when a few cubes get channeled to
the crusher.
Sometimes a mound of snow will form on the door in the ice chute.
This condition is normal, and usually occurs when you have dispensed
crushed ice repeatedly. The snow will eventually evaporate.
Sometimes crushed ice will spray beyond the glass. To avoid this,
hold the glass up close to the chute.
The first glass of water dispensed may be warmer than the
following ones. This is normal.
Dispensed water is cool, not iced. For colder water, simply add
crushed ice or cubes before dispensing water.
CAUTION: Never put fingers or other objects into the
dispenser opening.

AUTOMATIC ICEMAKER & DISPENSER
(continued)
To Remove Ice Storage Bin To Replace Ice Storage Bin
Lift the left corner to free the bin
from the shelf. Pull the bin straight out
while supporting it at front and back.
Slide the bin back until the tab on the
bin locks into the slot in the shelf.
If the bin does not go all the way back,
remove it and turn the drive mechanism
1/4 turn. Then push the bin back again
until the tab on the bin locks into the slot
in the shelf.
Rotate
Drive
Mechanism
If Ice is Not Used Often…
‘‘Old’’ ice cubes will become cloudy and taste stale. Empty ice
storage bin periodically and wash it in lukewarm water. Be sure to
allow storage bin to cool before replacing it—otherwise ice cubes will
stick to the metal auger.
Move the icemaker feeler arm to the (up)
position when…
• Home water supply is to be turned off for several hours.
• Ice storage bin is to be removed for a period of time.
• Going away on vacation, at which time you should also turn off the
valve in the water supply line to your refrigerator.
• Moving the freezer control to “ ” position.
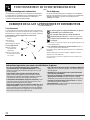
Fruit & Vegetable Drawers Adjustable Humidity Drawers
The top 2 storage drawers at the bottom
of the fresh food compartment are designed
to provide high humidity levels required by
most vegetables and lower humidity levels
required for most fruits.
When replacing the drawers, always push
them all the way in.
Storage time will depend upon the type
of food and its condition when placed in
the drawers.
Excess water that may accumulate in the
bottom of the drawers should be emptied and the drawers wiped dry.
These drawers have individual, adjustable humidity controls that let
you regulate the amount of moisture retained in foods.
Slide the control all the way to the setting and the drawer
provides high humidity recommended for most vegetables.
Slide the control all the way to the setting to provide lower
humidity levels recommended for most fruits.
STORAGE DRAWERS
High Humidity Convertible Drawer
Setting the drawer for high humidity keeps unwrapped foods fresh by
retaining the natural moisture content of foods such as:
• Artichokes • Cherries • Plums • Asparagus
• Corn • Radishes • Beets, topped • Currants
• Rhubarb • Blueberries • Greens, leafy • Spinach
• Carrots • Lettuce • Tomatoes, ripe • Celery
• Parsley • Peas, green
As in any refrigerated storage area, it is recommended that foods with
strong odors be stored wrapped—foods such as:
• Broccoli • Cabbage • Parsnips • Brussels sprouts
• Cauliflower • Turnips • Green onions
The high humidity setting also works well for the convenient storage
of lunch meats and cheese, hors d’oeuvres, spreads and snacks.
The Convertible drawer has its own cold air duct to allow a stream
of cold air from the freezer compartment to flow around the drawer.
The variable temperature control regulates the air flow from the
freezer compartment.
Set control lever down to the
coldest setting to store fresh
meats. If lever is left in meat
position for a long period of
time, some frost may form
on the inside of the drawer.
Set control lever up to convert
the drawer to normal refrigerator
temperature and provide extra
vegetable storage space. Cold air duct is turned off.
Variable settings between these extremes can be selected.
Normal
setting
Coldest
setting
Low Humidity
Setting the drawer for low humidity keeps the following foods fresh:
• Apples • Oranges • Squash, summer • Apricots
• Peaches • Grapes • Pears • Strawberries
• Mushrooms • Raspberries • Tangerines • Nectarines
6

SHELVES
Quick Space Shelf (on some models) Slide-Out Spillproof Shelves (on some models)
7
This shelf splits in half and slides
under itself for storage of tall items
on the shelf below.
The slide-out shelf allows you to
reach items stored behind others.
The special edges are designed to
help prevent spills from dripping to
lower shelves. Make sure you push
them all the way back in before you
close the door.
Automatic Icemaker & Dispenser Storage Drawers Shelves
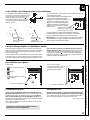
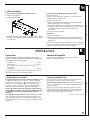
How to Rearrange Your Shelves
The shelves in the fresh food compartment are adjustable, enabling
you to make efficient shelf arrangements to fit your family’s food
storage needs.
To remove shelves:
Tilt the shelf up at front, then lift
it up and out of the tracks on the
rear wall of the refrigerator.
To relocate shelves:
Select desired shelf height. With
shelf front raised slightly, engage
the top hooks in the tracks at the
rear of the cabinet. Then lower
the front of the shelf until it locks
into position.
Bins on Fresh Food Compartment Door
(on some models)
Adjustable bins can easily be carried from the refrigerator to your
work area.
To remove:
Lift bin straight up until
mounting hooks disengage.
To replace or relocate:
Select desired shelf height,
engage bin’s hook in slots
on the tracks of the door, and
push in. Bin will lock in place.
The divider (on some models),
helps prevent tipping, spilling or
sliding of small items stored on the door shelf.
Place index finger and middle finger on either side of the divider near
the front and simply move it back and forth to fit your needs.
Lift up
and out
2
Tilt up
1
Engage
top hook
1
Lower to lock
into place
2
Divider
Removable Wine Rack (on some models)
The wine rack is designed to hold
a bottle on its side and will fit on
any shelf.
To relocate the wine rack:
Pull wine rack straight out. Then
position its lip over either edge of the
shelf you want to suspend it from and
push it all the way in.

FREEZER COMPARTMENT
Loading the Freezer Compartment Freezer Baskets (on some models)
Load so that at least 15 mm of space remains clear between stacks of
packages and 15 mm to 25 mm of space between the top of any stack
and any shelf or basket above it. Packages may hang over the front of
shelves but must remain 15 mm from doors.
• Food to be frozen must not be placed in direct contact with food in
storage. If food is to be frozen every day, it may be necessary to
reduce the quantity to be frozen.
• Food is most quickly frozen on the middle three shelves of the
freezer compartment and most slowly in the freezer door shelves.
• Do not store commercially quick-frozen food longer than the time
recommended by the food manufacturers.
• The freezer door storage shelves marked with a two-star label are
only appropriate for the storage of previously frozen food.
Effervescent drinks should not be stored in the freezer
compartment.
Wire slide-out freezer baskets
can be pulled out for easy access to
frozen foods.
WARNING: Poor performance may
occur if freezer baskets are not used.
Storage of items in the freezer without
using baskets may result in poor
temperature performance due to
restrictions of air flow within the
freezer compartment.
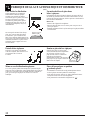
CARE AND CLEANING
Cleaning—Outside
The water and ice dispenser spill shelf should be wiped dry
immediately to prevent spotting. Water left on the shelf may leave
deposits that you can remove by soaking in undiluted vinegar.
You can also use a paste of non-precipitating water softener and water,
or 5 ml of citric acid powder per 500 ml of hot tap water. Soak until
the deposit disappears or becomes loose enough to rinse away.
Usually 30 minutes soaking time is adequate. Avoid using wax on the
spill shelf and trim.
The dispenser pad can be cleaned by using a warm water and baking
soda solution—about 15 ml of baking soda to one liter of water. Rinse
thoroughly with water and wipe dry.
The door handles can be cleaned with a cloth dampened with a
solution of mild liquid dishwashing detergent and water. Dry with a
soft cloth. Don’t use wax on the door handles with metal trim.
Keep the finish clean. Wipe with a clean cloth lightly dampened with
kitchen appliance wax or mild liquid dishwashing detergent. Dry and
polish with a clean, soft cloth. Do not wipe the refrigerator with a
soiled dishwashing cloth or wet towel. These may leave a residue that
can erode the paint. Do not use scouring pads, powdered cleaners,
bleach or cleaners containing bleach because these products can
scratch and weaken the paint finish.
Protect the paint finish. The outside of the refrigerator has a high
quality, baked-on paint finish. With proper care, it will stay new-
looking and rust-free for years. Apply kitchen/appliance wax when the
refrigerator is new and then at least twice a year.
The long door handles and trim (on models with trim kit) can be
cleaned with a cloth dampened with a solution of mild liquid
dishwashing detergent and water. Dry with a soft cloth. Don’t use wax
on the door handles and trim.
Cleaning—Inside
Inside the fresh food and freezer compartments should be cleaned
at least once a year. Unplug the refrigerator before cleaning. If this is
not practical, wring excess moisture out of sponge or cloth when
cleaning around switches, lights or controls.
Use warm water and baking soda solution—about 15 ml of baking
soda to one liter of water. This both cleans and neutralizes odor. Rinse
thoroughly with water and wipe dry.
Other parts of the refrigerator—including door gaskets, meat and
vegetable drawers, ice storage bin and all plastic parts—can be
cleaned the same way. After cleaning door gaskets, apply a thin layer
of petroleum jelly to the door gaskets at the hinge side. This helps
keep the gaskets from sticking and bending out of shape. If the freezer
baskets don’t slide freely after cleaning, lubricate them with petroleum
jelly. Do not use cleansing powders or other abrasive cleaners.
To help prevent odors, leave an open box of baking soda in the rear of
the refrigerator, on the top shelf. Change the box every three months. An
open box of baking soda in the freezer will absorb stale freezer odors.
Avoid cleaning cold glass shelves with hot water because the extreme
temperature difference may cause them to break.
Drain opening in the freezer compartment. During yearly cleaning,
remove bottom freezer basket and flush a baking soda solution—
5 ml of baking soda and 500 ml of hot (not boiling) water—through
the drain line with the help of a meat baster. This will help eliminate
odor and reduce the likelihood of a clogged drain line.
If drain becomes clogged, use a meat baster and baking-soda-and-
water solution to force the clog through the drain line.
Do not wash any plastic parts from your refrigerator in
your automatic dishwasher.
8

Drawer and Cover Removal
Drawers will stop before coming all the way
out of the refrigerator to help prevent
contents from spilling onto the floor. Drawers
can easily be removed by tilting up slightly
and pulling past the “stop” location.
To remove the
glass shelf above
the top drawer,
first remove the
top drawer and
any food on the
shelf. Then,
reach in, push
the rear of the
glass up until it
touches the bottom of the lower light shield.
Then push the shelf back (approx. 13 mm)
until it clears both the front corner retainers.
To replace the glass shelf, reverse the steps.
When replacing
the drawers,
make sure you
slide them
through both
drawer guides on
the right side.
Then press down
on the top of the
shelf to make
sure the shelf sits
firmly on top of
both drawer guides.
To remove the
drawers when
the fresh food
compartment
door cannot be
opened fully,
remove the lower
bins on the fresh
food door.
To remove bins,
first remove the
food in the bins. Then, grasping the bin at
each end, push in at the bottom as you lift and
pull out at the top. Once the bins are removed
the drawers will come straight out.
Freezer Compartment Care and Cleaning
Drawer
Guides
Under Refrigerator Behind Refrigerator
For most efficient operation,
you need to keep the area
under the refrigerator clean.
Turn the temperature control to
“ .” Remove the base grille.
Sweep away or vacuum dust
that is readily accessible on the
condenser coils, then turn the
control back on.
For best results, use a brush
specially designed for this
purpose, available at most
appliance parts stores. This
easy cleaning operation should
be done at least once a year.
Care should be taken in moving your refrigerator away from the wall.
All types of floor coverings can be damaged, particularly cushioned
coverings and those with embossed surfaces. Pull the refrigerator
straight out and return it to position by pushing it straight in. Moving
the refrigerator in a side direction may result in damage to the floor
covering or refrigerator.
When pushing the refrigerator back, make sure you don’t roll over the
power cord or icemaker supply line (on some models).
Light Bulb Replacement
Fresh Food Compartment—Upper Light
1. Unplug refrigerator.
2. Remove the snap-in light shield.
3. Replace with same size bulb and reinstall the light shield. If you
cannot locate the correct bulb, see your dealer.
Fresh Food Compartment—Lower Light (on some models)
This light is located behind a shield at the rear of the fresh food
compartment.
1. Unplug the refrigerator.
2. Grasp the top edge of the shield and lift it up and forward to free its
top edge.
3. After replacing with the same size bulb, hook the top of the shield
back in place. If you cannot locate the correct bulb, see your dealer.
4. Plug the refrigerator back in.
Freezer Compartment with a Dispenser
1. Unplug the refrigerator.
2. Remove the shelf just below the light shield. (The shelf will be
easier to remove if it is emptied first.)
3. Pull the light shield toward you to reach the bulb.
After replacing with same size bulb, reinstall shelf and plug the
refrigerator back in.
1
3
5
7
9
1
3 5
7
9
9
Clean the condenser coils
at least once a year.

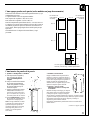
PREPARATION
Clearances Refrigerator Location
Allow the following clearances for ease of installation, proper air
circulation and plumbing and electrical connections:
Sides ...................................................................................3 mm
Top....................................................................................25 mm
(If built-in, allow 22 mm for hinge covers.)
Back..................................................................................13 mm
If the refrigerator is against a wall on either side, allow 19 mm for
door clearance.
Do install it on a floor strong enough to support a fully
loaded refrigerator.
When You Go on Vacation When You Move
For extended vacations or absences, shut off the power to the
refrigerator, move the freezer control to the “
”
position, and
clean the interior with a baking soda solution of 15 ml of baking soda
to one liter of water. Wipe dry. To prevent odors, leave an open box of
baking soda in the refrigerator. Leave doors open.
Move icemaker feeler arm to (up) position, which stops
icemaking, and be sure to shut off water supply to the refrigerator.
For shorter vacations, remove perishable foods and leave controls at
regular settings. However, if room temperature is expected to drop
below 16°C, follow the same instructions as for extended vacations.
Disconnect power cord from wall outlet, remove all food, and clean
and dry the interior.
Secure all loose items such as grille, shelves and storage pans by
taping them securely in place to prevent damage.
Be sure refrigerator stays in upright position during actual moving and
in van. Refrigerator must be secured in van to prevent movement.
Protect outside of refrigerator with blanket.
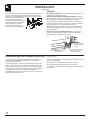
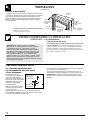
Rollers Leveling
Adjustable rollers behind the base grille enable you to move the
refrigerator away from the wall for cleaning. These rollers should be
set so that the refrigerator rests firmly on the floor. Side-by-side
refrigerators also have specially
designed door hinges that lift
both doors slightly when opened,
allowing the force of gravity to
help close them securely.
To adjust rollers, remove the base grille by grasping it at the bottom
and pulling it out.
Turn front roller adjusting screws clockwise to raise the
refrigerator, counterclockwise to lower it. Use an adjustable wrench
(3/8
² hex head bolt) or pliers.
Turn the rear roller adjusting screws clockwise to raise the
refrigerator, counterclockwise to lower it. Use a flat blade screwdriver.
NOTE: When leveling, you can improve door closure by raising the
front as much as 15 mm more than the rear of the refrigerator.
To replace base grille, align prongs on back of grille with clamps in
cabinet and push forward until grille snaps into place.
Front roller
adjusting screw
Slot where prong of
grille snaps into place
Rear roller
adjusting
screw
Water Supply to Icemaker (on some models)
If your refrigerator has an icemaker, or if you plan to add an
icemaker later, the icemaker will have to be connected to a cold
drinking (potable) water line.
A water supply kit containing copper tubing, shutoff valve, fittings
and instructions is available at extra cost from your dealer. There
should be sufficient tubing from the cold water supply to the
icemaker inlet to allow moving the refrigerator out from the wall
several feet (approximately 2.5 m of 1/4² copper tubing in three
25 cm diameter coils).
Do not use kits with plastic tubing since there is water pressure in the
supply line at all times.
Maximum permissible inlet water pressure—8.3 bars.
Minimum permissible inlet water pressure—1.4 bars.
Installation of icemaker must be made by a qualified service technician.
10

Preparation
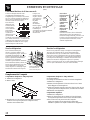
Adding Door Panels (on models with trim kit)
These instructions describe how to insert decorator panels and what
size the panels should be.
Panels should be cut to the following dimensions:
Top freezer panel—36.4 cm x 47.6 cm
Bottom freezer panel—36.4 cm x 82.2 cm
Fresh food panel—51.0 cm x 165.6 cm
Panels that are 6 mm thick will fit the door frame trim with no special
preparation. If you have a material thinner than 6 mm, you will need
to add a filler behind the panel for proper fit.
Pre-cut white and black panels are available from your dealer.
Special cut-
out required,
see below.
Special cut-
out required,
see below.
36.4 cm
47.6 cm
82.2 cm
36.4 cm
3 mm
8 mm
51.0 cm
165.6 cm
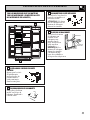
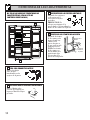
Inserting the Door Panels
1. REMOVE THE DOOR HANDLE TRIM
a. Open the freezer door and
remove the single screw from
the top handle cap. Do not try
to remove the cap.
b. Loosen the screws across
the top trim of the door
approximately 6 mm. This
allows the top handle cap to slip
out from under the top trim.
c. Remove the 5 screws from the
full–length handle. Keep all
screws. Extra replacement
screws for the door trim can be
found in the storage drawers.
d. Carefully remove the freezer
door handle along with the top
handle cap.
NOTE: Be careful not to damage
the bottom handle cap when
removing the freezer door handle.
It is attached to the full-length
handle with a screw and does
not need to be removed from
the handle.
2. INSERT THE PANELS
Carefully push the door panels into the
slots. Make sure that the top freezer
panel is put in with the cut-out at the
upper left hand corner. When inserting
the fresh food panel make sure the cut-
out is at the upper right hand corner.
3. REPLACE THE DOOR HANDLE
TRIM
Reinstall the full–length handle and top
handle cap. Loosely screw the handle
onto the door. Place the cap on the top
of the handle and loosely screw down
the cap. Lift the handle up and tighten
the top screw on the handle. Then
tighten the handle cap screw so that the
cap and handle fit flush. Tighten all the
screws.
The fresh food panel is installed the same way.
(continued next page)
A cut-out is required at these outer
corners, 8 mm long, 3 mm deep.
11

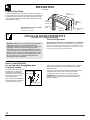
INSTALLATION REQUIREMENTS
IMPORTANT…Please read carefully
12
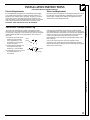
Electrical Requirements
The refrigerator should always be plugged into its own individual
electrical outlet—Please refer to the rating plate on the refrigerator
for the correct voltage and frequency. This is recommended for best
performance and to prevent overloading house wiring circuits, which
could cause a fire hazard from overheated wires.
WARNING: HOW TO AVOID ACCIDENTS TO CHILDREN.
WHEN DISCARDING AN OLD REFRIGERATOR OR
FREEZER BE CERTAIN TO MAKE THE LOCK UNUSABLE.
IF POSSIBLE, REMOVE THE DOORS AND DISCARD
SEPARATELY. DO NOT ATTEMPT TO STAND ON TOP OF
YOUR APPLIANCE. IT IS NOT DESIGNED FOR SUCH USE
AND YOU COULD INJURE YOURSELF OR DAMAGE THE
APPLIANCE BY SUCH ABUSE. CHILDREN SHOULD NOT
BE ALLOWED TO PLAY WITH THE APPLIANCE OR
TAMPER WITH THE CONTROLS.
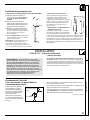
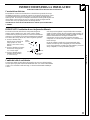
How to Connect Electricity
For personal safety, this appliance must
be properly earthed.
The power cord of this appliance is
equipped with an earthing plug
which mates with a standard
grounding wall outlet to minimize
the possibility of electric shock
hazard from appliance.
Have the wall outlet checked by a
qualified electrician to make sure
the outlet is properly earthed.
Where an unearthed wall outlet is encountered, it is your personal
responsibility and obligation to have it replaced with a properly
earthed wall outlet.
If the power supply cord becomes damaged, it must be replaced by
a qualified service agent in order to avoid a safety hazard.
If the plug does not fit your outlet a new plug can be fitted.
IMPORTANT: In some countries the refitting of electric plugs
and cables is only permitted when the work is completed by a
qualified technician.
Insure proper
earthing exists
before using.
Earthing Plug
PREPARATION
(continued)
19 mm or Raised Panel
A raised panel design screwed or glued to a 6 mm thick backing, or a
19 mm routed board can be used. The raised portion of the panel must
be fabricated to permit clearances of at least 51 mm from the handle
side for fingertip clearance and 32 mm from the hinge side to avoid
striking adjacent cabinetry.
6 mm
Thick Backing
Refrigerator
Door
19 mm
32 mm
Clearance
Hinge Side
Appearance
Panel
51 mm
Clearance
Handle Side
Weight limitations for custom panels:
Fresh Food : 17 kg max.
Freezer Door : 9 kg max.

13
IMPORTANT: Fitting a Different Plug
The wires in the mains lead are coloured in accordance with the
following code: Green and Yellow-Earth; Blue-Neutral; Brown-Live.
If you fit your own plug the colours of these wires may not correspond
with the identifying marks on the plug terminals. This is what you
have to do:
1. Connect the green and yellow
(Earth) wire to the terminal
in the plug marked ‘E’ with
the symbol or coloured green
or green and yellow.
2. Connect the blue (Neutral) wire
to the terminal in the plug
marked ‘N’ or coloured black.
3. Connect the brown (Live) wire to
the terminal marked ‘L’ or
coloured red.
If the plug is the moulded-on type the fuse cover must be refitted
when changing the fuse. In the event of losing the fuse cover the plug
must not be used until a replacement fuse cover has been obtained and
fitted. A new fuse cover can be obtained from your nearest Service
Centre or local Electricity Board. The colour of the correct
replacement fuse cover is that of the coloured marks or insert in the
base of the plug.
In the event of replacing a fuse in the plug supplied with this
refrigerator a 13A ASTA approved fuse to BS1362 must be fitted.
With an alternative plug a 15A fuse must be fitted either in the plug or
adapter or the main fuse box.
E
13 AMP
L
N
Green
Yellow
Blue
Brown
Cord grip
Electrical Requirements Mains Lead Replacement
We recommend that this appliance is connected to the mains supply
via a suitable switched socket in a readily accessible position. All
appliances come complete with a fitted plug. The plug on your Food
Centre has a 13A fuse. If the plug does not fit your sockets, a new
plug can be fitted. Cut off the old plug and throw it away, do not insert
it into a socket elsewhere in the house as this could cause a shock.
WARNING: THIS APPLIANCE MUST BE EARTHED.
If the mains lead on this appliance needs replacing at any time, it must
be replaced by a special lead which is obtainable from your nearest
Service centre. A charge will be made for the replacement of the
mains lead if you have damaged the lead.
INSTALLATION INSTRUCTIONS
FOR GREAT BRITAIN AND IRELAND ONLY
Preparation Installation

14
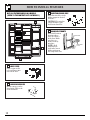
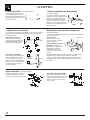
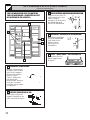
HOW TO INSTALL FEATURES
DOOR SHELF FRONTS
Hook shelf fronts at
locations where
there are shelves
in the door. Make
sure they are
locked securely
into place.
NOTE: Shelf
fronts must be
used in the lowest
ladder position on
the refrigerator door.
4
DAIRY COVER
Depress pins on the
cover and insert into
holes in the door.
1
DOOR BIN SNUGGERS
Roll the snugger on the
door bin lip. Slide to the
desired location.
2
ADJUSTABLE DOOR BINS
Hook bins into holes in the
ladder support at desired
locations.
CAUTION: Do not place
a door bin where door
shelf fronts should be.
3
NOT ALL FEATURES ARE ON ALL MODELS.
(REFER TO THE CONTENTS LIST ON THE BOX.)
1
2
3
4
Door Shelf
Door Shelf
Front

1
2
3
4
5
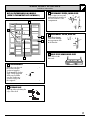
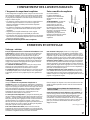
NOT ALL FEATURES ARE ON ALL MODELS.
(REFER TO THE CONTENTS LIST ON THE BOX.)
FREEZER BASKETS
Place the rear edges of
the basket on open
section of supports.
Push in until the basket
stops. Tilt up and push
all the way in. Make
sure the baskets are
securely engaged in
the supports.
1
BEVERAGE RACK
Slide lip of the rack along the
edge of the shelf.
2
REFRESHMENT CENTER, INSIDE COVER
Depress pins on cover and
insert into holes in sides of
the Refreshment Center
compartment.
3
REFRESHMENT CENTER, DOOR BIN
Hook Refreshment
Center bin (with lip)
into uppermost slots
in shelf tracks.
4
QUICK SERVE DISHES UNDER SHELF
Slide dishes in the
dish rack.
5
Lip
15
ADDITIONAL FEATURES
(Available on some models)

QUESTIONS?
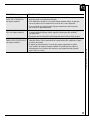
USE THIS PROBLEM SOLVER
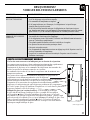
PROBLEM POSSIBLE CAUSE
REFRIGERATOR DOES • May be in defrost cycle when motor does not operate for about 30 minutes.
NOT OPERATE
• Temperature control is in “
”
position.
• If interior light is not on, refrigerator may not be plugged in at wall outlet.
• If plug is secure and the refrigerator still fails to operate, plug a lamp or a small
appliance into the same outlet to determine if there is a tripped circuit breaker or
burned-out fuse.
MOTOR OPERATES • Modern refrigerators with more storage space and a larger freezer compartment
FOR LONG PERIODS require more operating time.
• Normal when refrigerator is first delivered to your home—usually requires
24 hours to completely cool down.
• Large amounts of food placed in refrigerator to be cooled or frozen.
• Hot weather—frequent door openings.
• Door left open.
• Temperature control is set too cold. Refer to Temperature Controls section.
• Grille and condenser need cleaning. Refer to Care and Cleaning section.
MOTOR STARTS AND • Temperature control starts and stops motor to maintain even temperatures.
STOPS FREQUENTLY
VIBRATION OR RATTLING • If refrigerator vibrates, more than likely it is not resting solidly on the floor.
The front leveling legs need adjusting, or floor is weak or uneven. Refer to
Rollers in Preparation section.
• If dishes vibrate on shelves, try moving them. Slight vibration is normal.
NORMAL OPERATING SOUNDS
These sounds are normal and do not indicate a need for service.
The new high efficiency compressor runs faster and will have a higher pitch hum or
pulsating sound while operating.
Defrost timer and refrigerator control click on and off.
The fan circulating air inside the freezer which keeps the temperatures throughout.
Water dropping on the defrost heater causing a sizzling,
hissing or popping sound during the defrost cycle.
The flow of refrigerant through the freezer cooling
coils sounds like boiling water or a gurgling noise.
Cracking or popping of cooling coils caused by expansion
and contraction during defrost and refrigeration following defrost.
Water dripping as it melts from the evaporator
and flows to the drain pan during the defrost cycle.
Icemaker (on some models):
The icemaker water valve will buzz when the icemaker fills with water. If the feeler
arm is in the (down) position it will buzz even if it has not yet been hooked up to
water. Keeping the feeler arm in the (down) position before it is hooked up to water
can damage the icemaker. To prevent this, raise the feeler arm to the (up) position.
This will stop the buzzing.
The sound of cubes dropping into the bin and water running in pipes as
icemaker refills.
16

17
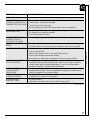
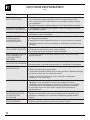
Problem Solver
PROBLEM POSSIBLE CAUSE
FOODS DRY OUT • Foods not covered, wrapped or sealed properly.
FRESH FOOD OR • Temperature control not set cold enough. Refer to Temperature Control section.
FREEZER COMPARTMENT
• Warm weather—frequent door openings.
TEMPERATURE TOO WARM
• Door left open for too long a time.
• Package holding door open or blocking air duct in freezer compartment.
FROST OR ICE CRYSTALS • Door may have been left ajar or package holding door open.
ON FROZEN FOOD
• Too frequent or too long door openings.
• Frost within package is normal.
MOISTURE FORMS ON • Not unusual during periods of high humidity. To help prevent rust, wipe surface dry.
CABINET SURFACE
BETWEEN THE DOORS
MOISTURE COLLECTS • Too frequent or too long door openings.
INSIDE
• In humid weather, air carries moisture into refrigerator when doors are opened.
REFRIGERATOR HAS ODOR • Foods with strong odors should be tightly covered.
• Check for spoiled food.
• Interior needs cleaning. Refer to Care and Cleaning section.
• Defrost water drainage system needs cleaning.
• Keep open box of baking soda in refrigerator; replace every three months.
HOT AIR FROM BOTTOM • Normal air flow cooling motor. In the refrigerator process, it is normal that heat
OF REFRIGERATOR be expelled in the area under the refrigerator. Some floor coverings will discolor
at these normal and safe operating temperatures. Your floor covering supplier
should be consulted if you object to this discoloration.
DIVIDER BETWEEN • Normal warmth is created by automatic energy saver system circulating warm
COMPARTMENTS liquid around front edge of freezer compartment to help prevent condensation on
FEELS WARM outside of refrigerator in hot, humid weather.
DOOR NOT • Door gasket on hinge side sticking or folding over. To correct, put a small amount
CLOSING PROPERLY of petroleum jelly on the face of the gasket.
INTERIOR LIGHT • No power at outlet.
DOES NOT WORK
• Light bulb needs replacing. See the Care and Cleaning section.
(continued next page)

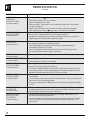
18
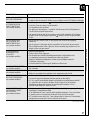
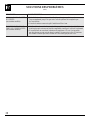
PROBLEM POSSIBLE CAUSE
AUTOMATIC • Icemaker feeler arm in (up) position.
ICEMAKER
• Water supply turned off or not connected.
DOES NOT WORK
• Freezer compartment too warm.
(on some models)
• Cubes too small—water shutoff valve connecting refrigerator to home water
line may be clogged.
• Piled up cubes in storage bin may cause icemaker to shut off prematurely.
With icemaker feeler arm in (up) position, level cubes in bin by hand.
CUBE DISPENSER • No ice cubes. Remove storage bin. If cubes are frozen to wire arm, remove cubes.
DOES NOT WORK
• No ice cubes. Icemaker turned off or water supply turned off.
(on some models)
• Irregular ice clumps in storage container. Break up as many as you can with
fingertip pressure and discard the remaining clumps.
ICE CUBES HAVE • Old cubes need to be discarded.
ODOR/TASTE
• Ice storage bin needs to be emptied or washed.
(on some models)
• Unsealed packages in refrigerator and/or freezer compartments may be
transmitting odor/taste to ice cubes.
• Interior of refrigerator needs cleaning. See the Care and Cleaning section.
• Poor-tasting incoming water. Install a water filter.
CUBES TOO SMALL • Water shutoff valve connecting refrigerator to home water line may be clogged.
(on some models)
SLOW ICE CUBE FREEZING • Door may have been left ajar.
(on some models)
• Turn temperature control to colder setting.
WATER DISPENSER • Water supply line turned off or not connected.
DOES NOT WORK
• Supply line may be clogged with sediment.
(on some models)
• If no water is dispensed when the refrigerator is first installed, there may be air
in the water system. Press the dispenser pad for at least two minutes to remove
trapped air from the water line and to fill the water system.
WATER IN FIRST • Allow about 24 hours for water to cool to proper temperature after refrigerator is
GLASS IS WARM first installed.
(on some models)
• If water dispenser has not been used for extended period, water in first glass will
not be as cool as in succeeding glasses.
• If the water system has been drained, allow several hours for replenished supply
to chill.
WATER HAS POOR • If the water dispenser has not been used for an extended period, dispense water
TASTE/ODOR in regular manner until all water in the system is replenished with fresh water.
(on some models)
• Poor-tasting incoming water. Install a water filter.
WATER ON FLOOR • The drain at the bottom of the freezer may be clogged. Remove any ice on
OR ON BOTTOM the freezer bottom and clean the drain.
OF FREEZER
• If you use a glass over 15 cm tall, you may be jamming the cubes in the funnel
(on some models)
chute. They can fuse inside the chute and drop out later, leaving water or ice
on the floor.
PROBLEM SOLVER
(continued)

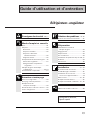
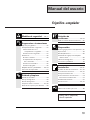
Guide d’utilisation et d’entretien
Réfrigérateur—congélateur
19
Côte à côte 21 encastré,
ligne G exporté
Consignes de sécurité
...20, 21
Mode d’emploi et conseils
Bacs .............................................................25
Clayettes ........................................................26
Balconnets .................................................26
Clayette retractable .................................26
Clayettes coulissantes
anti-déversements.................................26
Support bouteille......................................26
Compartiment des aliments surgelés.....27
Paniers du congélateur...........................27
Chargement du compartiment
congélateur .............................................27
Fabrique de glace automatique
et distributeur ....................................22–24
Commandes de température ...................21
Entretien et nettoyage
Derrière le réfrigérateur..............................28
Nettoyage extérieur/intérieur ..................27
Remplacement de
l’ampoule électrique................................28
Retrait des bacs et de leur couvercle......28
Sous le réfrigérateur....................................28
Solutions des problèmes ...35–38
B
ruits de fonctionnement normaux ...........35
Préparation
Alimentation en eau de la
fabrique de glace .....................................29
Dégagements ...............................................29
Emplacement................................................29
En cas d’absence .........................................29
Installation des panneaux de porte..30, 31
Roulettes ........................................................29
Nivellement ...................................................30
Installation ..................................31–34
Branchement de l’électricité.....................31
Grande-Bretagne et l’Irlande.....................32
Installation des accessoires.......................33
Accessoires supplémentaires ...............34
Mise à la terre ........................................31, 32
Remplacement de la fiche.........................32
Remplacement du fil conducteur.....21, 32
Numéros de modèle et de série ...............20

AIDEZ-NOUS À VOUS AIDER…
Lisez attentivement ce guide.
Il est conçu pour vous aider à faire fonctionner et entretenir
correctement votre nouveau réfrigérateur.
Gardez-le à portée de main pour le consulter en cas de doute.
Inscrivez les numéros de modèle et de série.
Ils figurent sur l’étiquette que se trouve soit sur la paroi du
réfrigérateur à côté du bac supérieur, soit à la partie inférieure de la
contre-porte du compartiment réfrigérateur.
Veuillez inscrire ces numéros ci-dessous :
Numéro de modèle
Numéro de série
Mentionnez les numéros de modèle et de série dans toute
correspondance concernant votre réfrigérateur ou lorsque vous
appelez le service de réparation.
Si le réfrigérateur qui vous a été livré est
endommagé…
Contactez directement le revendeur (ou l’entrepreneur) qui vous a
vendu le réfrigérateur.
Économisez du temps et de l’argent.
Avant d’appeler le service de réparation…
Consultez la section Solutions des problèmes. Elle contient une liste
des problèmes mineurs de fonctionnement auxquels vous pouvez vous-
même remédier.
Nos produits sont toujours en train d’être
améliorés…
Donc les caractéristiques et les spécifications de nos produits peuvent
changer ou varier légèrement.
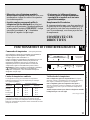
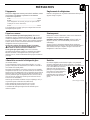
CONSIGNES DE SÉCURITÉ IMPORTANTES
Veuillez lire toutes les directives avant d’utiliser cet appareil.
AVERTISSEMENT—Lorsque vous utilisez le
réfrigérateur, observez toujours certaines
précautions de base, notamment :
• N’utilisez le réfrigérateur que pour son usage prévu,
comme décrit dans le présent guide.
• Installez le réfrigérateur conformément
aux directives d’installation.
AVERTISSEMENT—Raccordez uniquement
à une conduite d’eau potable.
• Ne débranchez jamais le réfrigérateur en tirant
sur le cordon d’alimentation. Saisissez fermement la
fiche du cordon et tirez droit pour la retirer de la prise.
• Réparez ou remplacez immédiatement tout cordon
effiloché ou endommagé. N’utilisez pas un cordon
fendillé ou présentant des signes d’usure.
• Lorsque vous déplacez votre réfrigérateur du
mur, faites attention de ne pas le faire rouler sur le
cordon d’alimentation afin de ne pas endommager
celui-ci.
• Ne laissez pas les enfants grimper, s’asseoir, se
tenir debout ni se pendre aux clayettes du
réfrigérateur. Ils pourraient endommager le
réfrigérateur et se blesser gravement.
• Si vous avez gardé votre ancien
réfrigérateur mais que vous ne vous en
servez plus, ayez soin de démonter les
portes pour éviter que les enfants ne s’y
enferment.
• Une fois le réfrigérateur en marche, ne touchez
pas les surfaces froides du congélateur, surtout si
vous avez les mains humides ou mouillées : la peau
risque d’adhérer à ces surfaces très froides.
• Ne posez pas les doigts ou les mains sur le
mécanisme de la fabrique de glace pendant
que le réfrigérateur est branché; vous risqueriez
de toucher les pièces mobiles du mécanisme ou
l’élément chauffant qui libère les glaçons.
•
Ne recongelez pas les aliments surgelés qui
ont complètement dégelé. Selon les experts en sûreté
alimentaire :
“…Il n’y a pas de danger à recongeler les aliments
partiellement décongelés s’ils renferment encore des
cristaux de glace ou si leur température n’a pas encore
dépassé 4 °C.
“…Les viandes hachées, la volaille ou le poisson
dégelés dont l’odeur ou la couleur sont suspectes ne
doivent être ni recongelés ni consommés. Les crèmes
glacées décongelées doivent être jetées. Si l’odeur ou
l’aspect d’un aliment vous semble anormal, jetez-le :
sa consommation pourrait être dangereuse.
“…Même une décongélation partielle suivie d’une
recongélation peut altérer la qualité des aliments,
surtout celle des fruits, légumes et plats cuisinés. Les
viandes rouges sont moins susceptibles d’être altérées
que la plupart des autres aliments. Consommez les
aliments recongelés dans les plus brefs délais pour
préserver au maximum leur qualité alimentaire.”
20
La page est en cours de chargement...
La page est en cours de chargement...
La page est en cours de chargement...
La page est en cours de chargement...
La page est en cours de chargement...
La page est en cours de chargement...
La page est en cours de chargement...
La page est en cours de chargement...
La page est en cours de chargement...
La page est en cours de chargement...
La page est en cours de chargement...
La page est en cours de chargement...
La page est en cours de chargement...
La page est en cours de chargement...
La page est en cours de chargement...
La page est en cours de chargement...
La page est en cours de chargement...
La page est en cours de chargement...
La page est en cours de chargement...
La page est en cours de chargement...
La page est en cours de chargement...
La page est en cours de chargement...
La page est en cours de chargement...
La page est en cours de chargement...
La page est en cours de chargement...
La page est en cours de chargement...
La page est en cours de chargement...
La page est en cours de chargement...
La page est en cours de chargement...
La page est en cours de chargement...
La page est en cours de chargement...
La page est en cours de chargement...
La page est en cours de chargement...
La page est en cours de chargement...
La page est en cours de chargement...
La page est en cours de chargement...
La page est en cours de chargement...
La page est en cours de chargement...
La page est en cours de chargement...
La page est en cours de chargement...
-
 1
1
-
 2
2
-
 3
3
-
 4
4
-
 5
5
-
 6
6
-
 7
7
-
 8
8
-
 9
9
-
 10
10
-
 11
11
-
 12
12
-
 13
13
-
 14
14
-
 15
15
-
 16
16
-
 17
17
-
 18
18
-
 19
19
-
 20
20
-
 21
21
-
 22
22
-
 23
23
-
 24
24
-
 25
25
-
 26
26
-
 27
27
-
 28
28
-
 29
29
-
 30
30
-
 31
31
-
 32
32
-
 33
33
-
 34
34
-
 35
35
-
 36
36
-
 37
37
-
 38
38
-
 39
39
-
 40
40
-
 41
41
-
 42
42
-
 43
43
-
 44
44
-
 45
45
-
 46
46
-
 47
47
-
 48
48
-
 49
49
-
 50
50
-
 51
51
-
 52
52
-
 53
53
-
 54
54
-
 55
55
-
 56
56
-
 57
57
-
 58
58
-
 59
59
-
 60
60


GE TPG21PRDBB Le manuel du propriétaire
- Catégorie
- Réfrigérateurs-congélateurs
- Taper
- Le manuel du propriétaire
- Ce manuel convient également à
dans d''autres langues
- English: GE TPG21PRDBB Owner's manual
- español: GE TPG21PRDBB El manual del propietario
Documents connexes
-
GE ZISP420DHSS Le manuel du propriétaire
-
GE ZISS480NMSS Le manuel du propriétaire
-
GE Monogram ZISS420DMSS Manuel utilisateur
-
-
GE Monogram ZISW48DC Manuel utilisateur
-
Kleenmaid PSG22 Le manuel du propriétaire
-
GE GSH25UFRBB Le manuel du propriétaire
-
-
GE Profile TFG30PFDBB Le manuel du propriétaire
-
Autres documents
-
 GE Monogram Refrigerator Side-by-Side Built-In Refrigerators Manuel utilisateur
-
Brandt UN2597E1 Le manuel du propriétaire
-
 GE Monogram Refrigerator Built-In Refrigerators Manuel utilisateur
-
-
 Pfister 111112 Guide d'installation
-
Brandt UN2587E4 Le manuel du propriétaire
-
Kenmore 3639652784 Le manuel du propriétaire
-
Groupe Brandt USA586 Le manuel du propriétaire
-
LG GC-151SNA.ASWCGSC Le manuel du propriétaire


