Bosch HMV8050/01 Manuel utilisateur
- Catégorie
- Micro-ondes
- Taper
- Manuel utilisateur
Ce manuel convient également à

Household Appliances
Over-the-Range Microwave
Use and Care Manual
For Models: HMV8050
PLEASE READ ENTIRE INSTRUCTIONS BEFORE PROCEEDING
IMPORTANT: Save these instructions for the local electrical inspector’s use.
INSTALLER: Please leave these Installation Instructions with this unit for the owner.
OWNER: Please retain these instructions for future reference.
Printed in Korea
P/No.: MFL47236601

- 2 -
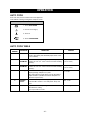
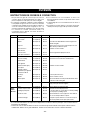
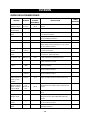
TABLE OF CONTENTS
TABLE OF CONTENTS ......................................... 2
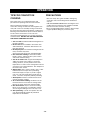
SAFETY.................................................................. 3
Important Safety Instructions ............................... 3
PRECAUTIONS TO AVOID POSSIBLE EXPOSURE
TO EXCESSIVE MICROWAVE ENERGY.............. 5
INFORMATION....................................................... 6
Location of Model Number................................... 6
Oven Specifications ............................................. 6
Electrical Requirements ....................................... 6
Grounding Instructions ........................................ 6
Microwave Oven Features ................................... 7
Control Panel Features ........................................ 8
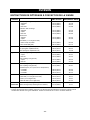
MICROWAVE COOKING TIPS .............................. 10
OPERATION........................................................... 15
Learn About Your Microwave Oven ..................... 15
Clock .................................................................... 15
Child Lock ............................................................ 15
Kitchen Timer....................................................... 16
Vent Fan .............................................................. 16
Vent Fan Auto Time Set....................................... 16
Add 30 Sec. ........................................................ 16
Turntable On/Off .................................................. 17
Light On/Off.......................................................... 17
More/Less ............................................................ 17
Custom Set .......................................................... 17
Cooking at High Cook Power............................... 17
Cooking at Lower Power Levels .......................... 18
Cooking With More Than One Cook Cycle .......... 18
Cooking Guide for Lower Power Levels............... 19
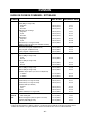
Soften................................................................... 20
Soften Table......................................................... 20
Melt ..................................................................... 20
Melt Table ............................................................ 20
Auto Defrost ......................................................... 21
Weight Conversion Table .................................... 21
Operating Tips .................................................... 21
Auto Defrost Table ............................................... 22
Defrosting Tips..................................................... 24
Sensor Operating Instructions ............................. 25
Sensor Cooking Guide......................................... 25
Sensor Popcorn ................................................... 25
Sensor Cook ........................................................ 25
Sensor Reheat ..................................................... 25
Sensor Cook Table .............................................. 26
Sensor Reheat Table ........................................... 26
Auto Cook ............................................................ 27
Auto Cook Table .................................................. 27
Tips for Convection Cooking................................ 28
Precautions .......................................................... 28
Convection ........................................................... 29
Tips for Combination Cooking.............................. 30
Helpful Hints for Combination Cooking ................ 30
Combination ........................................................ 30
Speed Auto Combination ..................................... 31
Speed Auto Combination Chart ........................... 31
COOKING............................................................... 32
Convection Baking Guidelines ............................. 32
Meat Roasting Guidelines Convection
Cooking................................................................ 34
Convection Roast Cooking Guide........................ 35
Combination Bake Cooking Guide....................... 36
Heating/Reheating Guide..................................... 37
Fresh Vegetable Guide ........................................ 38
MAINTENANCE ..................................................... 39
Caring for Your Microwave Oven......................... 39
Cleaning the Grease Filters ................................. 40
Charcoal Filter Replacement ............................... 40
Cooktop/Countertop Light Replacement.............. 41
Oven Light Replacement ..................................... 41
Questions and Answers ....................................... 41
Microwave Utensil Guide ..................................... 42
TROUBLESHOOTING ........................................... 43
Before Calling for Service .................................... 43

- 3 -
WARNING -
To reduce the risk of burns,
electric shock, fire, injury to persons, or exposure to
excessive microwave energy.
• Read all the instructions before using your oven.
• Do not allow children to use this oven without
close supervision.
• Read and follow the specific PRECAUTIONS TO
AVOID POSSIBLE EXPOSURE TO EXCESSIVE
MICROWAVE ENERGY found on page 5.
• Do not use corrosive chemicals or vapors, such as
sulfide and chloride, in this appliance. This type of
oven is specifically designed to heat, cook, or dry
food. It is not designed for industrial or laboratory use.
• Do not use or store this appliance outdoors. Do not
use this product near water - for example, near a
kitchen sink, in a wet basement, or near a swimming
pool, and the like.
• Do not use the cavity for storage purposes. Do not
leave paper products, cooking utensils, or food in the
cavity when not in use.
• Clean the ventilating hood frequently. Do not allow
grease to accumulate on the hood or the filters.
• Use care when cleaning the vent hood filters.
Corrosive cleaning agents such as lye-based oven
cleaners may damage the filters.
• Do not tamper with the built-in safety switches on
the oven door. The oven has several built-in safety
switches to make sure the power is off when the door
is open.
• When food flames under the hood, turn the fan on.
• Suitable for use above both gas and electric cooking
equipment 36 inches wide or less.
• Do not use this oven for commercial purposes. It
is made for household use only.
• When cleaning the door and the surfaces that
touch the door, use only mild, non-abrasive
soaps or detergents and a sponge or soft cloth.
• If your oven is dropped or damaged, have it
thoroughly checked by a qualified service
technician before using it again.
• To avoid a fire hazard:
- Do not severely overcook food. Severely
overcooked foods can start a fire in the oven. Watch
the oven carefully, especially if you have paper,
plastic, or other combustibles in the oven.
- Do not store combustible items (bread, cookies,
etc.) in the oven, because if lightning strikes the
power lines it may cause the oven to turn on.
- Do not use wire twist-ties in the oven. Be sure to
inspect purchased items for wire twist-ties and
remove them before placing the item in the oven.
- If materials inside the oven ignite, keep the oven
door closed, turn the oven off and disconnect the
power cord, or shut off power at the fuse or circuit
breaker panel. If the door is opened, the fire may
spread.
• If a fire should start:
- Keep the oven door closed.
- Turn the oven off.
- Disconnect the power cord or shut off the power
at the fuse or circuit breaker panel.
• To avoid electric shock:
- This appliance must be grounded. Connect it only
to a properly grounded outlet. See the electrical
GROUNDING INSTRUCTIONS on page 6.
- Do not operate this appliance if it has a damaged
cord or plug, if it is not working properly or if it has
been damaged or dropped.
- Do not immerse the electrical cord or plug in
water.
- Keep the cord away from heated surfaces.
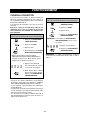
IMPORTANT SAFETY INSTRUCTIONS
The safety instructions below will tell you how to use your oven and avoid harm to yourself or
damage to your oven.
SAFETY

- 4 -
• To avoid improperly cooking some foods.
- Do not heat any types of baby bottles or baby
food. Uneven heating may occur and possibly
cause personal injury.
- Do not heat small-necked containers, such as
syrup bottles.
- Do not deep-fat fry in your microwave oven.
- Do not attempt home canning in your microwave
oven.
- Do not heat the following items in the microwave
oven: whole eggs in the shell, water with oil or fat,
sealed containers, or closed glass jars. These items
may explode.
• Do not cover or block any openings in the oven.
• Use your oven only for the operations described in
this manual.
• Do not run the microwave oven empty.
• Secure the cord in the cabinet above the oven.
• Preserve the oven floor:
- Do not heat the oven floor excessively.
- Do not allow the gray film on special microwave-
cooking packages to touch the oven floor. Put the
package on a microwavable dish.
- Do not cook anything directly on the oven floor or
turntable. Use a microwavable dish.
- Keep a browning dish at least 3/16 inch above floor.
Carefully read and follow the instructions for the
browning dish. If you use a browning dish
incorrectly, you could damage the oven floor.
• Install or locate this appliance only in accordance with
the provided installation instructions.
• This appliance should be serviced only by qualified
service personnel. Contact the nearest authorized
service facility for examination, repair, or adjustment.
• Liquids, such as water, coffee, or tea can be
overheated beyond the boiling point without
appearing to be boiling due to surface tension of the
liquid. Visible bubbling or boiling when the container is
removed from the microwave oven is not always
present.
THIS COULD RESULT IN VERY HOT LIQUIDS
SUDDENLY BOILING OVER WHEN THE
CONTAINER IS DISTURBED OR A SPOON OR
OTHER UTENSIL IS INSERTED INTO THE LIQUID.
To reduce the risk of injury to persons;
- Do not overheat the liquid.
- Stir the liquid both before and halfway through
heating it.
- Do not use straight-sided containers with narrow
necks.
- After heating, allow the container to stand in the
microwave oven for a short time before removing
the container.
- Use extreme care when inserting a spoon or other
utensil into the container.
SAFETY
SAVE THESE INSTRUCTIONS

- 5 -
SAFETY
(a) Do not attempt to operate this oven with the
door open since open-door operation can
result in harmful exposure to microwave
energy. It is important not to defeat or tamper
with the safety interlocks.
(b) Do not place any object between the oven
front face and the door or allow soil or cleaner
residue to accumulate on sealing surfaces.
(c) Do not operate the oven if it is damaged.
It is particularly important that the oven door
closes properly and that there is no damage
to the:
(1) Door (bent),
(2) Hinges and latches (broken or loosened),
(3) Door seals and sealing surfaces.
(d) The oven should not be adjusted or repaired by
anyone except properly qualified service
personnel.
PRECAUTIONS TO AVOID POSSIBLE
EXPOSURE TO EXCESSIVE
MICROWAVE ENERGY...
WARNING:
This equipment generates and uses ISM frequency
energy and if not installed and used properly, that is in
strict accordance with the manufacturer's instructions,
may cause interference to radio and television
reception. It has been type tested and found to comply
with limits for ISM Equipment pursuant to part 18 of
FCC Rules, which are designed to provide reasonable
protection against such interference in a residential
installation.
However, there is no guarantee that interference will
not occur in a particular installation. If this equipment
does cause interference to radio or television
reception, which can be determined by turning the
equipment off and on, the user is encouraged to try
to correct the interference by one or more of the
following:
• Reorient the receiving antenna of the radio or
television.
• Relocate the Microwave Oven with respect to the
receiver.
• Move the microwave oven away from the receiver.
• Plug the microwave oven into a different outlet so that
the microwave oven and the receiver are on different
branch circuits.
The manufacturer is not responsible for any radio or
TV interference caused by unauthorized modification
to this microwave oven. It is the responsibility of the
user to correct such interference.
FEDERAL COMMUNICATIONS COMMISSION RADIO FREQUENCY
INTERFERENCE STATEMENT ( U.S.A. ONLY)

- 6 -
Please read this owner’s manual. It will tell you how to
use all the fine features of this microwave oven.
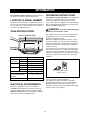
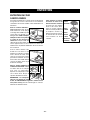
LOCATION OF MODEL NUMBER
To request service information or replacement parts, the
service center will require the complete model number of
your microwave oven. The number is on the oven front
as shown in the illustration below.
OVEN SPECIFICATIONS
ELECTRICAL REQUIREMENTS
The oven is designed to operate on a Standard
120V/60Hz household outlet. Be sure the circuit is at
least 15A or 20A and the microwave oven is the only
appliance on the circuit. It is not designed for 50Hz or
any circuit other than a 120V/60Hz circuit.
GROUNDING INSTRUCTIONS
This appliance must be grounded. If an electrical short
circuit occurs, grounding reduces the risk of electric
shock by providing an escape wire for the electric
current. The cord for this appliance has a grounding wire
with a grounding plug. Put the plug into an outlet that is
properly installed and grounded.
WARNING
- If you use the grounding plug
improperly, you risk electric shock.
Ask a qualified electrician if you do not understand the
grounding instructions or if you wonder whether the
appliance is properly grounded.
Because this appliance fits under the cabinet, it has a
short power-supply cord. See the separate Installation
Instructions for directions on placing the cord properly.
Keep the electrical power cord dry and do not pinch or
crush it in any way.
If it is necessary to use an extension cord, use only a 3-
wire extension cord that has a 3-blade grounding plug,
and a 3-slot receptacle that will accept the plug on the
appliance. The marked rating of the extension cord shall
be equal to or greater than the electrical rating of the
appliance.
For a permanently connected appliance:
This appliance must be connected to a grounded,
metallic, permanent wiring system, or an equipment
grounding conductor should be run with the circuit
conductors and connected to the equipment grounding
terminal or lead on the appliance.
Ensure proper ground
exists before use
INFORMATION
Power Supply
Rated Power Microwave
Consumption Convection
Power Output Microwave
Convection
Rated Current Microwave
Convection
Overall Dimensions(WxHxD)
Oven Cavity Dimensions
(WxHxD)
Capacity of Oven Cavity
120V AC, 60 Hz
1500W
1500W
*850W
1350W
13.0A
13.0A
29
15
/
16
" x 16
7
/
16
" x 15
3
/
8
"
21
1
/
4
" x 9
7
/
16
" x 14
3
/
16
"
1.7 cu.ft
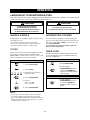
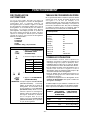
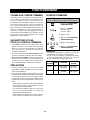
MODEL NUMBER LABEL

- 7 -
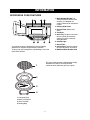
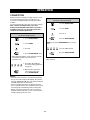
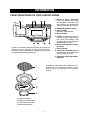
MICROWAVE OVEN FEATURES
INFORMATION
The glass turntable rotates in both direction to help
food cook more evenly. Do not operate the
microwave oven without the glass tray in place.
1. Metal Shielded Window The
shield prevents microwaves from
escaping. It is designed as a
screen to allow you to view food as
it cooks.
2. Cooking Guide Label
3. Charcoal Filter (behind Vent
Grille)
4. Vent Grille
5. Glass Tray The glass tray moves
food as it cooks for more even
cooking. It must be in the oven
during operation.
6. Cooktop Light
7. Grease Filter
8. Control Panel Touch the pads on
this panel to perform all functions.
9. Model and Serial Number Plate
Your microwave oven is designed to make your cooking
experience as enjoyable and productive as possible.
To get you up and running quickly, the following is a list of the
oven’s basic features:
1
2
3
4
1. Convection Rack
2. Metal Tray/Drip Pan
3. Glass Turntable
4. Rotating Ring

- 8 -
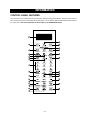
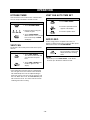
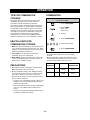
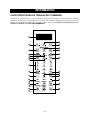
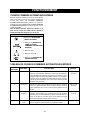
INFORMATION
1
4
3
6
7
10
13
16
18
22
25
28
2
5
8
11
15
19
17
20
23
26
12
9
21
24
27
14
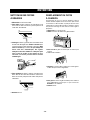
Your microwave oven control panel lets you select the desired cooking function quickly and easily. All you have to
do is touch the necessary Command Pad. The following is a list of all the Command and Number Pads located on
the control panel. For more information on these features, see OPERATION section.
CONTROL PANEL FEATURES

- 9 -
INFORMATION
1. DISPLAY: The Display includes a clock and indicators
to tell you time of day, cooking time settings, and
cooking functions selected.
2. MICRO.: Touch this pad when setting Microwave
cooking.
3. CONV.: Touch this pad when setting Convection
cooking.
4. COMBI.: Touch this pad when setting combination
cooking or preheat.
5. SENSOR POPCORN: Touch this pad when popping
popcorn in your microwave oven. The oven’s sensor will
tell the oven how long to cook depending on the amount
of humidity it detects from the popcorn.
6. SENSOR COOK: Touch this pad to cook baked potato,
frozen vegetable, fresh vegetable, canned vegetable,
frozen entrée, and rice. The oven’s sensor will tell the
oven how long to cook depending on the amount of
humidity coming from the food.
7. SENSOR REHEAT: Touch this pad to reheat casserole,
dinner plate, pizza slice, and soup/sauce. The oven’s
sensor will tell the oven how long to cook depending on
the amount of humidity coming from the food.
8. SPEED AUTO COMBI: Touch this pad when setting
weight combination cooking.
9. AUTO COOK: Touch this pad to cook Bacon, Fresh
Roll & Muffin, Frozen Roll & Muffin, Beverage, Chicken
Pieces, and Hot Cereal.
10. AUTO DEFROST: Touch this pad to select food type
and defrost food by weight.
11. CUSTOM COOK: Touch this pad to recall one cooking
instruction previously programmed into memory.
12. ADD 30 SEC.: Touch this pad to set 100% power level
on microwave cooking.
13. CUSTOM SET: Touch this pad to change the oven’s
default settings for sound, clock, display speed, and
defrost weight.
14. NUMBER: Touch number pads to enter cooking time,
power level, quantities, weights, or cooking
temperature.
15. TURNTABLE ON/OFF: Touch this pad to turn off the
glass turntable. OFF will appear in the display.
NOTE: This option is not available in sensor cook and
defrost modes.
16. POWER: Touch this pad to select a cooking power
level.
17. MORE: Touch this pad to add ten seconds of cooking
time each time you press it.
18. STOP/CLEAR: Touch this pad to stop the oven or to
clear all entries.
19. START/ENTER: Touch this pad to start a function or
enter all entries. If you open the door after oven begins
to cook, touch START/ENTER again.
20. LESS: Touch this pad to subtract ten seconds of
cooking time each time you press it.
21. SOFTEN: Touch this pad to soften Butter, Ice Cream,
Cream Cheese, or Frozen Juice.
22. MELT: Touch this pad to melt Butter or Margarine,
Chocolate, Cheese, or Marshmallow.
23. CLOCK: Touch this pad to enter the time of day.
24. LIGHT ON/OFF: Touch this pad to turn the cooktop/
countertop light on or off.
25. KITCHEN TIMER: Touch this pad to set the timer.
26. VENT ON/OFF: Touch this pad to turn the fan on/off.
27. VENT 5-SPEED: Touch this pad to choose one of 5
fan speeds.
28. VENT AUTO TIME SET: Touch this pad when setting
ventilation time. (1, 3, 5, 10, and 30 minutes.)

- 10 -
MICROWAVE COOKING TIPS
Amount of food
• If you increase or decrease the amount of food you
prepare, the time it takes to cook that food will also
change. For example, if you double a recipe, add a little
more than half the original cooking time. Check for
doneness and, if necessary, add more time in small
increments.
Starting temperature of food
• The lower the temperature of the food being put into
the microwave oven, the longer it takes to cook. Food
at room temperature will be re-heated more quickly
than food at refrigerator temperature.
Composition of food
• Food with a lot of fat and sugar will be heated faster
than food containing a lot of water. Fat and sugar will
also reach a higher temperature than water in the
cooking process.
• The more dense the food, the longer it takes to heat.
Very dense food like meat takes longer to heat than
lighter, more porous food like sponge cakes.
Size and shape
• Smaller pieces of food will cook faster than larger
pieces. Also, same-shaped pieces cook more evenly
than different-shaped pieces.
• With foods that have different thicknesses, the
thinner parts will cook faster than the thicker parts.
Place the thinner parts of chicken wings and legs in the
center of the dish.
Stirring, turning foods
• Stirring and turning foods spreads heat quickly to the
center of the dish and avoids overcooking at the outer
edges of the food.
Covering food
Cover food to:
• Reduce splattering
• Shorten cooking times
• Keep food moist
Releasing pressure in foods
• Several foods (for example: baked potatoes,
sausages, egg yolks, and some fruits) are tightly
covered by a skin or membrane. Steam can build up
under the membrane during cooking, causing the food
to burst. To relieve the pressure and to prevent
bursting, pierce these foods before cooking with a fork,
cocktail pick, or toothpick.
Using standing time
• Always allow food to stand either in or out of the
oven after cooking power stops. Standing time after
defrosting and cooking allows the temperature to
evenly spread throughout the food, improving the
cooking results. For inside oven standing time, you can
program a 0 power second stage of the cooking cycle.
See cooking with more than on cook cycle cooking.
• The length of the standing time depends on how
much food you are cooking and how dense it is.
Sometimes it can be as short as the time it takes you to
remove the food from the oven and take it to the
serving table. However, with larger, denser food item,
the standing time may be as long as 10 minutes.
Arranging food
For best results, place food evenly on the plate. You can
do this in several ways:
• If you are cooking several items of the same food,
such as baked potatoes, place them in a ring pattern
for uniform cooking.
• When cooking foods of uneven shapes or
thickness, such as chicken breasts, place the
smaller or thinner area of the food towards the center of
the dish where it will be heated last.
• Layer thin slices of meat on top of each other.
• When you cook or reheat whole fish, score the skin
– this prevents cracking.
• Do not let food or a container touch the top or sides of
the oven. This will prevent possible arcing.

- 11 -
MICROWAVE COOKING TIPS
Using aluminum foil
Metal containers should not be used in a microwave
oven. There are, however, some exceptions. If you have
purchased food which is prepackaged in an aluminum
foil container, refer to the instructions on the package.
When using aluminum foil containers, cooking times may
be longer because microwaves will only penetrate the
exposed top of the food and not the bottom or the sides.
If you use aluminum containers without package
instructions, follow these guidelines:
• Place the aluminum foil container in a glass bowl and
add some Water so that it covers the bottom of the
container, but not more than 1/4 in. (.64 cm) deep. This
ensures even heating of the container bottom.
• Always remove the container lid to avoid damage to
the oven.
• Use only undamaged containers.
• Do not use containers taller than 3⁄4 in. (1.9 cm).
• Container must be at least half filled.
• To avoid arcing, there must be a minimum 1⁄4 in.
(64 mm) between the aluminum container and the walls
of the oven and also between two aluminum
containers.
• Always place the container on the glass turntable.
• Shield parts of food that may cook quickly, such as
wing tips and leg ends of poultry, with small pieces of
aluminum foil.
• Heating food in aluminum foil containers usually takes
up to double the time compared to reheating in plastic,
glass, china, or paper containers.
The time when food is ready will vary depending upon
the type of container you use.
• Let food stand for 2 to 3 minutes after heating so that
heat is spread evenly throughout the container.
Cooking you should not do in
your microwave oven
• Do not do canning of foods in the oven. Closed glass
jars may explode, resulting in damage to the oven.
• Do not use the microwave oven to sterilize objects
(baby bottles, etc.). It is difficult to keep the oven at the
high temperature needed for sterilization.
Removing the rack
• When popping commercially packaged popcorn,
Remove the rack and drip pan from the oven; Do
not place the bag of microwave popcorn on the rack or
under the rack. Leave the glass tray in place at all
times.
CAUTION : Popping microwave popcorn with rack and
drip pan can cause fire or damage to your
microwave oven.

- 12 -
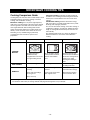
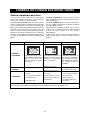
MICROWAVE COOKING TIPS
Cooking Comparison Guide
Cooking with your new oven offers a wide variety of food
preparation options: microwave cooking, convection
cooking, and combination cooking.
Microwave cooking uses very short, high-frequency
radio waves. The movement of the microwaves through
the food generates heat and cooks most foods faster
than regular methods, while retaining their natural
texture and moisture. Microwave cooking heats food
directly, not the cookware or the interior of the oven.
Reheating is easy and defrosting is particularly
convenient because less time is spent in food
preparation.
Convection cooking constantly circulates heated air
around the food, creating even browning and sealed-in
flavor by the constant motion of hot air over the food
surfaces.
Combination cooking combines microwave energy
with convection to cook with speed and accuracy, while
browning and crisping to perfection.
You can use microwave cooking, convection cooking, or
combination cooking to cook by time. Simply preset the
length of cooking time desired and your oven turns off
automatically.
The following guide shows at a glance the difference
between microwave, convection, and combination
cooking.
Microwave energy is
distributed evenly
throughout the oven for fast,
thorough cooking of food.
Microwave energy.
• Fast, high efficiency
cooking.
• Oven and surroundings
do not get hot.
• Easy clean-up.
COOKING
METHOD
HEAT SOURCE
BENEFITS
MICROWAVE CONVECTION COMBINATION
Hot air circulates around
food to produce browned
exteriors and sealed-in
juices.
Circulating heated air.
• Aids in browning and seals
in flavor.
• Cooks some foods faster
than regular ovens.
Microwave energy and
convection heat combine to
shorten the cooking time of
regular ovens, while
browning and sealing in
juices.
Microwave energy and
circulating heated air.
• Shortened cooking time
from microwave energy.
• Browning and crisping
from convection heat.
Read this guide to learn the many different things your Microwave/Convection/Combination Oven can do.
You will find a wide variety of cooking methods and programs designed to suit your lifestyle.

- 13 -
MICROWAVE COOKING TIPS
COOKWARE GUIDE
Microwave Cooking
Most heat-resistant, non-metallic cookware is safe for
use in your microwave oven.
To test cookware before using, follow these steps:
1. Place the empty cookware in the microwave oven.
2. Measure 1 cup of water in a glass measuring cup and
place it in the oven beside the cookware.
3. Microwave on 100% power for 1 minute. If the dish is
warm, it should not be used for microwave cooking.
Convection Cooking
• Metal Pans are recommended for all types of baked
products, but especially where browning or crusting is
important.
• Dark or dull finish metal pans are best for breads and
pies because they absorb heat and produce a crisper
crust.
• Shiny aluminum pans are better for cakes, cookies, or
muffins because these pans reflect heat and help
produce a light, tender crust.
• Glass or glass-ceramic casserole or baking dishes are
best suited for egg and cheese recipes due to the
cleanability of glass.
Combination Cooking
• Glass or glass-ceramic baking containers are
recommended. Be sure not to use items with metal trim
as it may cause arcing (sparking) with oven wall or
oven shelf, damaging the cookware, the shelf, or the
oven.
• Heat-resistant plastic microwave cookware (safe to
450°F) may be used, but is not recommended for foods
that require crusting or all-around browning, because
plastic is a poor conductor of heat.
COOKWARE MICROWAVE CONVECTION COMBINATION
Heat-Resistant Glass, Ceramic Glass Yes Yes Yes
Ceramics, China Yes Yes Yes
(Do not use china
with gold or silver trim.)
Metal Cookware No Yes No
Non Heat-Resistant Glass No No No
Microwave-Safe Plastic Yes No Yes*
Plastic Wrap, Wax Paper Yes No No
Paper Products Yes No No
Straw, Wicker, and Wood Yes No No
* Use only microwave cookware that is safe to 450°F

- 14 -
MICROWAVE COOKING TIPS
HOW TO USE ACCESSORIES
Glass Turntable
MICROWAVE CONVECTION COMBINATION
Notes :
• Do not operate the oven except when it is preheating in the convection mode only.
NEVER operate the microwave while the oven is empty.
: Possible to use
: Recommended method
: Do not use
Metal Tray/Drip pan Convection Rack
X
X
X
X
X
X

- 15 -
LEARN ABOUT YOUR MICROWAVE OVEN
This section discusses the concepts behind microwave cooking and introduces you to the basics you need to know to
operate your microwave oven. Please read this information before use.
OPERATION
To avoid risk of personal injury
or property damage, do not use
stoneware, aluminum foil, metal utensils,
or metal trimmed utensils in the oven.
CAUTION
To avoid risk of personal injury
or property damage, do not run oven empty.
CAUTION
CLOCK
When your microwave oven is first plugged in or after a
power failure, the Display will show PLEASE SET
TIME OF DAY. If a time of day is not set, : (a colon) will
show on the Display until you touch CLOCK.
NOTES:
• If you enter in an incorrect time and touch CLOCK,
you cannot set time of day. Enter the correct time.
• If you touch STOP/CLEAR while setting the clock, the
Display will show the last time of day set or : (a colon)
if no time of day has been set.
AUDIBLE SIGNALS
Audible signals are available to guide you when setting
and using your oven:
• A tone will sound each time you touch a pad.
• Seven tones signal the end of a Timer countdown.
• Four tones signal the end of a cooking cycle.
INTERRUPTING COOKING
You can stop the oven during a cycle by opening the
door. The oven stops heating and the fan stops, but the
light stays on. To restart cooking, close the door and
Touch START/ENTER.
If you do not want to continue cooking, open the
door and touch STOP/Clear.
1. Touch STOP/CLEAR.
2. Touch CLOCK.
3. Enter the time by using the
number key pad.
4. Touch START/ENTER.
5. Touch 1.
(Press 1 for AM,
Press 2 for PM)
6. Touch START/ENTER.
Example: To set the clock for 10:30(AM).
CHILD LOCK
Use this safety feature to lock the control panel when
you are cleaning the oven, or so children cannot use
the oven unsupervised.
1. Touch STOP/CLEAR.
2. Touch and hold
START/ENTER more than
4 seconds. LOCKED will
appear in the display window
with two beeps.
Example: To set the child lock.
1. Touch and hold
START/ENTER more than
4 seconds. LOCKED will
disappear and you hear two
beeps.
Example: To cancel the child lock.

- 16 -
OPERATION
1. Touch KITCHEN TIMER.
2. Enter the time by using the
number key pad.
3. Touch START/ENTER.
When the time is over, you will
hear seven beeps and END
will display.
Example: To set 3 minutes.
KITCHEN TIMER
Your microwave oven can be used as a kitchen timer.
You can set up to 99 minutes and 99 seconds.
1. Touch VENT ON/OFF.
2. Touch this pad until Level 4
appears in the display.
3. Touch this pad five times.
Example: To turn off fan after 30 minutes for level 4.
VENT FAN AUTO TIME SET
1. Touch ADD 30 SEC. 2 times.
The oven begins cooking and
display shows time counting
down.
Example: To cook for 1 minutes.
ADD 30 SEC.
A time-saving pad, this simplified control lets you
quickly set and start microwave cooking at 100% power
without the need to touch START/ENTER.
1. Touch VENT ON/OFF.
This shows the last level until
you select the fan speed
level.
2. Touch VENT 5-SPEED until
LEVEL 4 appears in the
display.
Example: To set Level 4.
VENT FAN
The bottom of the control panel controls the 5-speed
vent fan.
NOTES:
• If the temperature from the range or cooktop below
the oven gets too hot, the vent fan in the vent hood
will automatically turn on at the 4-Speed setting to
protect the oven. It may stay on up to an hour to cool
the oven. When this occurs, the VENT ON/OFF pad
will not turn the fan off. You cannot turn the vent fan
off during microwave cooking.
NOTES:
• Each time you touch ADD 30 SEC., it will add 30
seconds, up to 99 minutes and 59 seconds.

- 17 -
OPERATION
TURNTABLE ON/OFF
For best cooking results, leave the glass
turntable on. It can be turned off for large
dishes. Touch TURNTABLE ON/OFF to
turn the glass turntable on or off.
NOTES:
• This option is not available in sensor cook and
defrost modes.
• Sometimes the glass turntable can become hot to
touch. Be careful touching the glass turntable during
and after cooking.
• Do not run the oven empty.
LIGHT ON/OFF
To turn the Hood Light on, touch
LIGHT ON/OFF once.
To turn the Hood Light off, touch
LIGHT ON/OFF again.
MORE/LESS
By using the MORE or LESS keys, all of
the preprogrammed cook and time cook
features can be adjusted to cook food for
a longer or shorter time.
Pressing MORE will add 10 seconds of
cooking time each time you press it.
Pressing LESS will subtract 10 seconds of cooking
time each time you press it.
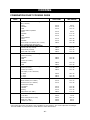
CUSTOM SET
You can change the default values for clock set, beep
sound, display speed, and defrost weight.
See following chart for more information.
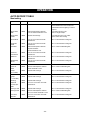
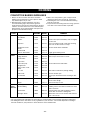
NUMBER FUNCTION NUMBER RESULT
1
2
1
2
1
2
3
1
2
Beep ON/ OFF
control
Clock display
control
Display
Defrost weight
mode selected
Sound ON
Sound OFF
Clock ON
Clock OFF
Slow speed
Normal speed
Fast speed
Lbs.
Kg.
1
2
3
4
1. Touch CUSTOM SET.
2. Touch number 4.
3. Touch number 2.
Example: To change defrost weight mode.(from Lbs. to Kg.)
COOKING AT HIGH COOK
POWER
1. Enter the cook time.
2. Touch START/ENTER.
When the cook time is over,
you will hear four beeps and
COOK END will display.
Example: To cook food for 8 minutes 30 seconds.

- 18 -
OPERATION
COOKING WITH MORE THAN
ONE COOK CYCLE
For best results, some recipes call for one Power Level
for a certain length of time, and another Power Level
for another length of time. Your oven can be set to
change from one to another automatically, for up to
three cycles if the first heating cycle is defrost or the
last at 0% power.
1. Touch MICRO.
2. Enter the cook time.
3. Touch POWER.
4. Enter the power level.
5. Touch START/ENTER.
When the cook time is over,
you will hear four beeps and
COOK END will display.
Example: To cook food for 7 minutes 30 seconds
at 70% power.
COOKING AT LOWER POWER
LEVELS
HIGH power cooking does not always give you the best
results with foods that need slower cooking, such as
roasts, baked goods, or custards. Your oven has 10
power settings in addition to HIGH.
1. Touch MICRO.
2. Enter the first cook time.
3. Touch MICRO.
4. Enter the second cook time.
5. Touch POWER.
6. Enter the power level.
7. Touch START/ENTER.
When the cook time is over,
you will hear four beeps
and COOK END will display.
Example:
To cook food for 3 minutes at 100% power and
then 70% power for 7 minutes 30 seconds.
When the first stage is over, you will hear two short
tones as the oven begins the second cook stage.

- 19 -
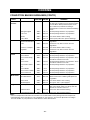
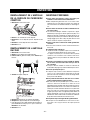
POWER LEVEL
MICROWAVE OUTPUT
USE
• Quick heating many convenience foods and
foods with high water content, such as soups
and beverages.
• Cooking tender cuts of meat, ground meat
• Heating cream soups
• Heating rice, pasta, or casseroles
• Cooking and heating foods that need a
Cook Power lower than high (for example,
whole fish and meat loaf) or when food is
cooking too fast
• Reheating a single serving of food
• Cooking requiring special care, such as
cheese and egg dishes, pudding, and
custards
• Cooking ham, whole poultry, and pot roasts
• Simmering stews
• Melting chocolate
• Heating pastries
• Manually defrosting foods, such as bread,
fish, meats, poultry, and precooked foods
• Softening butter, cheese, and ice cream
• Keeping food warm
• Taking chill out of fruit
• Standing time in oven
10
HIGH
9
8
7
6
5
4
3
2
1
0
100%
90%
80%
70%
60%
50%
40%
30%
20%
10%
0%
COOKING GUIDE FOR LOWER POWER LEVELS
The nine power levels in addition to HIGH allow you to
choose the best power level for the food you are
cooking. Below are listed all the power levels, examples
of foods best cooked at each level, and the amount of
microwave power you are using.
OPERATION

- 20 -
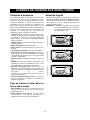
OPERATION
SOFTEN
The oven uses low power to soften foods (butter, ice
cream, cream cheese, and frozen juice)
See the following table.
1. Touch SOFTEN.
2. Choose the category.
Touch 2 for ice cream.
3. Touch 2.
4. Touch START/ENTER.
When the cook time is over,
you will hear four beeps and
COOK END will be displayed.
Example for quart of ice cream.
MELT
The oven uses low power to melt foods (butter or
margarine, chocolate, processed cheese food, or
marshmallows). See the following table.
1. Touch MELT.
2. Choose the category.
Touch 2 for chocolate.
3. Touch 2.
4. Touch START/ENTER.
When the cook time is over,
you will hear four beeps and
COOK END will be displayed.
Example for 8 oz. Chocolate.
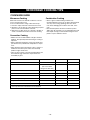
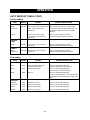
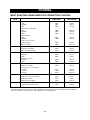
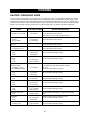
SOFTEN TABLE
AMOUNT
1, 2 or 3
sticks
Pint,
Quart,
Half
gallon
DIRECTION
Unwrap and place in
microwavable container.
Butter will be at room
temperature and ready
for use in recipe.
Place container in oven.
Ice cream will be soft
enough to make
scooping easier.
Unwrap and place in
microwavable Container.
Cream cheese will be at
room temperature and
ready for use in recipe.
Remove top. Place in
oven. Frozen juice will be
soft enough to easily mix
with water.
CATEGORY
Butter
Ice
cream
Cream
cheese
Frozen
juice
CODE
1
2
3
4
3 or 8 oz.
6, 12 or
16 oz.
MELT TABLE
AMOUNT
1, 2 or 3
sticks
4 or 8 oz.
8 or 16
oz.
5 or 10
oz.
DIRECTION
Unwrap and place in
microwavable container.
No need to cover butter.
Stir at the end of cooking
to complete melting.
Chocolate chips or
squares of baking
chocolate may be used.
Unwrap squares and
place in microwavable
container. Stir at the end
of cycle to complete
melting.
Use processed cheese
food only. Cut into cubes.
Place in a single layer in
microwavable container.
Stir at the end of cooking
to complete melting.
Large or miniature
marshmallows may be used.
Place in microwavable
container. Stir at the end of
cycle to complete melting.
CATEGORY
Butter or
Margarine
CODE
1
2
Chocolate
Cheese
Marshmallows
3
4
La page est en cours de chargement...
La page est en cours de chargement...
La page est en cours de chargement...
La page est en cours de chargement...
La page est en cours de chargement...
La page est en cours de chargement...
La page est en cours de chargement...
La page est en cours de chargement...
La page est en cours de chargement...
La page est en cours de chargement...
La page est en cours de chargement...
La page est en cours de chargement...
La page est en cours de chargement...
La page est en cours de chargement...
La page est en cours de chargement...
La page est en cours de chargement...
La page est en cours de chargement...
La page est en cours de chargement...
La page est en cours de chargement...
La page est en cours de chargement...
La page est en cours de chargement...
La page est en cours de chargement...
La page est en cours de chargement...
La page est en cours de chargement...
La page est en cours de chargement...
La page est en cours de chargement...
La page est en cours de chargement...
La page est en cours de chargement...
La page est en cours de chargement...
La page est en cours de chargement...
La page est en cours de chargement...
La page est en cours de chargement...
La page est en cours de chargement...
La page est en cours de chargement...
La page est en cours de chargement...
La page est en cours de chargement...
La page est en cours de chargement...
La page est en cours de chargement...
La page est en cours de chargement...
La page est en cours de chargement...
La page est en cours de chargement...
La page est en cours de chargement...
La page est en cours de chargement...
La page est en cours de chargement...
La page est en cours de chargement...
La page est en cours de chargement...
La page est en cours de chargement...
La page est en cours de chargement...
La page est en cours de chargement...
La page est en cours de chargement...
La page est en cours de chargement...
La page est en cours de chargement...
La page est en cours de chargement...
La page est en cours de chargement...
La page est en cours de chargement...
La page est en cours de chargement...
La page est en cours de chargement...
La page est en cours de chargement...
La page est en cours de chargement...
La page est en cours de chargement...
La page est en cours de chargement...
La page est en cours de chargement...
La page est en cours de chargement...
La page est en cours de chargement...
La page est en cours de chargement...
La page est en cours de chargement...
La page est en cours de chargement...
La page est en cours de chargement...
-
 1
1
-
 2
2
-
 3
3
-
 4
4
-
 5
5
-
 6
6
-
 7
7
-
 8
8
-
 9
9
-
 10
10
-
 11
11
-
 12
12
-
 13
13
-
 14
14
-
 15
15
-
 16
16
-
 17
17
-
 18
18
-
 19
19
-
 20
20
-
 21
21
-
 22
22
-
 23
23
-
 24
24
-
 25
25
-
 26
26
-
 27
27
-
 28
28
-
 29
29
-
 30
30
-
 31
31
-
 32
32
-
 33
33
-
 34
34
-
 35
35
-
 36
36
-
 37
37
-
 38
38
-
 39
39
-
 40
40
-
 41
41
-
 42
42
-
 43
43
-
 44
44
-
 45
45
-
 46
46
-
 47
47
-
 48
48
-
 49
49
-
 50
50
-
 51
51
-
 52
52
-
 53
53
-
 54
54
-
 55
55
-
 56
56
-
 57
57
-
 58
58
-
 59
59
-
 60
60
-
 61
61
-
 62
62
-
 63
63
-
 64
64
-
 65
65
-
 66
66
-
 67
67
-
 68
68
-
 69
69
-
 70
70
-
 71
71
-
 72
72
-
 73
73
-
 74
74
-
 75
75
-
 76
76
-
 77
77
-
 78
78
-
 79
79
-
 80
80
-
 81
81
-
 82
82
-
 83
83
-
 84
84
-
 85
85
-
 86
86
-
 87
87
-
 88
88


Bosch HMV8050/01 Manuel utilisateur
- Catégorie
- Micro-ondes
- Taper
- Manuel utilisateur
- Ce manuel convient également à
dans d''autres langues
- English: Bosch HMV8050/01 User manual
Documents connexes
Autres documents
-
Amana AMV5164ACS Le manuel du propriétaire
-
Maytag AMV5164AC Manuel utilisateur
-
LG LMV1631ST Le manuel du propriétaire
-
Kenmore 7678524900 Mode d'emploi
-
LG LMV1751ST Le manuel du propriétaire
-
Jenn-Air Microwave Oven JMV9169BA Manuel utilisateur
-
JennAir JMW2430LM Le manuel du propriétaire
-
-
-
Gaggenau BM281730/01 Le manuel du propriétaire