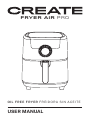
Create FRYER AIR PRO Le manuel du propriétaire
- Catégorie
- Friteuses
- Taper
- Le manuel du propriétaire

OIL FREE FRYER FREIDORA SIN ACEITE
USER MANUAL
FRYER AIR PRO


4
INDEX
ENGLISH
Important safeguards 6
Before First Use 8
Parts List 8
Control Panel 9
Using The Fryer 9
Settings 10
Cleaning 12
Storage 12
Troubleshooting 13
ESPAÑOL
Instrucciones de seguridad 14
Antes del primer uso 16
Listado de partes 16
Panel de control 17
Uso de la freidora 17
Ajustes 18
Limpieza 20
Almacenamiento 20
Solución de problemas 21
PORTUGUÊS
Instruções de segurança 22
Antes do primeiro uso 24
lista de peças 24
Painel de controle 25
Usando a fritadeira 25
Ajustes 26
Limpeza 28
Armazenamento 28
Resolução de problemas 29
FRANÇAIS
Consignes de sécurité 30
Avant la première utilisation 32
Liste des pièces 32
Panneau de contrôle 33
Utilisation de la friteuse 33
Réglages 34
Nettoyage 36
Espace de rangement 36
Résolution des problèmes 37
FRYER AIR PRO

5
ITALIANO
Istruzioni di sicurezza 38
Prima del primo utilizzo 40
Elenco delle parti 40
Pannello di controllo 41
Usando la friggitrice 41
Impostazioni 42
Pulizia 44
Conservazione 44
Risoluzione del problema 45
DEUTSCH
Sicherheitshinweise 46
Vor dem ersten gebrauch 48
Liste der einzelteile 48
Bedienfelds 49
Mit der fritteuse 49
Einstellungen 50
Reinigung 52
Lager 52
Problemlösung 53
NEDERLANDS
Beveiligingsinstructies 54
Voor het eerste gebruik 56
Onderdelen lijst 56
Bedieningspaneel 57
Met behulp van de friteuse 57
Afstellingen 58
Schoonmaak 60
Opslag 60
Probleem oplossing 61
POLSKI
Instrukcje bezpieczeństwa 62
Przed Pierwszym Użyciem 64
Lista Części 64
Panelu Sterującego 65
Korzystanie Z Frytkownicy 65
Ustawienia 66
Czyszczenie 68
Rozwiązanie problemu 69
INDEX
FRYER AIR PRO

6ENGLISH
IMPORTANT SAFEGUARDS
Thank you for choosing our air fryer. Before using the appliance, and to ensure the best use,
carefully read these instructions.
The safety precautions enclosed herein reduce the risk of death, injury and electrical shock
when correctly adhered to. Keep the manual in a safe place for future reference, along with the
completed warranty card, purchase receipt and package. If applicable, pass these instructions
on to the next owner of the appliance. Always follow basic safety precautions and accident
prevention measures when using an electrical appliance. We assume no liability for customer
failing to comply with these requirements.
When using any electrical appliance, basic safety precautions should al-
ways be observed.
• Do not touch any hot surfaces. Use mittens or the corresponding kitchen
utensils.
• To avoid electric shock, do not immerse the cord, plug, or any component
other than food containers in water or other liquid.
• Carefully supervise the use of the fryer when it is used near children.
• Unplug the fryer when not in use or before cleaning. Allow it to cool before
assembling / disassembling components.
• Do not use any appliance with a damaged power cord or plug or after fail-
ure or damage of any kind to the appliance. Take the appliance to the near-
est authorized technical service for repair or adjustment.
• The use of accessories not recommended by the manufacturer may dam-
age the appliance.
• Do not let the power cord hang over edge of table or counter, or on hot
surfaces.
• Do not place the appliance on or near gas / electric cookers while they are
hot or in a heated oven.
• Take special care when moving the appliance if it contains oil or other hot
liquid.
• Always connect the cord to the appliance rst and then to the outlet. To
disconnect, rst turn any control to “off” mode, then remove the plug from
the outlet.
• Do not use outdoors or for any other purpose than the specic one.
• Do not immerse the case in water or rinse it under the tap as this could
damage the electrical components.
• Avoid getting any liquid into the appliance to prevent electric shock or
short circuit.
• Put all ingredients in the basket to prevent direct contact with the heating
elements.
• Do not cover the air inlet or outlet when the appliance is working.
ENGLISH
DANGERS

7
ENGLISH
• Do not ll the basket with oil as it may cause a re.
• You should not ll the container with oil. This fryer works by hot air and it
is only necessary that in some cases the ingredients are lightly covered in
oil or fat, but NEVER FILL THE CONTAINER WITH OIL DIRECTLY.
• Do not touch the inside of the appliance while it is working.
• Check if the voltage indicated on the appliance is compatible with the
voltage of the domestic electrical installation.
• Do not use the appliance if there is any damage to the plug, the electric
cable or any other part.
• Do not let an unauthorized person replace or repair the damaged power
cord.
• Keep the appliance and the electric cable out of the reach of children.
• Keep the power cord away from hot surfaces.
• Connect the fryer to an earthed socket and always make sure it is properly
plugged into the socket.
• Do not connect the appliance to an external timer.
• Do not place the appliance on or near combustible materials such as ta-
blecloths or curtains.
• Do not place the appliance in contact with the wall or other appliance.
Leave at least 10 cm of clearance on the back, sides and surface.
• Do not place anything on top of the appliance.
• Do not use the device for any other purpose than that described in this
manual.
• Do not leave the appliance in operation without supervision.
• During hot air frying, hot steam is released from the air outlet. Keep your
hands and face at a safe distance from the steam and the air outlet. Also
be careful with steam and hot air when removing the container from the
appliance basket.
• Any accessible surface can become hot during use.
• Unplug the fryer immediately if you see dark smoke coming out. Wait for
the smoke to stop before removing the basket.
WARNINGS
• Make sure to place the fryer on a horizontal, at and stable surface.
• This appliance is designed for domestic use. It is not suitable for safe use in
environments such as staffed kitchens, farms, motels, and other non-resi-
dential environments.
• The warranty will not be valid if it is used for professional or semi-profes-
sional purposes or not according to the instructions.
• Always unplug the fryer while it is not in use.
• The fryer needs approximately 30 minutes to cool down for safe cleaning.
PRECAUTIONS

8ENGLISH
• This appliance has a polarized plug. To reduce the risk of electric shock, it
is designed to t in a specic way in a polarized outlet. If the plug does not
t completely, turn it over. If it still doesn’t t, contact a qualied electri-
cian. Do not try to modify the plug in any way.
• The fryer has a built-in timer that will automatically turn it off when the
countdown reaches zero. You can turn off the appliance manually by
pressing the cancel button; it will turn off automatically in 20 sec.
• The fryer complies with all electromagnetic elds (EMF) standards. If
used properly, there is no risk of harm to the human body based on availa-
ble scientic evidence.
POLARIZED PLUG
AUTO POWER-OFF
ELECTROMAGNETIC FIELDS (EMF)
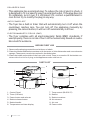
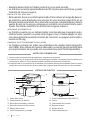
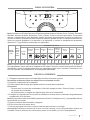
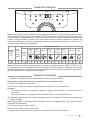
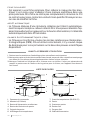
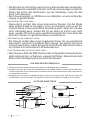
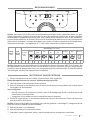
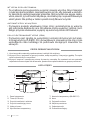
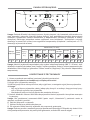
PARTS LIST
1. Control Panel
2. Timer (0-30min)
3. Power button and selector
4. Basket release button
5. Basket handle
6. Temperature and time display
BEFORE FIRST USE
1. Remove all packaging materials and stickers or labels.
2. Clean the basket and basket container with hot water, a little dishwasher and a non-abrasive
sponge. These parts can also be washed in the dishwasher.
3. Clean the inside and outside of the fryer with a cloth. There is no need to ll the basket con-
tainer with oil or fat for frying, as the appliance works with hot air.
7. Temp control (80-200°C)
8. Basket
9. Basket container
10. Air entrance
11. Air vent
12. Power cable
1
2
3
4
5
6
7
8
9
180
- - - - -
10
11
12

9
ENGLISH
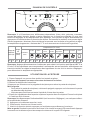
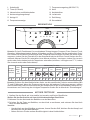
USING THE FRYER
CONTROL PANEL
1. Place the appliance on a stable, horizontal and at surface.
Do not place the appliance on a non-heat resistant surface.
2. Remove the container from the machine.
3. Press the button on the container handle to remove the basket from the container.
Caution:
• To remove the basket from the container, rstly grasp the handle. Then press the button
and the basket will release from the container.
• Do not add oil or any other frying liquid to the container.
4. Place the ingredients in the basket and place the basket in the container. Then place the
container inside the fryer.
Note: Do not exceed the MAX indication (see “Settings” section), as it may affect the quality
of the food.
5. Press the on / off selector.
6. Choose the function on the touch panel.
7. Once the function has been chosen, press the selector to start cooking.
Note: It has 8 functions for different preparations: French fries, Roasts, Fish, Prawns, Chicken
thighs, Biscuits, Chicken and Breads. Press the function you want. If you need more exible
settings and temperatures, you can adjust it directly by pressing the selector to choose the
predetermined function. By turning the dial you can adjust the time (increase / decrease one
minute by turning it to the right or left) and adjust the temperature (increase / decrease by 5
°C by turning it to the right or left).
Note: Press the selector directly to choose the predetermined function (180 °C and 15 min.).
If the ingredients do not t any of the other functions, select the predetermined function and
adjust the temperature for the ingredients to be cooked. See the “Adjustments” section to de-
termine the proper temperature.
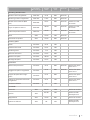
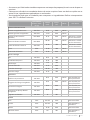
Temp.
range
(°C)
Time
range
(min.)
Functions (°C - min.)
Pre-
deter-
mined
French
fries Roast Fish Prawns Chicken
thighs
Biscuit/
Cake Chicken Bread
200 80 30 1180 15 200 15 180 20 160 20 160 20 200 20 160 30 200 30 160 20
180
- - - - -

10 ENGLISH
Caution: During the hot air frying process, the LED indicator light will be on. Press the selector
again to pause cooking and the LED light will ash.
8. The oil that is extracted from the ingredients will be stored in the bottom of the fryer.
9. Some ingredients need to be shaken or stirred during cooking time (see “Adjustments” sec-
tion). Thus, remove the container by the handle and shake it. Then put it back on your site.
Caution: Do not press the handle release button to separate the container from the basket
during shaking.
Advice: You can take the basket out of the container and shake it just to reduce the weight.
Follow these prompts: Remove the container, place it on a heat-resistant stand and press the
button on the handle to separate the container from the basket.
10. The fryer has an audible alarm when it has nished cooking. When you hear the alarm 5
times in a row, it means that the frying time is over. Take the container out of the fryer and
place it on a heat resistant stand. Note: After the alarm sounds 5 times, the ventilator will
stop in 20 sec.
11. Check if the ingredients are ready and remove the basket.
Note: If the ingredients are not ready yet, simply put the container with the basket back into
the fryer. Press the temperature selector to set the temperature and press again to set the
time. Now you can press the power button to start cooking again.
12. To remove the ingredients, press the basket open button and remove it from the container.
Note: Do not turn the basket over as oil or fat stored in the bottom could seep into the ingre-
dients.
13. Empty the basket into a plate or other container.
Advice: To scoop out large or fragile ingredients, use a pair of spatulas to help you.
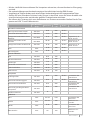
SETTINGS
The following table will help you select the basic settings depending on the ingredients.
Note: Please note that these settings are only approximate indications. Ingredients can differ
in size, shape, and weight.
As the fryer technology heats the air inside the appliance instantly, briey shaking the basket
during hot air frying hardly disturbs the optimal cooking process.
• Smaller ingredients generally require a slightly shorter prep time than larger ones.
• A larger quantity of ingredients requires a longer preparation time than a smaller quantity
of ingredients.
• Stirring the smaller ingredients mid-cooking will optimize the end result and can help pre-
vent ingredients from frying unevenly.
• Add a little oil to fresh potatoes for a crispy result. Fry the ingredients in the hot air fryer a
few minutes after adding the oil.
• Do not prepare extremely greasy ingredients such as hot dogs in the hot air fryer.
• You can prepare appetizers that are suitable for cooking in an oven using the hot air fryer.
• The optimal amount for cooking crispy potato chips is 500 grams.
• Pre-made doughs also require a shorter prep time than homemade doughs.
• Place a baking dish or pan inside the basket if you want to bake a cake or quiche, or if you
want to fry fragile ingredients or stuffed ingredients.
• You can also use the deep fryer to reheat ingredients: Set the temperature to 150 °C and set
5 minutes.
TIPS

11
ENGLISH
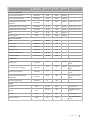
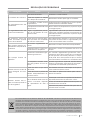
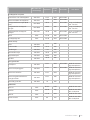
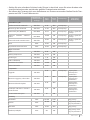
Min-max
quantity (g) Time (min) Temp.
(ºC) Shake Extra info.
Potatoes and chips
Thin frozen potatoes 300-700 9-16 200 Shake
Frozen thick potatoes 300-700 11-20 200 Shake
Homemade French Fries
(8x8mm) 300-800 16-10 200 Shake Add ½ tsp. of oil
Homemade potato wedges 300-800 18-22 180 Shake Add ½ tsp. of oil
Homemade potato cubes 300-750 12-18 180 Shake Add ½ tsp. of oil
Rosti 250 15-18 180 Shake
Potato gratin 500 15-18 200 Shake
Meat and chicken
Fillet 100-500 8-12 180
Pork chops 100-500 10-14 180
Hamburger 100-500 7-14 180
Sausage roll 100-500 13-15 200
Chicken drumsticks 100-500 18-22 180
Chicken breast 100-500 10-15 180
Appetizers
Spring rolls 100-400 8-10 200 Shake Use oven ready
ones
Frozen chicken nuggets 100-500 6-10 200 Shake Use oven ready
ones
Frozen Fish Fingers 100-400 6-10 200 Use oven ready
ones
Frozen Battered Cheese
Appetizers 100-400 8-10 180 Use oven ready
ones
Stuffed vegetables 100-400 10 160
Baked
Biscuit 300 20-25 1160 Use a mold
Quiche 400 20-22 180 Use baking pan
/ tray
Mufn 300 15-18 200 Use a mold
Sweet snacks 400 20 160 Use baking pan
/ tray

12 ENGLISH
• To cook homemade potato chips, follow these steps:
1. Peel the potatoes and cut them.
2. Wash the potato sticks carefully and pat them dry with a paper towel.
3. Add two tablespoons of olive oil to a bowl, put the potatoes on top and mix until they are
covered in oil.
4. Remove the potatoes from the container with your bare hands or with a kitchen utensil so
that the excess oil remains in the container. Put the potatoes in the basket.
Note: Do not add the potato sticks to the basket directly to avoid the excess oil ending up in
the basket.
5. Fry the potatoes according to the instructions in the table above.
COOKING HOMEMADE POTATO CHIPS
CLEANING
STORAGE
Clean the appliance after each use.
Do not clean the container, basket, and interior of the appliance with a metal cookware or
abrasive cleaning materials, as this can damage its non-stick coating.
1. Remove the plug from the outlet and allow the fryer to cool.
Note: Remove the basket to let the air fryer cool more quickly.
2. Clean the outside of the appliance with a damp cloth.
3. Clean the basket and container with hot water, a little soap and a non-abrasive pad. You can
remove any remaining dirt with degreasing liquid.
Note: The container and basket are dishwasher safe.
Advice: If there is dirt adhering to the basket or the bottom of the container, ll the basket with
hot water and a little soap. Take the basket out of the container and let them soak for about
10 minutes.
4. Clean the inside of the fryer with hot water and a non-abrasive pad.
5. Clean the heating element with a cleaning brush to remove any food residue.
1. Unplug the fryer and let it cool.
2. Make sure all parts are clean and dry.

13
ENGLISH
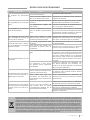
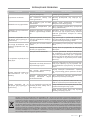
TROUBLESHOOTING
In compliance with Directives: 2012/19/EU and 2015/863/EU on the restriction of the use of dangerous
substances in electric and electronic equipment as well as their waste disposal. The symbol with the
crossed dustbin shown on the package indicates that the product at the end of its service life shall be
collected as separate waste. Therefore, any products that have reached the end of their useful life must
be given to waste disposal centres specialising in separate collection of waste electrical and electronic
equipment, or given back to the retailer at the time of purchasing new similar equipment, on a one for one
basis. The adequate separate collection for the subsequent start-up of the equipment sent to be recycled,
treated and disposed of in an environmentally compatible way contributes to preventing possible nega-
tive effects on the environment and health and optimises the recycling and reuse of components making
up the apparatus. Abusive disposal of the product by the user involves application of the administrative
sanctions according to the laws.
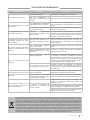
PROBLEM CAUSE SOLUTION
The fryer does not work.
It is not plugged in. Plug it into an outlet.
You have not set the func-
tion or cooking time. Press the selector to turn on the fryer.
The ingredients are not
cooked.
There are too many ingredi-
ents in the fryer.
Put fewer ingredients in the basket. Smaller
amounts cook better.
The set temperature is too
low.
Turn the temperature selector (go to the
“Settings” section).
Ingredients are not fried
evenly.
Some ingredients need a
medium-cooked shake.
Ingredients that stay on top or criss-cross
(eg French fries) should be stirred during
cooking. Go to the “Settings” section.
Fried appetizers are not
crispy when I take them
out of the fryer.
You have used a type of
appetizer that should be
cooked in a traditional way.
Use oven-baked snacks or brush a little oil
over the ingredients for a crispier result.
I cannot properly install
the container in the fryer.
There are too many ingredi-
ents in the basket.
Do not ll the basket above the MAX indi-
cation.
You have not inserted the
basket properly into the con-
tainer.
Press the basket into the container until you
hear a click.
White smoke comes out
of the appliance.
You are cooking greasy in-
gredients.
When cooking greasy ingredients with the
deep fryer, a lot of oil will seep into the con-
tainer. The oil produces a white smoke and
the container may get hotter than usual. This
does not affect the fryer or the end result.
The container has traces of
grease from previous use.
When fat is heated, that white smoke is
produced. Make sure to clean the container
properly after each use.
Fresh potatoes fry une-
venly in the deep fryer.
You have not used the right
kind of potato.
Use fresh potatoes and make sure they stay
rm during frying.
You have not washed the po-
tato sticks properly before
frying them.
Wash the potato sticks properly to remove
the starch from the exterior.
Fresh potatoes are not
crisp when I take them
out of the deep fryer.
Whether the potatoes are
more or less crisp depends
on the amount of oil and
water.
Make sure you dry the potato sticks properly
before adding the oil.
Cut the potatoes into smaller sticks for a
crispier result.
Add a little more oil for a crispier result.

14 ESPAÑOL
Muchas gracias por elegir nuestra freidora de aire. Antes de utilizar este producto, lea deteni-
damente las instrucciones para su correcta utilización.
Las precauciones de seguridad incluidas reducen el riesgo de sufrir una descarga eléctrica,
lesiones e incluso la muerte si se respetan estrictamente. Guarde este manual en un lugar
seguro para consultarlo en el futuro, junto con la tarjeta de garantía del producto debidamente
cumplimentada, el embalaje original del producto y el justicante de compra. Si es posible,
entregue estas instrucciones al siguiente propietario del electrodoméstico. Respete en todo
momento las precauciones de seguridad básicas y las normas de prevención de accidentes
cuando utilice un electrodoméstico. Declinamos toda responsabilidad derivada del incumpli-
miento de estas instrucciones por parte de los clientes.
INSTRUCCIONES DE SEGURIDAD
Al usar cualquier aparato eléctrico, siempre se deben observar precaucio-
nes básicas de seguridad.
• No toque las supercies calientes. Utilice manoplas o los utensilios de co-
cina correspondientes.
• Para evitar descargar eléctricas, no sumerja el cable, el enchufe o cual-
quier otro componente que no sean los recipientes para la comida en agua
u otro líquido.
• Supervise atentamente el uso de la freidora cuando se utilice cerca de los niños.
• Desenchufe la freidora cuando no esté en uso o antes de limpiarla. Deje
que se enfríe antes de montar/desmontar los componentes.
• No utilice ningún aparato con el cable eléctrico o el enchufe dañado o des-
pués de fallos o daños de cualquier tipo en el aparato. Lleve el aparato al
servicio técnico autorizado más cercano para su reparación o ajuste.
• El uso de accesorios no recomendados por el fabricante pueden causar
daños en el aparato.
• No deje el cable eléctrico colgando del borde de la mesa o la encimera, o
encima de supercies calientes.
• No coloque el aparato encima o cerca de cocinas de gas/eléctricas mien-
tras estén calientes o dentro de un horno encendido.
• Tenga especial precaución cuando mueva el aparato si este contiene acei-
te u otro líquido caliente.
• Siempre conecte primero el cable al aparato y luego a la toma de corriente.
Para desconectarlo, ponga primero cualquier control en modo “off”, des-
pués desconecte el enchufe de la toma de corriente.
• No utilice al aire libre ni con otro n que no sea el especíco.
ESPAÑOL
• No sumerja la carcasa en agua ni la enjuague debajo del grifo porque se
podrían dañar los componentes eléctricos.
• Evite la entrada de cualquier líquido en el aparato para prevenir una de-
scarga eléctrica o un cortocircuito.
PELIGROS

15
ESPAÑOL
• Asegúrese de colocar la freidora sobre una supercie horizontal, plana y
estable.
• Este aparato está diseñado para uso doméstico. No es apto para un uso
seguro en entornos tales como zonas de descanso del personal de una em-
presa, granjas, hostales y otros entornos no residenciales.
• La garantía no será válida si se usa con nes profesionales o semiprofesio-
nales o no acorde a las instrucciones.
• Compruebe si el voltaje indicado en el aparato es compatible con el voltaje
de la instalación eléctrica de su hogar.
• No utilice el aparato si hay algún daño en el enchufe, el cable eléctrico o
cualquier otra pieza.
• No deje que ninguna persona no autorizada reemplace o reparare el cable
eléctrico dañado.
• Guarde el aparato y el cable eléctrico fuera del alcance de los niños.
• Mantenga el cable eléctrico lejos de las supercies calientes.
• Conecte la freidora a un enchufe con toma de tierra y asegúrese siempre
que esté correctamente enchufado en la toma de corriente.
• No conecte el aparato a un temporizador externo.
• No coloque el aparato encima o cerca de materiales combustibles tales
como manteles o cortinas.
• No coloque el aparato en contacto con la pared u otro aparato. Deje como
mínimo 10 cm de espacio libre en la parte trasera, los lados y la supercie.
• No coloque nada encima del aparato.
• No utilice el aparto con otro propósito con no sea el descrito en este manual.
• No deje el aparato en funcionamiento sin supervisión.
• Durante la fritura con aire caliente, se libera vapor caliente por la salida de
aire. Mantenga las manos y la cara a una distancia de seguridad del vapor
y de la salida de aire. Tenga también precaución con el vapor y el aire ca-
liente cuando saque el contenedor de la cesta del aparato.
• Cualquier supercie accesible puede calentarse durante el uso.
• Desenchufe la freidora de inmediato si ve salir humo oscuro. Espere a que
pare de salir humo antes de extraer la cesta.
PRECAUCIONES
ADVERTENCIAS
• Ponga todos los ingredientes en la cesta para prevenir el contacto directo
con los elementos de calor.
• No tape la entrada o la salida de aire cuando el aparato esté en funcionamiento.
• No llene la cesta con aceite ya que puede causar un incendio.
• No debe llenar el contenedor con aceite. Esta freidora funciona por aire
caliente y solo es necesario que, en algunos casos, los ingredientes estén
ligeramente cubiertos de aceite o grasa, pero NUNCA LLENE EL CONTE-
NEDOR CON ACEITE DIRECTAMENTE.
• No toque el interior del aparato mientras esté en funcionamiento.

16 ESPAÑOL
LISTADO DE PARTES
1. Panel de control
2. Temporizador (0-30min)
3. Botón de encendido y selector
4. Botón de liberación de la cesta
5. Mango de la cesta
6. Visor temperatura y tiempo
ANTES DEL PRIMER USO
1. Retire todos los materiales de embalaje y pegatinas o etiquetas.
2. Limpie la cesta y el contenedor de la cesta con agua caliente, con un poco de lavavajillas y un
estropajo no abrasivo. Estas piezas también pueden lavarse en el lavavajillas.
3. Limpie el interior y el exterior de la freidora con un paño. No hay necesidad de llenar el conte-
nedor de la cesta con aceite o grasas para freír, ya que el aparato funciona con aire caliente.
7. Control temperatura (80-200°C)
8. Cesta
9. Contenedor de la cesta
10. Entrada de aire
11. Salida de aire
12. Cable alimentación
• La freidora cumple con todos los estándares de campos electromagnéti-
cos (CEM). Si se utiliza de manera adecuada, no existe riesgo de daño para
el cuerpo humano de acuerdo con las evidencias cientícas disponibles.
CAMPOS ELECTROMAGNÉTICOS (CEM)
1
2
3
4
5
6
7
8
9
180
- - - - -
10
11
12
• Este aparato tiene un enchufe polarizado. Para reducir el riesgo de descar-
ga eléctrica, está diseñado para encajar de una manera especíca en un
tomacorriente polarizado. Si el enchufe no encaja completamente, dele la
vuelta. Si aún así no encaja, póngase en contacto con un electricista cuali-
cado. No intente modicar el enchufe de ninguna manera.
• La freidora cuenta con un temporizador incorporado que la apagará auto-
máticamente cuando la cuenta atrás llegue a cero. Puede apagar el apa-
rato manualmente pulsando el botón de cancelar; se apagará automática-
mente en 20 seg.
ENCHUFE POLARIZADO
APAGADO AUTOMÁTICO
• Siempre desenchufe la freidora mientras no se esté usando.
• La freidora necesita aproximadamente 30 minutos para enfriarse y poder
limpiarla de manera segura.

17
ESPAÑOL
USO DE LA FREIDORA
PANEL DE CONTROL
1. Coloque el aparato sobre una supercie estable, horizontal y plana.
No coloque el aparato sobre una supercie no resistente al calor.
2. Saque el contenedor de la máquina.
3. Pulse el botón del mango para poder extraer la cesta del contenedor.
Precaución:
• Para extraer la cesta del contenedor, cójalo del mango primero. Pulse el botón y la cesta
se soltará del contendor.
• No añada aceite ni ningún otro líquido para freir en el contenedor.
4. Coloque los ingredientes en la cesta e introduzca la cesta en el contenedor. Seguidamente,
introdúzcalo en la freidora.
Nota: No exceda la indicación MAX (consulte la sección “Conguración”), ya que puede afectar
la calidad de la comida.
5. Pulse el selector de encendido / apagado.
6. Elija la función en el panel táctil.
7. Una vez escogida la función, pulse el selector para iniciar el cocinado.
Precaución: Durante el proceso de fritura con aire caliente, la luz LED indicadora estará en-
cendida. Pulse el selector de nuevo para pausar el cocinado y la luz LED parpadeará.
Nota: Cuenta con 8 funciones para diferentes preparaciones: Patatas fritas, Asados, Pescado,
Gambas, Muslos de pollo, Bizcochos, Pollo y Panes. Pulse la función que desee. Si necesita
ajustes y temperaturas más exibles, puede ajustarlas directamente al pulsar el selector y
activar la función predeterminada. Girando el selector puede ajustar el tiempo (aumentar/dis-
minuir un minuto girándolo a la derecha o la izquierda) y ajustar la temperatura (aumentar/
disminuir 5°C girándolo a la derecha o la izquierda).
Nota: Pulse el selector directamente para elegir la función determinada (180°C y 15 min.). Si
los ingredientes no se ajustan a ninguna de las otras funciones, seleccione la función prede-
terminada y ajuste la temperatura para los ingredientes que vaya a cocinad. Consulte la sec-
ción de “Ajustes” para determinar la temperatura adecuada.
Rango
de temp.
(°C)
Ran-
go de
tiem-
po
(min.)
Functions (°C - min.)
Prede-
termi-
nado
Patatas
fritas Asado Pesca-
do Gambas
Musli-
tos de
pollo
Bizco-
chos Pollo Pan
200 80 30 1180 15 200 15 180 20 160 20 160 20 200 20 160 30 200 30 160 20
180
- - - - -

18 ESPAÑOL
8. El aceite que se extraiga de los ingredientes se almacenará en el fondo de la freidora.
9. Algunos ingredientes deben agitarse o removerse durante el tiempo de cocinado (consulte
la sección de “Ajustes”). De este modo, retire el contenedor por el asa y agítelo. Después,
vuelva a introducirlo en su sitio.
Precaución: No pulse el botón de apertura del asa para separar el contendor de la cesta du-
rante el agitado.
Consejo: Puede sacar la cesta del contenedor y agitarla solo para reducir el peso. Siga estas
indicaciones: Retire el contenedor, colóquelo en un soporte resistente al calor y pulse el botón
del asa para separar el contenedor de la cesta.
10. La freidora cuenta con una alarma sonora cuando naliza del cocinado. Cuando oiga la
alarma 5 veces seguidas signicará que el tiempo de fritura ha terminado. Saque el con-
tenedor de la freidora y colóquelo en un soporte resistente al calor. Nota: Después de que la
alarma suene 5 veces, el ventilador se detendrá en 20 seg.
11. Compruebe si los ingredientes están listos y extraiga la cesta.
Nota: Si los ingredientes no están listos todavía, solo tiene que volver a introducir el contene-
dor con la cesta en la freidora. Pulse el selector de temperatura para ajustar la temperatura y
pulse de nuevo para ajustar el tiempo. Ya puede pulsar en el botón de encendido para iniciar
de nuevo el cocinado.
12. Para sacar los ingredientes, pulse el botón de apertura de la cesta y retírela del contenedor.
Nota: No le dé la vuelta a la cesta ya que el aceite o la grasa almacenados en el fondo podría
ltrarse a los ingredientes.
13. Vacíe la cesta en un plato u otro recipiente.
Consejo: Para sacar ingredientes grandes o frágiles, utilice un par de espátulas para ayudarse.
AJUSTES
La siguiente tabla le ayudará a seleccionar los ajustes básicos dependiendo de los ingredien-
tes.
Nota: Tenga en cuenta que estos ajustes son solo indicaciones aproximadas. Los ingredientes
pueden diferir en tamaño, forma y peso.
Como la tecnología de la freidora calienta el aire dentro del aparato al instante, agitar la cesta
brevemente durante la fritura con aire caliente apenas perturba el proceso de cocinado óptimo.
• Los ingredientes más pequeños generalmente requieren un tiempo de preparación un poco
más corto que los grandes.
• Una mayor cantidad de ingredientes requiere más tiempo de preparación que una cantidad
menor de ingredientes.
• Agitar los ingredientes más pequeños a mitad del cocinado optimizará el resultado nal y
puede ayudar a evitar que los ingredientes se frían de manera desigual.
• Agregue un poco de aceite a las patatas frescas para obtener un resultado crujiente. Fría los
ingredientes en la freidora de aire caliente unos minutos después de añadir el aceite.
• No prepare ingredientes extremadamente grasientos como salchichas en la freidora de aire
caliente.
• Puede preparar aperitivos que sean aptos para cocinarse en un horno utilizando la freidora
de aire caliente.
• La cantidad óptima para cocinar patatas fritas crujientes es de 500 gramos.
• Las masas prefabricadas también requieren un tiempo de preparación más corto que las ma-
sas hechas en casa.
• Coloque una fuente o un molde aptos para cocinado en horno dentro la cesta si desea hor-
near un pastel o quiche o si quiere freír ingredientes frágiles o ingredientes rellenos.
• También puede usar la freidora para recalentar ingredientes: Ajuste la temperatura a 150°C
y establezca 5 minutos.
CONSEJOS

19
ESPAÑOL
Cantidad
Min-max (g)
Tiempo
(min)
Temp.
(ºC) Sacudir Info. extra
Patatas y patatas fritas
Patatas nas congeladas 300-700 9-16 200 Sacudir
Patatas gruesas congeladas 300-700 11-20 200 Sacudir
Patatas fritas caseras (8x8
mm) 300-800 16-10 200 Sacudir Añada ½ cdita.
de aceite
Gajos de patata caseros 300-800 18-22 180 Sacudir Añada ½ cdita.
de aceite
Cubos de patata caseros 300-750 12-18 180 Sacudir Añada ½ cdita.
de aceite
Rosti 250 15-18 180 Sacudir
Gratinado de patata 500 15-18 200 Sacudir
Carnes y pollo
Filete 100-500 8-12 180
Chuletas de cerdo 100-500 10-14 180
Hamburguesa 100-500 7-14 180
Rollo de salchicha 100-500 13-15 200
Muslitos de pollo 100-500 18-22 180
Pechuga de pollo 100-500 10-15 180
Aperitivos
Rollitos de primavera 100-400 8-10 200 Sacudir Utilice los aptos
para horno
Nuggets de pollo congelados 100-500 6-10 200 Sacudir Utilice los aptos
para horno
Fingers de pescado conge-
lados 100-400 6-10 200 Utilice los aptos
para horno
Aperitivos de queso rebozado
congelados 100-400 8-10 180 Utilice los aptos
para horno
Verduras rellenas 100-400 10 160
Horneado
Bizcocho 300 20-25 1160 Utilice un molde
Quiche 400 20-22 180 Utilice molde/
bandeja horno
Magdalenas 300 15-18 200 Utilice un molde
Aperitivos dulces 400 20 160 Utilice molde/
bandeja horno

20 ESPAÑOL
Para cocinar patatas fritas caseras, siga los siguientes pasos:
1. Pele las patatas y córtelas.
2. Lave los palitos de patata con cuidado y séquelos con un papel de cocina.
3. Añada dos cucharadas de aceite de oliva en un recipiente, ponga las patatas encima y méz-
clelas hasta que estén cubiertas de aceite.
4. Retire las patatas del recipiente con sus propias manos o con algún utensilio de cocina para
que el exceso de aceite se quede en el recipiente. Introduzca las patatas en la cesta.
Nota: No añada los bastones de patata a la cesta directamente para evitar que el exceso de
aceite acabe cayendo en la cesta.
5. Fría las patatas de acuerdo con las instrucciones de la tabla anterior.
COCINAR PATATAS FRITAS CASERAS
LIMPIEZA
ALMACENAMIENTO
Limpie el aparato después de cada uso.
No limpie el contenedor, la cesta y el interior del electrodoméstico con un utensilio de cocina
de metal o materiales de limpieza abrasivos, ya que esto puede dañar su revestimiento an-
tiadherente.
1. Retire el enchufe de la toma de corriente y deje que se enfríe la freidora.
Nota: Retire la cesta para dejar que la freidora de aire se enfríe más rápidamente.
2. Limpie el exterior del aparato con un paño húmedo.
3. Limpie la cesta y el contenedor con agua caliente, con un poco de jabón y un estropajo no
abrasivo. Puede eliminar cualquier resto de suciedad con líquido desengrasante.
Nota: El contenedor y la cesta son aptos para lavavajillas.
Consejo: Si hay suciedad adherida a la cesta o al fondo del contenedor, llene la cesta con agua
caliente y un poco de jabón. Saque la cesta del contenedor y deje que se remojen durante unos
10 minutos.
4. Limpie el interior de la freidora con agua caliente y un estropajo no abrasivo.
5. Limpie el elemento calefactor con un cepillo de limpieza para eliminar cualquier residuo de
comida.
1. Desenchufe la freidora y deje que se enfríe.
2. Asegúrese de que todas las piezas están limpias y secas.
La page est en cours de chargement...
La page est en cours de chargement...
La page est en cours de chargement...
La page est en cours de chargement...
La page est en cours de chargement...
La page est en cours de chargement...
La page est en cours de chargement...
La page est en cours de chargement...
La page est en cours de chargement...
La page est en cours de chargement...
La page est en cours de chargement...
La page est en cours de chargement...
La page est en cours de chargement...
La page est en cours de chargement...
La page est en cours de chargement...
La page est en cours de chargement...
La page est en cours de chargement...
La page est en cours de chargement...
La page est en cours de chargement...
La page est en cours de chargement...
La page est en cours de chargement...
La page est en cours de chargement...
La page est en cours de chargement...
La page est en cours de chargement...
La page est en cours de chargement...
La page est en cours de chargement...
La page est en cours de chargement...
La page est en cours de chargement...
La page est en cours de chargement...
La page est en cours de chargement...
La page est en cours de chargement...
La page est en cours de chargement...
La page est en cours de chargement...
La page est en cours de chargement...
La page est en cours de chargement...
La page est en cours de chargement...
La page est en cours de chargement...
La page est en cours de chargement...
La page est en cours de chargement...
La page est en cours de chargement...
La page est en cours de chargement...
La page est en cours de chargement...
La page est en cours de chargement...
La page est en cours de chargement...
La page est en cours de chargement...
La page est en cours de chargement...
La page est en cours de chargement...
La page est en cours de chargement...
La page est en cours de chargement...
La page est en cours de chargement...
La page est en cours de chargement...
La page est en cours de chargement...
-
 1
1
-
 2
2
-
 3
3
-
 4
4
-
 5
5
-
 6
6
-
 7
7
-
 8
8
-
 9
9
-
 10
10
-
 11
11
-
 12
12
-
 13
13
-
 14
14
-
 15
15
-
 16
16
-
 17
17
-
 18
18
-
 19
19
-
 20
20
-
 21
21
-
 22
22
-
 23
23
-
 24
24
-
 25
25
-
 26
26
-
 27
27
-
 28
28
-
 29
29
-
 30
30
-
 31
31
-
 32
32
-
 33
33
-
 34
34
-
 35
35
-
 36
36
-
 37
37
-
 38
38
-
 39
39
-
 40
40
-
 41
41
-
 42
42
-
 43
43
-
 44
44
-
 45
45
-
 46
46
-
 47
47
-
 48
48
-
 49
49
-
 50
50
-
 51
51
-
 52
52
-
 53
53
-
 54
54
-
 55
55
-
 56
56
-
 57
57
-
 58
58
-
 59
59
-
 60
60
-
 61
61
-
 62
62
-
 63
63
-
 64
64
-
 65
65
-
 66
66
-
 67
67
-
 68
68
-
 69
69
-
 70
70
-
 71
71
-
 72
72


Create FRYER AIR PRO Le manuel du propriétaire
- Catégorie
- Friteuses
- Taper
- Le manuel du propriétaire
dans d''autres langues
- italiano: Create FRYER AIR PRO Manuale del proprietario
- español: Create FRYER AIR PRO El manual del propietario
- Deutsch: Create FRYER AIR PRO Bedienungsanleitung
- Nederlands: Create FRYER AIR PRO de handleiding
- português: Create FRYER AIR PRO Manual do proprietário
- polski: Create FRYER AIR PRO Instrukcja obsługi
Autres documents
-
Flama 655FL Manuel utilisateur
-
KALORIK FT 46689 BK Manuel utilisateur
-
KALORIK FT 43875 BK Manuel utilisateur
-
KALORIK FT 46587 Mode d'emploi
-
Starfrit 024606 Manuel utilisateur
-
KALORIK FT 47477 SS Manuel utilisateur
-
-
PROZIS KRIS Digital Air Fryer Manuel utilisateur
-
 Brentwood AF-500DBK Manuel utilisateur
-
T-Fal FR50AD50 Manuel utilisateur
