
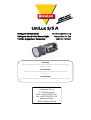
UniLux 5/5 A
Halogen-Fernstrahler Bedienungsanleitung
Halogen Hand-Held Searchlight Instructions for Use
Torche projecteur halogène Manuel d’emploi
Achtung!
Dieses Gerät muss vor dem ersten Gebrauch unbedingt 14 Stunden
geladen werden.
ATTENTION!
This torch must be charged for 14 hours before being used for
the first time.
ATTENTION!
La torche doit être charger au moins 14 heures avant le permier emploi.
Witte + Sutor GmbH
Steinberger Str. 6
D-71540 Murrhardt
Phone: +49(0)7192/92 92 0
Fax: +49(0)7192/92 92 50
www.acculux.de
eMail: [email protected]

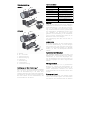
Gerätebeschreibung
UniLux 5
Unilux 5A
A - Stellring
B - Ein – Aus-Schalter
C - Ladekontrolleuchte
D - Riemenbefestigung
E - Haltelaschen
F - Wandhalterung
G – Steckernetzteil
H – KFZ-Ladevorrichtung
Befestigung der Wandhalterung „F“
Bohren Sie zwei Löcher im senkrechten Abstand
von 110 mm in die Wand. Achten Sie darauf,
dass die Wandhalterung in der Nähe einer
Steckdose befestigt wird, wobei das Netzversor-
gungskabel in der Wand nicht beschädigt wer-
den darf. Fixieren Sie die Wandhalterung mit
zwei Schrauben an der Wand.
Technische Daten
Gehäusematerial Kunststoff (schlagfest)
Leuchtmittel E10 5,2V/0,85A Halogen
Leuchtdauer ca. 150 min
Leuchtweite ca. 1000 m
Akku/Batterien NiMH 4,8V/2 Ah
Ladezeit 21 h
Ladespannung
100-230 V AC 50/60 Hz
bzw. 12/24 V DC
Gewicht 440 g
Maße in mm 256x93x93
Aufladen
Laden Sie das Gerät vor dem ersten Gebrauch
mindestens 14 Stunden auf. Das Laden erfolgt in
der Wandhalterung „F“ mit Hilfe des
Steckernetz-
teiles
„G“. Das Gerät ist für Dauerladung ausge-
legt und überladesicher. Damit Sie jederzeit über
eine vollgeladene, einsatzbereite Leuchte verfü-
gen, empfehlen wir, die Leuchte bei Nicht-
gebrauch zur Dauerladung in die Wandhalte-
rung zu stecken. Während des Ladens ist ein
Betrieb der Leuchte nicht möglich.
Der Ladevorgang wird durch die rote LED „C“
angezeigt.
Anwendung
Bei Bedarf entnehmen Sie den Handscheinwer-
fer aus der Wandhalterung „F“. Durch Umlegen
des Schalters nach vorn wird das Gerät einge-
schaltet. Die Leuchtdauer beträgt 2,5 h. Mit dem
Stellring „A“ kann der Brennpunkt fokussiert
werden.
Auswechseln der Glühlampe
Der komplette Stellring „A“ (mit Scheibe und
Reflektor) kann durch Eindrücken der seitlichen
Haltelaschen „E“ nach vorne abgezogen wer-
den. Die Glühlampe (siehe Technische Daten) ist
jetzt frei zugänglich und kann ausgewechselt
werden.
Wichtige Hinweise
Das Steckernetzteil „G“ nur in geschlossenen
Räumen an 120/230 Volt Wechselstrom an-
schließen. Das Gerät bitte nicht Nässe und ex-
tremen Temperaturen aussetzen. Den Hand-
scheinwerfer bitte nur mit einem feuchten Tuch
reinigen.
Entsorgungshinweis
Gebrauchte NiMH-Zellen oder defekte Geräte
nicht in den Hausmüll geben. Zum Entnehmen
des Akkus an der Geräteunterseite die Halteha-
B
,
C
F
A
G
E
D
B
,
C
F
A
H
E
D

ken des Deckels in Pfeilrichtung mit einem
Schraubendreher lösen und den Deckel abneh-
men. Akku entnehmen und einer geeigneten
Sammelstelle zuführen.
Gewährleistung
Unsere Gewährleistung für Material und Verar-
beitung beträgt 24 Monate. Verschleißteile wie
Batterien und Glühlampen sind von der Gewähr-
leistung ausgenommen. Bei unsachgemäßer
Handhabung besteht keine Gewährleistung.
Device Description
A
- Setting collar
B
- ON – OFF switch
C - Battery-charge indicator
D
- Strap fixing
E
- Fixing clips
F
- Wall fixing
G
- Wall plug transformer
H – Vehicle on-board charger
Technical specifications
Casing material Plastics (impact resistant)
Bulb E10 5.2V/0.85A Halogen
Operating time approx. 150 min
Range approx. 1000 m
Battery NiMH 4.8V/2 Ah
Charging time 21 h
Charge voltage
100-230 V AC 50/60 Hz;
12/24 V DC
Weight 440 g
Dimensions in mm 256x93x93
Fitting the wall fixing “F”
Drill two holes in the wall, 110 mm apart verti-
cally. Ensure that the wall fixing is fitted close to a
plug socket. Take care not to damage the mains
supply cable when drilling the holes in the wall.
Now use two screws to fasten the wall fixing to
the wall.
Charging
Charge the torch for at least 14 hours before
using for the first time. It is charged in the wall
fixing “F” with the aid of the wall plug trans-
former “G”. The torch is designed for continuous
charging and is protected against overcharging.
We recommend returning the torch to the wall
fixing when not in use to ensure a fully-charged
torch is available for use at all times. It is not
possible to use the torch while it is being
charged. The charge process is indicated by the
red LED indicator “C”.
Use
To use, remove the torch from the wall fixing “F”.
To switch it on, push the switch “B” forward. The
operating time of the torch is 2.5 hours (see
technical specification). Use the setting collar “A”
to focus the focal point.
Replacing the bulb
The complete setting collar “A” (with disc and
reflector) can be pulled off to the front by press-
ing in the fixing clips “E” on the sides. The bulb
(see technical specifications) is now freely acces-
sible and can be replaced.
Important information
Only connect the wall plug transformer “G” to an
indoor 120/230 Volt alternating current supply.
Do not expose the torch to wet weather and
extreme temperatures. Always use a damp cloth
to clean the torch.
Disposal information
Do not throw defective NIMH cells or
defective torches in the domestic waste. To
remove the battery, undo the fixing hook of the
cover on the underside of the torch by turning in
the direction of the arrow using a screwdriver
and remove the cover. Remove the battery and
dispose of in asuitable place (battery collection
point).
Warranty for defects
We provide a 24 month warranty for defects for
materials and workmanship. Wear parts such as
bulbs and batteries are not covered by the war-
ranty. No warranty provided for defects resulting
from incorrect use.

Description de l’appareil
A - Anneau de réglage
B
- Interrupteur marche/arrêt
C - Lampe contrôle de chargement
D
- Fixation courroie
E
- Languettes de support
F
- Fixation murale
G
- Transformateur d’alimentation
H – Chargeur d’accumulateur pour voiture
Données techniques
Matériau de coque
Matière plastique
(résistante aux chocs)
Agent lumineux E10 5.2V/0.85A halogène
Durée de luminosité environ 150 min
Etendue de
luminosité
environ 1000 m
Batteries NiMH 4.8V/2 Ah
Durée de
chargement
21 h
Charge voltage
100-230 V AC 50/60 Hz ou
12/24 V DC
Poids 440 g
Mesures en mm 256x93x93
Montage de la fixation murale « F »
Percez deux trous dans le mur avec un espace
vertical de 110 mm. Assurez que la fixation mu-
rale soit bien fixé en proximité d’une prise et que
le cable d’alimentation ne soit pas endomagé.
Fixez la fixation murale au mur avec deux visses.
Chargement
Charger la torche au moins 14 heures avant le
permier emploi. Le chargement s’effectue dans la
fixation murale « F » par le transformateur
d’alimentation « G » L’appareil à été conçu pour
des chargements permanents et est fiable au
surchargement. Pour assurer la disposition d’un
luminaire complètement chargé, nous recom-
mandons de le laisser branché dans la fixation
pour un chargement permanent durant le temps
de non utilisation. Le luminaire ne peut être
allumé durant le chargement.
Le chargement est affiché par la LED « C » rouge.
Emploi
Vous pouvez retirer la torche projecteur de la
fixation murale « F » en cas de besoin. Basculer
l’interrupteur pour allumer l’appareil. La durée de
luminosité est de 2,5 h. Le foyer peut être centré
avec l’anneau de réglage « A ».
Remplacement de l’ampoule
L’anneau de réglage « A » (avec disque et réflec-
teur) peut être ôter intégralement en enfonçant
légèrement les languettes de support « E » latéra-
les. L’ampoule (voir données techniques) est
alors accessible et peut être remplacer.
Avertissement
Le transformateur d’alimentation « G » doit être
branché uniquement au courant alternatif de
120/230 Volt. Ne pas exposer l’appareil à
l’humidité ou à des températures extrêmes.
Nettoyez la torche projecteur uniquement avec
un tissu moite.
Elimination des déchets
Ne pas jeter des cellules NiMH usées ou des
appareils défectueux avec les déchets domesti-
ques. Retirez la batterie rechargeable, en dévis-
sant les crochets du couvercle du bas de la
coque en direction de la flèche avec un tournevis
et soulevez le couvercle. Retirez la batterie re-
chargeable et jetez-la dans un récipient appro-
prié.
Garantie
La durée de notre garantie sur le matériel et la
finition est de 24 mois. Des pièces d’usure
comme les batteries et les ampoules ne sont pas
compris dans cette garantie. La garantie ne
s'applique pas en cas de manipulation inappro-
priée.
-
 1
1
-
 2
2
-
 3
3
-
 4
4


dans d''autres langues
- English: AccuLux UniLux 5 Operating instructions
- Deutsch: AccuLux UniLux 5 Bedienungsanleitung


