
BECAUSE
JUST ADD WATER
IS
PRETTY MUCH THE INSTRUCTIONS
FOR A WONDERFUL LIFE.
Thank you for buying an American Standard faucet.
We’re so grateful you did, and you will be too. Because faucets don’t just bring
us water—they’re called upon to clean up brownie pans, luxuriated under by
sleepy not-morning-people, and spit on by teeth-brushing kids. How do we
know? Just like you, we’ve lived with that same beautiful chaos called life for
almost 150 years. We believe that while every home should appreciate in
value, we never forget the sentimental value that grows from enjoying life in
the heart of home—your kitchen and bath. That’s why we love your stories
and ideas; they help us innovate with products that make your life easier.
Or, visit americanstandard-us.com/bathroom/sink-faucets
to watch video, view/download installation manuals
or learn more about your product.
Have a question or need help on install?
For questions or help on installation call us at 855-815-0004.

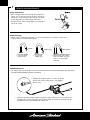
INSIDE THE BOX
RECOMMENDED TOOLS
Phillips
Screwdriver
Installation steps will indicate which tools should be used with asscociated letter
Flat Blade
Screwdriver
Channel
Locks
Adjustable
Wrench
Soap Bottle
Control Box
Pendant
Battery Pack
A B C D
Soap Dispenser
& Mounting Kit
Control Box
Drill
E
OWNERS MANUAL
Touchless Soap Dispenser
GZ16B
Image shown may vary from product purchased.
Level
F

INSTALLATION INSTRUCTIONS
DECK
1
2
3
4
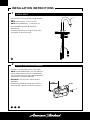
1
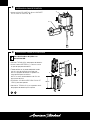
INSTALL SPOUT
C
• Insert the SPOUT and HOSES (1) through the deck
hole.
NOTE: Deck thickness - 8 mm to 50 mm
NOTE: Deck hole diameter - 25 mm to 28 mm
• Install RUBBER WASHER (2) and METAL
WASHER (3).
• Thread the MOUNTING NUT (4) on to the shank
and tighten to secure the faucet.
94 mm
3
2
1
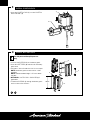
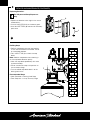
2
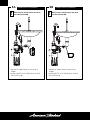
INSTALL CONTROL BOX PENDANT
A
• Drill holes in the wall under the sink 94 mm apart.
NOTE: Recommended height is 350 mm above the
floor to avoid interference with the soap bottle and
300 mm below the counter top to provide overhead
clearance for installing the control box.
• OPTIONAL: Use DRY WALL ANCHORS (2) if
applicable.
• Thread the SCREWS (1) through the CONTROL
BOX PENDANT (3) and in to the wall to secure it.
E F

3
4
INSTALL CONTROL BOX
INSTALL BATTERY PACK
A E
• Insert the CONTROL BOX (1) in to the CONTROL
BOX PENDANT (2).
• Unscrew the SCREWS (1) on the battery pack.
• Insert four BATTERIES (2) and reinstall the battery
pack cover.
• Drill holes in the wall under the sink 162 mm apart.
NOTE: the battery pack can be used as a hole
template.
NOTE: Recommended height is 350 mm above
the floor.
• OPTIONAL: Use DRY WALL ANCHORS (3) if
applicable.
• Thread the SCREWS (1) through the battery pack
and in to the wall to secure it.
For DC powered Soap Dispensers
only.
1
2
162 mm
1
1
2
3

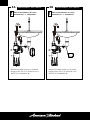
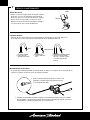
5A 5B
• Connect the wiring as shown in the image.
• Install the SOAP BOTTLE (1) on to the
CONTROL BOX (2).
CONNECT WIRING CONNECT WIRING
For DC powered Soap Dispensers
only.
• Connect the wiring as shown in the image.
• Install the SOAP BOTTLE (1) on to the
CONTROL BOX (2).
For AC powered Soap Dispensers
only.

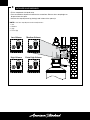
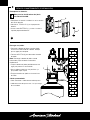
6
INITIALIZE SOAP DISPENSER
• Fill the soap bottle with liquid soap.
• Press and hold the dispenser button on the control box. Release when soap begins to
dispense from the spout.
• Activate the soap dispenser by placing hand in front of the spout tip.
NOTE: It has four soap dispense volume adjustment:
1. Low
2. Medium
3. High
4. Extra High
Low Volume Medium Volume
High Volume Extra High Volume

1.Turn the nozzle
anticlockwise
2.Pull out the
rubber plug
3.Remove the filter screen
from the rubber plug and
clean it. Re-install
after cleaning.
nozzle
rubber plug
filter screen
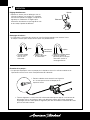
7
SERVICE AND MAINTENANCE
Sensor Adjustment:
• Move a magnet close to the sensor at the top of the
faucet. An LED light will flash continuously during the
adjustment. When the light stops flashing, the sensor
is now adjusted to its surroundings and should
operate normally when a hand/object is moved within
the sensor range.
Nozzle Cleaning:
• After a week of not being used there is a risk of soap build up in the nozzle. Follow these
steps to clean the nozzle after being idle:
Pump Maintenance:
• The soap pump may not be able to pump any liquid due to the machine being idle or the soap being
completely depleted before replacing the bottle.
1. Turn the nozzle
anticlockwise
2. Pull out the
rubber plug
3. Remove the filter screen
from the rubber plug and
clean it. Re-install after
cleaning.
1. Remove the soap connector as shown on the left
and ensure that the check valve is not clogged
due to soap.
2. Place the controller leveled, connect the power supply and press the start button on the
controller. After starting the motor to fill the gear pump with liquid, the controller can be
installed back into the soap bottle for normal use.

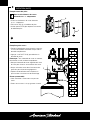
8
1
2
1
Refilling Soap:
• Refill the soap bottle when the soap reaches
20 mm from the bottom of the bottle. Do not
let it completely deplete.
• Press the BUTTON (1) to unlock the soap
bottle.
Note: Hold the soap bottle when unlocking it
as the soap bottle detaches quickly.
• Clean the soap bottle periodically with water
to prevent buildup.
• Do not use abrasive soaps with particles as
this can lead to clogs.
• Push the refilled soap bottle back in to the
locking mechanism.
Recommended Soap:
• Clean Revolution
®
Foaming Hand Soap
• Foam Soap with 1-20 cps Viscosity Range
SERVICE AND MAINTENANCE (CONTINUED)
A
• Replace the batteries when a light in the sensor
window blinks.
• Unscrew the SCREWS (1) on the battery pack.
• Insert four BATTERIES (2) and reinstall the battery
pack cover.
For DC powered Soap Dispensers
only.
Replacing Batteries:

9
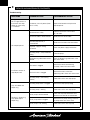
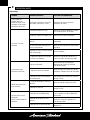
SERVICE AND MAINTENANCE (CONTINUED)
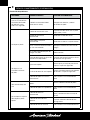
SYMPTOMS
PROBABLE CAUSE
RECOMMENDED ACTION
An LED light flashes at
the base of the soap
dispenser twice every
2-3 seconds.
Low battery is out of power (lower
than 3.9 volts)
Replace the batteries and prime the
soap dispenser
No soap dispenses.
The sensor lens is dirty
Wipe the sensor lens with a clean,
dry, soft cloth
The sensor cable is disconnected Reconnect the sensor cable
The tube (soap and air) is
disconnected
Reconnect the tube to the control box
No power supply or wrong
connection
Check the power supply connection
The soap pump is not primed after
refilling
Prime the pump
The dispensing tube/check valve is
blocked
Clean the dispensing tube/check valve
with warm water
Insufficient amount of
soap dispensed.
The nozzle is clogged
Remove the nozzle and foaming
assembly. Clean with warm water
The check valve is clogged
Remove the check valve from
dispensing tube. Clean with warm water
The soap pump is not working
correctly
Order and install a new soap pump
Only air bubbles are
dispensing.
The soap pump outlet is clogged Remove the soap pump tubing
The soap pump is leaking Order and install a new soap pump
No foam is dispensing.
Only liquid soap is
dispensing.
The air pump is disconnected
Check the air pump connection and
reconnect the tube to the control box
The air pump/tube is clogged
Remove the air pump tubing. Clean the
air pump outlet with warm water
The air pump is not working Order and install a new air pump
Troubleshooting

WARRANTY
FAUCET LIMITED LIFETIME FUNCTION AND FINISH WARRANTY
FOR RESIDENTIAL INSTALLATIONS: AS America, Inc. (“American Standard®”) warrants this product to
be free from defects in materials or workmanship for as long as the original consumer purchaser owns this
product. Proof of purchase (original sales receipt) from the original consumer purchaser must be made
available to American Standard for all warranty claims. This warranty is non-transferable. It does not apply in
the event of product damage due to the use of other than genuine American Standard replacement parts,
installation error, abuse, misuse or improper care and maintenance (whether performed by a plumber,
contractor, service provider or member of the purchaser’s household). The warranty excludes damage
due to aggressive air or water conditions, or harsh or abrasive cleaners and/or materials.
FOR COMMERCIAL INSTALLATIONS: For all industrial, commercial and business usage the warranty
period is five years, from date of purchase and except for duration, all other aforementioned warranty terms
apply. For both Residential and Commercial warranties, batteries are not included in the warranty.
FOR ELECTRONIC FAUCETS, VALVES AND CONTROLS: American Standard warrants its electronic faucets,
valves and controls to be free from manufacturing defects in material and workmanship under normal use
for five (5) years from the date of purchase by or for the original consumer owner. American Standard will
provide free of charge, at it’s sole option, replacement part(s) or product (or if no longer available, a
comparable product) to replace those which have proven defective in materials or workmanship.
This warranty does not cover labor charges incurred and/or damage sustained in installation, repair or
replacement, nor incidental or consequential damages. This warranty is effective for all faucets sold after
March 1, 2018.
THIS WARRANTY IS EXCLUSIVELY IN LIEU OF ALL OTHER WARRANTIES, INCLUDING ANY IMPLIED
WARRANTIES OF MERCHANTABILITY OR FITNESS FOR A PARTICULAR PURPOSE.
This warranty gives the original consumer purchaser of an American Standard faucet specific legal rights
which may vary from state to state or from province to province. In some states or provinces the exclusion or
limitation of incidental or consequential damages is not allowed, so those exclusions may not apply to you.
UNITED STATES
American Standard Brands
1 Centennial Ave
Piscataway, New Jersey 08854
Attention: Director of Customer Care
For residents of the United States,
warrantyinformation may also be obtained
by calling the following toll free number:
(800) 442-1902
www.americanstandard.com
PLEASE COMPLETE AMERICAN STANDARD WARRANTY REGISTRATION PROCESS AND SAVE THIS WARRANTY INFORMATION
IMPORTANT: Registration of the faucet must be completed for this warranty to become effective. Your registration will make it easier
to contact you in the event of a product recall.*
INSTRUCTIONS: Register your faucet at www.americanstandard.com. Please save your proof of purchase (sale receipt).
If you need assistance or do not have access to our website, please contact American Standard Customer Care at: (800) 442-1902.
An American Standard representative will assist in completing the warranty registration.
*In California, your warranty rights remain intact even if you do not complete the registration process.
THIS WARRANTY IS NOT TRANSFERABLE FROM ORIGINAL CONSUMER PURCHASER.
CANADA
LIXIL Canada, Inc.
5900 Avebury Rd.
Mississauga, Ontario
Canada L5R 3M3
Toll Free: (800) 387-0369
www.americanstandard.ca
MEXICO
American Standard B&K Mexico
S. de R.L. de C.V.
Via Morelos #330
Col. Santa Clara
Ecatepec 55540 Edo. Mexico
Toll Free: 01-800-839-1200
www.americanstandard.com.mx

M985122 EN 12/20
TELL US WHAT YOU THINK!
Please leave us a product review or story
at americanstandard.com/reviews
Register your warranty and sign up for an idea-filled
newsletter at americanstandard.com/warranty.
Find installation videos at
youtube.com/americanstandard.
Happy I purchased this faucet
08/22/2019 00:04:41 CDT American Standard Kitchen Faucets Xavier SelectFlo Pull-Down Kitchen Faucet
I enjoy the SelectFlo pull-down kitchen faucet with three
spray patterns. It’s a great fit, finish and overall quality has
been excellent.
SHARE YOUR NEW PRODUCT!
Tag us @american_standard on Instagram
and show us how your new product looks.
WANT MORE INFO?
For questions or help call us at 855-815-0004,
or visit americanstandard.com

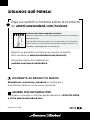
PARCE QU’AJOUTER SEULEMENT
DE L’EAU EST PRATIQUEMENT
LE SEUL REMÈDE POUR UNE VIE
EXTRAORDINAIRE.
Merci d’avoir acheté un robinet American Standard.
Nous sommes si contents que vous l’ayez fait, vous le serez également. Parce
que les robinets ne servent pas uniquement à nous fournir de l’eau, ils servent à
nettoyer les moules à brownies, ils sont adorés par les lève-tard et ils reçoivent
les éclaboussures des enfants qui se lavent les dents. Comment le savons-nous?
Tout comme vous, nous vivons dans ce même désordre qu’est la vie depuis
presque 150 ans. Comme toute maison doit être précieuse, nous n’oublions
jamais la valeur sentimentale qui croît en profitant de la vie au cœur de la
maison, votre cuisine et votre salle de bains. Voilà pourquoi nous aimons vos
histoires et idées qui nous permettent d’innover dans des produits qui facilitent
la vie.
Visitez également le site americanstandard-us.com/bathroom/
sink-faucets pour regarder la vidéo, consulter ou télécharger les
manuels d’installation ou en apprendre davantage sur votre
produit.
Vous avez une question ou avez besoin d’aide pour
l’installation?
Pour toute question ou tout besoin d’aide pour l’installation,
appelez-nous au 855-815-0004.

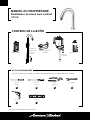
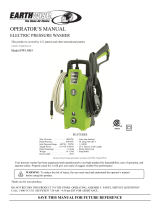
CONTENU DE LA BOÎTE
OUTILS RECOMMANDÉS
Tournevis
Phillips
Les outils à utiliser seront indiqués par la lettre correspondante à chacune des étapes de l’installation.
Tournevis à
tête plate
Pince
multiprise
Clé ajustable
Bouteille de savon
Support du boîtier de
commande
Boîtier de piles
A B C D
Ensemble de
distributeur de
savon et de
montage
Boîtier de
commande
Perceuse
E
MANUEL DU PROPRIÉTAIRE
Distributeur de savon sans contact
GZ16B
L’illustration peut être différente du produit acheté.
Niveau
F

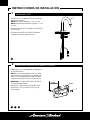
INSTRUCTIONS D’INSTALLATION
TABLIER
1
2
3
4
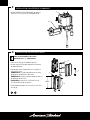
1
INSTALLATION DU BEC
C
• Insérer le BEC et les TUYAUX (1) dans le trou
du tablier.
REMARQUE : Épaisseur du tablier de 8 mm
à 50 mm
REMARQUE : Diamètre du trou du tablier de
25 mm à 28 mm
• Installer LA RONDELLE EN CAOUTCHOUC (2)
et la RONDELLE EN MÉTAL (3).
• Visser l’ÉCROU DE FIXATION (4) sur la tige et
serrer pour maintenir le robinet.
94 mm
3
2
1
2
INSTALLATION DU SUPPORT DU BOÎTIER DE COMMANDE
A
• Percer deux trous espacés de 94 mm dans le mur
sous la cuve.
REMARQUE : On recommande une hauteur de 350
mm du plancher pour éviter tout obstacle avec la
bouteille de savon et 300 mm sous le comptoir pour
pouvoir installer le boîtier de commande.
• FACULTATIF : Utiliser les FIXATIONS POUR
CLOISON SÈCHE (2) au besoin.
• Visser les VIS (1) dans le SUPPORT DU BOÎTIER DE
COMMANDE (3) et dans le mur pour le fixer.
E F

3
4
INSTALLATION DU BOÎTIER DE COMMANDE
INSTALLATION DU BOÎTIER DE PILES
A E
• Insérer le BOÎTIER DE COMMANDE (1) dans le
SUPPORT DU BOÎTIER DE COMMANDE (2).
• Dévisser les VIS (1) sur le boîtier de piles.
• Insérer quatre PILES (2) et replacer le couvercle
du boîtier de piles.
• Percer deux trous espacés de 162 mm dans le
mur sous la cuve.
REMARQUE : Le boîtier de piles peut servir de
guide pour l’emplacement des trous.
REMARQUE : Hauteur recommandée au-dessus
du plancher de 350 mm.
• FACULTATIF : Utiliser les FIXATIONS POUR
CLOISON SÈCHE (3) au besoin.
• Fixer le boîtier de piles en le vissant au mur avec
les VIS (1).
Pour les distributeurs de savon
alimentés au c. c. uniquement.
1
2
162 mm
1
1
2
3

5A 5B
• Brancher les câbles comme sur l’illustration.
• Installer la BOUTEILLE DE SAVON (1) sur le
BOÎTIER DE COMMANDE (2).
BRANCHEMENT DES CÂBLES BRANCHEMENT DES CÂBLES
Pour les distributeurs de savon
alimentés au c. c. uniquement.
• Brancher les câbles comme sur l’illustration.
• Installer la BOUTEILLE DE SAVON (1) sur le
BOÎTIER DE COMMANDE (2).
Pour les distributeurs de savon
alimentés au c. c. uniquement.

6
MISE EN MARCHE DU DISTRIBUTEUR DE SAVON
• Remplir la bouteille de savon avec du savon liquide.
• Maintenir enfoncé le bouton du distributeur sur le boîtier de commande. Relâcher le bouton lorsque
le savon commence à sortir du bec.
• Activer le distributeur de savon en plaçant la main devant l’extrémité du bec.
REMARQUE : Il y a quatre réglages du volume du débit :
1. Faible
2. Moyen
3. Élevé
4. Très élevé
MUR
Volume faible Volume moyen
Volume élevé Volume très élevé

1.Turn the nozzle
anticlockwise
2.Pull out the
rubber plug
3.Remove the filter screen
from the rubber plug and
clean it. Re-install
after cleaning.
buse
bouchon en
caoutchouc
crépine
7
ENTRETIEN
Réglage du détecteur :
• Déplacer un aimant près du détecteur situé au
sommet du robinet. Une lumière DEL clignotera
constamment pendant le réglage. Lorsqu’elle ne
clignote plus, le détecteur est réglé et peut
fonctionner normalement au passage de la main
ou d’un objet à portée du détecteur.
Aimant
Détecteur
Nettoyage de la buse :
• Le savon peut s’accumuler dans la buse en cas d’inutilisation pendant une semaine. Suivre
les étapes suivantes pour nettoyer la buse après une période d’arrêt :
Entretien de la pompe :
• Il se peut que la pompe à savon ne pompe plus le liquide en raison d’un arrêt du matériel ou de
l’épuisement total du savon avant le remplacement de la bouteille.
1. Tourner la buse
dans le sens
antihoraire.
2. Retirer le bouchon
en caoutchouc.
3. Retirer la crépine du
bouchon pour la nettoyer.
Réinstaller une fois le
nettoyage effectué.
1. Retirer le tube de savon comme illustré à gauche
et s’assurer que du savon ne bloque pas le
clapet anti-retour.
2. Placer le régulateur à niveau, brancher l’alimentation électrique et appuyer sur le bouton de
démarrage situé sur le régulateur. Après avoir démarré le moteur pour remplir la pompe à
engrenages avec du savon liquide, le régulateur peut être réinstallé dans la bouteille de savon
pour une utilisation normale.

8
1
2
MUR
1
Remplissage de savon :
• Remplir la bouteille de savon lorsque le savon est
à 20 mm du fond de la bouteille. Ne pas vider la
bouteille complètement.
• Appuyer sur le BOUTON (1) pour détacher la
bouteille de savon.
Remarque : Tenir la bouteille de savon au moment
de la libérer, car elle se détache rapidement.
• Nettoyer la bouteille de savon régulièrement avec
de l’eau pour éviter les accumulations de savon.
• Ne pas utiliser de savon abrasif contenant des
particules pour éviter des engorgements.
• Replacer la bouteille de savon remplie en la
poussant dans le mécanisme de verrouillage.
Savon recommandé :
• Clean Revolution
®
Savon moussant pour les
mains
• Savon mousse avec 1-20 cps gamme viscosité
ENTRETIEN (SUITE)
A
• RPour les distributeurs de savon alimentés
au c. c. uniquement.
• Dévisser les VIS (1) sur le boîtier de piles.
• Insérer quatre PILES (2) et replacer le couvercle
du boîtier de piles.
Pour les distributeurs de savon
alimentés au c. c. uniquement.
Remplacement des piles :

9
ENTRETIEN (SUITE)
SIGNES
CAUSE PROBABLE
ACTION RECOMMANDÉE
Une lumière DEL
clignote deux fois
toutes les deux à trois
secondes à la base du
distributeur de savon.
Alimentation coupée en raison des
piles faibles (moins de 3,9 volts)
Remplacer les piles et activer le
distributeur de savon
Le savon n’est pas
distribué.
La lentille du capteur est sale
Nettoyer la lentille du détecteur à l’aide
d’un chiffon propre, sec et doux
Le câble du capteur est débranché Rebrancher le câble du détecteur
Le tube (de savon et d’air) est
détaché
Rattacher le tube au boîtier de
commande
Aucune alimentation électrique ou
mauvais branchement
Vérifier le branchement de l’alimentation
électrique
La pompe à savon n’est pas activée
après remplissage
Activer la pompe
Le tube de distribution ou le clapet
anti-retour sont bloqués
Nettoyer le tube de distribution ou le
clapet anti-retour avec de l’eau tiède
Quantité de savon
distribué insuffisante.
La buse est bouchée
Retirer la buse et l’ensemble de
fabrication de la mousse. Nettoyer
avec de l’eau tiède
Le clapet anti-retour est bloqué
Retirer le clapet anti-retour du tube de
distribution. Nettoyer avec de l’eau tiède
La pompe à savon ne fonctionne
pas correctement
Commander puis installer une nouvelle
pompe à savon
Seules des bulles d’air
sont produites.
La sortie de la pompe à savon est
bouchée
Retirer le tube de la pompe à savon
La pompe à savon fuit
Commander puis installer une nouvelle
pompe à savon
Aucune mousse n’est
distribuée.
Seul le savon liquide est
distribué.
La pompe à air est débranchée
Vérifier le branchement de la pompe
à air et rattacher le tube au boîtier de
commande
La pompe ou le tube à air sont
bouchés
Retirer le tube de la pompe à air.
Nettoyer la sortie de la pompe à air
avec de l’eau tiède
La pompe à air ne fonctionne pas
Commander puis installer une nouvelle
pompe à air
Dépannage
La page est en cours de chargement...
La page est en cours de chargement...
La page est en cours de chargement...
La page est en cours de chargement...
La page est en cours de chargement...
La page est en cours de chargement...
La page est en cours de chargement...
La page est en cours de chargement...
La page est en cours de chargement...
La page est en cours de chargement...
La page est en cours de chargement...
La page est en cours de chargement...
La page est en cours de chargement...
-
 1
1
-
 2
2
-
 3
3
-
 4
4
-
 5
5
-
 6
6
-
 7
7
-
 8
8
-
 9
9
-
 10
10
-
 11
11
-
 12
12
-
 13
13
-
 14
14
-
 15
15
-
 16
16
-
 17
17
-
 18
18
-
 19
19
-
 20
20
-
 21
21
-
 22
22
-
 23
23
-
 24
24
-
 25
25
-
 26
26
-
 27
27
-
 28
28
-
 29
29
-
 30
30
-
 31
31
-
 32
32
-
 33
33


American Standard GZ16B Le manuel du propriétaire
- Taper
- Le manuel du propriétaire
- Ce manuel convient également à
dans d''autres langues
Documents connexes
Autres documents
-
Toto CP Manuel utilisateur
-
Delta Faucet DESD-751 Guide d'installation
-
Kohler K-8637-0 Mode d'emploi
-
Moen 8560BL Le manuel du propriétaire
-
Delta 72055T-RB Mode d'emploi
-
-
 EarthWise PW15003 Manuel utilisateur
-
Powermate PW0551750 Manuel utilisateur
-
 Good Ideas SV-URN-TC Mode d'emploi
-
 Bobrick B-826 Mode d'emploi


